
How to Tip for all version of macOS, you might refer the tip for hiding file and folder on your Mac. But have you ever been read the tutorial for Show or hide file name extension to your Macbook Air, MacBook Pro or iMac? No right whatever, you are in the right place where you can get steps to show or hide file name extension on Mac OS Catalina, Mojave, High Sierra, and Earlier. A filename extension is a two or three letters word, which always appears after dot mark in file names. In the file names that denote files are open with particular extension programs such as .JPG extension is always open With Image viewer tools, because JPG is an extension of the image file. Apple provides to its users hide and show the option of file name extension. The file extension is usually hidden in OS X, but if you find them that useful for you then you can show them in your Mac.
Note – when you rename your file name at that time don’t change that file extension, otherwise, that file you may no longer be able to open the file with that was used to create it.
Also check, Automatically Open Apps On Mac After Login
Step for Show or Hide File Name Extension For, All Files [Image, Documents..]
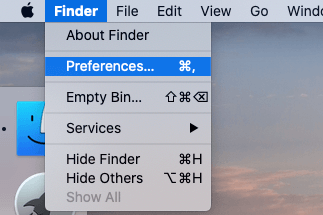
- Step 1. Open Finder on Mac > Choose Finder from top Meu.
- Step 2. Preferences, > Advanced.
Step 3. Select or Deselect “Show all filename extensions” to show Extension on Files. and Uncheck to Hide

That’s it. According to our experience, some file names can’t be hidden such as.JPG file, for example, images imported from the digital cameras may continue to show the .jpg extension although if you deselect “Show all Filename Extensions”.
Step for Show or Hide File Name Extension For, One File
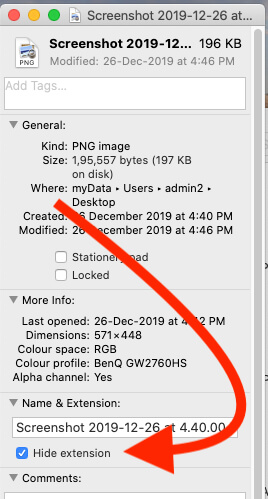
- Step 1. Select a file
- Step 2. Right Click on File > and Select “Get Info” or press Command – I.

- Step 4. Click the triangle next to Name & Extension to expand the file name section, and see the file name section for the file.

Now, your turn gives your replay in the bellow comment box, with respect to the Show or Hide File Name Extension on macOS.


