You should know everything about Siri on Mac. Apple Continuing “Siri” or “Hey Siri” improvement with New Type To Siri on Mac. It’s the first generation of Mac operating systems available with built-in Siri. Siri is new for Users who are interacting with Apple OS for the first time. But before, we already discussed the thread about using Siri in macOS. Today, we will demonstrate how to activate Hands-free Siri on Mac. Apple’s macOS Sierra has integrated Siri, which works as an intelligent personal assistant, likewise iOS and WachOS of Apple.
By default, you can summon Siri by pressing Shortcut Key to mean Command or through a Click on Siri icon from the top Mac menu bar. But a magic way to Enable Hey Siri on Mac, at a glance, seems mind-blowing, even though, virtually, it’s possible. Let’s dive into the following steps that will guide what to do to turn on hands-free Siri on MacBook Air, MacBook Pro, MacBook, iMac, Or Mac Mini.
Ideal Process to Enable “Siri” only or “Hey Siri” in MacOS
Follow the steps as per Which macOS Version is installed on mac.
Steps:- How to Setup Siri
Follow the below steps to Enable Siri on Mac. Then set up Hey Siri to talk with your Mac and Get a Response with a Very useful Siri command (How to Use).
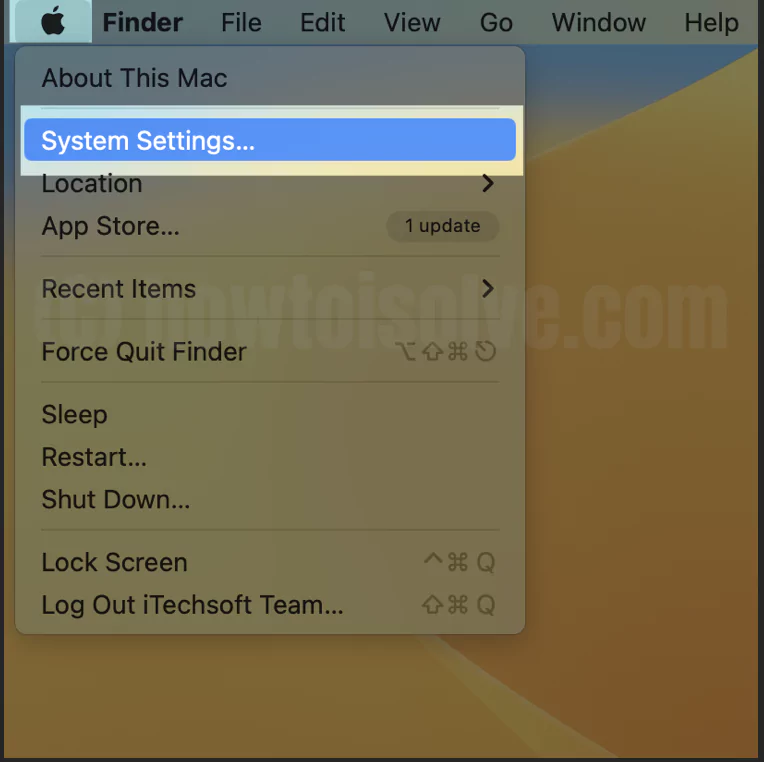
1→ Go to the Apple Logo from the top menu > System Settings.
2→ Select Siri & Spotlight > Enable Toggle Ask Siri.
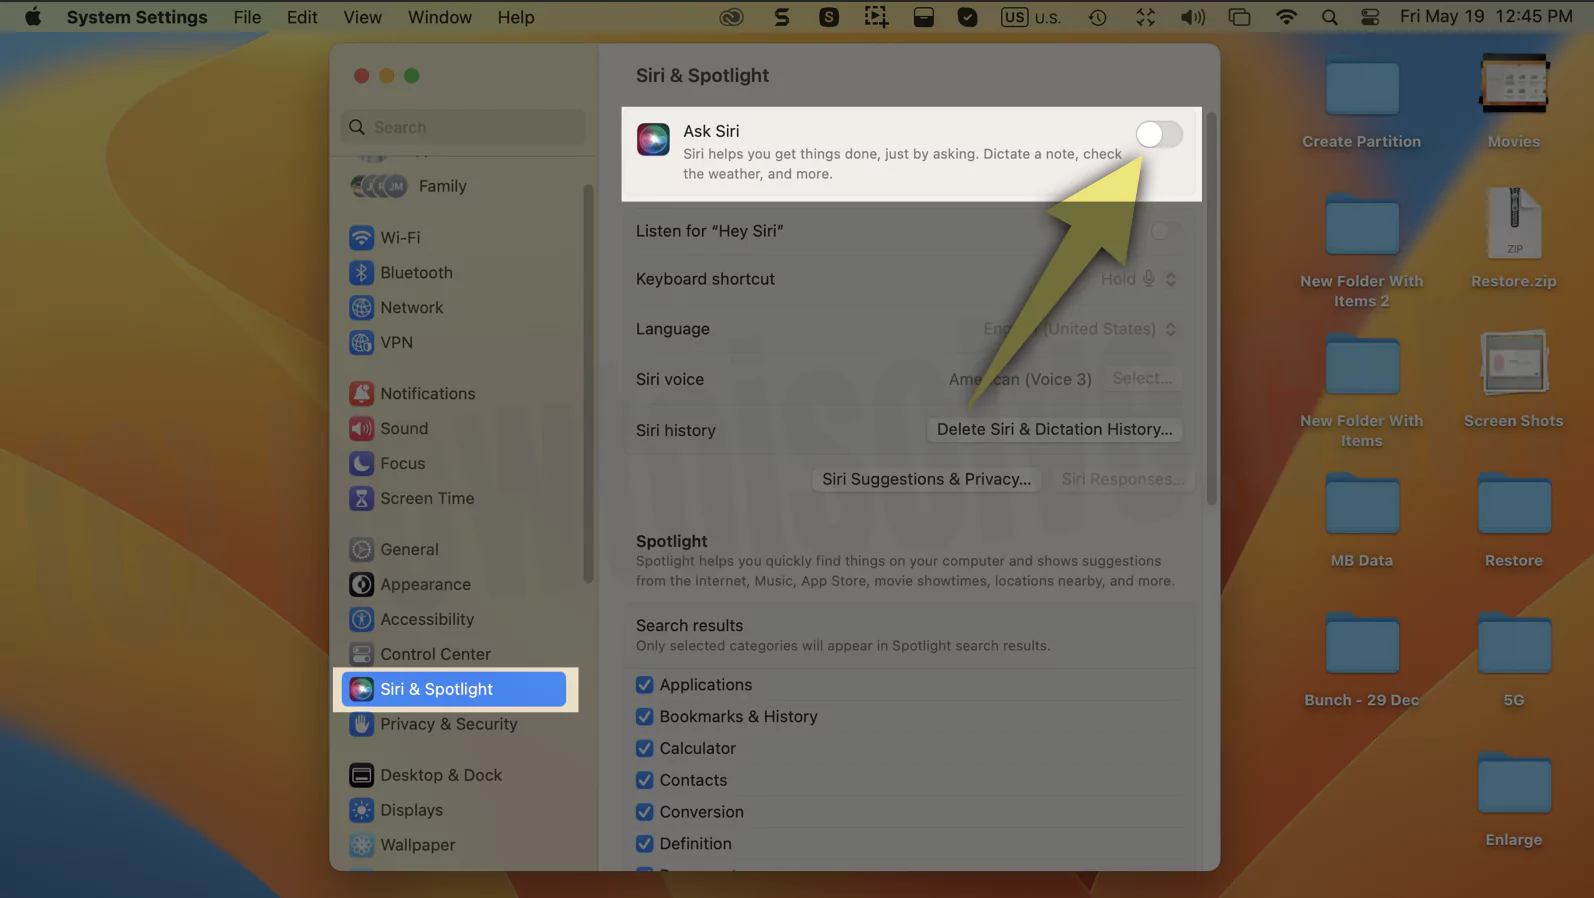
3→ Enable Ask Siri on Mac “Siri sends information light your voice input, contacts and location to apple to process your requests“.
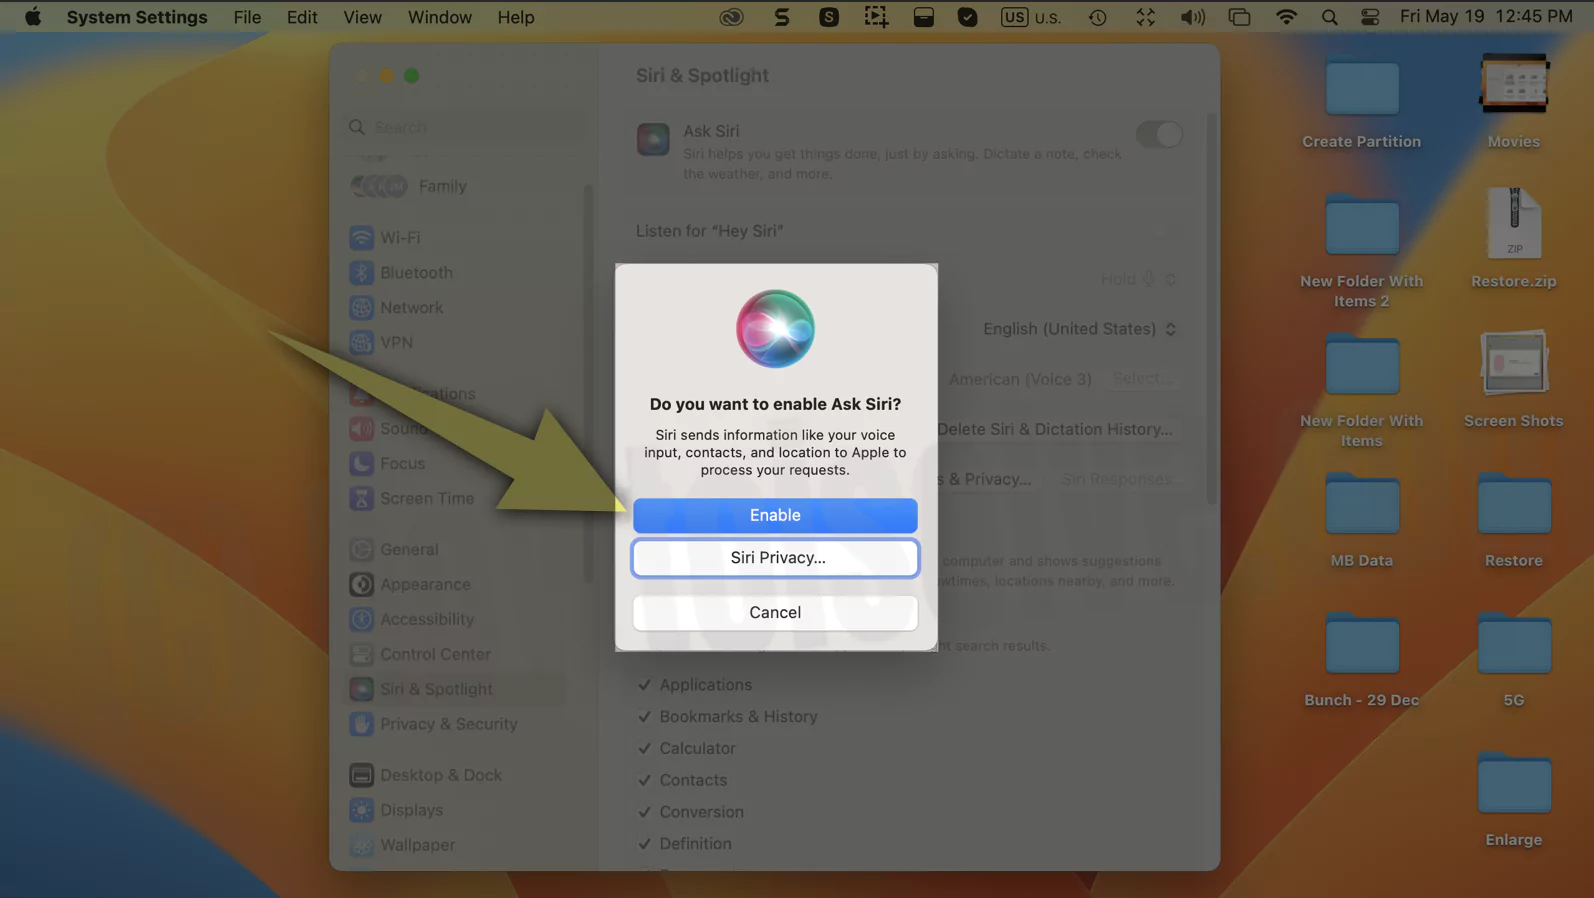
4→ Siri is Enabled. We can access Siri on Mac.
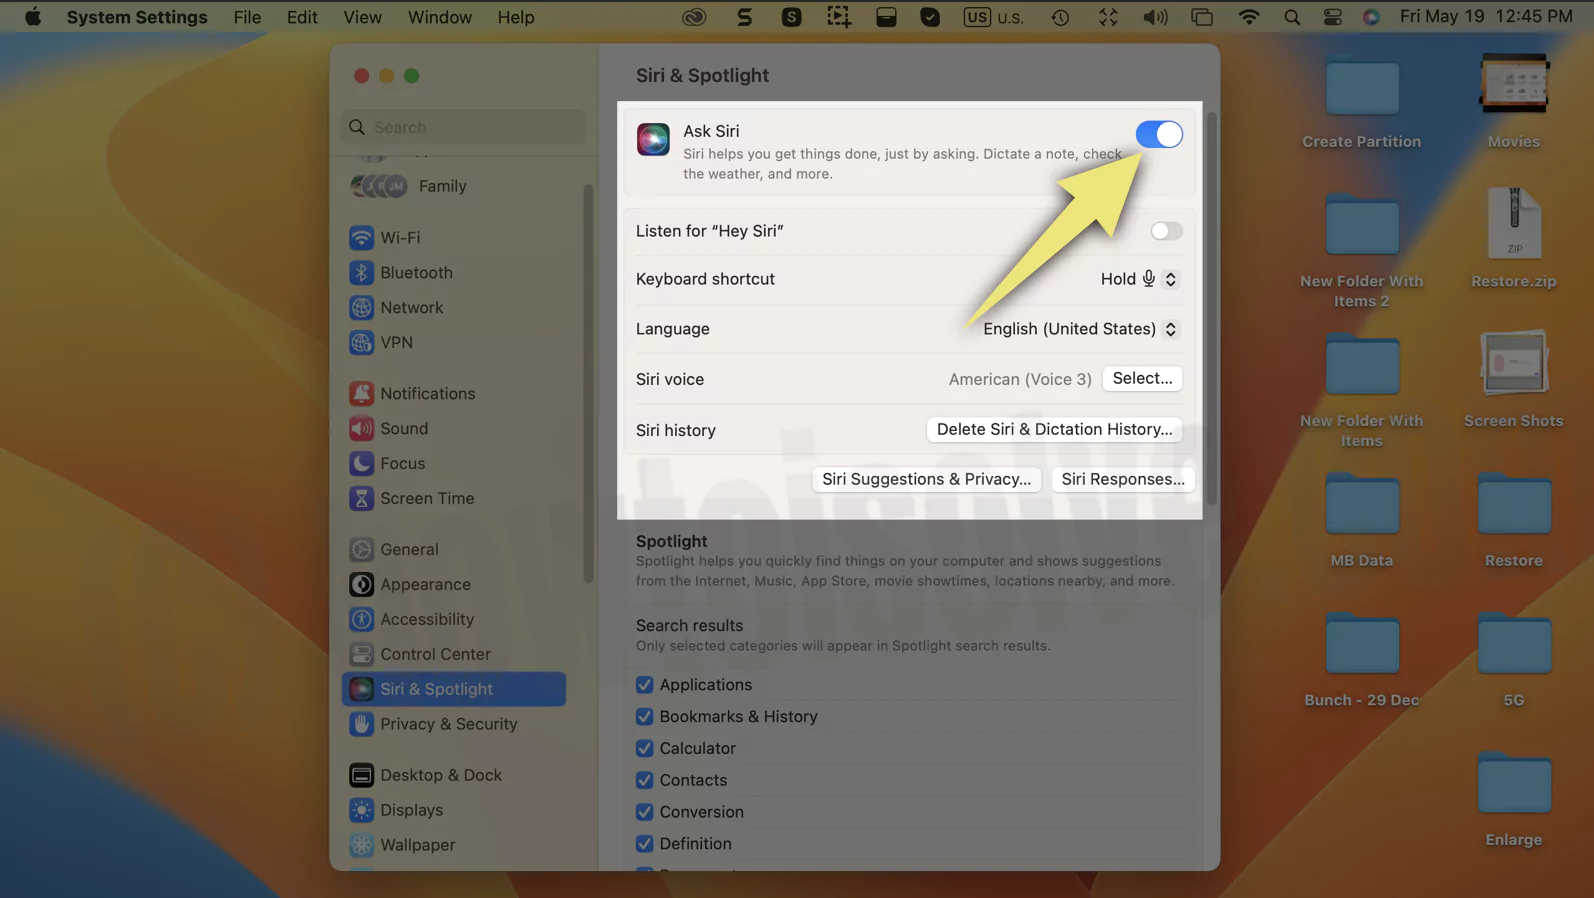
5→ Check the installed macOS on your Mac, and find the relevant settings.
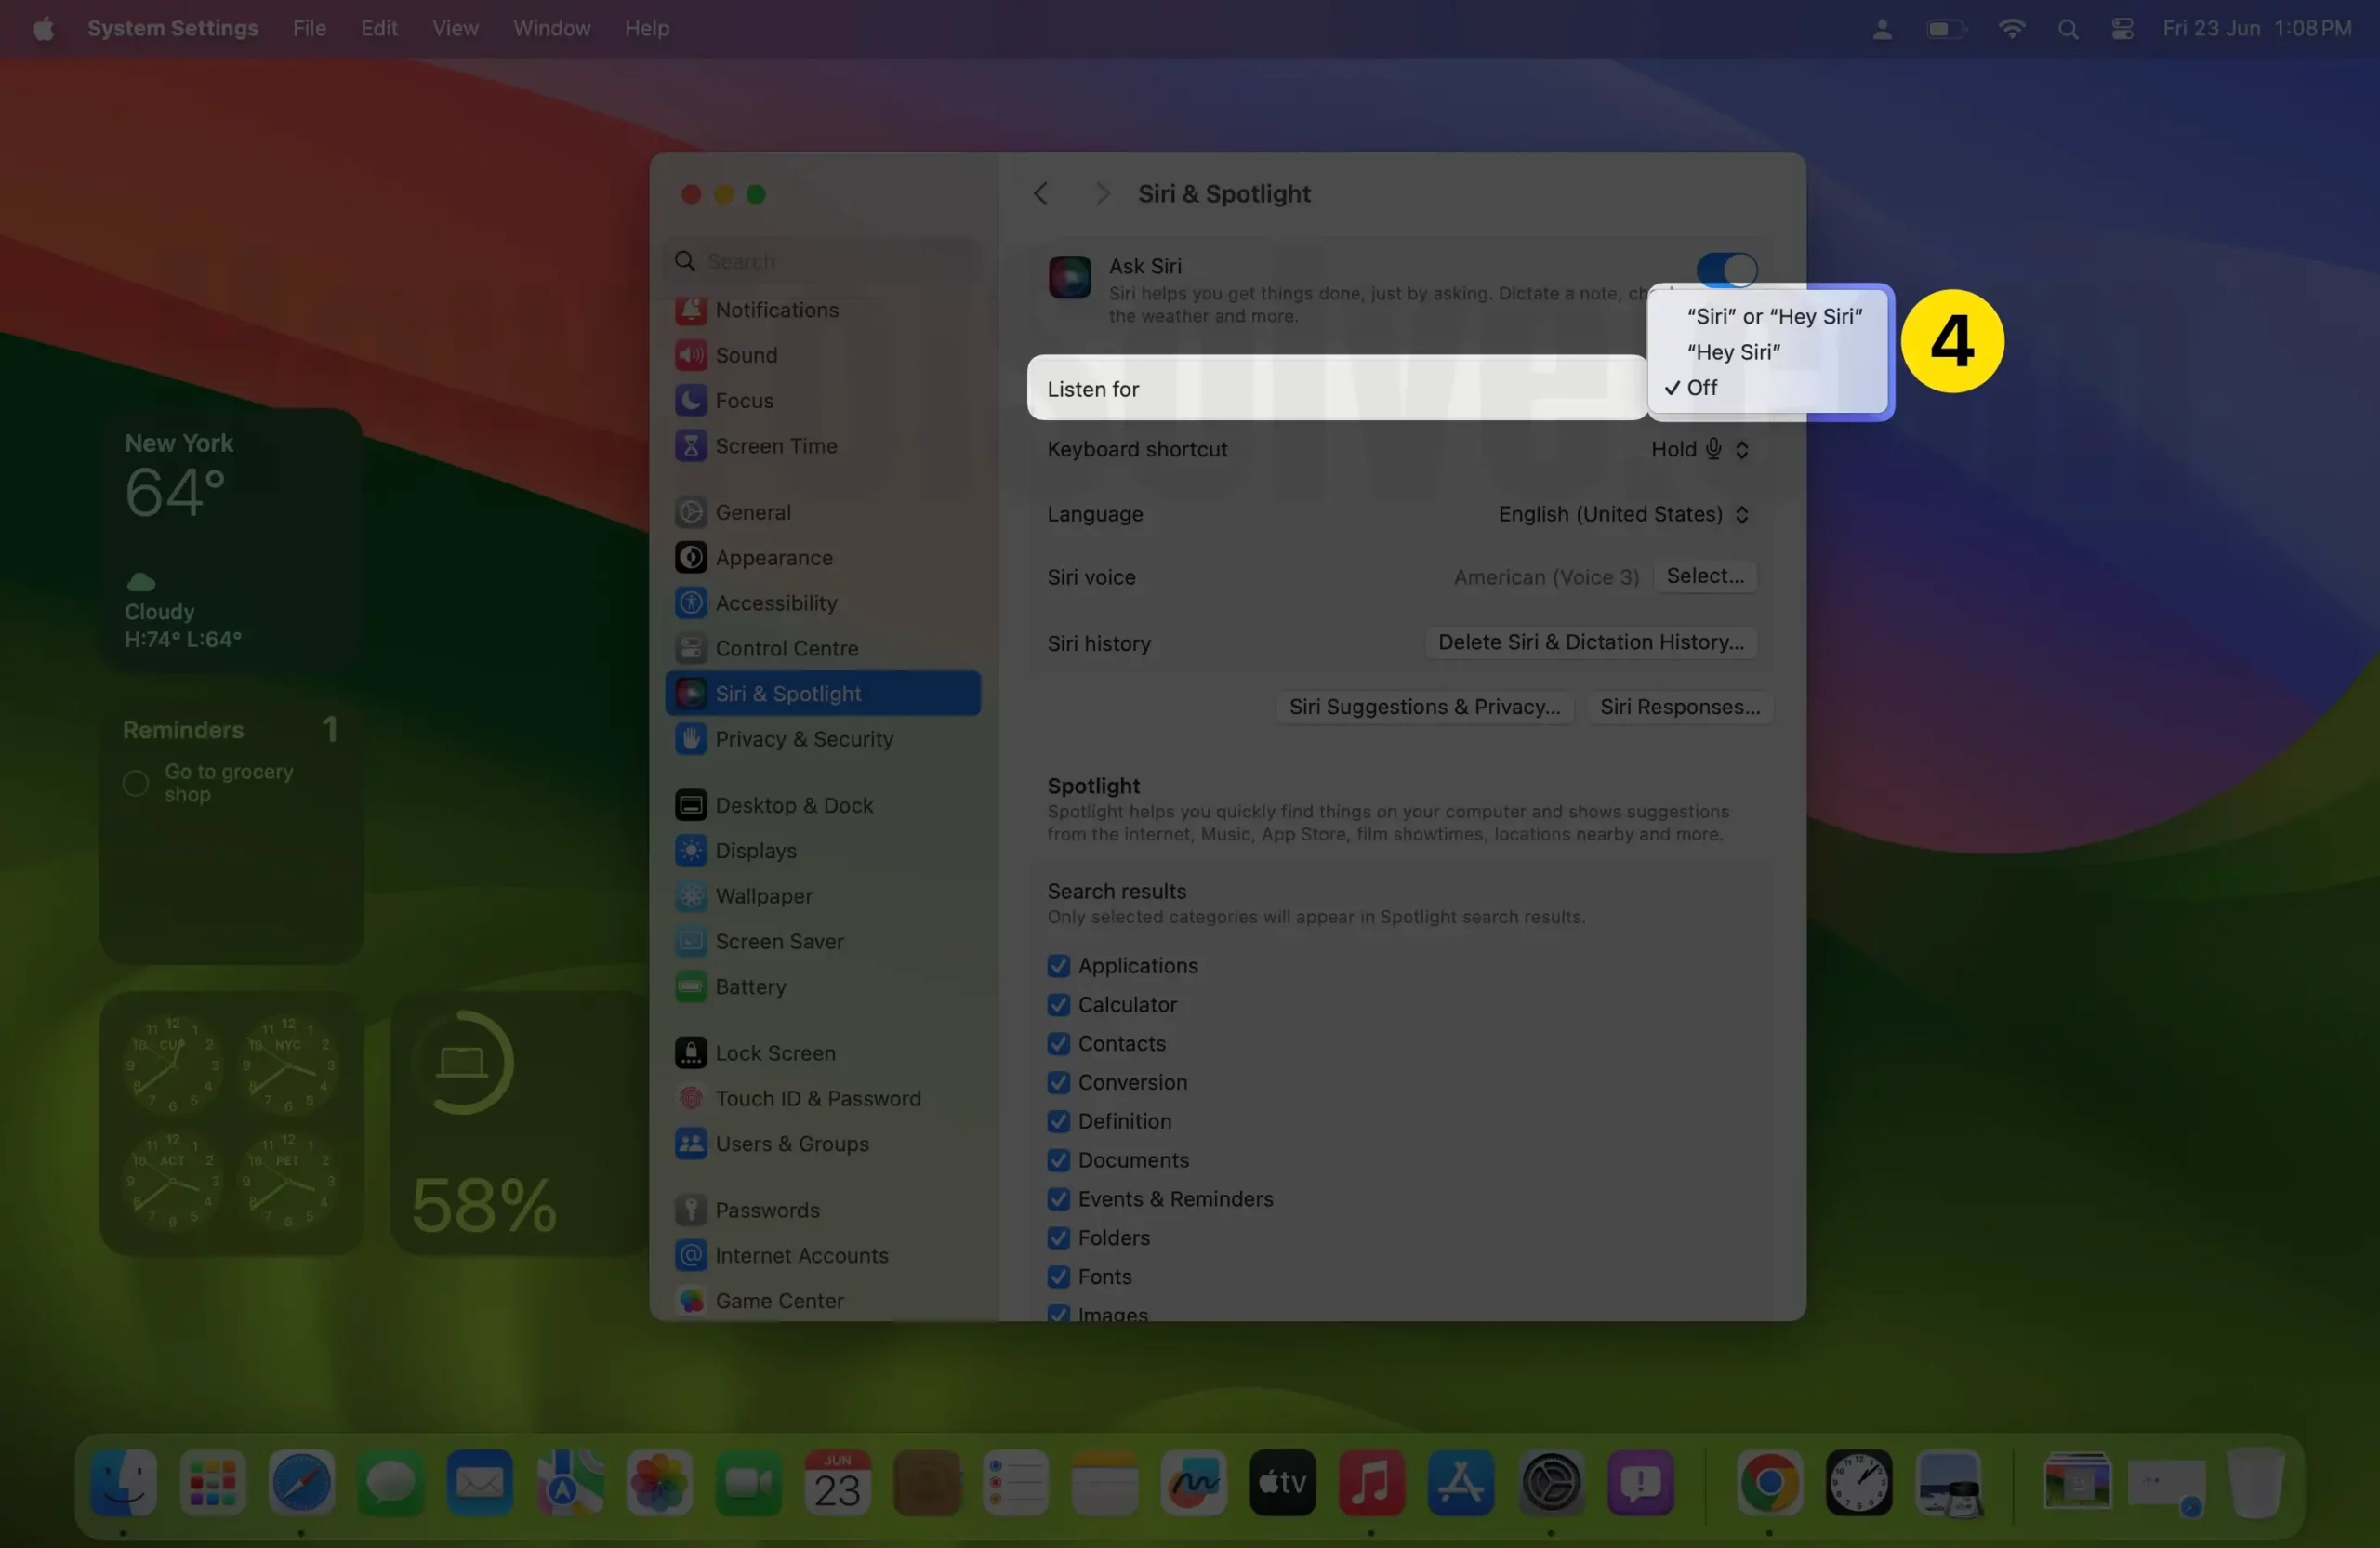
For macOS Sonoma:- Siri can activate with “Siri” or “Hey Siri” commands.
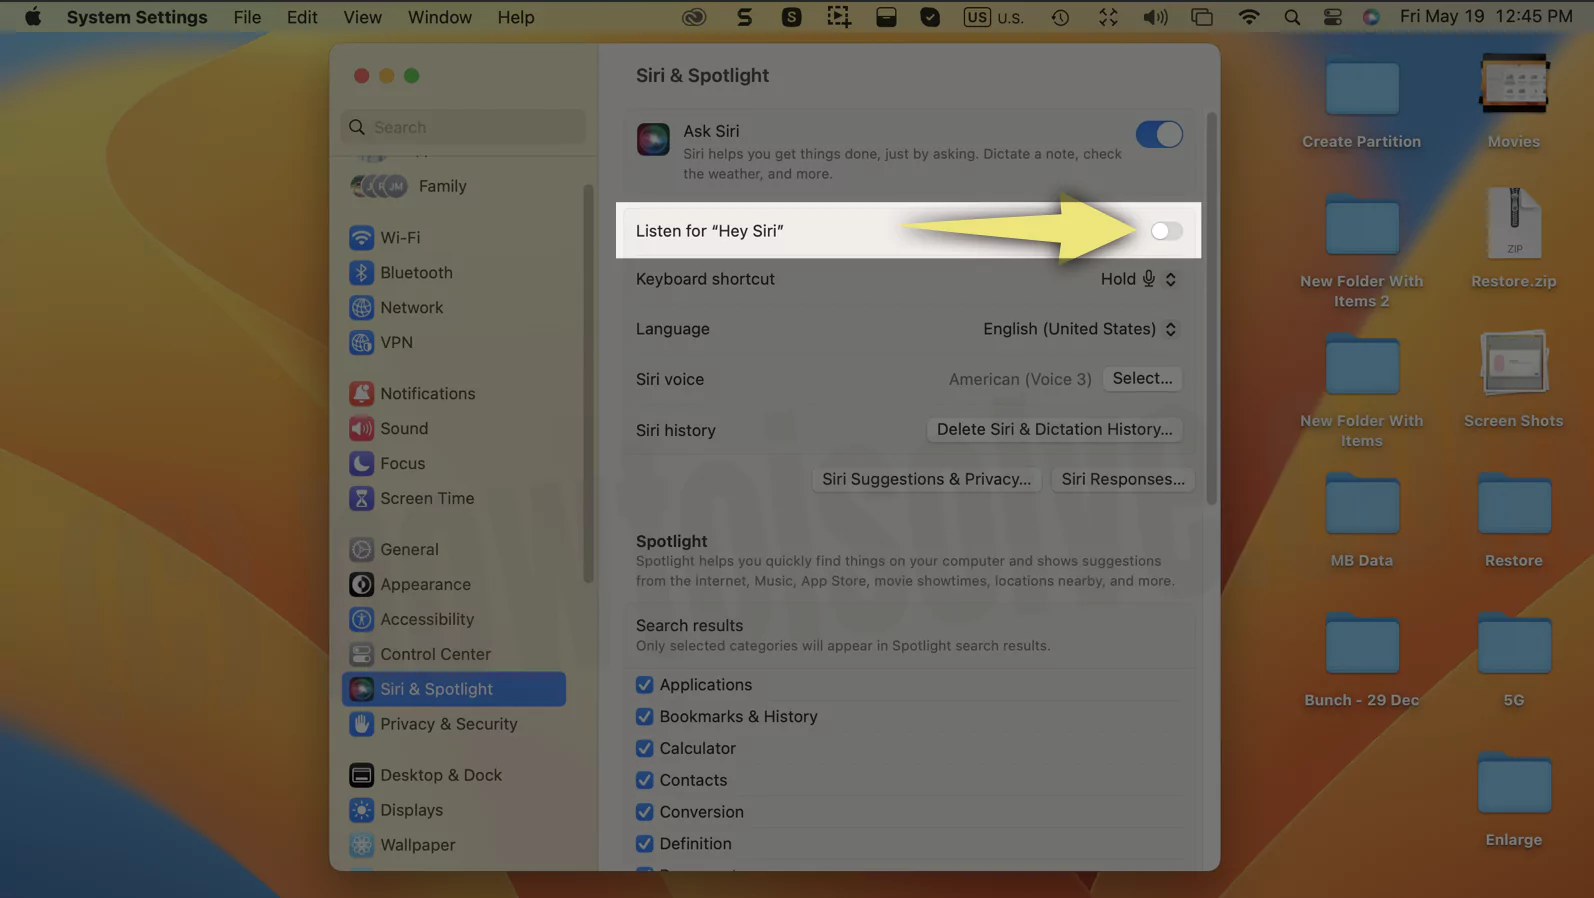
For macOS Ventura:- Now, We can Start Setup & Enable Listen for “Hey Siri” on Mac.
6→. To Setup Set Up Hey Siri on Mac. Click on Continue.

7→ Say Hey Siri and Record on your Mac.
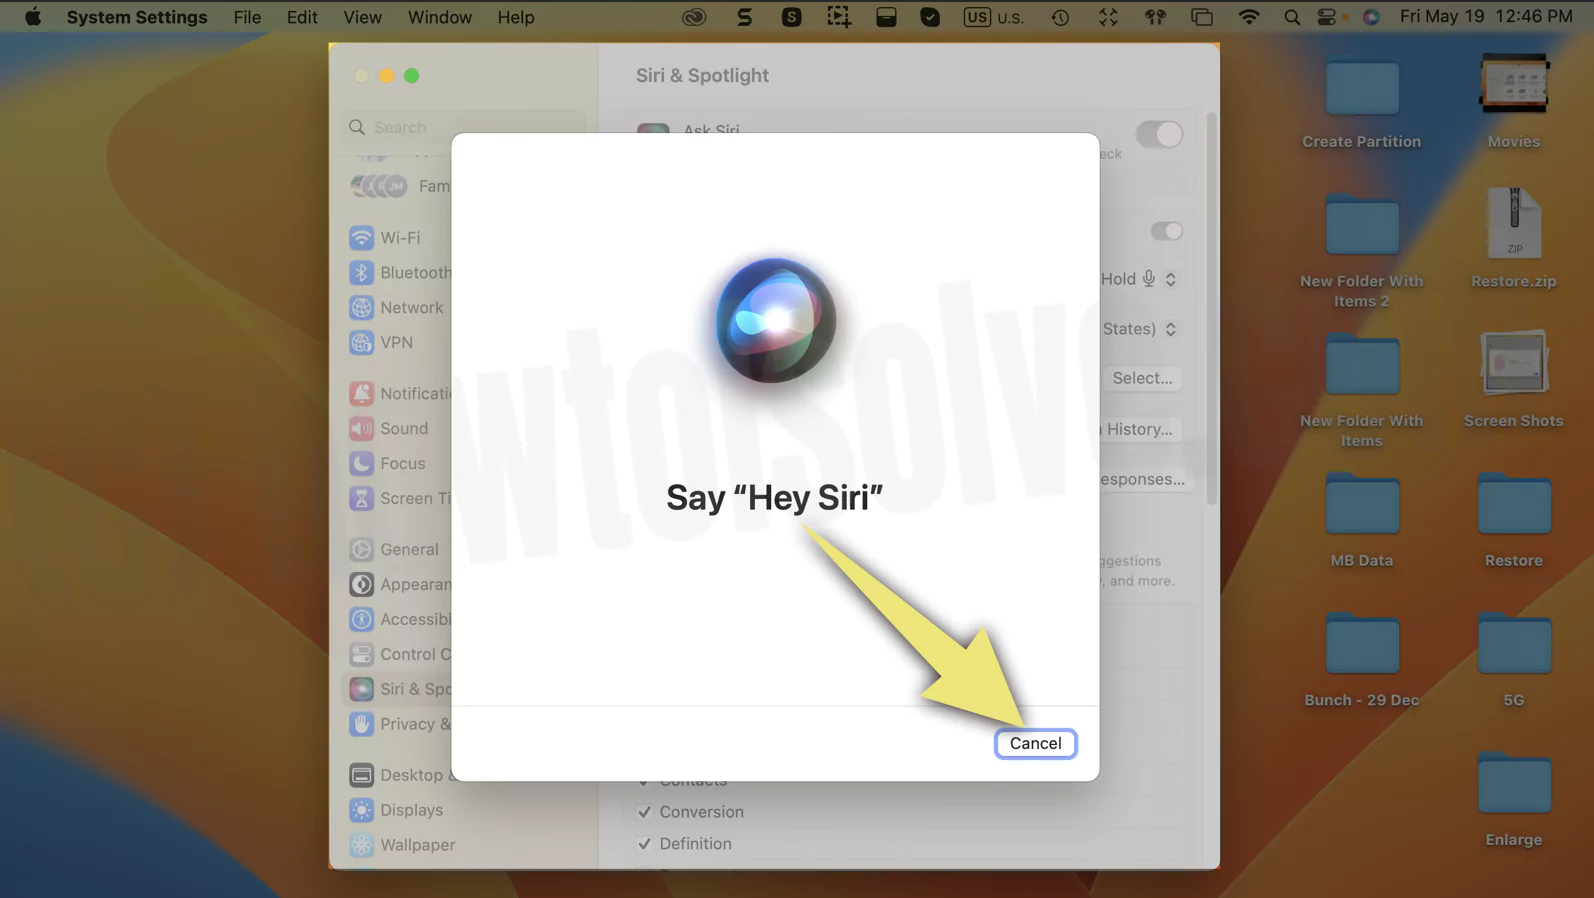
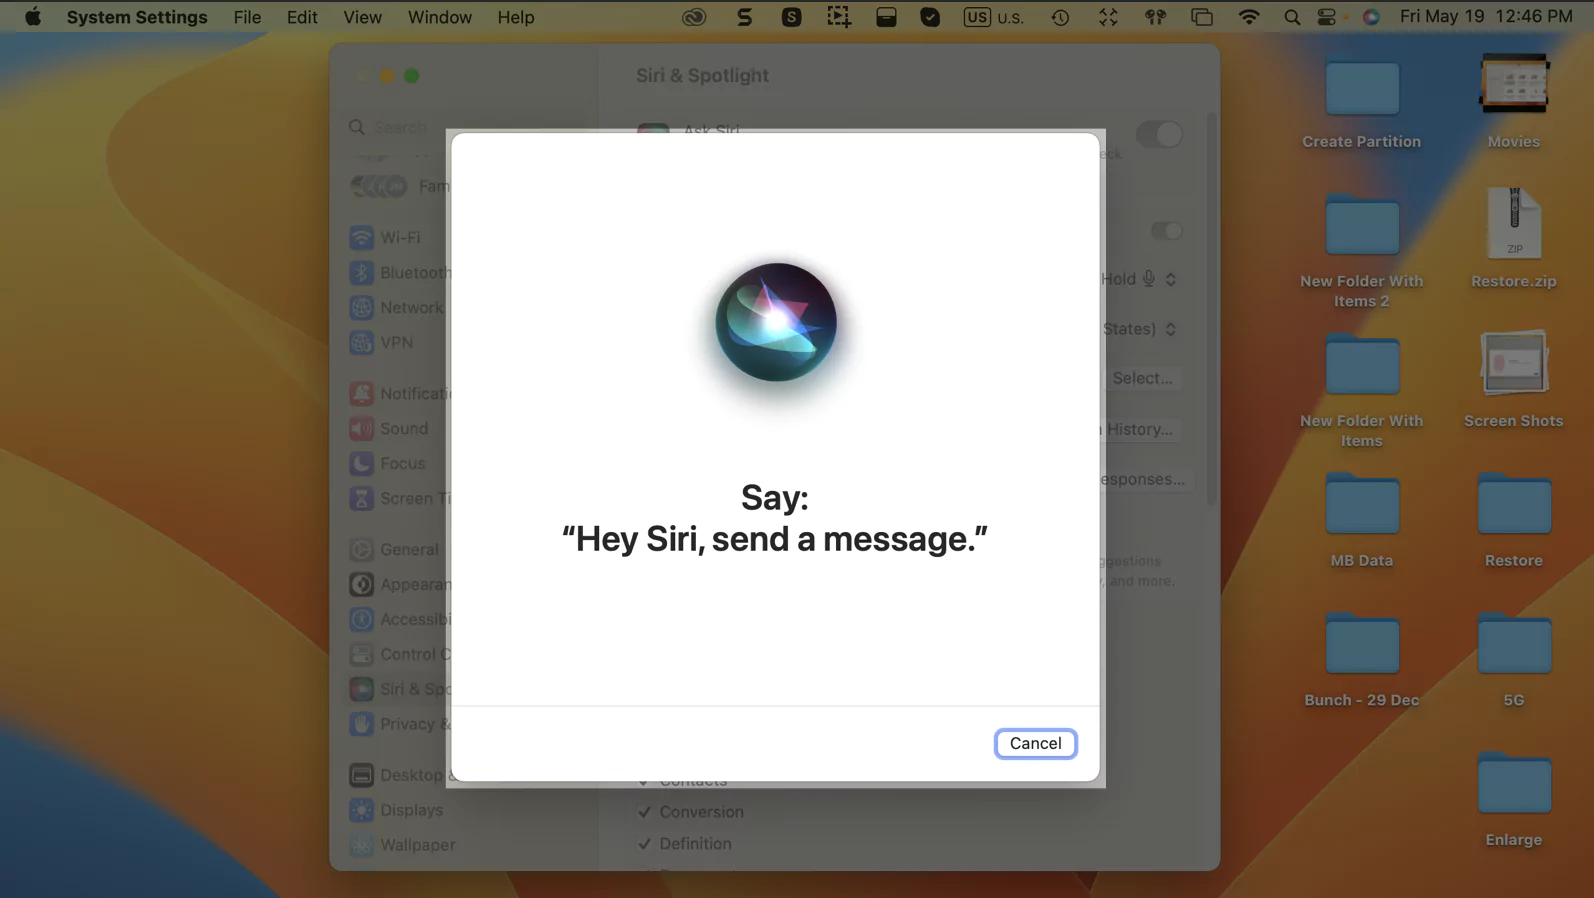
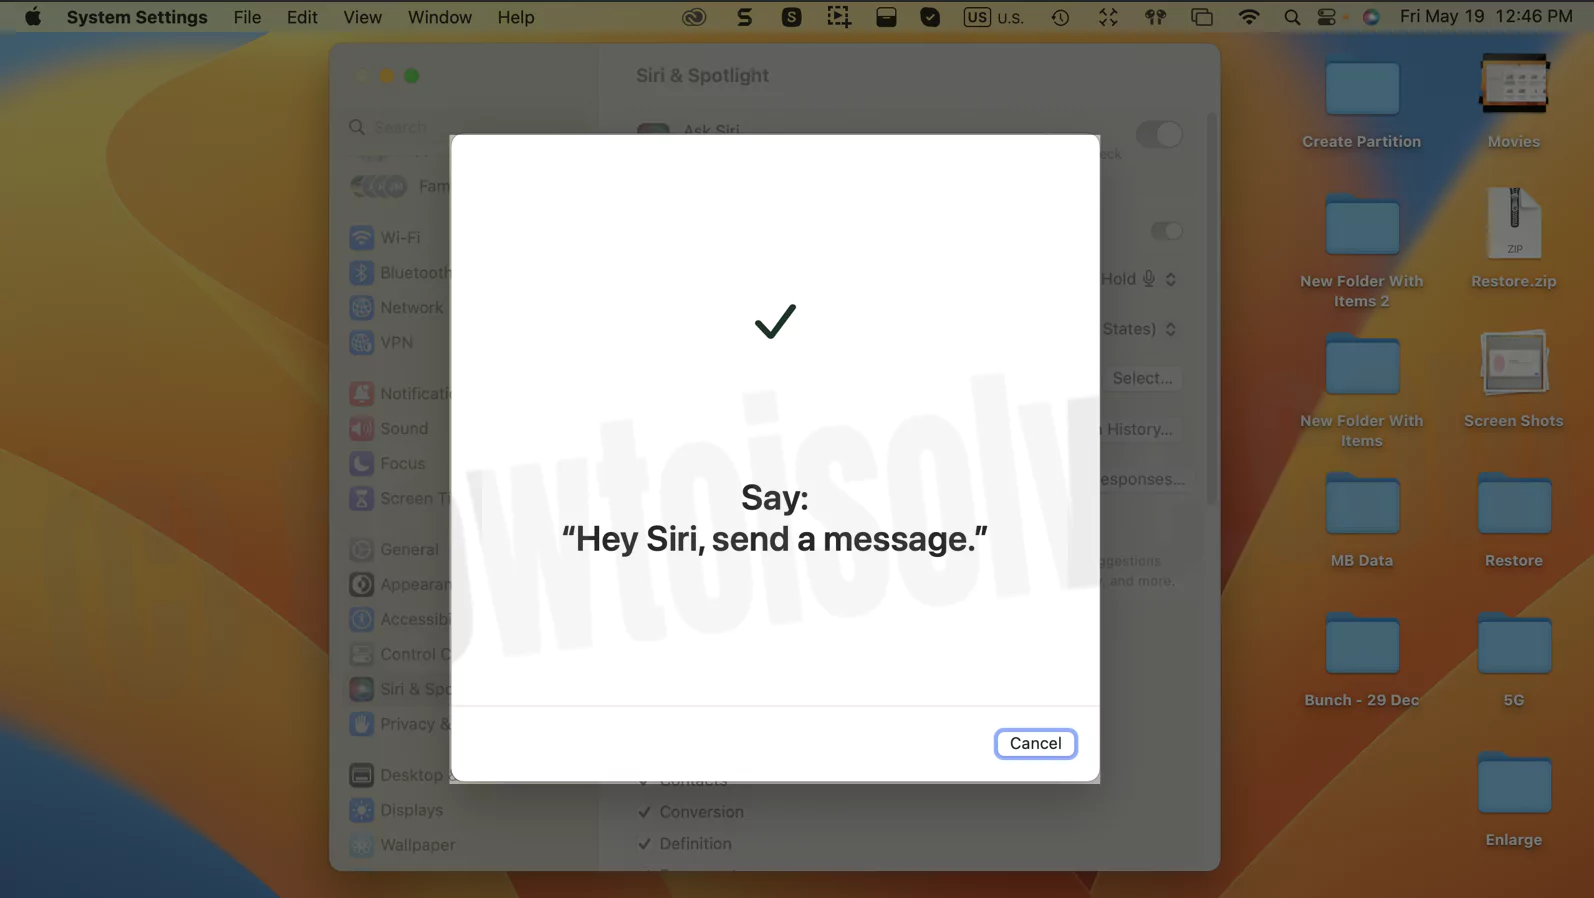
Hey Siri Ready to use.
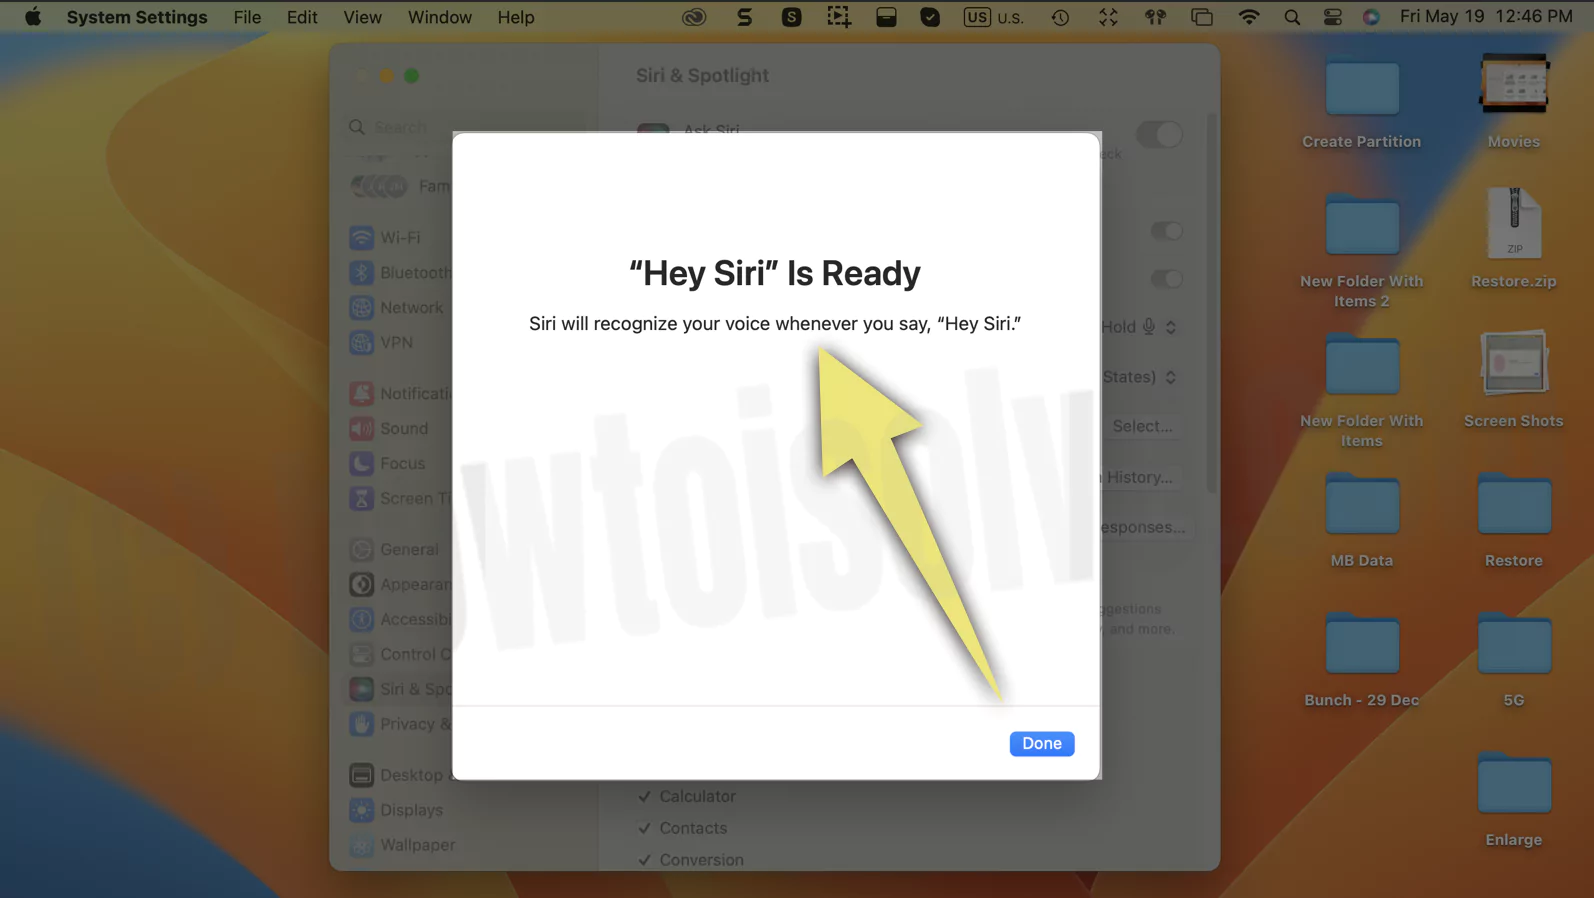
Hey Siri is Activated on your Mac. Also, check the other settings. to Activate Siri like using Keyboard Shortcut (F5/Microphone Dictation Key – Press & Hold to Activate Siri on Mac). Allow Siri when locked, Language and Siri Voice.
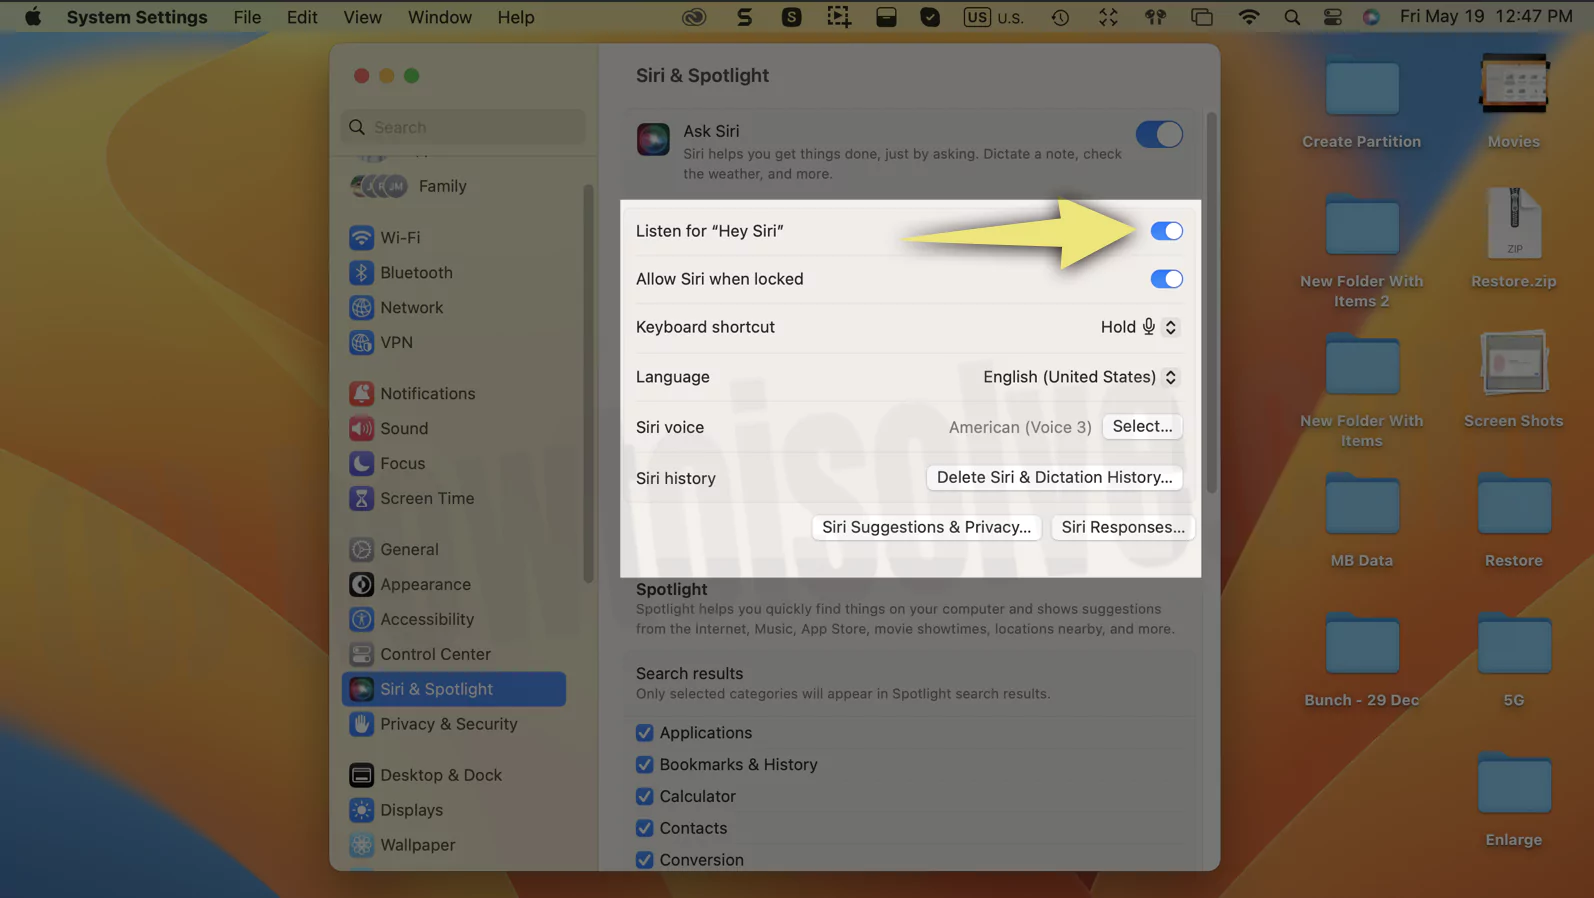
Mac users can enable Siri without Say Hey Siri or Without a Keyboard BY Clicking on the Siri icon that appears on the Top Mac menu bar.
To Turn On Siri From Menu Bar,
Go to the Apple Logo > System Settings > Control Center > Siri “Show in Menu Bar”.
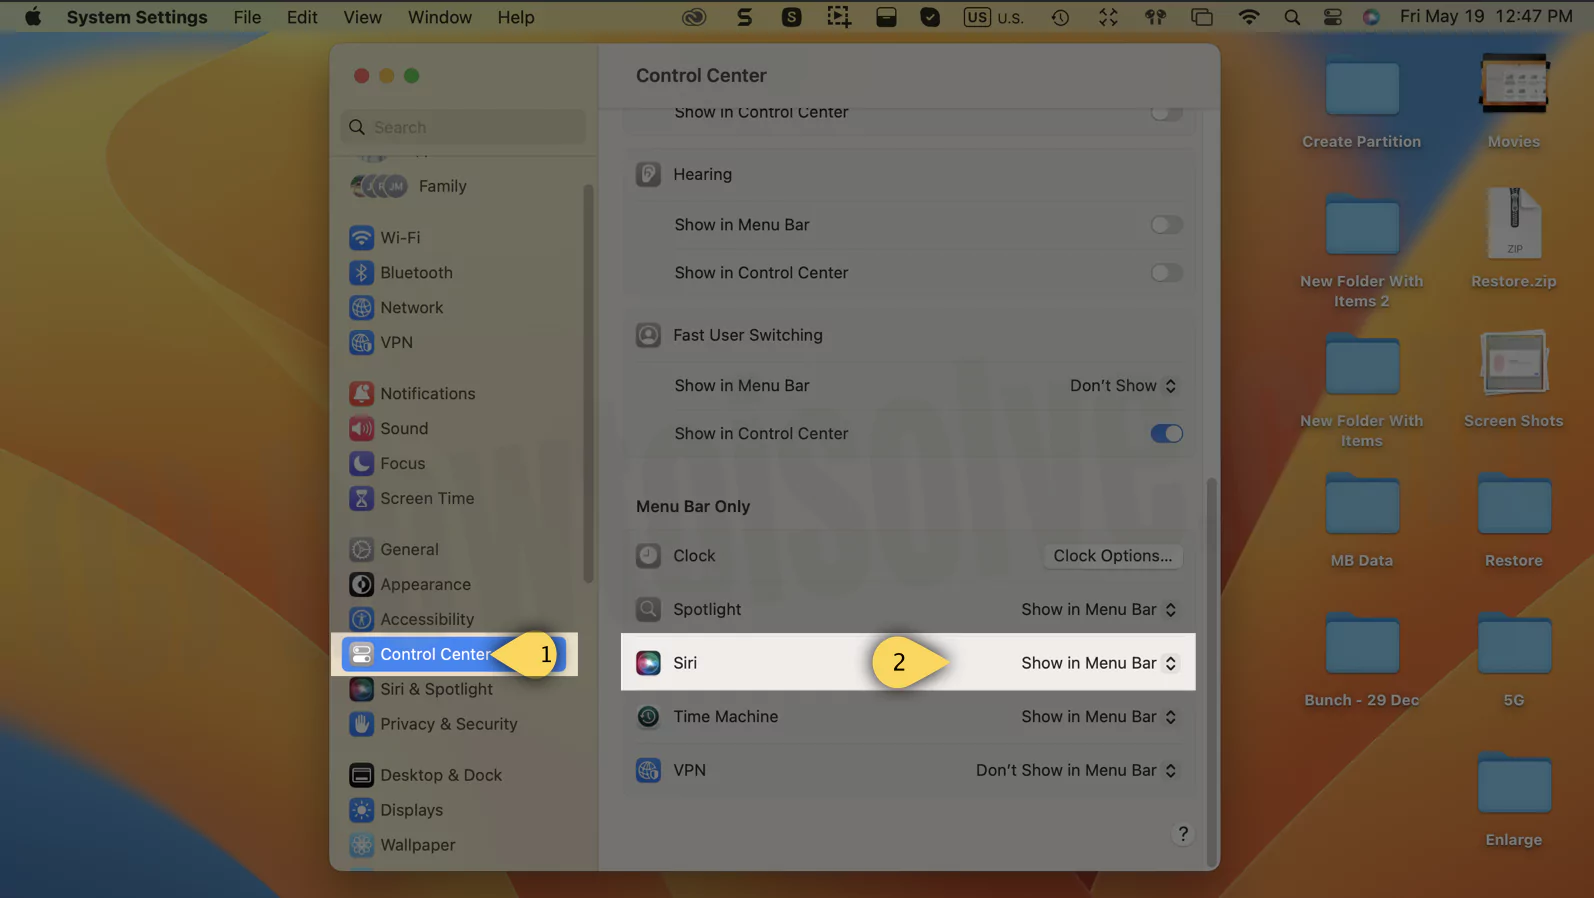
Click on the Siri icon to Activate Siri on Mac. Sey command to Talk with Siri or use Type to Siri Feature is it’s enabled.
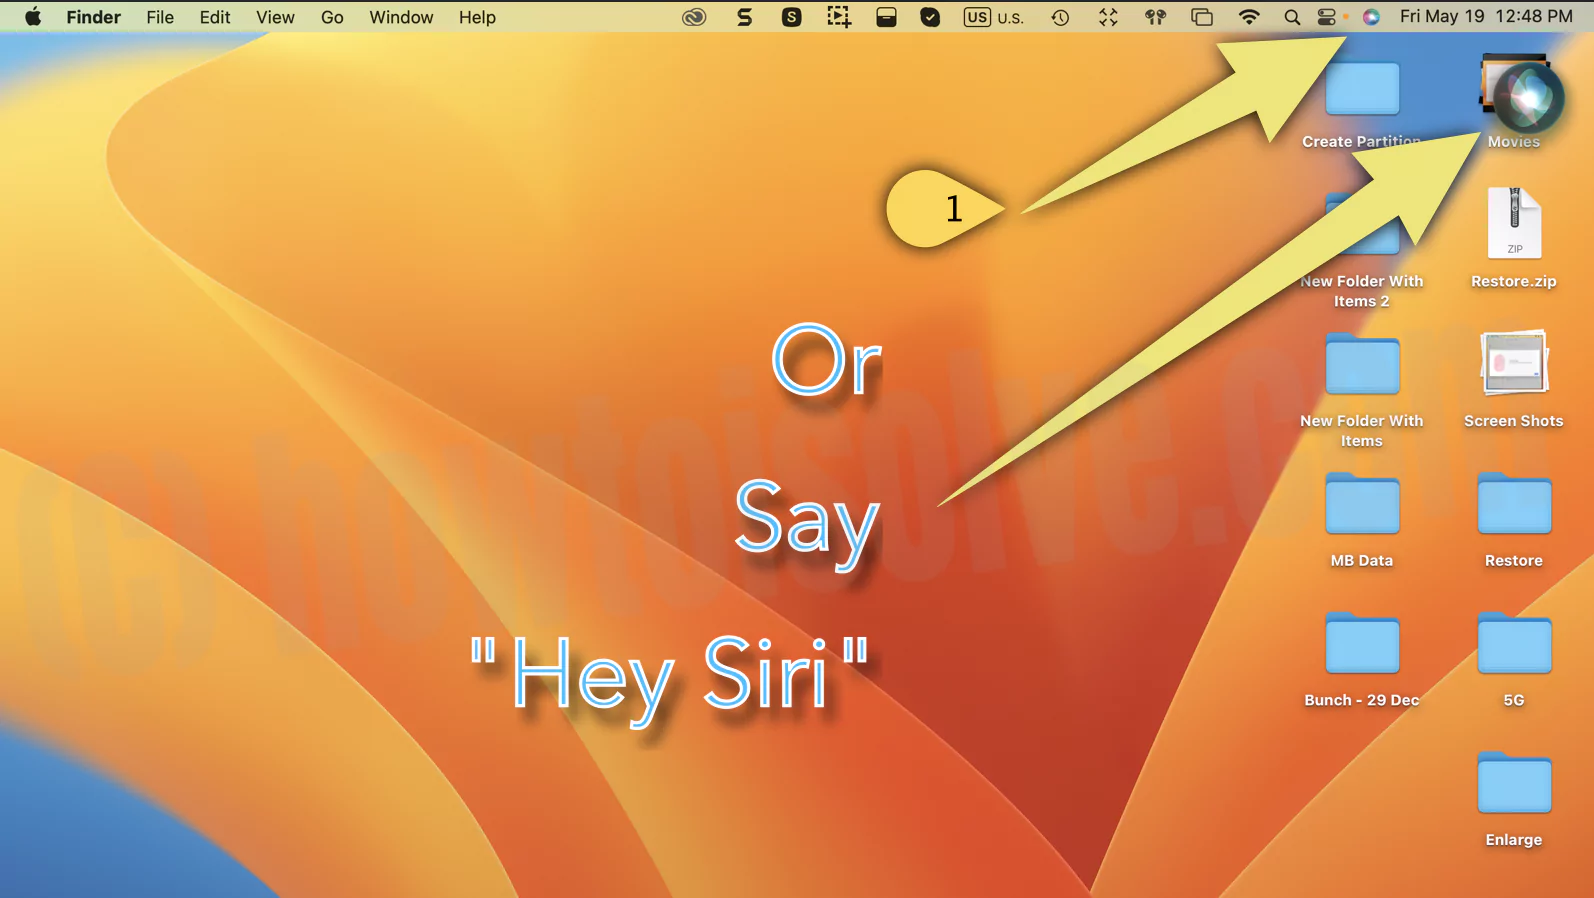
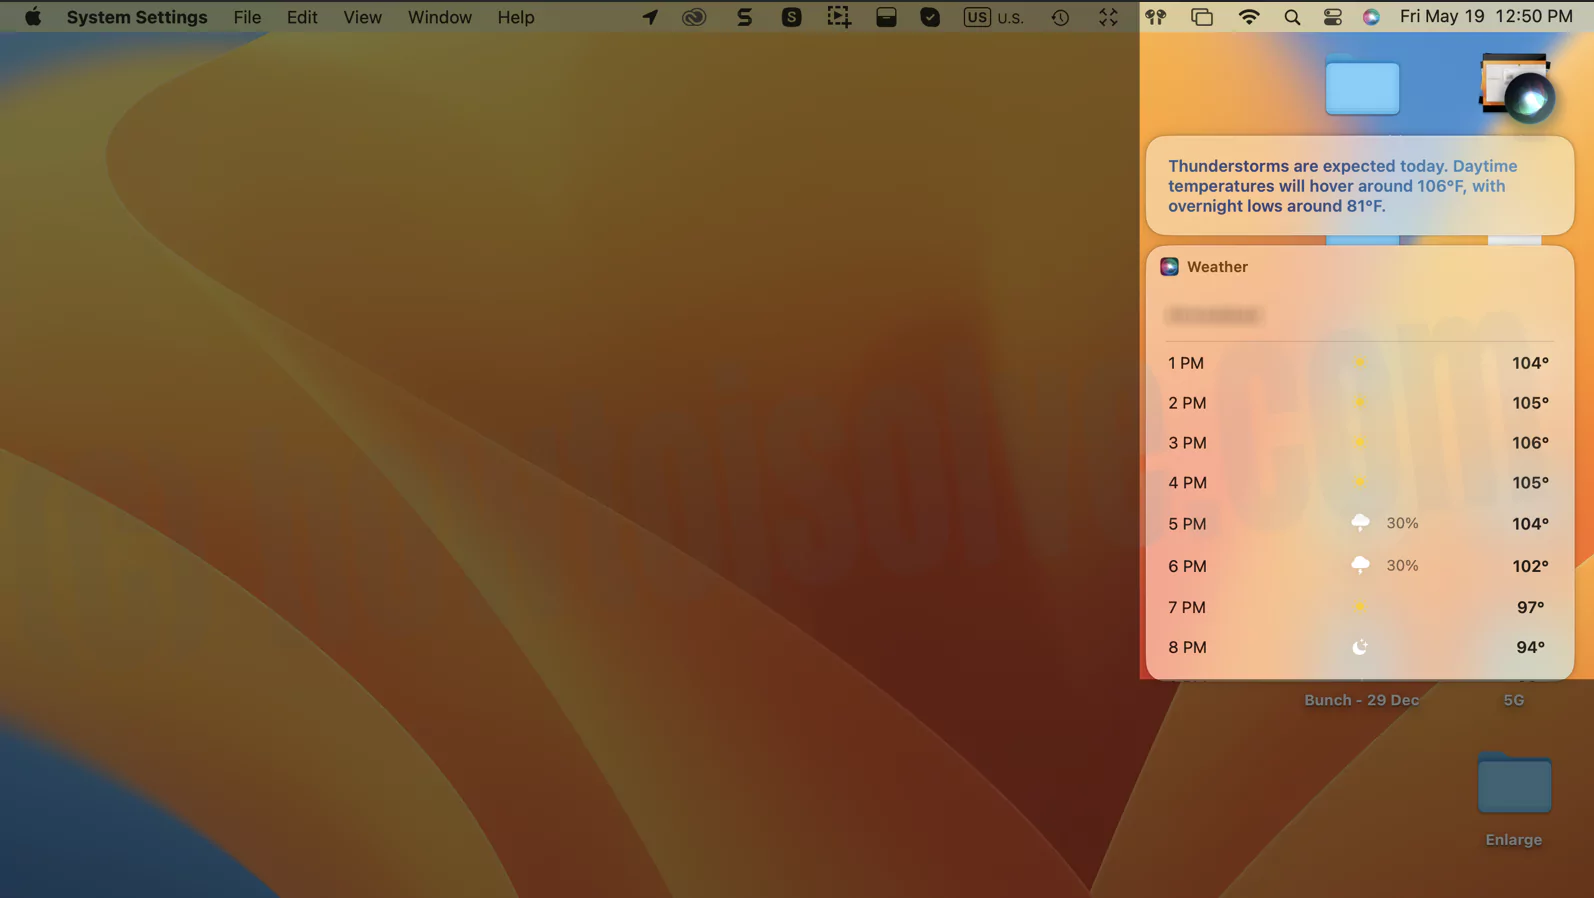
Here’s How you get the Siri Reponce on your Mac screen. Check some helpful Siri shortcuts to be your Mac productive.
macOS Monterey or Earlier macOS: Turn On Hey Siri on Mac! How to Setup
On the Latest macOS, Siri settings are separated from Other Mac accessibility settings. Follow the below steps to Enable or Disable Listen for Hey Siri on Mac.
1→ Go to the apple logo from top Mac menu > System Preferences.

2→ Next, Click on Siri.
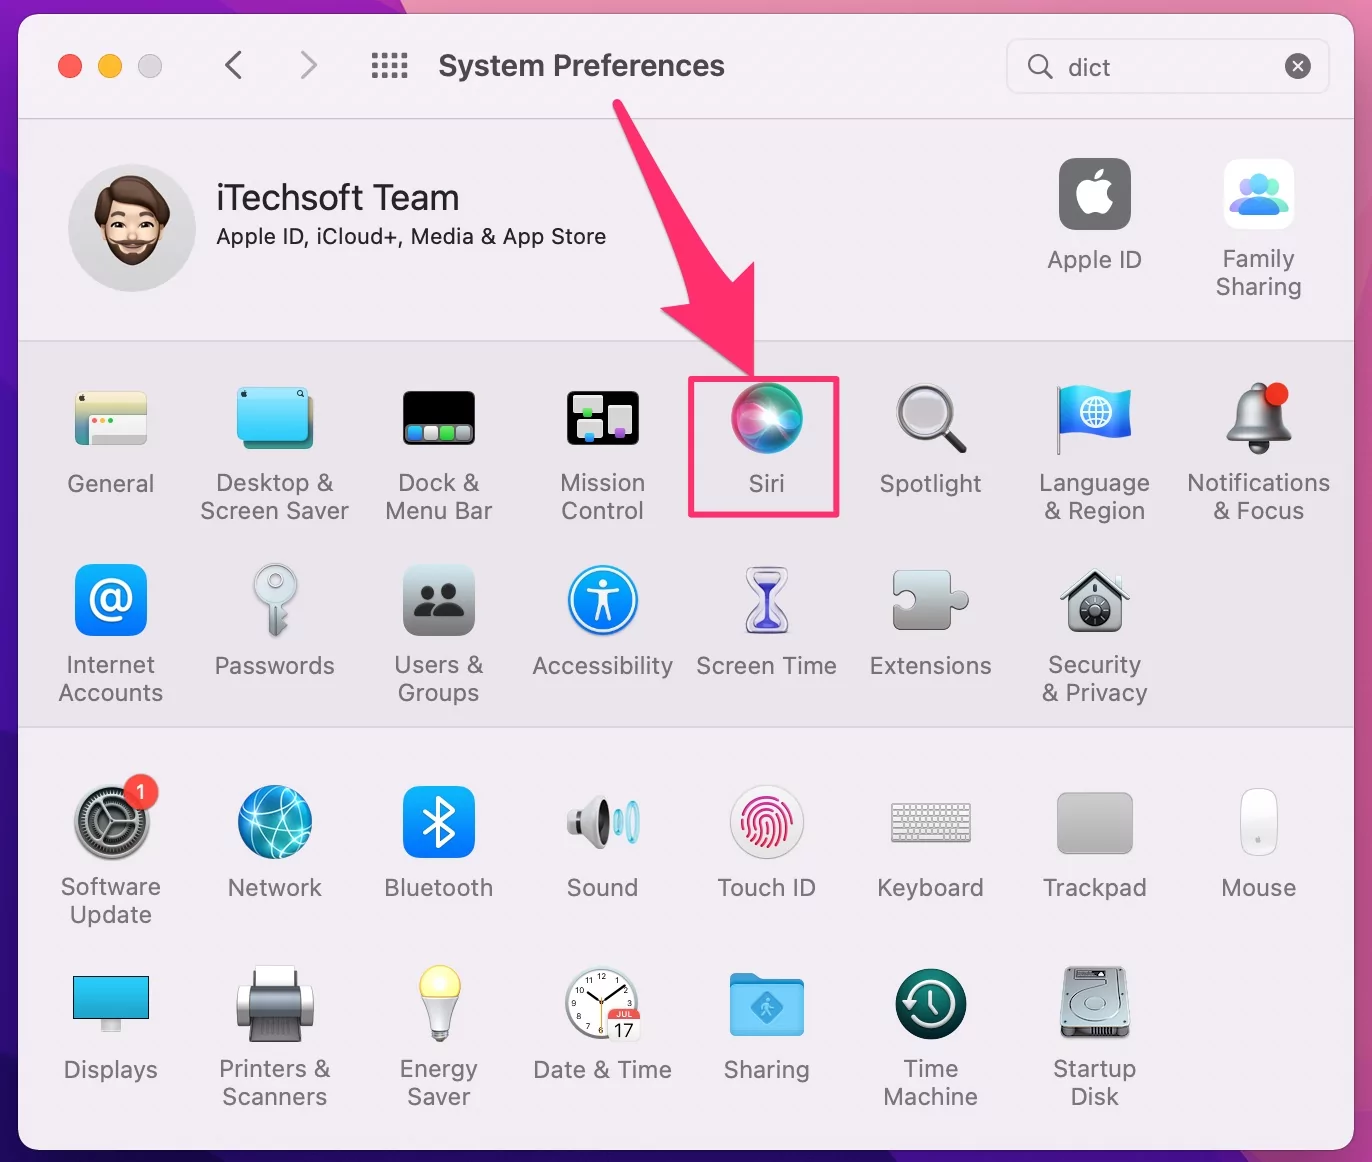
3→ Now, Select Enable Ask Siri.
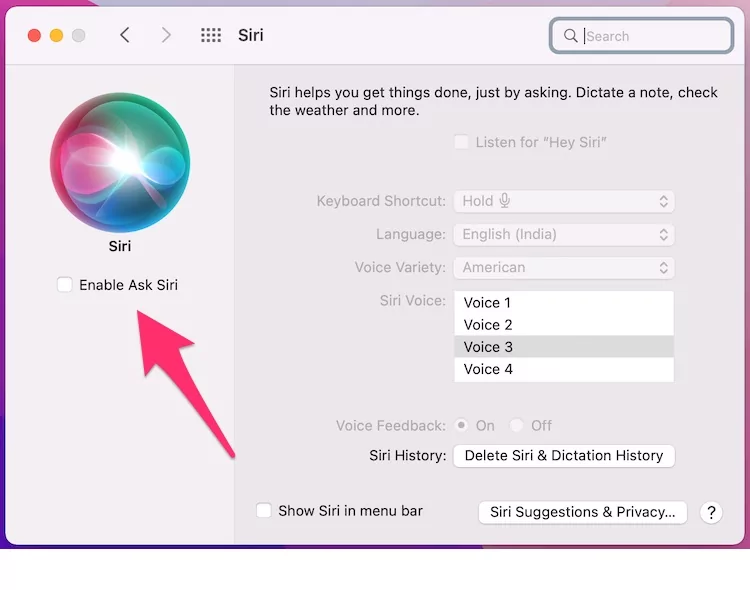
4→ Enable Ask Siri from the confirmation popup.

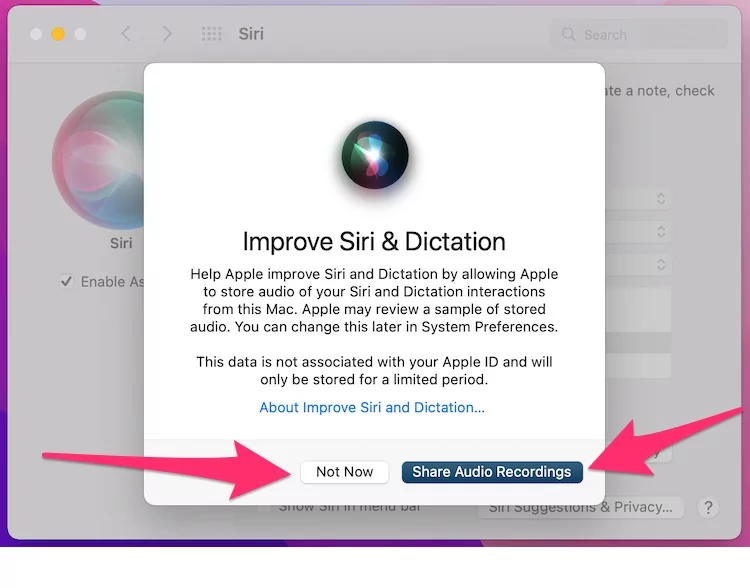
5→ Next, Allow permission to Share Siri Data with Apple to Improve Siri & Dictation.
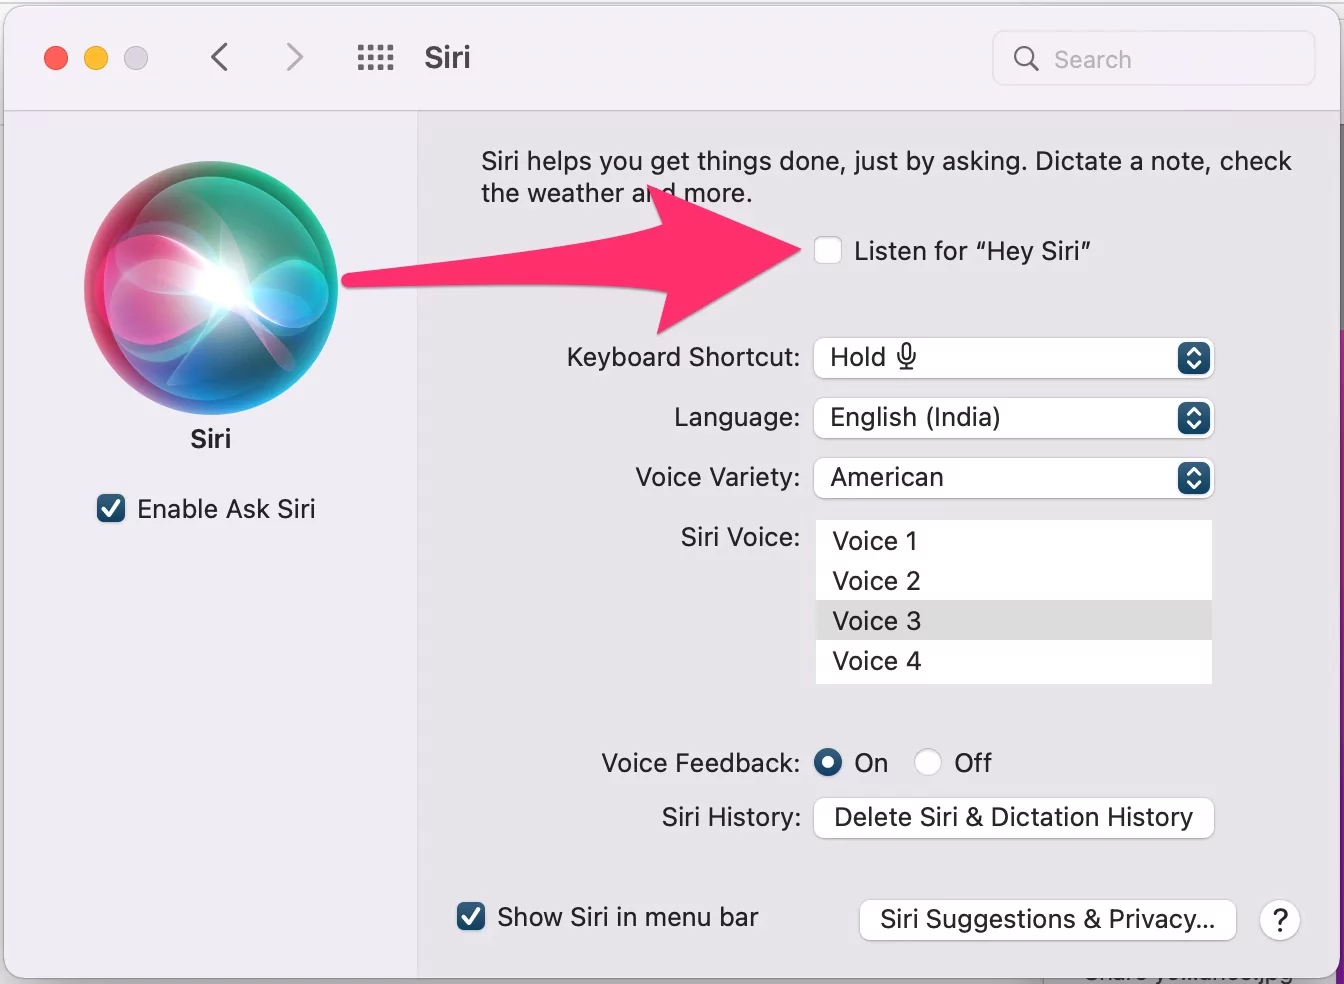
5→ Set up Hey Siri with command and Continue. Enable the “Listen for “Hey Siri” checkbox on headphones”. If you wish to disable Siri activation using the Hey Siri command, then alternate option is manually call Siri by press the Siri icon from top Mac menu or Use Type to Siri on Mac.
6→ Follow the On-screen Voice command and Pass all the tests successfully.

6→ Click on Done to complate Hey Siri setup on Mac. More customizations are keyboard Shortcuts for Mac siri, language, Voice, Voice Feedback, and Clear Siri search history.

That’s it.
How to Activate Siri on Mac
For Mac Hey Siri, We need to connect headphone with a mic [AirPods & AirPods Max] is the best apple headphone to use Siri and other sound features. Then follow the steps for Enable Siri & Activate Hey Siri on Mac mini.
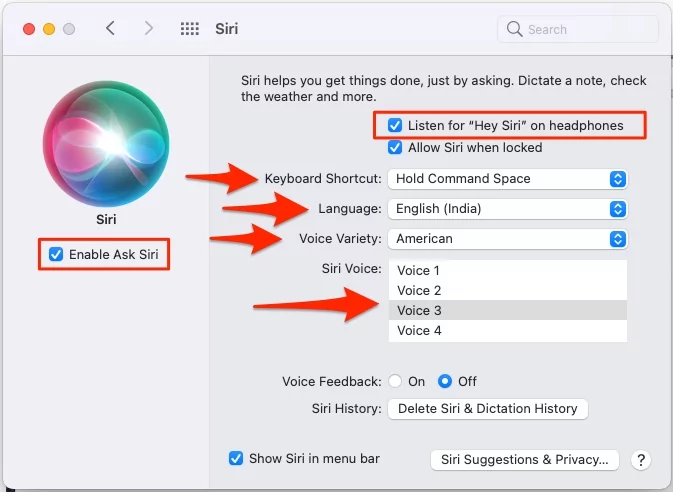
We can Turn off Listen for Hey Siri with headphones on Mac any Time using the above steps.
Show or Hide Siri On Mac Menu Bar
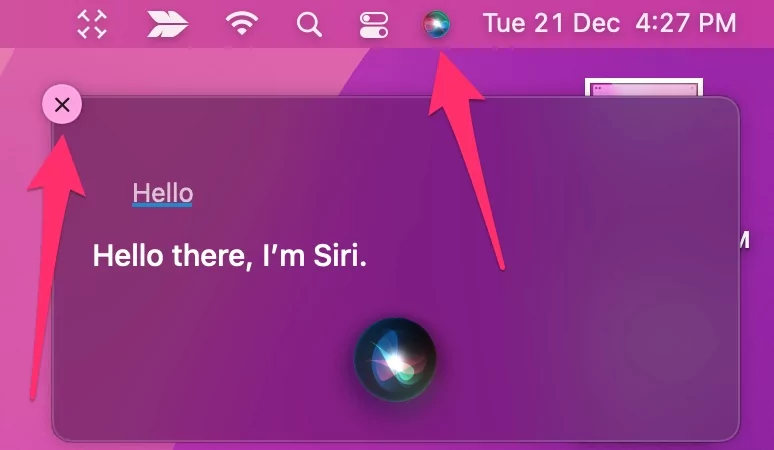
If you don’t like to use the Hey Siri command on Mac, activate Siri on Mac and Work on it. Then Open Siri manually from the top Siri Shortcut in the Mac menu. This option helps to open Siri On Mac silently without disturbing the other own [iPhone, iPad] or your Nearby Apple device in the working area.
To Enable Siri Shortcut on Mac Menu
MacOS Ventura:– Go to the Apple Logo from the top menu > System Settings > Control Center > Siri (Always Show in Menu Bar.)

MacOS Monterey:- Go to the Apple logo from the top Mac menu > System Preferences > Siri > Enable Checkbox “Show Siri in Menu Bar”.

To Disable Siri Shortcut on Mac Menu:- Go to the Apple logo from top Mac menu > System Preferences > Siri > Disable Checkbox “Show Siri in Menu Bar”. to Hide from the top menu.
How to Activate Siri on Mac Keyboard
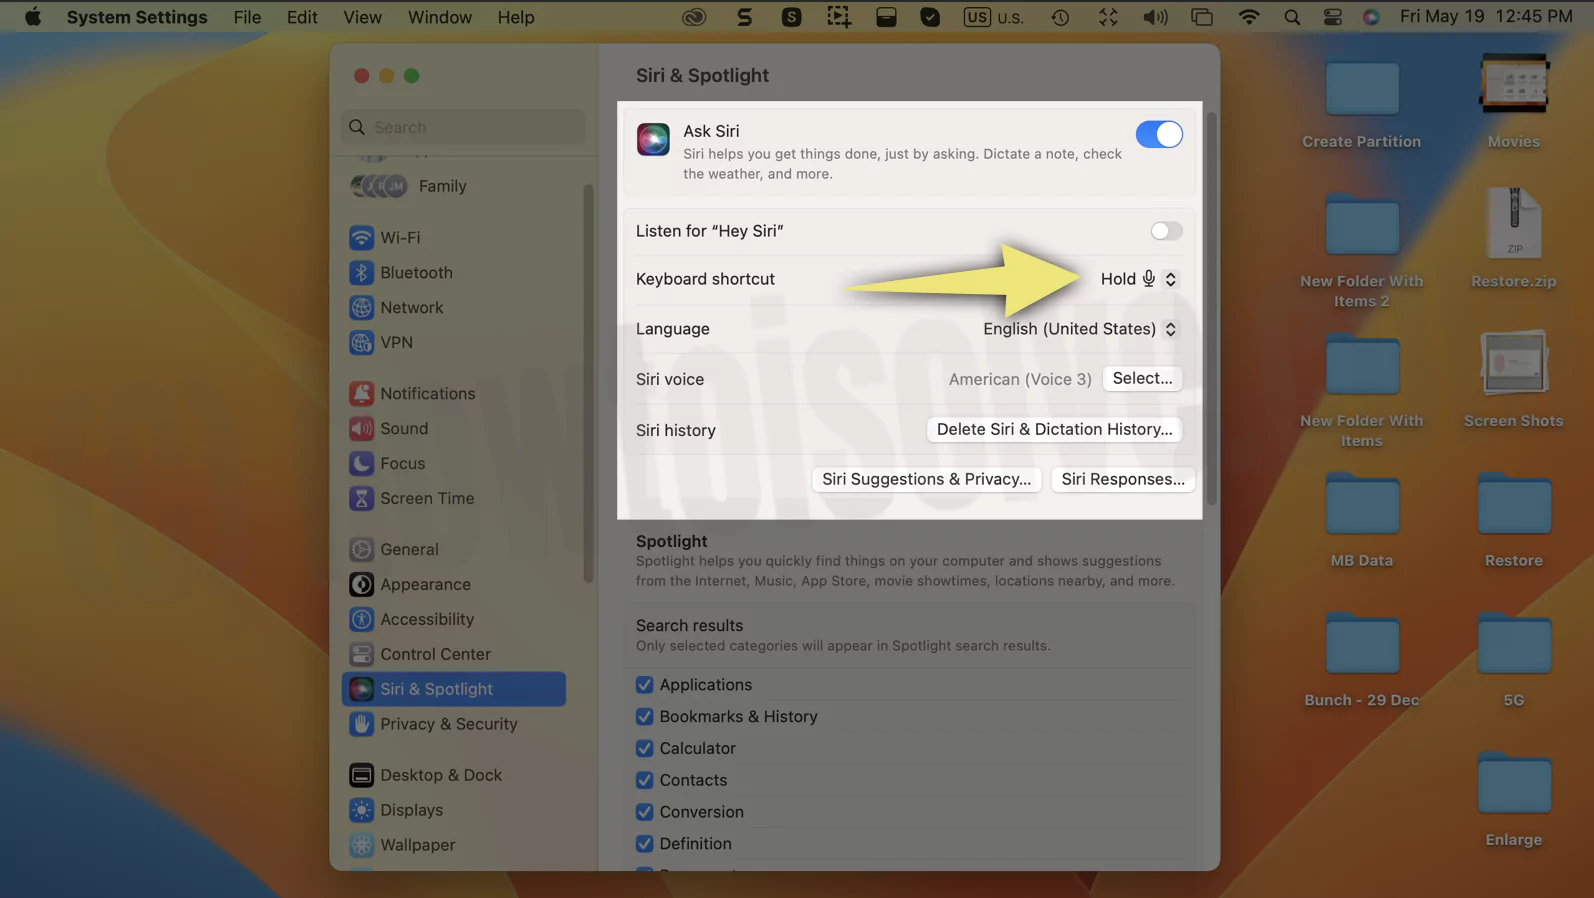
We can use Voice and Keyboard to activate Siri on Mac as an Alternate option. Apple is giving the default Key to Activate Siri on Mac on Apple’s Magic Keyboard. Default Key is to Press and Hold on F5 [Mic] button. In addition, we can customize the Siri Keyboard Shortcut on Mac. Check your Present Keyboard Shortcut for Siri or How to change it.
On MacOS Ventura:-
1→ Go to the Apple Logo > System Settings.
2→ Select Siri & Spotlight > Select Keyboard Shortcut. The default Key is F5 (Dication key). – Check the setting given here if Fn key Not working on Mac.
On macOS Monterey:-
- Go to the Apple logo from top mac menu > System Preferences.
- Next, Click on Siri > Keyboard Shortcut [Select from the options]

- Hold Mic – F5
- Hold Command Space
- Hold Option Space
- Press Globe + Space or Add new Keys from keyboard.
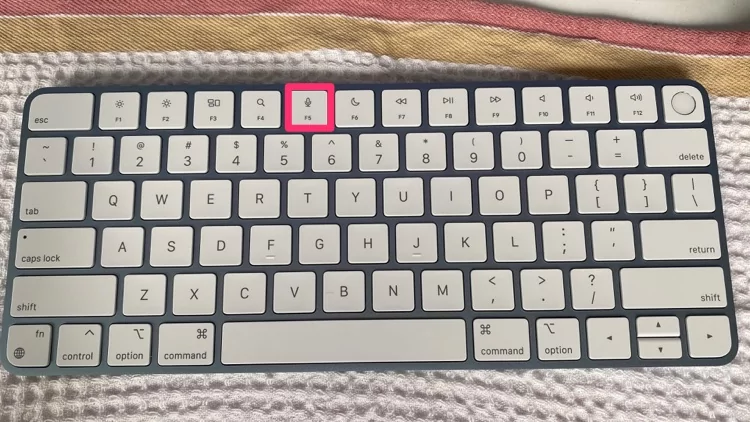
That’s an easy way to open Siri on Mac using a Keyboard.
How to Activate Siri on Mac Using AirPods
AirPods users can activate Siri in a smart way. That’s tested on all Hey Siri-supported Mac and MacOS. Follow the below steps for Activating Siri on Mac using AirPods Pro, AirPods 3 & AirPods 2.
- First, Connect your AirPods to your Mac from Bluetooth Preferences.
- Go to the Apple logo from the top Mac menu > System Settings/System Preferences.
- Bleutooth > Enable BLuetooth and Search your AirPods in the list and Click on AirPods Name to pair with Mac. Once AirPods is connected.
- Put AirPods into Ear
- Press and Hold on Steam of Airpods Pro and AirPods 3 to Activate Siri on Mac without Saying Hey Siri voice command or Use Hey Siri command as well. for AirPods 2, Double Tap on AirPods to Activate siri.
How to Activate Siri on Mac Using AirPods Max
Siri activation on Mac through AirPods Max is just easy as Other AirPods Pro, and AirPods 3. But the COntrol is different from Wake Up Siri on Paired Mac. Press and Hold on Digital Crown button on AirPods Max to Activate Siri.
- First, connect your AirPods Max to Mac from Bluetooth Settings. [Apple logo > System Settings/Preferences > Bluetooth > Enable Bluetooth and Pair AirPods Max from the list of Bluetooth device].
- Press and Hold on Digital Crown button givne on AirPods Max Until you hear chime.
- Start Saying your Voice command to use Mac.
Which Macs Support Hey Siri
Siri is an easy way to access mac data or Internet data using the Voice command. So, the Smart internal microphone of your Mac automatically activates Siri on your Voice command “Hey Siri“. if your Mac microphone not working or not clearly defined then Use External headphones with a mic.
- 2018 MacBook Air and Later model
- 2018 MacBook Pro and Later model
- iMac Pro
- Mac Mini with Headphone.
Older MacOS
Step 1. Click on Apple Logo on the top Menu bar and Open up System Preferences on your Mac.
Step 2. Then, Click on Accessibility.
Step 3. Choose Dictation and do checkmark Enable the dictation Keyboard Phrase.
Now quite below in the field, replace any text and Enter the new text ‘’Hey’’.
Step 4. Now Click on Dictation Commands…
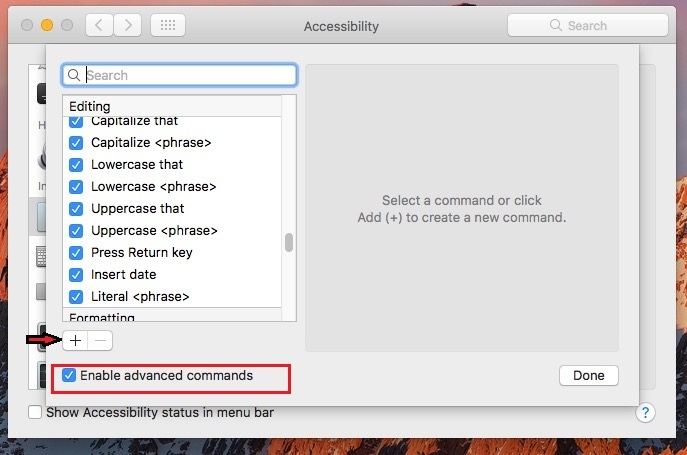
Step 5. Now make checkmark Enable Advanced commands.
Step 6. Hit the ‘’+’’ button to add a new Command.
Step 7. Now make changes as per the below-given instructions.
When I Say: Siri
While using: Any Application
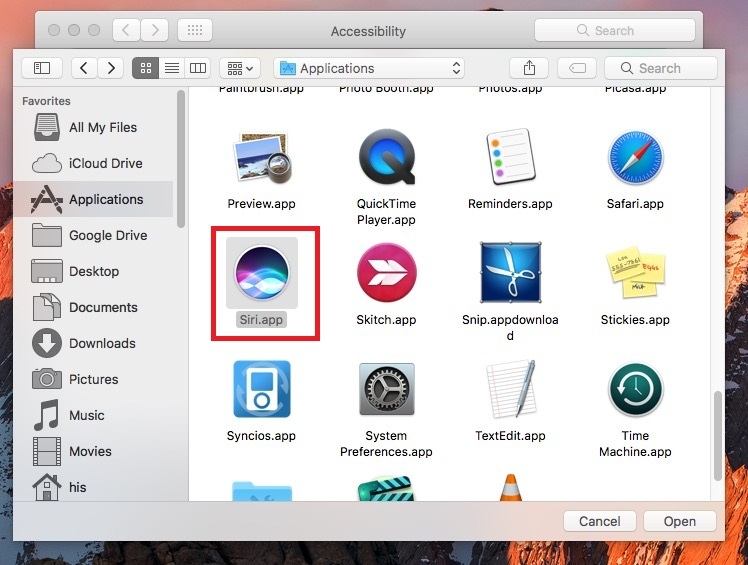
Perform Open ‘’Siri.app’’
- To Get App in Perform option follow Steps – Choose Open Finder Items… and select to open Siri – you can find it inside your Application folder.
Step 8. Click Done.
That’s it.
Delete Siri & Dictation History on Mac
Instead of hey, you can also keep such the ‘’hello’’ keyword to summon Siri hands-free using Dictation. This means It’s a customized command. The reason behind the different keywords is that using the ‘’hey’’’ command for Mac’s Siri, maybe a nearby Apple device Siri will also happen to activate.
I hope you got it and easily guided the above tip to turn on/Enable Hey Siri on macOS.
If you’ve any queries meanwhile, please send us a comment, and we will reply to you as soon as possible. To get more tips and tricks, subscribe us our E-mail Alert.

