
Over time, Marketing people are spreading, and they try to communicate via different platforms, such as Messages, Ads, Mails, and more. You can unsubscribe the Text Messages by asking the Carrier operator, Remove Ads, and when it comes to Mails, it’s a bit hard to prevent the marketing emails and to keep them away from tracking you and your personal details. Promotional Emails, Subscribed Newsletters, Sponsored Emails, etc., these emails hoard up your inbox pretty fast.
Luckily, Apple has introduced the Mail Privacy Protection feature to add an extra layer of protection to your inbox and, of course, your Mail ID. So let’s see how you can stop spammers from tracking pixels and locating you.
How to Enable and Disable Privacy Protection in MacBook, Mac?
What are Tracking Pixels in Emails, and Why are they unethical?
The tracking pixels are just 1×1 dimension located on the lower side of the image, which you might not find with naked eyes. With the help of these tracking pixels, the advertisers and marketers track your behavior, how you react to the mail, do you open and visit the mail, and much other information.
So to avoid being tracked by these advertisers, Apple has added a Mail Privacy Protection feature that will show the marketers Apple’s proxy IP Address, rather than revealing your IP Address.
The Mail Privacy Protection is available for both Mac and iPhone; follow both iPhone and Mac processes separately.
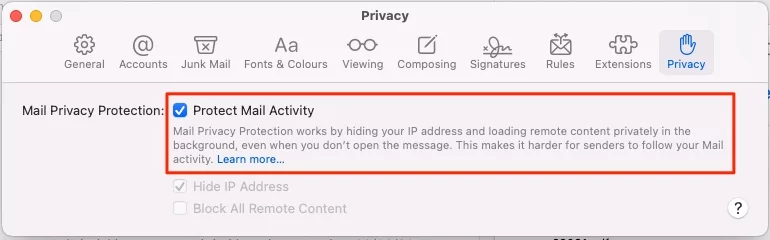
How to Enable Mail Privacy Protection in Mac, MacBook?
- Launch the Mail App on your Mac.
- Click on the Mail option in the top menu bar.
- Select Preferences.

- Select the Privacy tab.
- Enable Hide my IP or Block All Remote Content in Mail app on Mac.

- Or Click on the Protect Mail Activity next to Mail Privacy Protection.
- That’s it.


This setting will automatically enable on your iPhone or iPad mail app that’s signed in with the same apple id account. Follow the below steps to change Mail Privacy settings on iPhone.
How to Enable Mail Privacy Protection in iPhone?
- Open the Settings App on your iPhone.
- Swipe down to the Mail App, tap on it.
- Under the Messages section, select Hide my Address or Block All Remote content.

- Or Enable Privacy Protection that prevent from all mail tracking activity.
- Toggle Protect Mail Activity On.


That’s it.
Conclusion: New iOS and macOS comes with powerful security and Tracking system that Prevent from Tracking in Safari by Website. here’s what is icloud+, Features and Plans. Also, Turn on Private Relay from Tracking activity on Apple devices.