Notification on your iPhone alerts you whenever a new message appears and eliminates the need to open every individual app. But what if iPhone notification stops working after updating to the latest iOS? However, it’s always tough for individuals to pick point the reason behind the issue, but luckily, it is handy to fix if you have an exemplary array of solutions. Read this article to fix notifications not working on iPhones after the iOS update.
Get more tips on Notifications sound not working.
Here below are solutions you must try to fix it. But before that, know the possible reason behind the issue.
Causes for not getting App Notifications after updating to iOS 17
You are not receiving notifications on your iPhone right after updating to the latest iOS version. This could be due to various reasons; the common reason for this is disabled notification settings on your iPhone. If that’s what is on your device, it works normally once you enable Allow Notification for all installed apps. Besides this, it could also be due to enabled focus mode, schedule summary, disabled Background App Refresh, outdated app version, etc. Considering all the possible reasons, we have curated a list of troubleshooting tips to fix it.
Solution #1. Verify Allow Notifications Settings
Before performing any high-end solutions, it’s fair to check notification settings for the app if you do not receive notifications. To do so, follow the steps below.
Step 1: Launch the Settings App on your iPhone > Select Notifications.

Step 2: Swipe Down to Select Specific App under the Notifications Style > Enable Allow Notification > Enable Lock Screen > Disable Banners under Alerts Section.

Solution #2. Ensure Focus mode is disabled
Focus mode on Apple devices can silence notifications, even if you’re not actively using it. In case you’re not receiving notifications, it’s vital to check whether Focus Mode is disabled on your iPhone. To do so, follow the steps below.
Step 1: Access the Control Center > Tap on the Focus Mode to Deactivate it,

Once you disable Focus Mode on your iPhone, you should turn off automatic activation to make sure Focus Mode does not get enabled automatically. To do so, follow the steps below.
Step 1: Access the Control Center > Touch and Hold on Focus.

Remember, Focus Mode will be replaced by the name of Focus Mode if enabled.
Step 2: Select Three-Horizontal Dots next to the Focus Mode > Tap on Settings.

Step 3: Tap on Smart Activation > Select Delete Schedule.

Solution #3. Disable Schedule Summary
As we all know, the schedule summary feature helps you to manage notifications on your iPhone easily, and that’s without getting overloaded; it can inadvertently silence an alert you want to see immediately. Thus, we suggest disabling the schedule summary feature by following the steps below.
Step 1: Launch the Settings App on your iPhone > Select Notifications.

Step 2: Select Scheduled Summary > Disable Scheduled Summary.

Solution #4. Turn on the Background App Refresh
As of now and forever, iPhone apps rely entirely on background apps to stay updated and receive timely notifications. But if this feature is disabled for an app, it won’t deliver notifications. Hence, we suggest turning on Background App Refresh by following the steps below.
Step 1: Launch the Settings App on your iPhone > Select General.
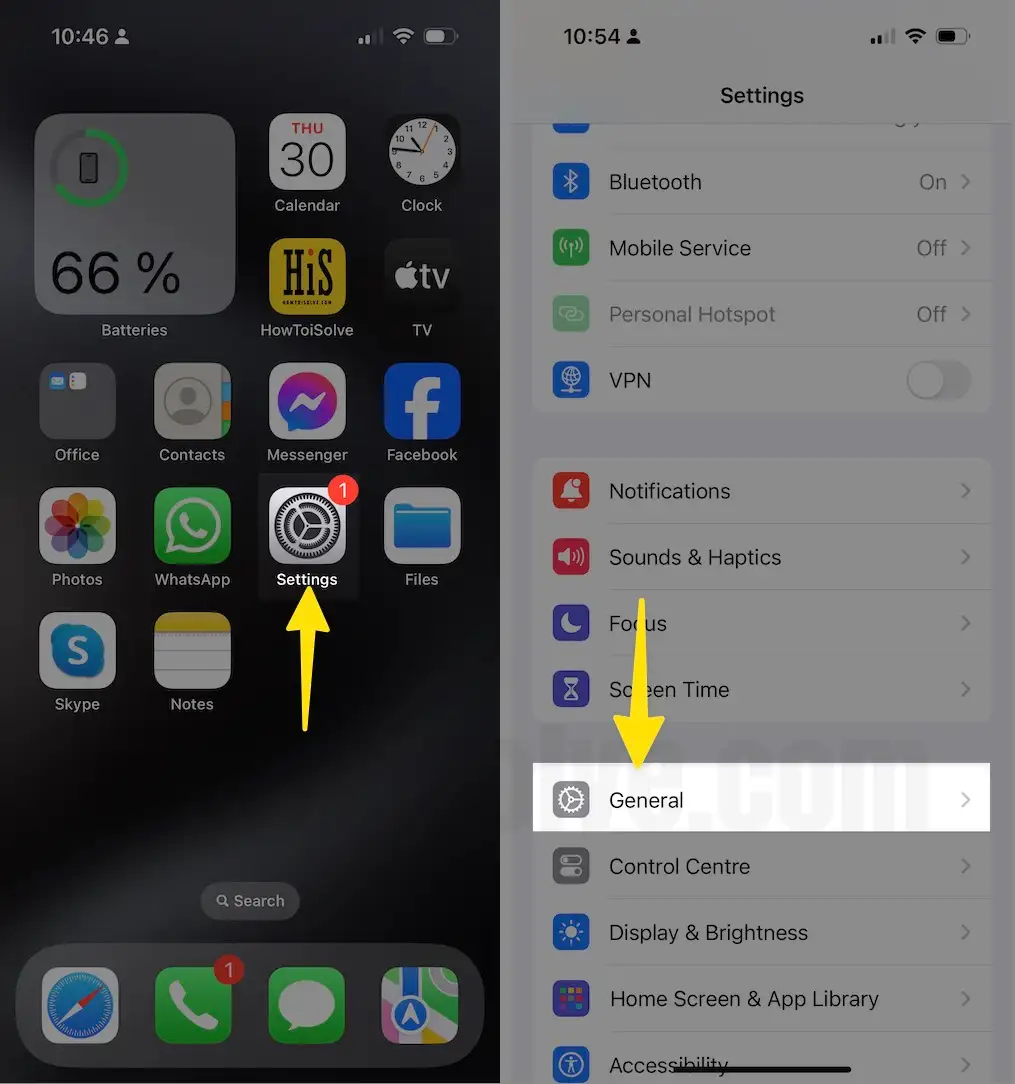
Step 2: Select Background App Refresh > Click on Background App Refresh.

Step 3: Choose Wi-Fi & Mobile Data > Hit Back from the Top Left Corner > Enable Specific App.

Also Read:- Group Notifications not working on iPhone, iPad, Apple Watch
Solution #5. Update – [Re-install app]
Before re-installing the app, we suggest checking the problematic app version. For this, follow the steps below.
Step 1: Launch the App Store on your iPhone > Tap on the Profile Icon from the right corner > Scroll down and Select the Update option next to the problematic app, if available.

But if no update is available, it’s time to reinstall the app. That’s because the bug within the app can cause various problems, including app notifications not working on iPhones. Here’s how.
Step 1: Touch and hold the problematic app icon > From the Pop-Up Menu, Select Remove App.

Step 2: From Remove “App Name”? Removing from the Home Screen will keep the app in your App Library pop-up, Tap on Delete App > Now, From Delete “App Name”? Deleting this app will also delete its data” pop-up, Select Delete.

Solution #6. Check if an app is allowed to use Cellular Data
Is the notification issue with a particular app? If so, it’s possible that you have restricted the app from using cellular data on your iPhone. To check it, follow the steps below.
Step 1: Launch the Settings App on your iPhone > Tap on Mobile Service > Scroll down to the Mobile Data Section and Check whether the toggle next to the problematic app is enabled.

Solution #7. Check for software update
If there is a pending update on your iPhone, ensure to install it immediately. More often than not, an outdated version of iOS can be the possible reason why iPhone notifications not working. To do so, follow the steps below.
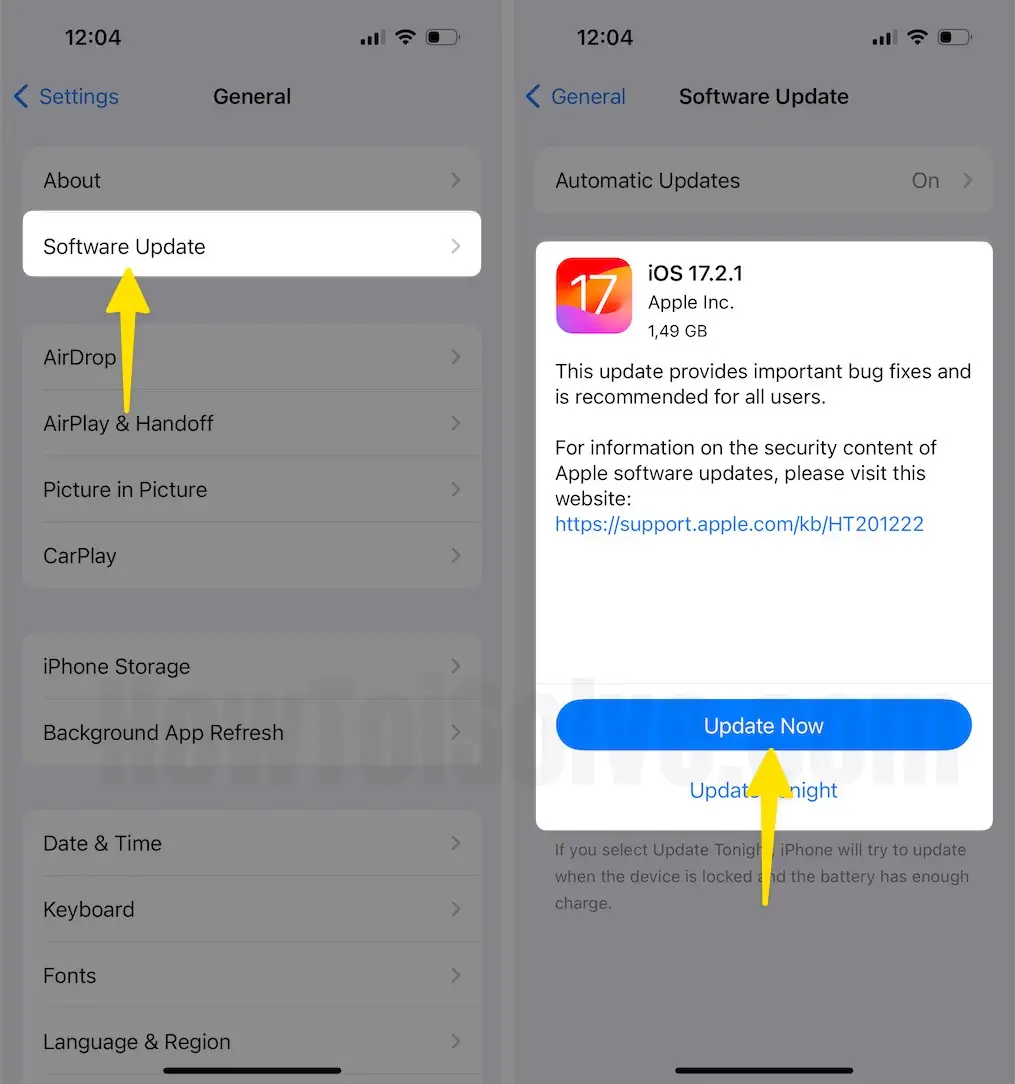
Step 1: Launch the Settings App on your iPhone > Tap on General.

Step 2: Select Software Update > Tap on Update Now.
Solution #8. Disable Low Power Mode
Although Low Power Mode is a useful feature to prevent battery-draining problems, it does so by restricting various features, including notifications. To turn it off, follow the steps below.
Step 1: Launch the Settings App on your iPhone > Tap on Battery > On the next screen, Disable Low Power Mode.

Solution #9. Turn off Low Data Mode
Step 1: Launch the Settings App on your iPhone > Tap on Mobile Service.

Step 2: Select Mobile Data Options > Tap on Data Mode.

Step 3: Uncheck Low Data Mode and Choose Standard as Data Mode > Hit Back from the left top corner > Standard as Data Mode > Hit Back From Mobile Data Options.

Step 4: After this, Head to Settings > Select Wi-Fi > Tap on the info icon next to the connected Wi-Fi > Disable Low Data Mode.

Solution #10. Reconnect WiFi or Cellular Connection
Yet another possible reason why you are not receiving after updating your iOS is a corrupted or unstable internet connection. In this scenario, simply turn off the Cellular Connection or WiFi, then wait a few seconds and enable it again. Doing so will resolve delayed or no notification problems.
Solution #11. Check Network-related problem
If you’re still unsure whether the mobile data or WiFi to which you’re connected is working correctly or not, then we suggest turning off Airplane Mode and then on. Apart from this, you can also restart your WiFi router in case you’re connected to WiFi.
LED Flash notifications not working on iOS
Step 1: Launch the Settings App on your iPhone > Select Accessibility.

Step 2: Select Audio & Visual under Hearing Section > Tap on LED Flash for Alerts > Enable LED Flash for Alerts.

Solution #12. Hard reboot your device
I am recommending this for those unable to view, Open, or Dismiss Notifications on iPhone
- Press and Quickly Release Volume Up button,
- Press and Quickly Release the Volume Down Button,
- Press and Hold the Side Button until you see the Apple logo on the Screen.
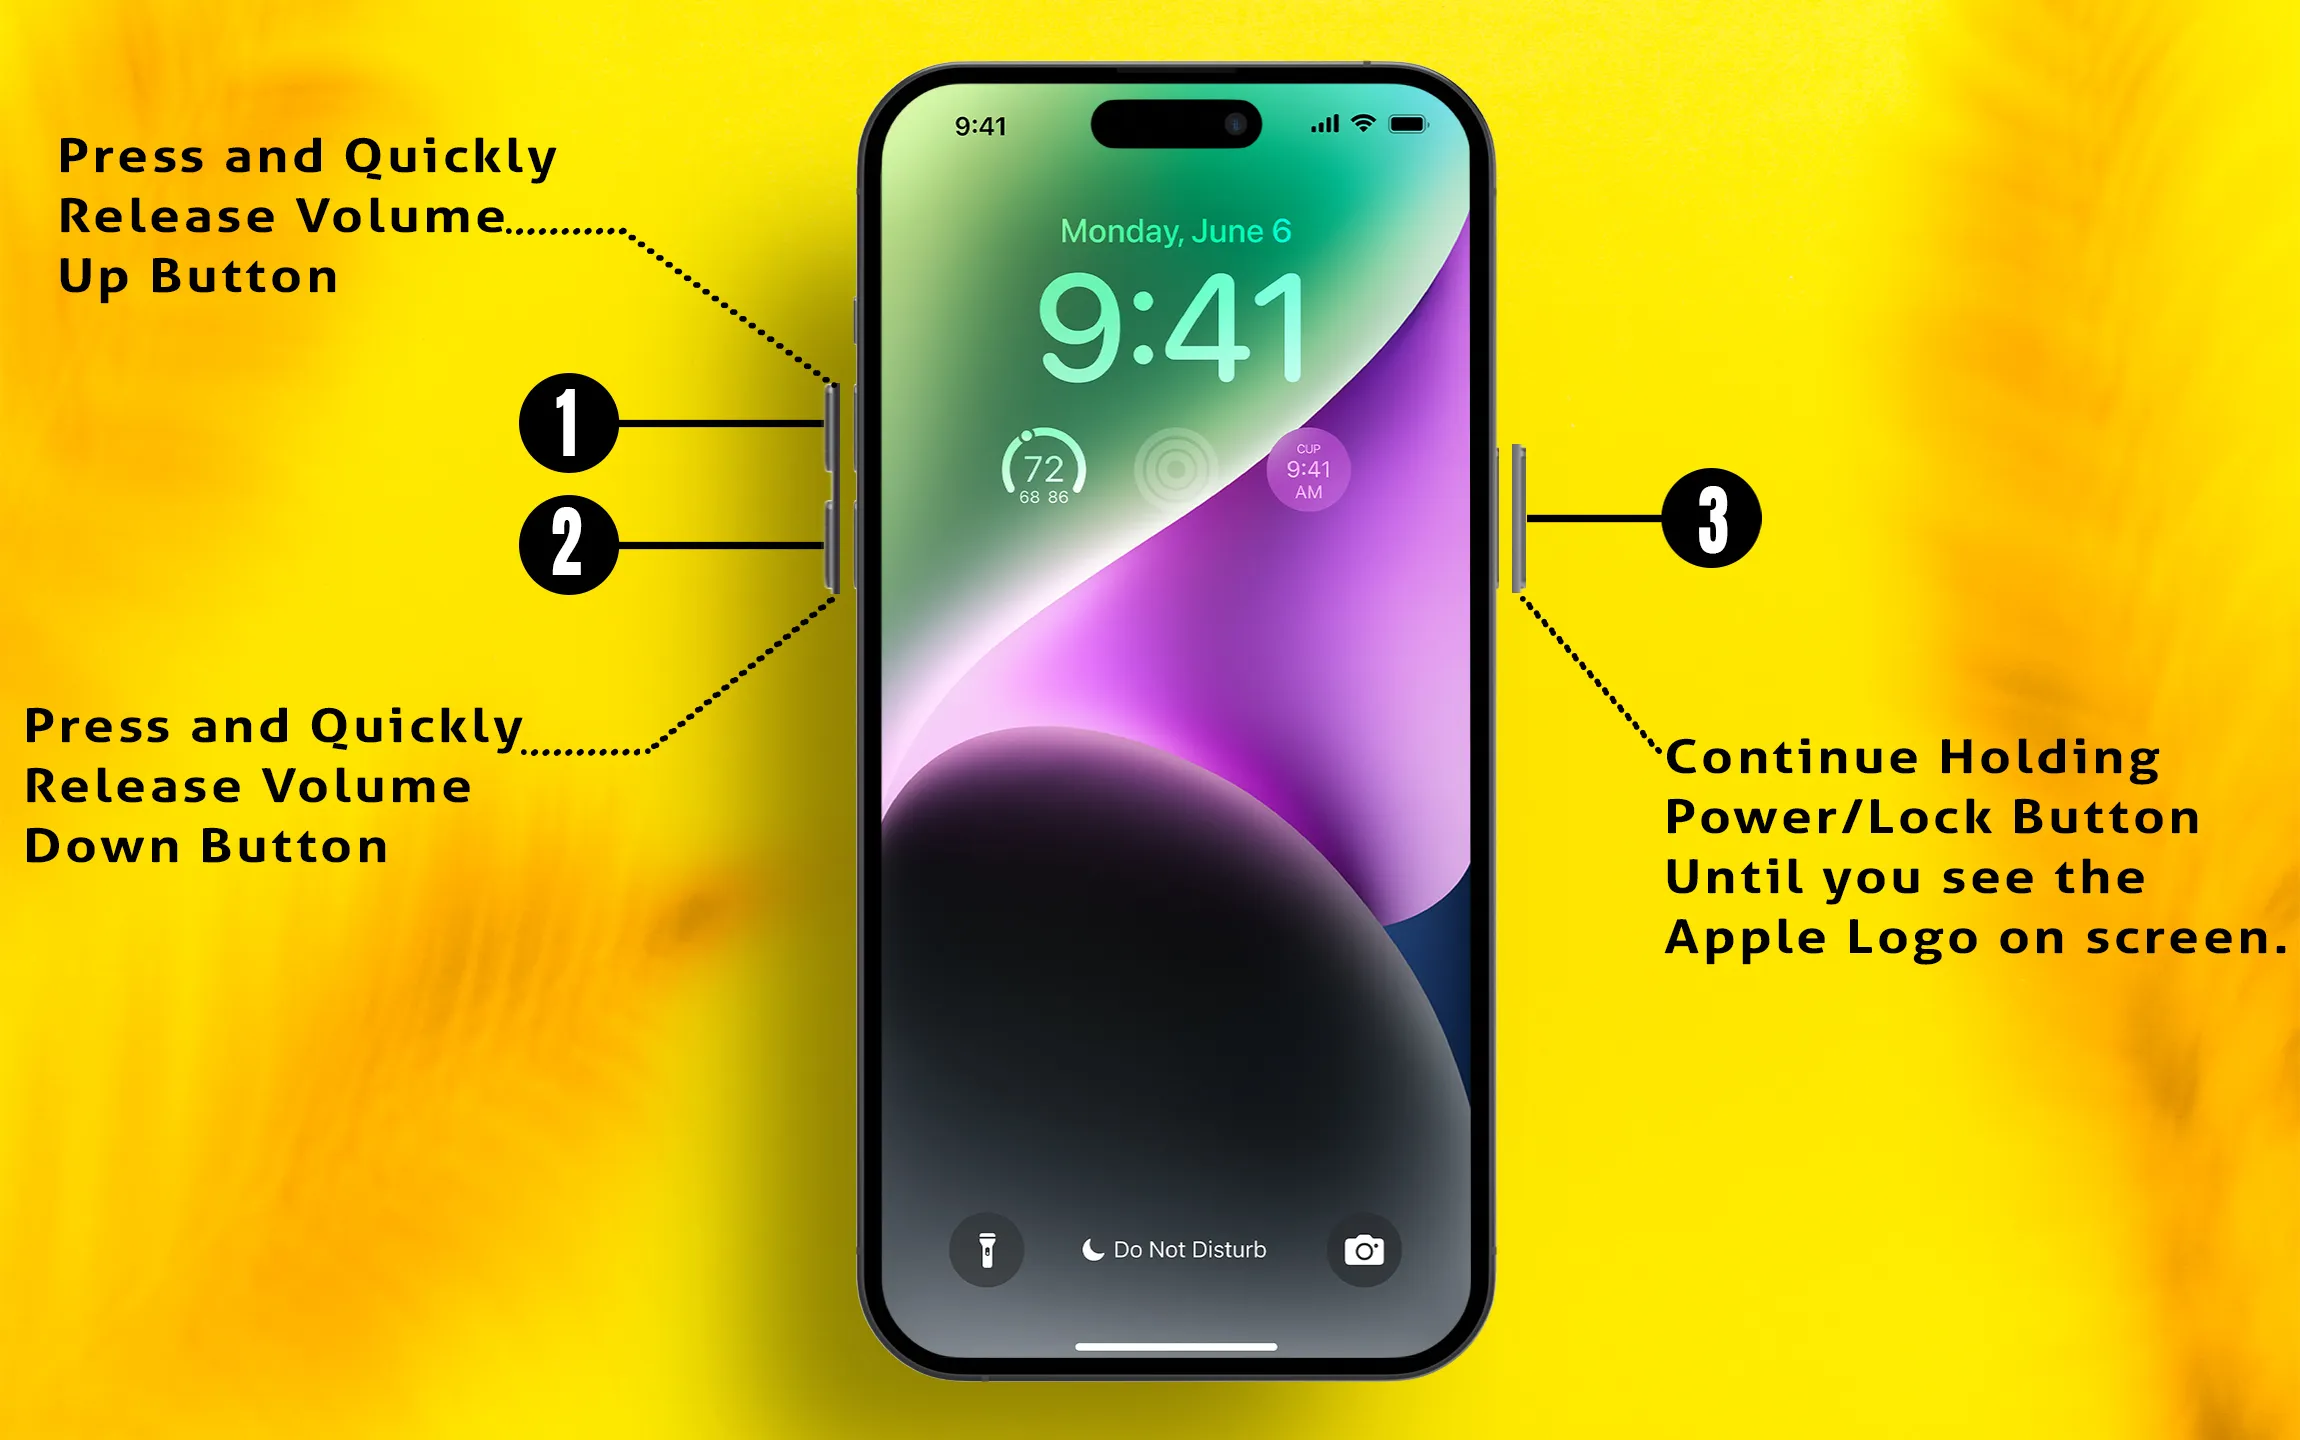
To start the iPhone, press the Side button again until the startup Apple logo is on the screen.
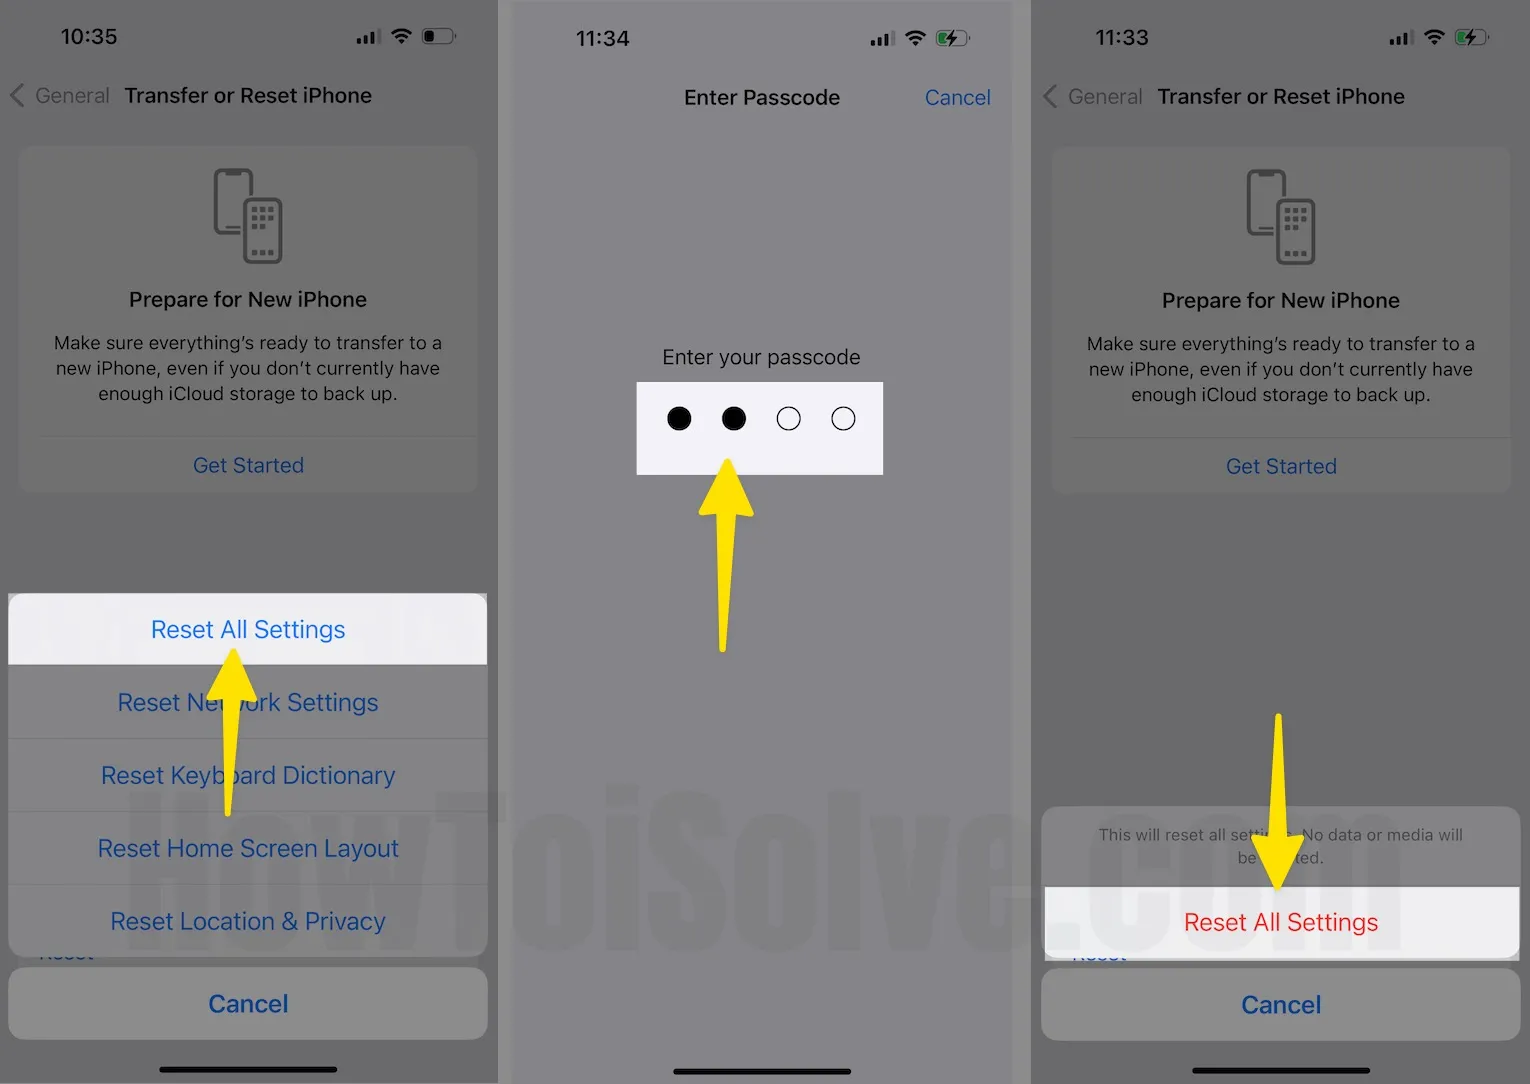
Solution #13. Reset All Settings
If you have tried all the possible solutions and iPhone notifications are still not working, resetting all settings will resolve the problem. To do so, follow the steps below.
Step 1: Launch the Settings App on your iPhone > Select General Option.

Step 2: Select Transfer or Reset iPhone > Click on Reset.
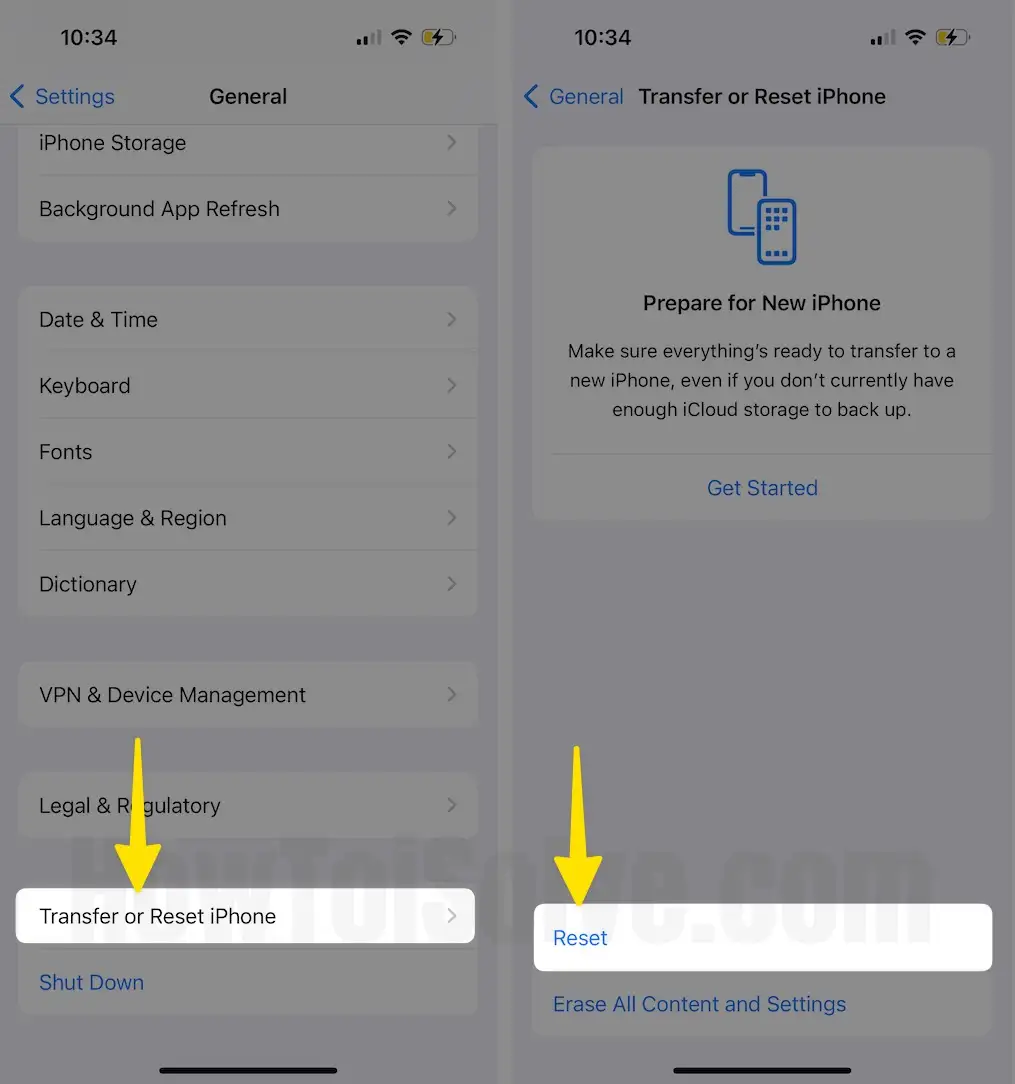
Step 3: Choose Reset All Settings > Enter your iPhone lock screen passcode > From the pop-up Menu for Confirmation, Select Reset All Settings.
Solution #14. Contact Apple Support
If none of the solutions work for you and got frustrated with a delay notification issue on your iPhone after updating to the latest iOS, then it’s time to contact an expert. That’s because it’s the only solution left around. Besides this, they will help you diagnose the reason behind the issue and accordingly offer you a solution. There are different ways to contact them; you can read our article on how to contact Apple Support Team.
Final Verdict!
That’s It! This is how you can fix iPhone notifications not working after updating to the latest iOS version. Further, if you have a troubleshooting tip that needs to be mentioned in the article, please drop it in the comment box below.
