The finder search of Mac is a handy tool as it allows the users to search for files and folders just by typing their names in the search bar. The Finder uses icons and windows to display the contents of the Mac, iCloud Drive, and other storage devices. It is a convenient tool and helps users to organize their files. But sometimes, due to bugs or other reasons, the documents not showing up in finder or finder search malfunctions and does not work correctly.
The problem of Mac finder search not working can be a nuisance as the files you search for don’t appear, leading to inefficiency and wastage of time. Therefore, we have compiled this great list of ways using which you can fix the issue of finder search not working on MacBook.
How Do I Search in Finder on Mac?
Finder search in Mac works just like Spotlight search but that’s for specific Folder and Your Mac only. To search in Finder Mac, Click on the Search icon in the left-right corner of the window.
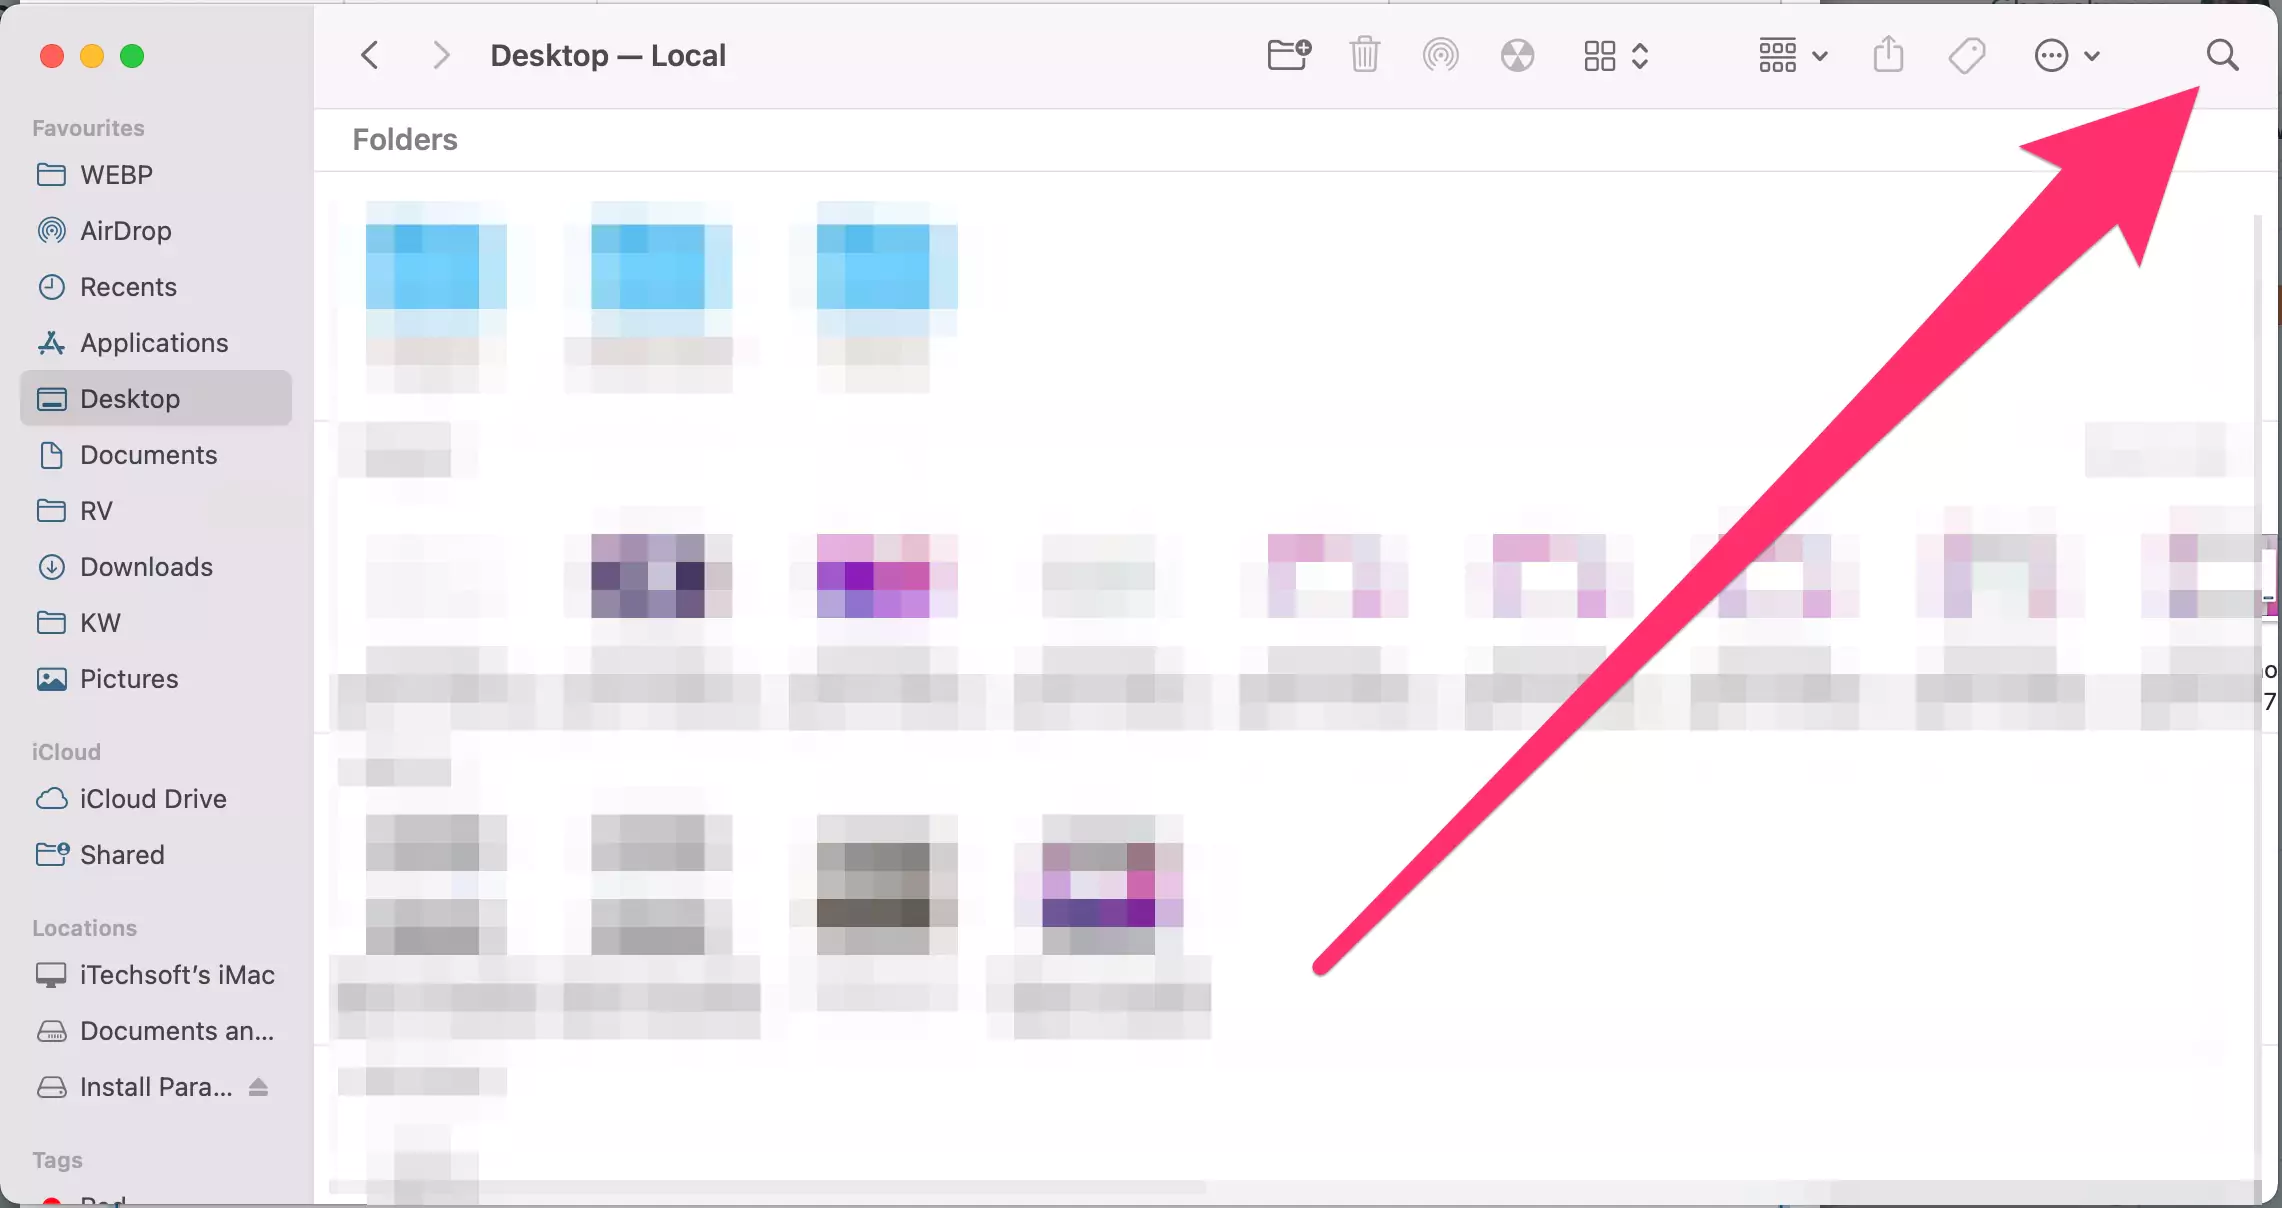
Type the Text that you want to find, like the File or Folder name, File Extension [PDF, PNG, JPEG and Mp4, MOV, and more.].
Once you click on Return from the keyboard to search in Finder, By default, you will get a result from Whole Mac; that’s selected This Mac Option. Switch to the current folder to Change search location without Re-try or Re-search.

That’s it. To fix the issue from the Finder search, Follow the below Troubleshooting.
Solution. 1→ Safe boot your MacBook
Booting up your MacBook in safe mode can solve the problem of finder search not working correctly. Booting up the MacBook in safe mode is a straightforward process and can be done in just a few minutes. Since the new M1 chipset launch, it is necessary to talk about booting up the Mac in safe mode for both M1 and Intel chipsets.
Before we get into the process of booting up your Mac with an M1 chip in safe mode, make sure to shut down your device if it is turned on. Once you have shut down the MacBook, follow the steps described below to boot up your M1 Mac in safe mode.
Step. 1→ First, normally start up your MacBook by pressing the power button and keeping the power button pressed until you see the startup options on the screen.
Step. 2→ Now, choose the startup disk of your Mac and long-press the shift key until you see the option of “Continue in Safe Mode” and click on it.

Step. 3→ Then, release the shift key and let the Mac turn on.
After following these steps, your Mac will be booted in safe mode, and a text saying “safe boot” will be visible at the top right corner of the screen, indicating that safe mode has been enabled. Now try using the finder search again to check if the problem has been solved.
If your MacBook is powered up, make sure to shut it down. After shutting down the Mac, follow these straightforward steps to boot up your device in safe mode.
Step. 1→ Normally, press the power button to turn on your Mac.
Step. 2→ Now press and hold the shift key as soon as you press the power button.
Step. 3→ Then, release the shift key as soon as the login window appears on your screen.
Step. 4→ Finally, log in to your Mac like you usually do.
This process will boot up the Mac with the intel chipset in safe mode. Once you have booted up the MacBook in safe mode, open the Finder again and search for files and folders to monitor the proper functioning of the finder search tool.
Solution. 2→ Check Spotlight Search settings
Checking your Mac’s spotlight search settings might help solve the problem of finder search not working as the Finder uses the same search index as that of the spotlight search. Go through the procedure described below for easy access to check the spotlight search settings.
On MacOS Ventura:-
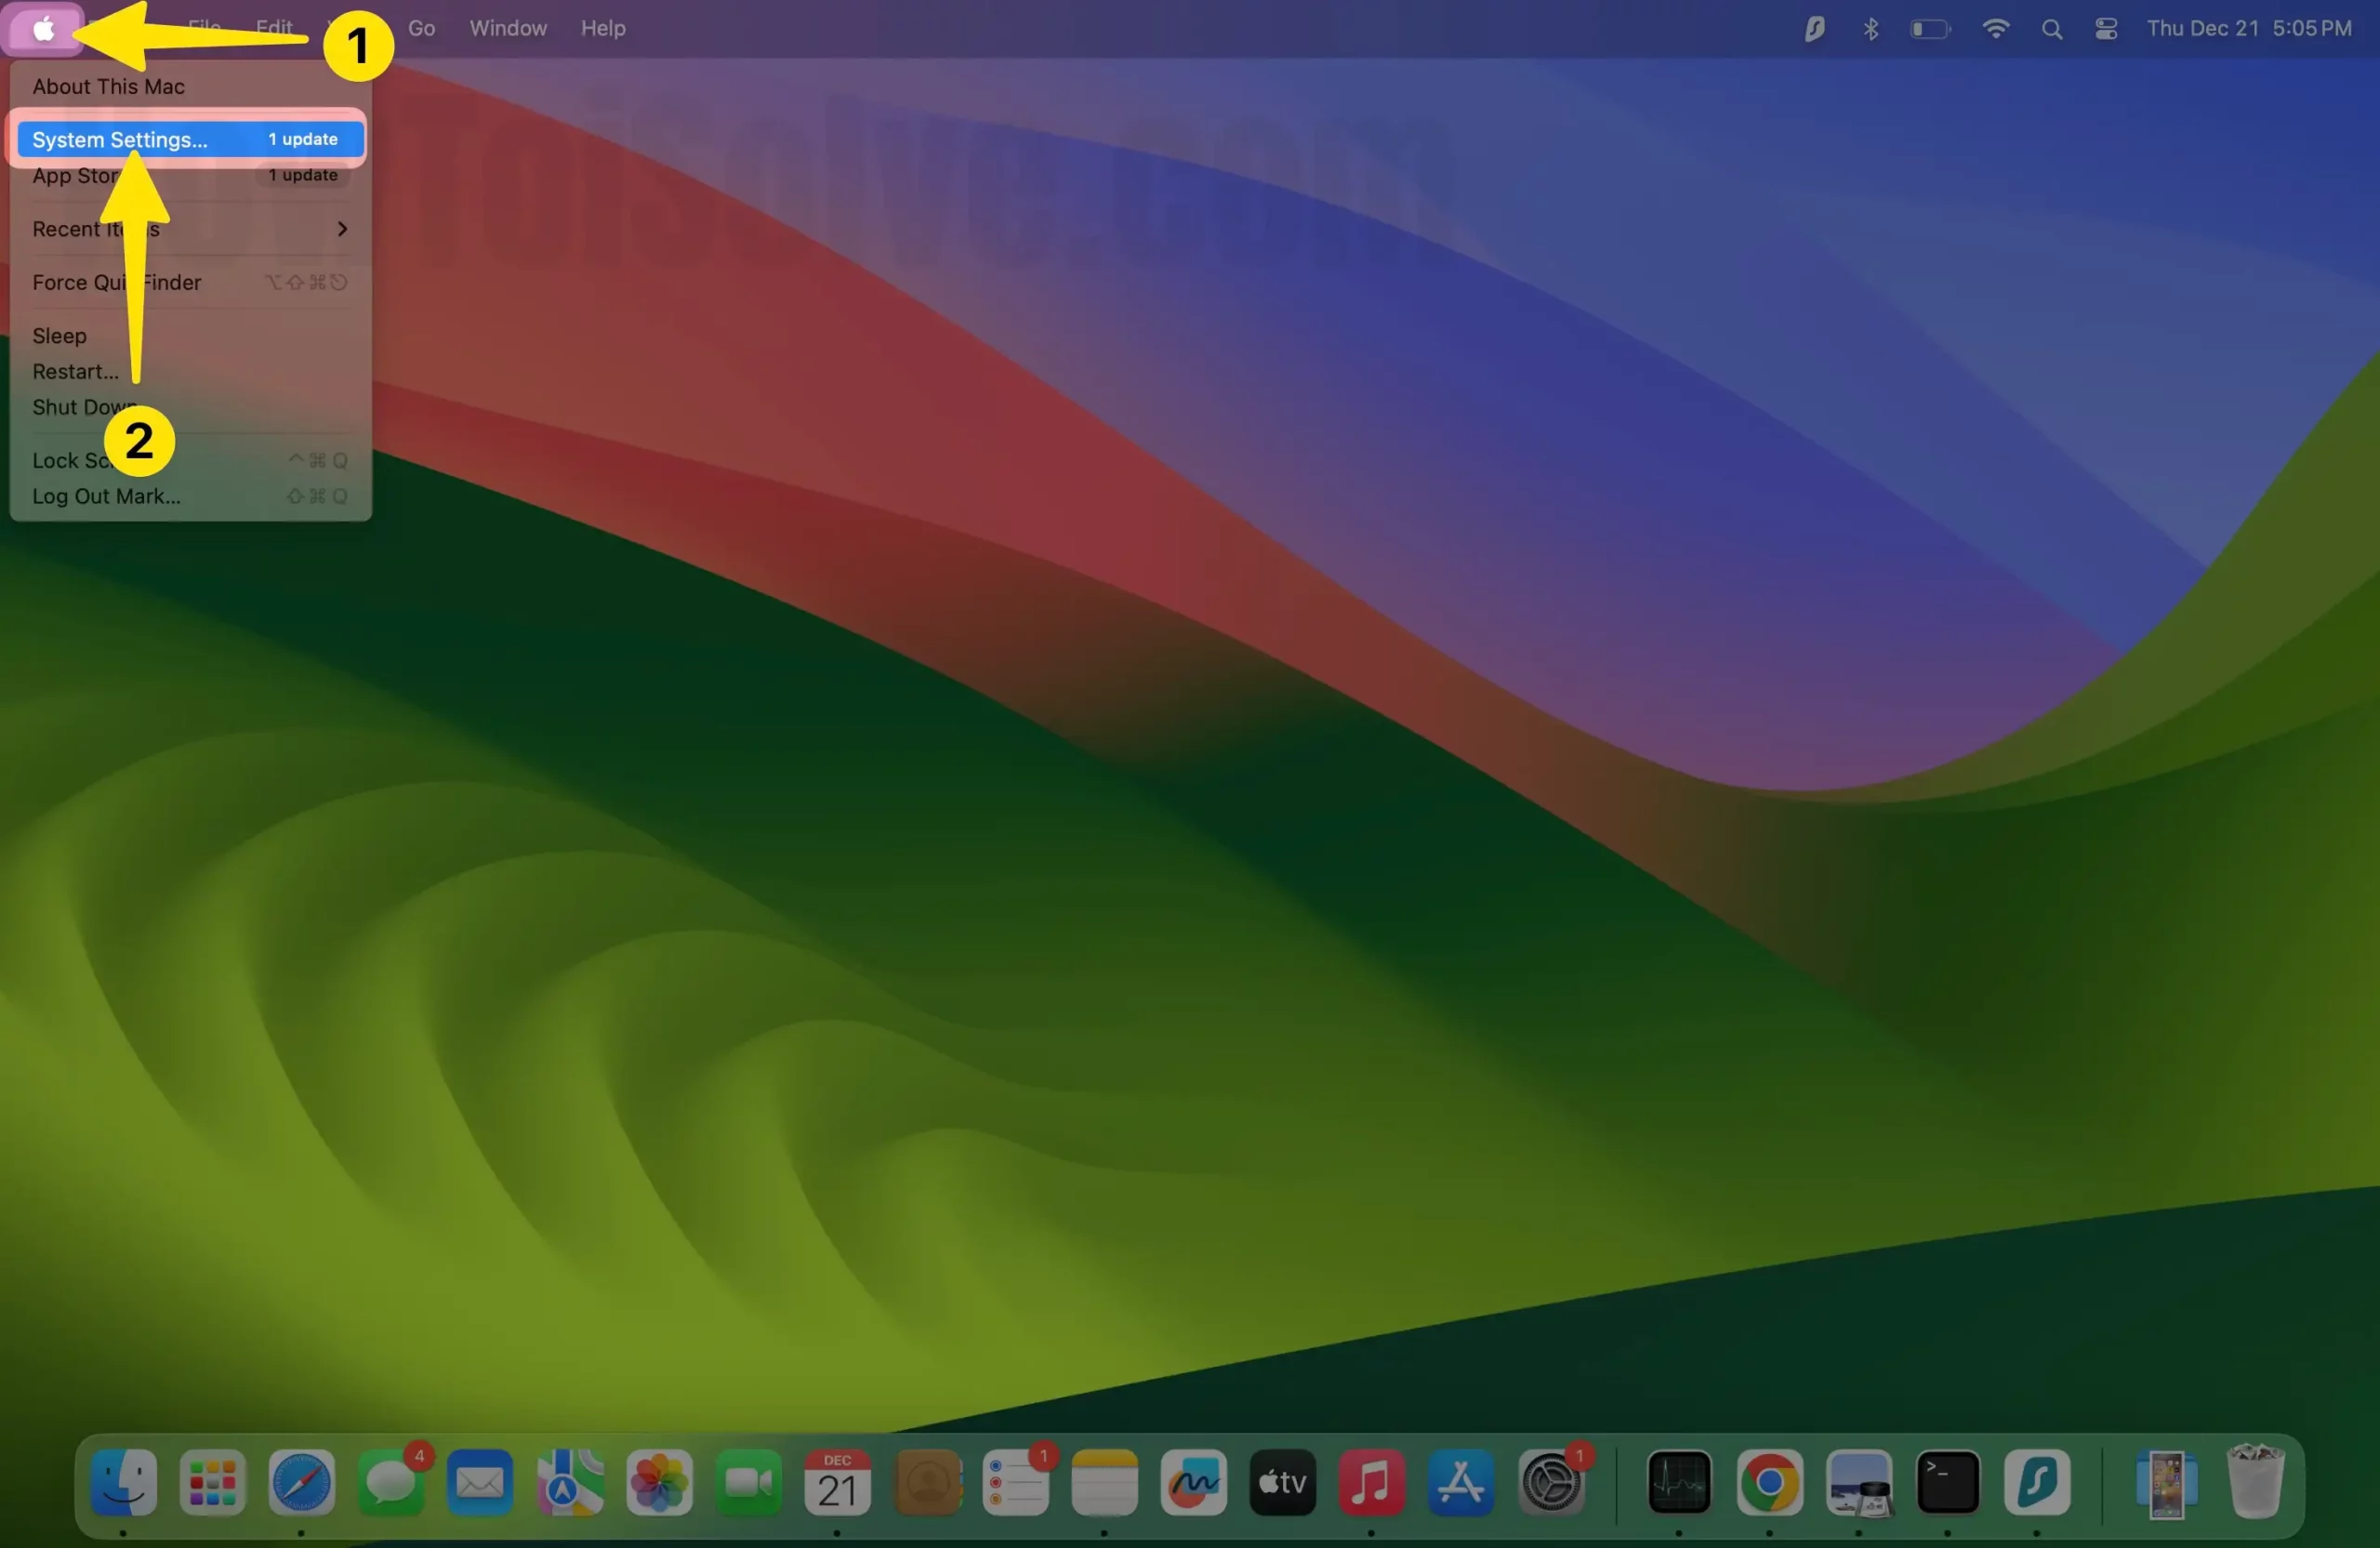
1. Go to the Apple logo from the top mac menu and Click on System Settings.
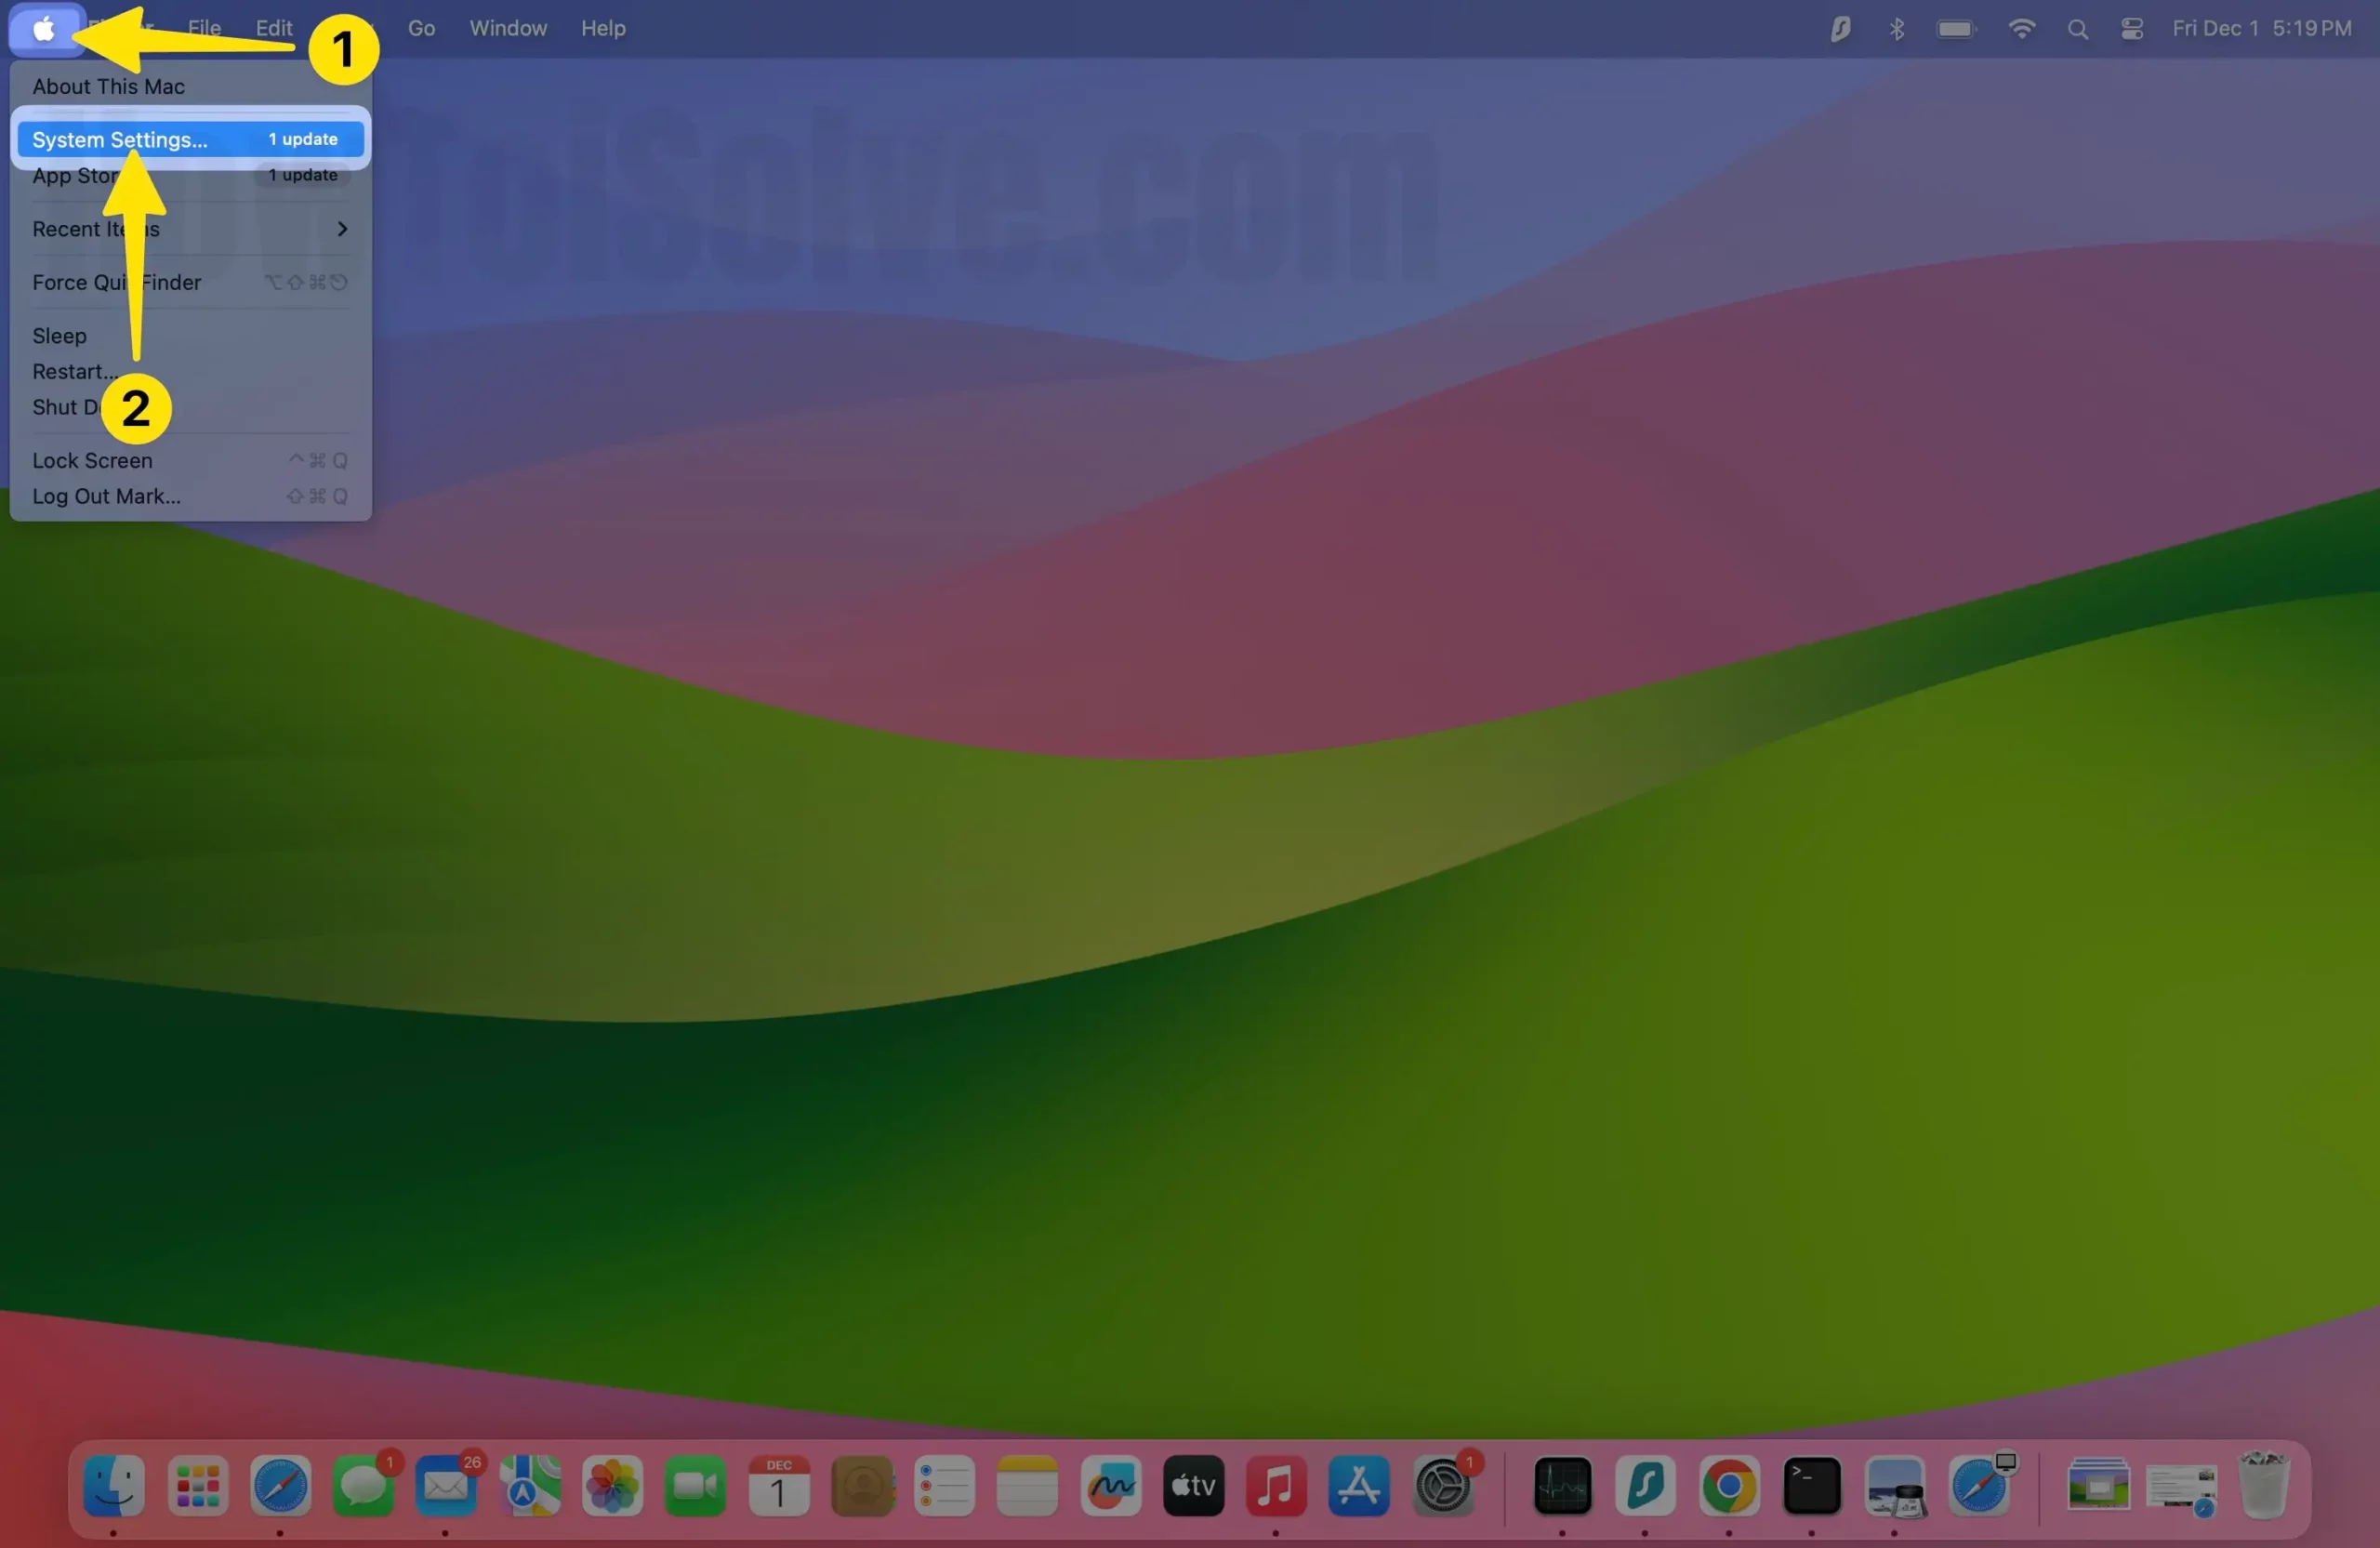
2. Find and Option Siri & Spotlight Option > See the list of categories, for Spotlight “Search Results that “Only selected categories will appear in Spotlight search results.”

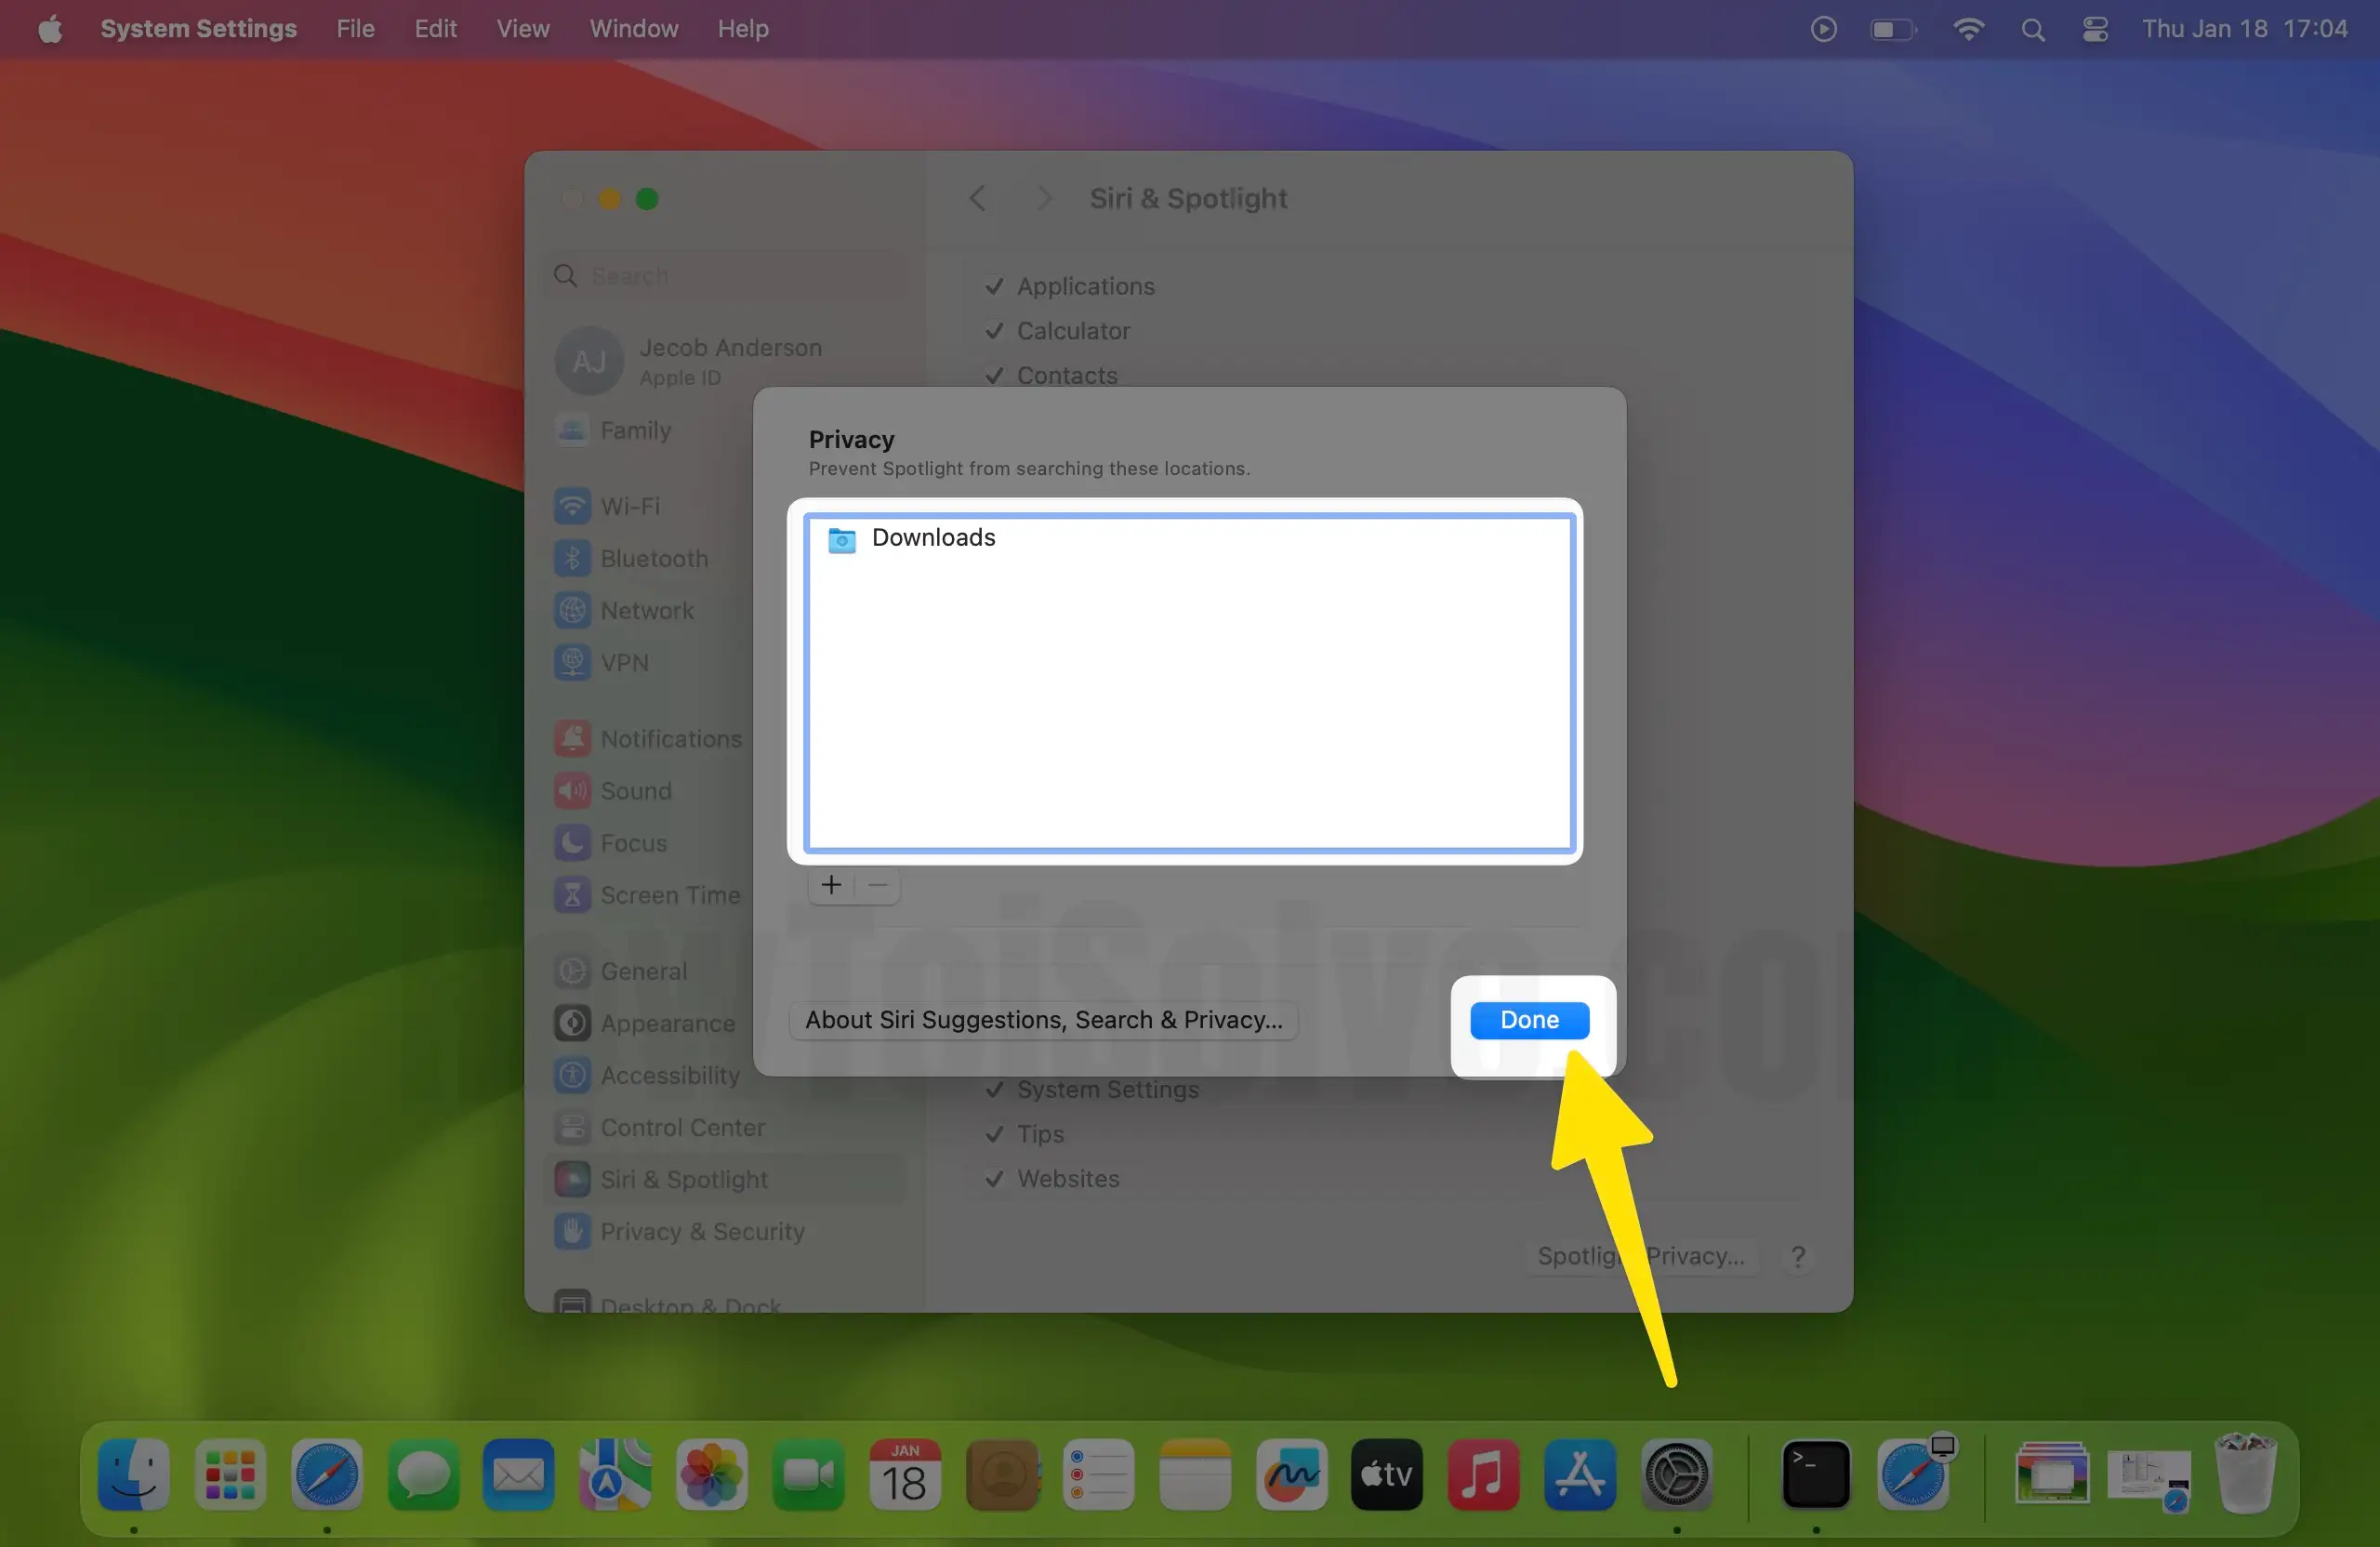
3. Now, Click on “Spotlight Privacy…” to Exclude or Prevent Spotlight from searching these locations. Click on “+” button to add your Folder location. Done to save.

4. Select the select folder and click on the choose option on Mac.

5. Now, click on the Done Button in the Finder app.
That’s it.
On MacOS Monterey & Earlier:-
Step. 1→ Tap on the Apple Logo icon at the top left corner of the screen.
Step. 2→ Select system preferences from the different options available in the drop-down menu.
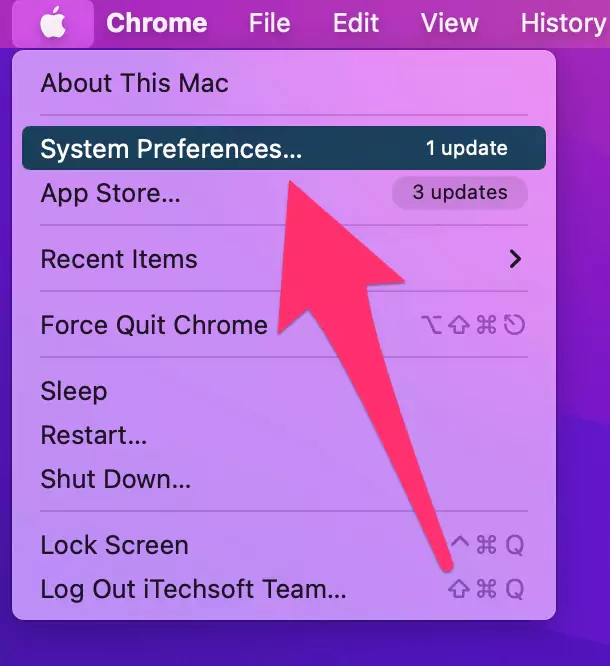
Step. 3→ Then, click on the spotlight

Step. 4→ and go to Privacy.

In the privacy menu, check if the folders or files listed there are to be excluded or not, as the Finder will only look for files that are indexed in the spotlight. So, if the file you are searching for is excluded from the spotlight index, you will not be able to see the results for that search. Therefore, make sure that the excluded files are not the ones you want the Finder to look for on your Mac.
Solution. 3→ Using Terminal Rebuild indexing
If the finder search does not function properly, the users can try to rebuild the index of the spotlight app as the Finder works on the same index as the spotlight. The process of rebuilding the spotlight index is very easy and convenient and can be done by using the help of the terminal app. Before getting into the process, make sure that you have turned on your Mac in safe mode. If not, go through the steps mentioned in Solution 1 to start your MacBook in safe mode. After safe boot, take note of the method explained below for rebuilding the index of the spotlight using the terminal app.
Step. 1→ Launch the terminal app by clicking on the launchpad icon in the dock and typing terminal in the search bar.

Step. 2→ Then, in the terminal app, type in the command sudo mdutil -E /
Step. 3→ The users can also use the command “sudo mdutil -i on /” for only reindexing the external drives connected to their device.

Step. 4→ Type in your Mac password if the terminal app asks for it and press enter.

The rebuilding of the spotlight index will initiate after properly completing this method. Note that the rebuild indexing process can take a lot of time, depending on the size of the data you are indexing. Once the indexing process is complete, go to Finder and see if the search bar shows the results you want.
Solution. 4→ Change the default search in Finder
Another solution to fix the problem of finder search not working on Mac is to change the default search in the finder tool. This solution is very quick and easy to implement by going through the steps mentioned below.
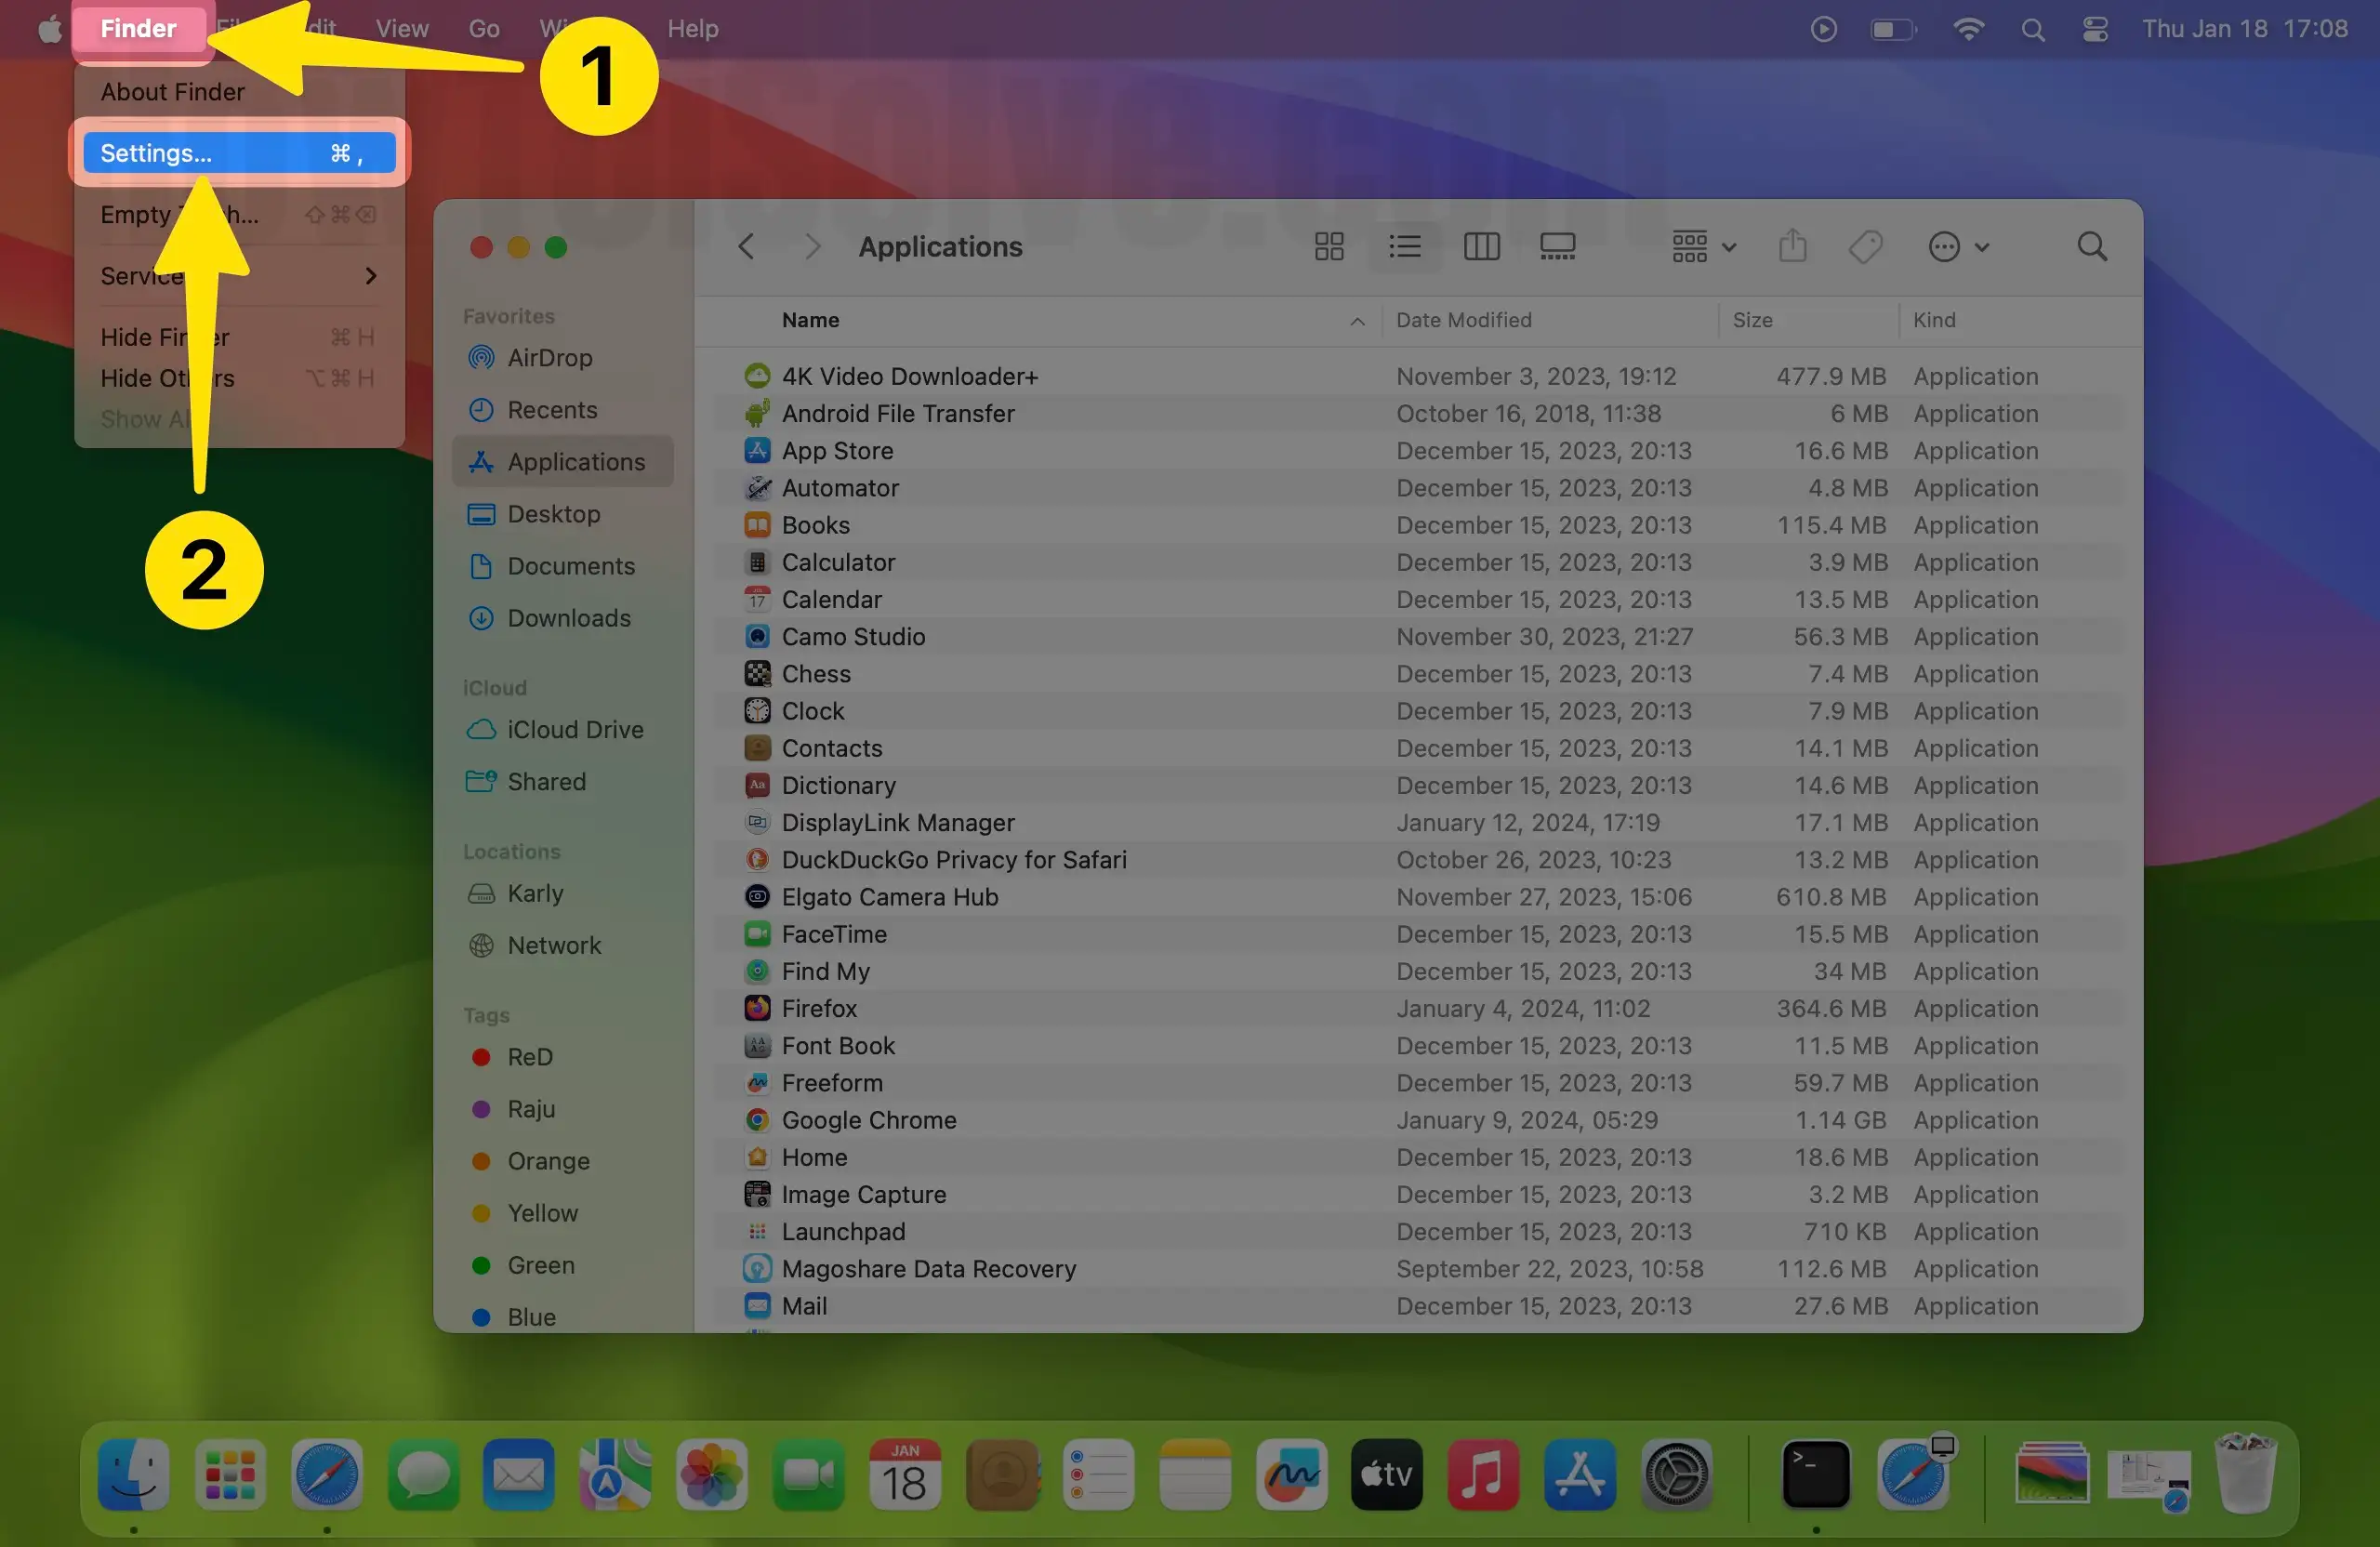
1. Open the Finder on your MacBook.
2. Then, go to the preferences/Settings [on macOS Ventura] of the finder app.
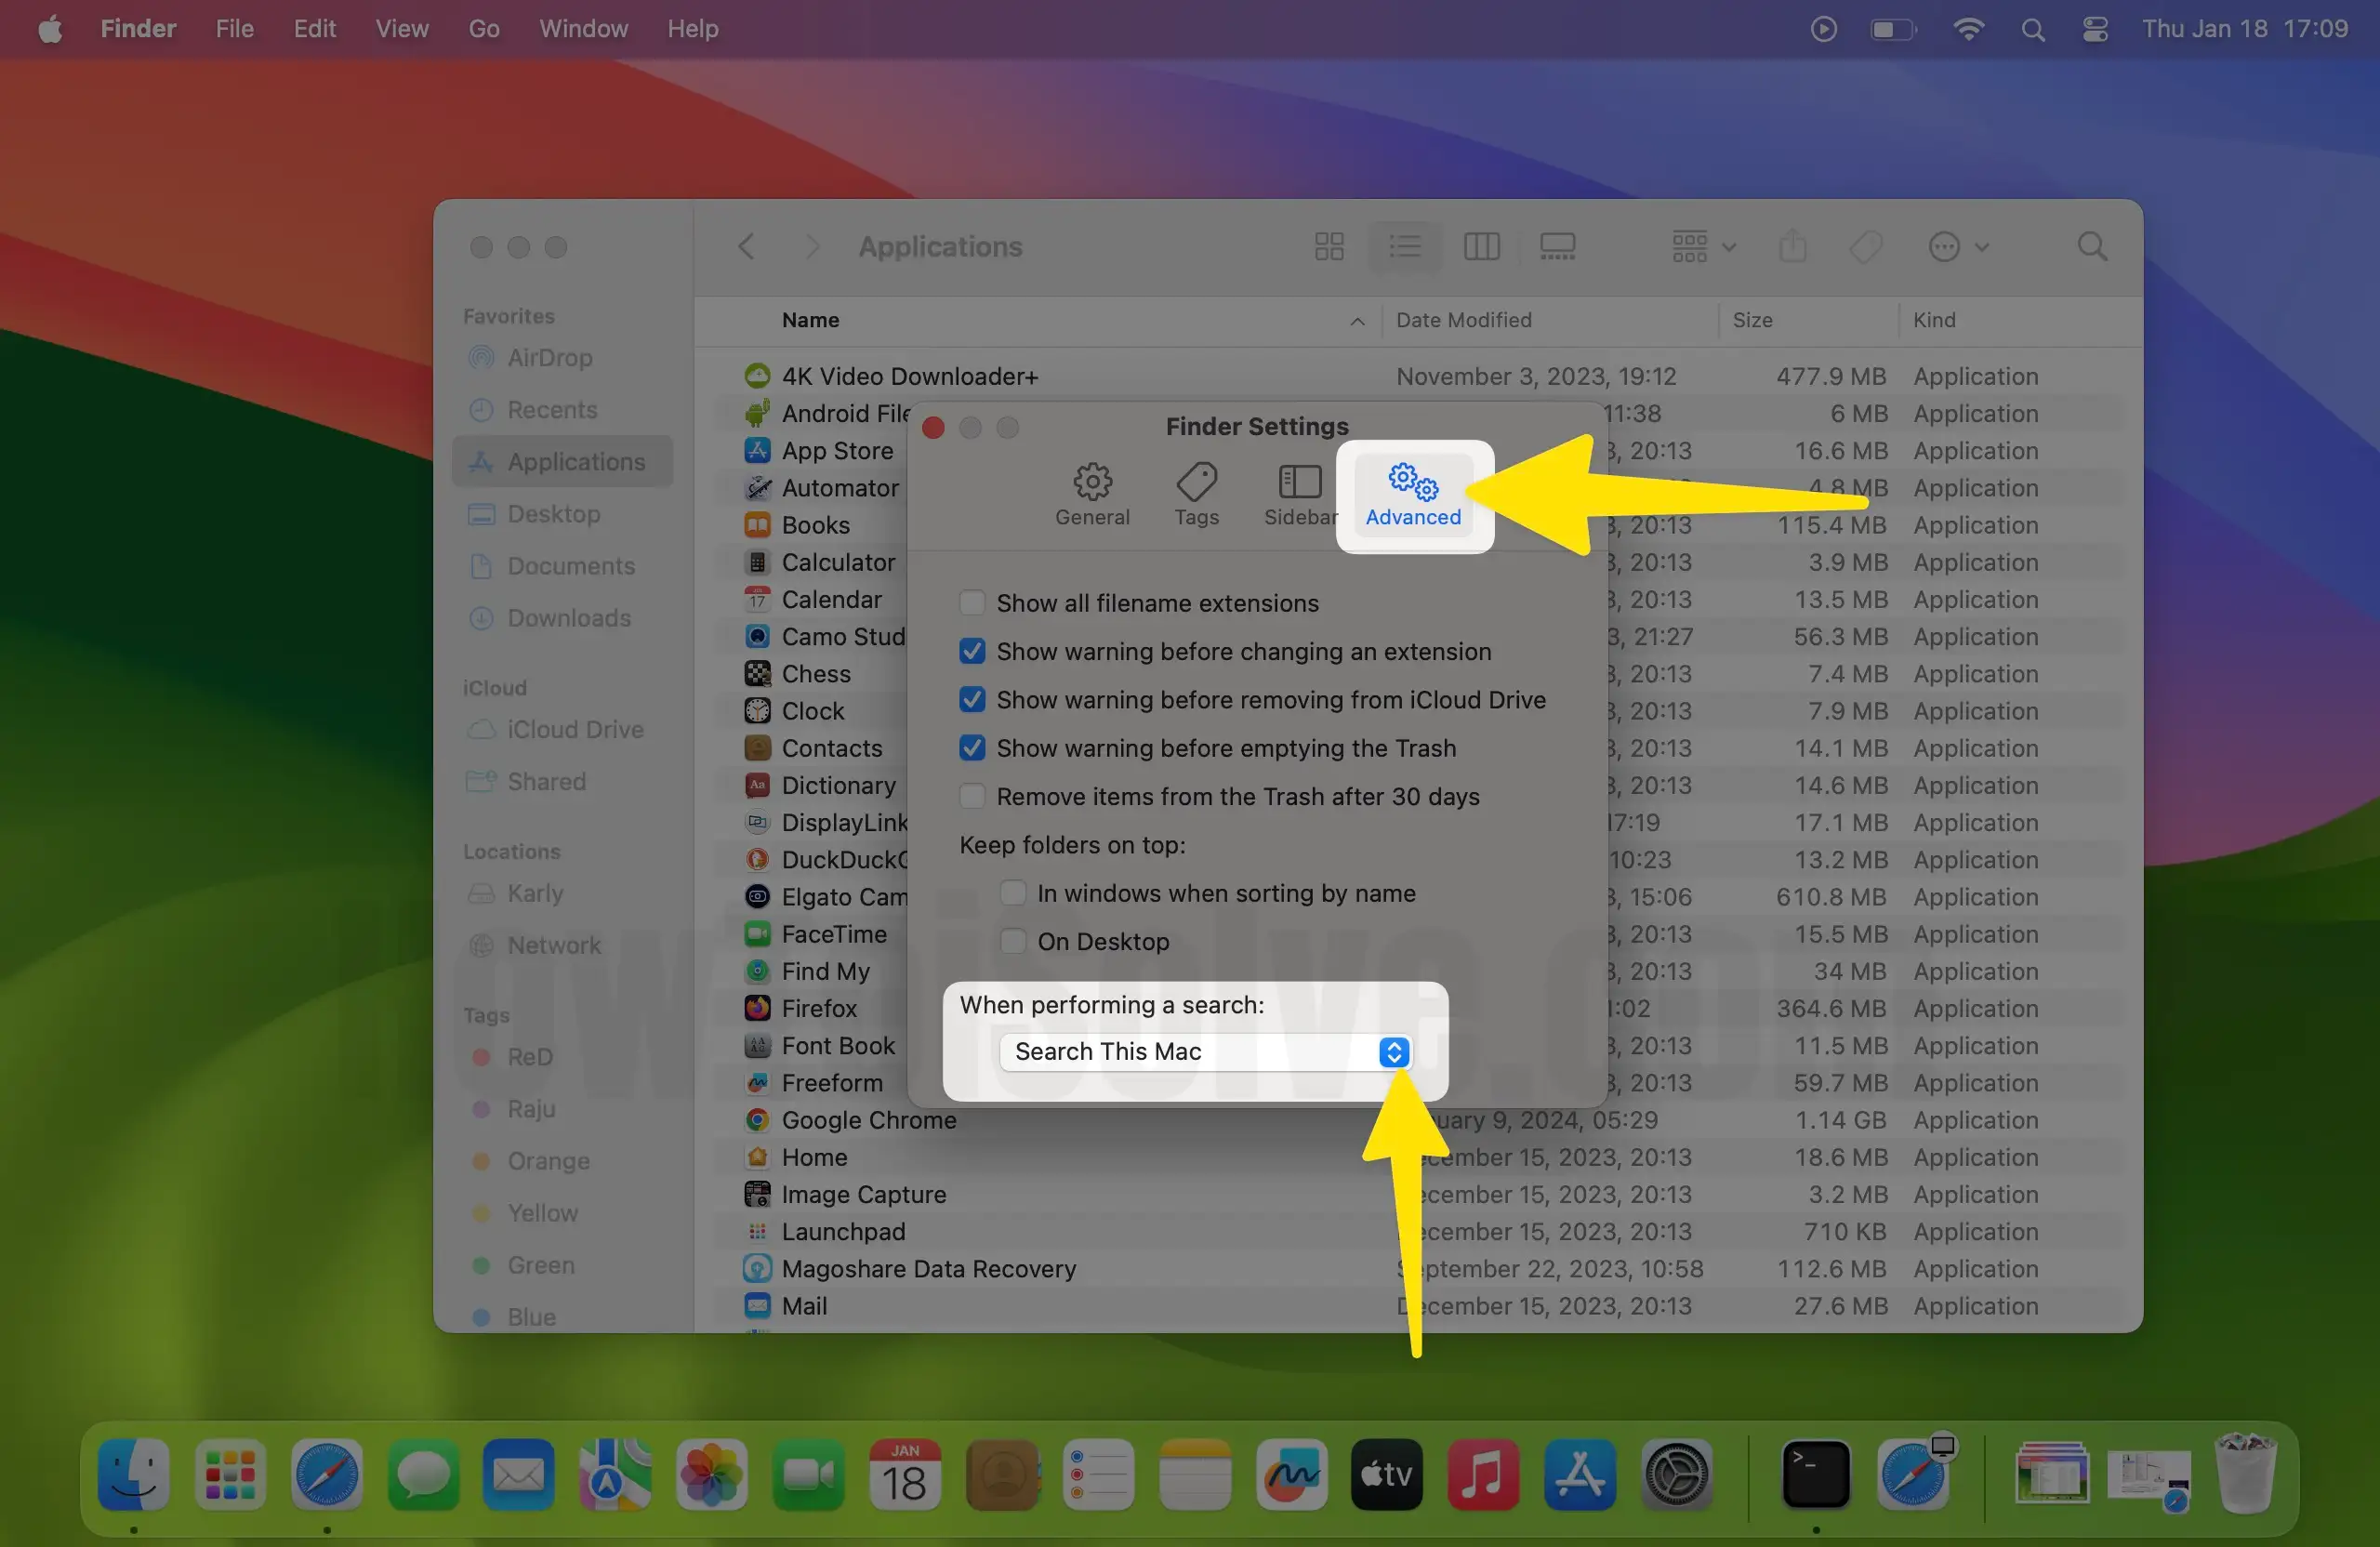
3. Hover to the advanced settings and look for the option at the bottom labeled as “When performing a search.” Click on it.
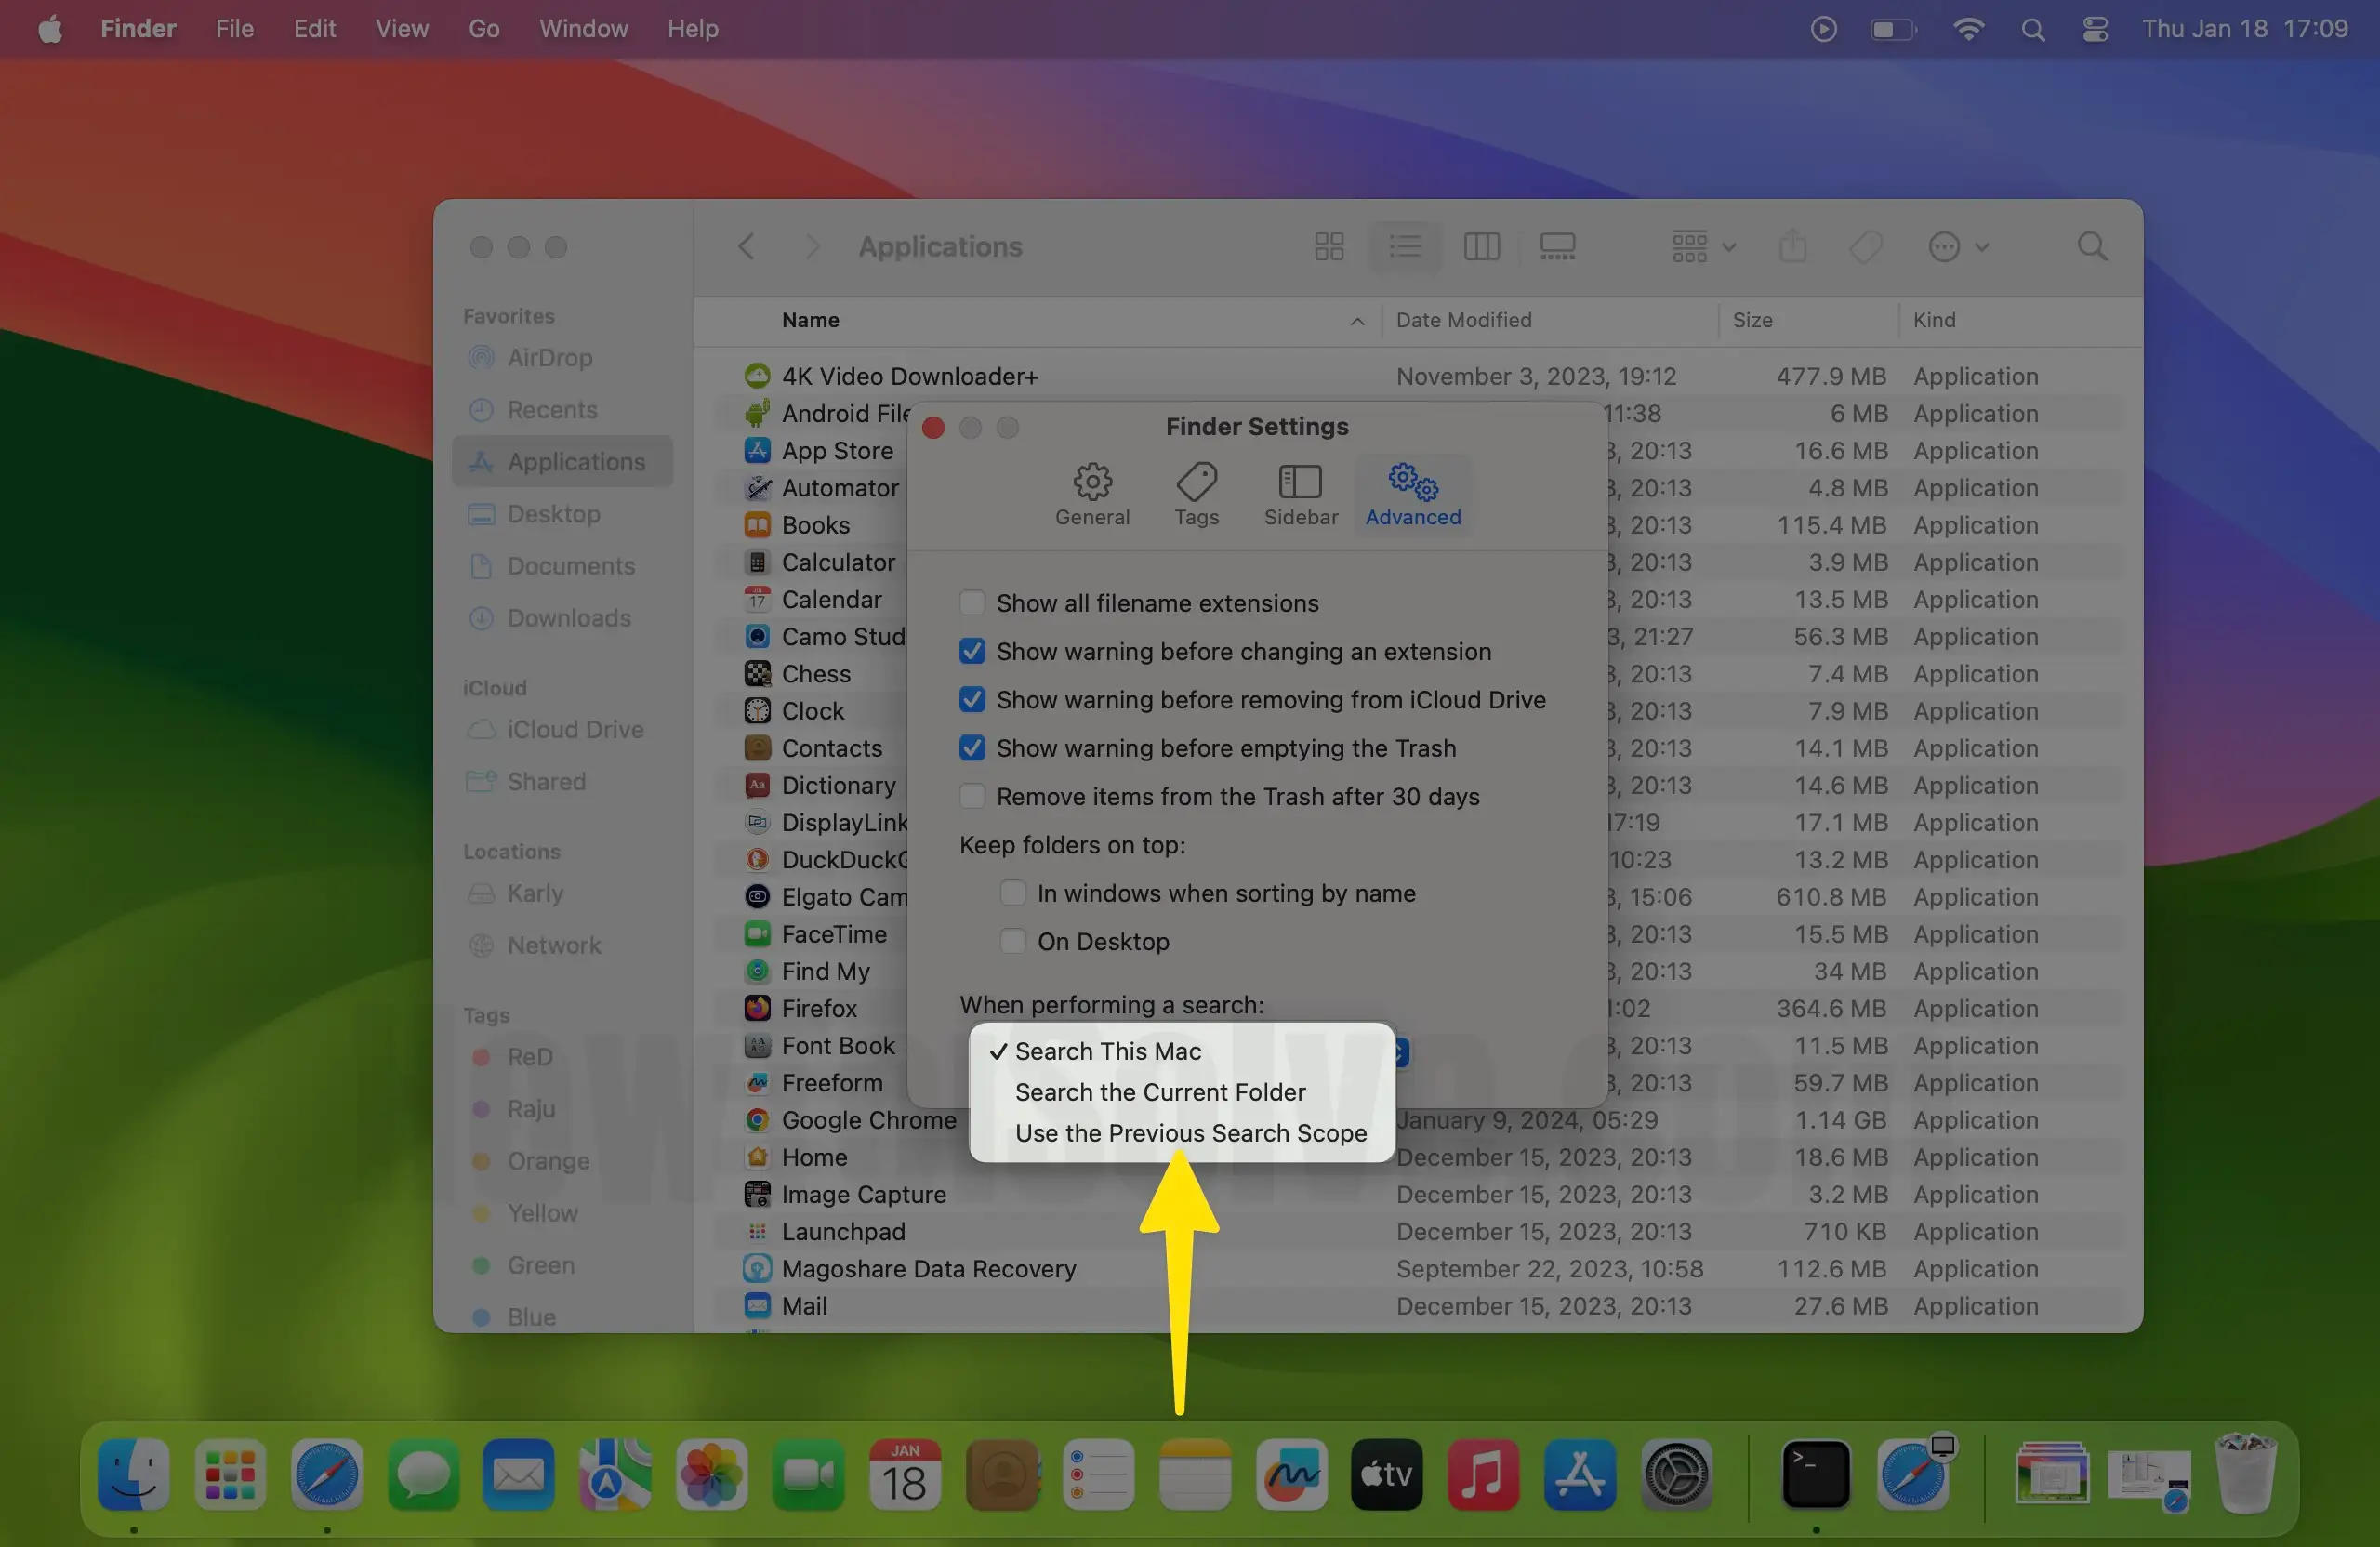
4. From the “when performing a search” setting, the users can change the default behavior of the search in the finder app.
Now open the Finder app again and try searching for the folder or disk you had trouble searching.
Solution. 5→ Mac finder search not working on the external hard drive- GUI Spotlight Rebuild method
Since the finder search works on the same index as that of the spotlight, rebuilding the index of the spotlight app can fix the issue of the finder search not working correctly on Mac. Apart from the rebuild indexing process using the terminal app as listed above, the users can also use GUI to rebuild the spotlight index. This method requires the users to follow the steps given below.
On MacOS Ventura:-
Step. 1 Go to the Apple logo from the top menu > System Settings.
Step. 2 Next, Select Siri & Privacy > Scroll to the section, Search Results – select the category that you allow to find using Spotlight search on Mac. To add or Remove External Drive, We can manage this under the “Spotligh Privacy” > Select the Folder that you found in the list, select the folder and click on the [-] button to remove it from the list. and add Allow into Spotlight search on Mac
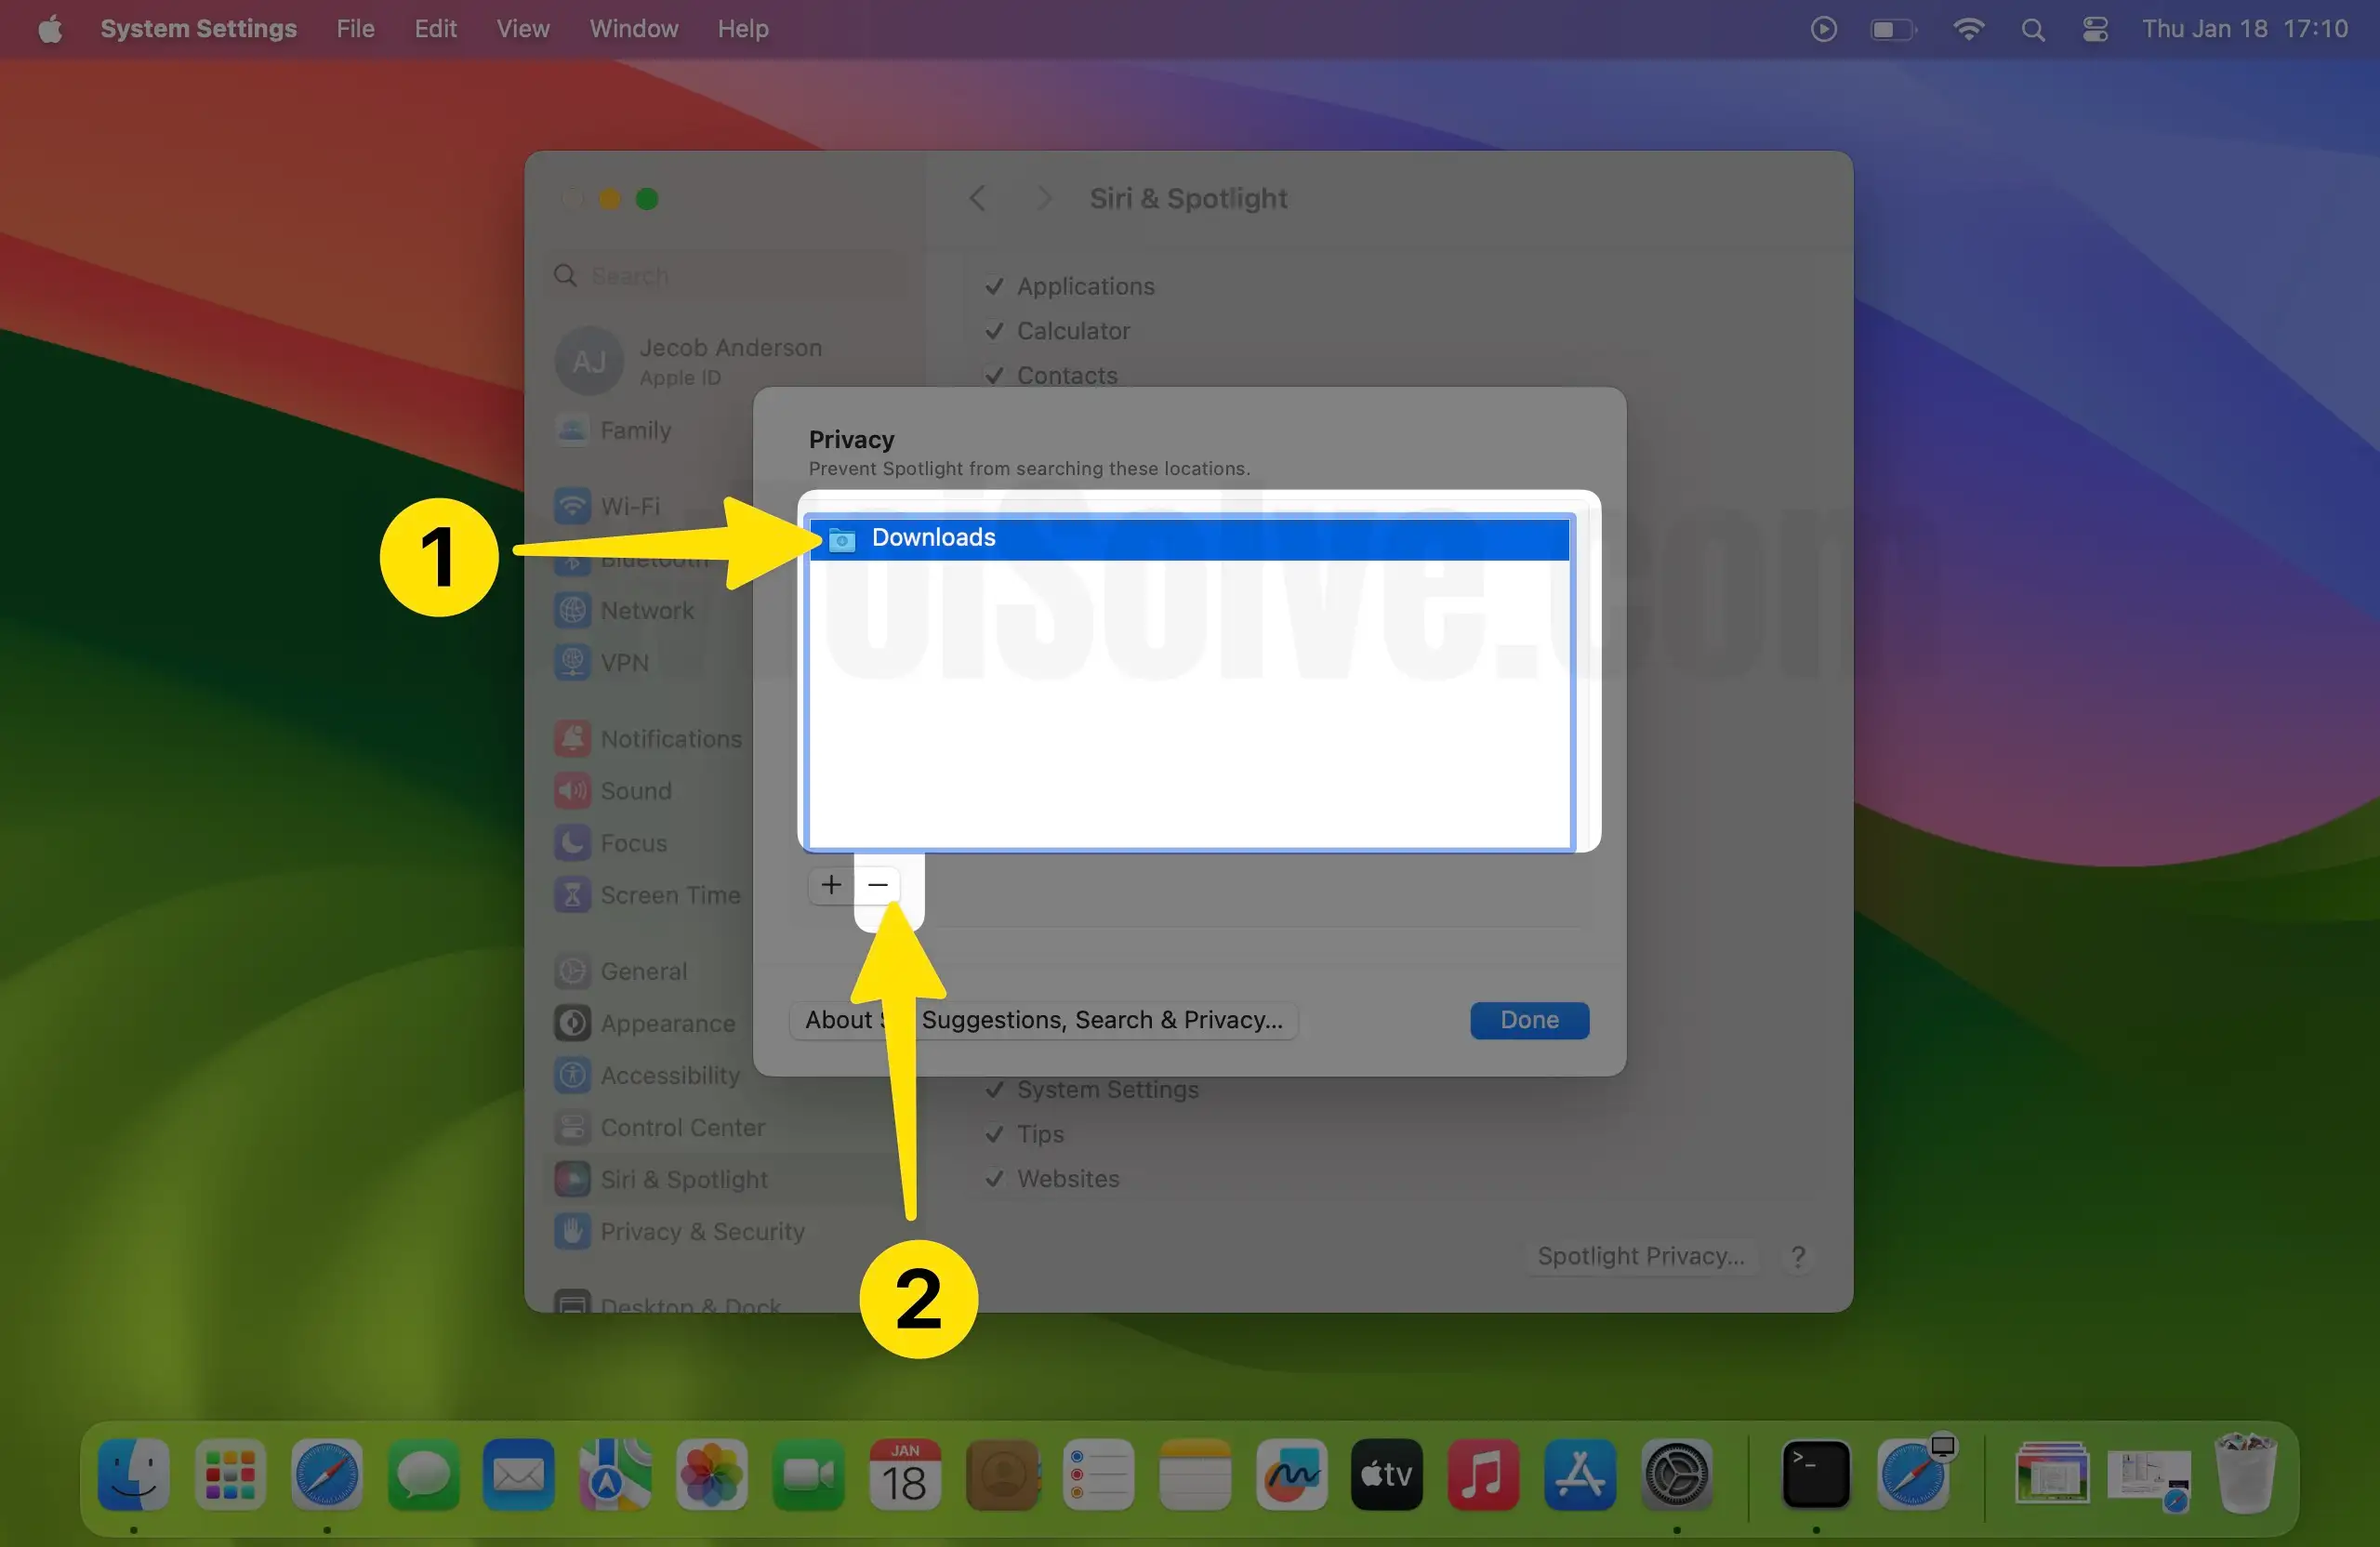
Step 3: Click on the Done Button on Mac.

On MacOS Monterey and Earlier:-
Step. 1→ First, go to the Apple menu > System preferences > spotlight.
Step. 2→ Click on the privacy tab from the available options.
Step. 3→ Now, drag or pull down the primary hard drive you wish to reindex to the list of locations that the spotlight app is restricted from searching. The users can also initiate this process by clicking on the Add (+) icon and selecting the hard drive they want to add.
Step. 4→ Make sure you have the ownership permissions, or else you won’t be able to add any disk or folder to the privacy tab.
Step. 5→ From the same list of locations you had selected before, choose the external hard disk you just added and click on the Remove (-) button to remove it from the list.
Step. 6→ Finally, exit from system preferences and wait until the spotlight reindexes the contents of your hard disk.
This procedure is very beneficial when the finder app is unable to look for the files or folder on our hard disk. Note that the process of rebuilding the index can take a lot of time, depending on the amount of data to be indexed.
Solution. 6→ Delete Finder PLIST file
Sometimes the preference setting files or the PLIST files may be the reason for the finder search not functioning correctly on your MacBook. This can be due to some bugs or malware that corrupt the files on your system. The most basic method to deal with this issue is to delete the PLIST file from your system. The users can complete this process by going through the steps mentioned in this section.
Step. 1→ Open the finder window on your Mac.
Step. 2→ Now press CMD + SHIFT + G keys on your keyboard to launch the Go To panel.
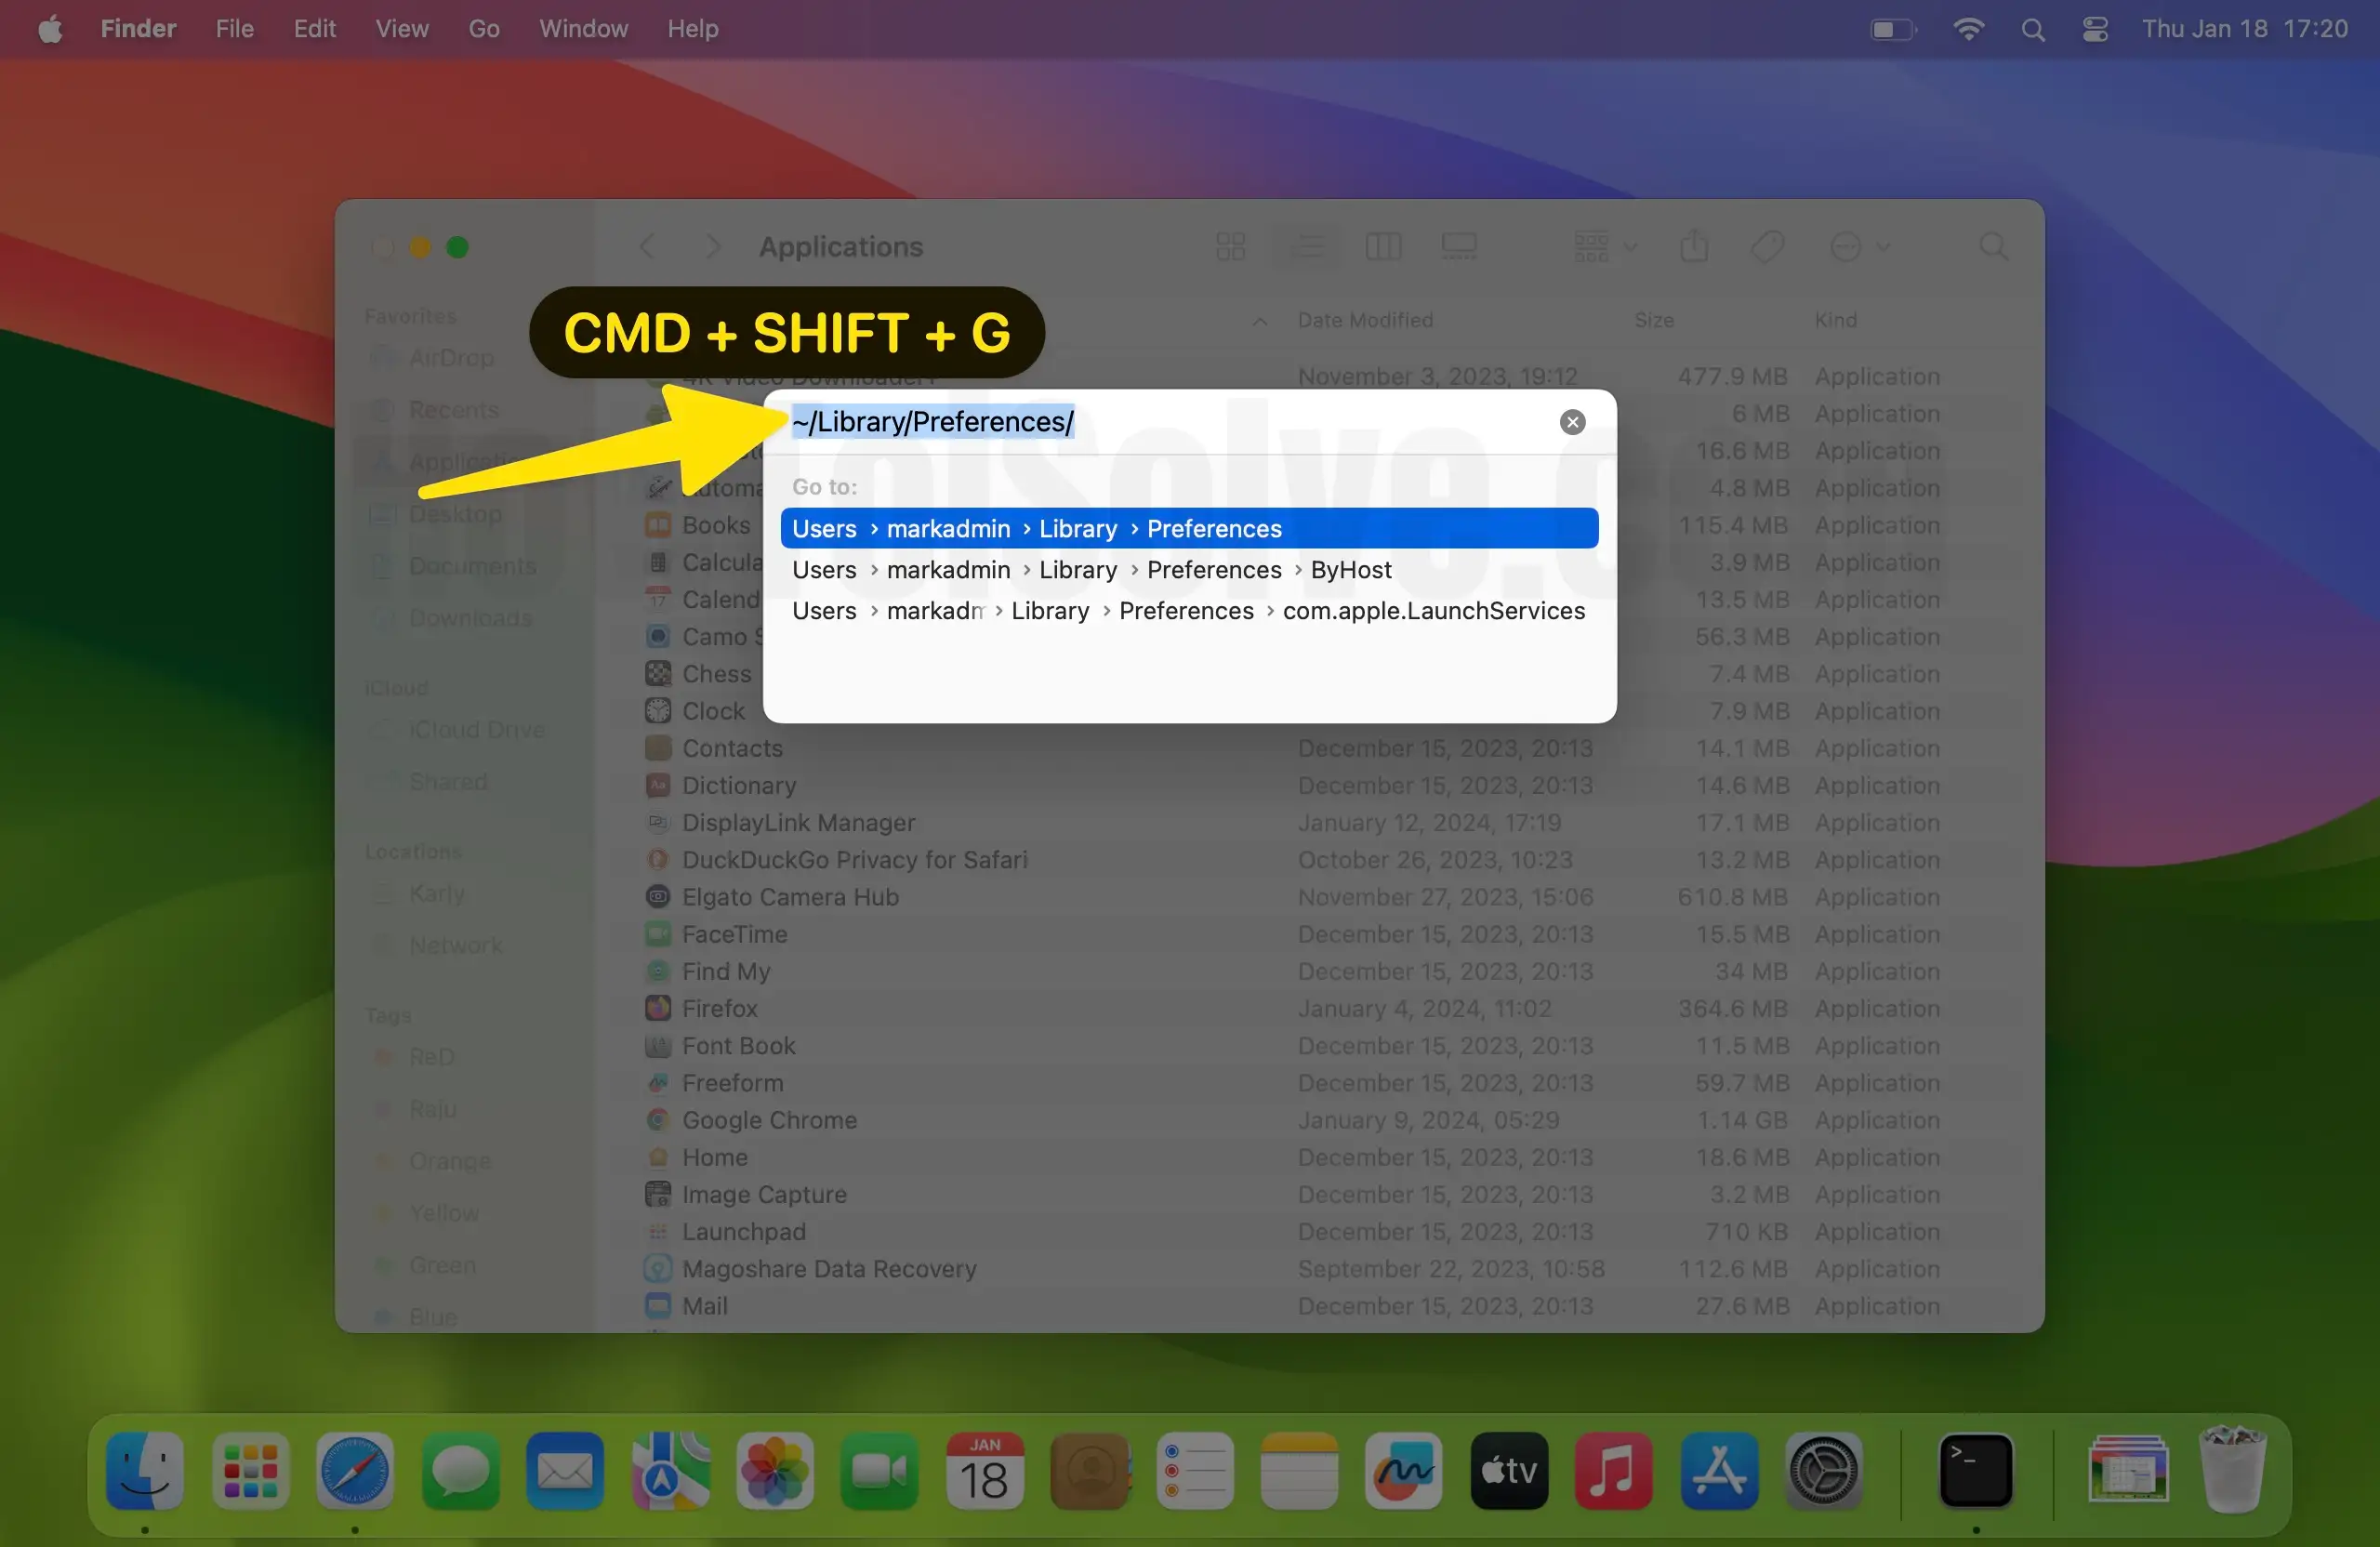
Step. 3→ In the “go-to” panel, enter the path ~/Library/Preferences/ and tap on the go button.
Step. 4→ Now, look for the file with the name “com.apple.finder.plist” and right-click on it.
Step. 5→ Then, select the option of “move to trash” to delete the PLIST files.
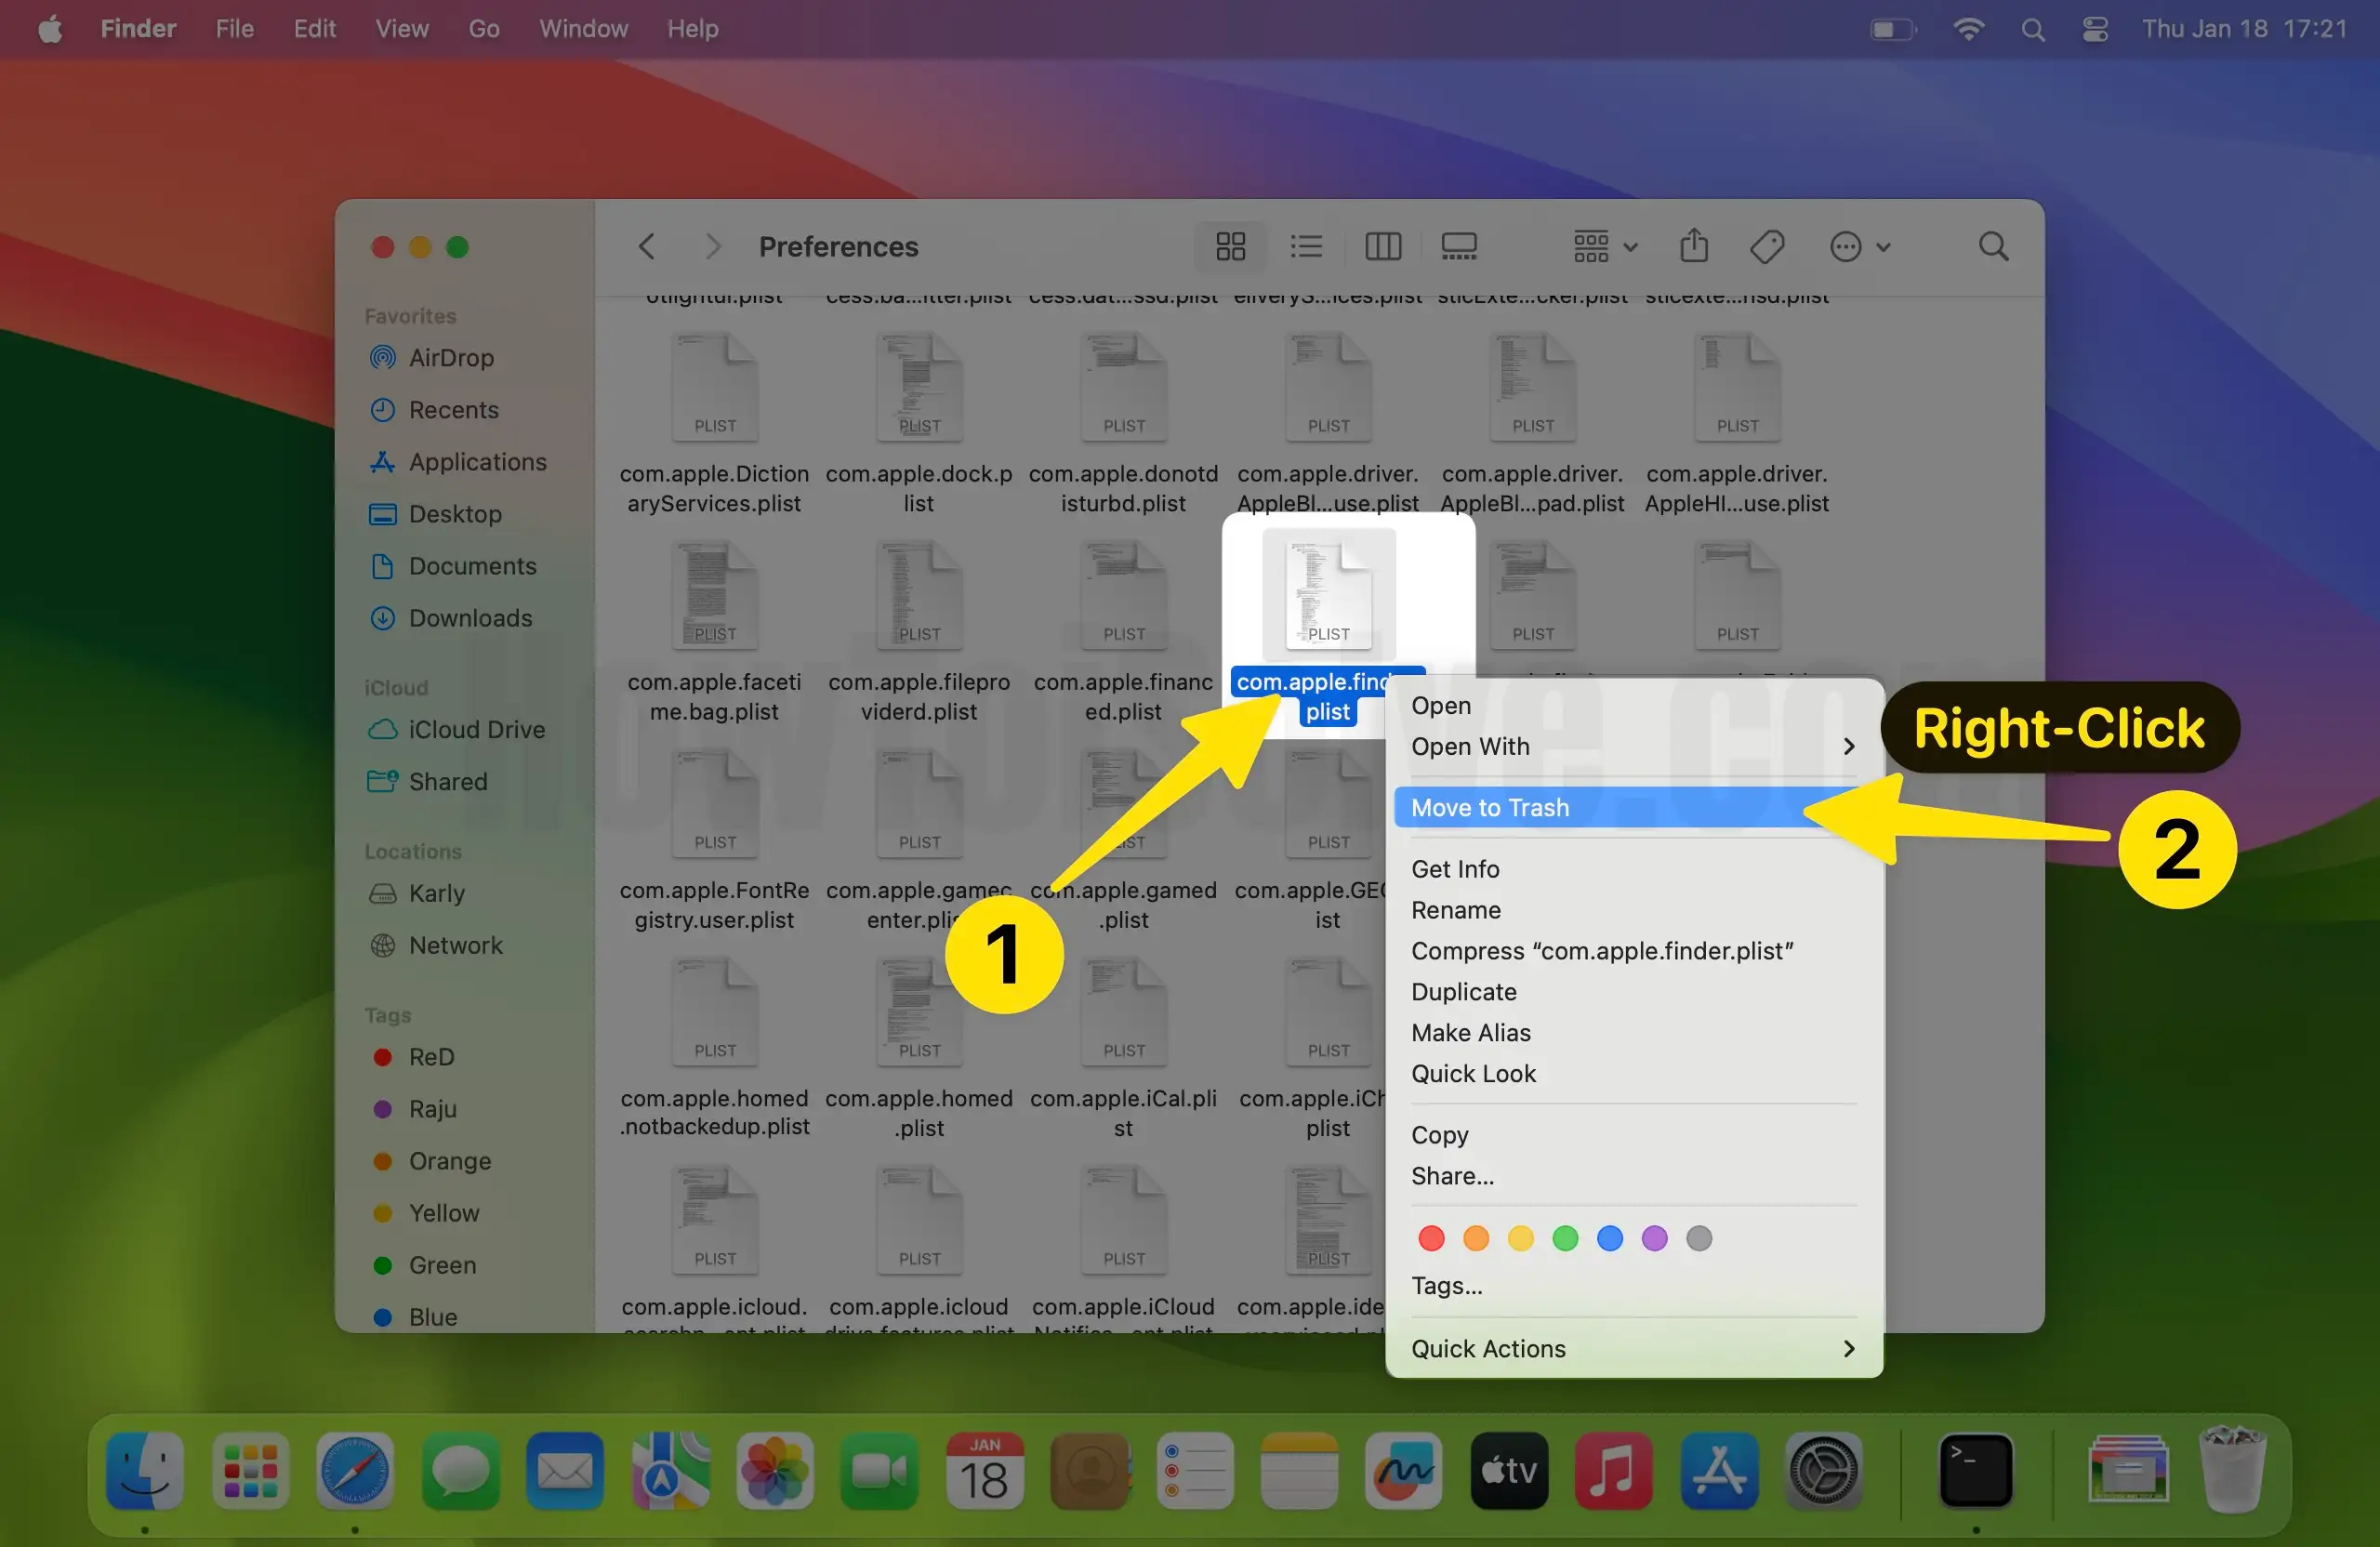
The PLIST files will be successfully deleted from your MacBook by completing this process. Now open the finder tool again and try searching for the folders or disks you previously had a problem searching for on your Mac.
Solution. 7→ Update your MacBook
The current software version of your Mac may have some bugs that prevent the finder search from functioning correctly. So it is advised that the users update the software of their Macs as the newer updates have all necessary bug fixes and can help fix your issue of the mac finder not working correctly. To update your Mac, follow these simple steps.
Step. 1→ Go to Apple Logo by clicking on the System Settings… at the top of the screen.

Step. 2→ Look for the option General Tab then select “software update” and click on it.
Step. 3→ Click on “update or upgrade now.”
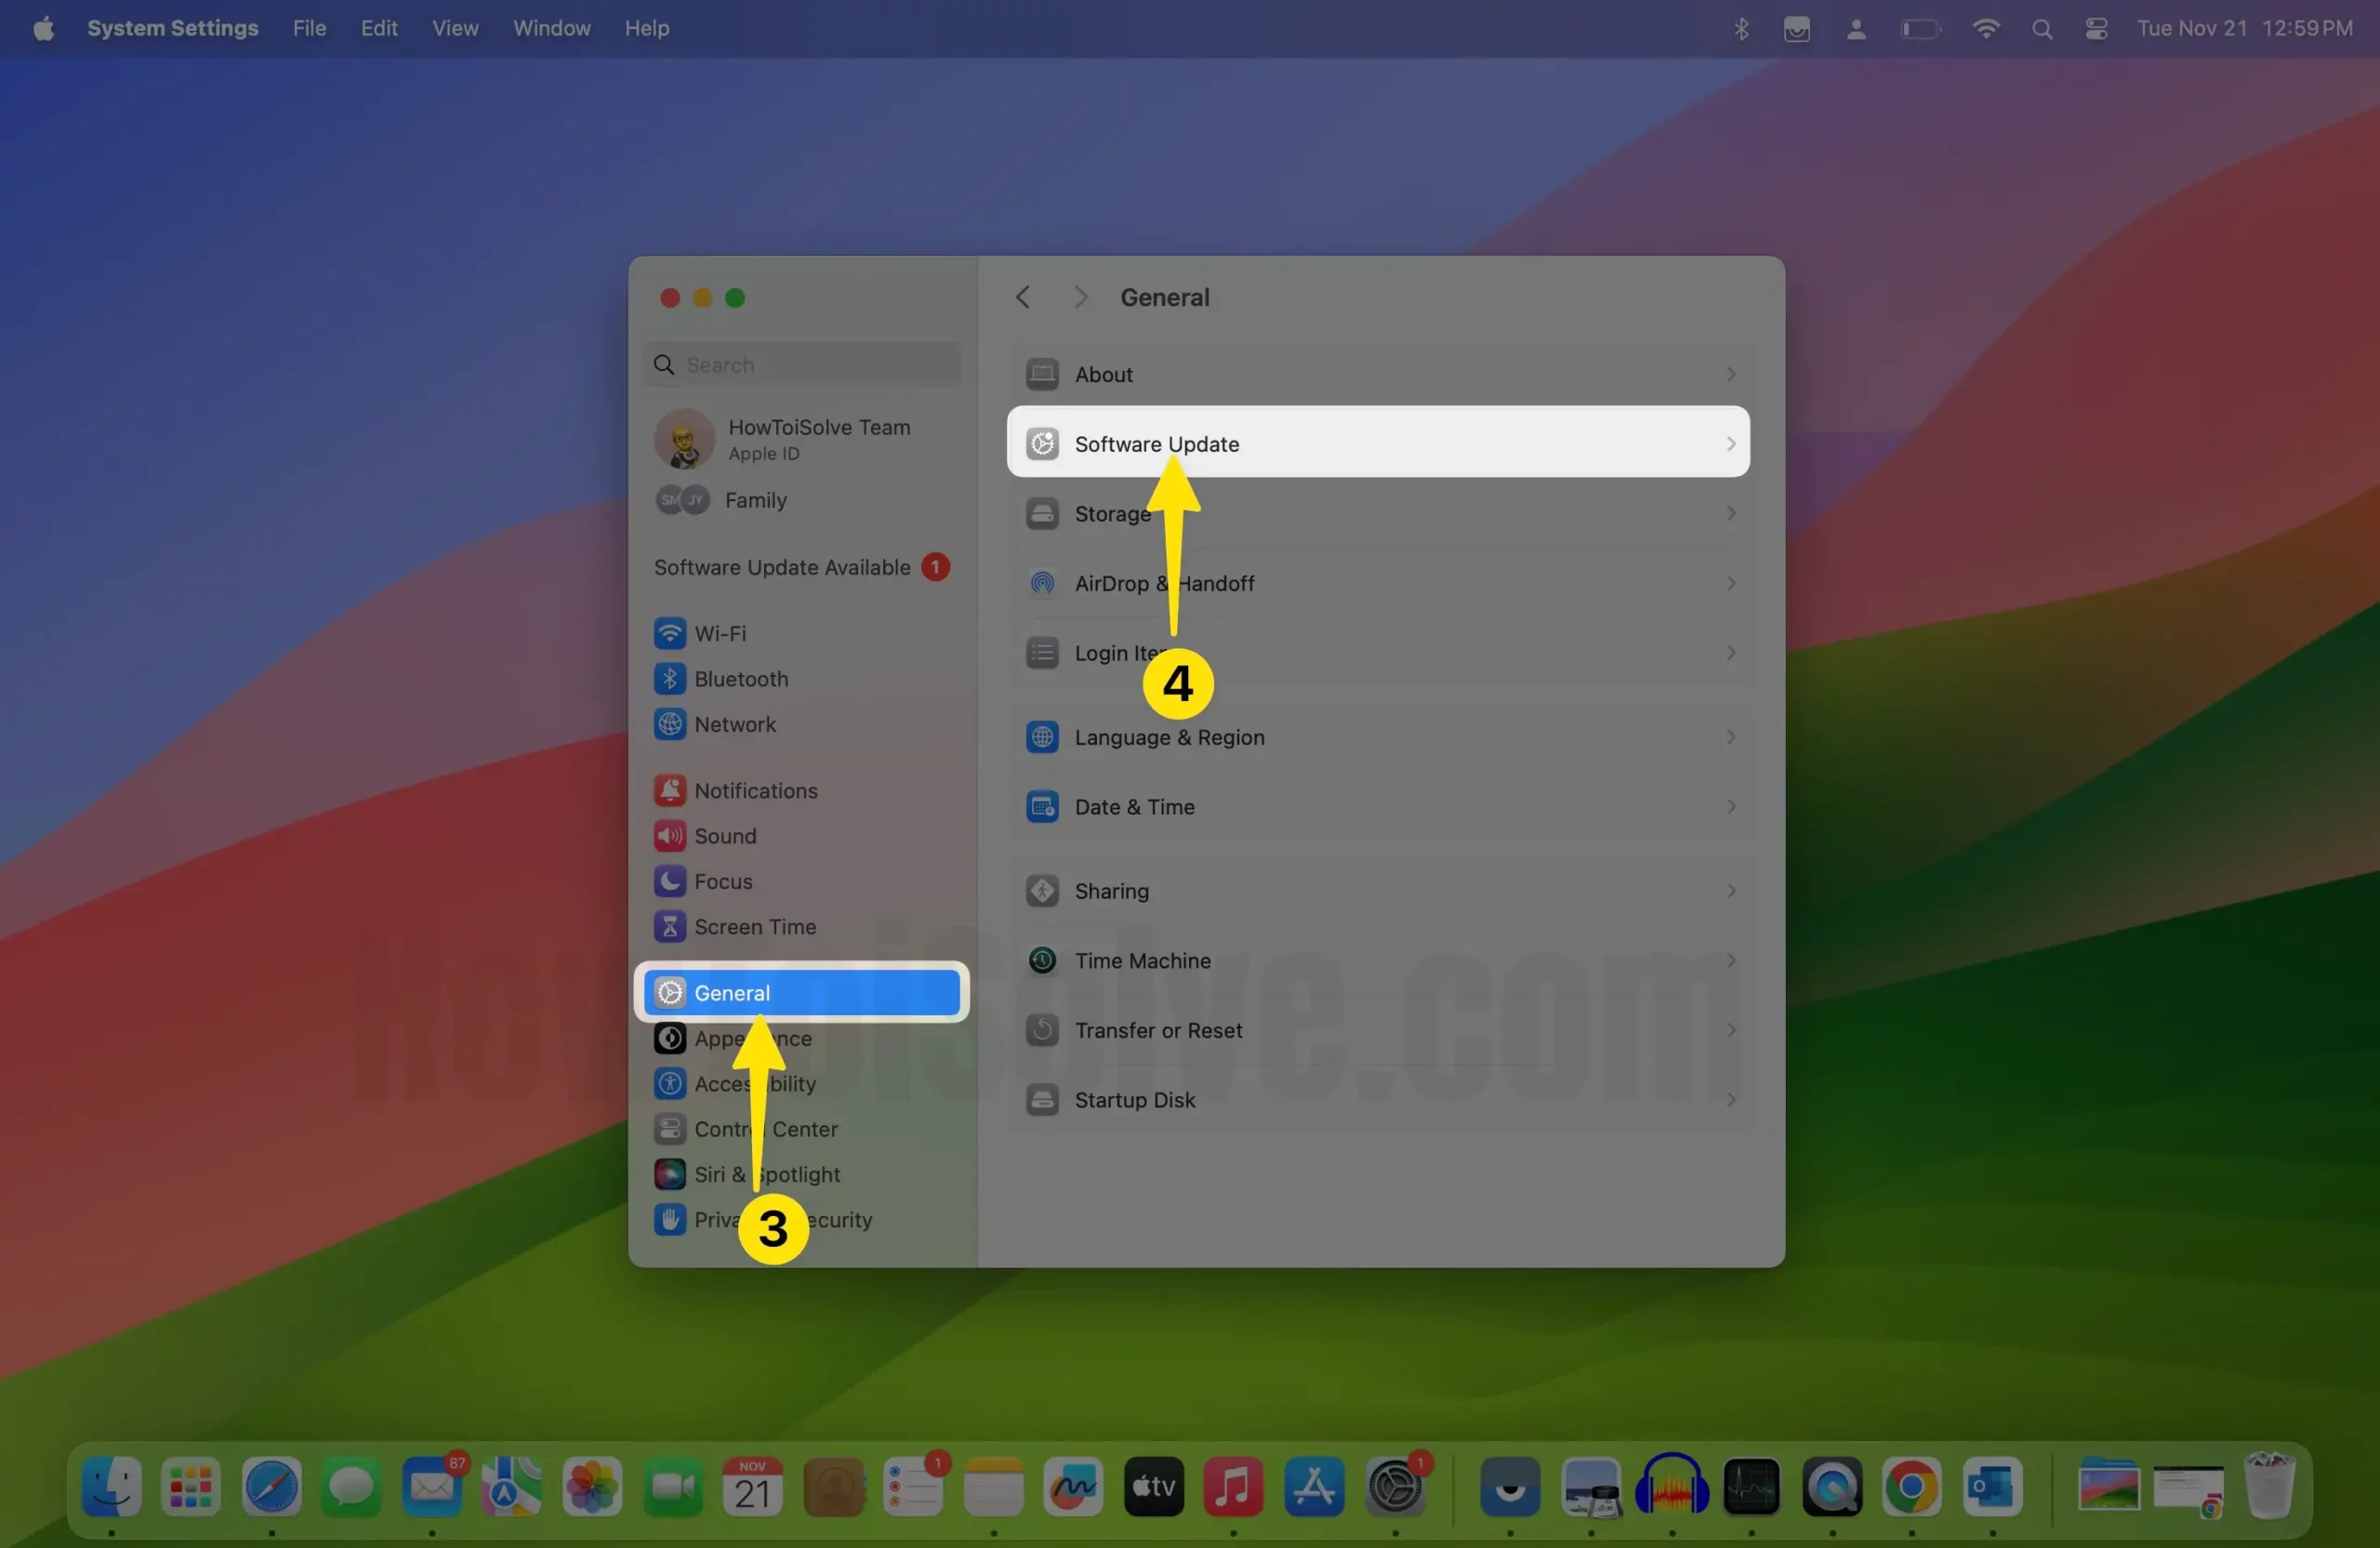
This method will search for available updates for your Mac and download and install them directly on your device. Try searching for folders and disks on the finder app again to check if the problem exists.
Solution. 8→ Upgrade your Mac
If the finder app is taking very long to search for the files and folders that you type in it, then it is recommended that you shift to upgrade your MacBook to a newer model. With every software update, the load on the system keeps increasing, and it is evident that the older models of Mac won’t be able to handle this load effectively. Therefore, getting yourself a new Mac will solve your problem.
M1 Series mac is perfect for Work Heavy load Software and Apps. Here’s the Best iMac to Buy.
Solution. 9→ Reinstall macOS
Sometimes the problems caused during the installation of the macOS lead to many issues and glitches like the finder search not working on your device. Therefore, if you have tested all the solutions listed above and are still facing the same problem, we suggest you reinstall the macOS. Reinstalling the macOS will lead to your Mac getting restored to its factory settings and fixing all the bugs and glitches you might face without Erasing any Data from your Mac [Apps, Contacts, Notes, Reminders, Mails, and more..].
- Step by Step Guide: Reinstall macOS on Mac
Therefore, to remove your stress and tension of Mac finder search not working correctly, we have put together this great list of solutions. We hope that with these solutions, we were able to help you out in solving the problem related to the Finder search not working on Mac. Hence, try out the different solutions described in this article and see what works for you.
Q & A→ How do I rebuild Finder on Mac?
→ Since the Finder and the spotlight app work on the same index, the process of rebuilding the index of the spotlight will rebuild the Finder on Mac. To rebuild the spotlight index, go through solution number 3.
