
WHAT TO DO IF YOU CAN’T CONNECT TO A CURRENT TIME MACHINE BACKUP DISK ON macOS MONTEREY? We all have multiple folders and many bytes of data stored on our systems. These data may be personal, professional, or private. Be it photos, videos, apps, emails, or any piece of documents, having a secure record of data and information you consider valuable can always come in handy.
This process of having a protected archive of information is known as backing up. In the event of accidental data deletion or a destructive virus attack on the system, these backed-up data will provide you access to those files and facilitate recovery, if necessary.
Now there are various ways to back up the data on your computer. One of these ways is to use the Time Machine feature, built-in exclusively on macOS systems, for backing up any and all kinds of user data.
To begin with, let us understand how you could create a backup of your Mac files with the Time Machine feature. Then, here is a step-by-step explanation for the same:
- Start by connecting an external storage device onto which you wish to back up the files. This device will be your backup disk.
- There are a few storage devices that are compatible for use with the Time Machine. These include the AirPort Time Capsule (a hard drive developed by Apple), NAS device, Thunderbolt, FireWire, or an external USB drive.
How to Take Backup On External Disk, Using Time Machine
On MacOS Ventura
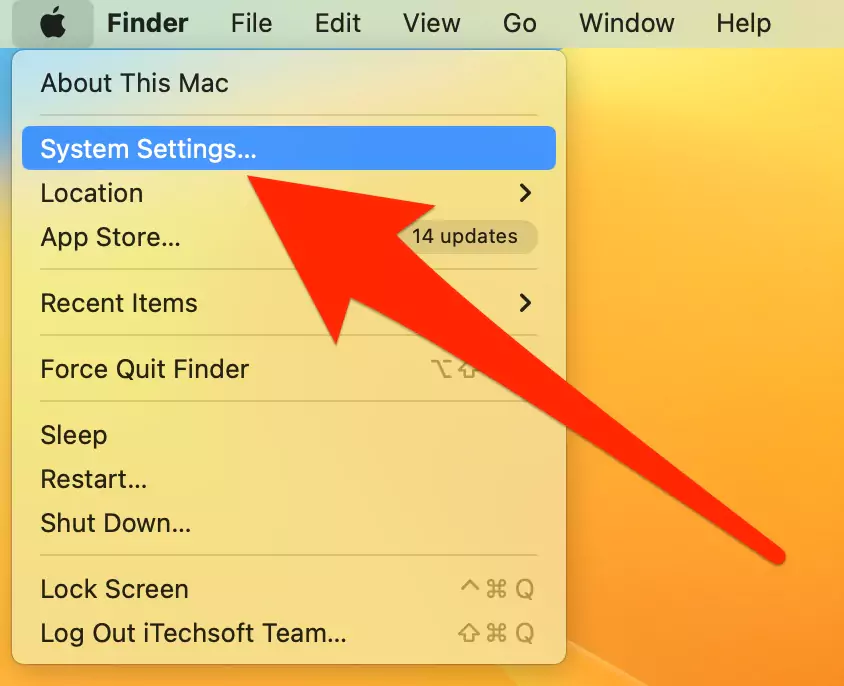
1. Connect your Time Machine Drive to Mac Using the Cable. Now, Go to the Apple Logo from the top Menu. and Click on System Settings.
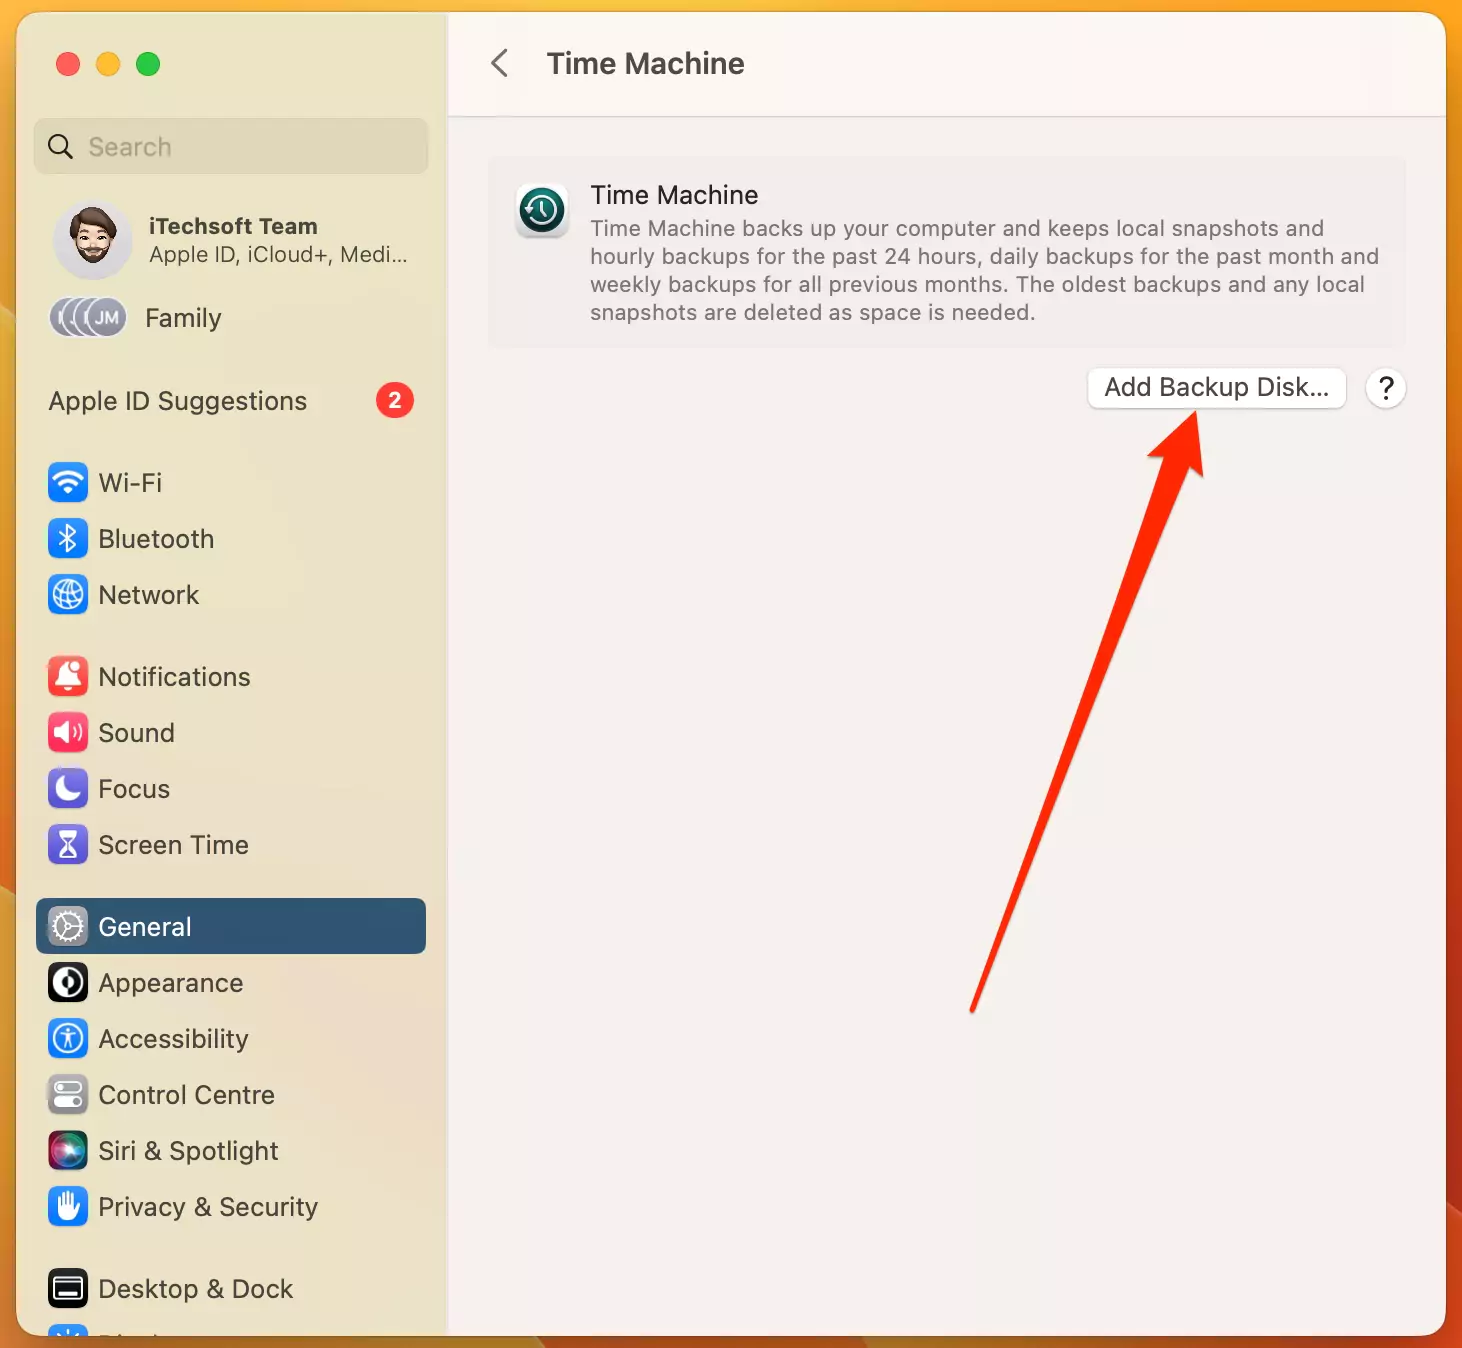
2. Next, Click on General > Time Machine.

3. Now, Click on Add Backup Disk.
4. Select the Backup disk that is connected to your Mac and click on Set Up Disk…

5. There are extra settings for “Allocate the space to use for Backup“, Encrypt Backup, and Make Password Protected backup.

6. Once you connect the Drive as Time Machine, We can start or stop the backup process at any time, by right click on the drive.

That’s it.
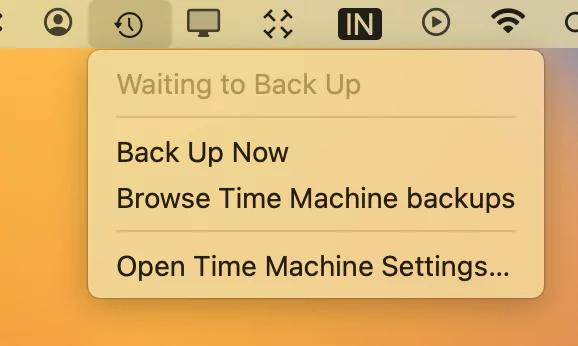
Also, we can start or Stop Backup Process from the top Time Machine Shortcut in the Menu bar, Just add the Time Machine to the Menu bar using the below steps on MacOS Ventura.
- Go to the Apple Logo > System Settings.
- Select “Control Center” > Scroll to the “Menu Bar Only” section and enable “Time Machine” for Show in Menu Bar.

- That’s it. Now, Click on Time Machine Shortcut and see Option for Start Backup or Open Time Machine Settings or Manage Backups.


Now, if your mac running on MacOS Monterey and older macOS then follow the steps given in the next section, to set up a time machine or Enable/Disable Time Machine backup.
On MacOS Monterey & Earlier
- Once the connection is complete, go to the Menu Bar and open the Time Machine menu. There, find the Time Machine preferences icon and open it. Alternatively, you can go to Apple Menu, choose System Preferences, and click on the Time Machine.

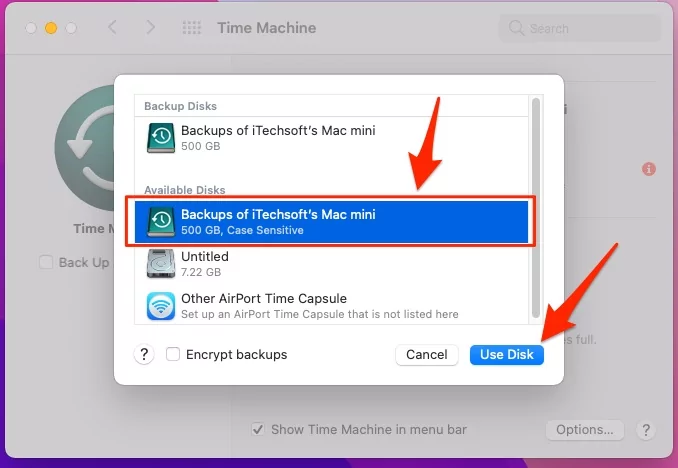
- When the window is open, click on Select Backup Disk.

- From the pop-up, select the name of the backup disk connected to the Mac and click Use Disk.

- The Time Machine then begins its process of periodically creating automatic backups to the external storage disk.


The routine automatic backups of the Time Machine happen by the hour. So, if you wish to perform a manual backup of the data before the next automatic one, then here is what you do:
- Go to the Menu Bar, select the Time Machine menu and choose Back Up Now. Voila! Your manual backup is underway.

- In addition, the same menu shows you the progress level of an existing backup or the ability to skip a backup process in progress through the Skip This Backup option.

- When there is no backup currently in progress, the menu shows the date and time of the last backup on the system by the Time Machine.


As easy as the concept of backing up the data on your Mac with the Time Machine feature sounds, there are a few unavoidable complications that may arise.
If you are a user of the latest version of the macOS, Monterey, there are chances that you are facing issues connecting your Mac to the Time Machine feature. The most common problem to arise is this error message: “can’t connect to a current time machine backup disk.”
The error usually pops up when you try to access the Time Machine backup after the feature finishes its routine backup. It not only stops you from accessing the Time Machine backups but also the files inside the backups.
Luckily for you, there are several alternate ways to resolve all of your backup-related issues and restore the files you could not access in the Time Machine.
Basic Diagnoses:-
Before we explore the solutions, here are a few possible reasons why your Mac cannot connect to a current Time Machine backup disk in the first place.
- There could exist a connectivity issue between your Mac and the external storage device. This problem could arise as a cause of your backup disk being connected directly to the system.
- It could be possible that your Mac does not have the required permissions to access the backup database folder of the Time Machine.
- If your backup disk is a network device, there are high chances for network disconnection to occur and your Mac to lose connectivity to the external storage.
- If your backup disk is the AirPort Time Capsule, the hard drive likely caused the trouble. The Capsule may not have been set up correctly or connected to the network or Firmware should be updated.
- If there is a connection between your backup disk and another system, and that system fell a sleep, it could also lead to your Mac not being able to connect to the Time Machine.
Now that we have established the possibilities that could cause connectivity errors, here is a list of the solutions available to us:
SOLUTION 1: LOCATE YOUR BACKUP DISK USING THE FINDER ICON
It is entirely possible for the backup disk to be turned off, disconnected, or be defective. To find the status of the backup, follow these steps:
- Go to Apple Menu and choose System Preferences. You can find the Dock & Menu Bar option.

- Start Backup to External drive from Mac shortcut.

- Another method is, On your Dock, click on the Finder icon, which will open the Finder window.

- Under the Device section, you should be able to find your backup disk in the listing.
- If the backup disk is missing, our theory that that disk is off, disconnected, or defective is true.


SOLUTION 2: RECONNECT THE BACKUP DISK IF IT IS A PHYSICAL EXTERNAL DEVICE
In most cases, the issue of disconnectivity arises from an improperly plugged external storage device. So, if the backup disk for your Time Machine is a physical hard drive, it could often simply mean that the disconnected device is the culprit.
Here is what you should do during such situations:
- Unplug or remove the backup disk from your Mac.
- Then, replug or connect the device back into the system.
- Ensure that the backup disk is attached firmly to the Mac, plugged into the power source, and switched on.
SOLUTION 3: VERIFY NETWORK CONNECTIVITY IF IT IS A NETWORK DEVICE
Like the previous case, an improper connection could be the root cause of the backup issues. Only this time, the backup disk is a network device and not a physical hard drive.
To confirm that the connectivity between the network backup disk and the Mac is stable and intact, you will have to verify the Disk Utility by performing the following steps:
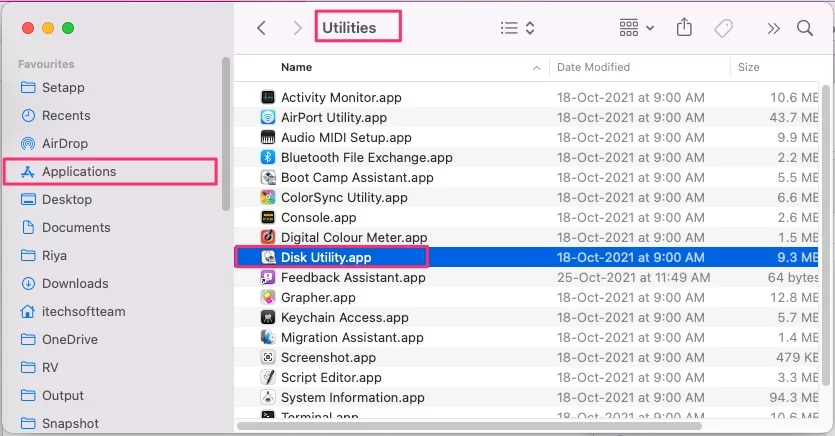
- Open Finder on Mac.
- In the Finder window, select Applications, and look for Utilities.

- Click on the Utilities option and double-click on Disk Utility.
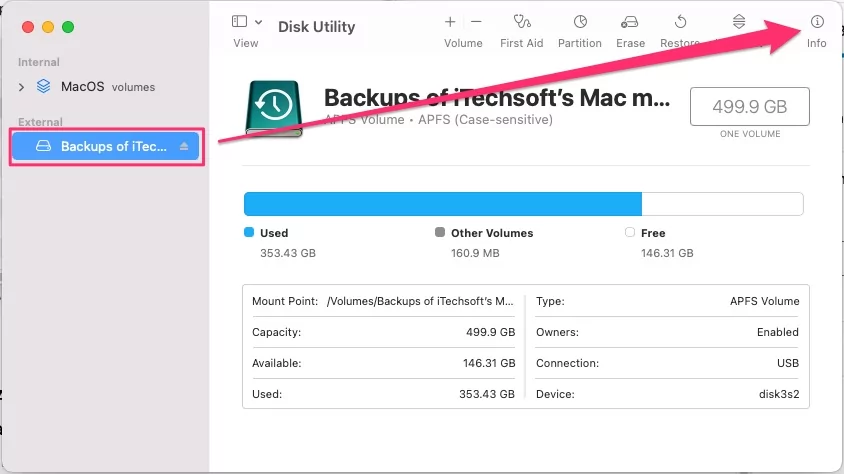
- You will find the Time Machine backup drive on the left panel. Select it.

- see the (i) button displayed at the the right panel.

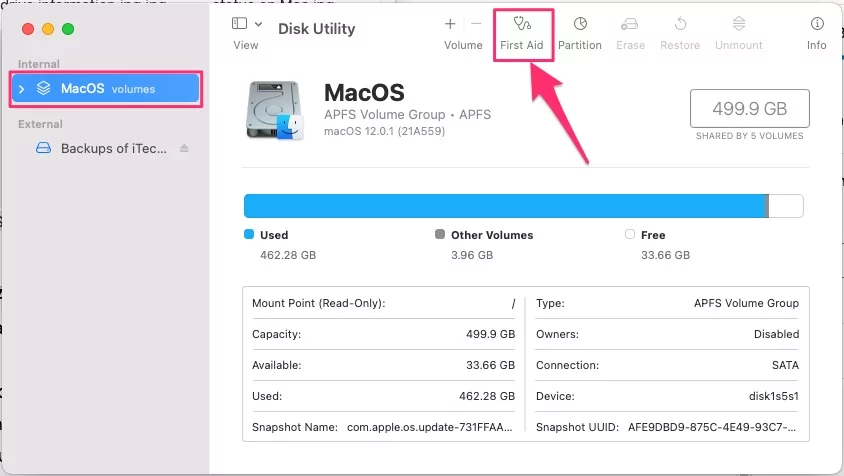
- You can now see the First Aid to Verify Disk option to repair disk issue.
- By clicking on that option, you can view the connectivity details on the backup disk of your Time Machine.
- If still stuck or Time Machine Backup won’t start or Stuck Preparing then Repair the Mac volume disk and Try to Backup using Time Machine.


SOLUTION 4: ALLOW ACCESS FOR TIME MACHINE BACKUP
The primary reason for a Mac not being able to access the backup folders of the Time Machine is the lack of permissions granted. To identify if there really is an issue with the Time Machine permissions, follow this procedure:
- Open Finder on Mac.
- In Finder, look for the Time Machine disk and go to the Backups.backupdb folder under Time Machine backup.
- If you find a red stop sign in the Backups.backupdb folder, it indicates that you do not have permission to access the backup folder.
However, the permission problem is easily resolvable through these steps:
- Open the Terminal application. [Open Terminal, By Command + Space and Search Terminal to find app]
- Enter this command: cd /Volumes/TimeMachineDriveName (but insert the actual name of your Time Machine backup disk instead of TimeMachineDriveName).
- This command takes you to the Time Machine backup disk to which your Mac was unable to connect.
- Then, enter this command: udo chgrp admin Backups.backupdb This command allows the admin group on your Mac to access the backup folder. The system will prompt for your Mac password twice to confirm the changes made.
This way, you get permission to access the backup folders, and your Mac will re-establish the connection with the Time Machine.
Solution 5: Try in Safe mode
The safe mode determines all the software issues on Mac in safe mode, So put your Mac in safe mode and Start Time Machine Backup in External drive as explained earlier in this article in Details.
- M1 Mac:- Shut down your Mac and Turn it on After 20 seconds. Now, Press and Hold on the Power button [Touch ID button] until you see the Startup volumes with the Options gear icon. Now, Select your Drive Volume, And Press the Shift key from the keyboard and Click on COntinue in safe mode. Now, log in to your Mac and your Mac is on safe mode. Use External Drive to start backing up using Time Machine.
Then, Restart your Mac to exit from Safe mode.
- Intel Mac:- Shut down your Mac and turn it on after 10 seconds. Now, Turn on your Mac then Press and Hold on the Shift key once you hear the startup volume. Now, log in to your Mac to use Mac in safe mode. That’s it.
Once you have done, Restart your Mac to exit from safe mode.
Solution 6: Repair MacOS Volume in Recovery Mode
Repair Mac volume [Mac Data] from Disk Utilities in Normal login or Repair Mac in Recovery mode, if you want to need extra steps. Check out a more detailed guide: Repair Mac in Recovery mode.
More info: Check out Time Machine Not Working on Mac
CONCLUSION:
As a macOS Monterey user, all the information furnished above will provide you with adequate guidance to navigate the Time Machine feature and resolve any connectivity issues on your own. With these suggestions, the backup process will continue to function smoothly on your Mac, and all your data can be safe in the archives.
If you have concerns that persist despite trying all these methods, let us know of them in the comments below, and we will try our best to assist.


