What To Know
- You must check your Mac’s screen recording settings.
- Outdated Software causes screen recording issues, so please update it.
- Restart your Mac as well as make free up space to store your screen record file.
- Alternatively, you can utilize Use QuickTime Player.
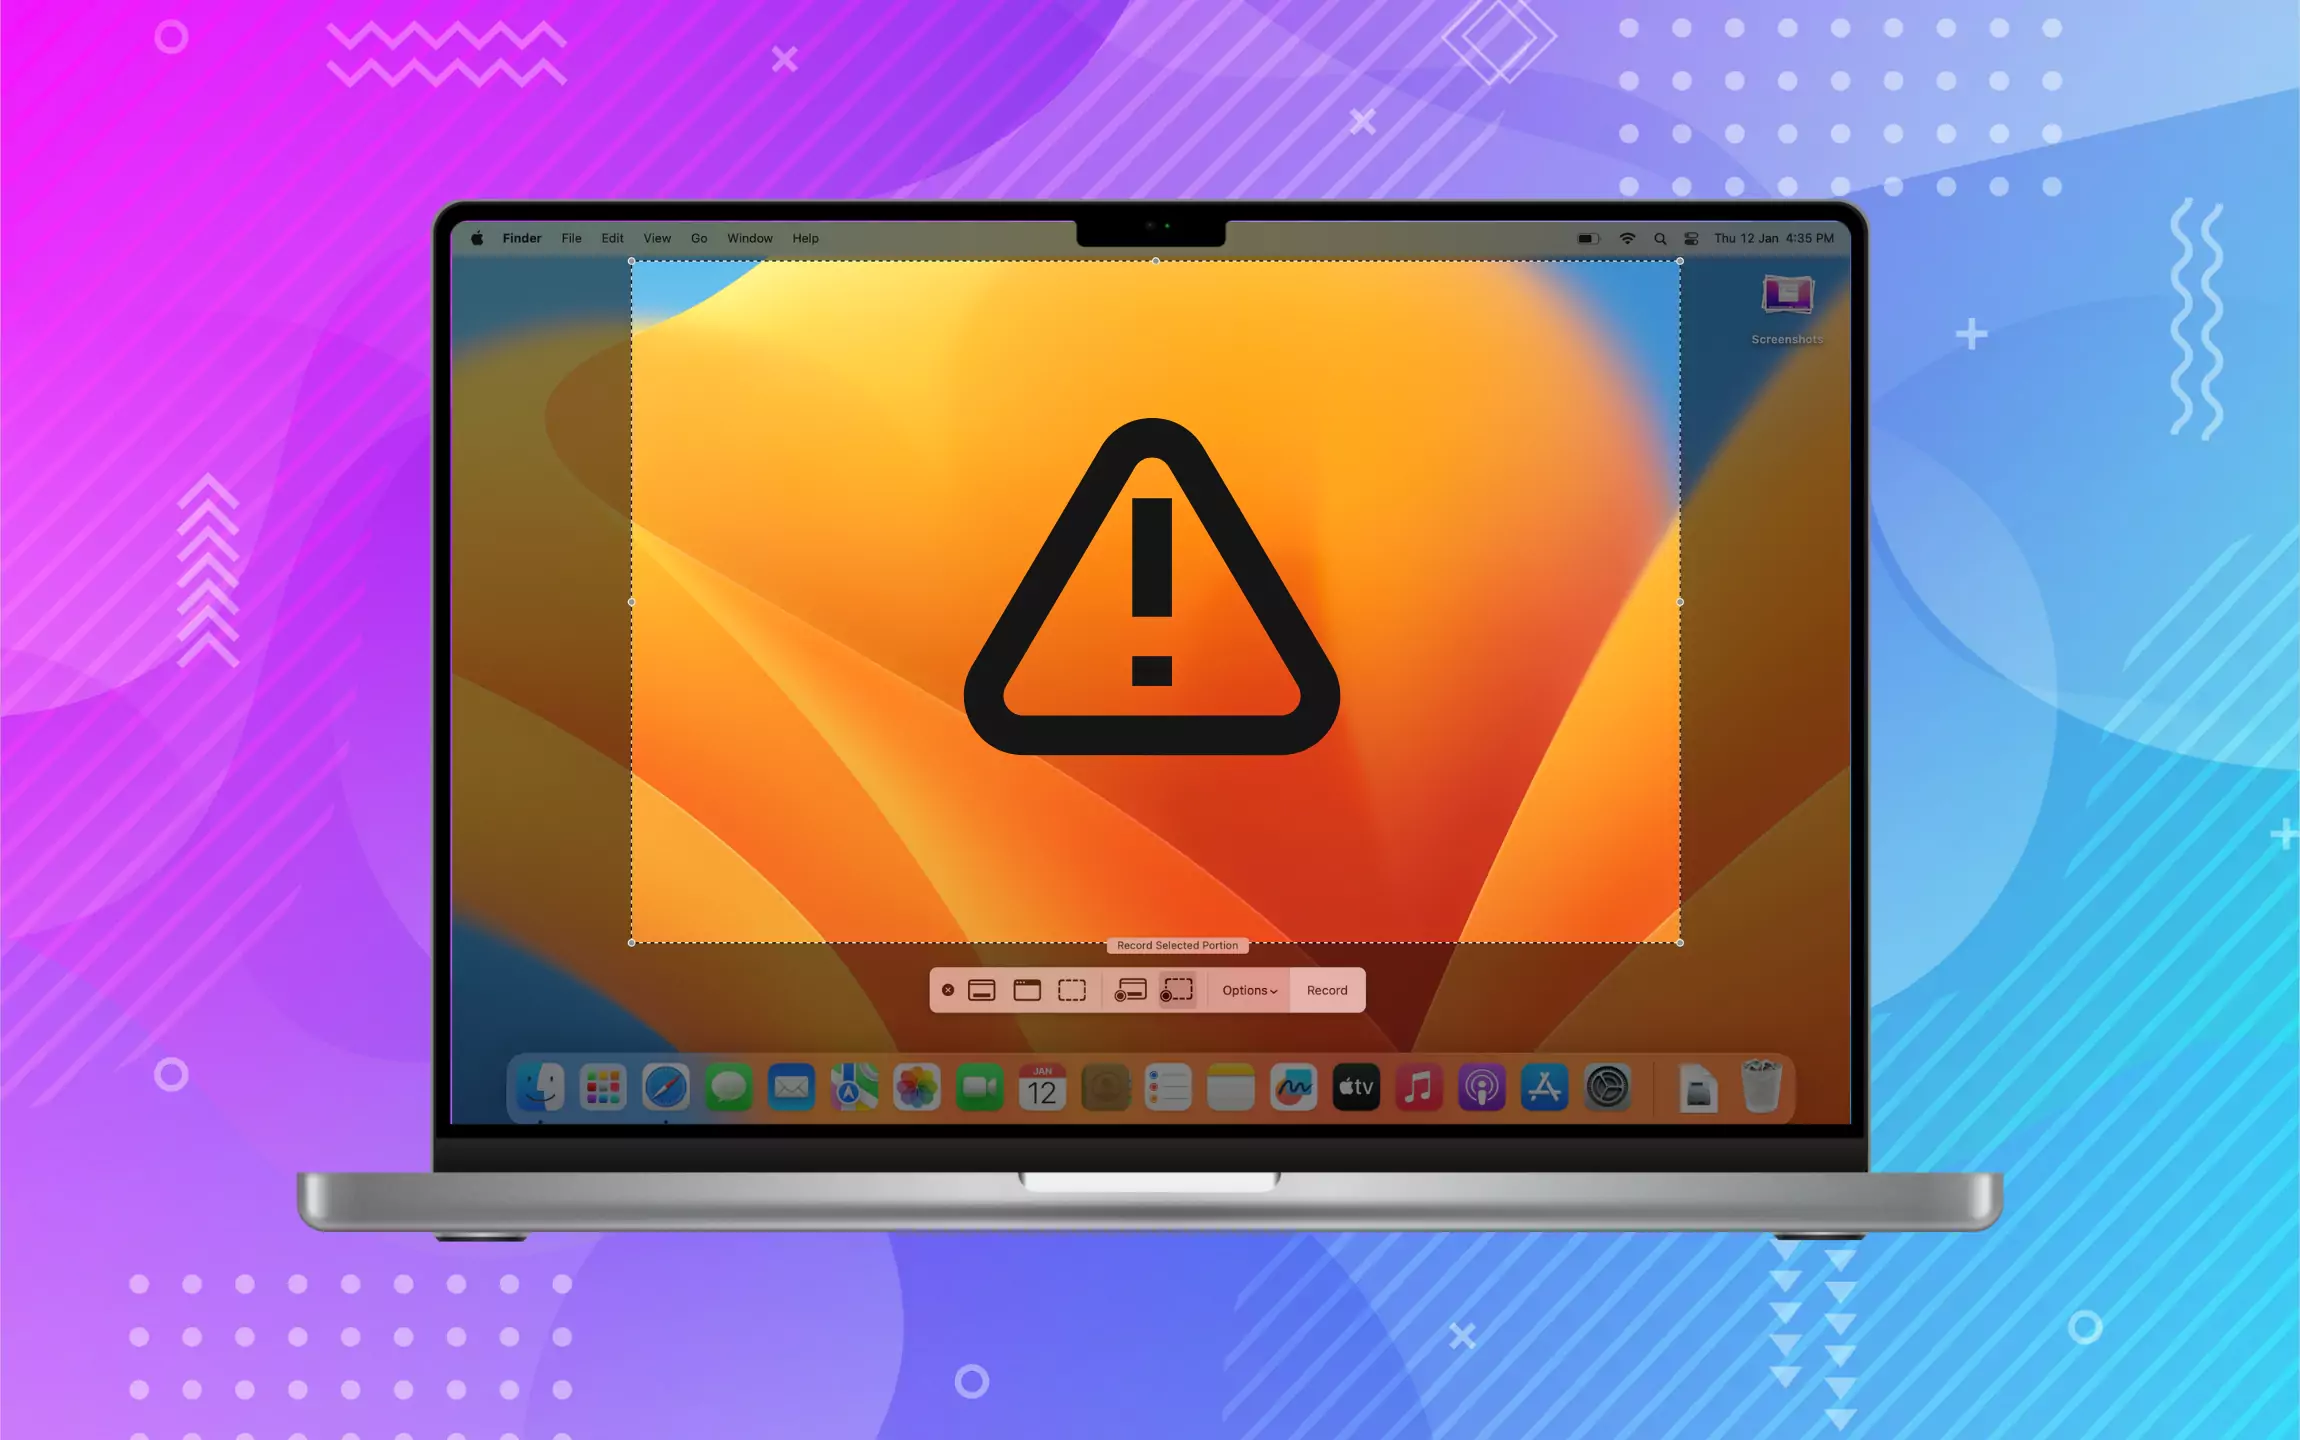
Screen recording tool (Shift+Command+5) on Mac is helpful, especially for Video Production professionals. But when it’s false play, screen recording can’t be saved (Because of Not Enough Free Up space on mac & Other issues), or screen recording is not saving in your drive after stop screen recording, etc., are the common errors experienced by every Mac owner.
What if the screen recording stuck and crashing while you record? or Won’t Play in Preview, Fret not! Continue reading the article, as we have curated the best solution to fix it.
Troubleshooting guide: Screen Recording not Working, Can’t be Saved on Mac
Have you come across Shift + Command + 5 doesn’t work for taking a screenshot or Record Video record screen on Mac? Let’s fix it by following the below-mentioned guide.
We have another free screen recording, Restart your Mac and Check, and also try QuickTime Player.
Fix 1: The Recorded Screen video won’t play on a Mac
The last time I tried to record my Mac running macOS Sequoia, the video didn’t play or save. An error message stated, “Your screen recording can’t be saved.”
I am using Full-screen recording with a microphone (record screen with audio). At that time, the microphone was not working due to hardware issues. After I disabled the microphone, That’s work fine for me.
Press Shift+Command+5 and choose Record Screen; click on “Options”> Set the Microphone to “None.” Or Fix your Microphone problems on Mac,
Pro Tips: How to Record audio from Website On Mac.
This resolves the issue of audio not working in screen recordings on Mac.
Fix 2: Check Keyboard Shortcuts
Whenever you want to record a video on Mac, you can use the Keyboard Shortcut keys: “Shift + Command + 5” as its Default Keyboard Shortcut on Mac from Keyboard Preferences. So, if you encounter an unresponsive recorder, you need to verify that the default shortcut isn’t disabled or changed.
macOS Ventura, Sonoma, And Later
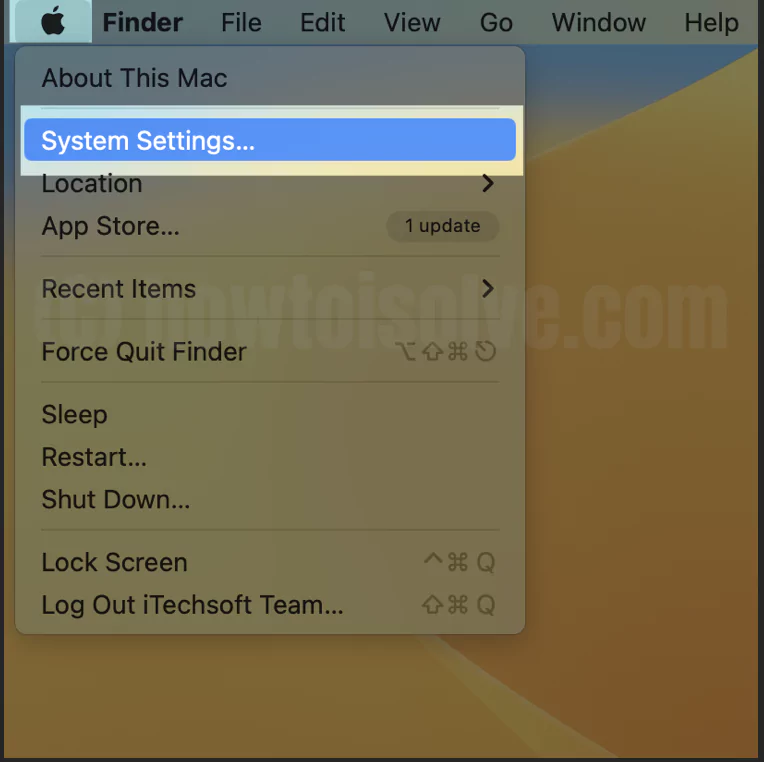
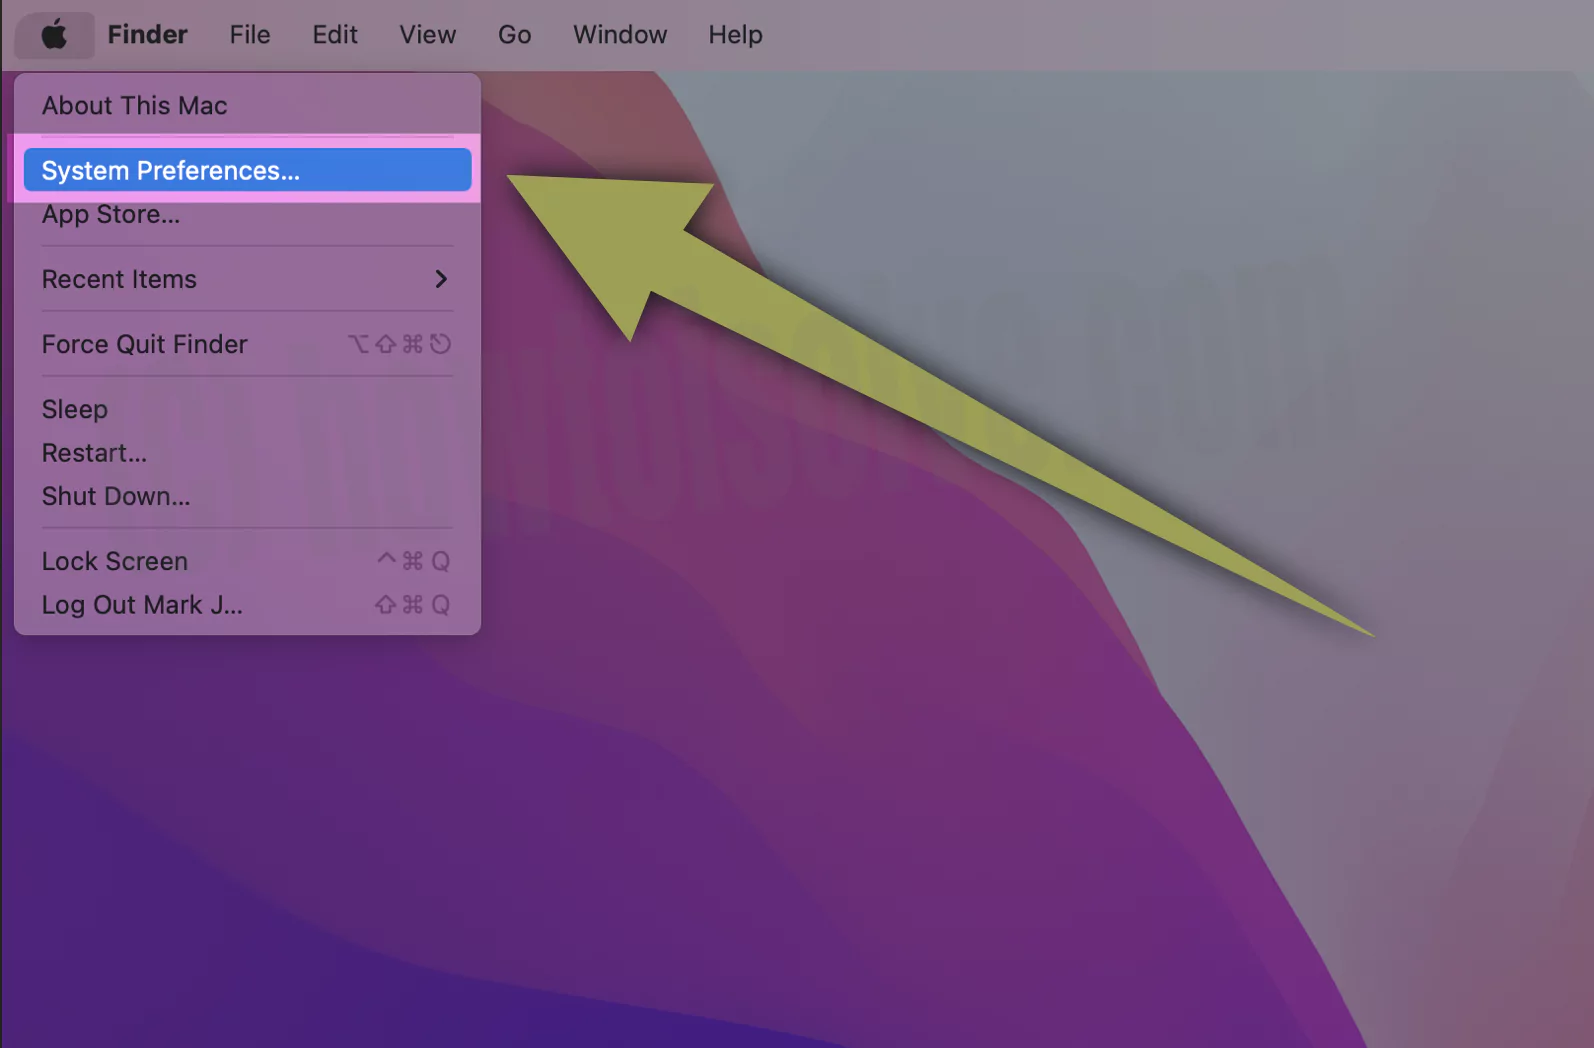
- 1→ Go to Apple Logo > System Settings…
- 2→ Select Keyboard from the Tab. And then click on Keyboard Shortcuts…
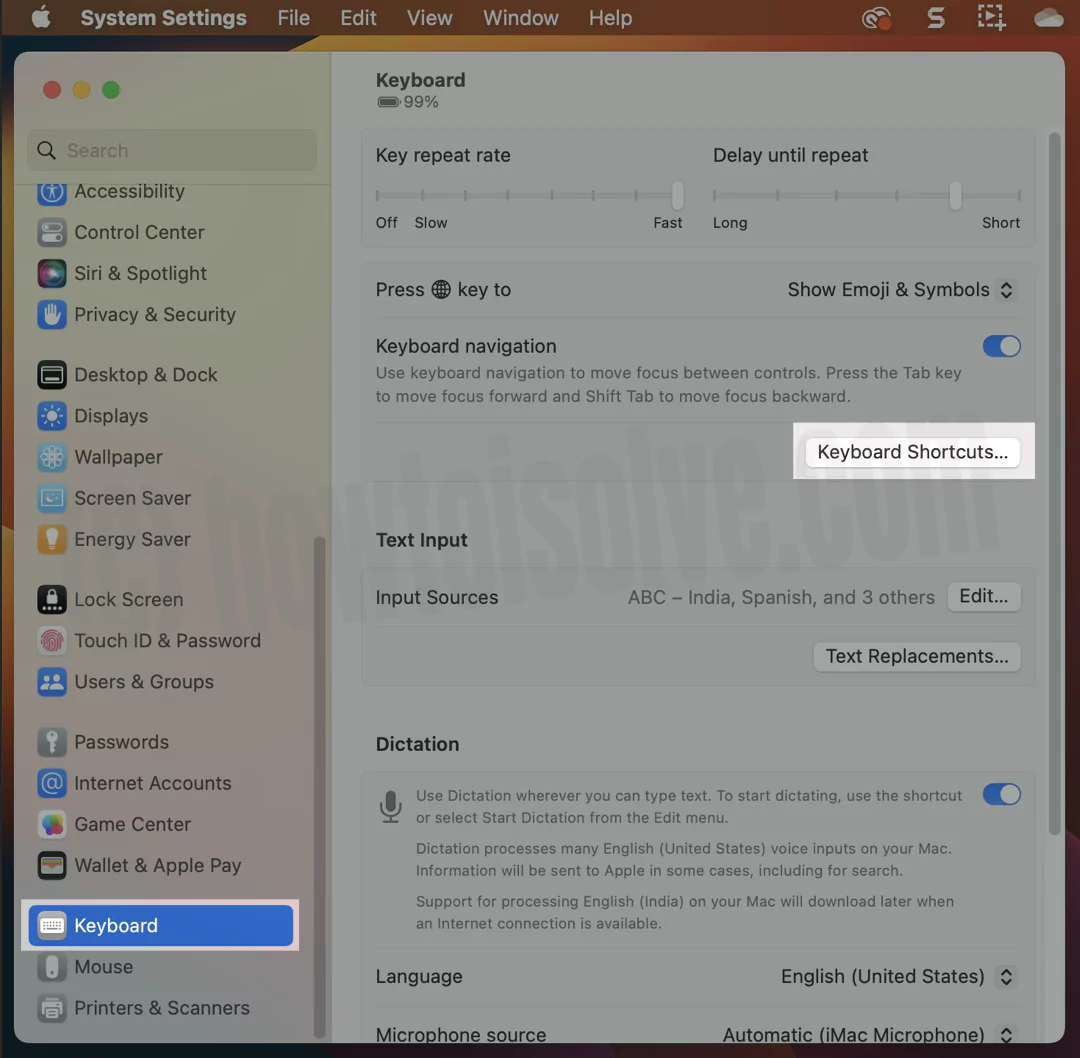
- 3→ Click on Screenshots and then check the box next to the Screenshots and Recording Options.

- 4→ At the same point, verify the shortcut isn’t changed. To restore the default one, click Restore Default at the bottom.
macOS Monterey And Earlier
- 1→ Click on the Apple Logo from the top Mac menu > System Preferences
- 2→ Choose Keyboard.

- 3→ Shortcuts Tab> Screenshots > Select all Checkbox
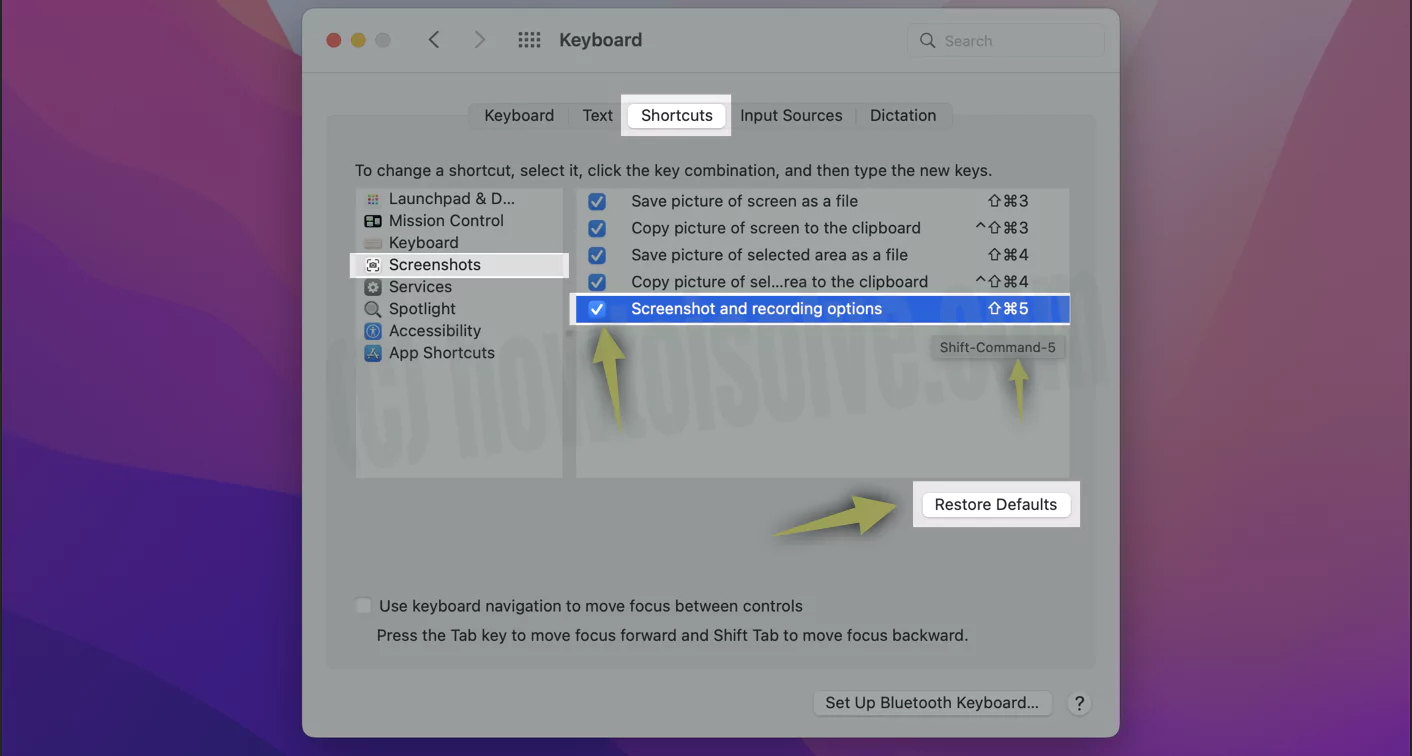
Check that your Mac keyboard shortcuts for screen recording or screenshots haven’t been changed. If they have, you can click the Restore Default button.
Screen Recording Is Not Saving In Your Drive After Stop Screen Recording
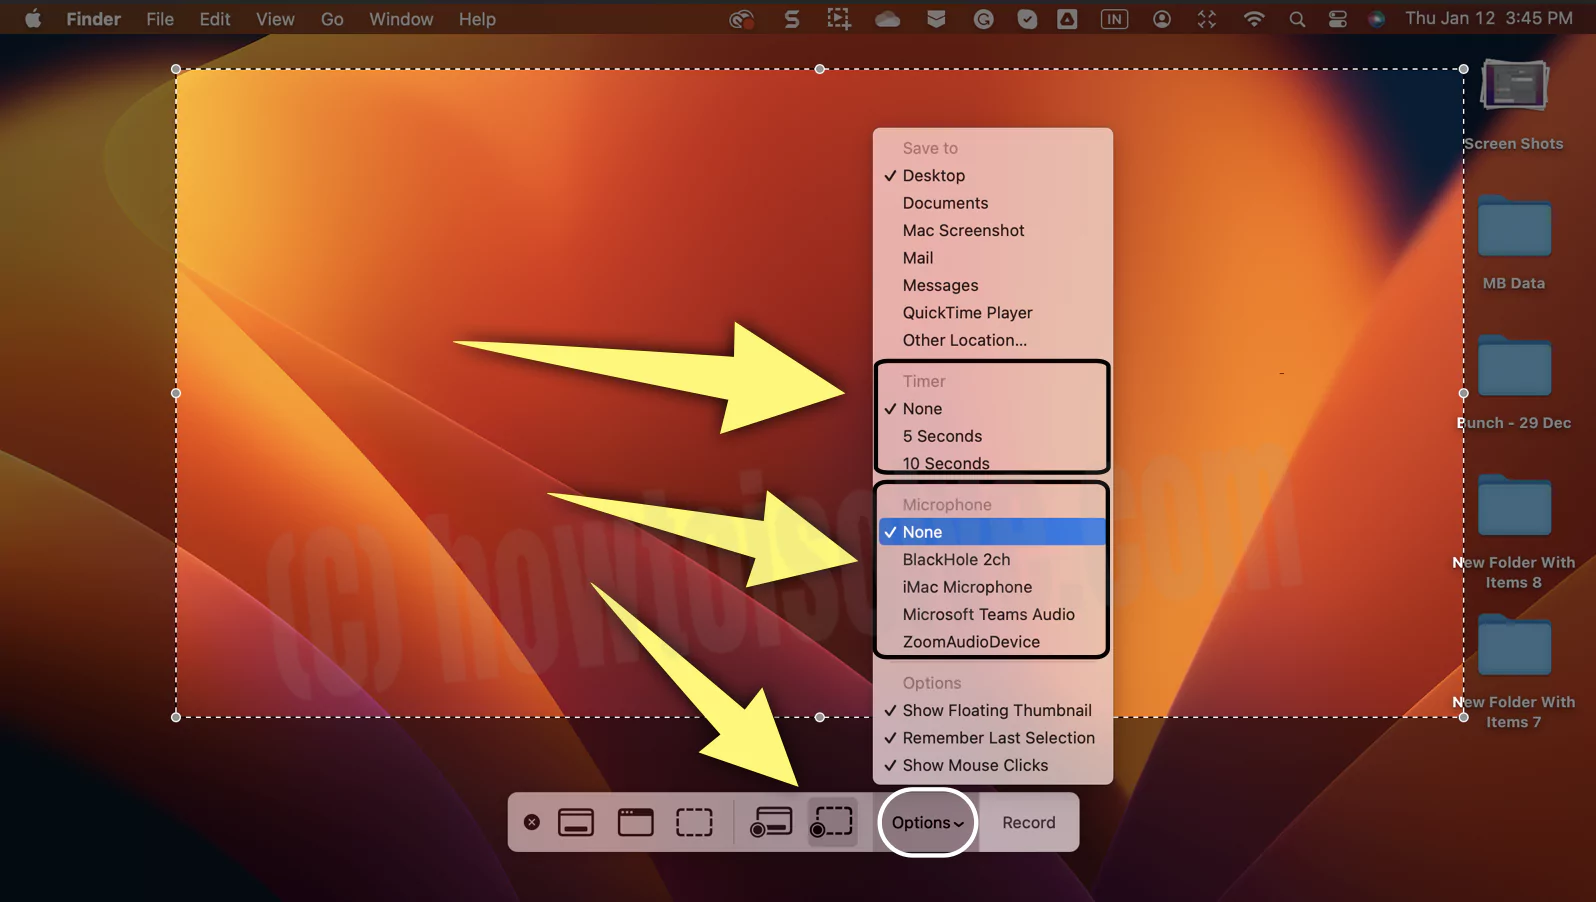
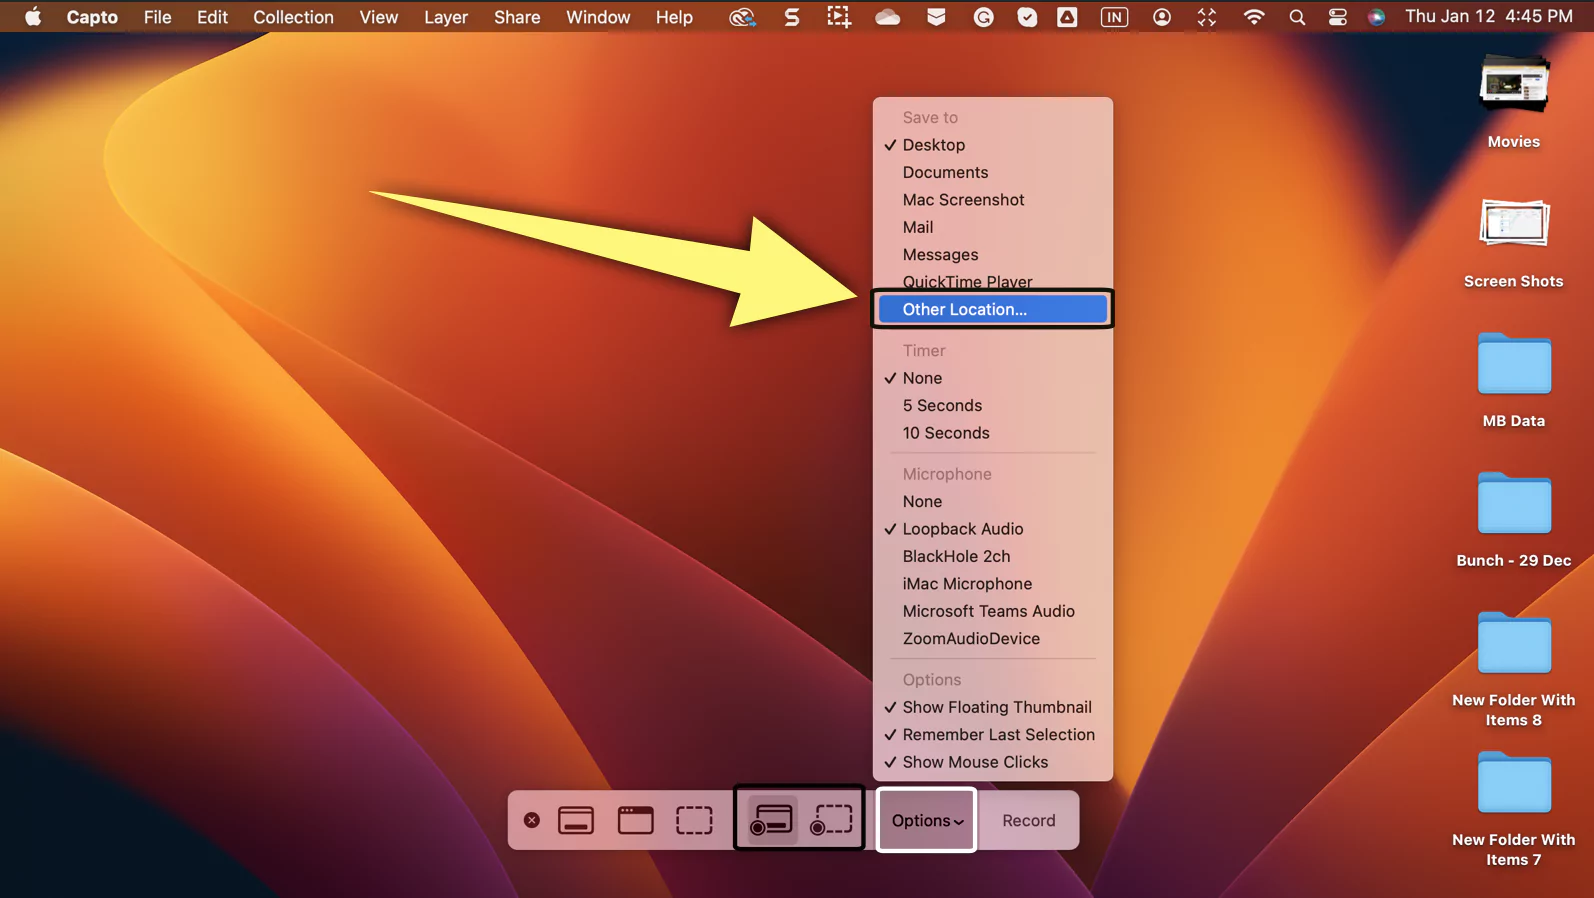
There is nothing to worry about since you have not yet selected the drive in which the video needs to be saved. To do so, press Shift+Command+5 from the recording tool and click on Options. Next, click on Other Locations…
Select Drive from the left sidebar. And accordingly, select the location you want.
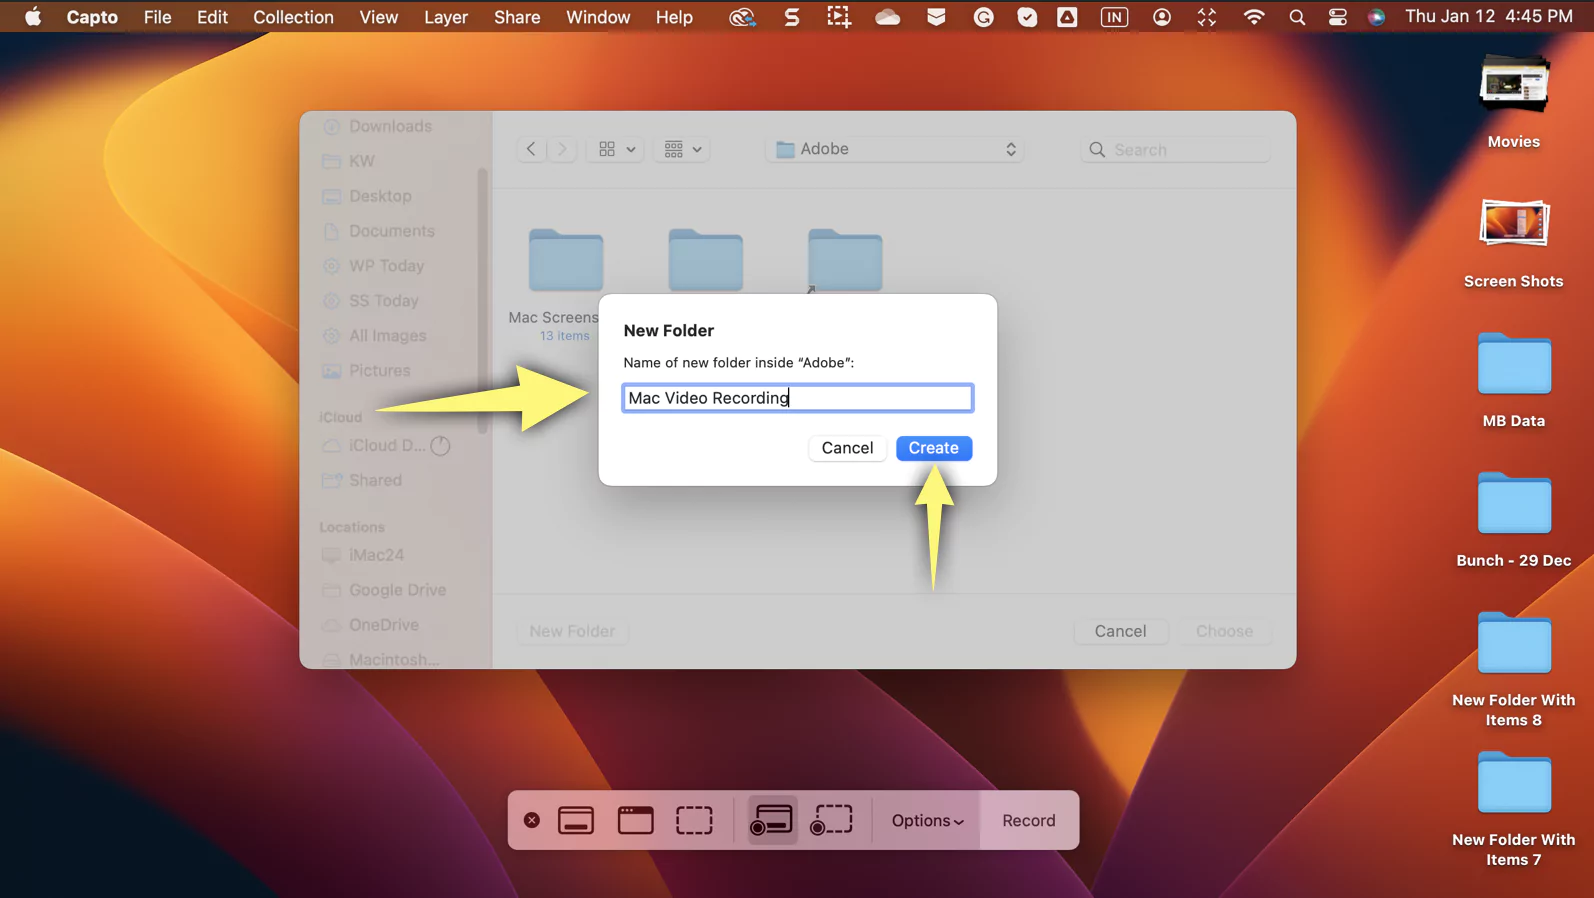
Choose the Folder to save the next recording or screenshot.
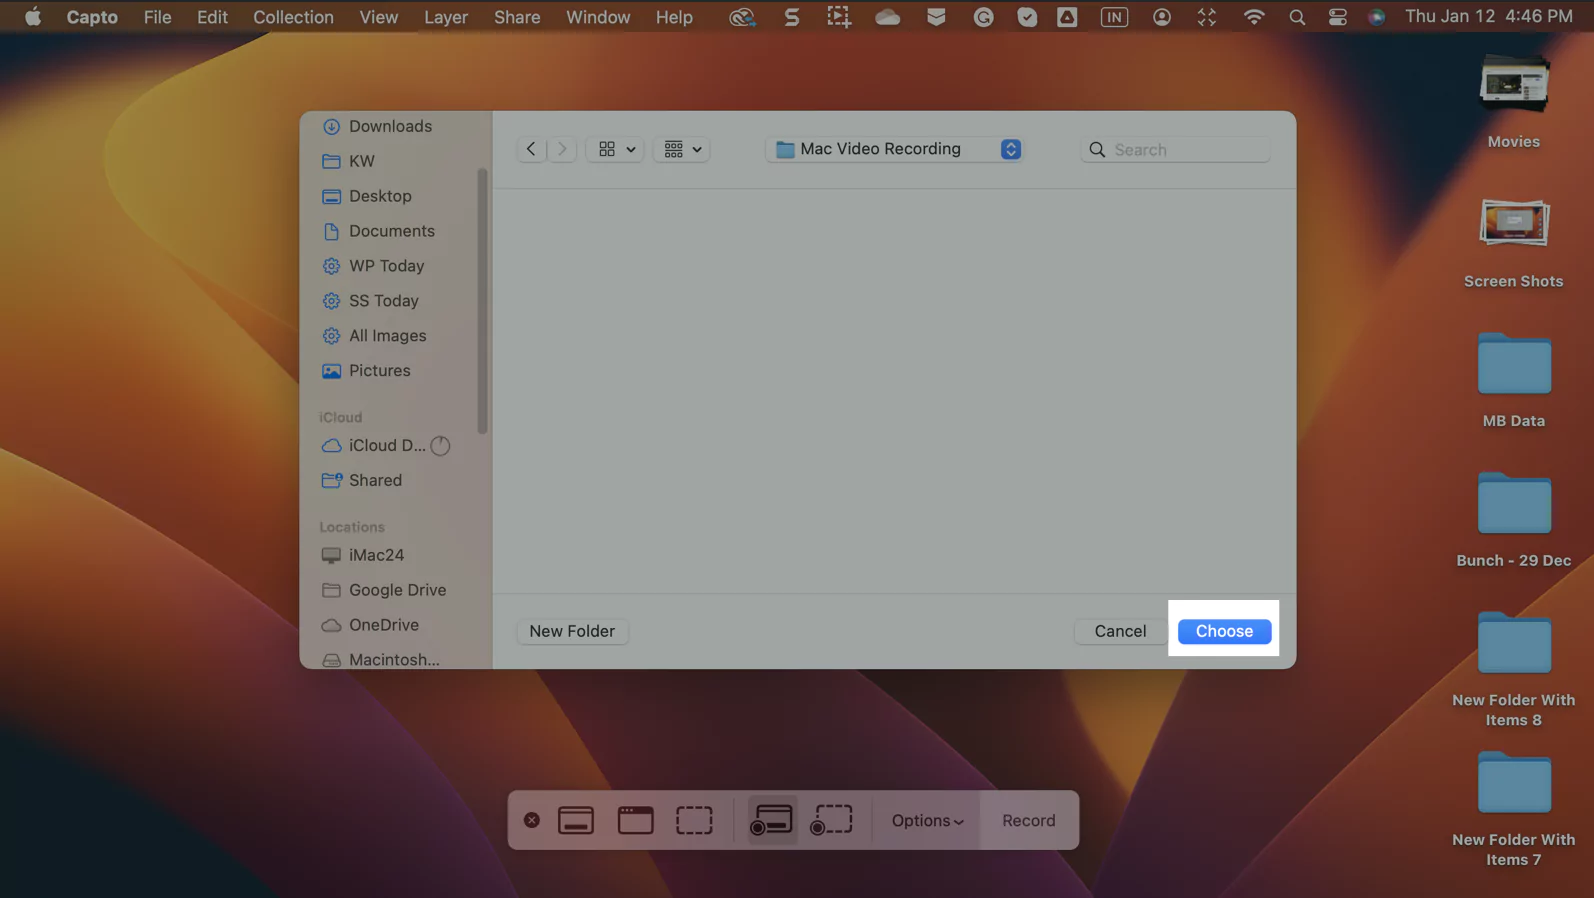
Re-check before starting recording under the save to options.
That’s it.
Fix 3: macOS Screen Recording Permission Not Working
Some Mac users reported the issue with the App, and the Browser won’t allow a recording screen or “screen recording not showing up in system preferences.” For Example, Screen Recording video-making software can record the screen during Zoom meetings in-app or Browser. So, you have to enable the screen recording permission from Mac’s privacy settings.
macOS Ventura And Later
- 1→ Click on the Apple logo in the menu bar and select “System Settings…“
- 2→ Swipe down and select Privacy & Security. Select Screen Recording from the right side.
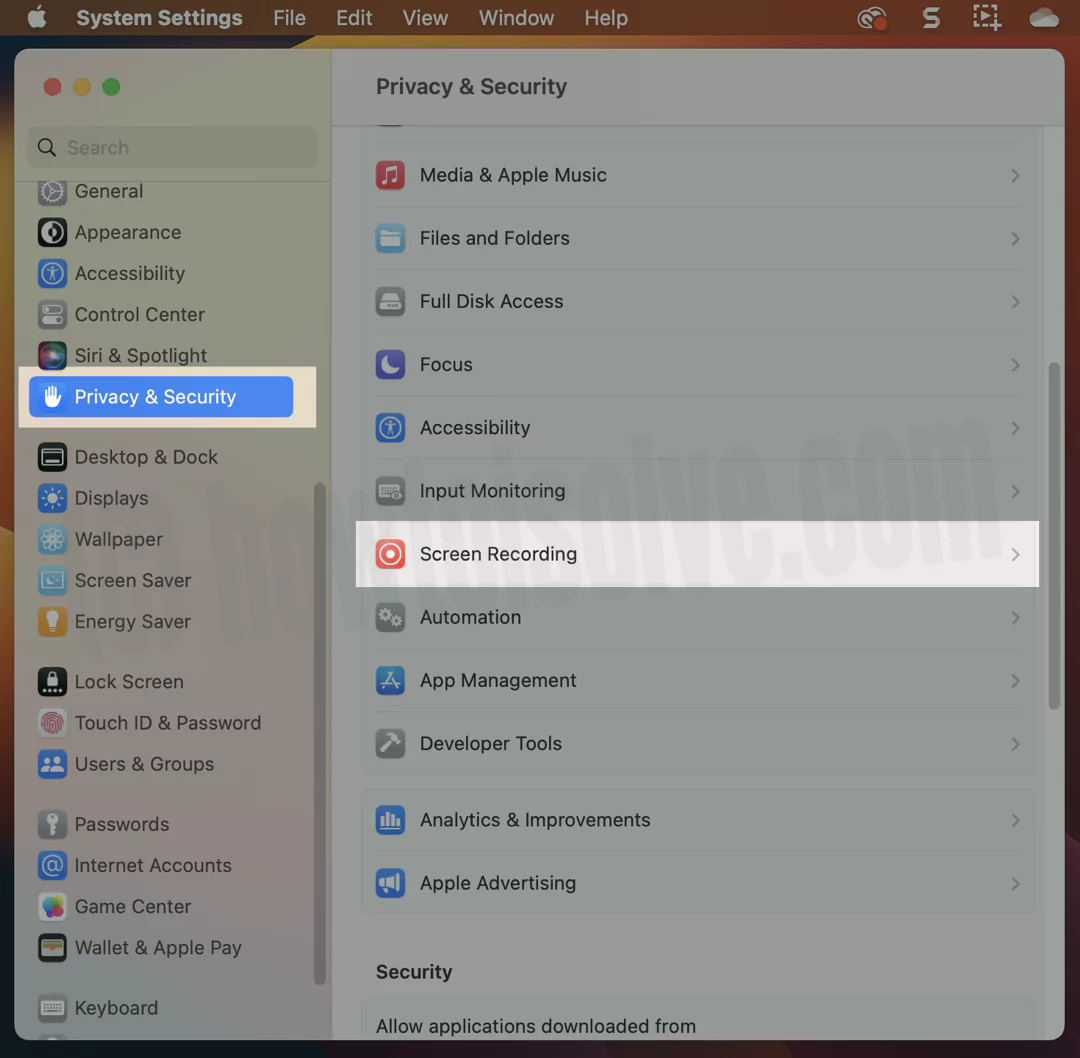
- 3→ Enable toggle next to the application and enter the Administrator Name And Password. That’s It!

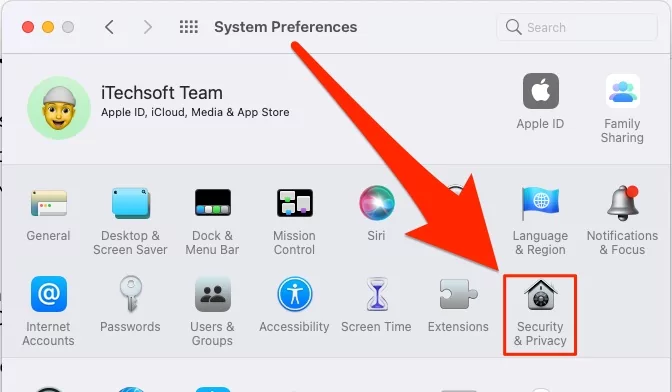
macOS Monterey And Earlier
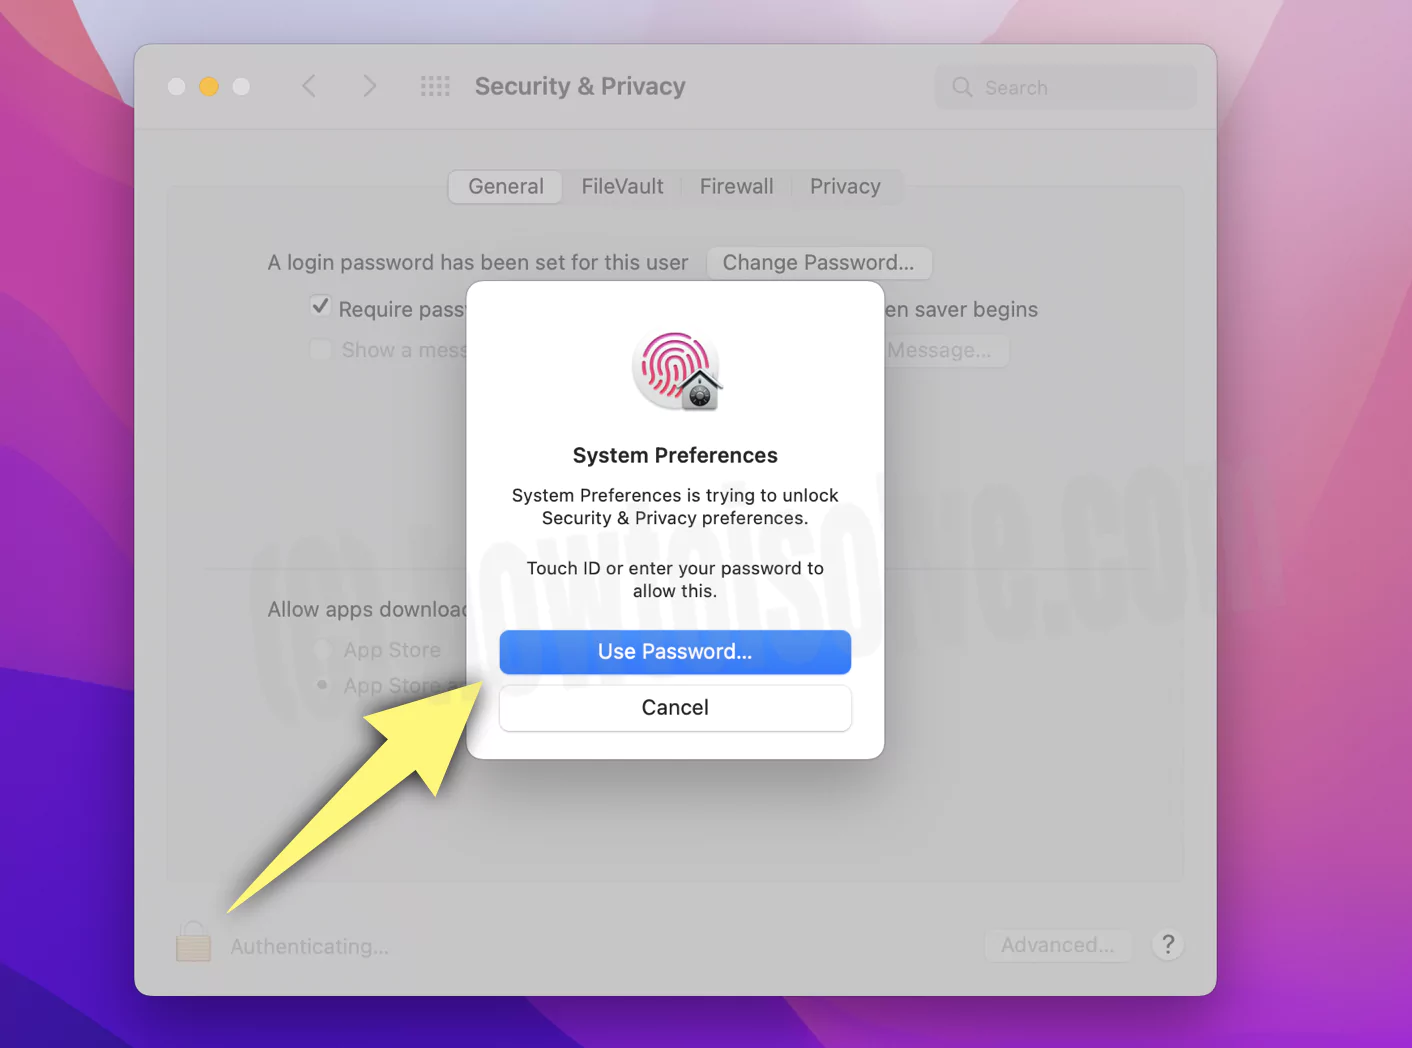
- 1→ Go to the Apple Logo from the top mac menu > System Preferences.
- 2→ Click on Security & Privacy.
- 3→ Click on lock [Enter Administrator Name and Password] to make changes.
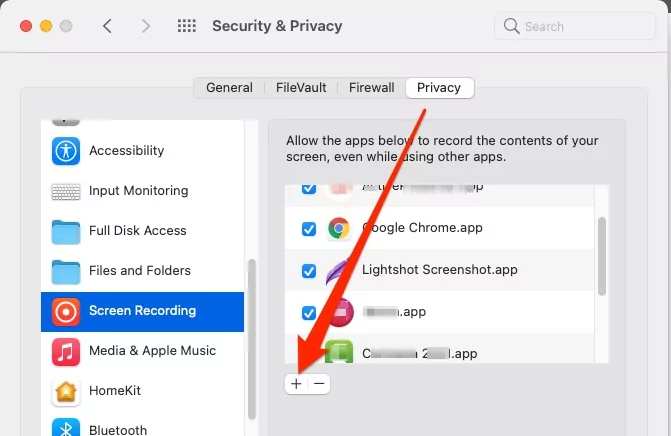
- 4→ Privacy Tab > Select “Screen Recording” from the left side of the window. Also, Select the App or Browser to allow Screen recording while opening on the screen. That’s it.

Fix 4: Mac Privacy Screen Recording Missing
There might be a chance the application from which you are willing to record isn’t allowed under the Screen Recording privacy on macOS. If that’s so, follow the below steps.
macOS Ventura & Later
- 1→ Go to Apple Logo from the menu bar and choose System Settings…
- 2→ Swipe down and select Privacy & Security. Select Screen Recording from the right side.
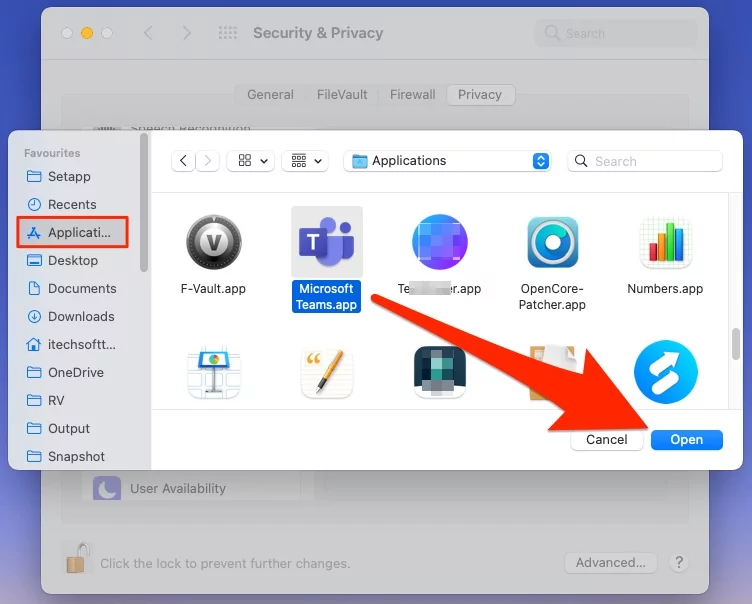
- 3→ Click on + Plus Icon and enter the Administrator Username Name And Password.
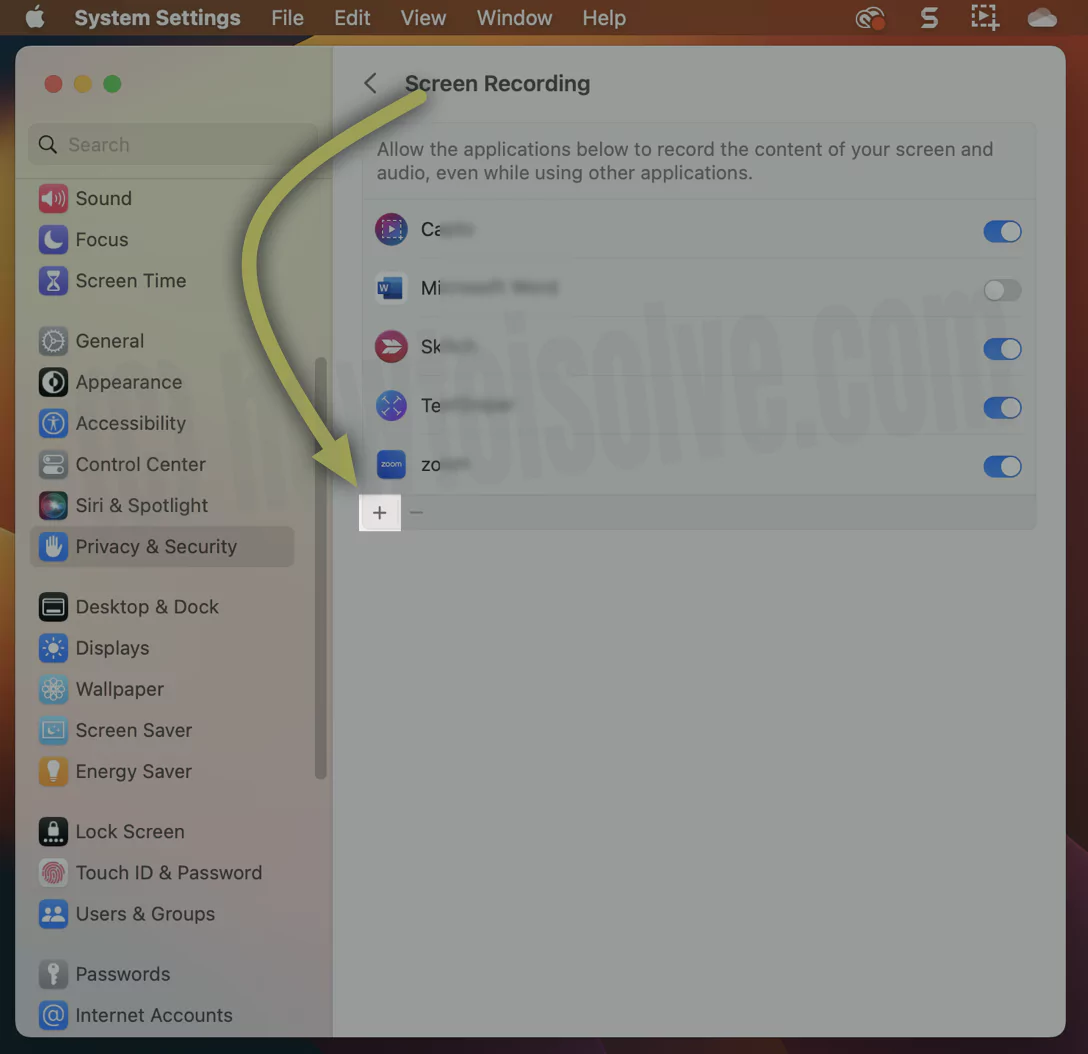
- 4→ Next, choose App from Windows under the applications from the sidebar. Select the app or Use the Search box to find it and click on Open from the bottom right of the screen.
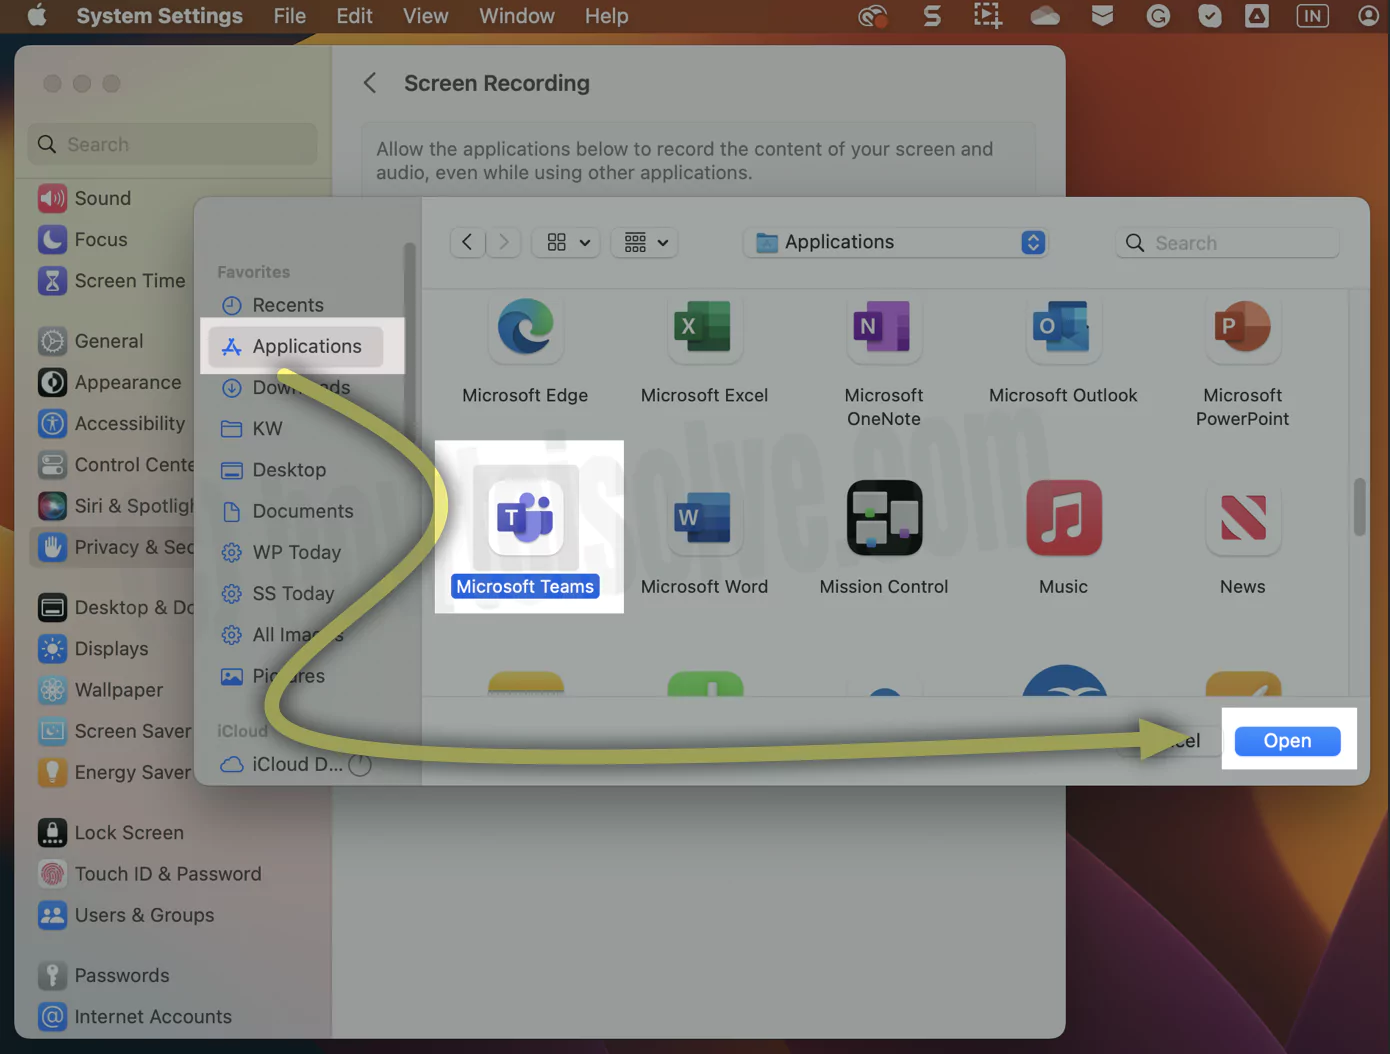
- 4→ Enable toggle to allow screen recording.
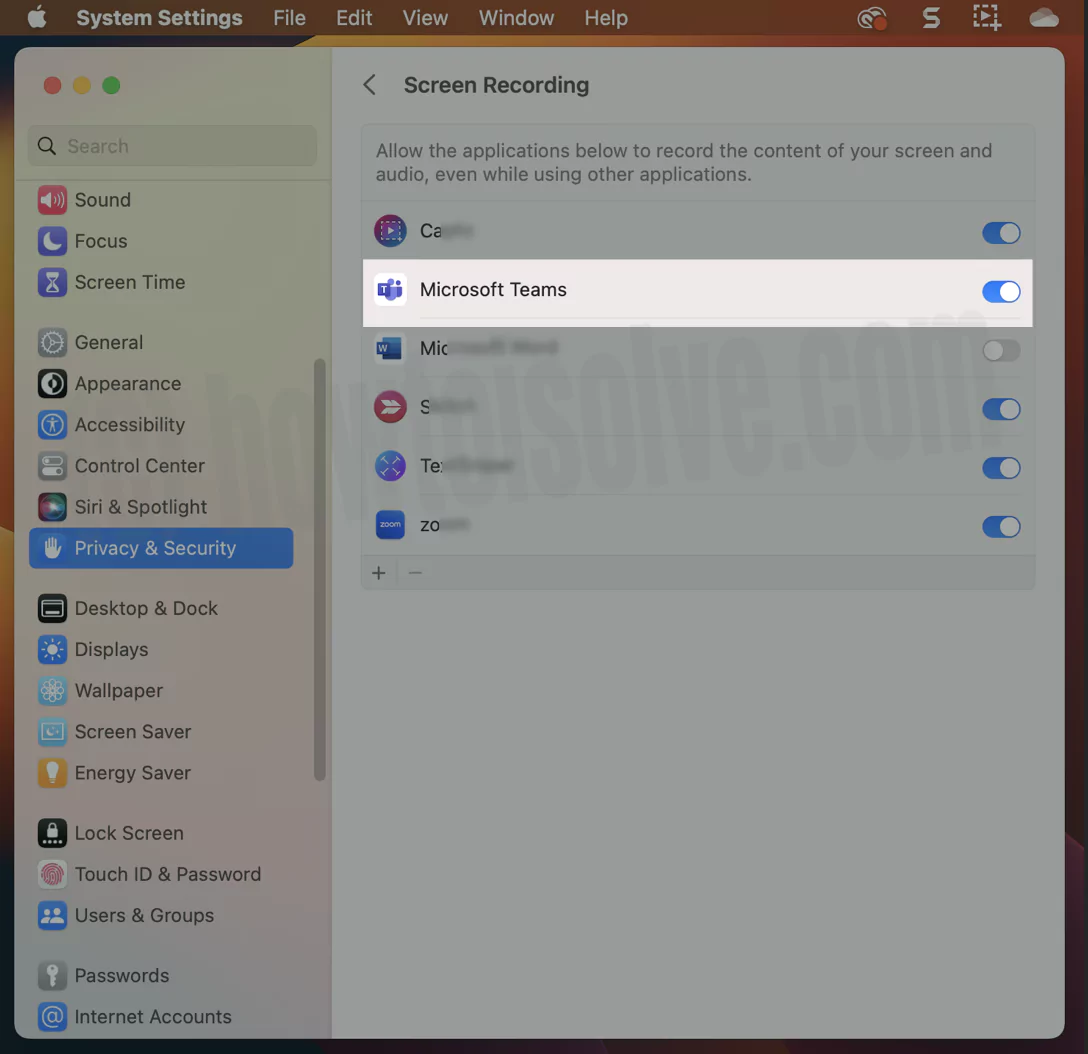
That’s it. Quit the app & Reopen it to start using it for screen recording.
macOS Monterey And Earlier
- 1→ Go to the Apple Logo from the top mac menu > System Preferences.

- 2→ Click on Security & Privacy > Click on lock [Enter Administrator Name and Password] to make changes. > Select “Screen Recording” from the left side of the window.
- 3→ Also, select the App or Browser to allow Screen recording while open on the screen.

- That’s it.
Due to other internal System Errors or App bugs, your app is not showing under the Screen Recording Privacy option on Mac System Preferences. Follow the steps below to add and allow for screen recording.
- If your app is not in the list, then add manually from [+] Option,
- Select Applications Folder and > App that you want to add.
- Browser app from Mac, and Enable Checkbox to allow screen recording for mac.
That’s it.
Fix 5: Check for Software Update On Mac
Outdated macOS versions can cause specific issues with Mac, including screen recording stopping automatically after a certain time or interval. To check if this is not the cause, follow the steps below.
macOS Ventura And Later
1→ Select the Apple Logo from the Menubar.
2→ Click on System Settings…
3→ Choose Software. Let the system Check For Updates. If available, click on Update Now and then Restart Now.
macOS Monterey And Earlier
1→ Go to the Apple Logo on your Mac.
2→ Next, click on System Preferences. Now, find and choose Software Update. Wait for a few seconds to check and get the Software update. If available, instantly select Update.
Fix 6: Restart your Mac
Internal software glitches and hardware issues can be fixed with a simple restart. My Mac mini was affected by problems with the Keyboard Shortcut (Shift + Command + 5) for taking Screenshots or Starting Video Recording not working or not starting.
- Go to the Apple menu > Apple logo > Restart.
Or, Use the Power button to force restart or turn off your Mac, iMac, MacBook Pro, or MacBook Air.
Fix 7: Delete Screen Recorder Plist file from Library on Mac
Plist is an application file that allows you to store the settings or preferences you use. However, occasionally, it needs to be restored to fix the conflicts within the Application. That’s what we need to do with the Screen Recording App: follow the steps below.
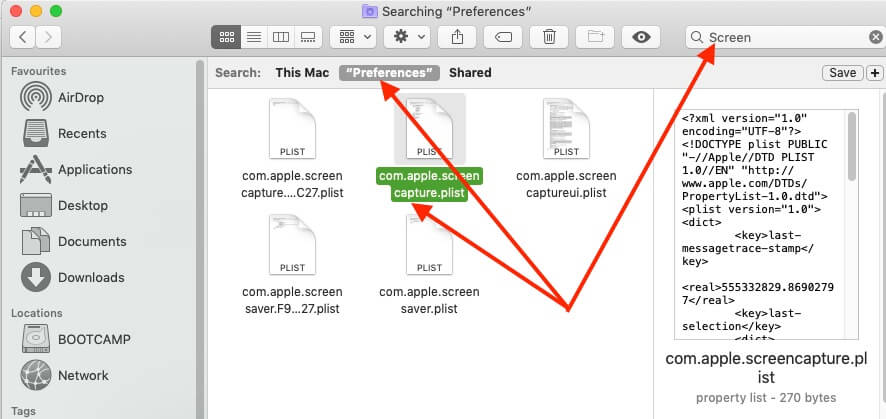
1→ Open Finder on Mac and select Go from the menu bar. Click on Go to Folder…
2→ Enter the below command line: ~/Library/Preferences/
3→ Tap on the Go button.
Search the “Screen” [com.apple.screen capture.plist] file using the Search box, Select Preferences Folder Directory, and Quickly find your find. Copy this File for Backup and save it to another folder or place. Delete this File under the Library folder.
Check now screen recording works or not. Otherwise, restart your Mac and Check it to get effect 100%. Thanks.
Fix 8: Screen Recording Permission Mac Chromecast
To cast your Chrome browser from your Mac to a compatible device, such as a Chromecast, you’ll need to enable Screen Recording permissions for Google Chrome in your Mac’s Privacy settings.
macOS Ventura & Later
- 1→ Go to the Apple Logo from the menubar and choose System Settings…
- 2→ Swipe down and select Privacy & Security… Select Screen Recording from the right side. Enable toggle next to the application and enter the Administrator Name And Password.
- 3→ If Google Chrome Browser is missing the list, click on the + Plus Icon and enter the Administrator Name And Password.
- 4→ Next, choose Google Chrome App and click on Open from the bottom right of the screen.
- Ensure that Chrome is enabled.
If you are using an older version of macOS, please follow the steps below.
macOS Monterey And Earlier
- 1→ Go to the Apple Logo from the top mac menu > System Preferences.
- 2→ Next, Click on Security & Privacy > Unlock the Window by clicking on the Lock icon [Enter your Mac name and Password]. Select Screen Recording from Sidebar > and Select Google Chrome Browser.

- 3→ Quit and reopen your Browser and start cast to Chromecast. If Google Chrome is not showing on the list, click on the + icon from the screen, and from the Applications, search for Google Chrome and tap Open.
Cast your Mac screen to Chromecast: Open a Tab in Google Chrome Mac Browser on your Mac, Click on the More button at the top right corner of the screen > Cast > Select Sources and Devices in your Network, and Record your Mac screen.


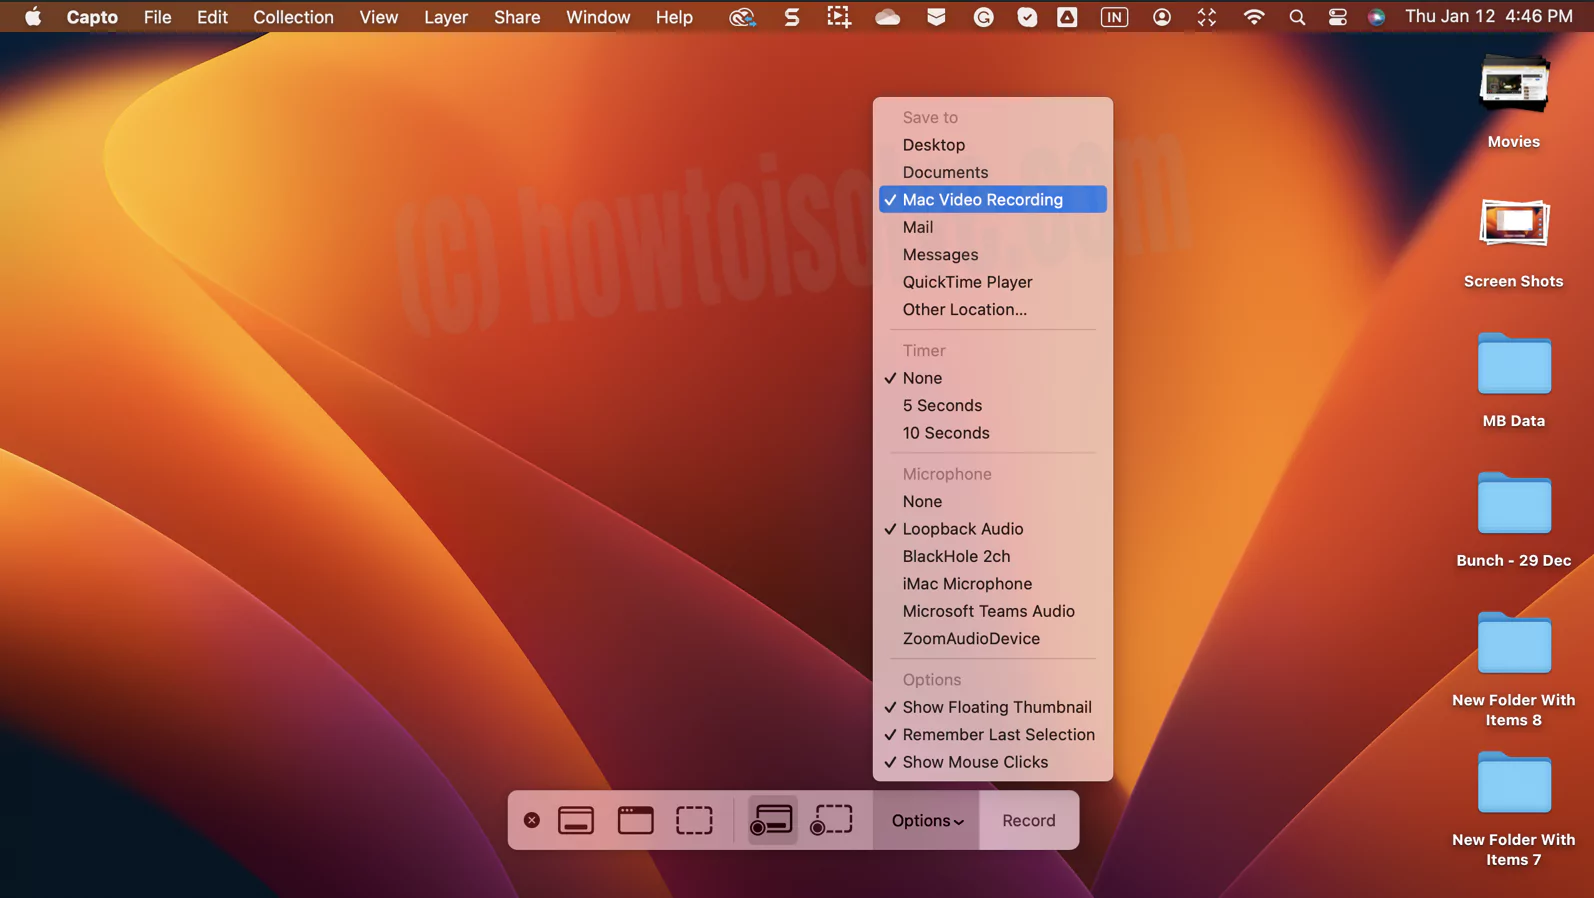
Fix 9: Screen Recording Stops Automatically
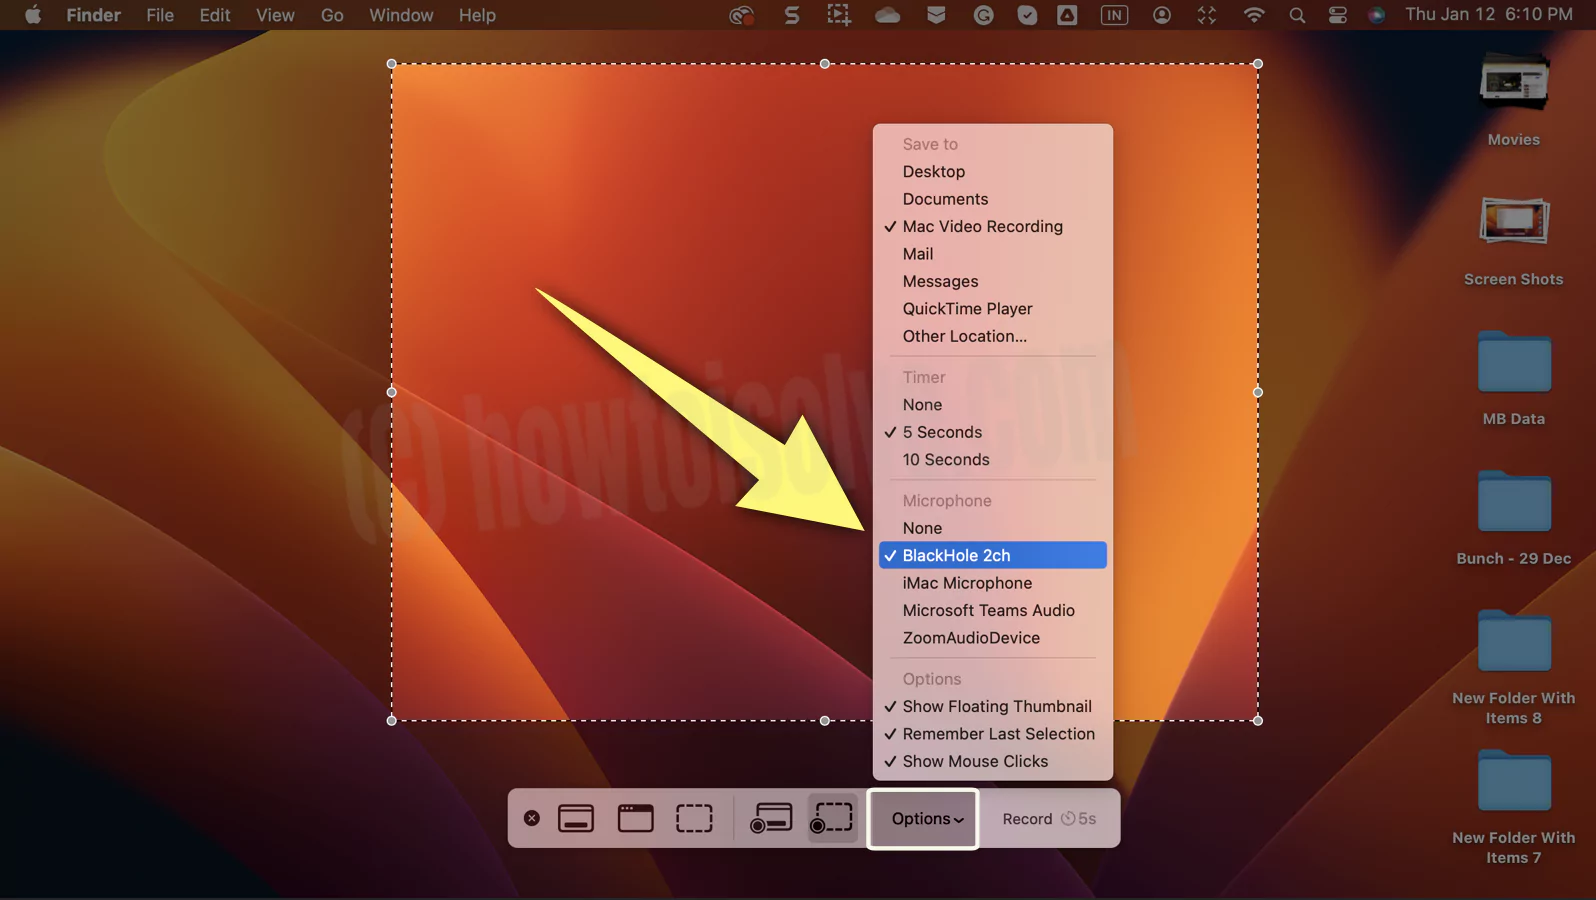
However, this could be due to the screen recording limit applied by you. To check it, press Shift+Command+5. Next, click on the Options, and then under the Timer Menu, select None.
Fix 10: Can I record the Mac screen With Internal audio?
Officially this option is disabled for Mac users, But we can do it using the third-party Extension known as Loopback on supported by all macOS.
macOS Ventura And Later
1→ Download and Install Loopback Extension and allow all security permissions.
2→ Once you do, navigate to the Apple Logo > System Settings… > Sound from the left sidebar.
3→ Right under the Output & Input Menu, click on Output and select Loopback.
4→ Now press Shift+Command+5, and from the recording tool, select Options. Under the Microphone Menu, select Built-In Microphone and begin recording.
macOS Monterey And Earlier
1→ Download and install the Loopback Extension and allow all permissions on Mac.
2→ Enable Loopback as an internal audio reference from Microphone Preferences. Go to the Apple Logo from the top Mac menu > System Preferences > Sound > Under the Output tab, select Loopback.
3→ Now, Start the Built-in Screen Recording On your Mac screen by pressing “Shift + Command + 5,” Selecting the Options menu, Selecting the Built-In Microphone, and Starting the recording.
Fix:11 Screen Record Mac with internal audio QuickTime not recording
Can I Record Mac Screen Using Quick Time? No. Apple doesn’t allow audio recording with Quick Time Screen because of apple’s terms and conditions. But Third-Party Screen Recording software will help you to record a Mac screen with Audio [System Sound, Click, Video with Sound]. Here’s an Example,

Fix 12: Quick Time Player Has still in use
1→ Open Quicktime Player on Mac using Spotlight Search (Command + Space).
2→ Do Right Click on the QuickTime Play icon on the dock and select “New Screen Recording.” Or open QuickTime, choose File from the menubar, and then select New Screen Recording (Control+Command+N).

3→ Start to record the screen by clicking on Button on QuickTime player.
4→ Now, Click to record full screen or drag the selected part to be recorded.
Make sure to save your task before closing it.
Bottom Line
I hope the troubleshooting guide has helped you to fix the issue. However, if the error continues, we recommend contacting Apple Support for further assistance, or you can visit the nearest Apple Center as there may be a hardware issue.
Share this guide with your friends or anyone looking to Screen Recording Can’t be Saved & Record Screen Not Working.


