
In this article, I’ll give you fixes for the MacBook microphone that stopped working. Apple Mac computer internal Microphone does much more useful than External Microphones. We daily use Applications like Discord for the gaming community, Zoom, Google Hangout, Skype for video calls, Fortnite games, and much more App needs Mic. Also, if it doesn’t work in some cases, then users feel frustrated. Are you looking to troubleshoot my mic is not working on MacBook Pro? Don’t worry. We have made this post which includes potential solutions to fix the microphone not working on Mac. If the Mic does not stop, responding, then you can’t FaceTime your friend, you can’t even use Siri on Mac, and many more features will not function correctly.
This solution is useful for microphones not working on Skype, Zoom, GoToMeeting, etc. And as you know, these all kinds of platforms needed our Apple Mac or Windows laptop microphone and camera in workable mode. In case your laptop mic or camera doesn’t work at this moment, this post will help you to fix your issues for free and DIY. So let’s see!!
This guide How do I get my microphone to work on my Mac? Right away, you can begin communications with your friends and colleagues.
How do I Fix My Microphone on My MacBook? Get Solved
Fix 1). How to Clean Microphone on MacBook and iMac
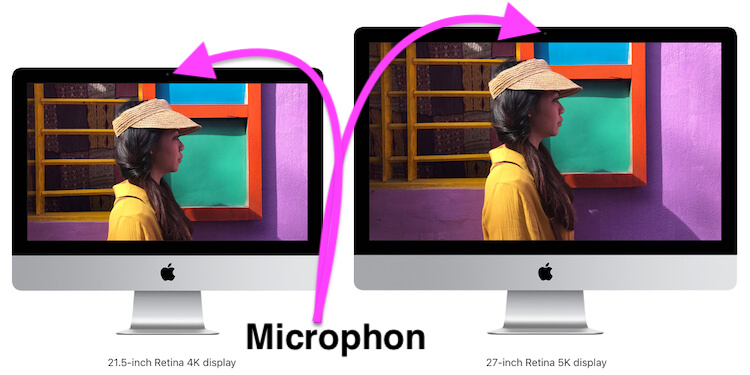
Finding Microphone Mic is hard to find on Apple Mac Devices, Here’s the below picture that will help in finding “Where is Microphone location on MacBook and iMac“, That used as an Internal mic or microphone. Let’s Clean up perfectly, That help is removing Debris and a Thin layer of Viscous substance from the microphone grill.
On MacBook Pro/Air,

On iMac Display,
Note: The microphone is too sensitive a part of your Device; you don’t take hard actions like Heavy Water flow, Sharp objects, or Hard Rubbing on the Microphone Input.
How to Clean Internet Microphone from MacBook, Mac
See the Above image and Find where is the exact location of your internal microphone? Use a Micro Fiber cloth & Compressed air [Blow from your mouth]. Also, You can use Soft Baby Brush ? to Remove the hard Layer of Dust.
Once you clean, repeatedly check that your microphone receives an outer sound level with a Sound detector equalizer, Shown Below. Fix at Step 5 – Input level.
Fix 2). Configure the Microphone Settings
As Per your Installed MacOS Version, Find the Microphone settings on your Mac [MacOS Monterey & MacOS Sonoma],
On MacOS Venture Microphone Settings
Step #1: Go to the Apple Logo from the top Menu > System Settings.
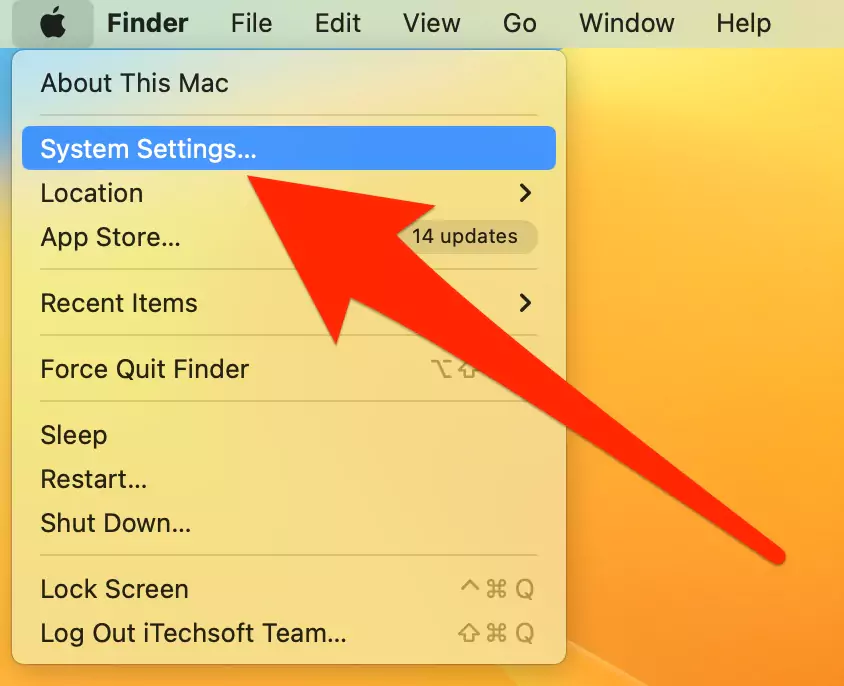
Step #2: Select Sound settings, Scroll to the Input & Output section, and Choose the Input section.

Step #3: Choose Input Mic if you connected External Microphone to your Mac. See the Input Volume Level and Set to Maximum. Also, see the Microphone Sensing the Sound Wave level. If the Wave is not playing, make sure Hardware or Other Software issues are resolved. If it’s fine, we can quality manage from the top menu on Mac. Let’s enable using the next step,
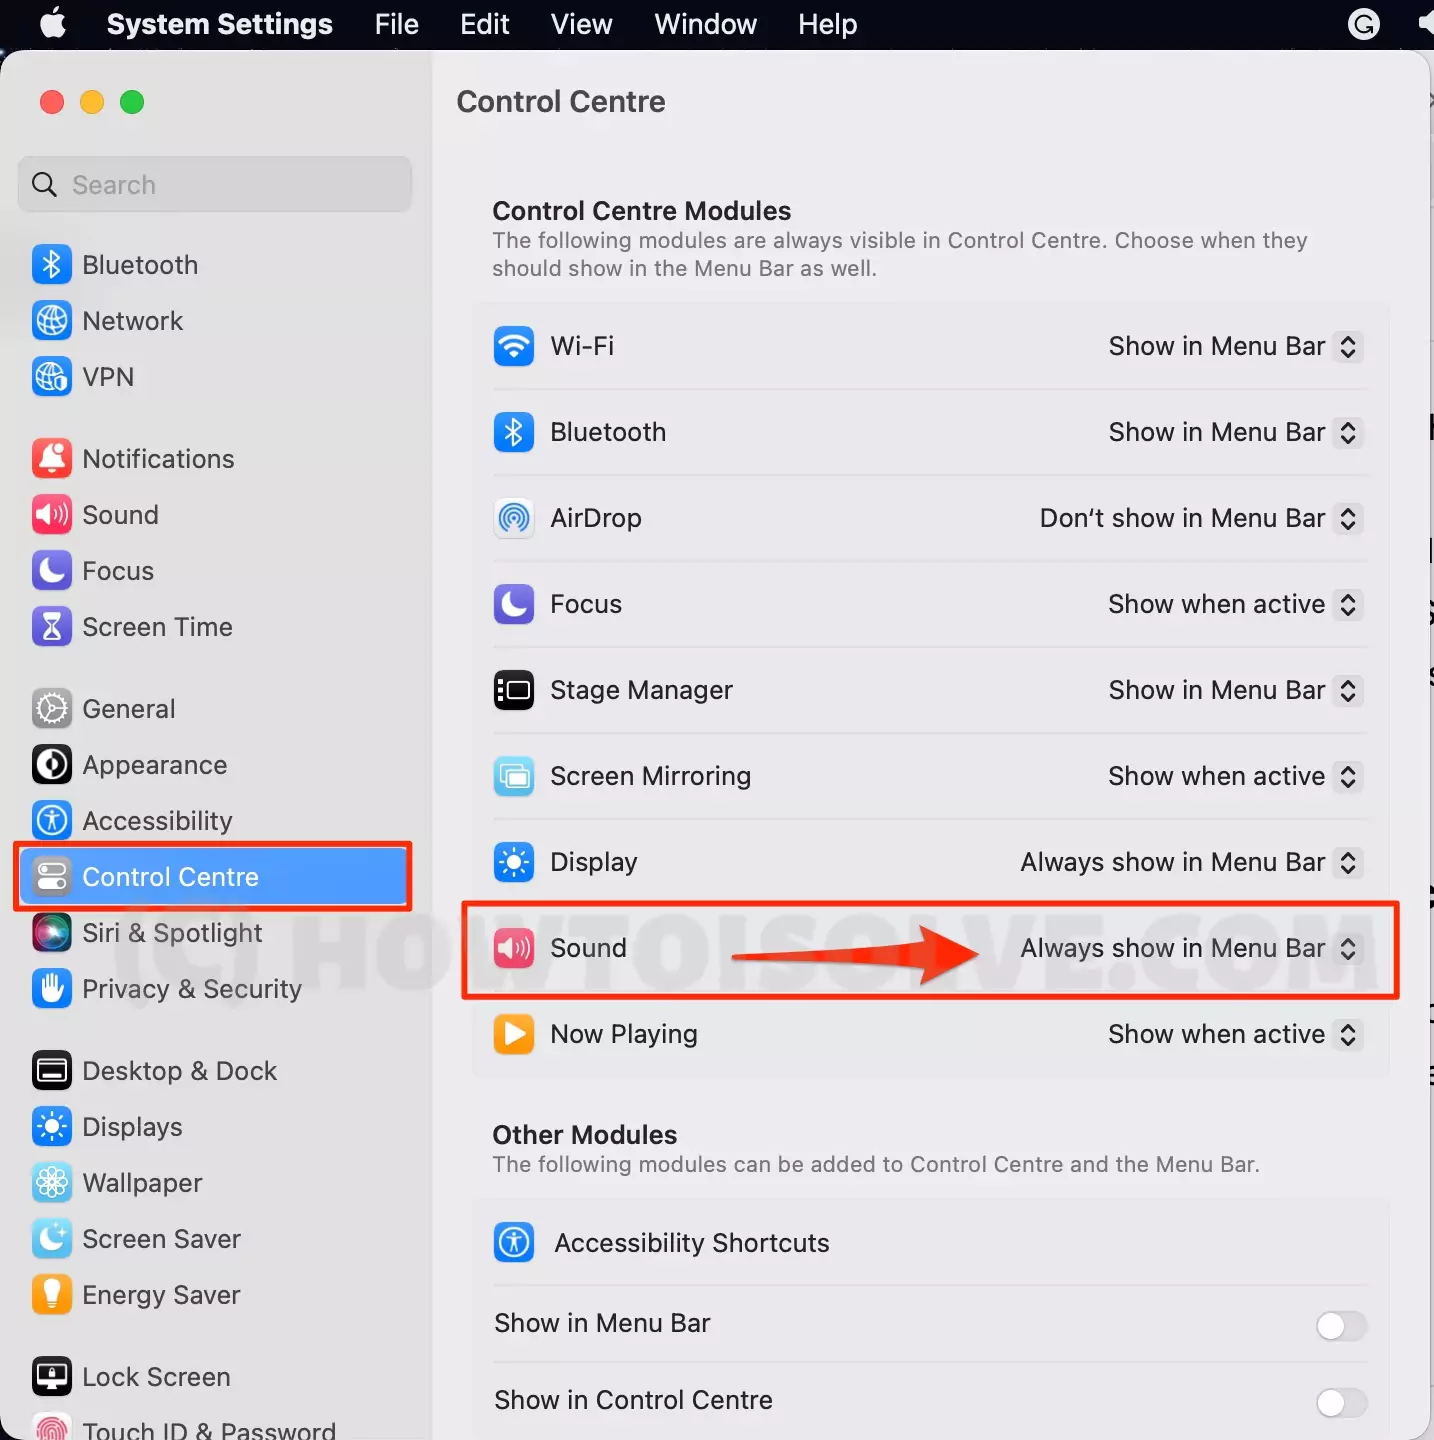
On your Mac System Settings > Select Control Center > and Select “Always show in Menu Bar” for Sound.
That’s it.
Click on the Speaker icon on the Top Mac menu, and Choose Microphone.

For MacOS Monterey & Earlier: Find Microphone Settings
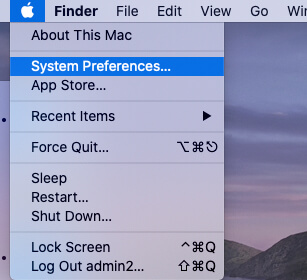
Step #1: Click on Apple Logo () From Top Mac Menu.
Step #2: Select “System Preferences.”
- Step #3: Locate “Sound” and open it.

- Step #4: Click on the “Input” tab.
- Step #5: Choose the “Internal Microphone” if not. Try to speak in the microphone and observe the blue lines of the Input level. or Select Third-Party Headphone if you are using on your MacBook Mac with a gaming headset mic, afterglow headset mic, hyperx headset mic as Eaxtnerla mic.

- Step #6: If blue bars are rising while you speak then the microphone is working correctly otherwise there is a problem with the Microphone.
- Step #7: If the blue lines are not rising then drag the slider of “Input volume” to the maximum. [Should be loud enough if your microphone delivering low sound through Built-in Microphone.]
- Step #8: Again check the blue bars by speaking into a microphone. Once you enable Checkbox for Show Volume in Menu Bar, the Speaker icon will appear on the top right corner of the Mac Screen, Click on it. Now, Quickly and Easily Select the External Audio Accessories if you are using it.

Update Your Mac System: Click on Apple Logo () From Top Mac Menu > System Preferences > Software Update > Download and install the latest macOS version.
Tricks: Use Bluetooth Earbuds or Wired Headphone: Have a Mic
Bluetooth Earbuds perfectly work with your macOS Version for the Conferencing on Skype, Zoom Using Apple AirPods, and Other Headphone use for Microphone amazing solution that really appreciated by mac users. here’s the guide on Setup your Airpods with your Mac,
- Open Bluetooth Preferences on your Mac.
- Click on Apple Logo () From Top Mac Menu
- > System Settings [System Preferences on Old macOS]
- > Bluetooth.


- Move back to System Preferences on Mac > Sound > Set Headphone for input and Output device.
Note: If you wish to use a 3.5mm Headphone on your Mac from a USB port then you must have this Audio Adapter that has a built-in Sound card: USB C, | USB Adapter.
Fix 3). How to Allow to Use Microphone For Installed Apps on Macbook, Mac
In general, if you want to verify the microphone access to the applications on Mac, you can do so by following a few instructions. You can find Such apps as Zoom, Skype, Recording software, and Other All Video conference or Group Chat software. Follow the steps as to Which MacOS Version install on Mac.
On MacOS Monterey & Earlier Allow Microphone permission
- Click on the Apple Logo () From Top Mac Menu > System Preferences.
- Go to Security & Privacy.
- Select Privacy Tab [In Last] and find Microphone from Side panel.
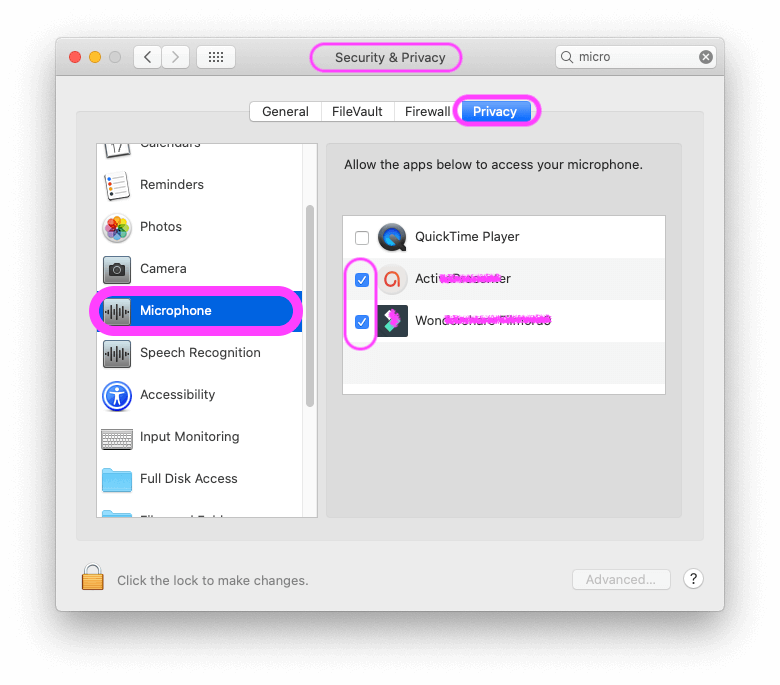
On the other side, you can see the list of apps that are allowed Apps to access the microphone of the Mac. Keep the Selected app with a Checked box.
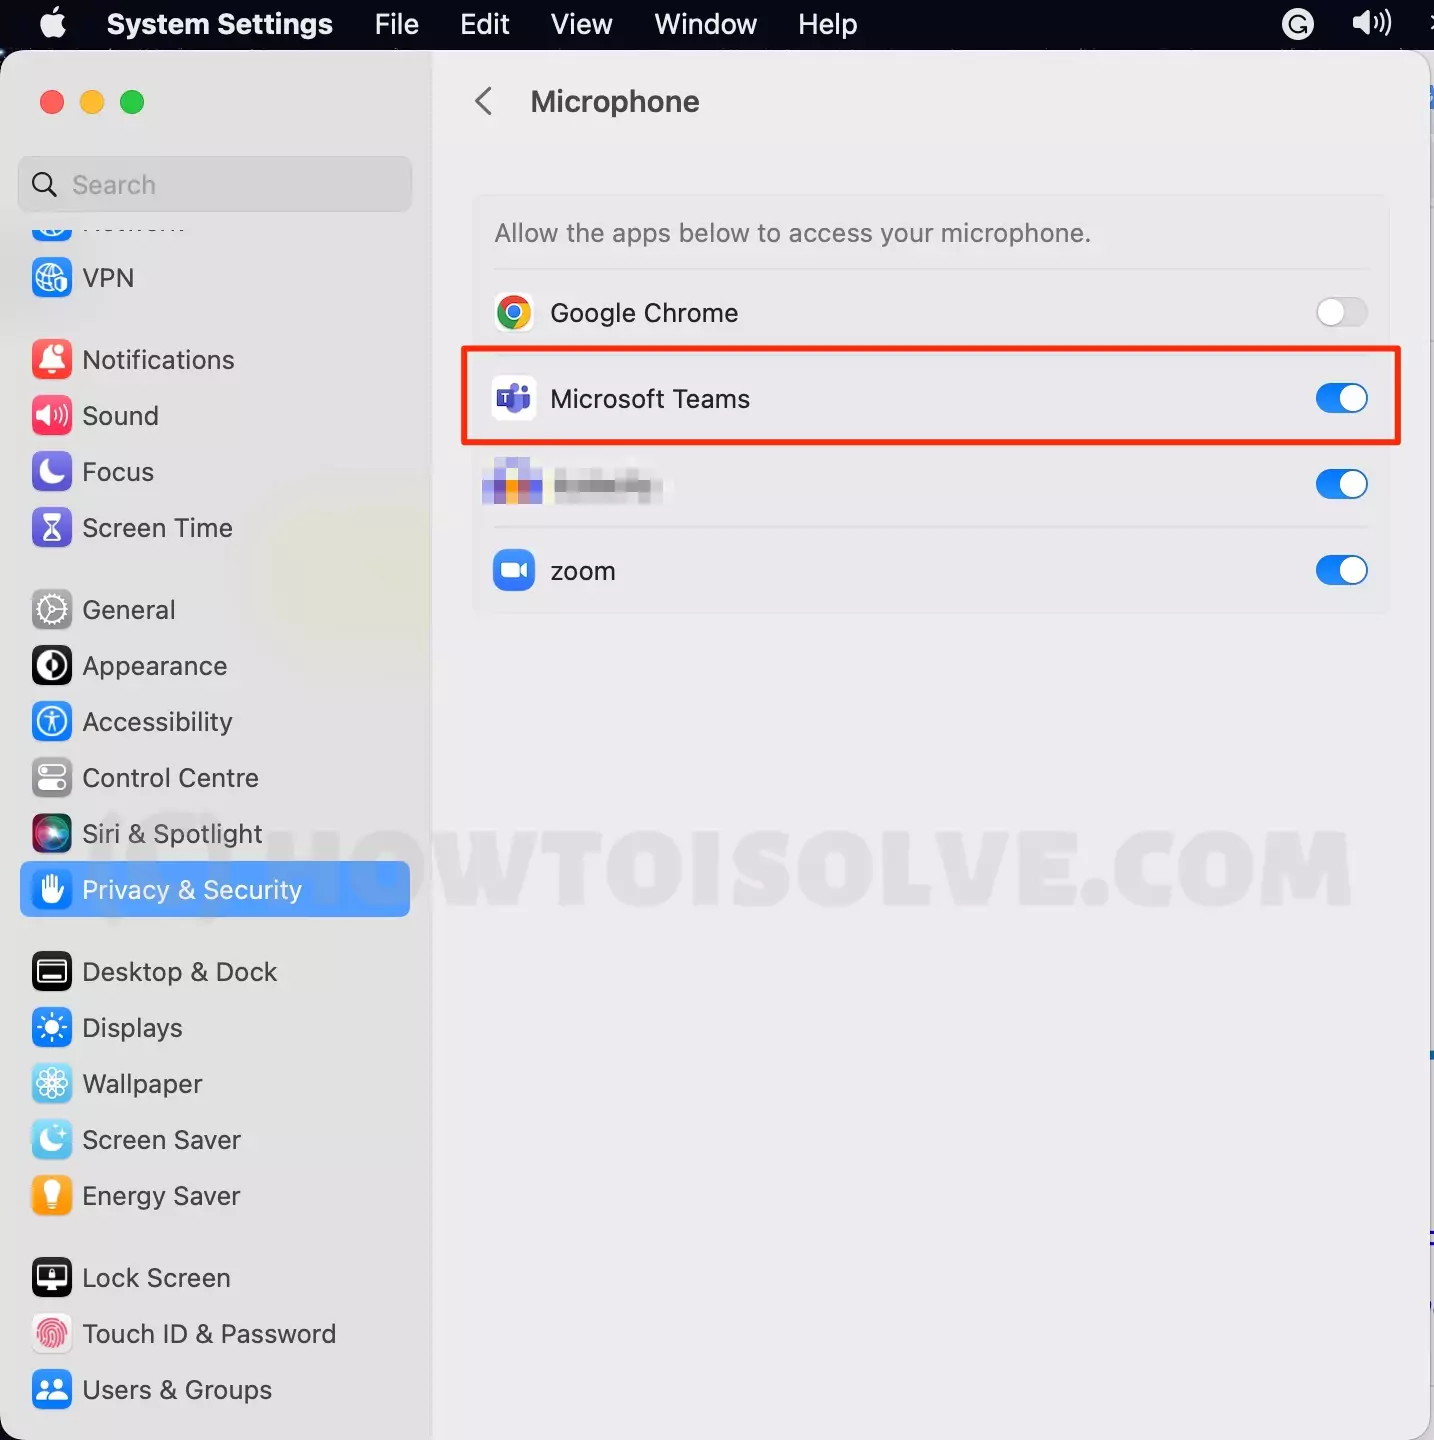
On MacOS Allow Microphone Permission
Step 1: Go to the Apple Logo from the top Menu > System Settings.
Step 2: Next, Privacy & Security > Microphone.

Step 3: Now, Enable the toggle to allow Microphone permission to install apps like Microsoft Team, Zoom.
That’s it. Next Sollution is Set Built-In Microphone in use from Sound Settings.
Fix 4). Turn on Dictation on Mac ->
“Justin,” said that in the comment, he serves the tips to enable Dictation on Mac,
What you need to do it go to System Preferences [System Settings on MacOS Ventura] > Accessibility > Voice Over From Side Panel. and then switch dictation to ‘on’ [Enable Voice Control Checkbox]. My iMac downloaded something that took 4 minutes and hey presto it now registers my voice.
Try Now.
Fix 5). Zoom Microphone Not Working Mac, MacBook
As we know Zoom Doesn’t support Safari Web Browser on your MacBook, Mac. So We can download and install the Zoom Mac app as an Identified Developer [Third-Party], App is not available on the app store. Follow this guide, Install Zoom on Mac. As discussed earlier we can customize an Audio interface like External Microphone [Bluetooth Earbuds, Wired Headphone]. Same settings we can also manage from Zoom Preferences settings.
Follow the below steps to Make Loud and Zoom Failed to Detect microphone [Set Built-in or External]. and the Same we can setup Speaker [That helps in fix Zoom can’t Detect your speaker on MacBook Mac].
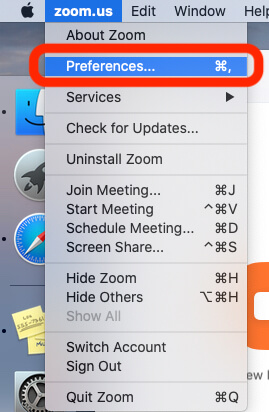
- Open Zoom on MacBook Mac.
- From top mac Menu, File > Preferences.
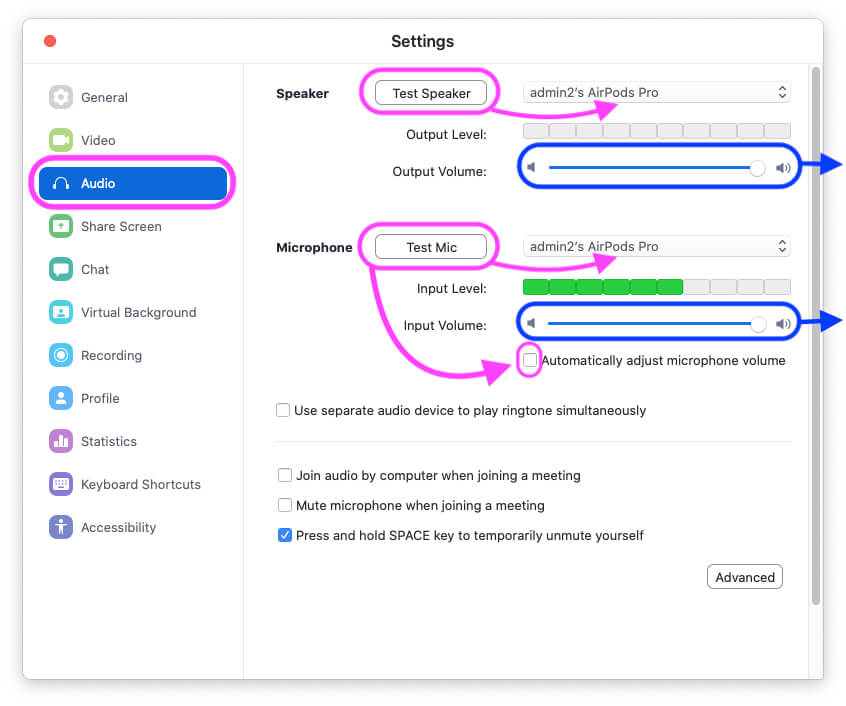
- Also, select the Device if you are using external Headphones with your Mac. Or select Buit-in microphone from the dropdown devices list.
- Speak something to test the microphone level. if your microphone is unable to deliver sound then replace the mic or Select an alternate built-in microphone.
- Select the Output Speaker device from dropdown.
- Set the Speaker volume level to the max.
- zoom no audio mac: Force Quite Zoom app from MacBook Mac System Use Command + Q Key from keyboard to Force close. Re-launch the Zoom app and test again.
Fix 6). MacBook Microphone Not Working Skype
Skype is one of the professional video conferencing software that is available on all devices and OS Version. So, Below are the Skype settings for Mac when you make an audio or Video call and Send an Audio message. In this type of fo Conversation, we have a valid or working Microphone on your Mac System, That might be either an Internet microphone or External mic (Headphon on Bluetooth Earbuds).
- Valid input microphone device, Open Skype on your MacBook Mac > From Top Mac Menu “Skype” > Audio and Video Settings.. > Under the Audio section [Showing Valid Microphone],
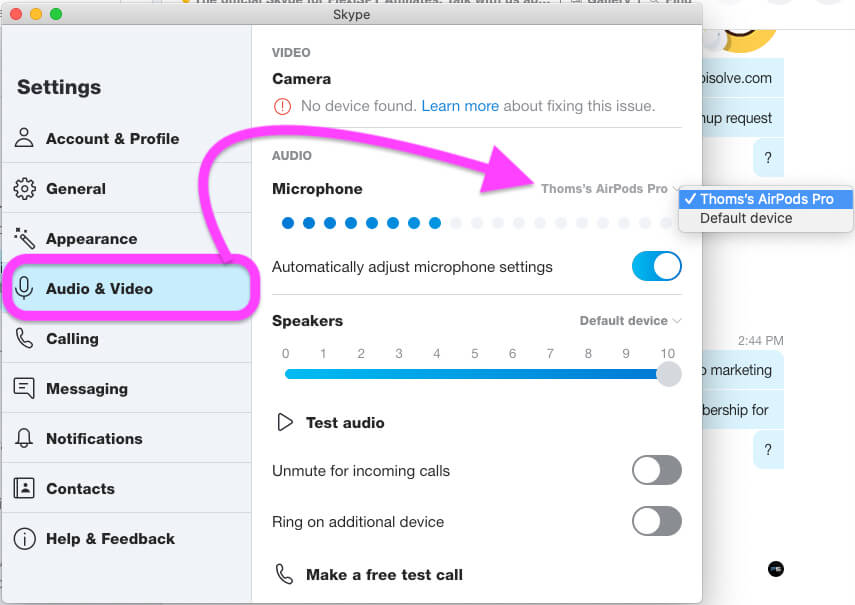
If not then select microphone from Mac’s System Preferences [Click on Apple Logo () From Top Mac Menu] > System Preferences > Sound > Input Tab > Test Internal Microphone sound.
- Quit the Skype app on Mac.
- Go to the Applications folder and drag the Skype application to the trash
- Later, empty the Trash folder too and if possible restart the Mac.
- Launch the Terminal and type the following code,
sudo killall coreaudiod
- You will be asked to enter the Administrator password to confirm the action.
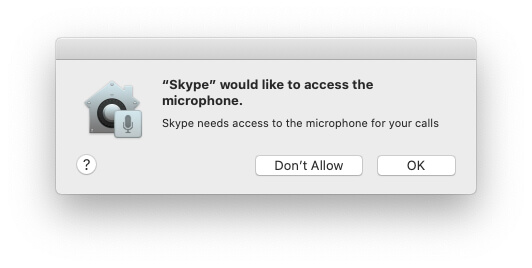
Firstly, make sure your MacBook Pro/Air has been given access to the Skype app to use the microphone. Sometimes due to bugs, these permissions are turned off automatically.
- Click on the Apple Logo menu > System Preferences.
- Open the Security & Privacy and click on Privacy
- Find the Skype app listed on the Microphone.
- Check the box of the Skype app and if it is already checked, then uncheck and recheck the option.
That’s it.
It’s an unfortunate condition when we were talking business on Skype and the microphone stopped working on MacBook Skype. However, our MacBook Pro and MacBook Air have an inbuilt microphone to facilitate several services like FaceTime, Skype, Video Calls, and more. But if Skype for business web app microphone not working mac, at that time you need to check out a few workarounds and fix the issue.
Fix 7). Restart the Mac
Still, the microphone is not responding on macOS Mojave then reboot the Mac. Give a fresh start to your Mac and check the Microphone of it.
- Step #1: Click on the “Apple” menu and then click on “Restart.”
Fix 8). Reset PRAM on Mac
As it is a hardware issue so you must reset the PRAM, Here’s how to reset the PRAM in macOS Mojave.
- Step #1: Shut down the Mac.
- Step #2: Now, turn on the Mac and press and hold the Command+Option+P+R keys together and release when you hear the startup chime.
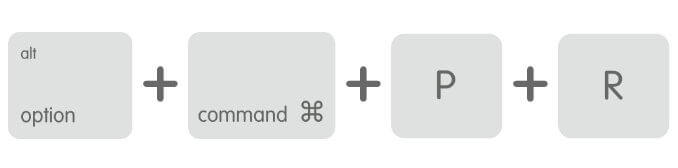
- Step #3: After the PRAM is reset you will have to reconfigure the microphone settings by following the fix 1 and test the Mic.
- You can get here more to Reset NVRAM and Reset SMC on Apple documents and get your mic workable again on your mac without going anywhere at the repair shop.
Fix 9). Create a New Account And Try
By changing the account if your microphone not working on Mac is fixed then the issue is with your user account. Still, if the microphone is not responding on macOS Mojave, then the problem is with hardware, so you need to contact Apple Support.
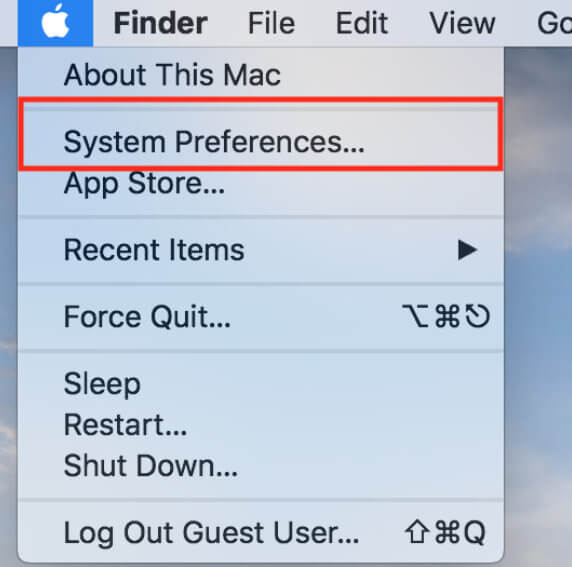
- Step #1: Click on Apple Logo () From Top Mac Menu and then open “System Preferences.”
- Step #2: Now, select “Users & Groups.” Unlock the Window and enter Mac System Password.
- Step #3: Click on the “+” button to add a new user account. Enter Account type, and Enter Your details.
- Step #4: Logout from the current account and then switch into the newly created account and log in with it.
- Note: Make sure you must log out from the current account and then log in with a new story. Do not switch accounts.
Fix #10). Mac Internal Microphone Not Listed
By default your Mac’s internal microphone should be active; however, to confirm the settings, you can proceed with the below stepwise guide and fix the internal microphone not working on Mac.
- Open the System Preferences from the Apple
- Click on Sound.
- Select Input
- Your Mac will show the list of Microphones, and we are searching for the internal microphone, so click on Internal Microphone.
- After that, adjust the Input volume and Input volume of the microphone.
Apple Support & Assistance
What if you could see the blue bars are raising, but still it is not working on some programs?
The blue bars are rising perfectly when you are speaking in the microphone, but still, it is not working for some programs then you must contact their developer support and tell them about the Microphone not working on the Mac issue. Don’t do more experiments if the problem is related to hardware. Book an Appointment at apple Genius bar, Get Free repair service if your mac system is under warranty.
Headset Microphone Not Working Mac
No matter how much money you spend on the headset, but if all the requirements are not met, then it’s probably impossible to use the headset with Mac. In this line of the tutorial, I’m discussing the earphone mic not working on MacBook Pro/Mac. Check out the following settings and mainly the compatibility to work with Mac.
Solution 1: Increase Sound Levels
From the Sound menu, increase/decrease the output sound levels of the connected headset. Here’s how it can be done.
- Click on the Apple icon located at the top menu bar.
- Select System Preferences.
- Navigate to the Sound.
- Choose the Output tab.
- Click on the headset (the one you are facing microphone issue with).
- Keep the Balance slider in the middle of Left & Right.
- Try increasing the Output volume to high, to do so, drag the slider all the way to the right.
Solution 2: Check Compatibility
Still if the headset microphone not working on MacBook, then you might want to check the user manual of the headset and see if there are any compatibility requirements are listed. Not all the headset works with the Mac unless a correct companion accessory is connected.
One of the most common things needed is the USB Sound Card, it will help the headset’s mic and MacBook to cooperate and work properly.
Alternatively, you can ask the support team of the Headset and see if they can help or give any suggestions, on the earphone mic not working on MacBook.
Solution 3: Buy New Headset
After taking assistance from the technical team of the headset, still, the headset mic doesn’t work on Mac, then buy a new headset for Mac.
In case your iOS mic does not work correctly then get Fix Microphone not working in iOS. For India Guys: Pick Best Cheap Microphone.


