
Mac is an excellent machine for video, audio, and multimedia production. Since you will be using the new macOS Version for recording purposes, you need to enhance the System Settings… and especially Sound Settings so that the installed plugins, applications, and Mac itself work effortlessly. As always, new macOS Settings give you a by-default Sound Settings.
That means you need to first understand and then customize the Sound settings on your Mac to enhance its performance. Regardless, most of the Sound Settings are ideal for making your Mac truly yours. So, follow our guide to updating the New Mac Sound Settings In macOS tahoe and older.
Customizing your Mac’s audio output
Being new to the latest macOS Version and not familiar with the Sound Settings? Not to worry more! As we have mentioned in detail, all the sound settings of revamped System Settings…
The New Sound Settings macOS Ventura & Later
While the older macOS versions did a great job of revitalizing the look and feel of the system preferences, they still lacked the first impression of the basic side. That’s transformed now in the new macOS Ventura, thanks to the revamped Sound Settings On Mac.
Building the intent feature introduced in the older macOS, you can now handily customize the Alert Sound with various sound effects and can change the Sound Output too. However, everything seems to be exact in the mac advanced sound settings, but the only difference is that the new macOS Settings come more linearly, just like iPadOS or iOS.
Here are some of the essential Sound features of macOS Ventura:
1. Play Sound Effect Through

As always, you play the sound effect from Mac’s internal speaker, but if you have configured the external Sound peripheral, you can select it from the Apple logo > System Settings… > Sound > Play Sound Effect Through.
2. Adjust Volume Alerts & Sound
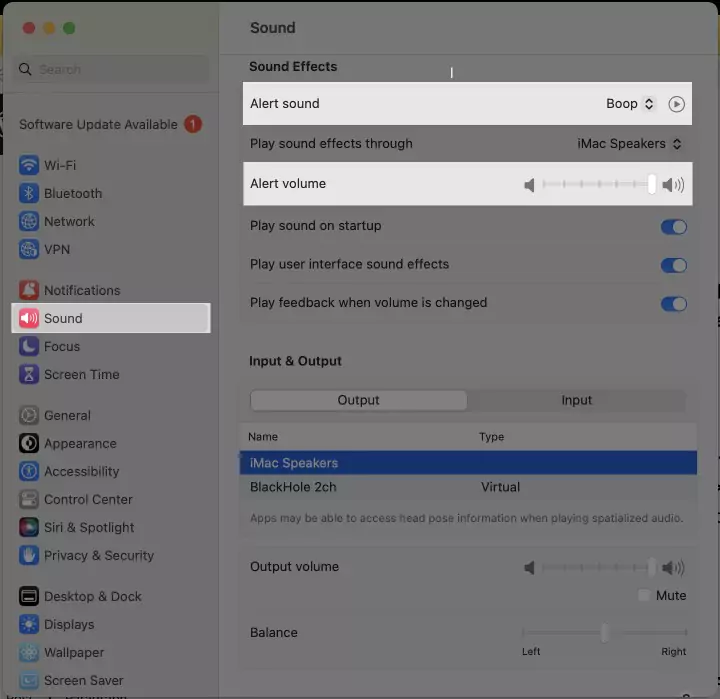
As you set the Default or Custom Alert Sound, from the Given Sounds Option from the Drop-down list. Also, With the help of the Alert Volume Slider (Apple logo > System Settings… > Sound > Alert Volume), you can alter the Sound which is relative to the Mac output’s Volume, so if you are willing to higher or lower Mac’s Volume; drag the slider as per your need.
3. Play Sound On Startup

Enabling the Play Sound On Startup (Apple Logo > System Settings… > Sound > enable or disable Play Sound On Startup Toggle), beep the Sound whenever you Turn On the Mac.
4. Play User Interface Sound Effects

Your Mac can play Sound when you do a specific task, like drag and drop or when placing items in the trash. So, if you are fond of Soundor else when to eliminate unnecessary Sound, go to System Settings… > Sound > enable, or disable “Play User Interface Sound Effect.”
5. Play Feedback When Volume Changed

When you tap on the Volume Keys on a few keyboards, the changed sound lets you hear the new Sound. To get rid of such Sound, navigate and Turn off the settings, Go to the Apple Logo > System Settings… > Sound > disable the toggle next to the “Play Feedback When Volume Changed.”
6. Input & Output Audio Settings
In this sound settings section, you Change the Sound Output On a Mac while playing a media file on your Mac. At the same point, you choose the Input media device for Call, Recording, VoiceOver, or Siri command. To adjust the Microphone level, use Sider to maximize it.

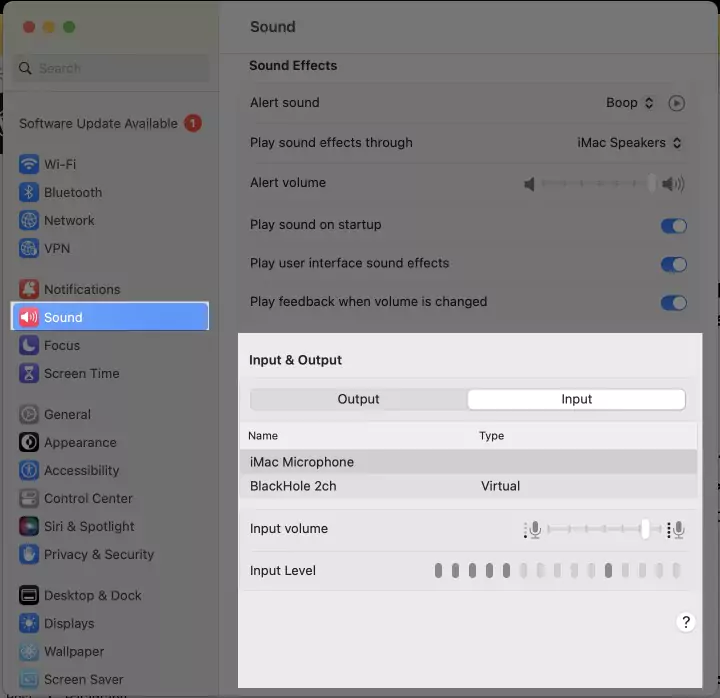
The Output section under the Sound Settings comes with specific capabilities, such as changing the Output Volume level by dragging the Output Volume Slider. Plus, the Balance Slider allows customizing the Sound if you want more or less sound from the particular left or right speaker. Finally, moving forward to the Input Section, you can modify the Volume by dragging the Input Volume Slider.
7. Shortcut Way To Change Sound Settings
To follow the success of the older macOS Older, the new macOS Ventura offers the same way to change the sound settings… using the shortcut method on Mac. Yes, you can permanently alter sound settings using the control center. Here are the steps you need to follow.
macOS Ventura, Sonoma & Later: Select Control Center Icon in the Menu Bar. Drag the Sound Slider if you want to volume.
Similarly, you change the Sound from the Control Center by choosing Sound Option. On the next screen, you will receive the Output Menu; select any of the one. And from the same screen, you can move to Sound Preferences… for advanced configuration.
Also Read: Find All AirPods Settings on Mac
Mac Sound Not Working? Update macOS
Troubleshooting no sound on Mac can be challenging because it has various possibilities. For example, it can be due to hardware problems or misguided Mac audio output; even after diagnosing it, the problem still seems stuck in the Mac.
Why I can’t get Sound on Mac? It can get fixed by below mention comprehensive troubleshooting steps. Don’t hesitate; all the solutions we have offered are easy to perform without any need for technical experts.
Solution #1. Check Volume
There is obvious to discover that you haven’t accidentally muted the Volume, or else Volume is configured low on Mac, due to which you are experiencing the MacBook speaker not working. To verify it, follow the given below steps.
For macOS Ventura & Later
Step 1 → Go to Apple Logo > System Settings… > Sound.
Step 2 → Scroll down to Input & Output and select Output.
Step 3 → Uncheck the Box present next to Mute. Then, from the same page, drag the Output Slider in the right direction to increase the Volume. On the same page, you can audio balance check for Mac.
For macOS Monterey & Earlier Version
Step 1 → Select Apple Logo > System Preferences… > Sound.
Step 2 → Choose Output. And check if there is no tick on the box next to the Mute. And then, drag the Output Volume Slider to the maximum.
Usually, this is the common cause of Macbook sound lock issues. But sometimes, the general build-up of dirt and debris in the headphone port can also be a reason to look on. Try cleaning the port but applicable only when you are using headphones.
Solution #2. Verify Sound Preference
Suppose the internal speaker is still not working on Mac after verifying that it’s not mute or configured at low Volume. In that case, there are chances where you have not selected the right Output source—assuming that you might have connected with the Best Bluetooth with Mac and forgot to disconnect it. So instead of playing music on the built-in speaker, it’s now playing on the Headphone.
macOS Ventura & Later,
Step 1 → Go to Apple Logo > System Settings… > Sound.
Step 2 → Scroll down to and select Input & Output > Output. And verify that you have selected the right Output Sound source.
macOS Monterey & Earlier,
Step 1 → Select Apple Logo > System Preferences…
Step 2 → Click on the Sound > Output.
Select the one you always prefer.
Repeat the same steps for the input setting too. And remember that you checked on the box next to the Mute.
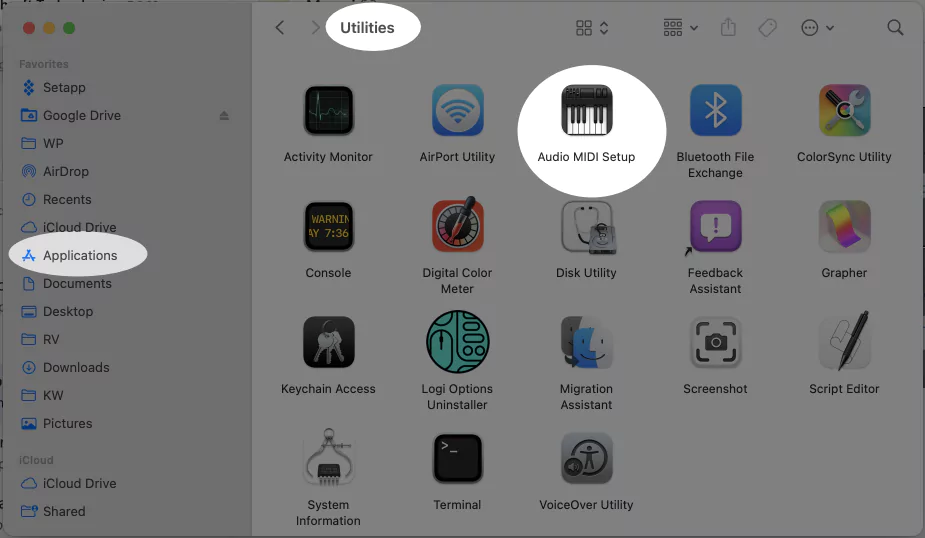
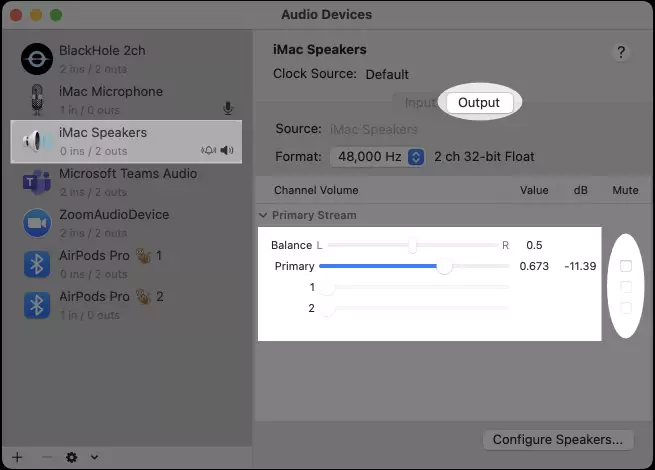
In case to get a better view of all output devices, take the help of the Audio MIDI Setup present in the Utility folder and configure it accurately.
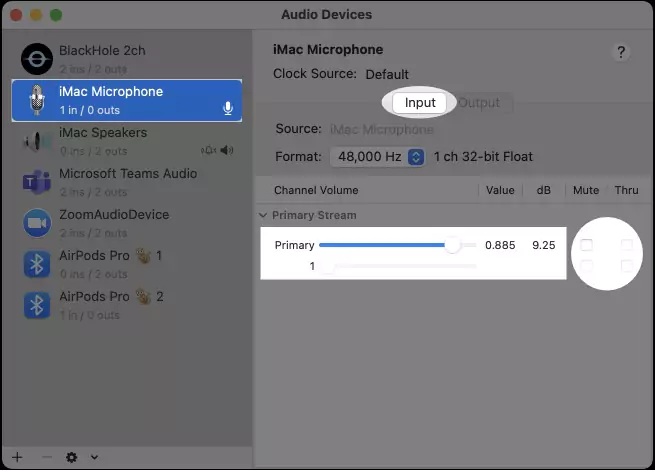
For iMac Built-In Speaker
Step 1 → Go to Finder > Applications.
Step 2 → Search and select Utilities > Audio MIDI Setup.
Step 3 → Select iMac Speaker > Output and then configure the Balance and Primary Slider at your convenience. Also, set up the Format at the Higher Rate.
For Headphone
Step 1 → Go to Finder > Applications.
Step 2 → Search and select Utilities > Audio MIDI Setup.
Step 3 → Search and select Third-party headphones; consider Airpods Pro.

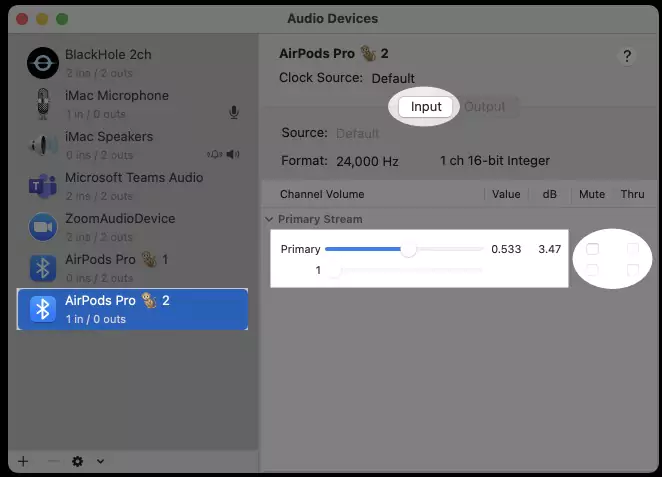
Step 4 → Now, in the Output section under the primary slider, drag slider 1 & 2 to the maximum. At the same point, check if it’s not muted. Similarly, configure the same settings for the Headphone under the Input section.
If your Mac’s speaker is crackling, try altering the same audio settings and exit the app. Now, try playing the audio to verify the issue.
Solution #3. Unplug Speaker Or Other Connections
If an external device is connected to your Mac, you must try disconnecting it. Then play a sound to see if the issue is getting fixed.
Solution #4. Reset Core Audio
If the sound problem persists, there might be an issue within Mac’s audio interface that results in various bugs. Resetting Core Audio often makes you free from a common sound issue on Mac. Presumably, you will not be familiar with the steps to reset core audio, so follow the below steps.
Using Terminal
Step 1 → Press Command + Space to open the Spotlight.
Step 2 → Search Terminal. On the terminal screen, write down sudo killall coreaudiod and then enter the password if prompted on the screen.
sudo killall coreaudiodSometimes even after performing the command in the terminal, you might not encounter the Sound. In this case, try restarting the device or type the sudo launchctl start.com.apple.audio.coreaudiod and enter the password.
Use Activity Monitor
Step 1 → Press Command + Space to open Spotlight.
Step 2 → Go to Activity Monitor.
Step 3 → In the Activity Monitor, search for Coreaudiod in the search bar.
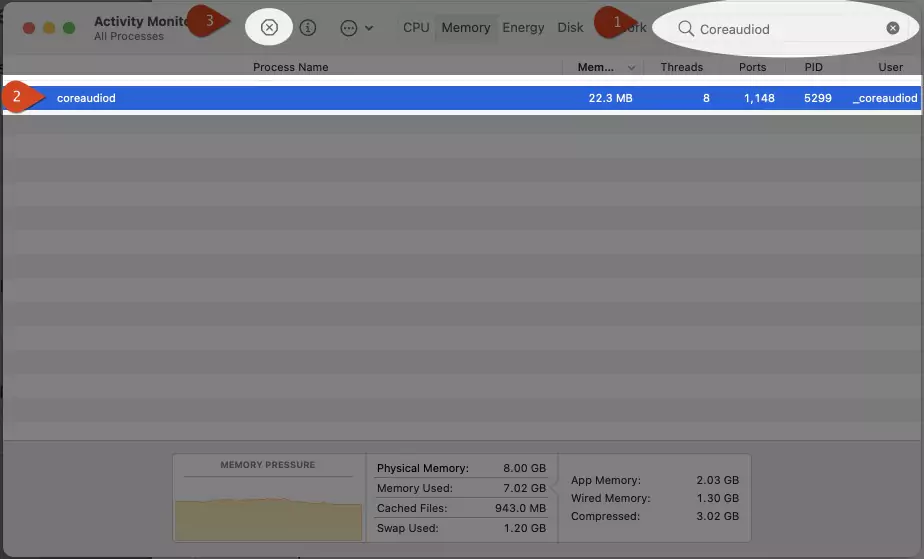
Step 4 → Click on it to highlight and select the Cancel Icon.
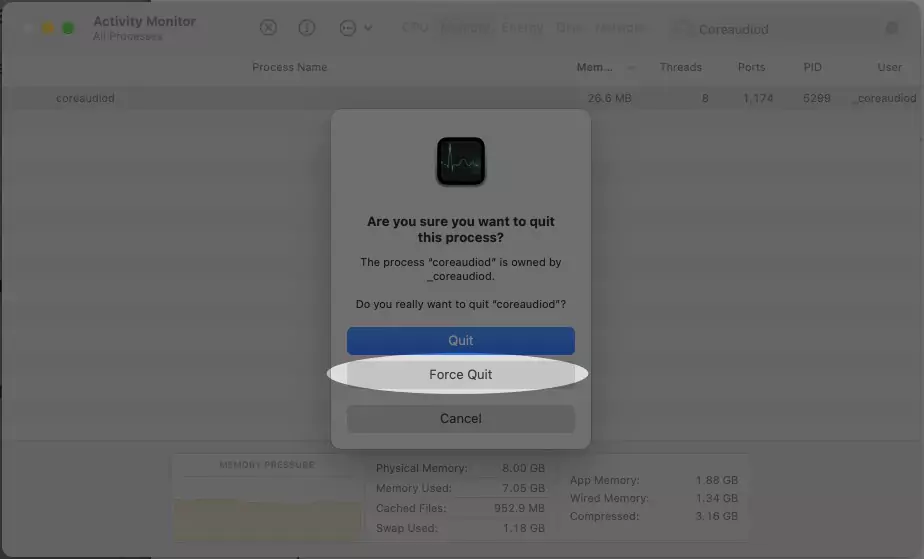
After the completion of the procedure, check if the mac sound not working is fixed. If not, move to the next troubleshooting step.
Solution#5. May Sound Not Work Due To Missing Major Updates
As of now and always, the third-party plugin craved within the Mac can sometimes be the reason for Sound not working. Nevertheless, this can happen due to incompatibilities, which frequent updates can only fix. Therefore, it’s our suggestion never to delay doing updates. Moreover, you can never forget to miss out on the update or individual application as it can prevent the no volume on Mac issue.
Solution #6. Reset NVRAM
Skip this Solution on M1 or M2 (Apple Silicon mac users),
Presumably, you will be familiar with what NVRAM is. But if not, the NVRAM is a memory that stores various device settings such as Display resolution, Volume, Startup disk, and many more. Due to this, Resetting The NVRAM helps to get rid of specific bugs causing absolute no sound on Mac.
Solution #7. Issue With External Device
Rarely, when you link your Mac with an external peripheral, the Sound will come from the in-built Mac Speaker. The connection seems perfect, but the connected external peripheral won’t be visible in Sound settings. If this is the case, check the HDMI cable you are using is not damaged because even minor damage can result in HDMI not showing up as a sound option on Mac.
Note: MacBook Models Launched before 2011 are not compatible with Mini DisplayPort.
At the same point, ensure that the external device you are using is under the compatible list.
Solution #8. Mac Won’t Play Sound Through TV
Why is there no sound when I connect my Mac to the TV with HDMI? Is that question? Primarily, check Mac is not older than 2011: After confirmation, here is the step you need to follow.
Verify Sound Settings
Step 1 → Go to the Apple Logo > System Settings… (for Monterey, Select Apple Logo > System Preferences…)
Step 2 → Choose Sound. Under the Input & Output Menu, select Output.
Check if your TV is configured as Output; the Output Volume Slider dragged to the maximum. Also correct the TV settings in MIDI as per given below steps,
Change Format Values In Audio MIDI Settings
Step 1 → Go to Finder > Applications.
Step 2 → Search and select Utilities > Audio MIDI Setup.
Step 3 → Search and select TV from the list.
Under the Output option, set the Format Value to the maximum.
Solution#9. Restart Both TV And Mac
Turn off both devices and plug them out from the primary power source. Wait for 20-30 seconds and then enable both devices.
Solution #9. Examine Hardware And Ports
After going through all the software-related possibilities behind the Mac having no sound issue, you should never ignore to check the hardware such as HDMI, Headphone, and USB. First, let out all the accessories, then do the cable’s quality test to ensure nothing is wrong with it. After doing so, we suggest connecting one accessory at a time.
GET YOUR SOUND BACK!
Fixing out sound issues on Mac is always challenging. As always, Mac lacks a tool to diagnose various problems. But still, you can fix it as it’s a complete try and error. These mentioned troubleshooting tips can help you to get rid of it.
Either to alter the settings or to fix the misguided app sound settings, here are the steps you need to follow.
macOS Ventura & Later: Go to Apple Logo > System Settings… > Notifications > Under App Notification, choose any of the apps, and on the next screen, you receive various sound settings such as Allow Time Sensitive Alert, Show Notification In Lock Screen, Show Notification In Center and many more.
macOS Monterey & Earlier: Choose Apple Logo > System Preferences… > Notification & Focus.
To adjust sound notification settings on Mac, the step differs for macOS Ventura & Later and Monterey & Earlier.
macOS Ventura & Later: Go to Apple Logo System Settings… > Sound > on the next screen; various options will be available to customize the Sound.
macOS Monterey & Later: Navigate to the Apple Logo > System Preferences… > Sound.
There are two different ways to open the sound settings. But this is a shortcut way. Select the Control Centre at the top of the screen > Sound > Sound Preferences… On the next screen, you will receive complete settings related to the Sound.
Ideally, there are no particular steps to reset the sound settings on Mac. But to do it, you can go to System Settings…(for Monterey & earlier, go to System Preferences…) > Sound, and on the next screen, you will receive various sound settings and alter them manually as per your need.
No, there are no specific equalizer settings available for Mac, but in case you are using the Apple Music App, open the Music app right from the Windows Menu, and select Equalizer. Now on the next screen, choose the Preset, such as Rock. And then keep adjusting the preset until you get satisfied.


