When the Twitter (X) app on your iPhone fails to receive notifications promptly, you may miss out on important news. A large number of reasons can reasons why delayed Twitter notifications problem on iOS. And the worst part is that you can pinpoint the specific reason behind it. However, in this article, we’ve compiled a list of troubleshooting tips that will help you resolve Twitter notifications not working on your iPhone. Let’s go through them quickly.
Sometimes, you may try to disable push notifications for some action due to repeated notifications sound, for Tweets, Mentions and photo tags, Retweets, Likes, Polls, New followers, Direct messages, Contact joins, Twitter, and Recommendations.
Potential Fixes to Resolve Twitter Notifications not working on iPhone, iPad
Solution #1. Check the Push Notification settings on Twitter
If Twitter push notification is not working on your iPhone, it could be due to misconfigured notification settings. In this case, you only need to configure notification settings properly. To do so, follow the steps below.
Step 1: Launch the Twitter (X) App on your iPhone > Tap on your Profile icon from the left corner.

Step 2: Tap on Settings and Support > Select Settings and Privacy.
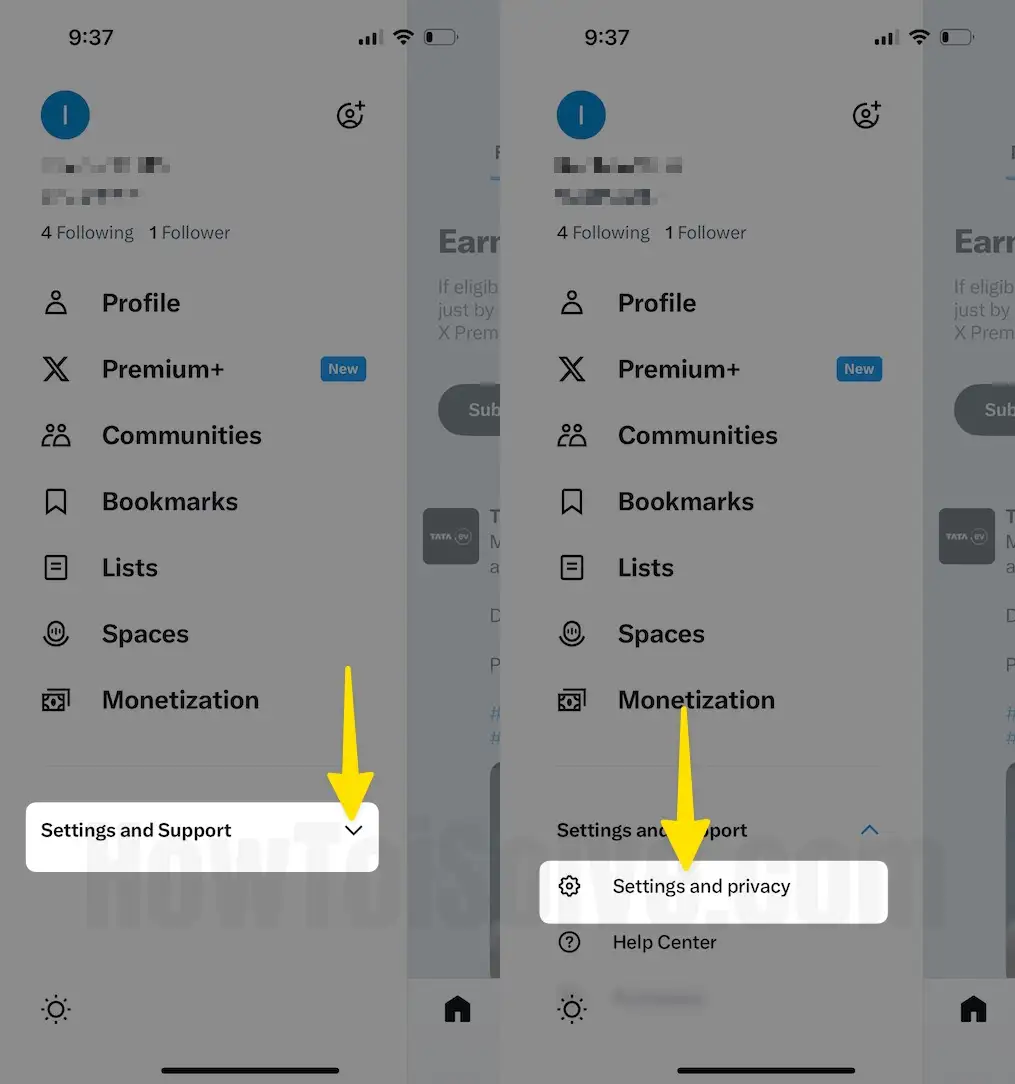
Step 3: Select Notifications > Click on Preferences.

Step 4: Tap on Push Notifications > Enable the toggle next to the preferred option or all options.

Solution #2. Allow Twitter App Notifications on your iPhone
The next solution to fix Twitter notifications not working is to check whether the Twitter app notification is enabled or disabled. You can verify it by following the steps below.
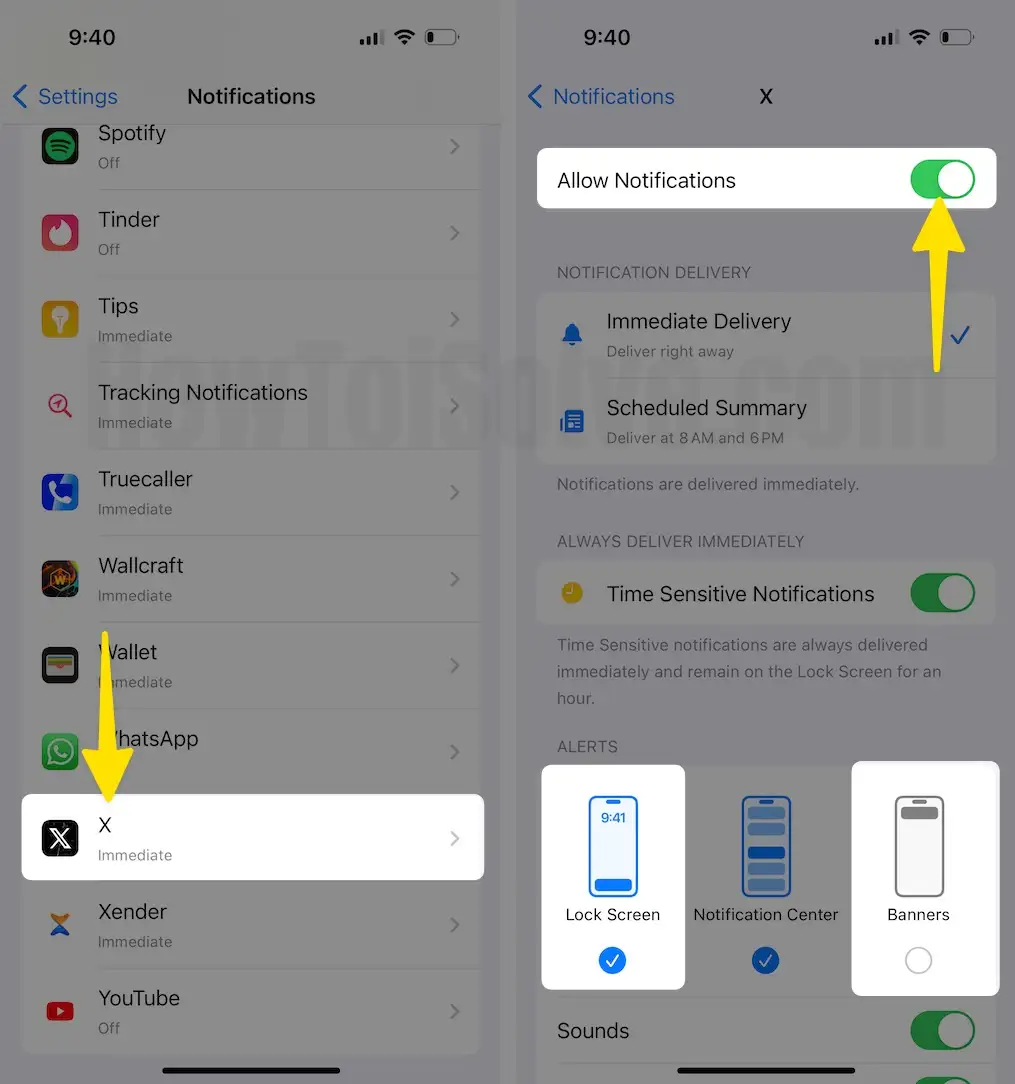
Step 1: Launch the Settings App on your iPhone > Swipe down to Tap on Notifications.

Step 2: Swipe down to the Notifications Style Menu and Tap on a Twitter (X) app > Enable Allow Notifications > Enable Lock Screen > Disable Banner Notifications.
Solution #3. Enable Background App Refresh
To prevent delayed Twitter notifications, you must keep Background App Refresh enabled. That’s because this feature allows the app to refresh the content in the background. To enable it, follow the steps below.
Step 1: Launch the Settings App on your iPhone > Tap on General.

Step 2: Tap on Background App Refresh > Select Background App Refresh.

Step 3: Check Wi-Fi & Cellular Data > Hit Back from the left top corner > Enable the Twitter App.

Solution #4. Disable Muted Notification
Twitter offers an option to prevent certain types of notifications from the app. Check if this feature is disabled on your phone. To do so, follow the steps below.
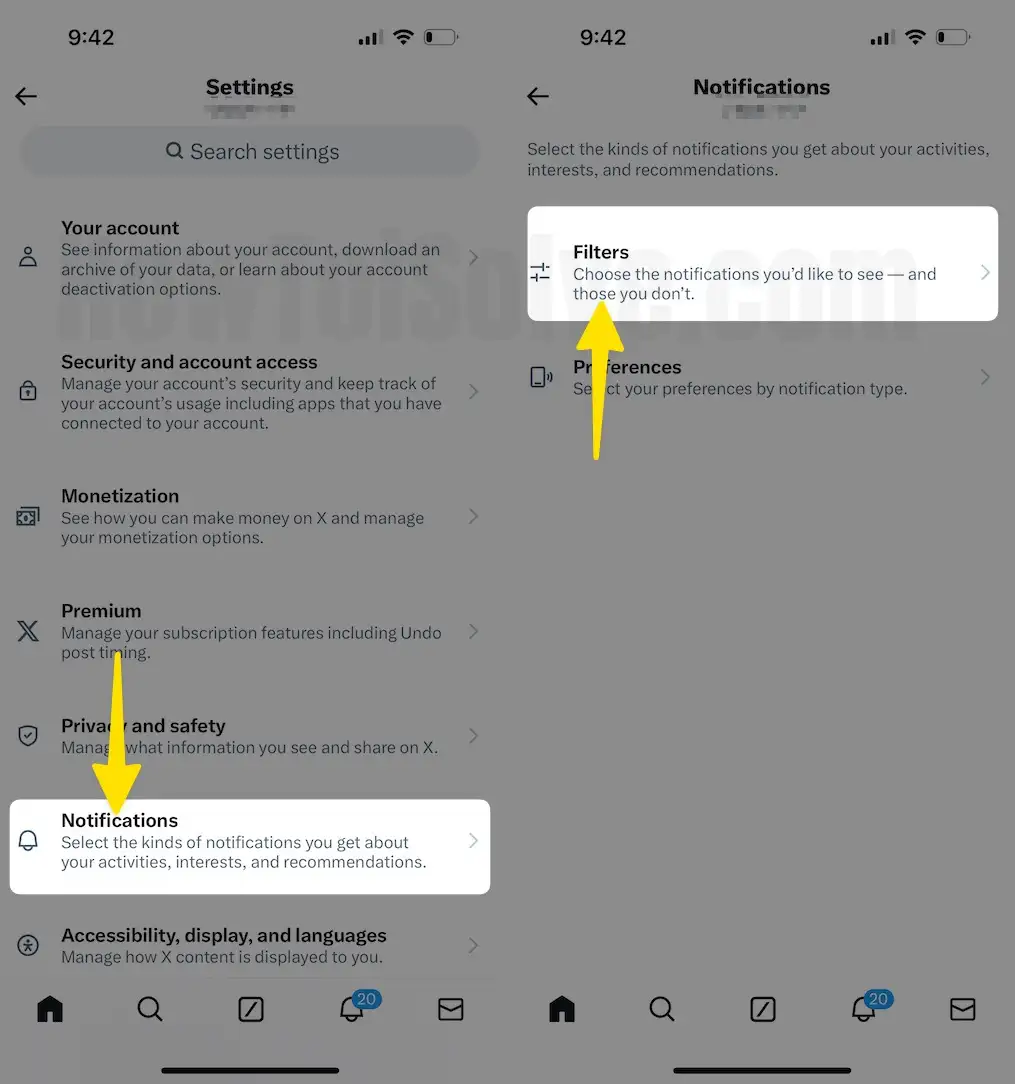
Step 1: Launch the Twitter (X) App on your iPhone > Select the Profile icon from the left top corner.

Step 2: Select Settings & Support > Tap on Settings and Privacy.

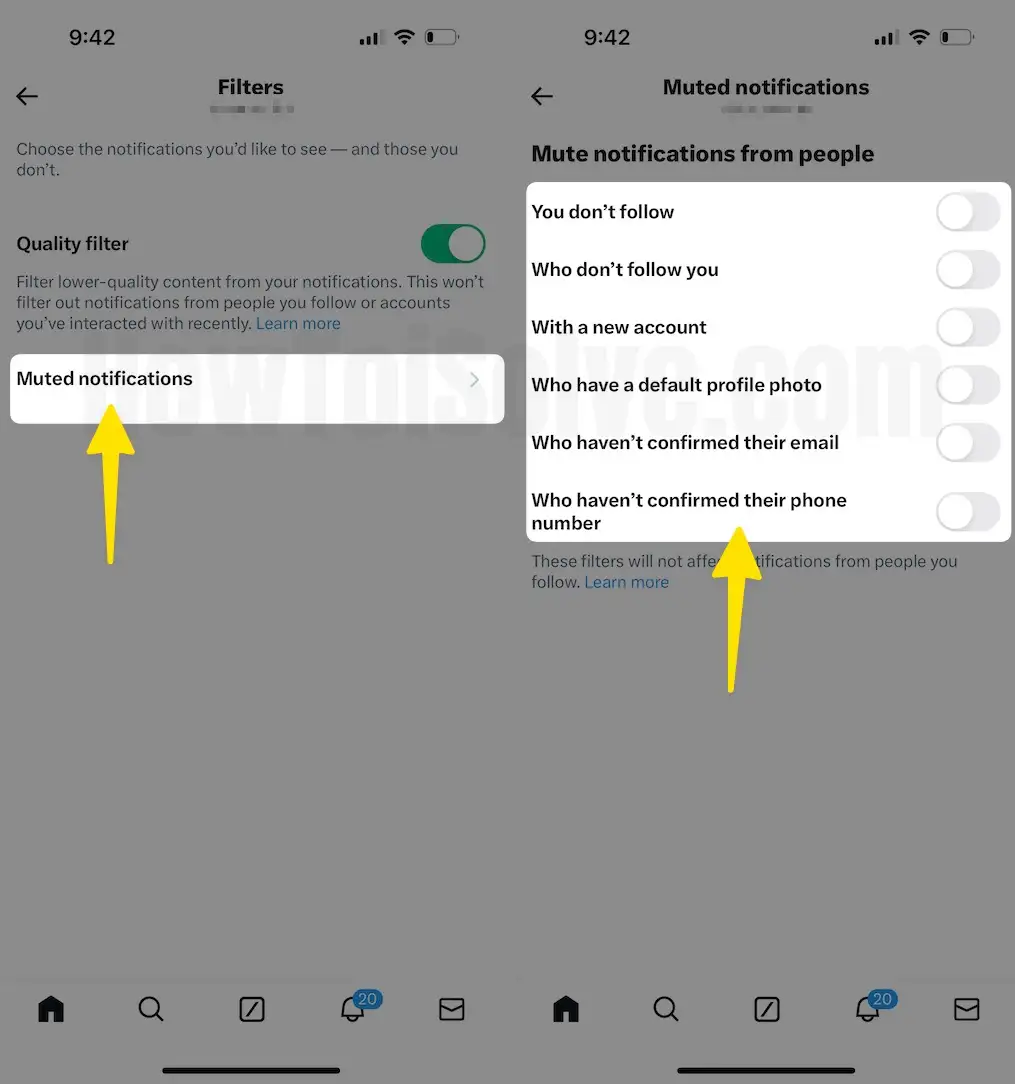
Step 3: Tap on Notifications > Select Filters.
Step 4: Tap on Muted Notifications > Turn off the toggle to the preferred option.
Solution #5. Disable Data Saver on Twitter
Twitter is a feature-rich application; one of its most admirable features is a data saver. The feature aims to reduce data consumption. But sometimes, it can lead to slow-loading feed issues, and it eventually leads to delays in Twitter notifications on iPhones. Hence, we suggest turning off the feature by following the steps below.
Step 1: Launch the Twitter (X) App on your iPhone > Select the Profile icon from the left top corner.

Step 2: Select Settings & Support > Tap on Settings and Privacy.

Step 3: Navigate to Accessibility, display, and language > Select Data Usage > Disable Data Saver.

Solution #6. Disable Focus Mode
Lately, Apple has introduced a feature known as focus mode to block unwanted notifications during specific times. If you have configured Twitter in any of your Focus Mode schedules, you won’t receive notifications from the app. So if your Twitter notification is not working, try turning off the feature on your iPhone.
Access the Control Center > Tap on the Focus Mode to Disable.

Once you deactivate the feature, you need to turn off automatic activation to ensure Focus Mode does not get enabled automatically. Here’s how.
Step 1: Access the Control Center > Touch and Hold Focus.

- Remember, Focus Mode will replaced by the name of Focus Mode if it’s enabled.
Step 2: Select Three-Horizontal Dots next to the Focus Mode > Tap on Settings.
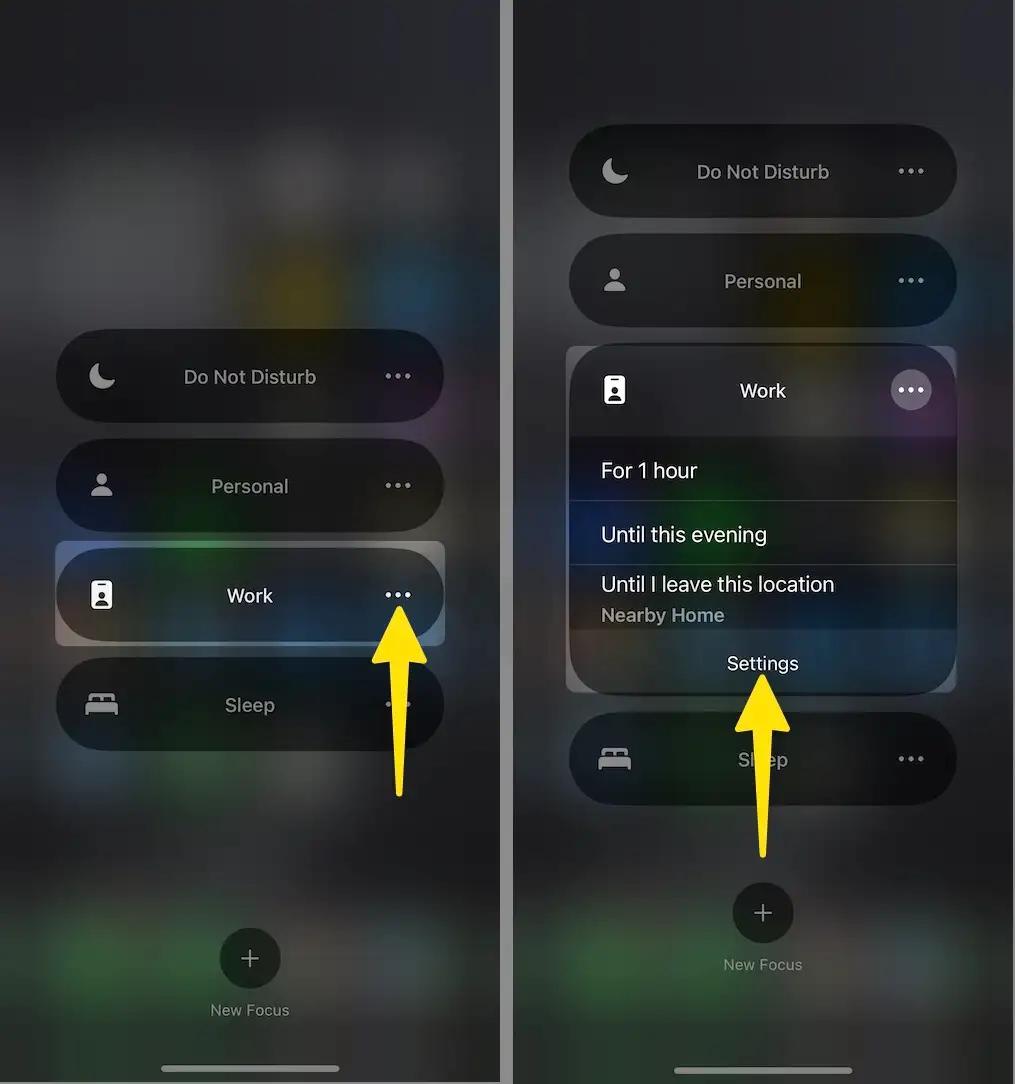
Step 3: Tap on Custom Schedule or Smart Activation > Select Delete Schedule.

Solution #7. Make sure Twitter has access to cellular data
Are you able to receive notifications from Twitter when your iPhone is connected to the internet? If yes, you must check whether Twitter has access to your cellular data.
Launch the Settings App on your iPhone > Tap on Cellular > Swipe down to Cellular Data Menu and check whether the toggle next to the Twitter (X) App is turned on.

Solution #8. Check if Twitter is down
Sometimes, the Twitter app and your device are not the reason behind the issue but the server it’s connected to. It’s common for server-based applications to go offline for maintenance or when they run into technical problems. If you are unsure about Twitter Server Status, you can visit its official site to check.
Solution #9. Update Twitter
An outdated app version may contain glitches and bugs that can cause various in-app problems, including delays or irregular notifications. So it’s best to keep your app updated to its latest version to prevent such scenarios. Here below are steps to update Twitter.
Click on App Store > Tap on your Profile icon from the top right corner > Swipe down to Tap on Update next to Twitter (X) App.

Update iOS
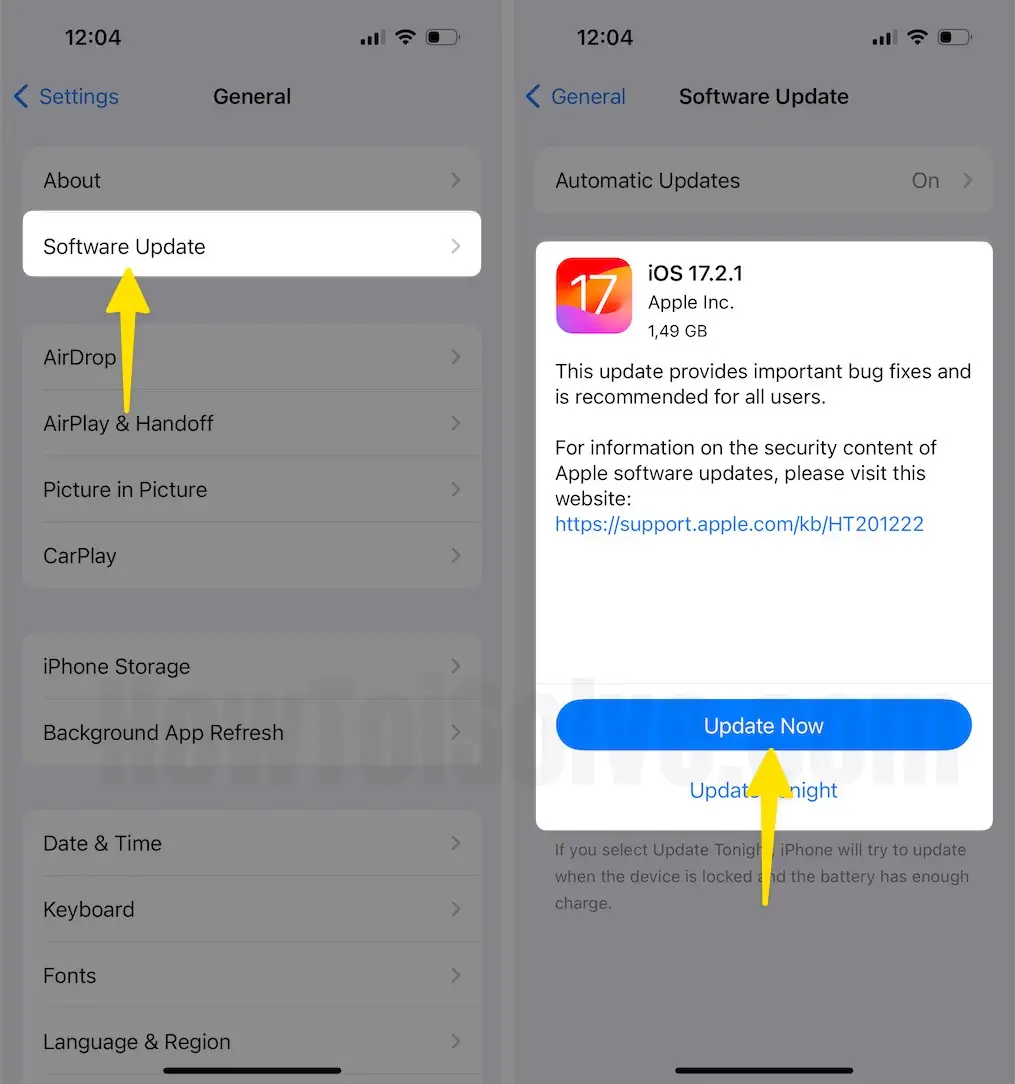
Step 1: Launch the Settings App on your iPhone > Select General.

Step 2: Tap on Software Update > Select Update Now.
Solution #10. Not getting notifications from specific Twitter accounts? Fix it!
Twitter offers the option to enable notifications for individual accounts so that you won’t receive a barrage of notifications for unwanted tweets and Twitter accounts. Here’s how to use this feature.
Launch the Twitter App on your iPhone > Tap on the account for which you want to Enable notifications > Hit the Bell Icon next to the following button > Check the post for which you want to receive notifications. You can Select the All Post option.

Solution #11. Force stop Twitter
Often, minor software bugs within the applications can lead to malfunctioning. These glitches can be resolved quickly by force quitting the app. To do so, you can read our article on how to force quit app on iPhone.
Solution #12. Restart your iPhone & iPad
Yet another efficient solution to fix the issue after force-stopping the Twitter App is restarting the device. Doing so will turn off your device and efficiently resolve the software glitch that could prevent the app from working normally. To do so, read our article on how to restart your iPhone.
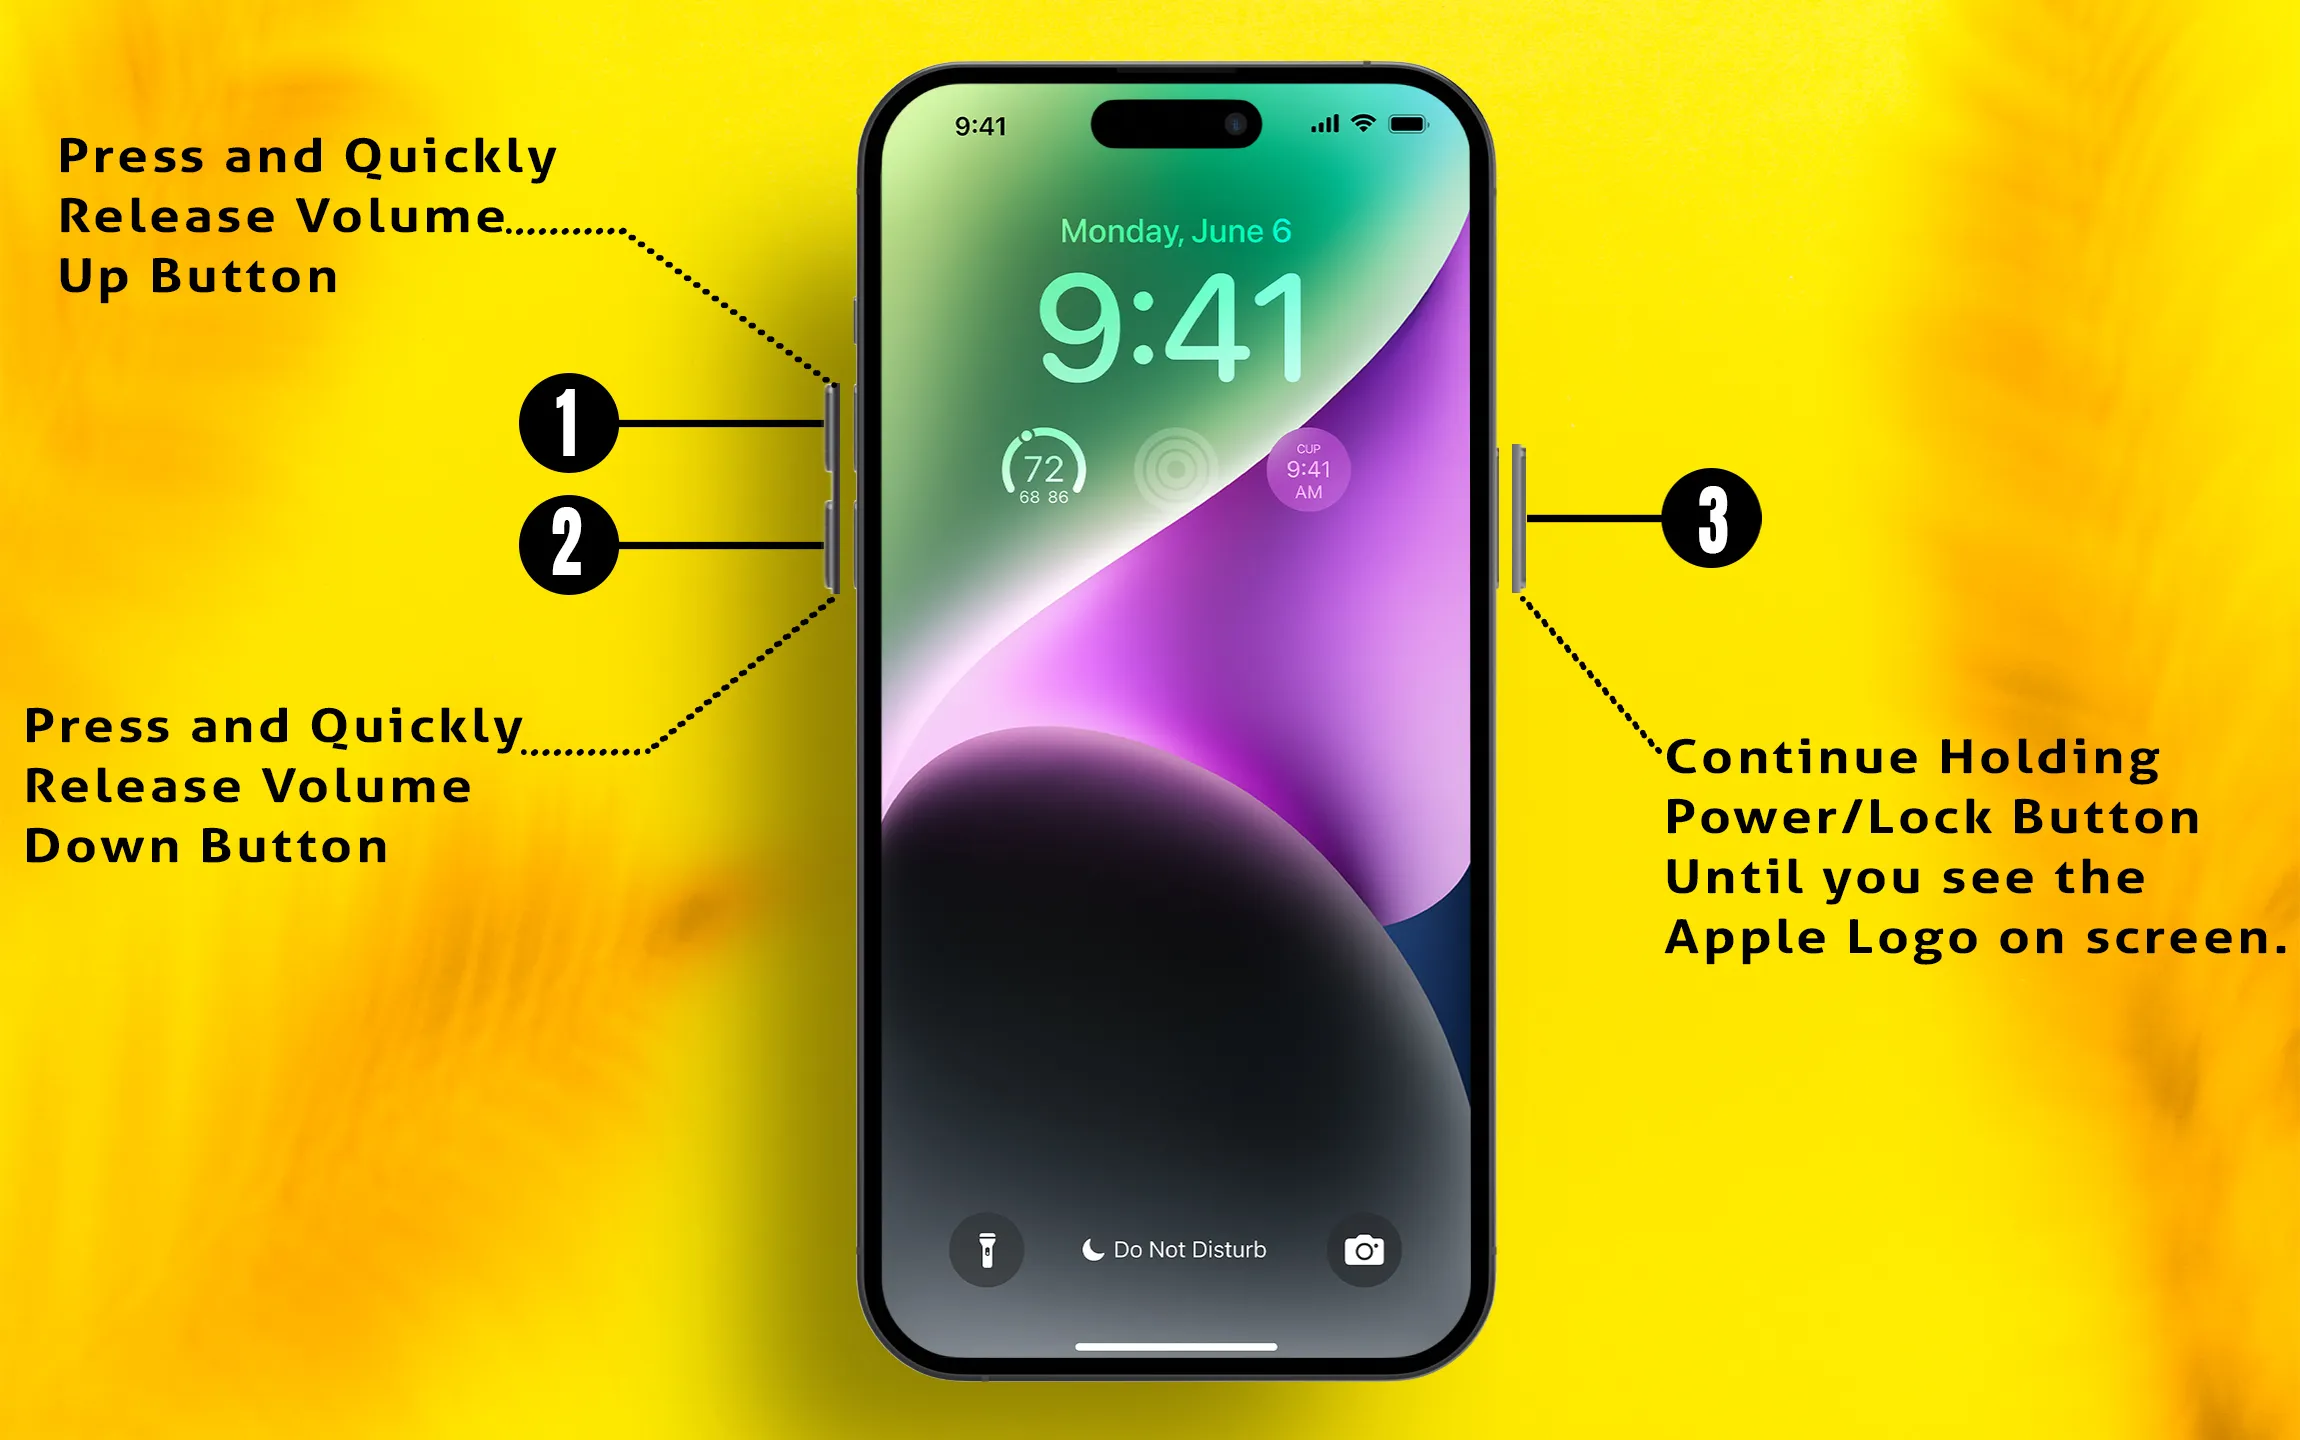
If a normal restart doesn’t resolve your issue, you must try force-restarting the iPhone.
- Press and quickly release the volume up button. Press and quickly release the volume down button. Press and hold the side button. When the Apple logo appears, release the side button.
Solution #13. Check Network-related issue
If the Twitter app is working normally, but you’re unable to access the Twitter Feed, you must ensure that you haven’t encountered a network-related problem. Unlike other Social Media apps, Twitter requires an uncorrupted and stable internet connection to fetch real-time data.
If you are unsure about your internet connection stability, you can check it by running a speed test on your iPhone or alternative flagship. If your device fails to check internet speed, you must follow the steps mentioned below.
Access Control Center on your iPhone > Tap on Airplane Mode to Enable it > Wait for a few seconds, then Turn it off.

Solution #14. Disable VPN
VPNs on iPhones are the best way to protect your data and digital footprint from the websites you visit. However, enabling a VPN often causes network latency, interrupting the normal working of various applications, including Twitter. Thus, we suggest turning off the VPN on your iPhone by following the steps below.
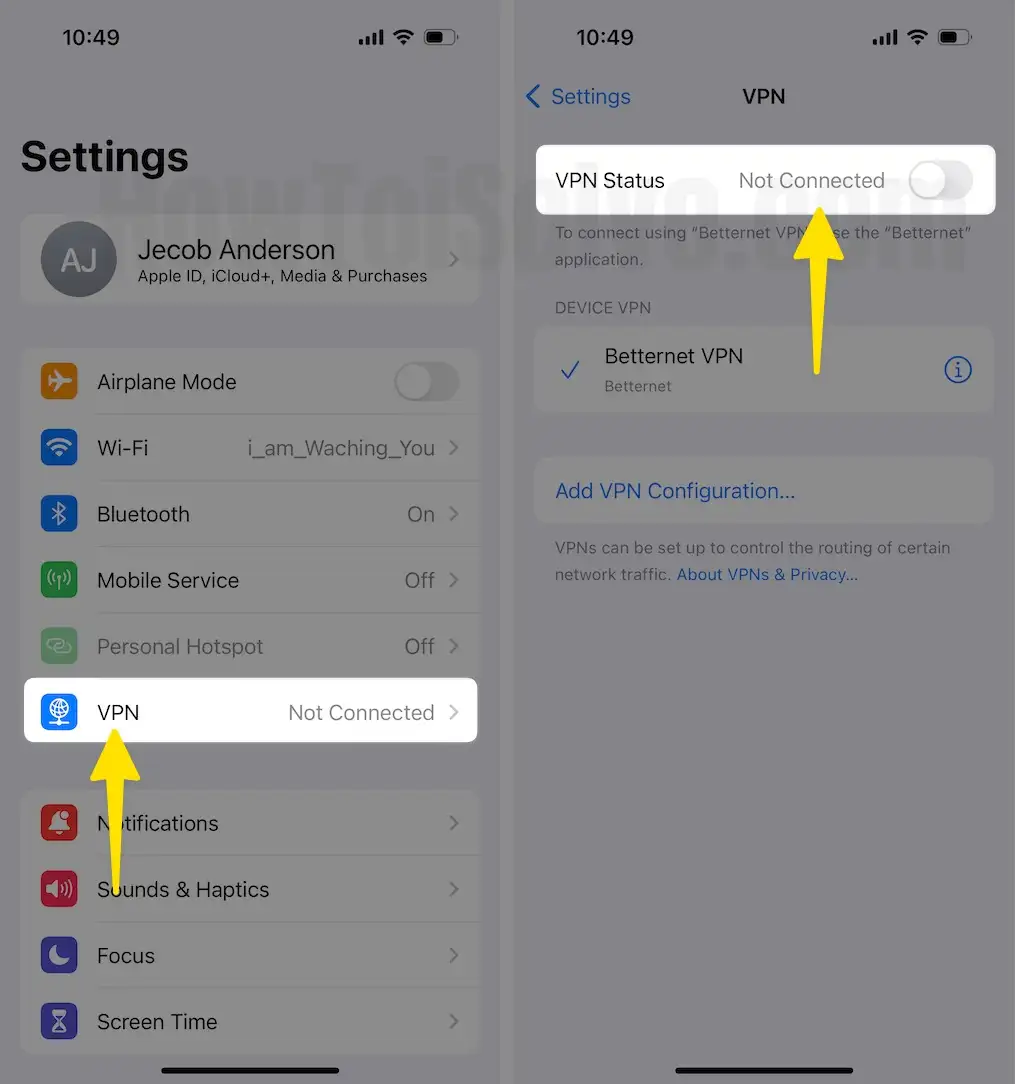
Step 1: Launch the Settings App on your iPhone > Disable VPN.

Step 2: Tap on the VPN > Disconnect VPN.
Solution #15. Log out and log in to Twitter
Glitches within Twitter login credentials can prevent the app from working correctly. If you doubt this is causing the issue on your device, try logging out and logging in to fix it. Here’s how.
Step 1: Launch the Twitter (X) App on your iPhone > Select Profile Icon from the top left.

Step 2: Tap on Settings and Supports > Select Settings and Privacy.

Step 3: Choose Your Account > Select Account Information.

Step 4: Click on Log Out > After this, Re-login into the Twitter (X) App.

Step 5: Tap on login with Email and password.

Solution #16. Reset Network Settings
If none of the above-mentioned solutions doesn’t work for you, then there might be a problem with network settings, which could prevent Twitter from connecting to the internet. In this scenario, you can do is reset network settings. Doing so will bring the iPhone back to default network settings. Here’s how.
Step 1: Launch the Settings App on your iPhone > Select General.

Step 2: Swipe down to Select Transfer Or Reset iPhone > Tap on Reset.
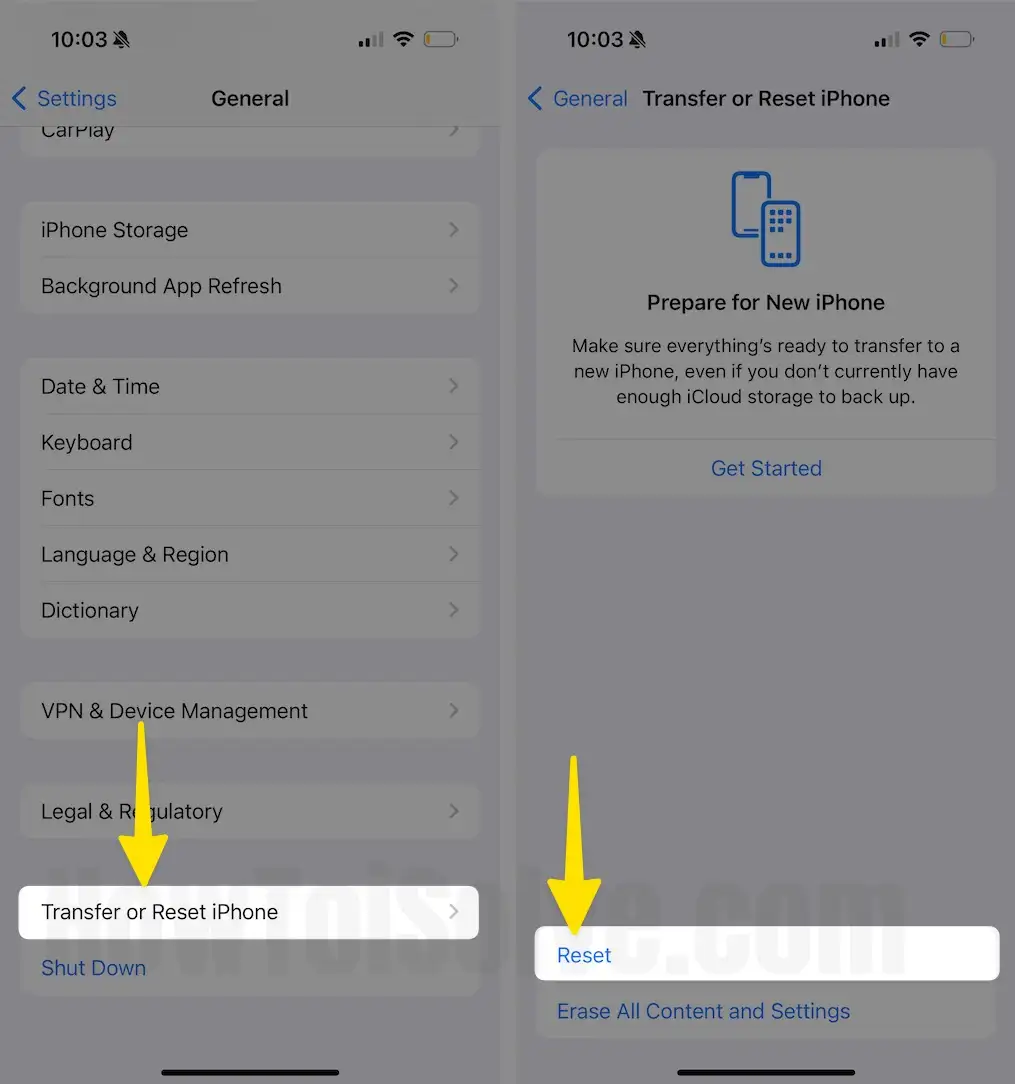
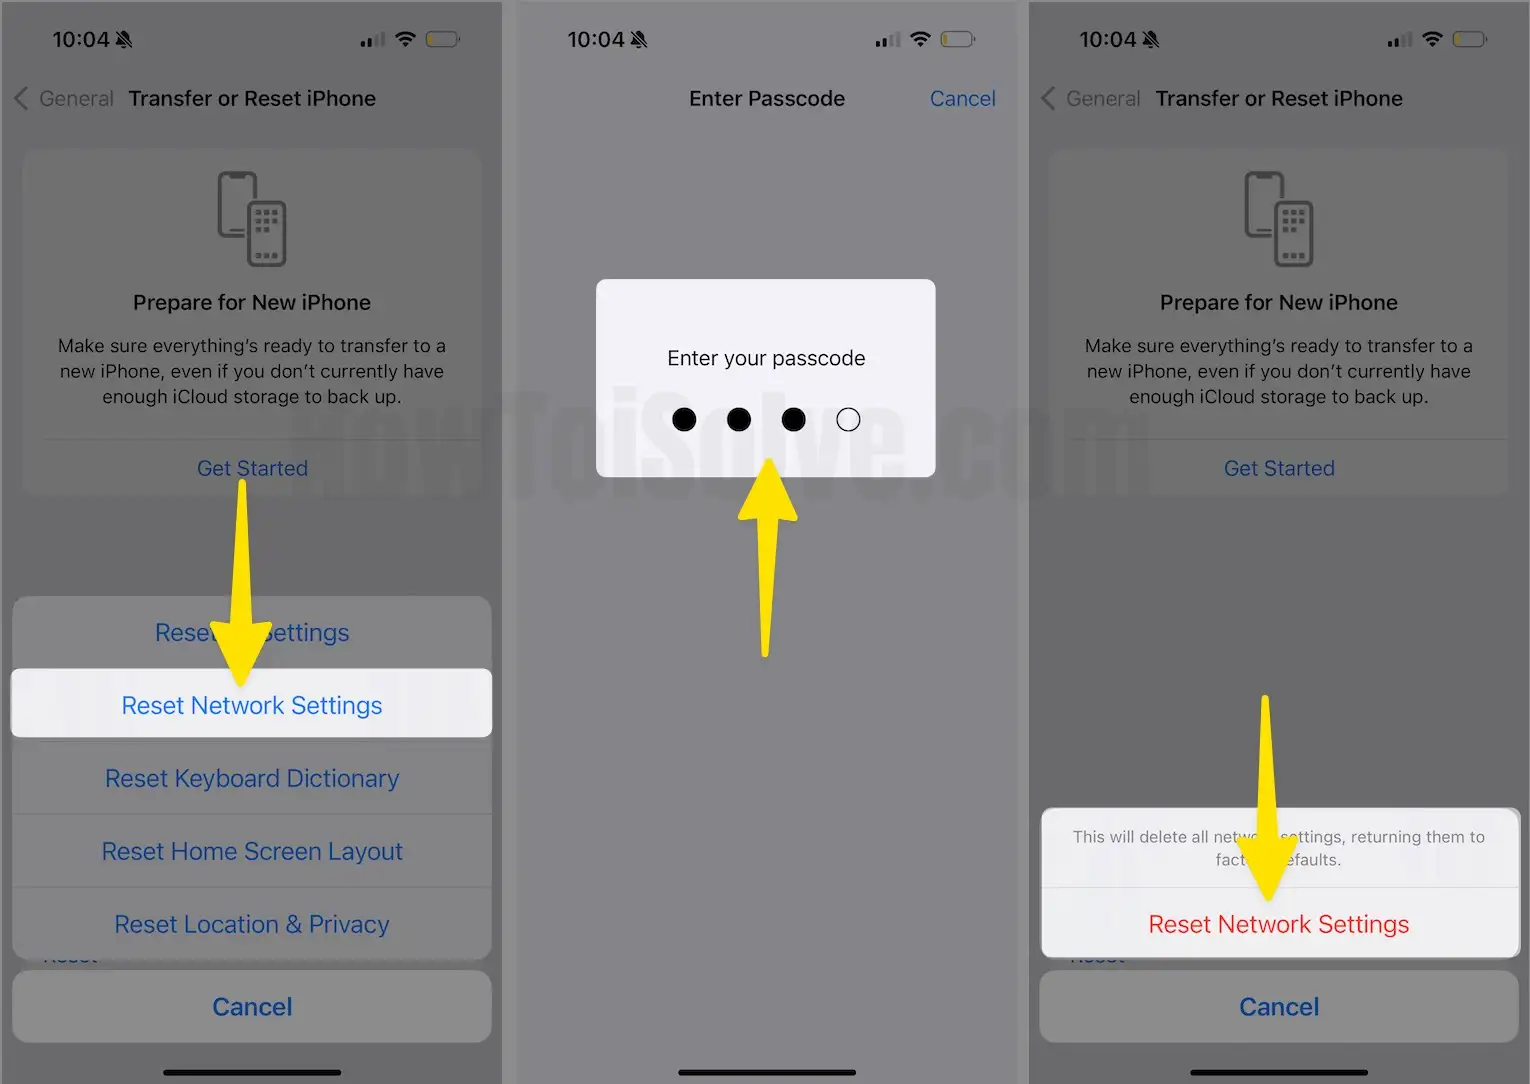
Step 3: Tap on Reset Network Settings > Enter your iPhone’s lock screen passcode if asked > At last, Tap on Reset Network Settings for confirmation.
Final Verdict!
Receiving real-time Twitter notifications keeps you engaged and prevents you from missing out on some critical updates. However, following the above-mentioned troubleshooting tips, you can fix Twitter notifications not working on iPhones running the latest iOS version. But if the issue continues even after following this guide, you can get help from the Twitter Support Team.
