
The ‘Disk Not Ejected Properly’ is a message that pops out when you disconnect an external hard drive from your computer without ejecting it safely. However, it appears to be a common error Mac users have recently faced. For example, several users have reported that after installing the recent OS update on their Mac, the drives often get disconnected randomly, and an error message mentions, “Disk not ejected properly.”
Are you facing a similar problem on your MacOS Sonoma, Ventura, Monterey or earlier macOS? If yes, then you are at the right place! on older mac and Apple’s Silicon M2-Series, M1-series, M1 Pro (MacBook Pro), M1 Max (MacBook Pro & Mac Studio), M1 ultra (Mac Studio), M2 chip of 2022 (MacBook Pro & MacBook Air) Or Intel chip Mac computer.
Here, we will discuss the probable reasons you face the problem and share some workarounds that have fixed the issue for us.
Let’s check it out!
Why Disk Not Ejected Properly Keeps Popping Up?
As mentioned earlier, if you disconnect the hard drive from your Mac without ejecting it, the message will appear for obvious reasons. Apart from that, there can be a faulty cable, or the USB port can be problematic, which is why your hard drive automatically gets disconnected. There is more than one reason you are facing the ‘Disk Not Ejected Properly’ error. Here are some bases you must check out before moving to the resolutions.
- The USB Port on your Mac is defective
- An issue with the removable hard drive
- Operating system corruption or Software bug
- Faulty hard drive cable
How to fix Disk Not Ejected Properly on Mac?
Method 1: Check your USB Cable & Ports
The most viable reason behind the disk not ejecting properly is a faulty hard drive cable or a damaged USB port on your Macbook. If there is a problem with either of these two, your hard drive will connect and disconnect frequently, showing the error message on the screen.
To verify whether the cable or the port on your Mac is damaged, you can first use a different USB cable to connect the hard drive to your computer. If it stops the error message from popping out, you must be sure that a faulty cable is why you face this issue.
But if the ‘disk not ejected properly’ keeps popping up on your screen even after that, insert the drive on a different USB port. Does this resolve the problem? Well, then there can be a faulty port which is why the hard drive was getting disconnected unexpectedly.
However, if a faulty USB cable or ports are not the reason for the ‘disk not ejected properly’ error, you can proceed with further workarounds to resolve the issue.
Method 2: Prevent your computer & disk drive from sleep
Many users have reported that the problem specifically arises after updating to MacOS Ventura. As per the problem reported, users receive the ‘Disk Not Ejected Properly‘ error message whenever they turn on the computer from sleep or after restarting the Mac.
There might be some internal glitch with the OS itself, which is why your computer fails to detect the external drive after a restart or after turning it on from sleep mode.
Resetting the energy-saving settings on the Mac has fixed the issue for some users. You can follow the steps below on your computer to resolve the error,
Change the Energy Saver settings on the MacBook
On MacOS Sonoma, Ventura:-
Step 1: Go to the Apple Logo from the top menu > System Settings.
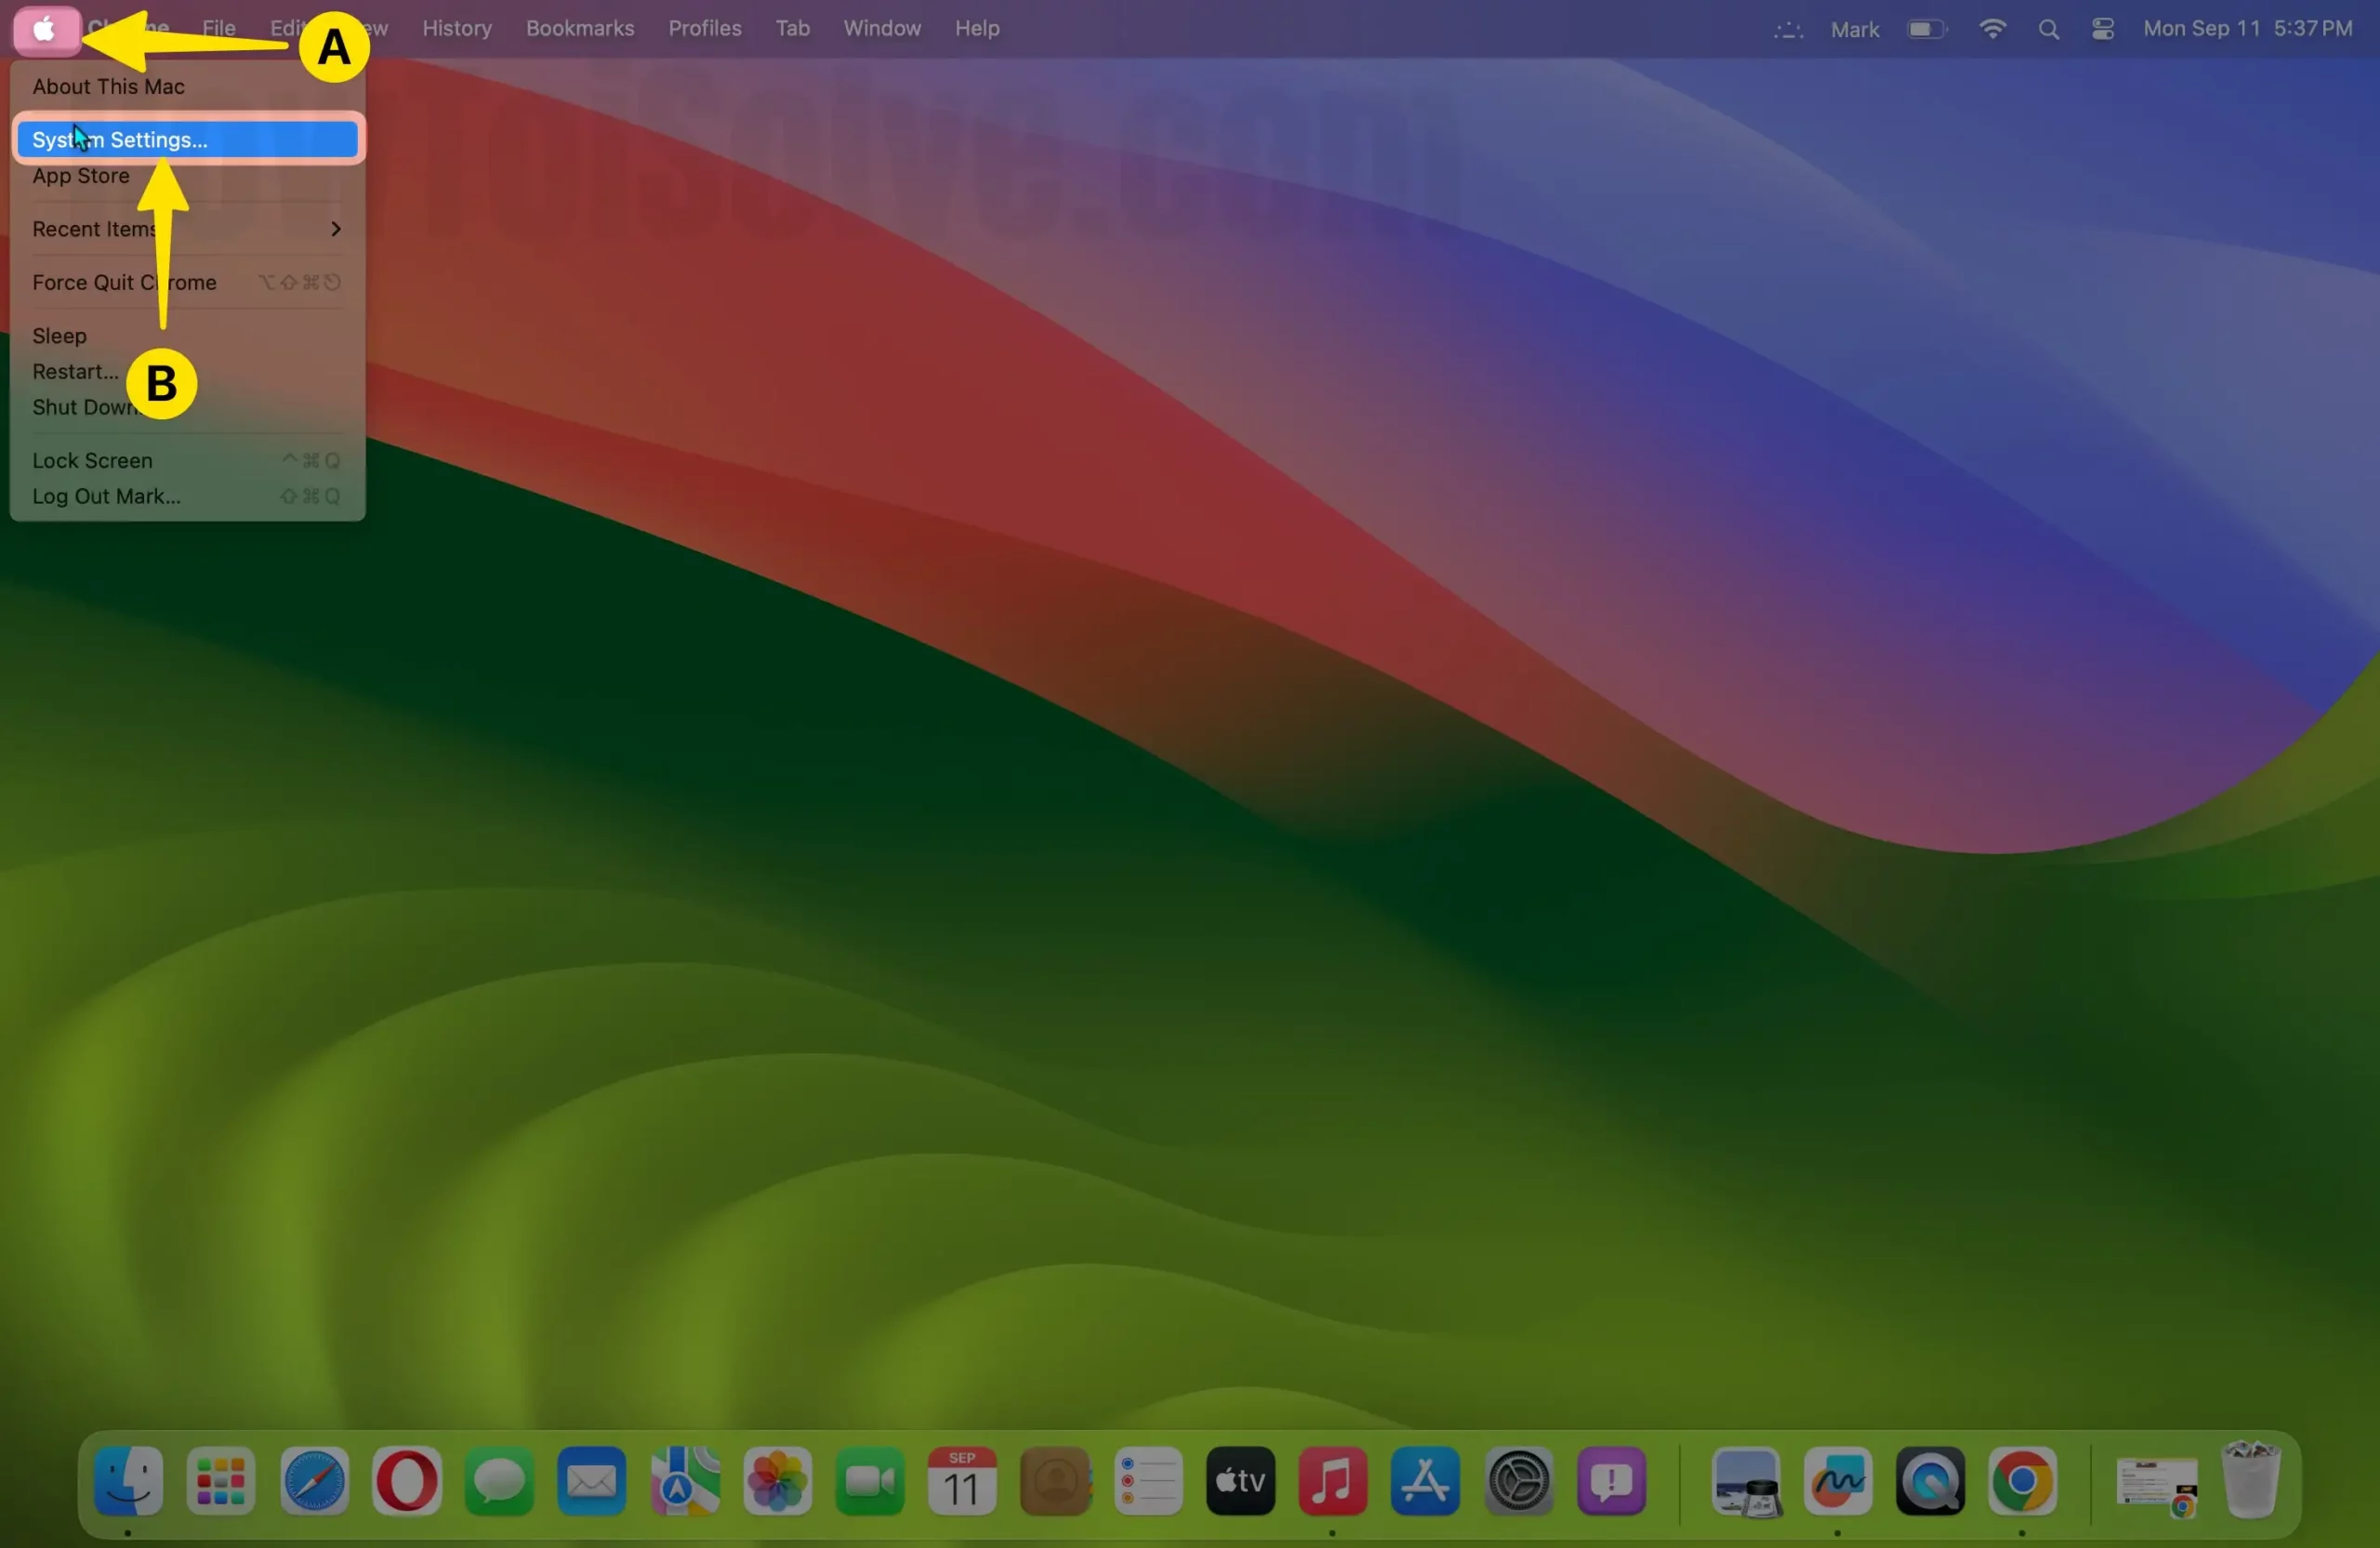
Step 2: Move the steps forward with the installed macOS Version and Mac Model.
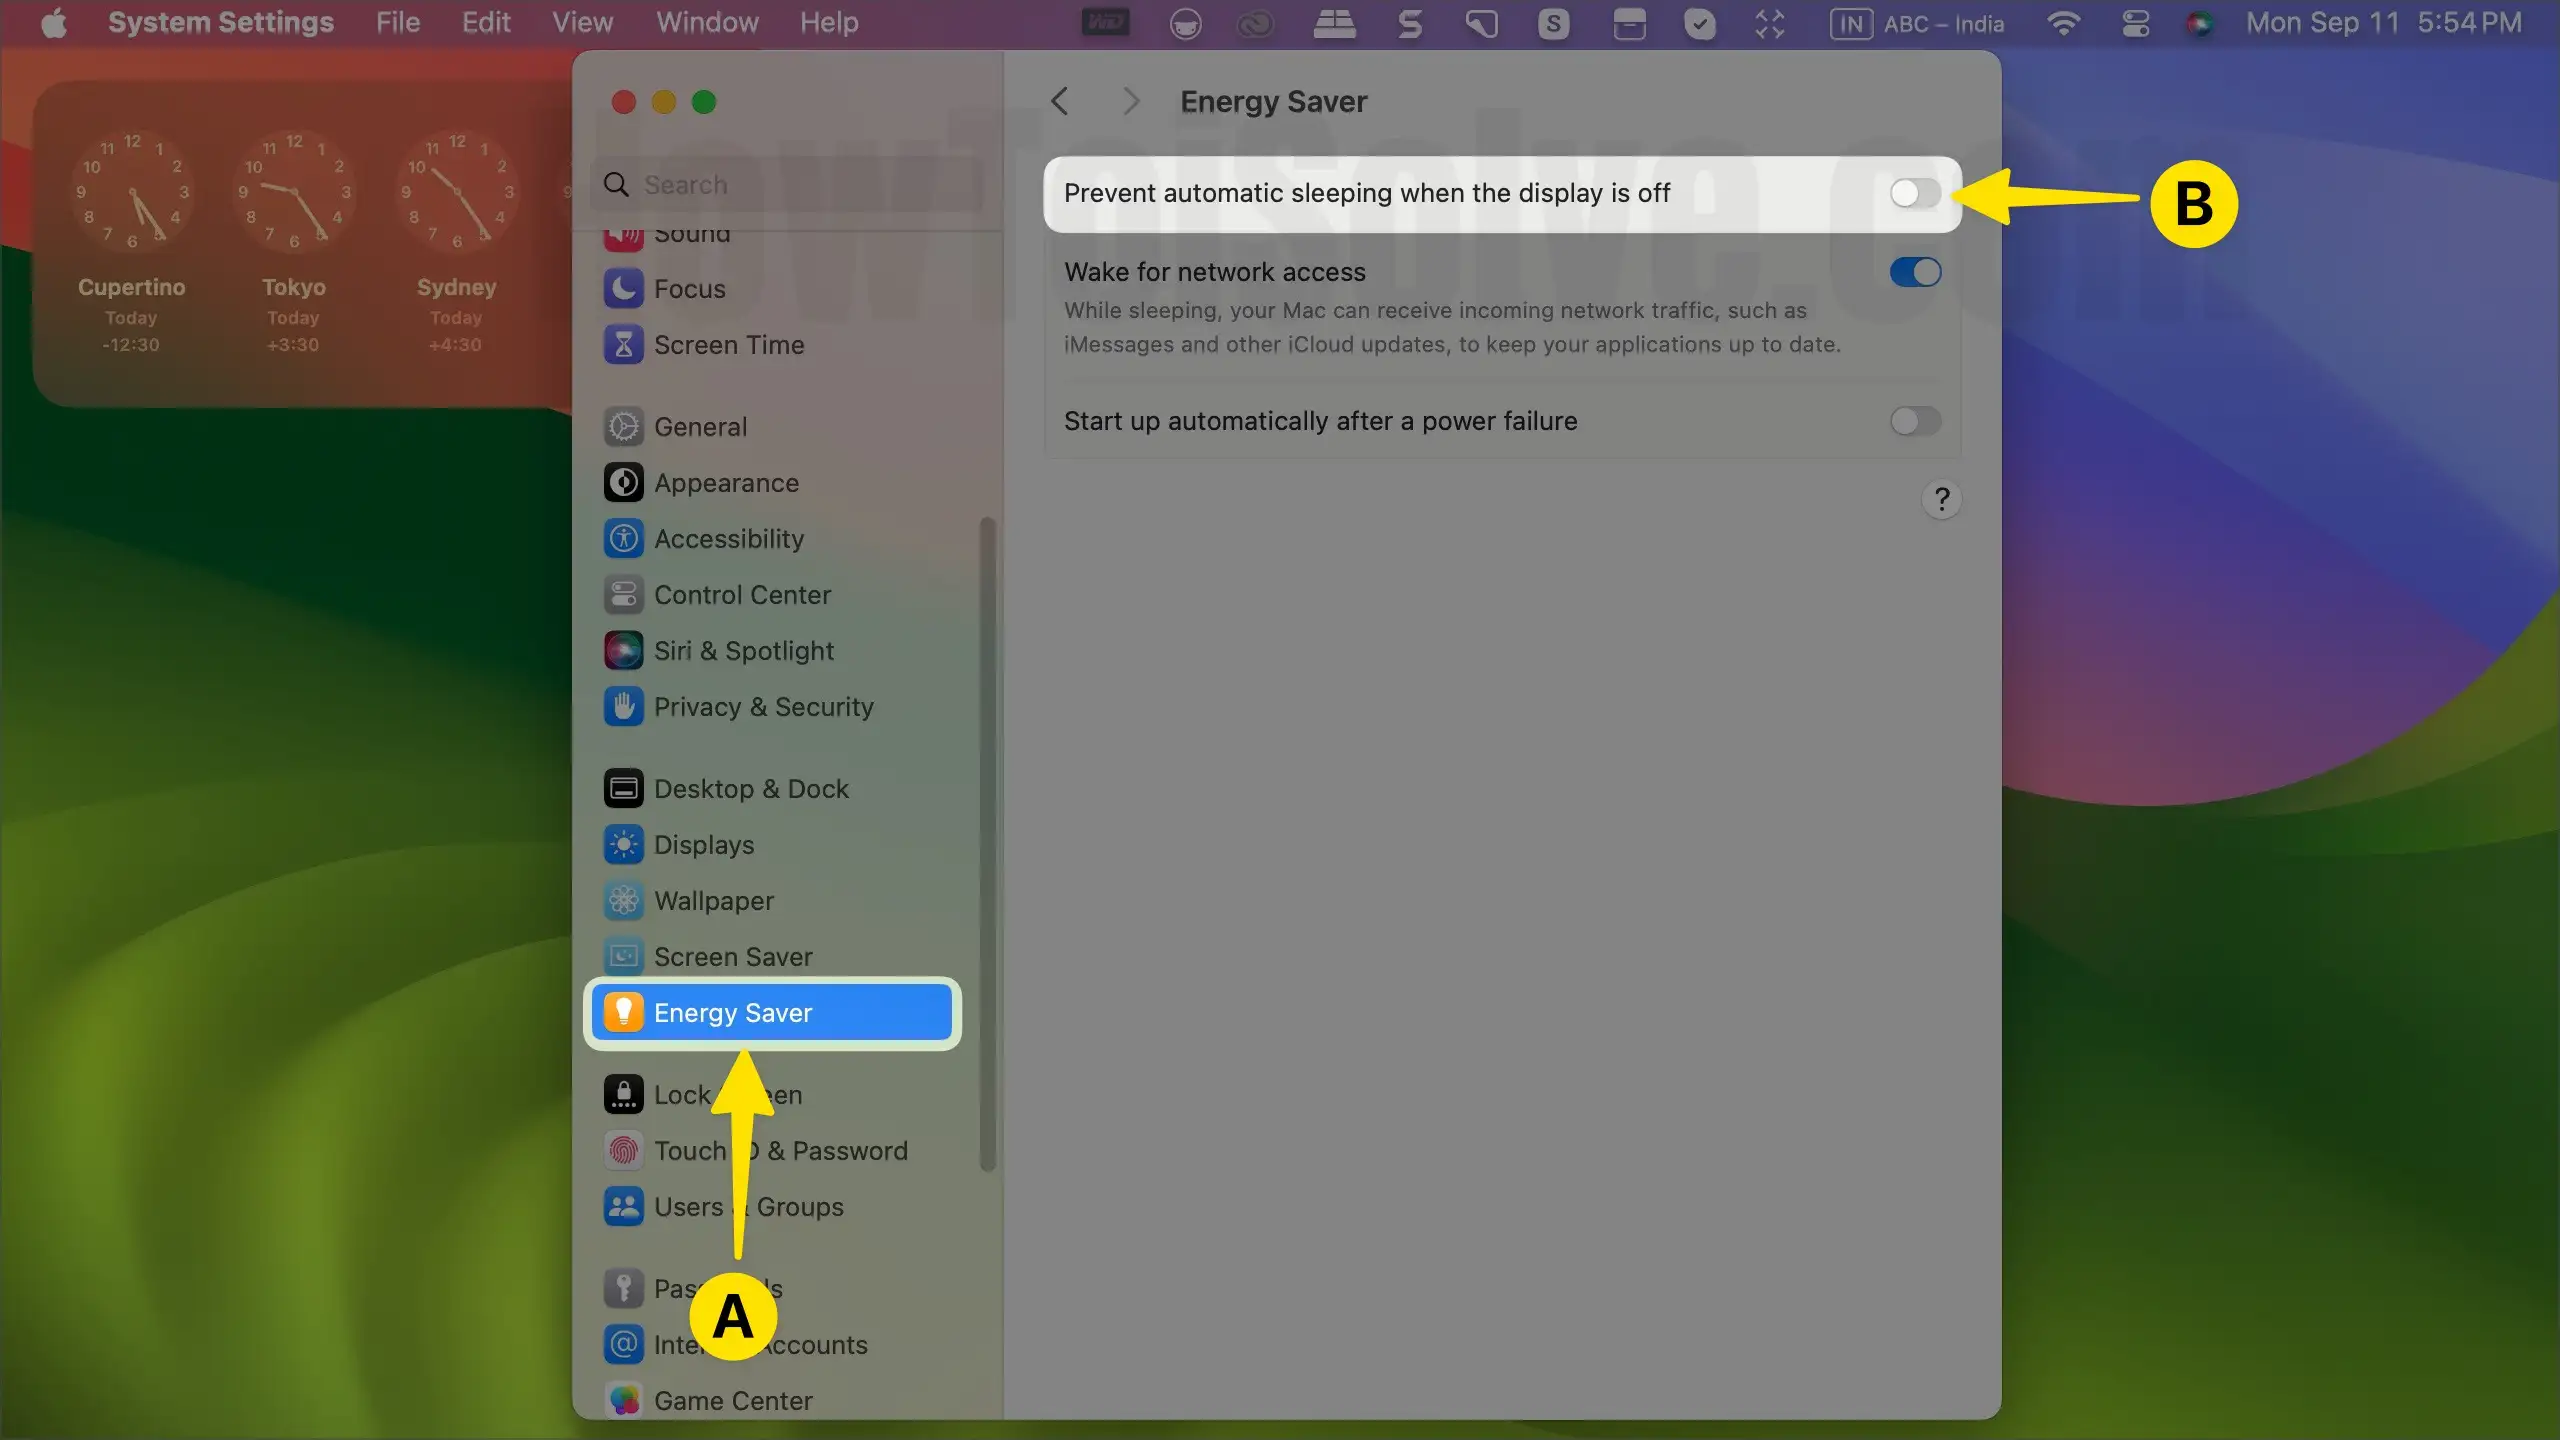
On MacOS Sonoma:-
- For iMac Users,
- Open Energy Saver > Disable toggle ‘Prevent automatic sleeping when the display is off‘.
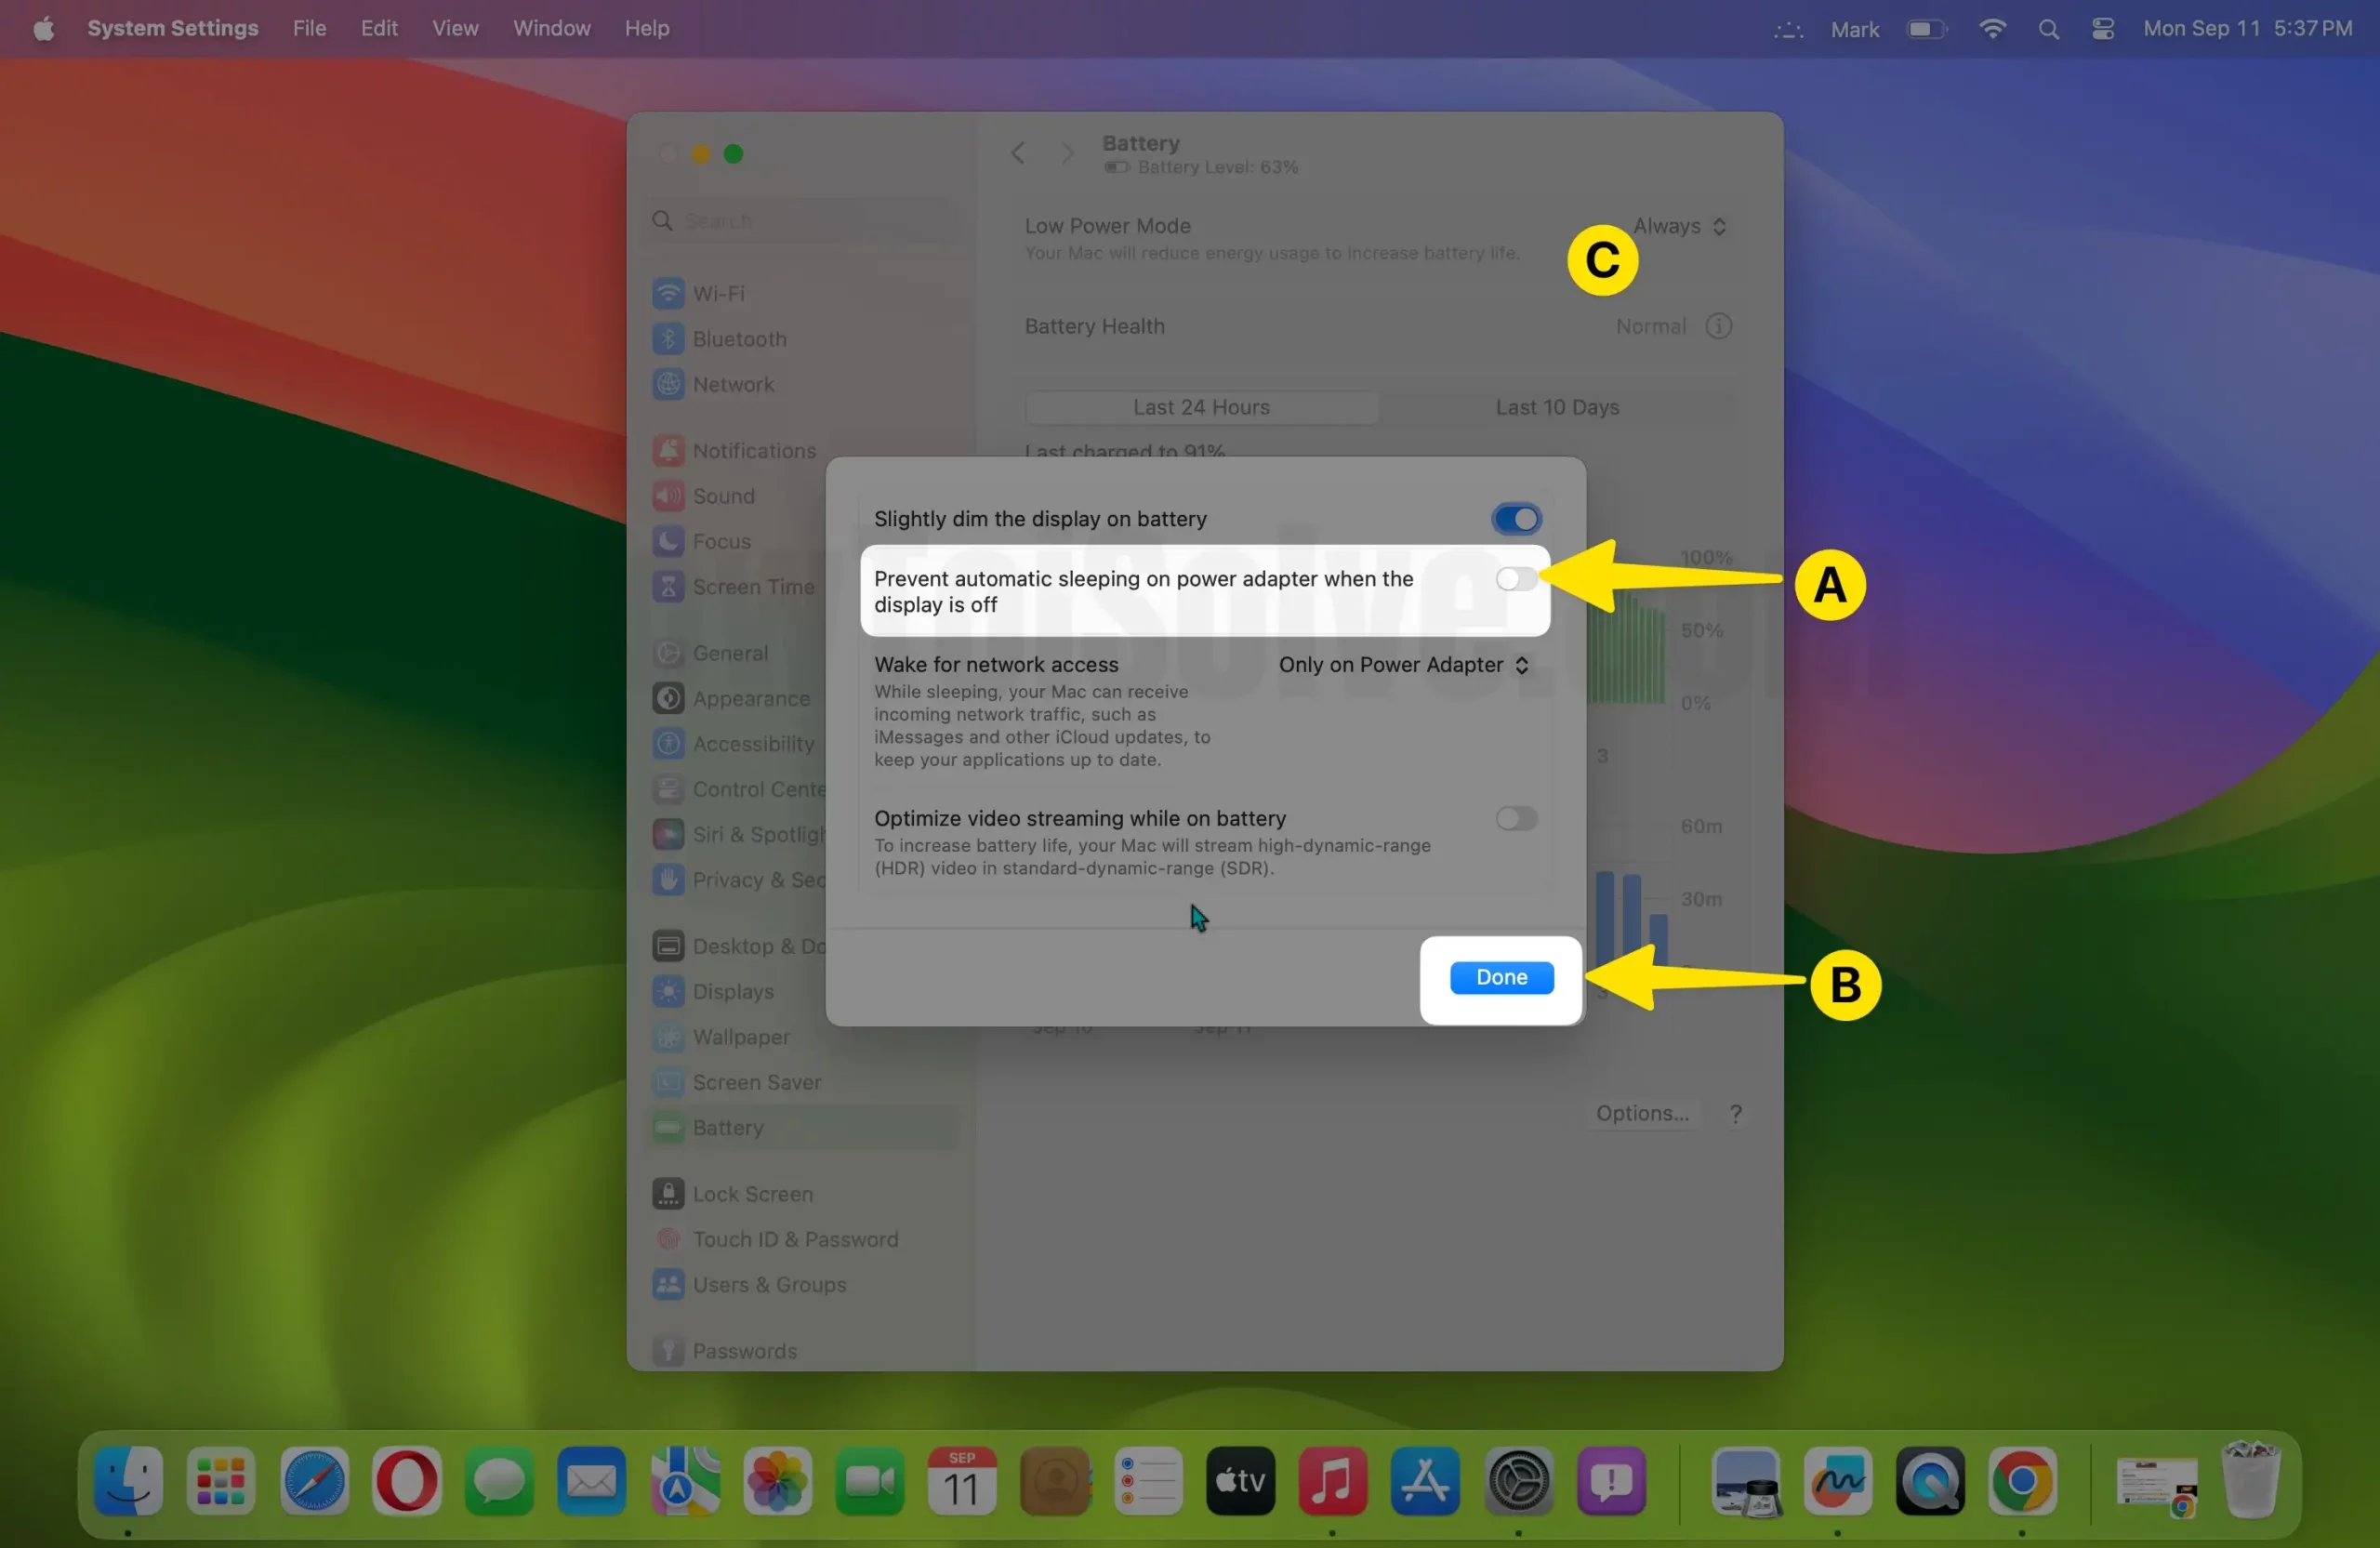
- For MacBook Users,
- Open Battery > Options.

- Disable toggle for ‘Prevent automatic sleeping when the display is off‘.
On MacOS Ventura:- Open Displays settings > Click on Advanced…

Step 3: Disable the toggle for “Prevent automatic sleeping when the display is off“.

Step 4: Click on Done.
Note: You won’t be able to perform the steps while your Mac is working on a battery. Thus, connect your Mac to a power source before trying this workaround.
You can reset the System Management Controller settings to fix the problem if you are using an intel-powered Mac and not a Macbook that runs on an M1 chip. Follow the resolution below.
On MacOS Monterey & Earlier:-
- At first, click on the Apple logo icon from the top left corner of your Mac home screen.
- Then, from the drop-down list, click on System Preferences.
- As the new window opens, locate and click on Energy Saver.
- Next, Click on the Power Adapter tab on the Energy Saver window.
- Check the box beside ‘Prevent computer from sleeping when the display is off‘.
- Now, uncheck the box beside the ‘Put hard disks to sleep when possible‘ tab.
Method 3: Reset SMC on your Macbook
Important! Skip this solution for M1, M2 Mac [Apple Silicon]
The System Management controller takes care of certain core tasks on your Macbook. Its small hardware is incorporated exclusively into the Intel-powered Macbook. It keeps the main processor free by controlling the essential hardware functions such as power button responses, managing portable battery performance, etc. Since the ‘disk not ejected’ error pops out mostly after a restart restoring the SMC settings to the default may resolve the problem. Here is how to perform the steps,
- At first, shut down the Mac.
- Then, press and hold the left Option key + left control key + left shift key for 10 seconds. At the same time, press the power button with the other hand.
Note: If you are using an external keyboard, then the process won’t work. It only works with the built-in keyboard.
- Now, upon completing 10 seconds, release all the buttons.
- Finally, press the power button again to start your Mac.
Method 4: Reset NVRAM on your Mac
Important! Skip this step on M1, M2 Mac
NVRAM uses a flash-based storage type RAM tha in SSDs to store the settings used on your Mac. It controls the configuration of peripheral devices and other essential system components. You can reset the NVRAM to properly fix the ‘disk not ejected’ error. Follow the steps below to reset NVRAM,
- First, Shut down your Mac. And then turn it on again.
- Press and hold the option+command+P+R as soon as you press the turn-on button.
- Hold the keys for at least 20 seconds, and then release them.
- The computer will continue the start-up process, and NVRAM will be reset.
Method 5: Format the external hard drive
If none of the above methods stops the ‘disk not ejected properly’ error message from popping up, then it might be the external hard drive that got corrupted. And that’s particularly why you are facing the problem. Format the hard drive using the disk utility feature on your Mac to resolve the issue. Here are the steps that you need to follow,
Before following the steps, Backup your Data from Drive and Erase it on Mac in a compatible format.
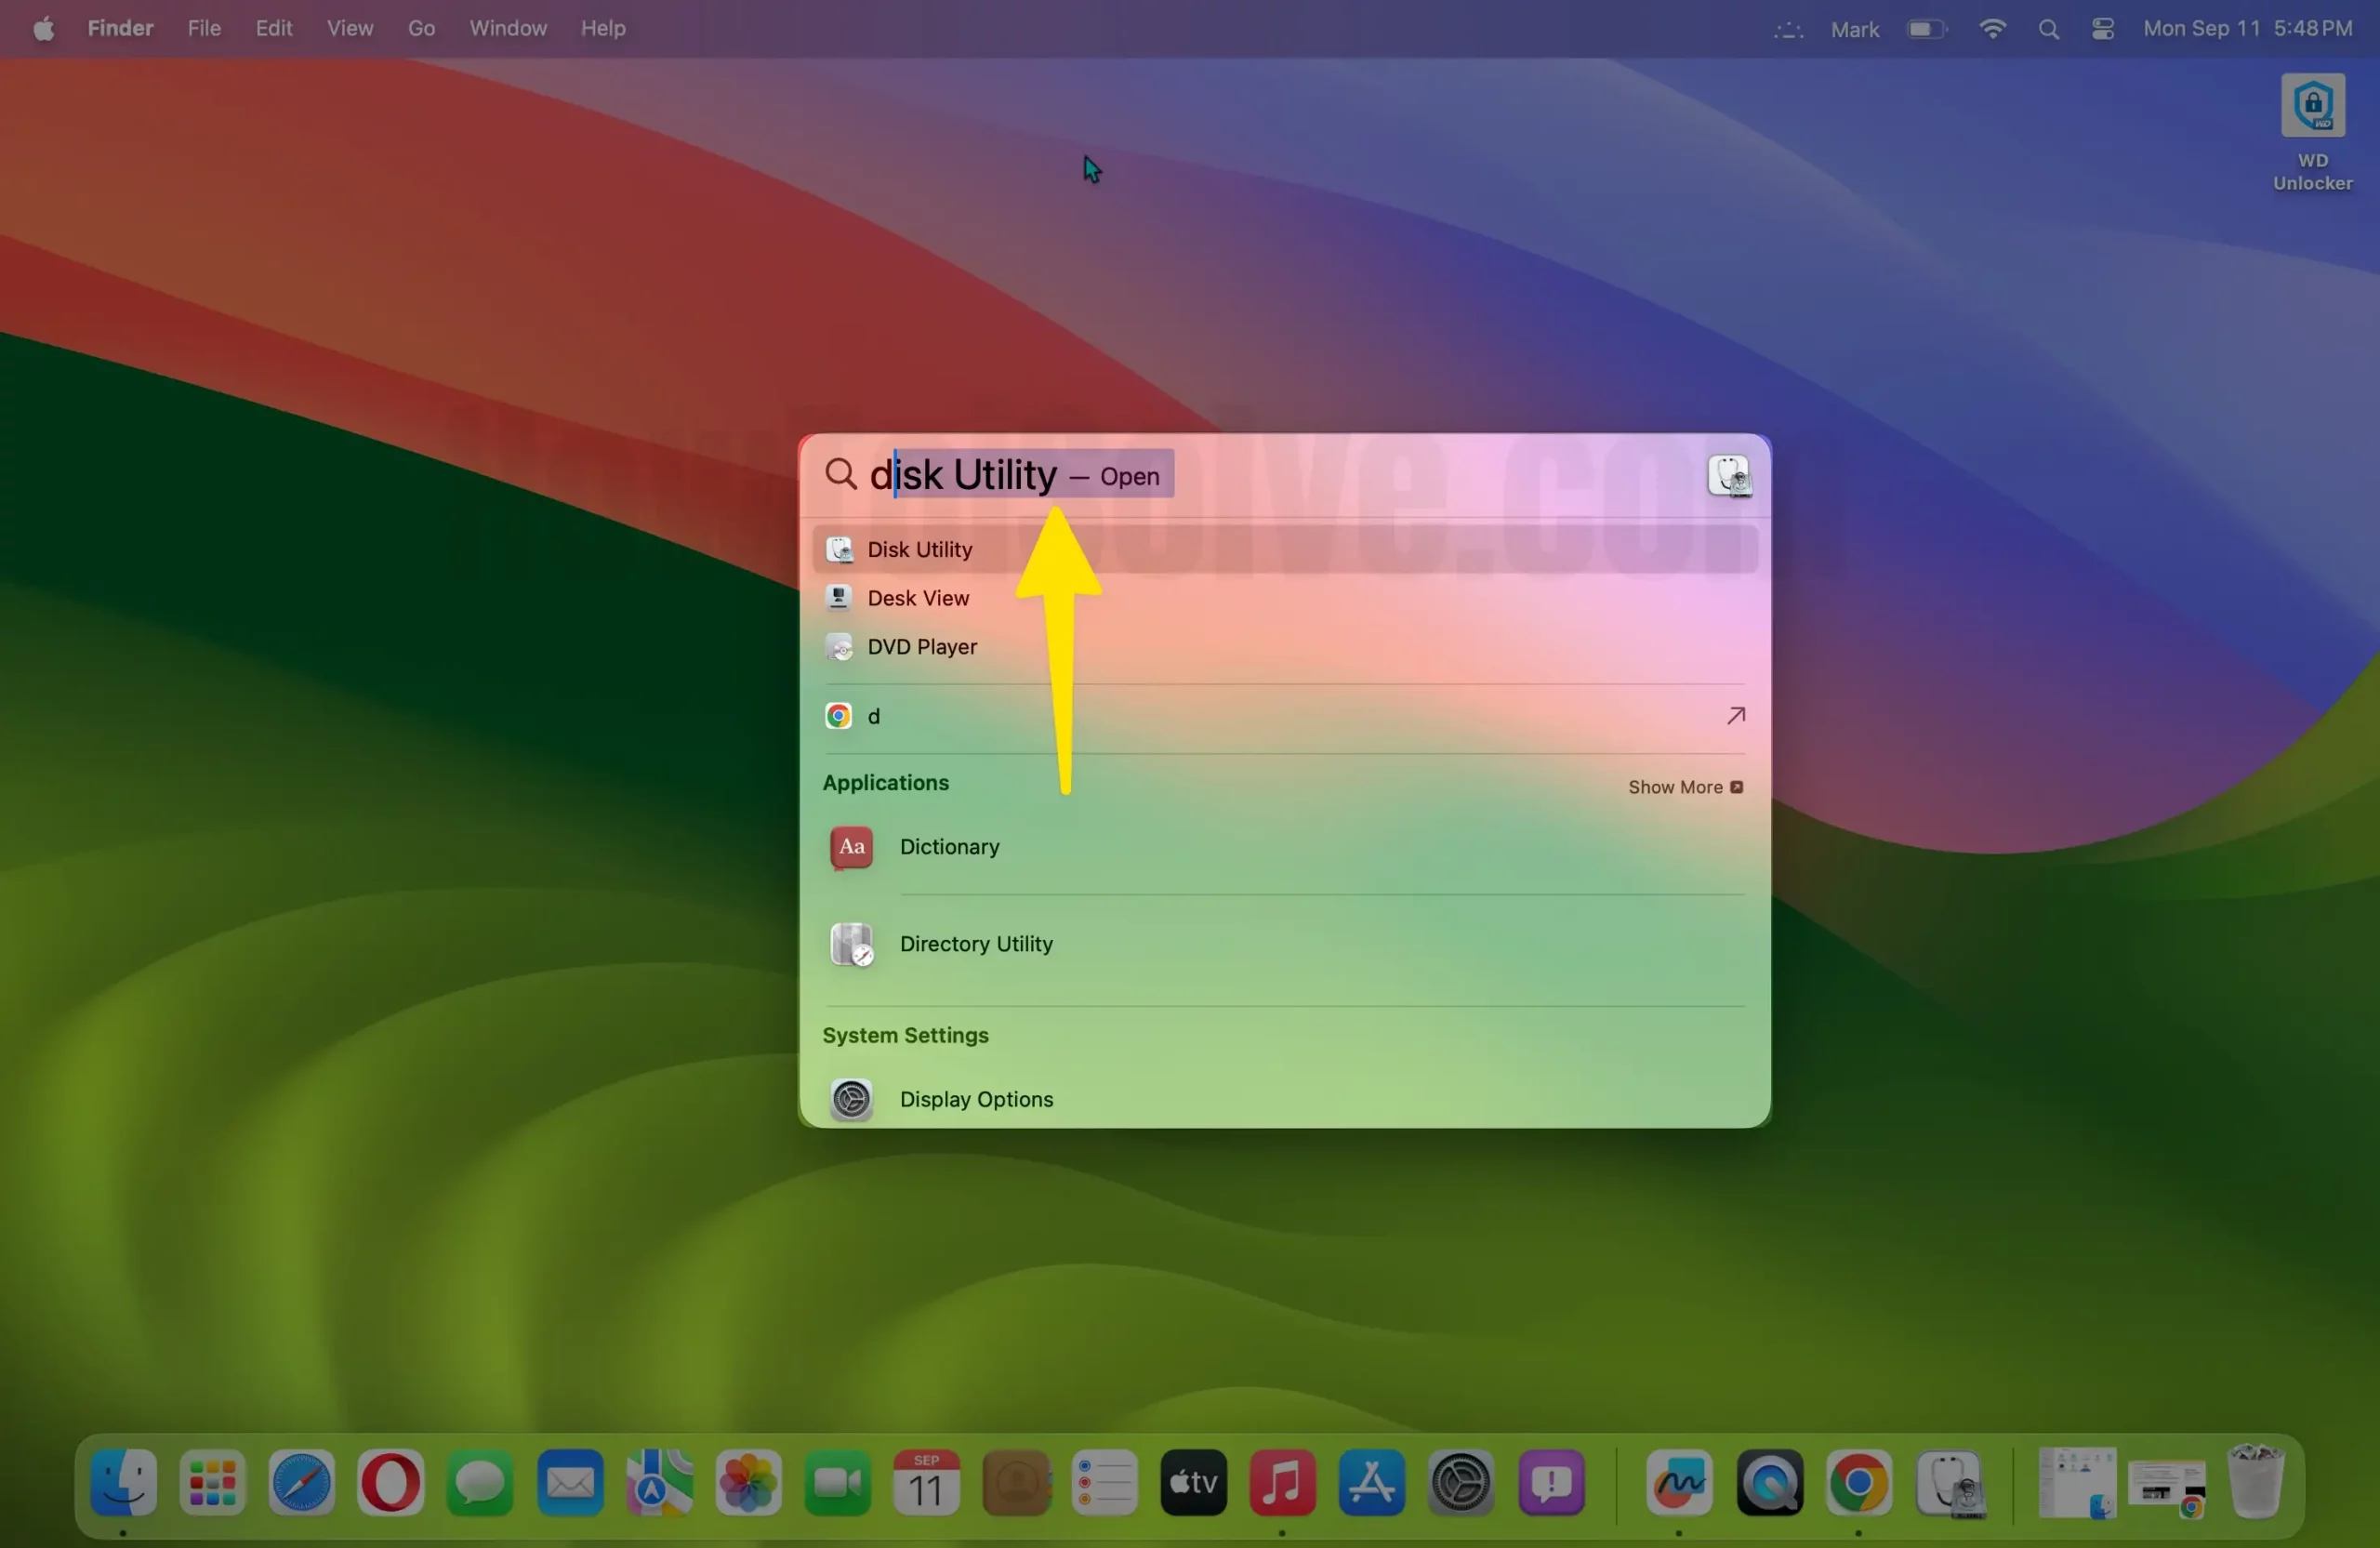
Step 1: Open Disk Utility on Mac, Under Finder > Applications.
Step 2: Next, select the External storage device you want to format and click on the Erase button at the top of the window.
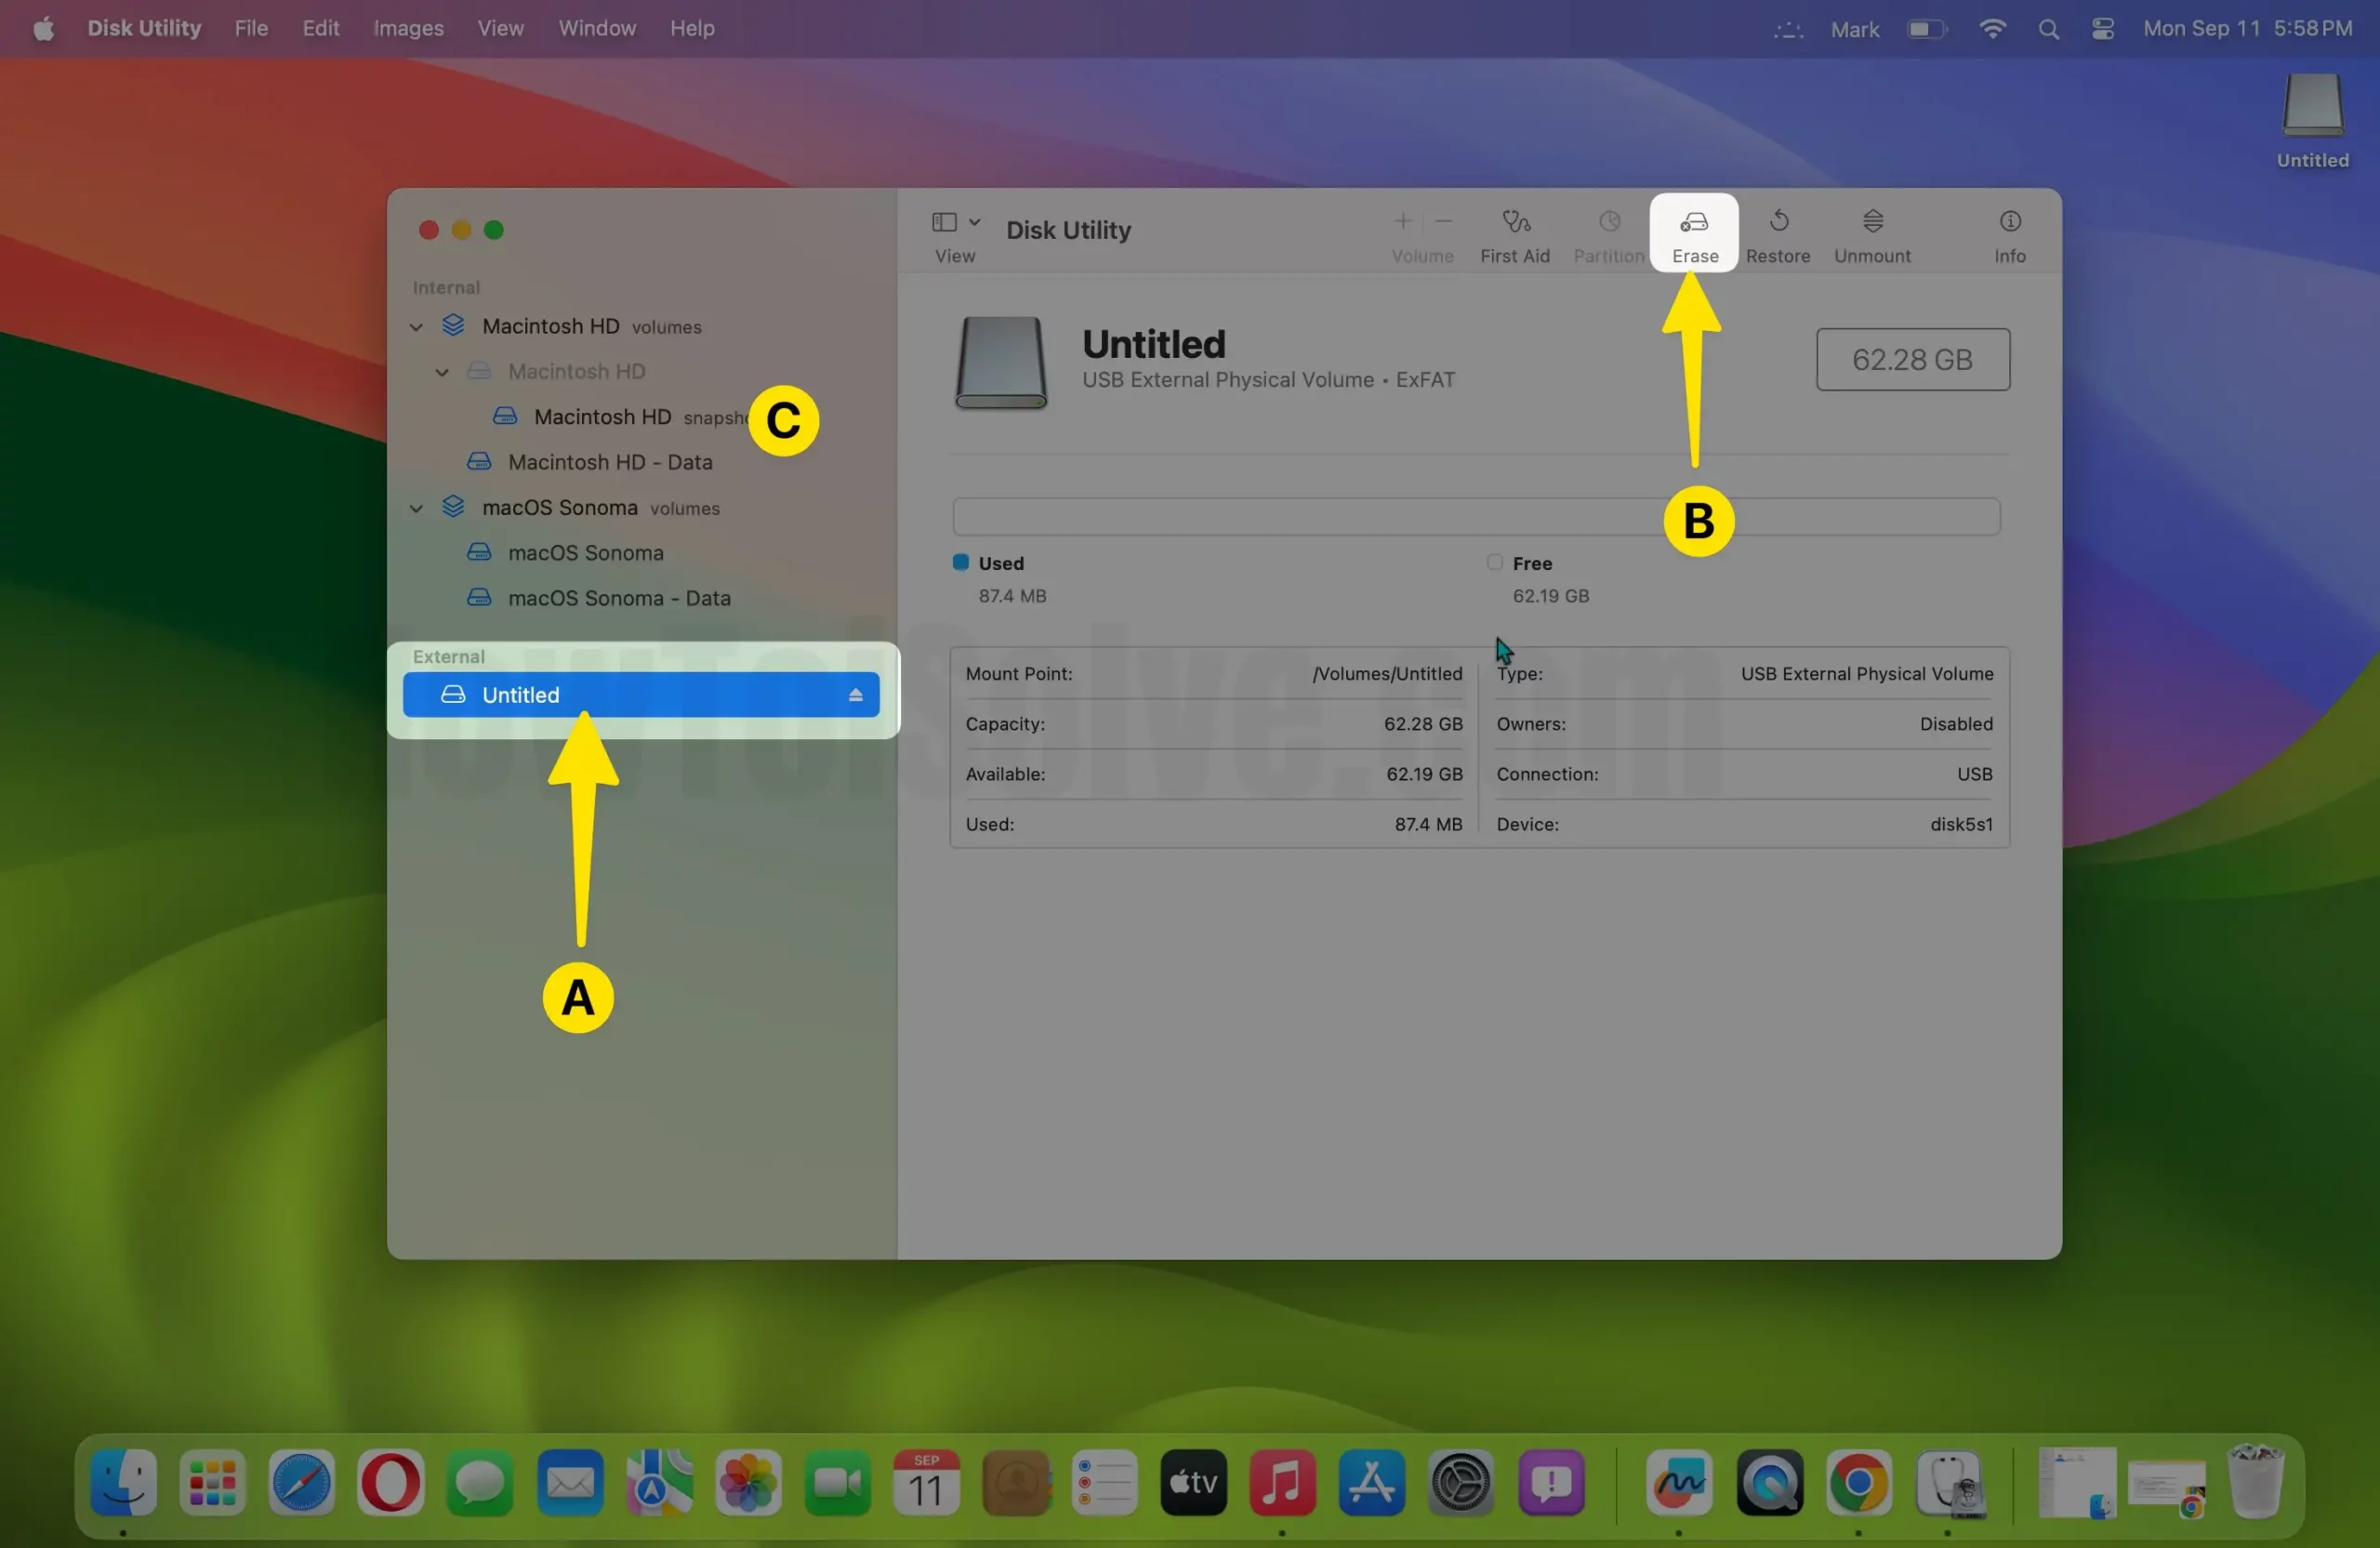
Step 3: Now, select the “GUID Partition Map” from the Scheme pop-up menu. Then, select a file system format and enter a name for the drive. The recommended file format is exFAT – That’s compatible with MacOS and Windows.
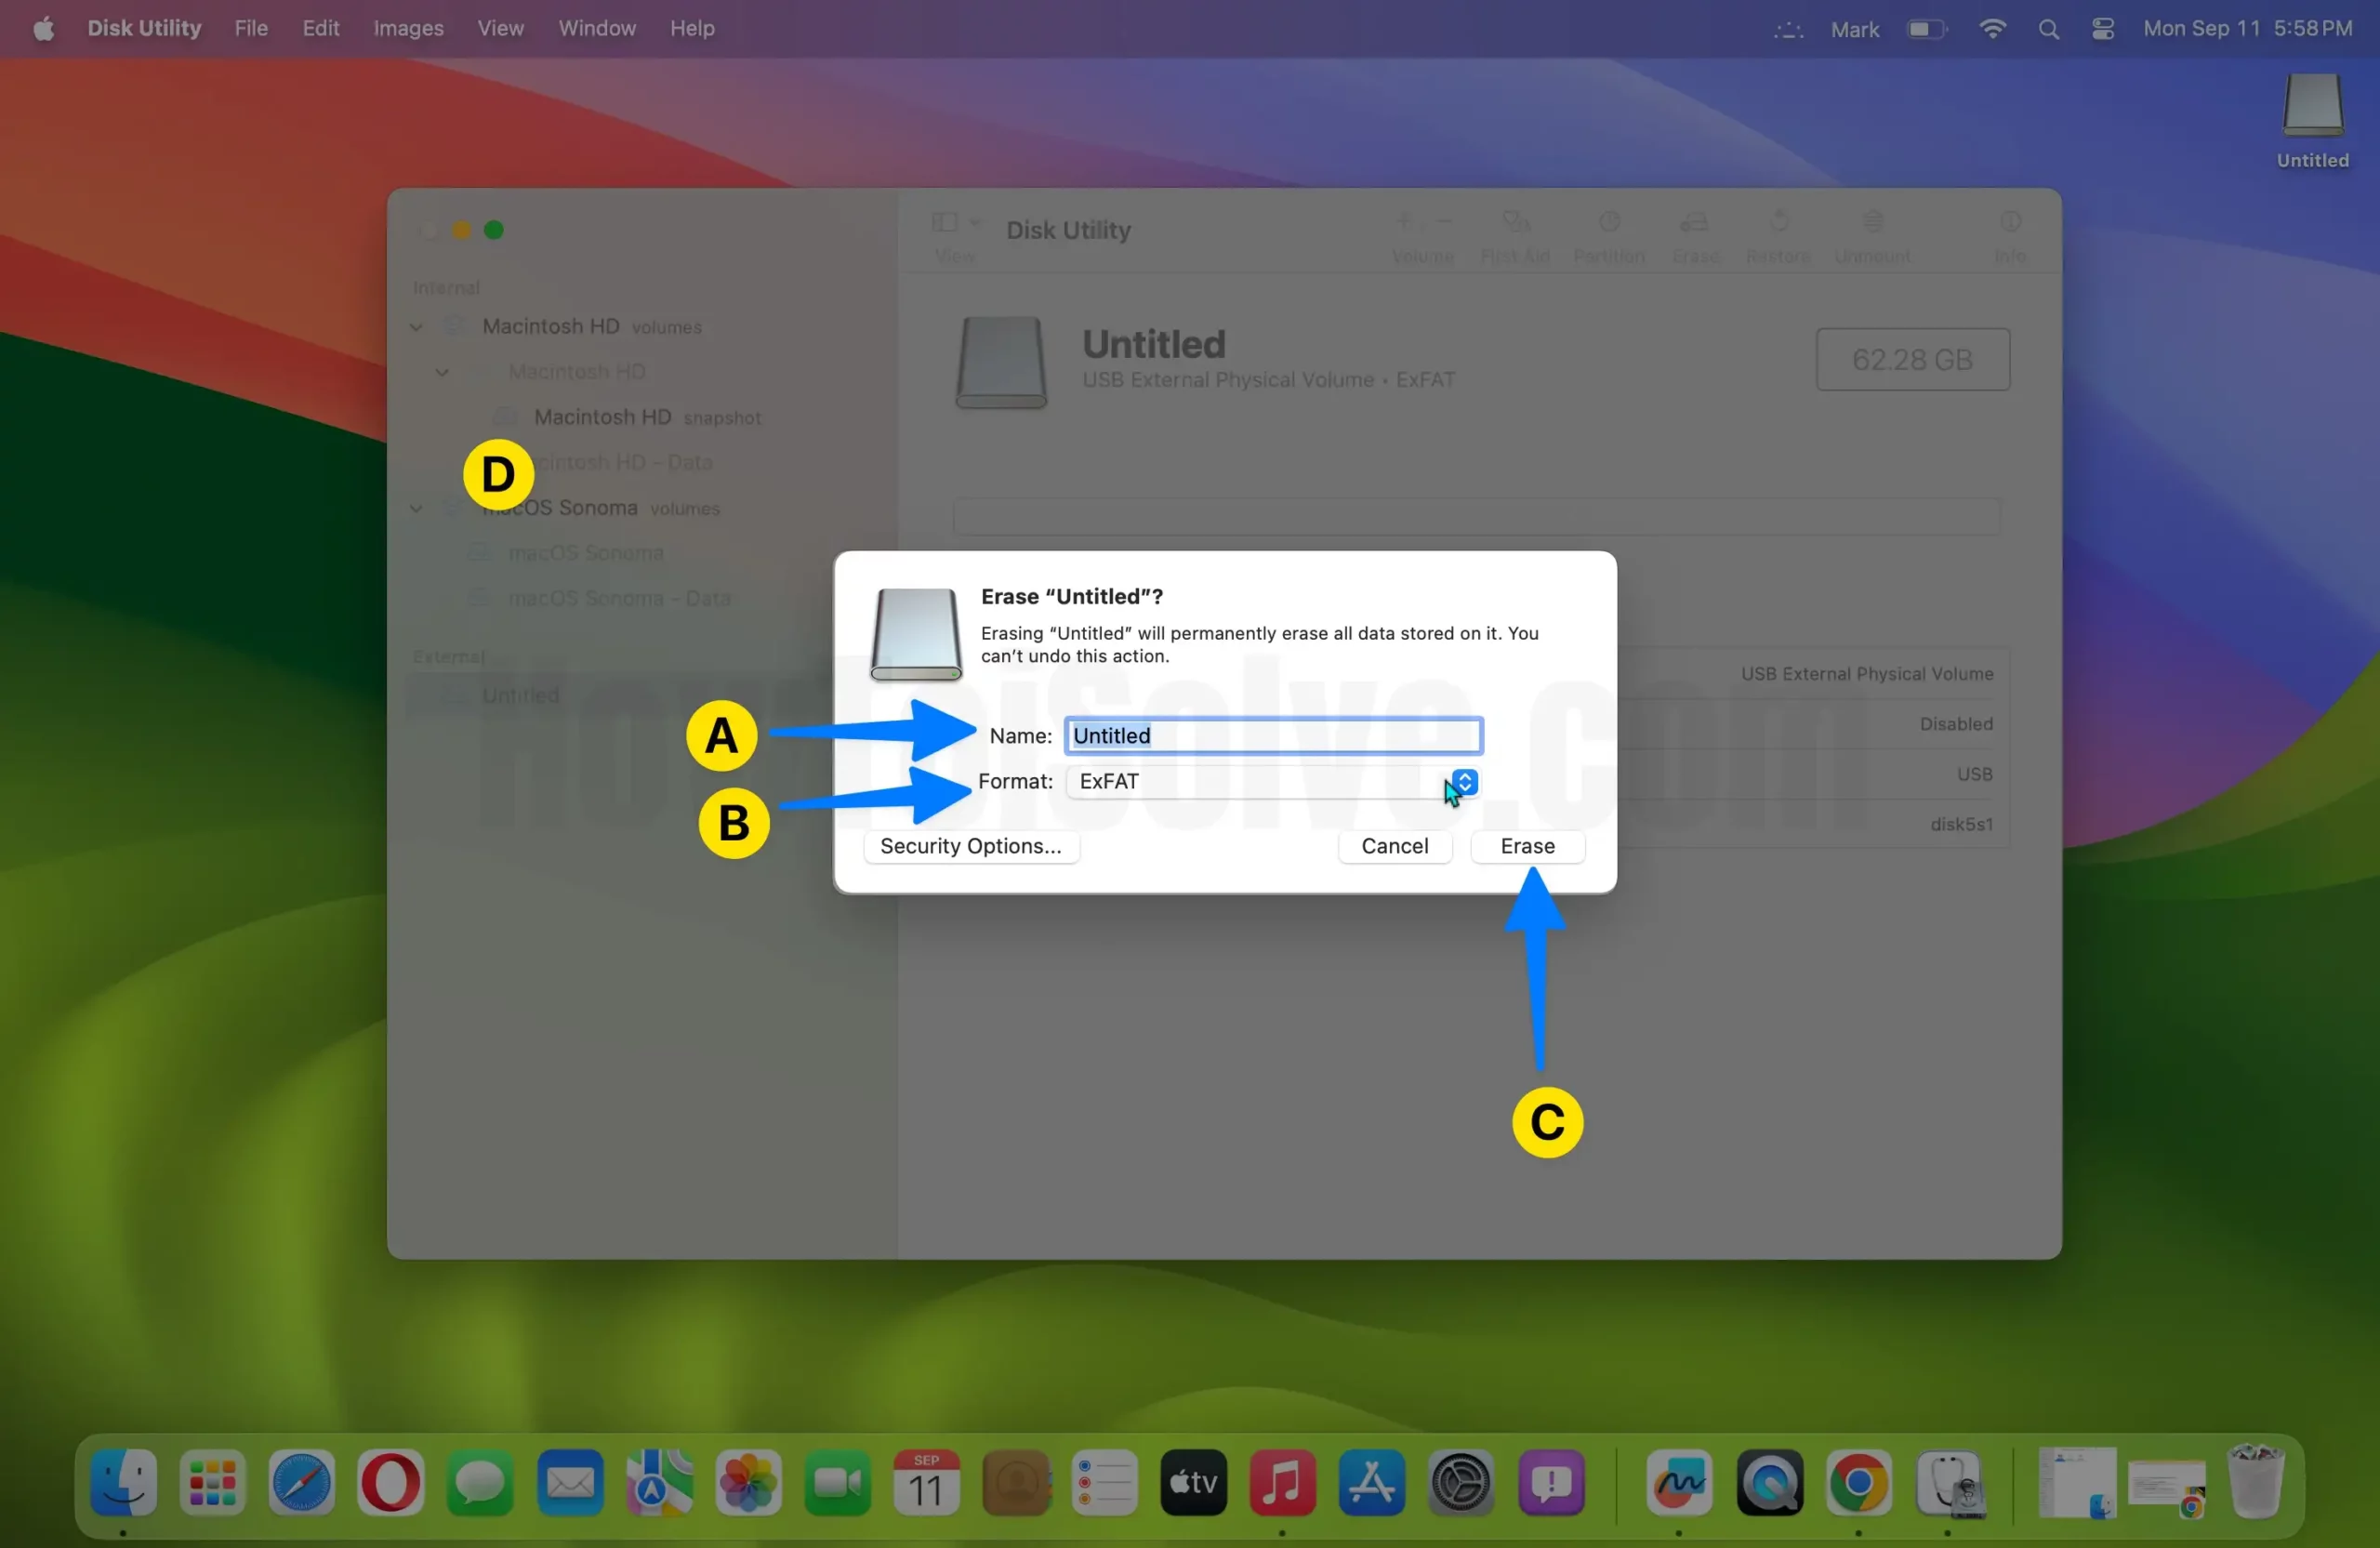
If your disk drive offers additional security features, click Security Options.
Select how many times you want to write over the erased data, and click OK.
Finally, click on Erase and select Done.
As posted on different Mac forums, people face the problem after an update they installed on Mac. Thus, if an internal system bug is behind the ‘Disk not ejected properly’ error, a further update will likely resolve the issue.
Method 6: Update your MacOS
If an update is available for your operating system, you can proceed through the process to fix the error. Follow the steps mentioned below to check and update your Mac.
On MacOS Sonoma, Ventura
- Go to the Apple Logo from the top menu > System Settings.
- Next, Click on General > Software Update.
- Download and install all pending updates and That’s it.
On MacOS Monterey & Earlier
- First, open the Apple Logo Menu by clicking on the Apple logo at the top left corner of your screen.
- Then, from the list, select the System Preferences option.
- Now, as the System Preferences window opens, click on Software Update.
- Choose either of the options ‘Update Now‘ or ‘Upgrade Now‘ upon availability.
Note: The ‘Update Now’ is for installing the latest updates on the current install version of the operating system. Whereas the ‘Upgrade Now’ option is for upgrading the MacOS from one version of the OS to the other. Here, in this context, since you might have bugs in the current system, choosing the Update Now option is favorable.
- Finally, wait until your Mac automatically downloads the updated File. Once done, follow the simple on-screen instructions to complete the process.
Tips to Avoid the ‘Disk Not Ejected Properly’ error message
Safely ejecting your external disk drive will stop the error from appearing on your screen repeatedly. Thus, whenever you want to remove the disk drive from the system, take these preventive measures,
Check if there is an ongoing task that your external drive is performing. For example, if you transfer files from or to the drive, its always better until the process concludes.
Once done, you can safely eject it by following one of these simple methods,
Method 1:
- Click on the disk drive you want to eject.
- Then click on File
- Finally, select Eject.

Method 2:
- Go to the Finder sidebar.
- Find and click the Eject button beside the item name you want to eject.
Method 3:
- While on the desktop, drag and drop the particular item you need to eject into Trash.
Conclusion
That’s all. Once you follow all the resolutions mentioned there, the Disk Not Ejected Properly error message won’t appear on your screen. Let us know which method works for you in the comment box below. Also, if you want to contribute to any other easy solution for our readers, mention it in the comment.
In conclusion, we suggest you follow the basic ejection methods to keep your flash drives or external hard disk in good health.


