What is a Startup Disk on Mac? It’s one of the most essential parts of the Mac computer to perform several important tasks on the device. Moreover, using the Startup Disk allows you to set up two macOS versions simultaneously. But in the worst case, if your Mac’s Startup disk gets corrupted, it results in Misbehaving Of Mac.
Still, if you want to use the Startup Disk on Mac and want to change Startup Disk once or every time but don’t know how to. In this article, we provide a comprehensive guide.
How Can I Change Mac Startup Disk On My Mac Computer
As there are multiple settings to be played to change the Startup Disk on Mac, wisely follow the article. Before that keep in mind, System Preferences… in the older macOS version is replaced with System Settings… in the macOS Ventura & later
Method 1: How To Change Your Mac Startup Disk Once
If you are frequently jumping around from one startup disk to another the Change Startup Once is the best option to go with. In this case, both Apple Silicon M1 chip and Intel consume different Procedures. It is our suggestion to perform the steps as per the chip installed in your Mac.
- For M1 Mac Users
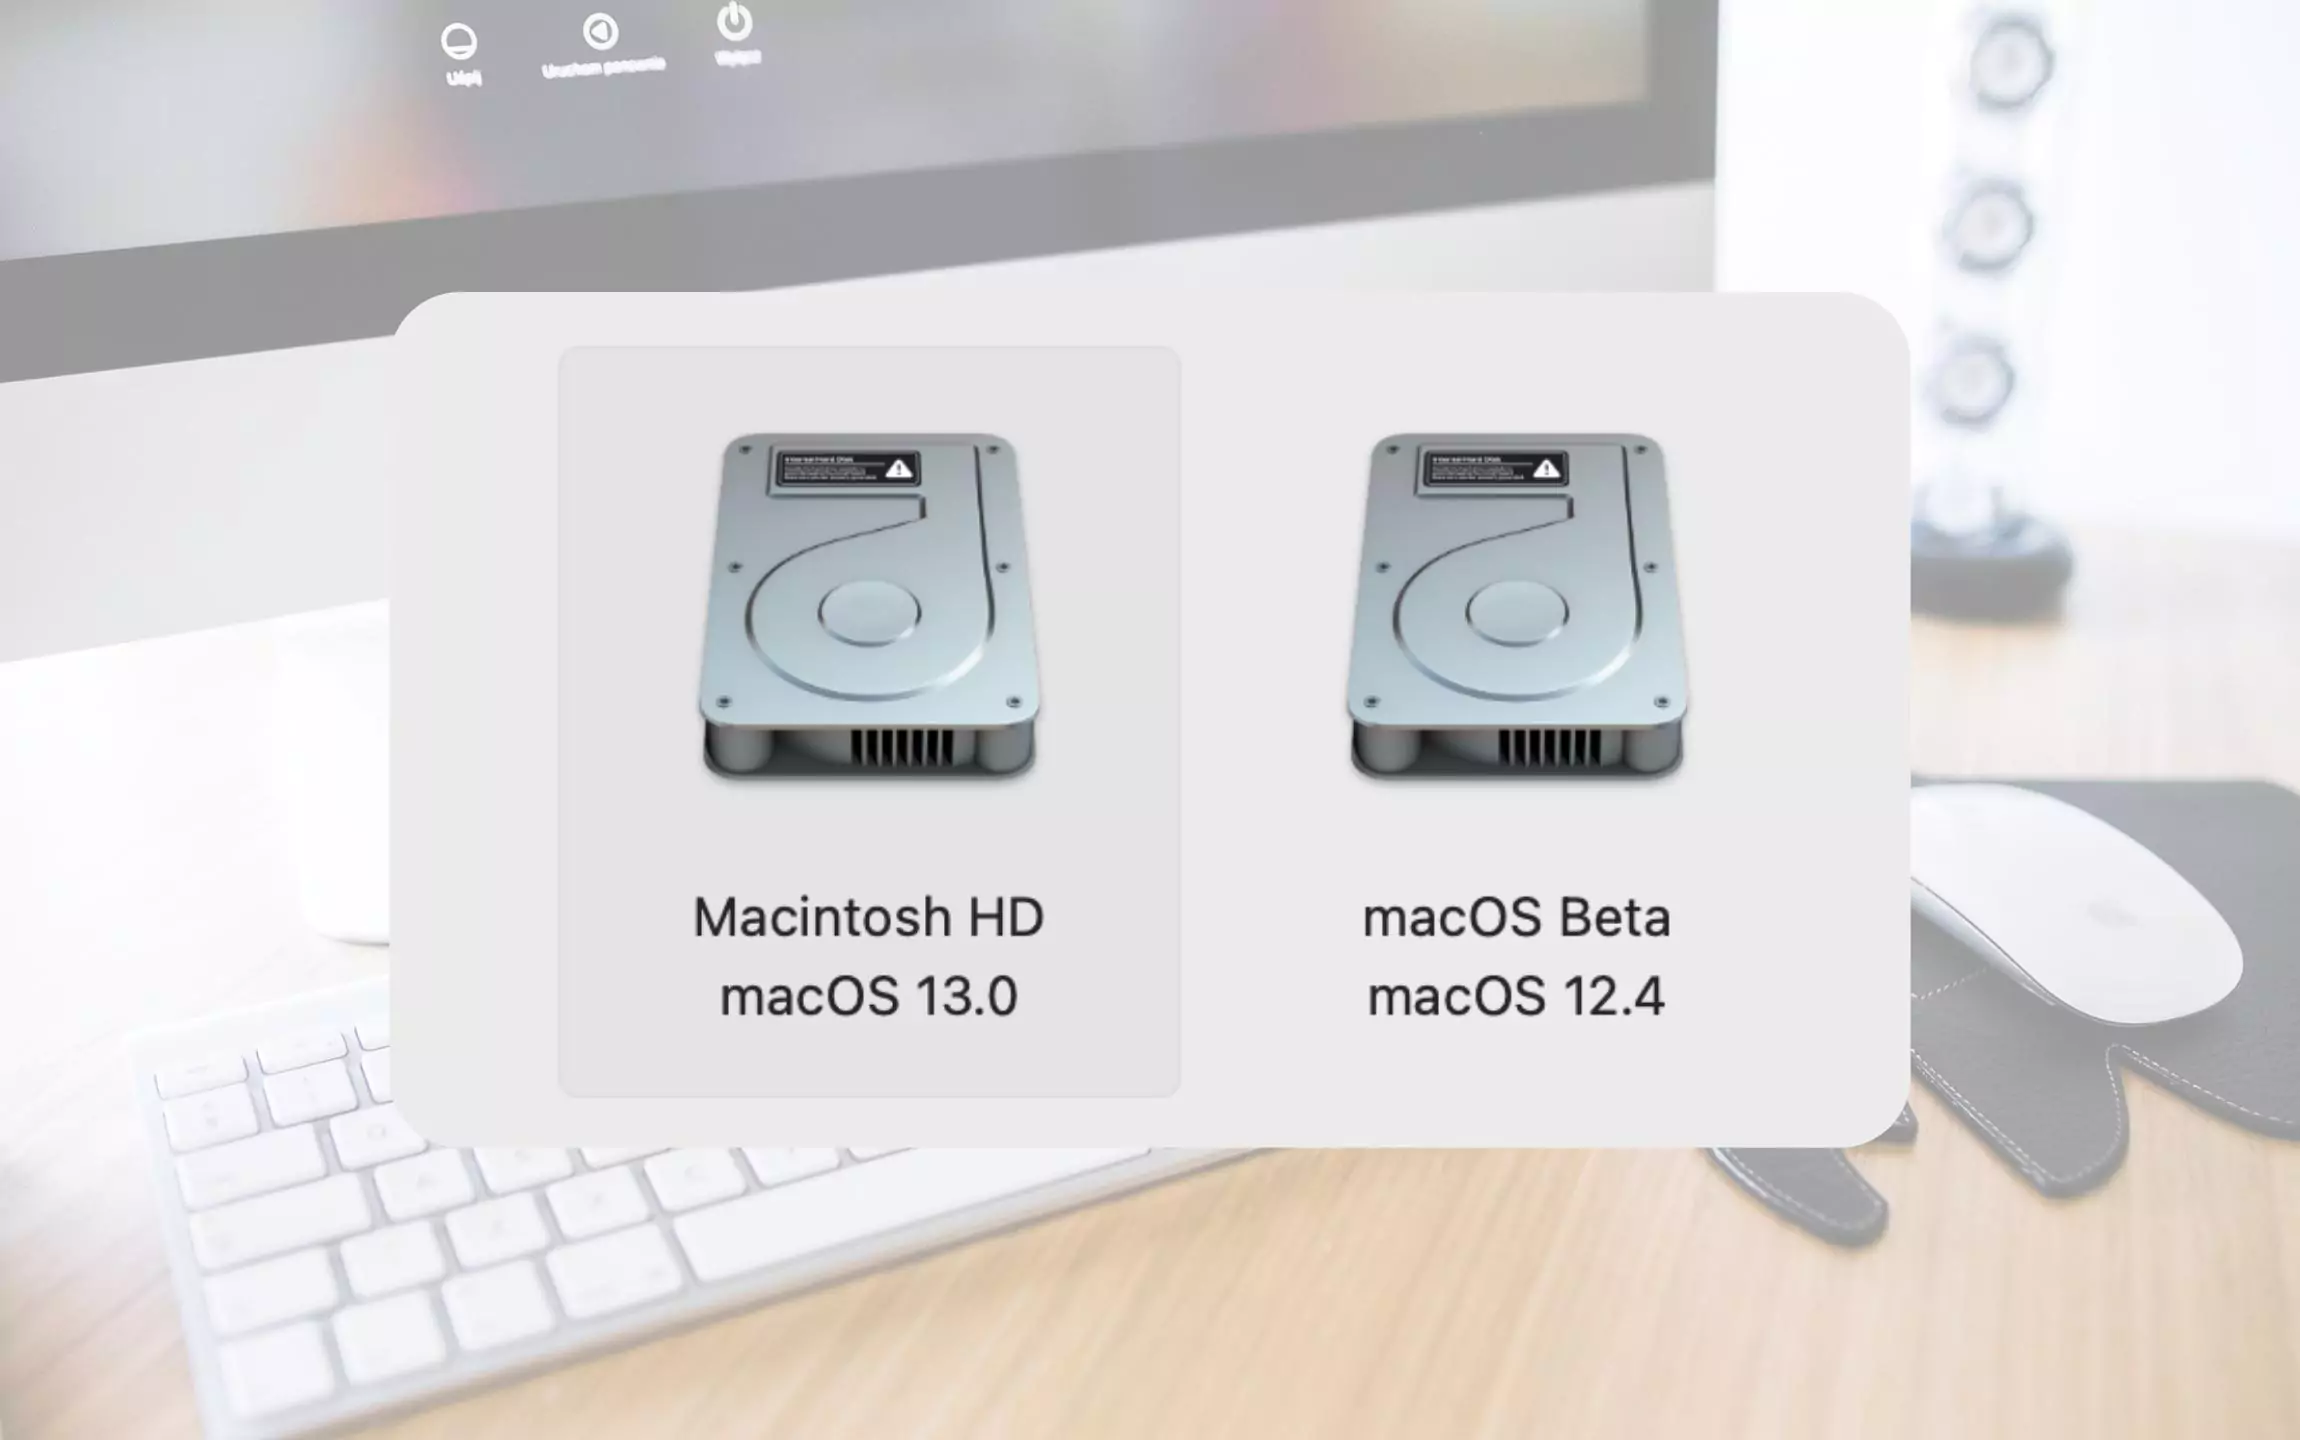
1→ Press and hold the Power Button until the “Loading Startups Option Screen” appears. If you are a Mac Mini user, hold on until the System Indicator highlights the amber light.
2→ Doing so will feature the Startup Disk, click on the desired one, then choose Continue Button.

- For Intel Mac Users,
1→ Press and hold the Option Button while starting up the Mac. If you have a Mac Mini, wait until the amber light is turned on by the System Indicator.
2→ When the screen features Startup Disk, choose desired once, then drag the cursor over the Up Arrow On Mac Intel.

Hint: In case your Mac Is Showing Question mark With Folder in the Startup Disk Option screen.
After performing these steps you will be navigated to the Startup Disk you choose, but unfortunately, the Startup Disk gets changed the same as the disk you have selected in the System Preference after restarting the Mac.
Method 2: How To Change Your Mac Startup Disk Every Time
Well, if you are fond of using the same Startup Disk, and want to continue to work with it without changing it manually, then it’s better to use an option known as change your Mac Startup Disk Every Time. Here are the steps to do so.
Note: The steps of Change Your Mac Startup Disk Every Time are different in macOS Monterey and macOS Ventura & later, so prefer the steps according to macOS installed on your Mac.
- macOS Ventura And Later,
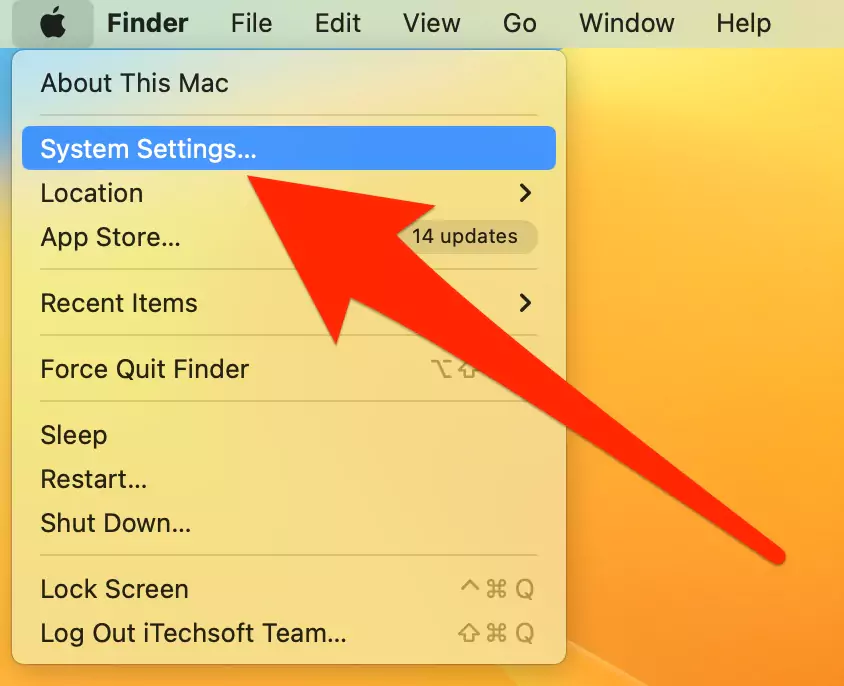
1→ Click on the Apple Logo present at the upper left corner of the screen.
2→ Select System Settings….
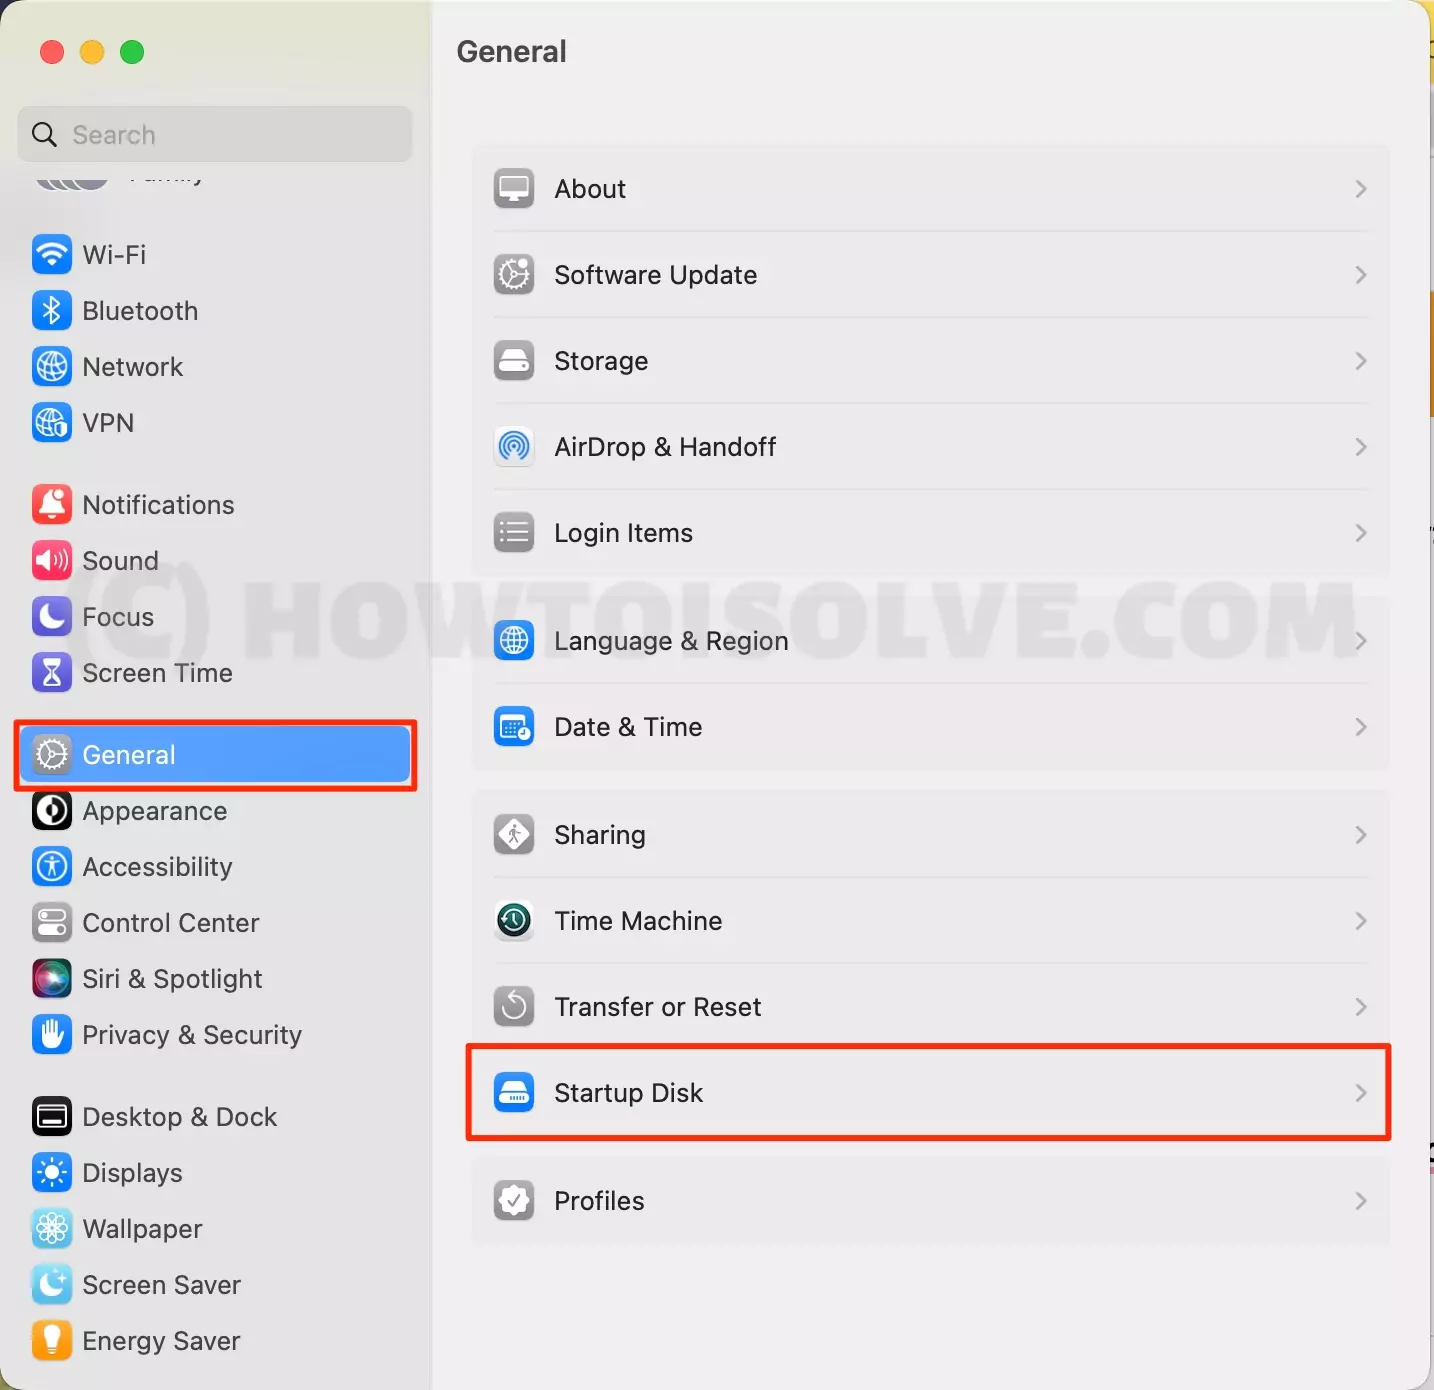
3→ Click on the General > Startup Disk as per your choice.
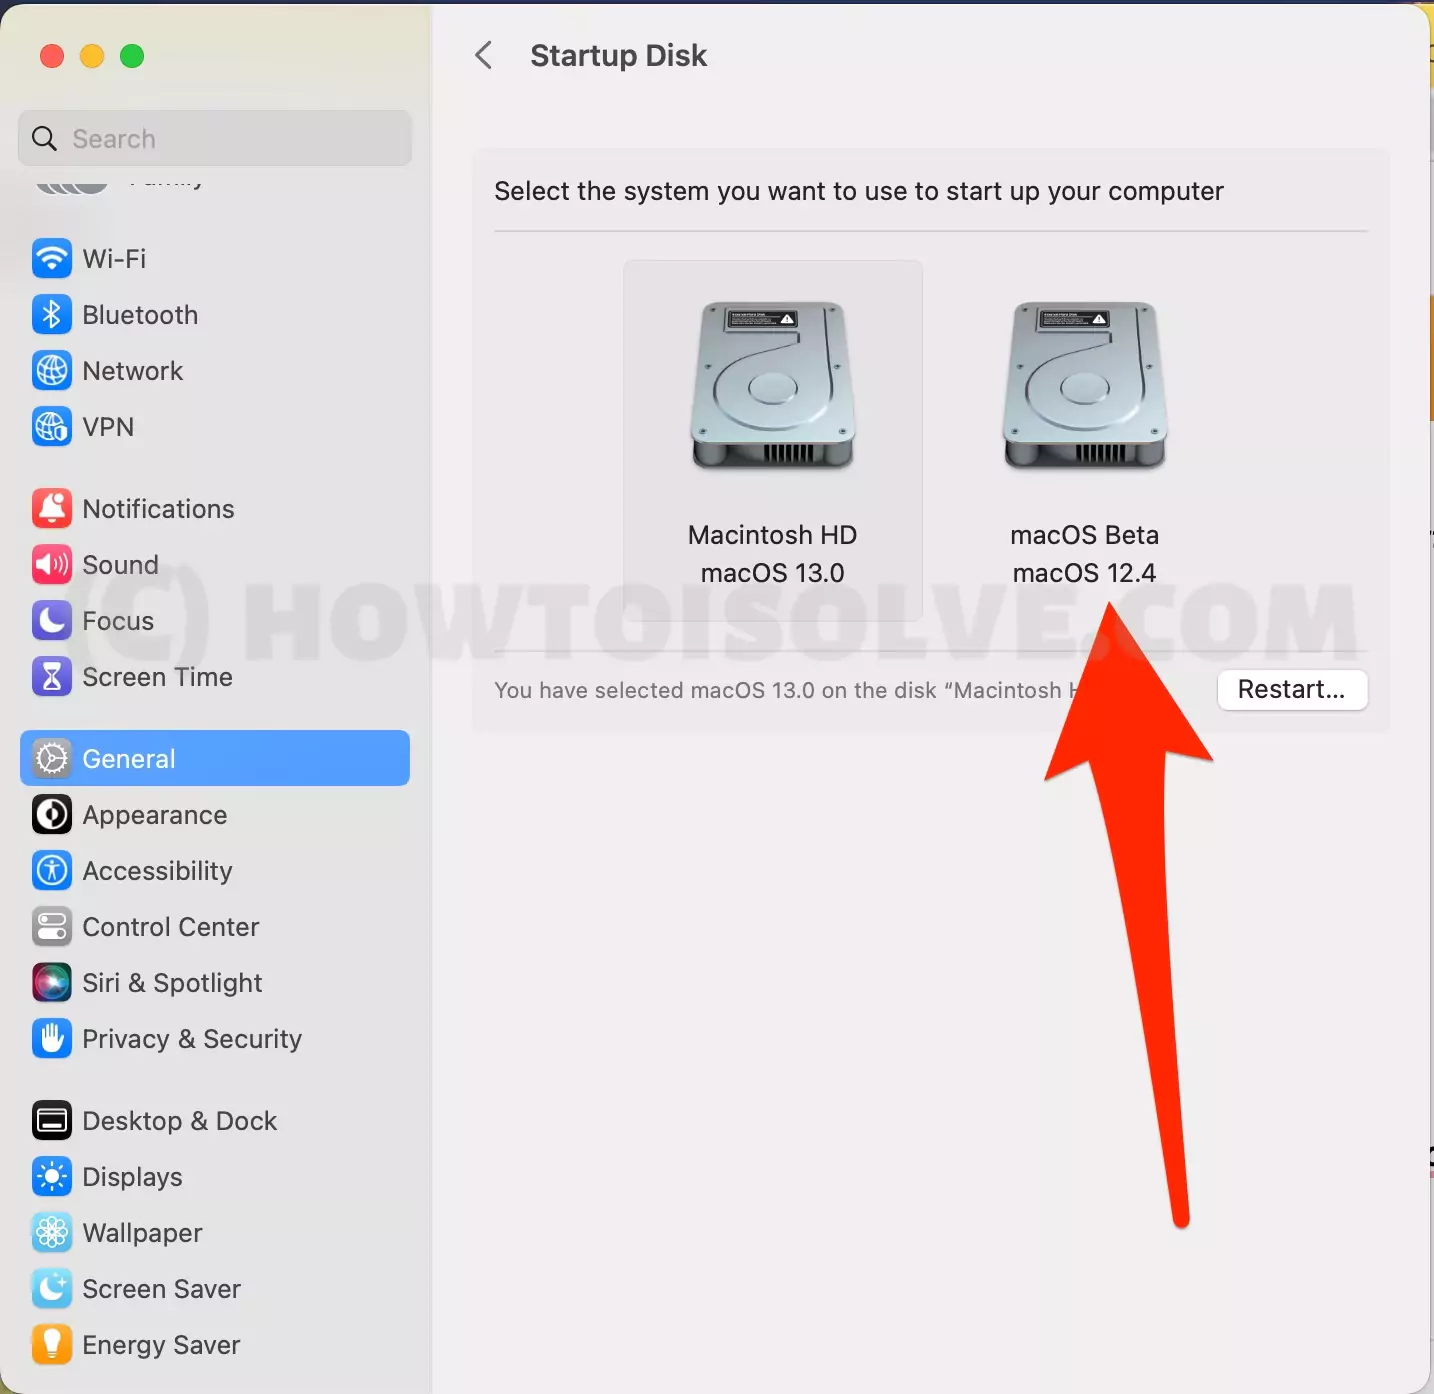
4→ Select your New Startup disk from the list.
5→ Enter your Mac Login password or Use Touch ID if your mac supports it.

5→ Choose Restart.

Every time your Mac automatically logs in to New MacOS, you choose under the System settings.
- macOS Monterey And Earlier,
1→ From the Menu Bar, click on the Apple Logo.
2→ Choose the System Preferences… > Show All Icon.
3→ Click on the Startup Disk Option. In the next page, click on the Lock Icon present in the bottom left corner.
4→ Doing so will feature a pop-up asking you to enter Administrator Name And Password > Unlock.
5→ Choose the desired Startup Disk you want to use, and the pop-up will feature asking your Are You Sure You Want To Restart, select Restart.
That’s how you can permanently select the Startup Disk after every startup of Mac. Well if you want to switch between the startup disk in the future, simply go to the same steps, mentioned above.
How To Change Startup Disk On Mac Using Terminal
As we all know you handily play between the Startup Disk using the System Preferences but there are chances where the System Preference Completely Rule Out. In this case, you can still change the Startup disk using the Terminal. If you are not familiar with it, simply follow the given below steps.
Note: Before proceeding to the steps given below, it’s our suggestion to save the files and operations you have performed on the currently running Startup Disk, as there are chances of data loss.
Step. 1→ From the Menu Bar, select the Search Icon to highlight Spotlight Search.
Step. 2→ Search for Terminal and select it.
Step. 3→ In the Terminal Utility Screen write down “sudo bless -mount /Volumes/Startup_Disk_Name” without using the quotation icon in the Terminal Window. Doing so will order the Bless Command to the Mac Startup Disk.
sudo bless -mount /Volumes/Startup_Disk_NameStep. 4→ Now change the “Startup_Disk_Name” with the name of the Startup Disk you want to use. There will be space in the name of Startup Disk, enclose the complete path using the quotations. Considering the name of the startup disk is “My macOS” write down the command mentioned below.
Sudo bless -mount “/Volume/My macOS” -setBootStep. 5→ Tap on the Return Key and move to another Startup Disk you want to use. This will only happen when your Mac computer restarts. To restart the Mac computer instantly, write down the code mentioned below.
sudo shutdown -r nowWe always suggest changing the Startup Disk using the System Preferences, because in rare cases there are chances your data might get damaged.
How To Determine Which Startup Disk Started On Your Mac
Using the multiple Startup Disks on the device makes you confused about which you are currently working on. But no need to worry, you can easily determine which startup disk started on Mac by following the given below steps.
Note: The steps to determine the Startup utilities vary from macOS versions.
- macOS Ventura And Later,
Step. 1→ Navigate to the Apple Logo present in the Menu Bar > System Settings…
Step. 2→ Click on the General > Startup Disk.
Step. 3→ In the next screen, the Startup Disk you are using is highlighted.

- macOS Monterey And Earlier,
Step. 1→ choose the Apple Logo > System Preferences…
Step. 2→ Click the Startup Disk. In the next screen, the Startup Disk you are currently using will appear on the top of the Preferences Pane.
If you want to switch over to an alternative Startup Disk go through the above-mentioned steps.
What To Do When There Is No Startup Disk On Mac (No start-up disk showing)
Considering all the possibilities behind why my Mac is not detecting the Startup Disk, one of the most common reasons is hardware or software-related bugs. To prevent such situations, you should regularly keep your Mac under maintenance to keep your device always ready and steady. Under Maintenance doesn’t mean you have to clean the hardware part! In simple words, keep your macOS Software Well Managed. And when such things happen, follow the given below troubleshooting steps to fix startup disk not showing on Mac M1, M2, and Intel.
- Reset NVRAM ( Mac Intel )
Step. 1→ Turn Off the Mac Computer.
Step. 2→ Press the Power Button and hold on to the Command-Option-P-R.
Step. 3→ When you hear the startup sound, let out all the buttons after capturing the second sound ( In case, if your Mac consumes T2 Chip, let out the buttons when encounter Apple Logo ).
Step. 4→ Once the Mac is booted up, assure that you have gone through the correct startup disk.
- Restart Mac ( Apple Silicone Chip )
As the Mac M1 doesn’t consume NVRAM, restarting the Mac M1 works the same as resetting the NVRAM. Here are the steps to do so.
Step. 1→ Navigate to the Apple Logo > Restart.
Wait until the procedure is finished and check whether the No Startup disk error on Mac gets fixed or not.
If is my Mac not showing a startup disk, Contact The Apple Support Team as they offer a clear crystal view regarding the issue.
FAQs→
Q. Is It Possible To Change Startup Disks Using Single User Mode On Mac Computer?
Ans. Unfortunately, Apple doesn’t allow you to Change the Startup Disk using the single-user mode.
Q. Accidentally Deleted Startup Disk On Mac, How To Restore?
Ans. If you have accidentally deleted the Startup Disk, you can still restore it by using the Disk Utility restore and recovery mode.
Q. Startup Disk Not Showing Up On Mac Computers?
Ans. If the Startup Disk is not showing on the Mac, in case of an Intel-based Mac simply reset the NVRAM, and for Mac M1 and M2 restart the device as mentioned above.
Q. Where Is My Startup Disk On macOS Sonoma?
Ans. If you have macOS Ventura & Sonoma and want to know the location of Startup disk follow this Apple Logo > System Settings… > General > Startup Disk.
Q. What Is The Keyboard Key To Startup Disk On Mac ( Intel, M1 or M2 )
Ans. There is the shortcut key to Startup Disk On Mac. For M1 Or M2 press the Power Button until the Startup Option Window appears on the screen. For Mac Intel Option (⌥) or Alt, Quickly Hold down to See Startup Manager on the Mac screen.
Q. How To Switch Startup Disk On Mac Intel?
Ans. In case of Permanent Switch over the Startup Disk, you have to manually go to the System Settings… on macOS Ventura, Sonoma ( For macOS Monterey, go to System Preferences…) For Temporary Switch over the Startup Disk, press the Option Button to when startup the Mac. For more detail, go through the above-mentioned article.
Q. How To Switch Startup Disk on M1, M2 Mac?
Ans. For a Temporary Switch over the Startup disk on M1 or M2 Mac, press the Power Button to feature Loading Startup Option. And for a Permanent switch go to System Settings… on macOS Ventura ( For mac Monterey, head to the System Preference…). For a complete guide, go through the above steps in the article.
Q. How Do I Restore My Mac Without A Startup Disk?
Ans. If you want to restore the Mac without the Startup Disk, there is a built-in feature known as Disk Utility recovery and restore. If you are unfamiliar with how to do so, here is the complete guide to restoring the Mac.
Q. How do I fix my Mac startup disk?
Ans. The Apple is carved with a feature known as the Disk Utility, navigate to it using the Spotlight > select Verify Disk. After that wait until the Mac verifies the disk and let the Mac say the disk is viable or require a repair.


