
Skype is one of the greatest communication applications, widely available and accessible on macOS, iPadOS, iOS, Windows, and Android phones. It comes with the most commonly used features, such as Chat, Video Calls, and Voice Calls, irrespective of device. So far, we were used to relying on Skype to make Video Calls across the globe, but nowadays, there are dozens of Skype Alternatives available, the one we use is FaceTime on iPhone or maybe WhatsApp.
WhatsApp and FaceTime may have taken over Skype for personal use, but when it comes to business purposes, no one can compete with Skype for Business. Microsoft has designed Skype for Business, for large organizations to handle and communicate with clients and, obviously, in their departments. For whatever reason, if you don’t need Skype for Business, then here’s a quick walkthrough on how to uninstall Skype for Business on Mac and MacBook. I Strongly recommend Enabling 2 Factor Authentication for Skype from unauthorized access.
How to Clean Uninstall Skype for Business in 3 Steps
Step 1: Sign Out Your Skype Account and Close App, Uninstall Skype
The tutorial to uninstall Skype for Business from Mac and MacBook is divided into two parts, if you only want to delete Skype for Business app from Mac, then following the first part would be enough. The second part shows how to clean uninstall Skype for Business from MacBook and Mac.
- Launch the Skype for Business on your Mac.
- Now on the top menu bar, click on Skype for Business.
- Click on Sign Out.


These were the basic steps to delete Skype for Business, so if you are not working for an enterprise or Skype for Business is stored in your personal Mac, or MacBook, you might not want to run a few commands to completely delete Skype for Business from Mac, as it needs expertise and sort of grip on how to use Terminal, otherwise you may end up into the big problem.
Since most of IT Companies use Skype for Business, they may ask you to remove it altogether, if it is the case, then follow the below steps to uninstall Skype for Business’s related files and data from Mac. Again a word of warning, if you are not sure how to use Terminal, I’d suggest you hand over your Mac, or MacBook to an expert, and let them do this task for you.
Step 2: Remove Skype Files From Mac File System Using the Terminal
Here’s how to clean uninstall Skype for Business from MacBook, iMac, Mac,
- Launch Finder on your MacBook, Mac.
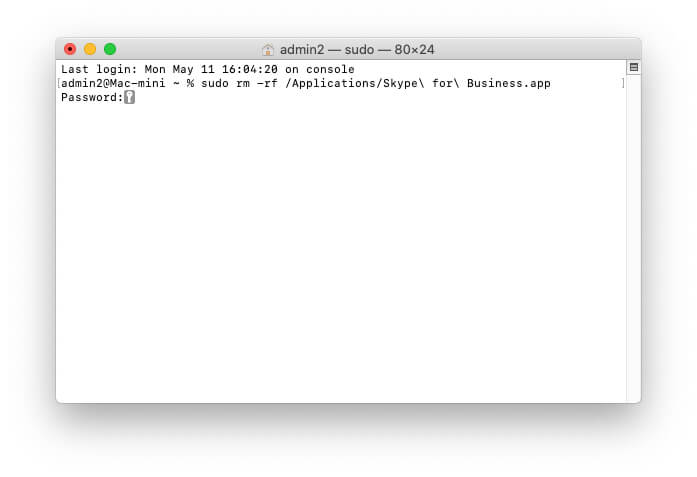
sudo rm -rf /Applications/Skype\ for\ Business.app

---------

sudo rm -rf /Library/Internet\ Plug-Ins/MeetingJoinPlugin.plugin

---------

defaults delete com.microsoft.SkypeForBusiness || true

---------

rm -rf ~/Library/Containers/com.microsoft.SkypeForBusiness

---------

rm -rf ~/Library/Logs/DiagnosticReports/Skype\ for\ Business_*

---------

rm -rf ~/Library/Saved\ Application\ State/com.microsoft.SkypeForBusiness.savedState

---------

rm -rf ~/Library/Preferences/com.microsoft.SkypeForBusiness.plist

---------

rm -rf ~/Library/Application\ Support/CrashReporter/Skype\ for\ Business_*

---------

rm -rf ~/Library/Application\ Support/com.apple.sharedfilelist/com.apple.LSSharedFileList.ApplicationRecentDocuments/com.microsoft.skypeforbusiness*

---------

rm -rf ~/Library/Cookies/com.microsoft.SkypeForBusiness*

---------

sudo rm -rf /private/var/db/receipts/com.microsoft.SkypeForBusiness*

---------

rmdir ~/Library/Application\ Scripts/com.microsoft.SkypeForBusiness

---------

find -f /private/var/db/BootCaches/* -name "app.com.microsoft.SkypeForBusiness*" -exec sudo rm -rf {} +
Note: You can prefer the latest commands from Microsoft Support, in case if any of the mentioned commands are altered by Microsoft.
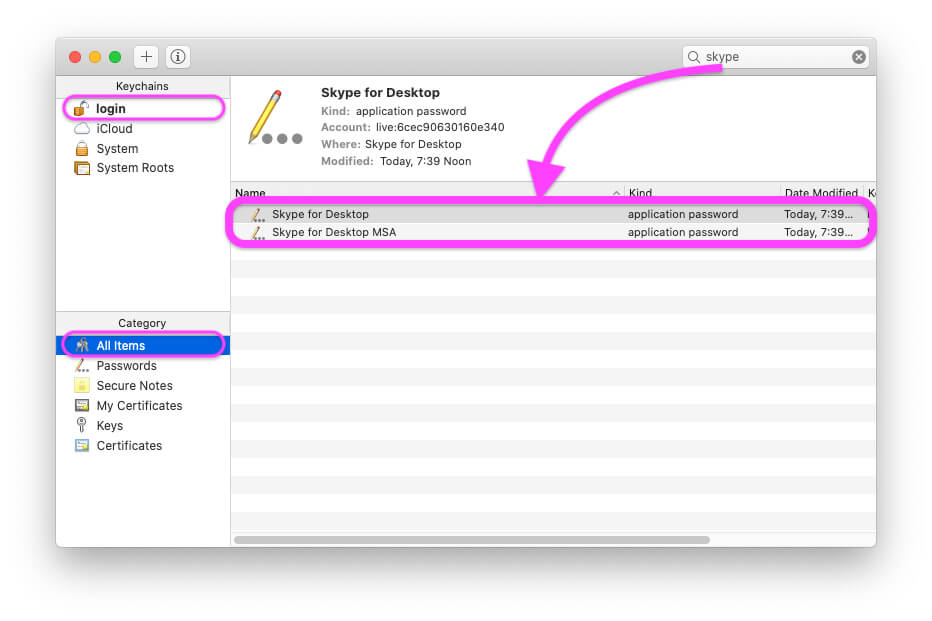
Step 3: Remove Skype Login Details From MacBook Max
- Again open Finder.

This is it!


