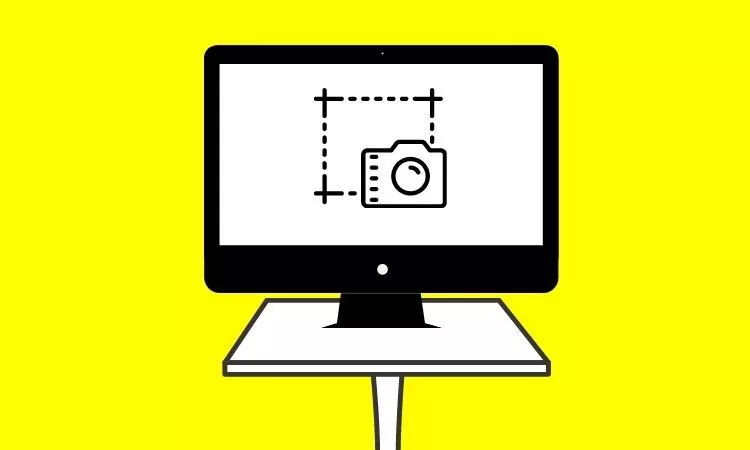
Not All guys are aware of capturing a full Screenshot on Mac OS X or Print Screen On Mac Command for built-in display or On an External monitor with Mac, as with new updates, Apple added new features to take a screenshot on Mac. You can save your Mac screen’s important Text or Pictures, and if you would like to share it with someone, you can take a snapshot of your Mac screen and quickly share it.
You should know, Your Mac mac copy screenshot to clipboard without saving them using Keyboard Shortcut, Covered in this tutorial.
Read More – How to crop a screenshot on Mac.
Way to screen grab Mac – Method for Capture Entire or full Screenshot
Screenshot Commands in macOS
| Command | Use |
| Shift+Command+3 | To capture fullscreen |
| Shift+Command+4 | To capture a portion of Screen |
| Shift+Command+4+Spacebar | To capture a Window or Menu |
| Shift+Command+5 | For Snipping tools |
| Shift+Control+Command+3 | To take full-screen screenshot and copy screenshot to clipboard Mac and paste it where you want to save/send it. |
| Shift+Control+Command+4 | To capture a portion & copy screenshot to clipboard Mac. |
Screenshot Trick for macOS

1. Capture the Entire Screen on a Mac computer
- Step #1: Press Shift+Command+3 to capture fullscreen or Use Shift+Command+5 on the keyboard for Snipping tools.
- Step #2: The capture controls will appear on the screen. Select the one as shown in the image to capture a full-screen screenshot and click Capture.
2. Capture Select Screen
- Step #1: Press Shift+Command+4 and drag the crosshair icon on screen for a selected area or Press Shift+Command+5 and select the second option as shown in the picture.
- Step #2: Now, you have to click on a specific Window to capture a screenshot of that window and click Capture.
3. Capture Specific Screen/Window or Menu
- Step #1: Press Shift+Command+4+Spacebar and Click on Window or menu to Capture Or Shift+Command+5 and select the third option on the screenshot control panel.
- Step #2: Drag the mouse pointer to select a particular area and click Capture.
Mac Screenshot to Clipboard
To take a full-screen screenshot & copy screenshot to clipboard Mac, Press Shift+Control+Command+3 from your Mac Keyboard at once, and you will hear the Screenshot taken sound only, and it’s copied to the clipboard. But the Thumbnail preview will not show at the bottom right corner. Use it and Paste (Command+V) where you want to save or send.
To capture a portion & copy screenshot to clipboard mac » Press Shift+Control+Command+4 from your Mac Keyboard at once and Capture using crosshair icon appears on the screen.
Now, the screenshot will be Copied to the clipboard for Share and Save/Paste (Command+V).
Shift-Command-5 Not Working on macOS?
Some users have recently reported that Shift+Command+5 not working to take a screenshot on macOS Catalina or macOS Mojave. This issue could be because someone has changed the keyboard shortcuts to capture a screenshot on your Mac or Disabled by Third-Party Mac Screenshot tools. Here’s how to restore the settings to default,
On MacOS Ventura
- Go to the Apple Logo > System Settings > Keyboard > Keyboard Shortcuts… > Screenshots > Check Screenshot and Recording Option.
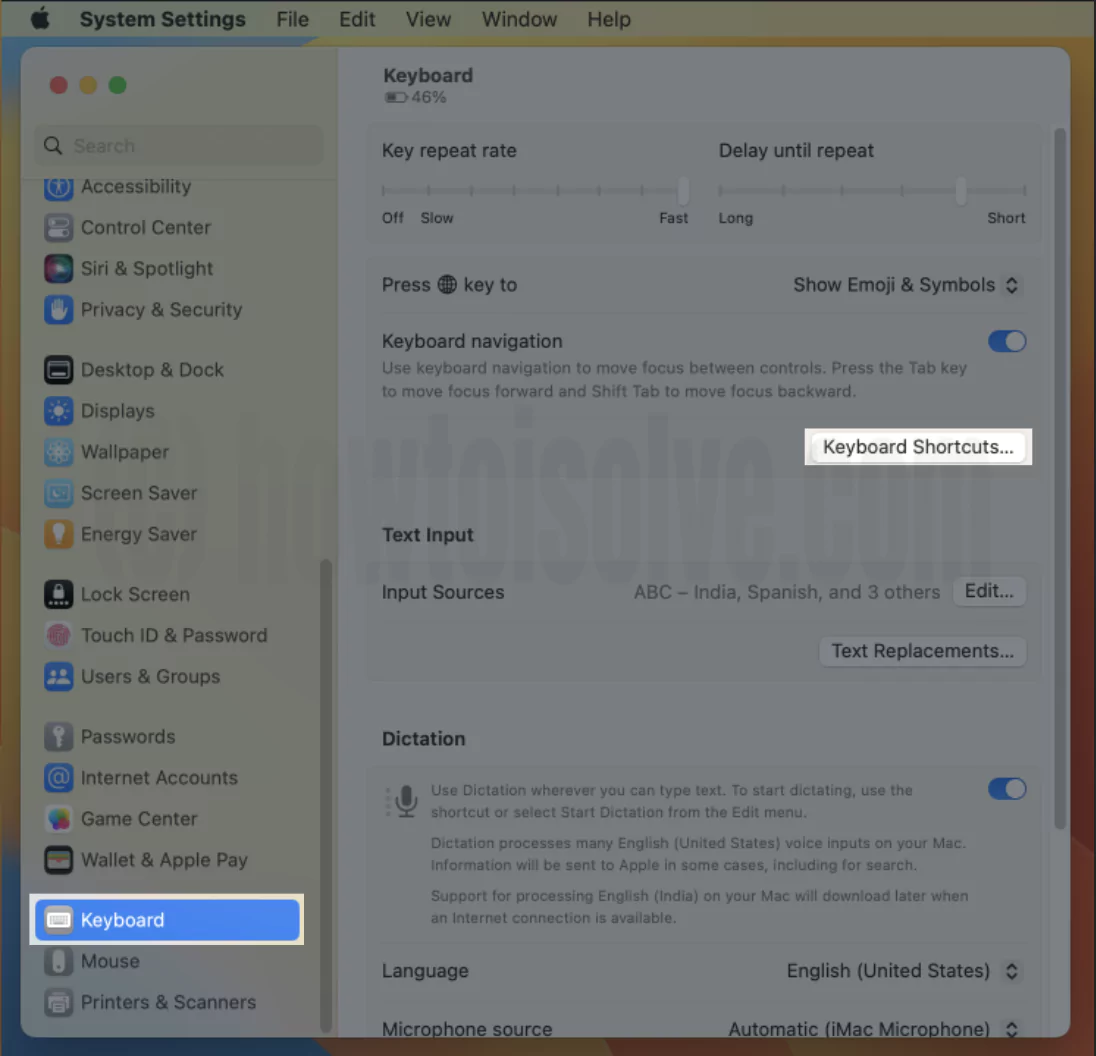

If the below steps and settings are fine with the correct keyboard shortcut then make sure the mac slow key is disabled. Apple Logo > System settings > Accessibility > Keyboard > Disable “Slow Keys”. or use the command: Option + Command + F5, Uncheck Slow Key.
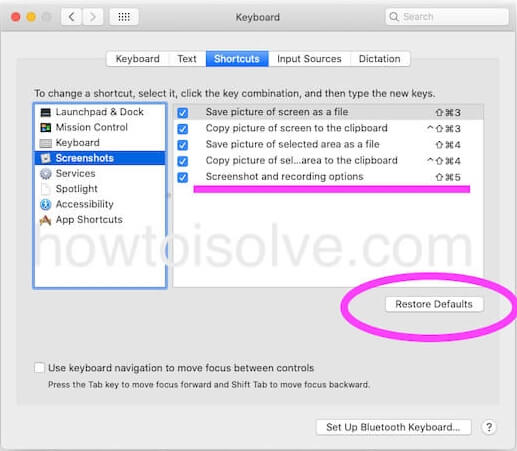
On MacOS Monterey & Earlier
- Go to the Apple logo > System Preferences > Keyboard > Shortcuts > Screenshot and click Restore Defaults.
For Other MacOS,
Capture Entire Screen
- Step #1. Open your Mac Screen, which you want to capture for share or keep safe for a long time.
- Step #2. Now on your keyboard – press command + shift + 3; after that, leave all the keys.
- Step #3. now you can see your Mac screen by noticing the extra .png extension file. This file contains words** screenshot.
- Step #4. In the last, Double click on the notice file, I mean words**screenshot file; you can launch this file in either image previewers or within the image viewer you like most. After clicking snapshot, you can also see it on your Mac desktop. You can now share it or save it on your Mac.
Note: If you are using Windows Keyboard, Use Shift + Windows + 3.
Capture Specific Window
- Step #1: Press Shift+Command+4 and then press the Space bar.
- Step #2: Click on a Window to take a screenshot.
Capture Select Portion of Screen
- Step #1: Press Shift+Command+4 and drag the mouse by holding the Space bar to select and capture a screenshot of the specific portion.
Related, Very Useful:
Change Default save path of the screenshot on Mac.
For Change Keyboard Shortcuts,
Also, we can change keyboard shortcuts for screen capture or screenshot on Mac,
On macOS Ventura: Go to the Apple Logo > System Settings > Keyboard Shortcuts > Screenshots > Click on the Shortcut key to change it.
On macOS Monterey & Earlier: Go to the System Preferences > Keyboard > Shortcuts > Screenshots (Double click on shortcut key code).
Trick How to Screenshot on Mac for Capture Specific Portion
Open on your Mac desktop, favorite apps, etc.; for particular area capture, it should not take more work than the entire capture step.

- Step: 1. Open with a screen which you would like for taking a snapshot: you can make this snap from anywhere it is your system screen or Web page anything whatever.
- Step: 2. Now look on your keyboard and press command + shift + 4 after that leave it all keys.
For Windows: Shift + Windows + 4
- Step: 3. you will show that on your screen mouse cursor; using the cursor, you can choose a specific area for taking the snapshot. As well as crosshair that you can move anywhere on the screen.
- Step: 4. now Press down your cursor and drag the mouse over the area where you want to take a snapshot.
- Step:5. After selecting the specific area, release the mouse. Finally, you got (a screenshot in Mac OS X: Yosemite.png extension file that is your destination, I mean which you want to take the specific snapshot.
Note: – Mac OS X v10.6 and later versions, the screenshots in Mac OS X are automatically saved as PNG files on your Mac desktop. As well, it saved automatically named ‘’Screenshot (date & time).png. ’’
Extra Tip
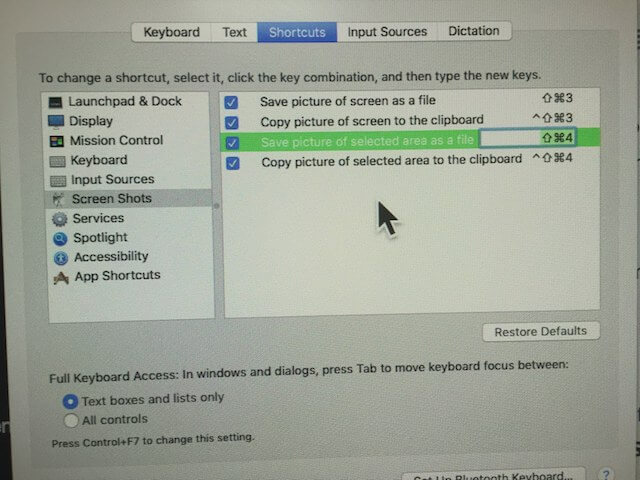
Mac Screenshot Not working (Command Shift 4 won’t work)
- Fix #1. Go to the System Preferences -> Keyboard -> Shortcuts
- Select “Screen Shots” in the list at left…then make sure the shortcuts are checked.
- Fix #2. First, you should Log out under Apple in the Menu bar. Then Log into Guest user mode.
Can you take a screenshot in Guest? If no…
Now you must boot into Recovery Drive and run Disk Utility > First Aid on your internal Macintosh HD.
Restart in Safe boot mode. Hold down the Shift key when restarting.
That’s it!
Useful: How to change apps icon size on iPhone, iPad – Resize app icon.
Like it and share it with your friends even your friends will also get a new update regarding new tips & tricks, How to, iOS updates, and more.


