
Logitech is a brand known to all when it comes to computers and their accessories. Logitech has launched its very own application called the Logitech Options to utilize the accessories better, offering many features and unique personalization choices for customers. Although the Logitech options software is very intriguing and unique in its way, there are a few cases where users have difficulties using the software on their Macs.
We have compiled a list of effective methods to address the issue of Logitech Options not working on Mac, aiming to provide a solution for Logitech Options software users.
Solution 1: Allow Logi Options Daemon
Important: Logi Options is running with the Latest version for your MacOS. Otherwise, Uninstall Logi Options and Re-download and install from logi options website.
In order to address the issues with the Logitech Options app, it’s important to ensure that the Logi Options Daemon is enabled on your MacBook. By enabling this feature, you can effectively resolve the problems you’ve been experiencing. Here’s a guide on how to enable the Logi Options Daemon on your Mac.
On macOS Tahoe, Sequoia, Ventura, Sonoma:-
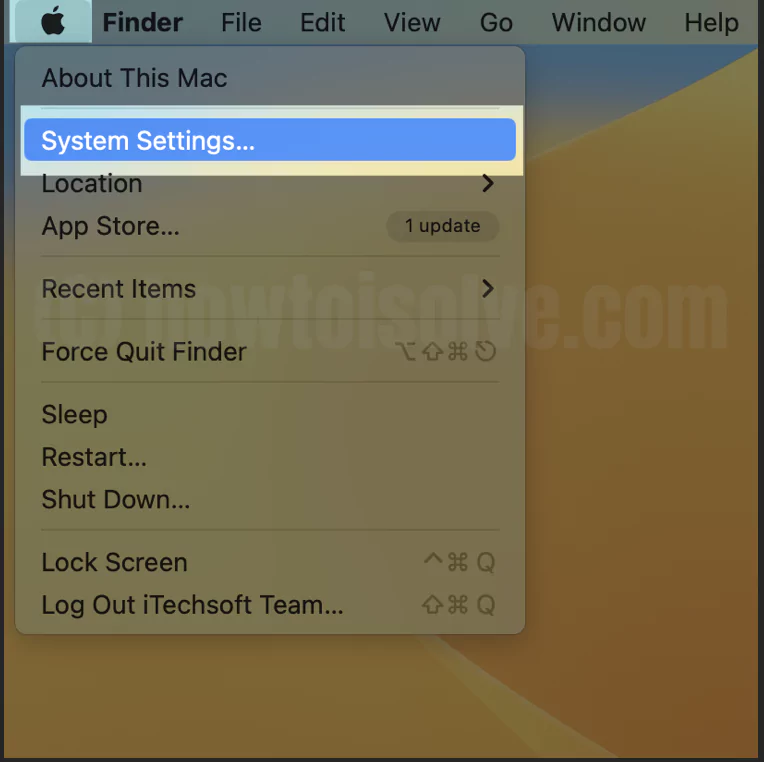
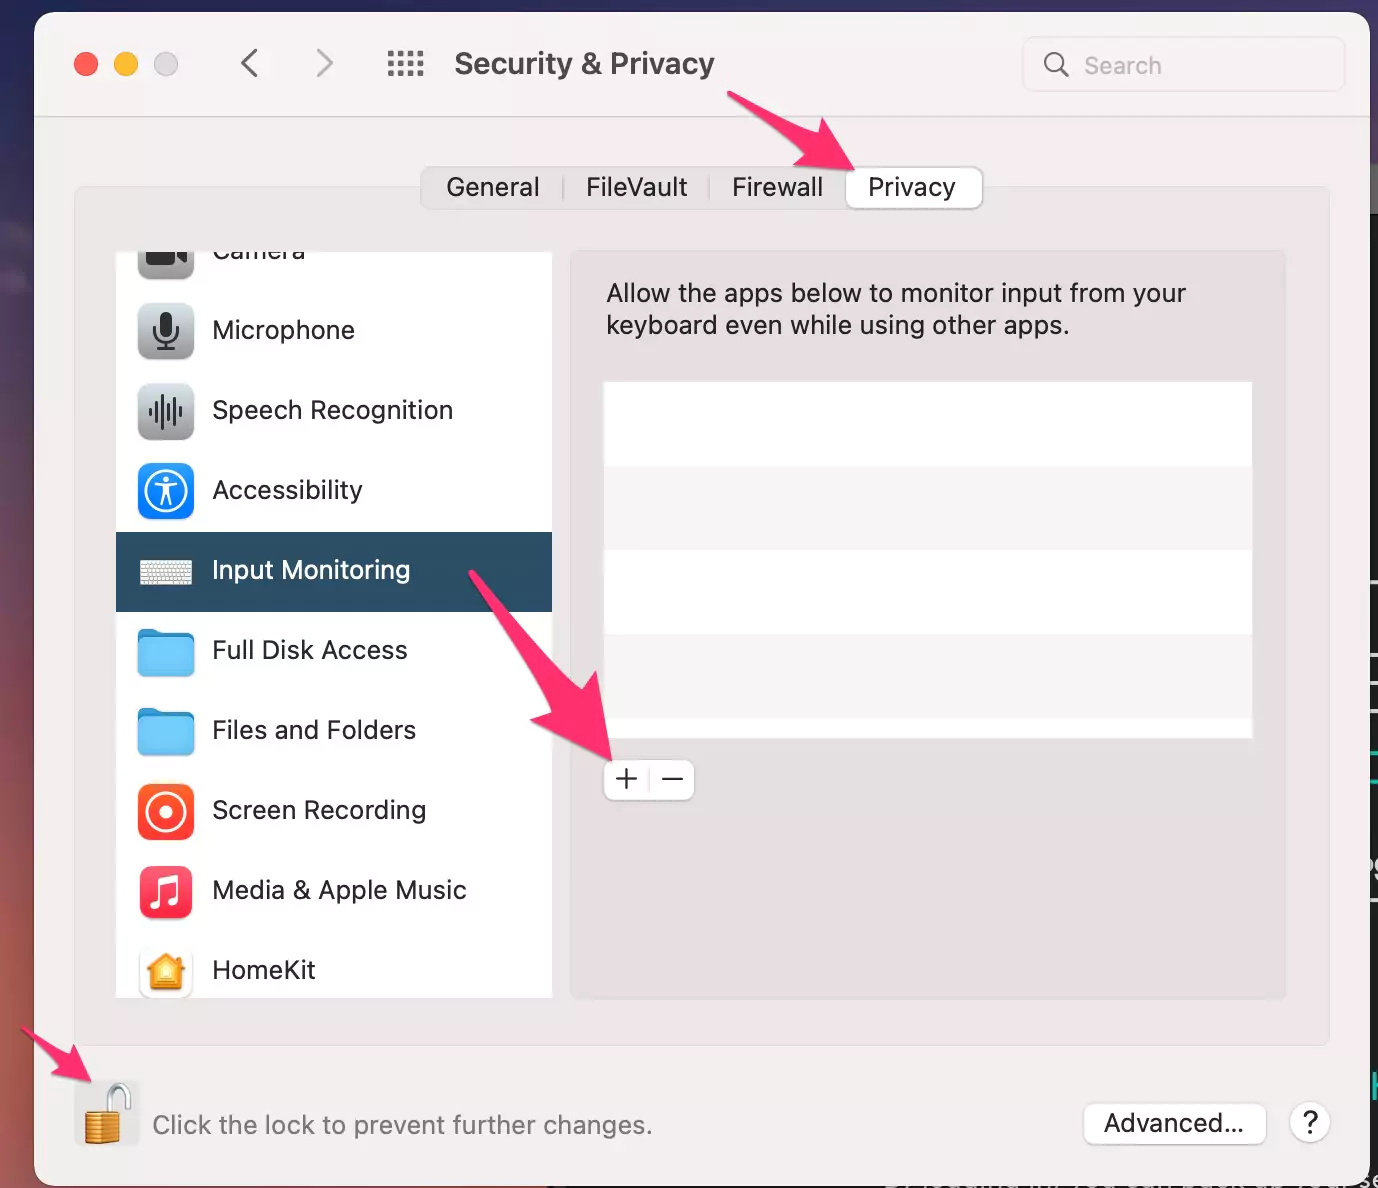
Step. 1→ Go to the Apple Logo > System Settings…
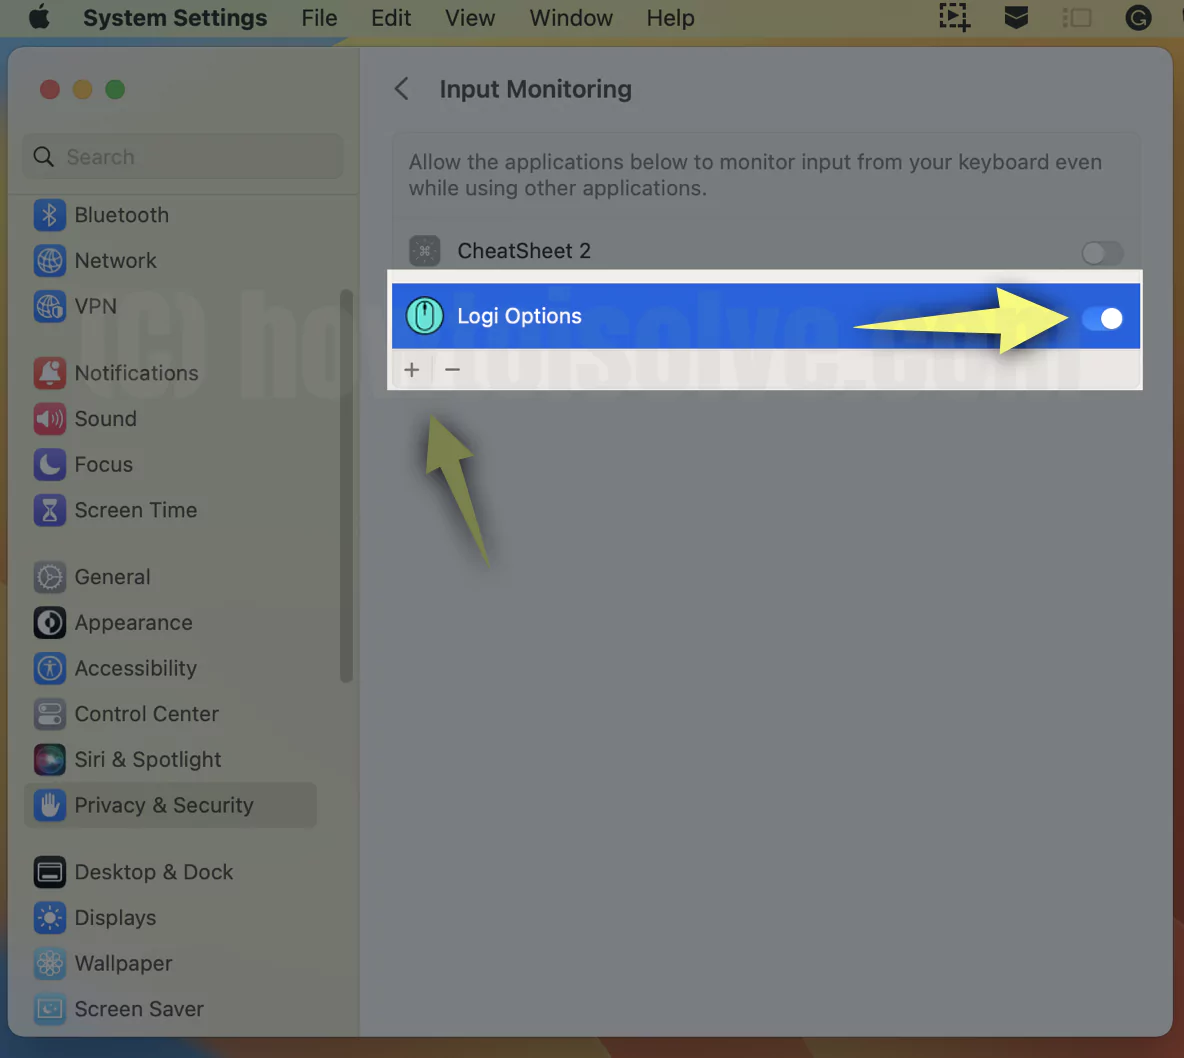
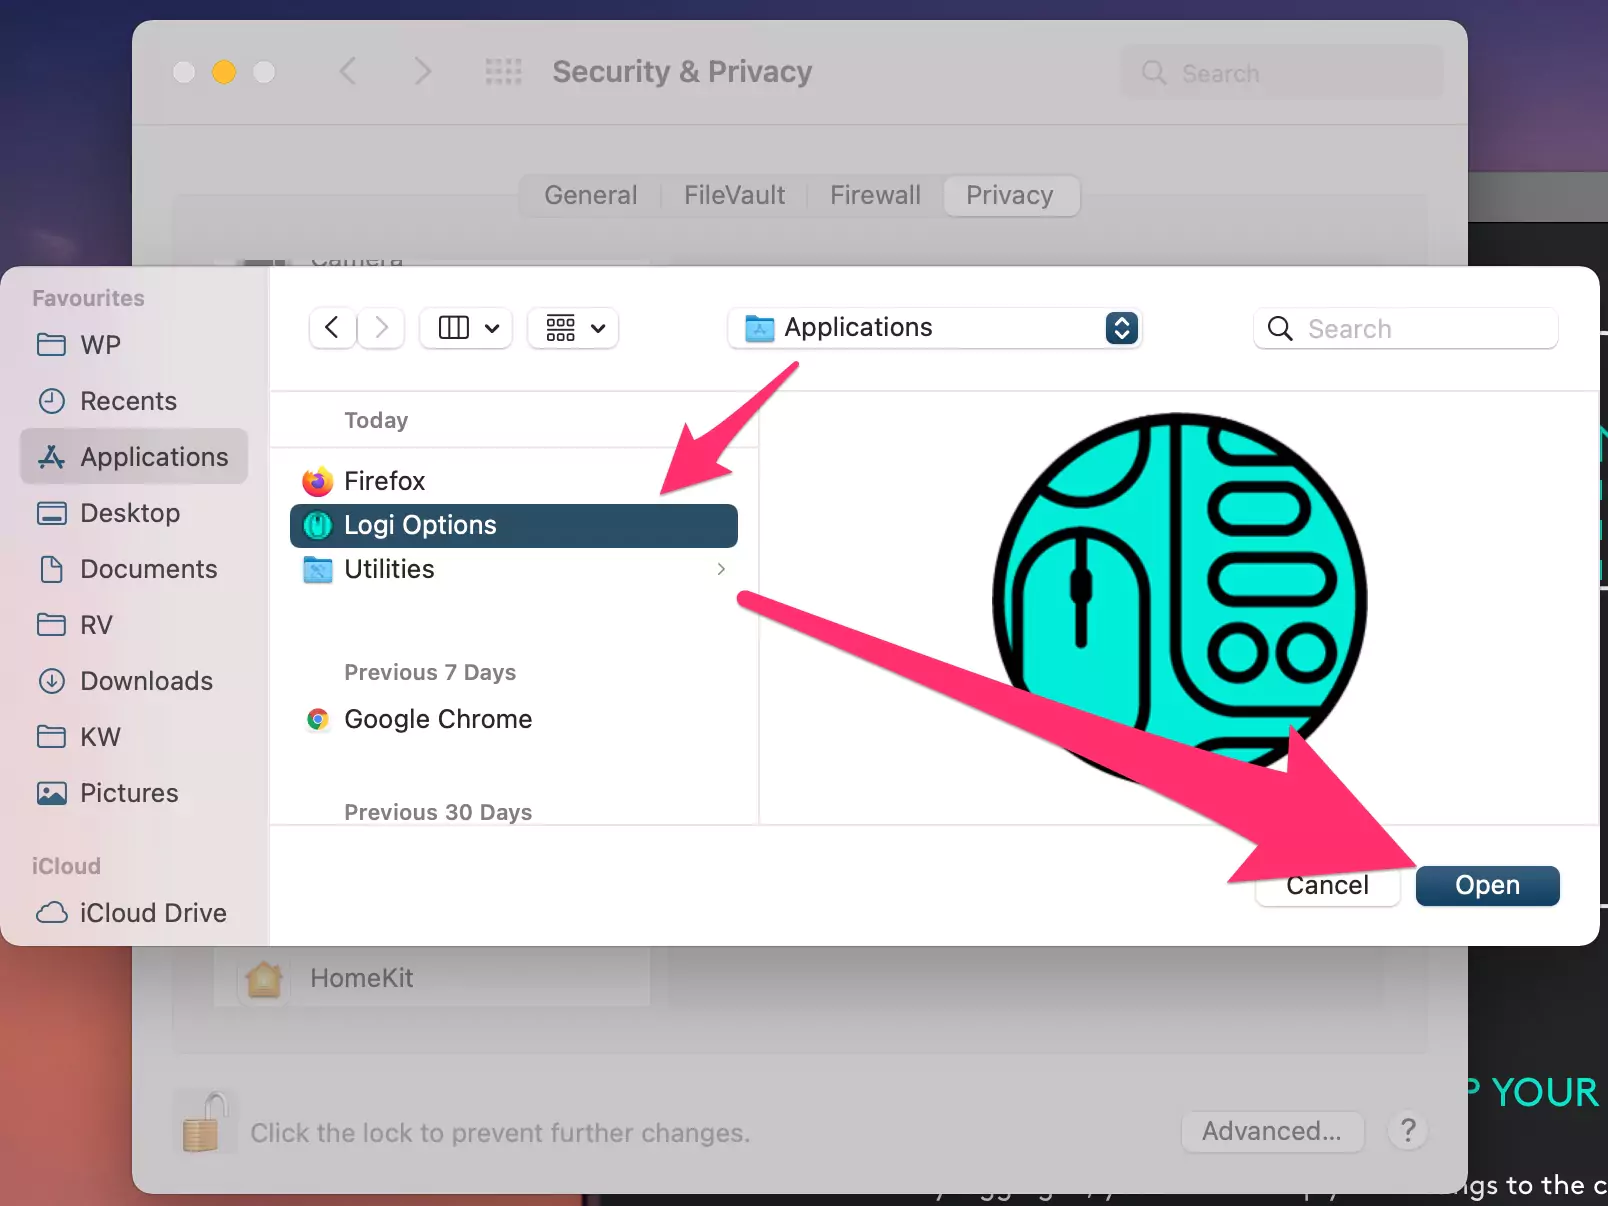
Step. 2→ Privacy & Security > Navigate Input Monitoring > Click on Plus [+] to Add a Logi Option from the Applications folder.

Step. 3→ Select Logi Options Daemon and Open.
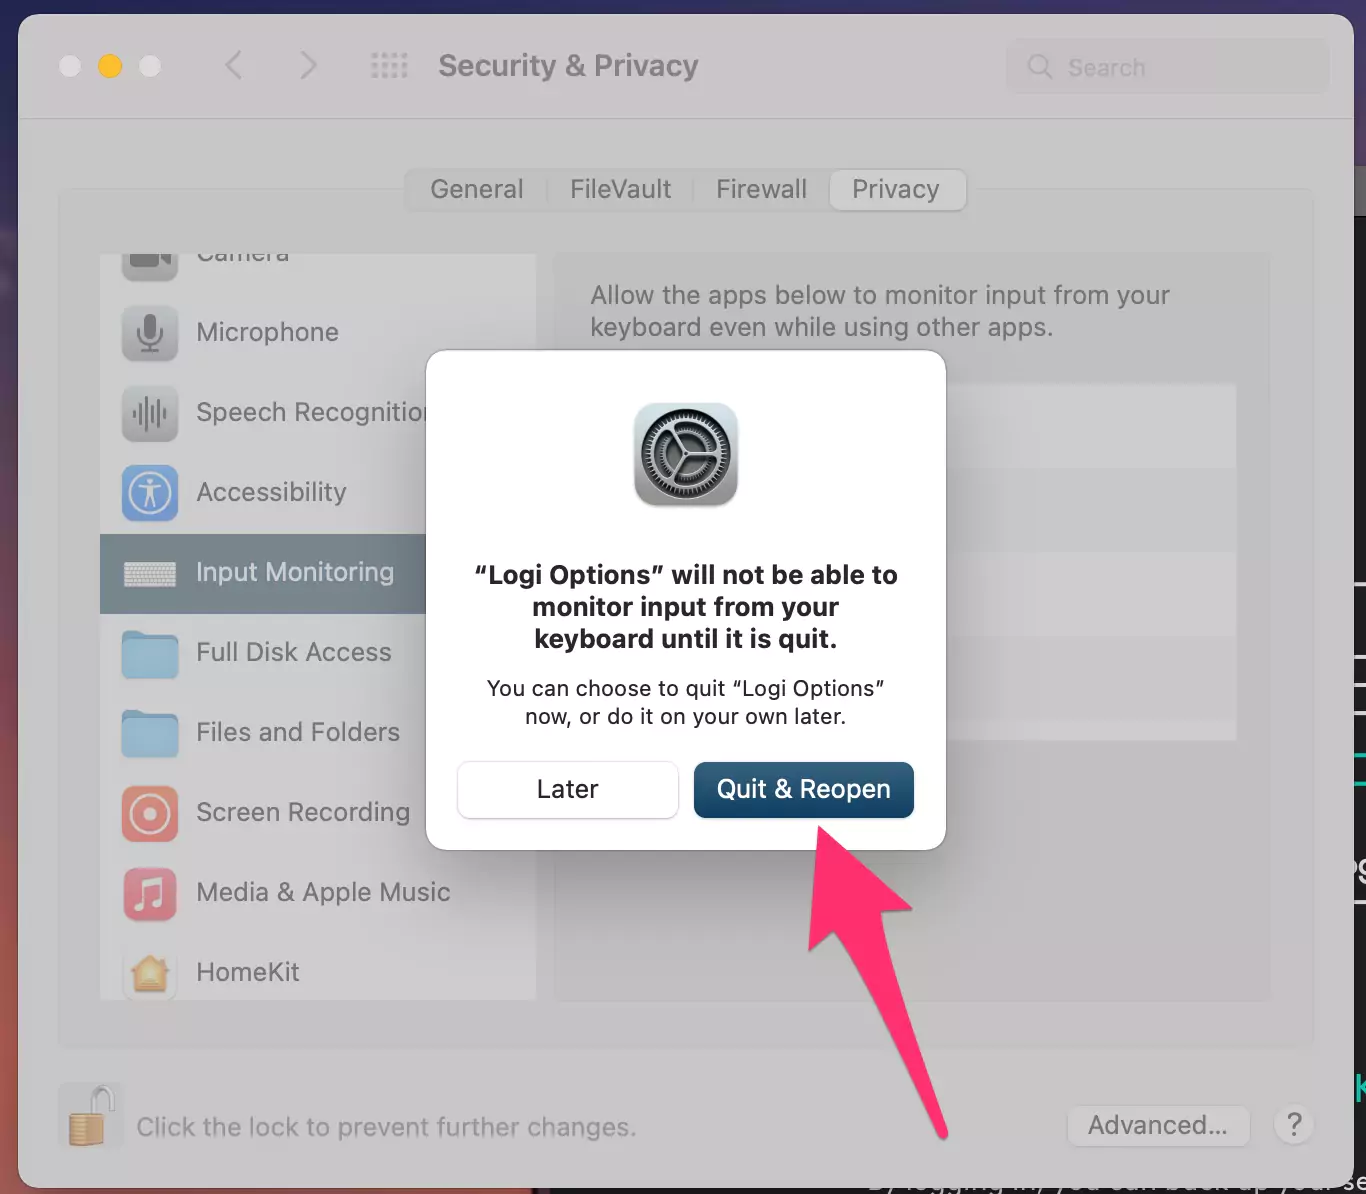
Now, select the “Logi Options Daemon” checkbox, then quit and reopen the app.
For the earlier version of macOS. Follow the steps below,
On MacOS Monterey:-
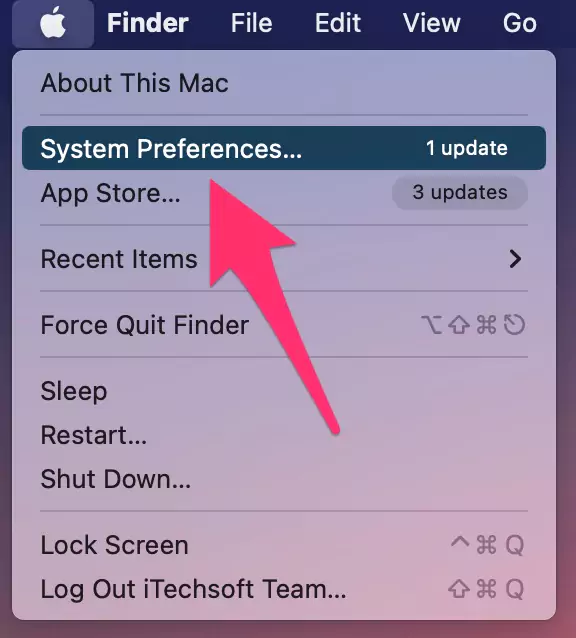
Step. 1→ Go to the Apple menu > System Preferences.
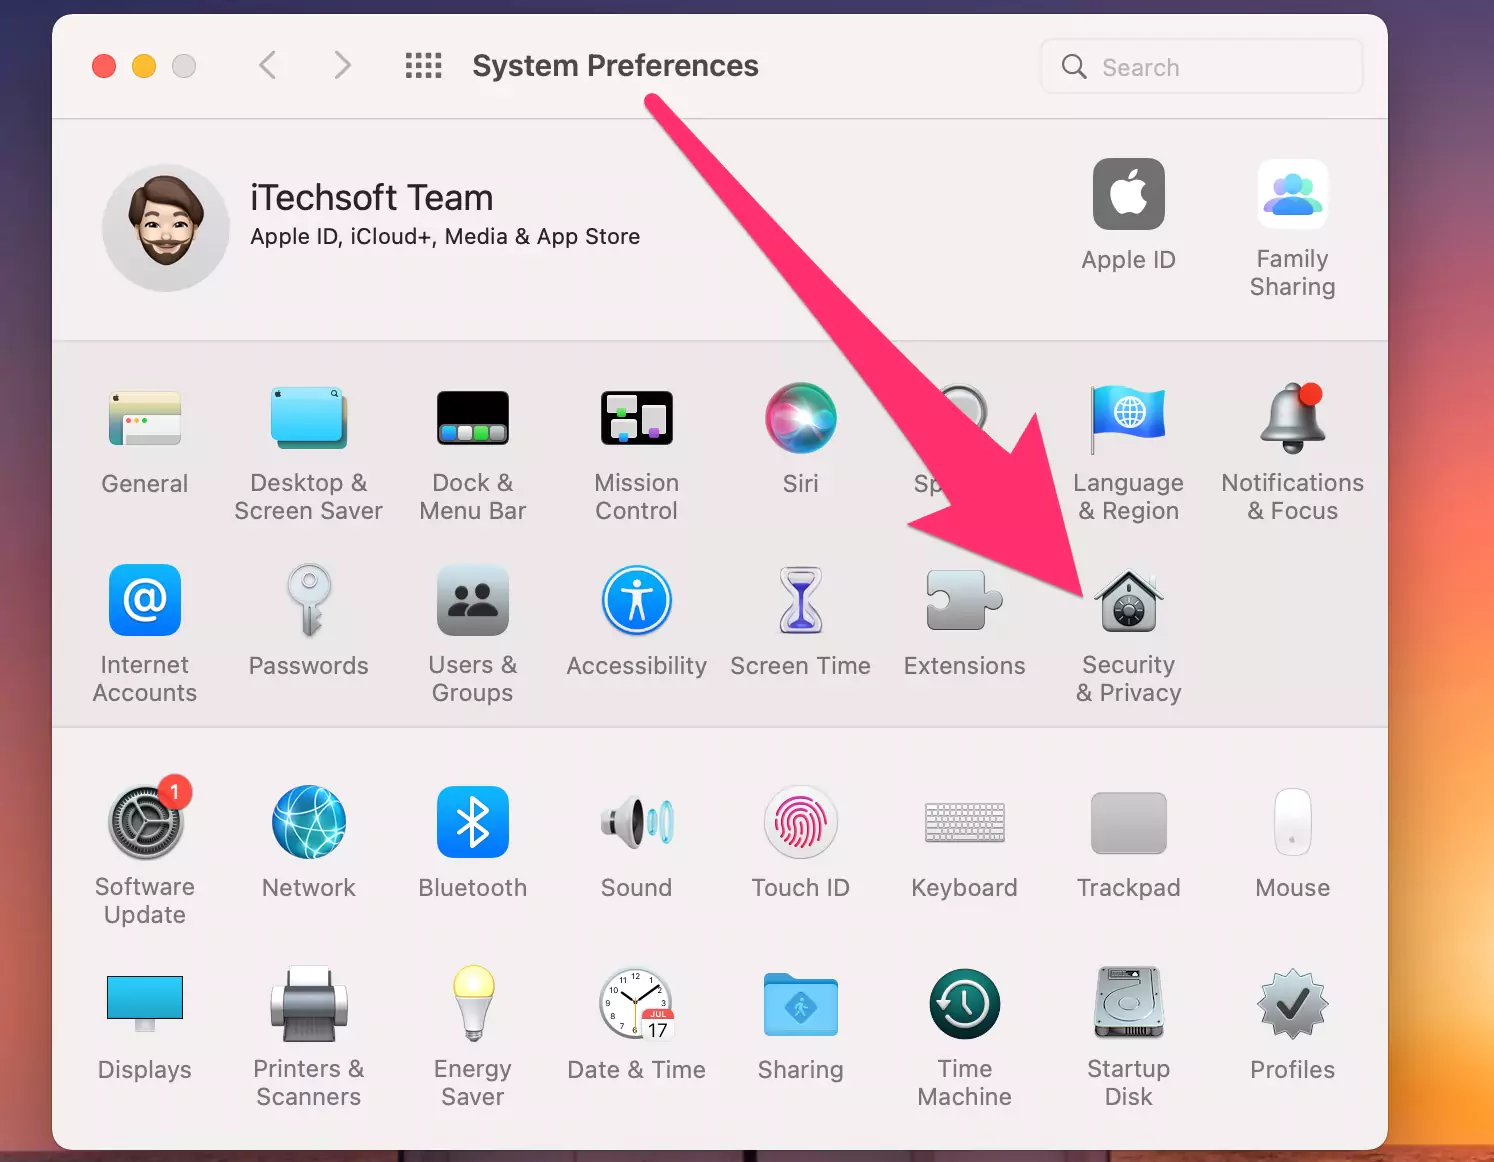
Step. 2→ open the security & privacy window by clicking on it.
Step. 3→ Look for the option labeled as input monitoring and tap on it.
Step. 3→ Search for the lock icon and click on it if it is not already selected.
Step. 4→ Click the “+” sign if the “Logi Options Daemon” does not appear.
Step. 5→ On the window that opens, look for the option “Logi Options Daemon” and click on it to open its settings.
Step. 6→ Ensure that the “Logi Options Daemon” setting is checked. If not, then click on the checkbox to enable it.

Step. 7→ Quit & Reopen Logi Options if it’s open on your Mac. Finally, restart your MacBook.
Once you have allowed Logi Options Daemon on your system, open the Logitech Options software again to check whether the software is working fine or not.
Solution. 2: Bluetooth Setup Assistant at startup is checked
Since many Logitech devices work on wireless Bluetooth technology, it is possible that the users might be facing the issue of Logitech Options software not working correctly on their Macs due to some bugs or errors at the time of setting up the Bluetooth Assistant on their devices. To Ensure that Bluetooth is the reason for this problem, go through the steps explained below.
Ensure that the proper Bluetooth parameters are selected on your Mac
Skip this Solution for M1, and M2 Mac users
Step. 1→ Open the Bluetooth preference pane by clicking on the Apple menu, followed by going to the system preferences window and then selecting Bluetooth.
Step. 2→ Then turn on the Bluetooth of your Macbook by toggling the ON/OFF button.
Step. 3→ After that, at the bottom right corner of the Bluetooth Preference window, look for the option labeled as Advanced and tap on it. (If you are an Apple Silicon Mac user, then you can skip this and the next step as the advanced option is no longer available on those devices.)
Step. 4→ Make sure that the following options- “Open Bluetooth Setup Assistant at startup if no keyboard is detected” and “Open Bluetooth Setup Assistant at startup if no mouse or trackpad is detected” are checked as these options make sure that the Bluetooth assistant launches every time a Bluetooth device like a mouse, keyboard, headphones, etc. is not discovered as connected on your MacBook.
Step. 5→ At last, tap on the OK button and then restart the Bluetooth again on your Mac.
Then open the Logi Options software to check if the problem related to your Bluetooth device still exists or not.
Remove the Logitech device you are using from the list of devices on the Mac and try to pair it again.
Step. 1→ Head over to the Bluetooth Preference pane by going to the Apple menu > system preferences and opening the Bluetooth setting window.
Step. 2→ Then, from all the devices in the devices list, scroll down, look for your device, and click on the Remove icon (x) to remove your device.
Step 3→ Now pair your device again by connecting it to the MacBook, as you did for the first time.
On MacOS Ventura:- Go to the Apple Logo > System Settings > Bluetooth > Click on (i) button next to the Keyboard name and Forgot this device.
Once you have completed this procedure, open the Logitech Options app again and check whether the device you had a problem connecting to is now able to connect to your Mac.
Solution. 3: Disable the iCloud Hand-off Feature on Your MacBook
Turning off the iCloud hand-off feature on your Mac can help fix the problem of Logitech Options not functioning correctly on your Mac. Mac users can disable the iCloud hand-off feature on their MacBooks by following the steps explained in this section.
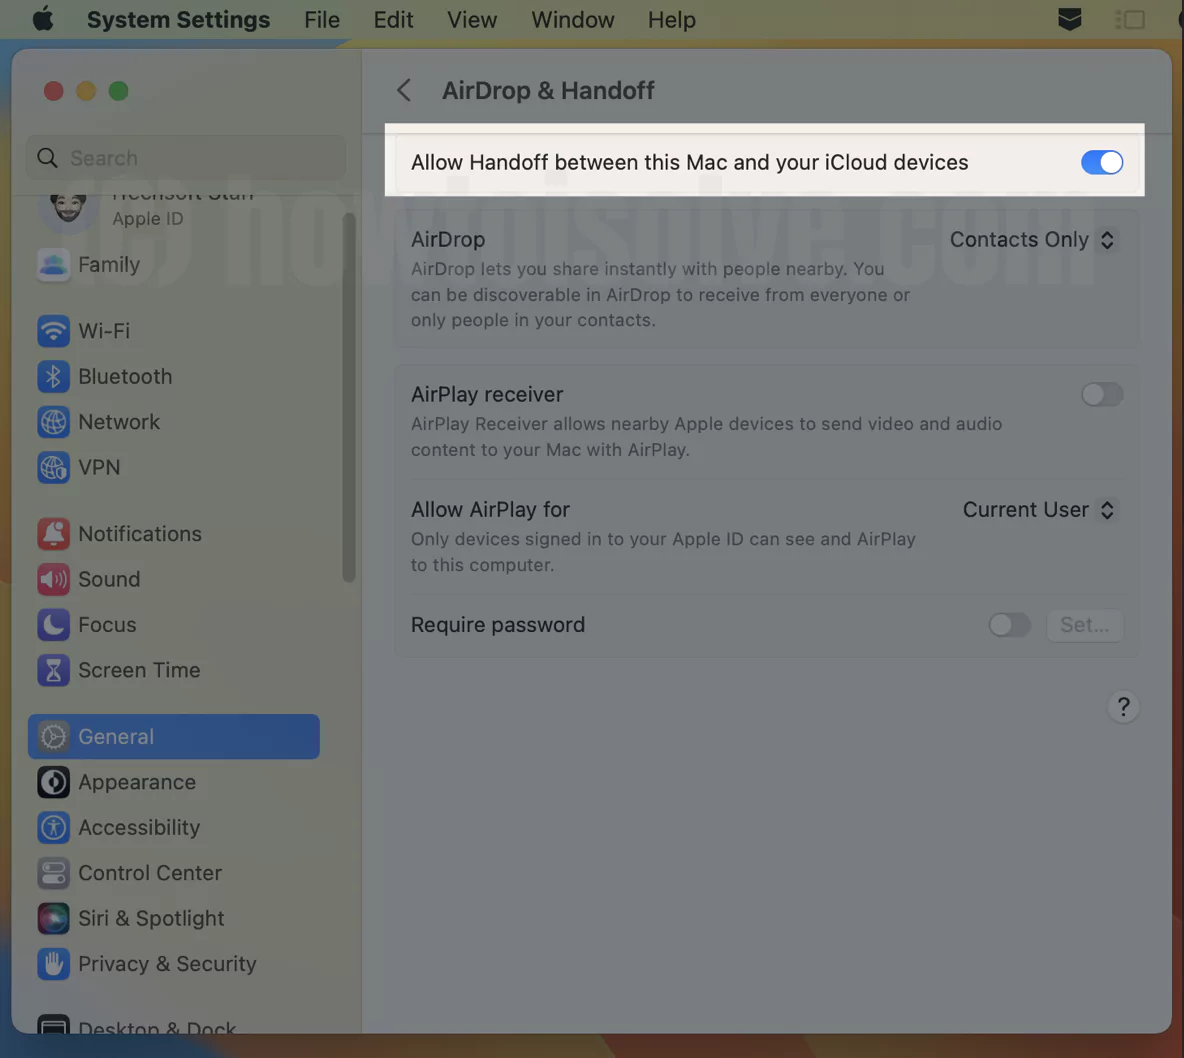
On MacOS Sequoia & Ventura:
Step. 1→ Go to the Apple logo from the top menu > System Settings…
Step. 2→ General > AirDrop & Handoff.
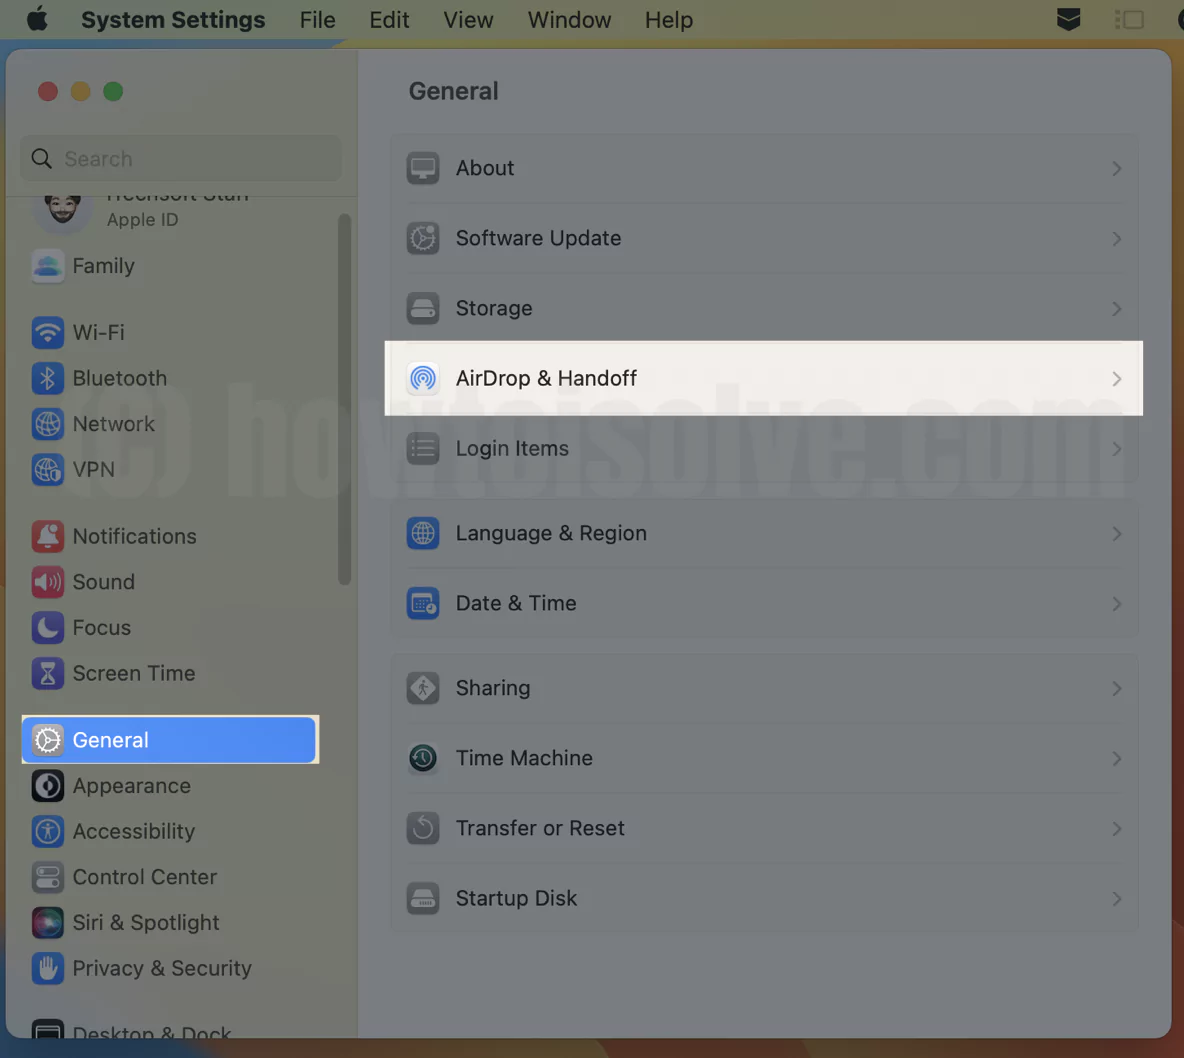
Step. 3→ Enable the toggle “Allow Handoff between this Mac” and your iCloud devices.
That’s it.
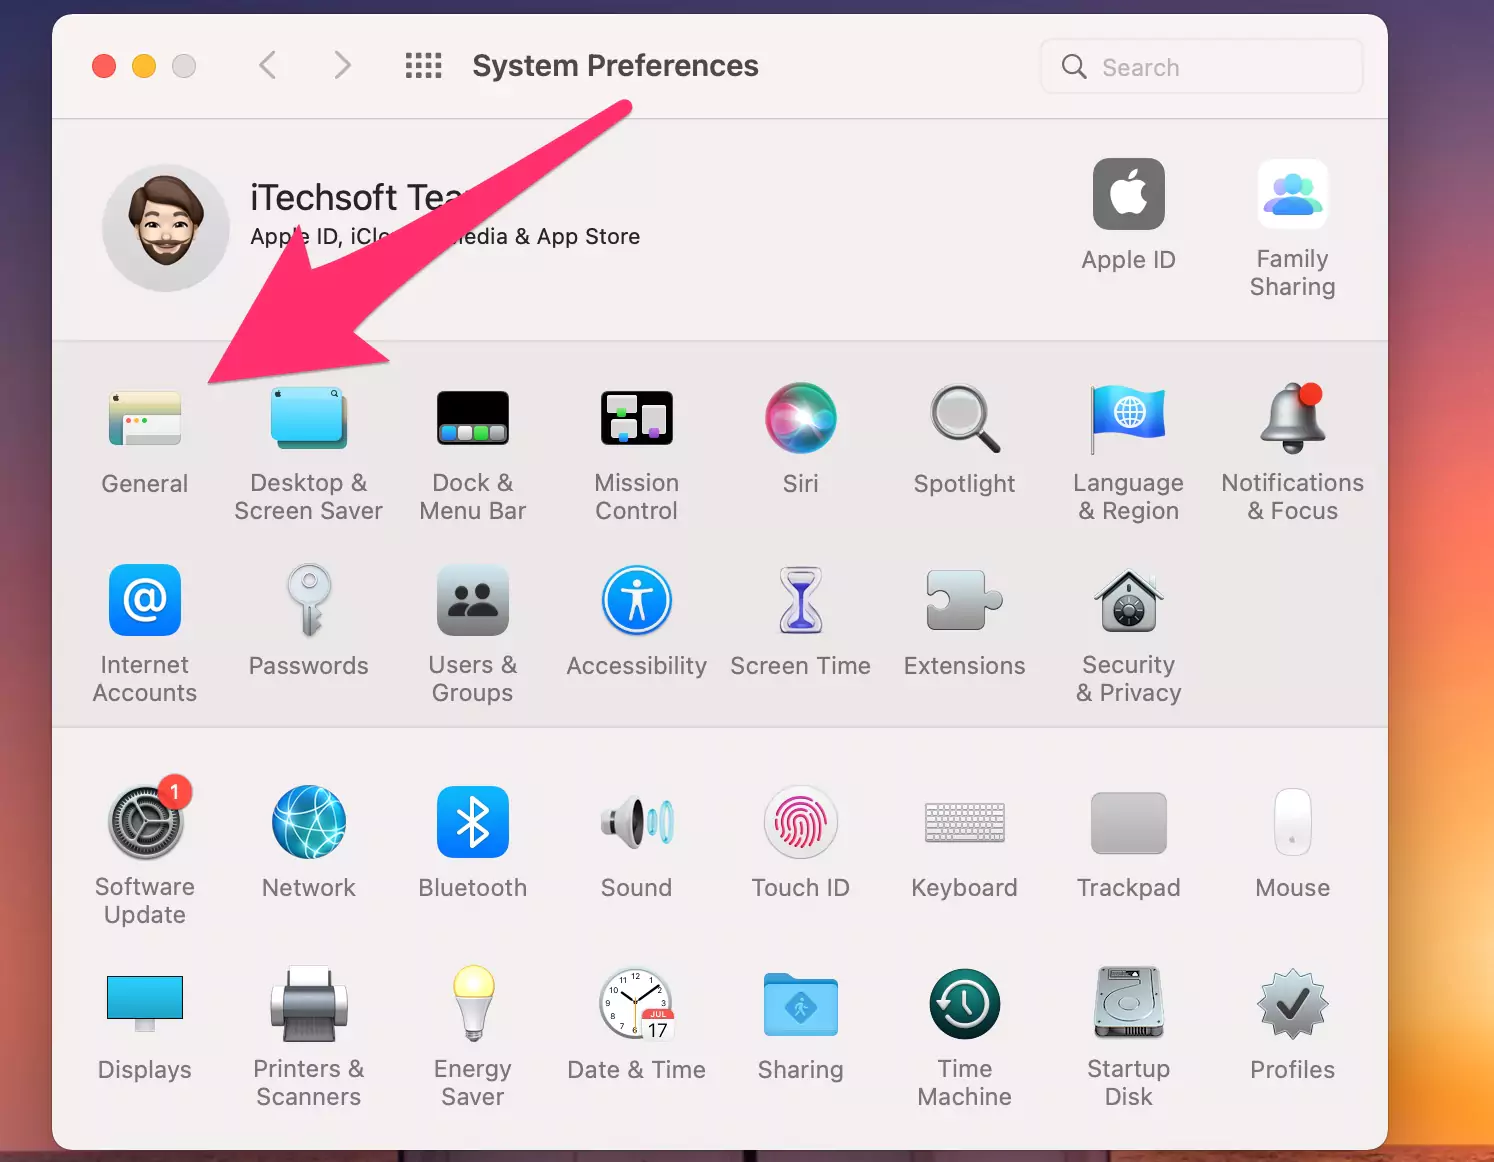
macOS Monterey & Earlier
Step. 1→ Tap on the Apple logo at the top left corner of the screen and head over to system preferences > General.
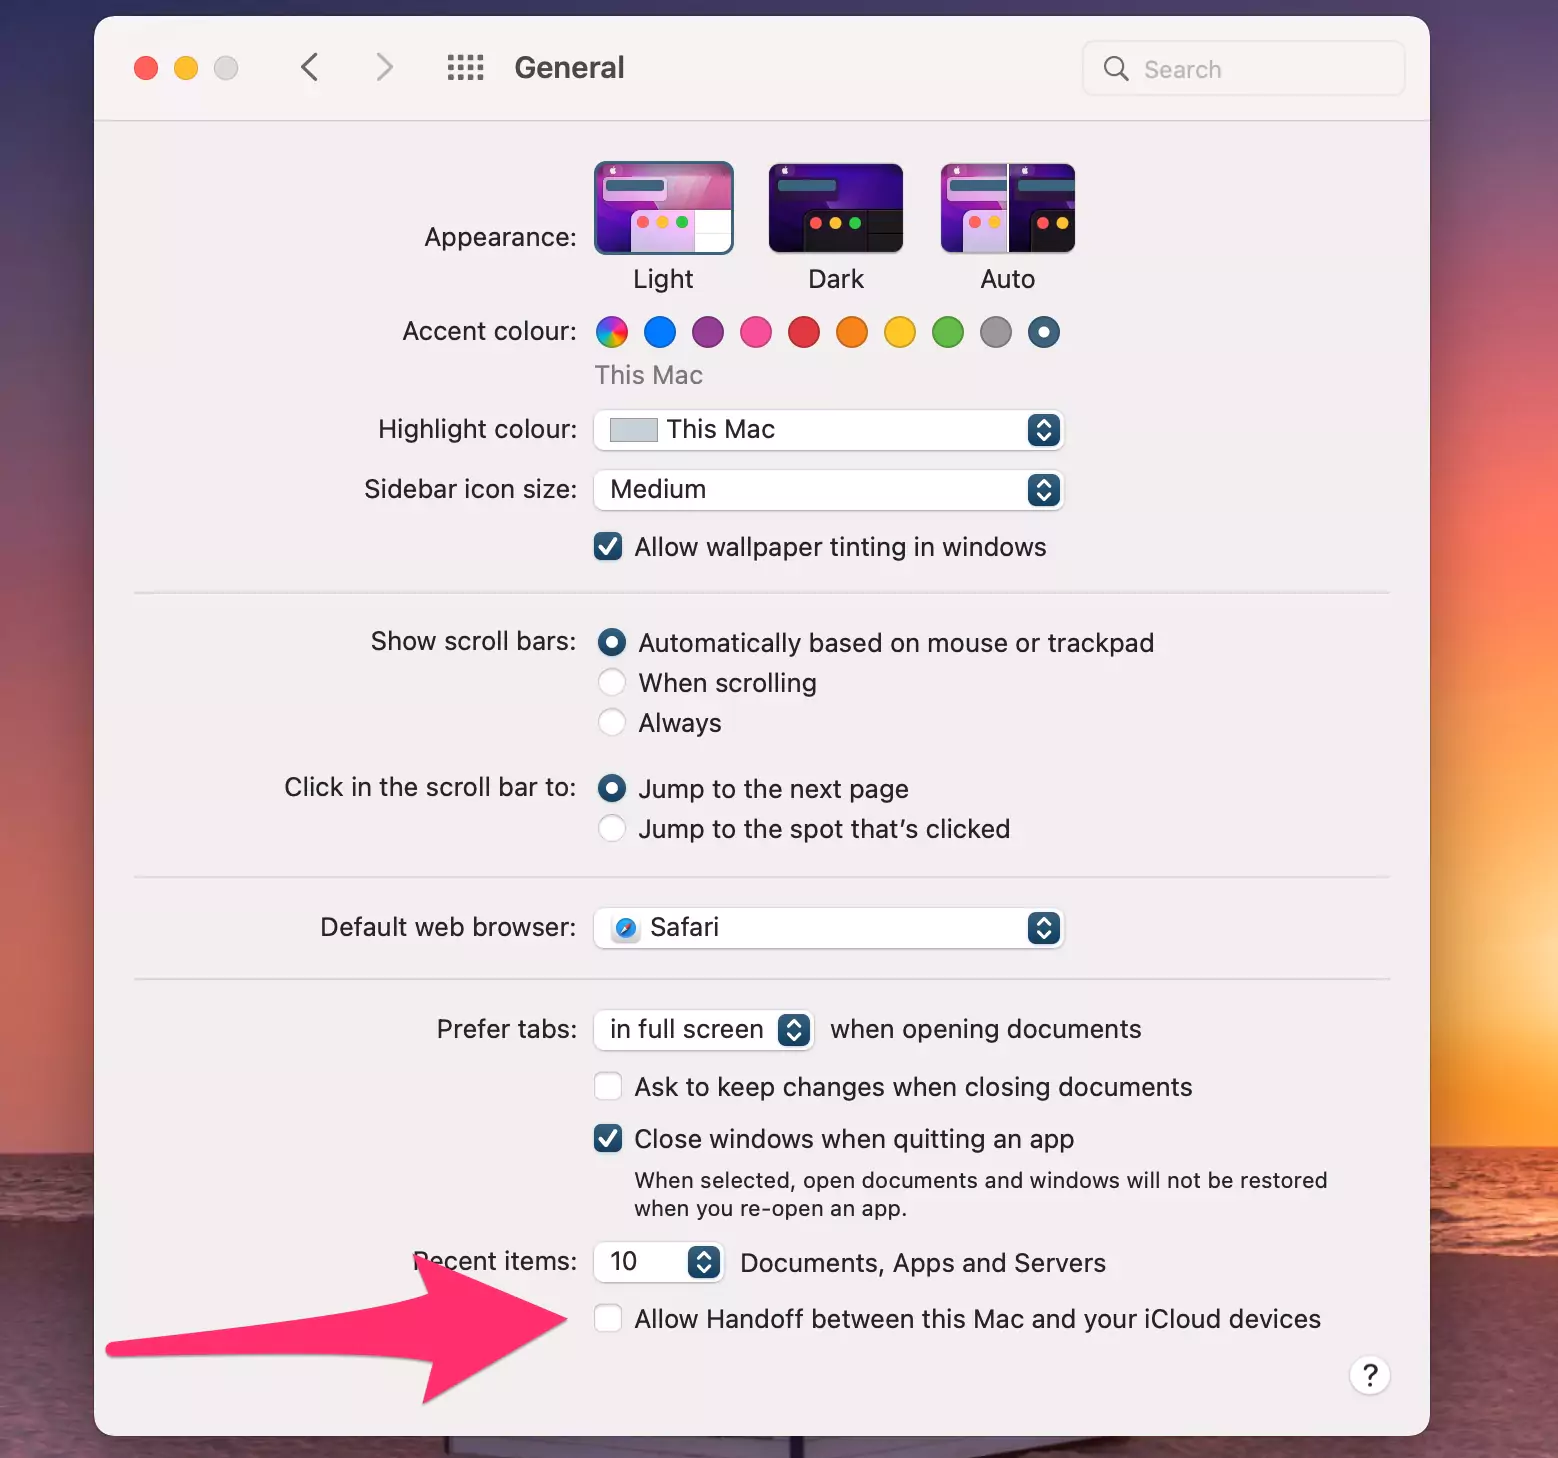
Step. 2→ Now, from all the available options on the general preference pane, look for the setting “Allow Hand-off between this Mac and your iCloud devices” and make sure that it is not checked.
After you have completed the steps mentioned above, launch the Logi Options app and see if the device you had a problem connecting can now connect freely with your Mac or not.
Solution 4: Allow Logi Options + Permission on the Mac
The Logi Options software requires two basic permissions from your Mac: Accessibility and Input Monitoring. If any of these permissions are not enabled on the device, the Logi Options app will not work properly on your MacBook. To allow these permissions on your Mac, follow the procedure described below.
- Accessibility
For the essential functions like scrolling, forward and back options, zoom, volume control, etc., the Macbook needs to have accessibility permission enabled on it. The users can enable the accessibility permission on the Mac by-.
On MacOS Ventura:- Go to the Apple Logo > System Settings > Privacy & Security > Accessibility > Enable toggle for “Logi Options Daemon“.
On MacOS Monterey & Earlier
Step. 1→ Tap on the option Open Accessibility under Apple Logo > System Preferences > Security & Privacy.
Step. 2→ Then, click on the lock icon at the bottom left corner of the screen and type in your password in the window that appears to unlock it.

Step. 3→ At last, in the panel at the right side of the screen, check the setting of Logi Options + to permit it.
This method will give permission to access the Logitech Options software on the MacBook. Now open the software again to check if the problem persists.
- Input Monitoring
The input monitoring features need to be enabled for basic software features of scrolling, gestures, moving back and forth, etc. To allow the input monitoring permission on the Mac, follow the process described below.
Step. 1→ Click on the option of Open Input Monitoring.
Step. 2→ Now tap on the lock icon at the screen’s bottom left corner and unlock it by entering your password.
Step. 3→ Finally, check the box in front of the setting “Logi Options +” then select “Quit and reopen” when asked to give permission.
After completing the procedure mentioned earlier, the users can enable the input monitoring permission on their device. Then open the Logitech Options software again and check if the app is working fine or not.
Solution 5: Logi Options+ issues recognizing devices on macOS when Secure Input is enabled
Another effective solution to the issue of “Logitech Options” apps not working correctly on Mac is recognizing devices on macOS that have secure input enabled. To enable secure input on your MacBook, follow the simple steps below.
Step. 1→ Open the terminal from the “/Applications/Utility folder.”
Step. 2→ Then, in the terminal app, type in “ioreg -l -d 1 -w 0 | grep SecureInput” and hit the enter key on your keyboard.
Step. 3→ If no information is returned from the command, it means that secure input is not enabled on your system.
Step. 4→ If some information is returned back from the command, then search for “kCGSSessionSecureInputPID”=xxxx. The number XXXX indicates the Process ID or PID of the process or application with secure input enabled.
Step. 5→ Now open the Activity Monitor from the /Applications/Utility folder.
Step 6→ Finally, look for the PID with secure input enabled to find out about the applications with secure input enabled.
After figuring out which application has secure input enabled, shut down that application to fix the issues with the Logitech Options software.
Solution. 6: Logi Options Not Working Mac m1
With the release of the new MacBook M1 series, some M1 users have faced trouble connecting their Logitech Bluetooth devices, such as mice, keyboards, headsets, etc., even after downloading the Logitech Options software. To resolve this problem, the users need to follow the method mentioned in this section.
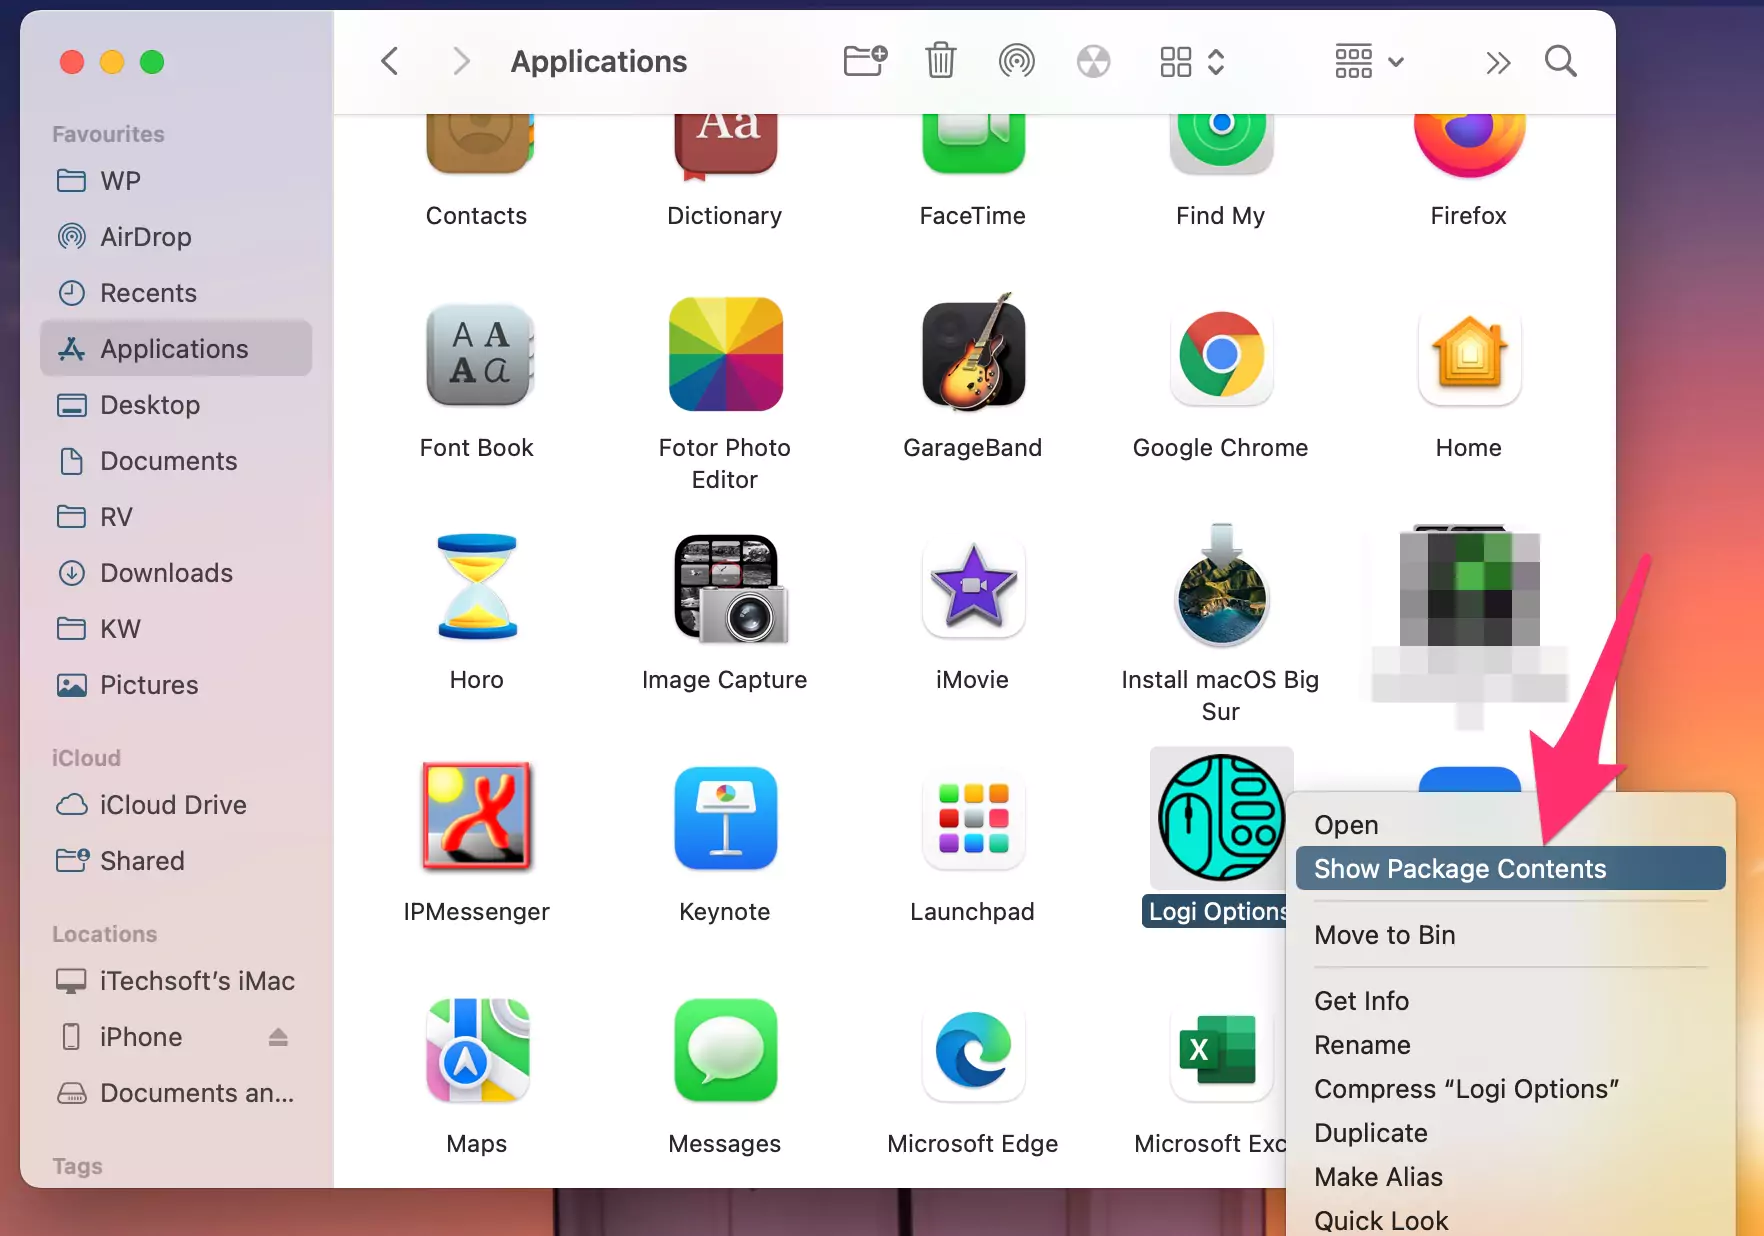
Step. 1→ Open the Applications folder on your MacBook.

Step. 2→ Look for the “Logi Options. app” option and right-click on it.
Step. 3→ Now, click on the “Show Package Contents” setting.
Step. 4→ Then open the “Contents-Support” folder from all the available folders.
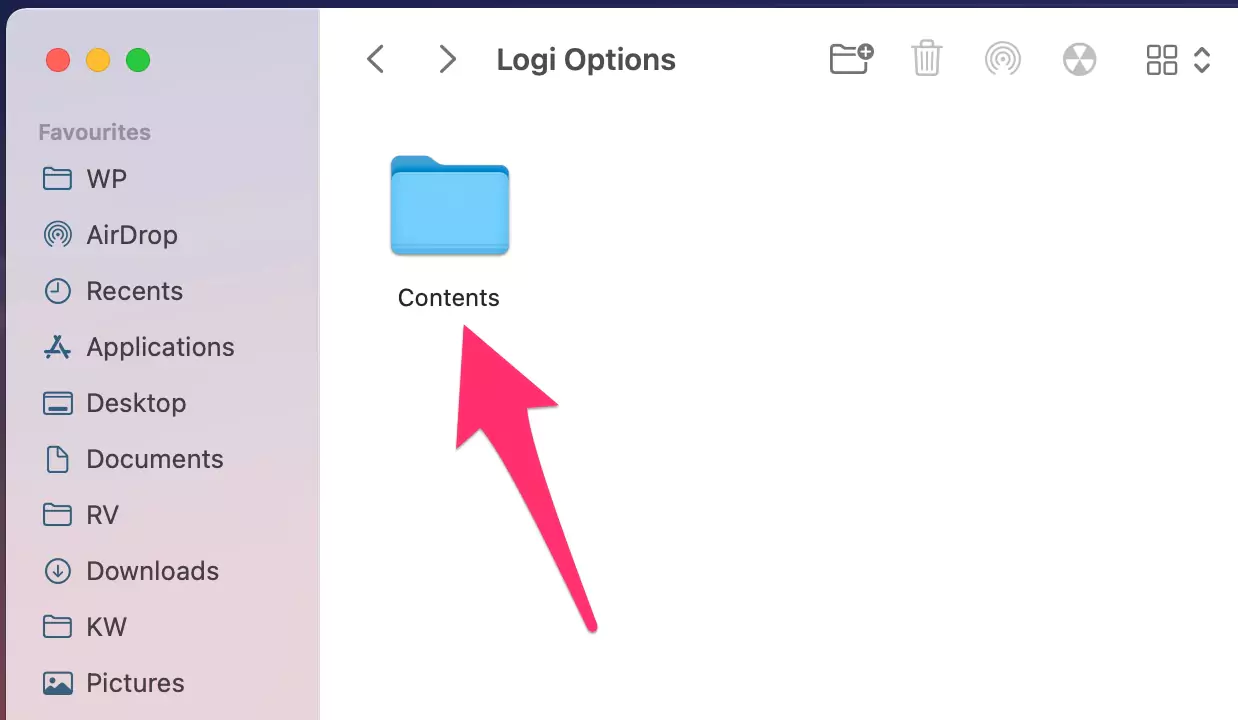
Step. 5→ At last, look for “Logi Options Daemon. app” and double click on it to execute the program.


After the users have executed the program mentioned above, the Logitech Options software will automatically detect the nearby Bluetooth devices and connect with them effortlessly.
Solution. 7: Logi Options Daemon Download [Redownload and install]
Uninstalling and reinstalling the Logi Options Daemon on the MacBook can fix the issue of the software not functioning well on your device. This is easy and can be carried out by following the process described here.
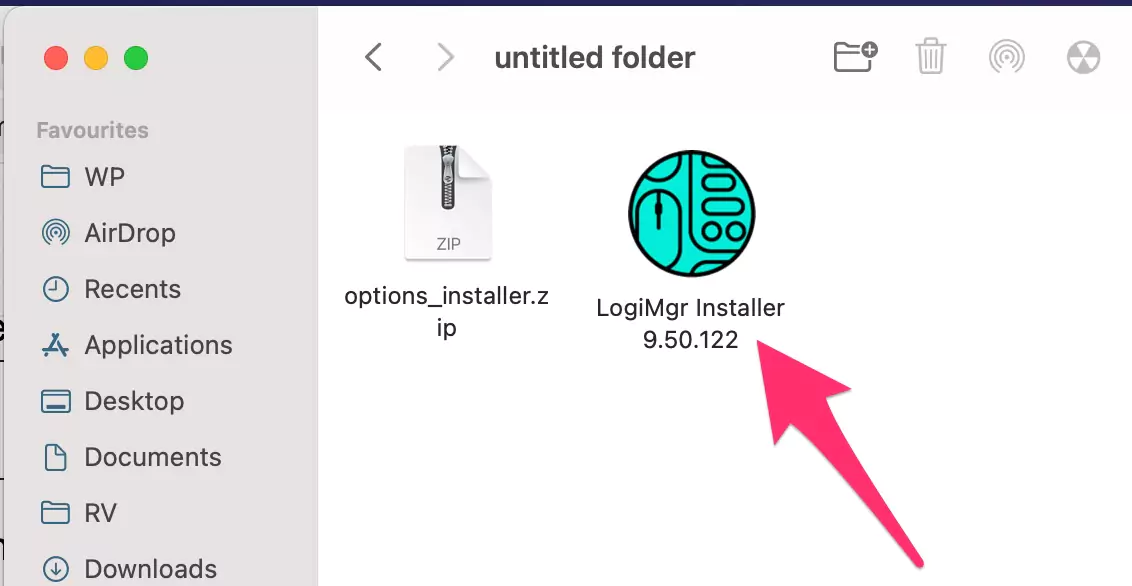
Step. 1→ Go to the Logitech Options website and download the software.

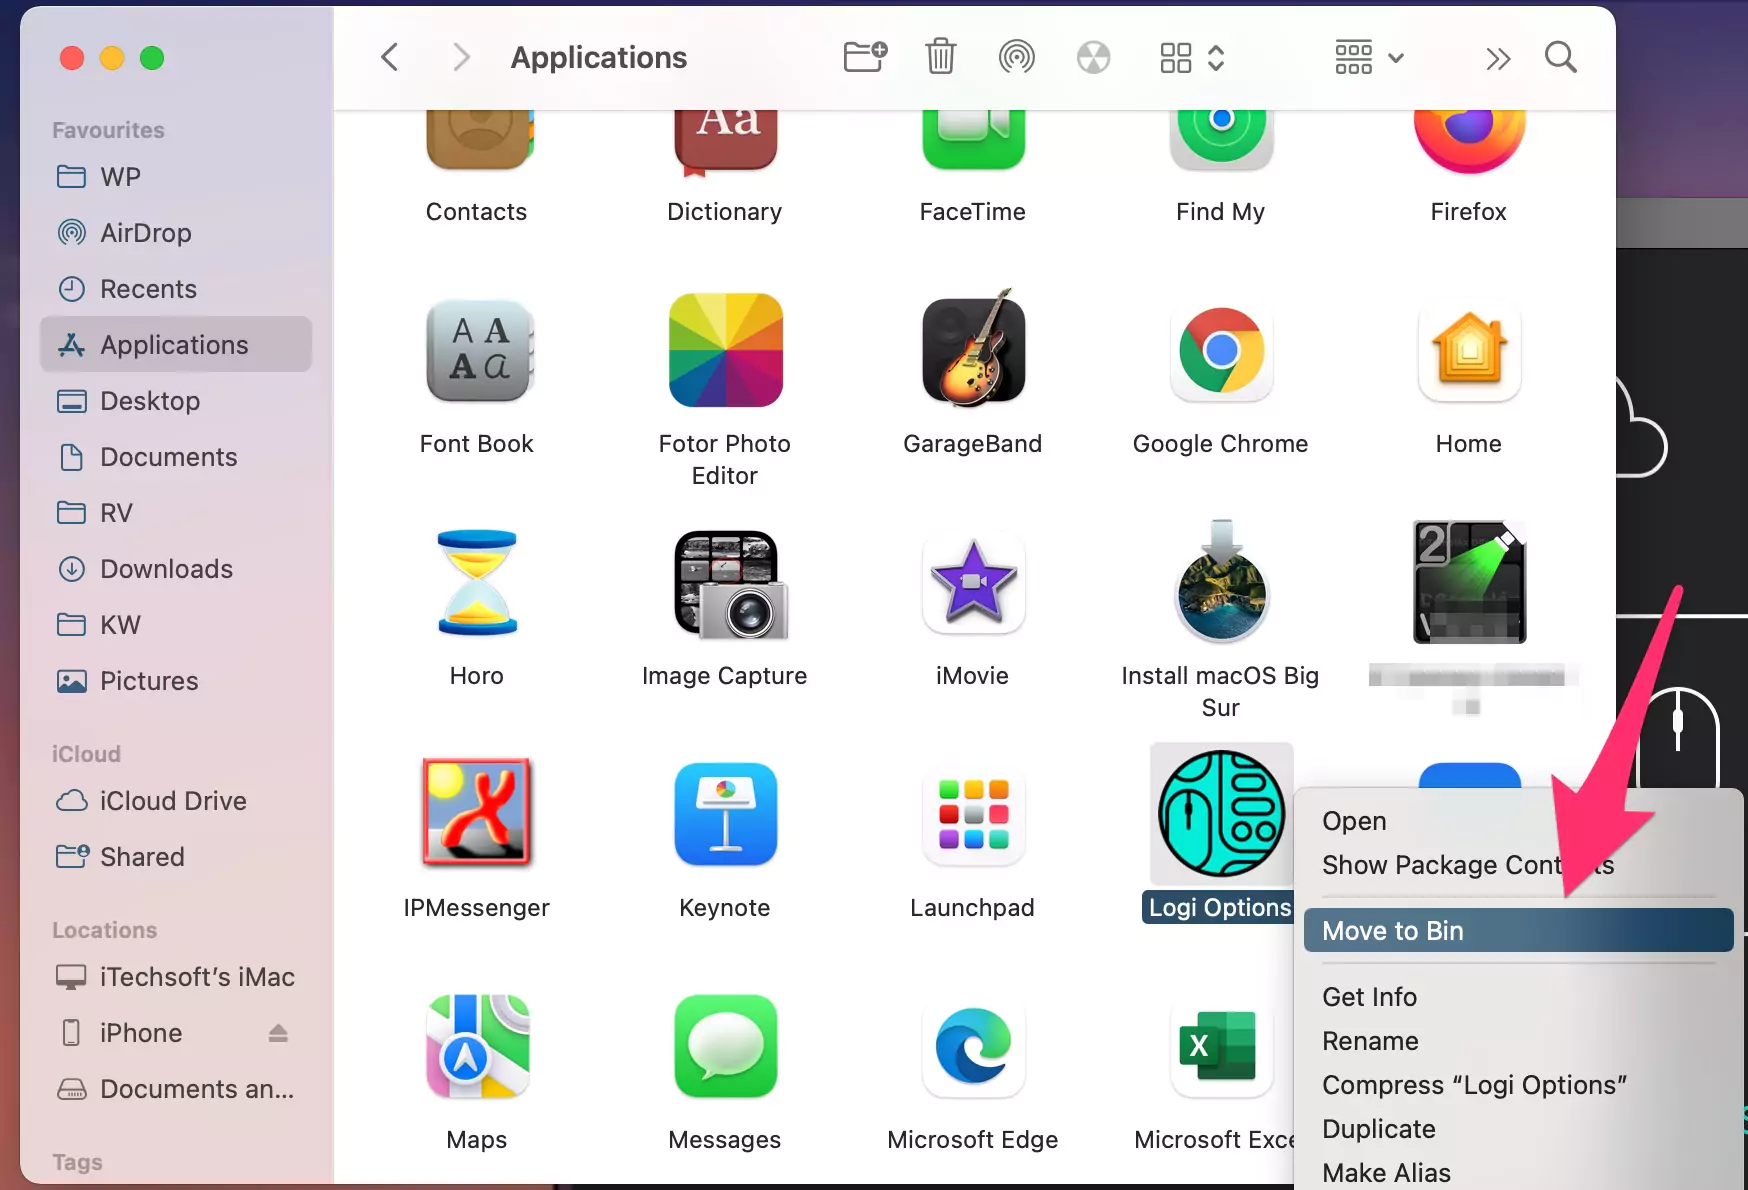
Step. 2→ Now, uninstall the old Logitech Options Daemon setup from your system. Open Finder on Mac > Applications [From top Menu Go > Applications] > Logi Options.app > Right-click on App > Move to bin. That’s it.
Step. 3→ Extract Logi installer Zip file Then, Install the newly downloaded Logitech Options software on the Mac. Right-click on Setup file > Open.
Now open the Logi Options Daemon app again to check that the application is working correctly on your MacBook.
Solution. 8: Try Logitech Options + Beta
Suppose you have tried all the solutions given above and are still facing difficulty in using the Logitech Options software. In that case, we suggest the users download the Logitech Options + Beta app. This solution has worked for many Mac users who faced severe trouble regarding the Logitech options not working on Mac.
Solution. 9: Logitech Options Not Detecting Mouse on Mac
Suppose you are a Mac user and have recently bought a Logitech wireless mouse and are facing difficulties like Logitech Options not detecting mouse on your MacBook. In that case, here are some ways by which you can resolve the problem of Logitech Options not detecting the mouse on a Mac.
- Boot up your Mac in safe mode and try pairing the Bluetooth mouse with your device again.
- Remove the Logitech Options from the Bluetooth of your MacBook, and then try reconnecting the mouse. Go to the Apple Logo from top menu > System Preferences > Bluetooth > Hover on Mouse, Click on Close icon (X) or Right Click on it and Remove.
- Restart your MacBook. This is a temporary solution and will fix any issues with the Logitech Options app which might be caused during the starting up of the device.
- Check for the software updates of macOS on your Macbook. If there is a new software update and you have not downloaded it, then some functions of various apps start malfunctioning. We suggest the users keep their Macs up to date to fix this problem. Go to the Apple Logo > System Preferences > Software Update [Download and install] or in macOS Ventura: apple logo > System Settings > General > Software Update > Download and Install.
- Reinstall the macOS on your system. Sometimes, these problems arise due to improper installation of the macOS on the system. Therefore, reinstalling the macOS can solve this problem without Deleting Data or Settings. Note: recommended to take Backup in External Drive using Time Machine.
The tips mentioned above will resolve the problem of Logitech Options not detecting the mouse on a Mac.
All the solutions described in this article result from deep analysis and research. We have compiled this list of solutions based on all the reviews and feedback of the Mac and Logitech Options users. Therefore, we hope that you found this post helpful in resolving the issues related to Logitech Options not working correctly on Mac.
Q & A→
Logi Options Daemon Location on Mac?
→ The location for the Logi Options Daemon can be accessed by going to “Finder > Applications> Logi Options. app” on the MacBook.
Does Options+ Have Native Support for M1 Apple Silicon?
→ Yes, the Logitech Options + software has native support for M1 Apple silicon starting from version 0.90.