Are you looking for a single-click solution to Erase all the contents and login on to your Mac, iMac or Macbook? Yes, that’s possible now with the latest macOS. Before moving forward, you must care for your saved data using the guide in this article.
Suppose you want to clear data manually or sign out an account in macOS, then follow all the methods one by one.
Steps to Prepare Mac to sell by Delete/Wipe all Data and Login Profile
For security reasons, Mac always needs an iCloud profile for easy-to-manage online data over multiple apple devices. But some of these are locally stored for easy and fast access. To learn how to manage and which action we need before selling to an unknown person.
These tips are also useful in making your Mac OS X Brand new and completely refreshed just like new.
Erase All Content and Settings…in macOS Ventura, Sonoma
MacOS Ventura & later version of macOS, lets you clear your Mac data in just a single option. During this process, your Mac will ask to create a backup, Remove the activation lock (Remove the device from Apple ID), and Erase All data and settings.
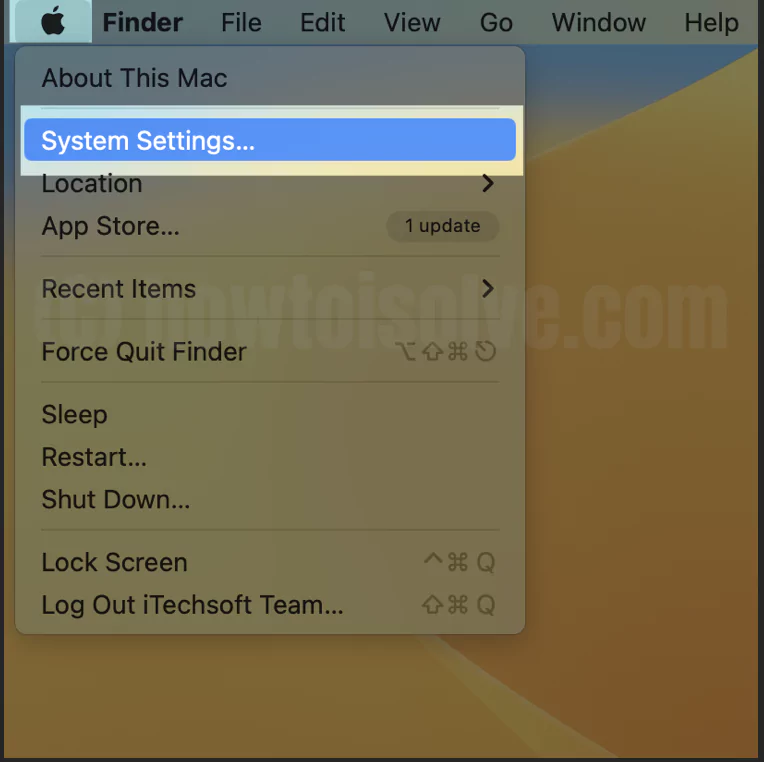
1→ Go to the Apple Logo from the top menu > System Settings.
2→ Next, Go with General Option from the left side of the window > Transfer or Reset.
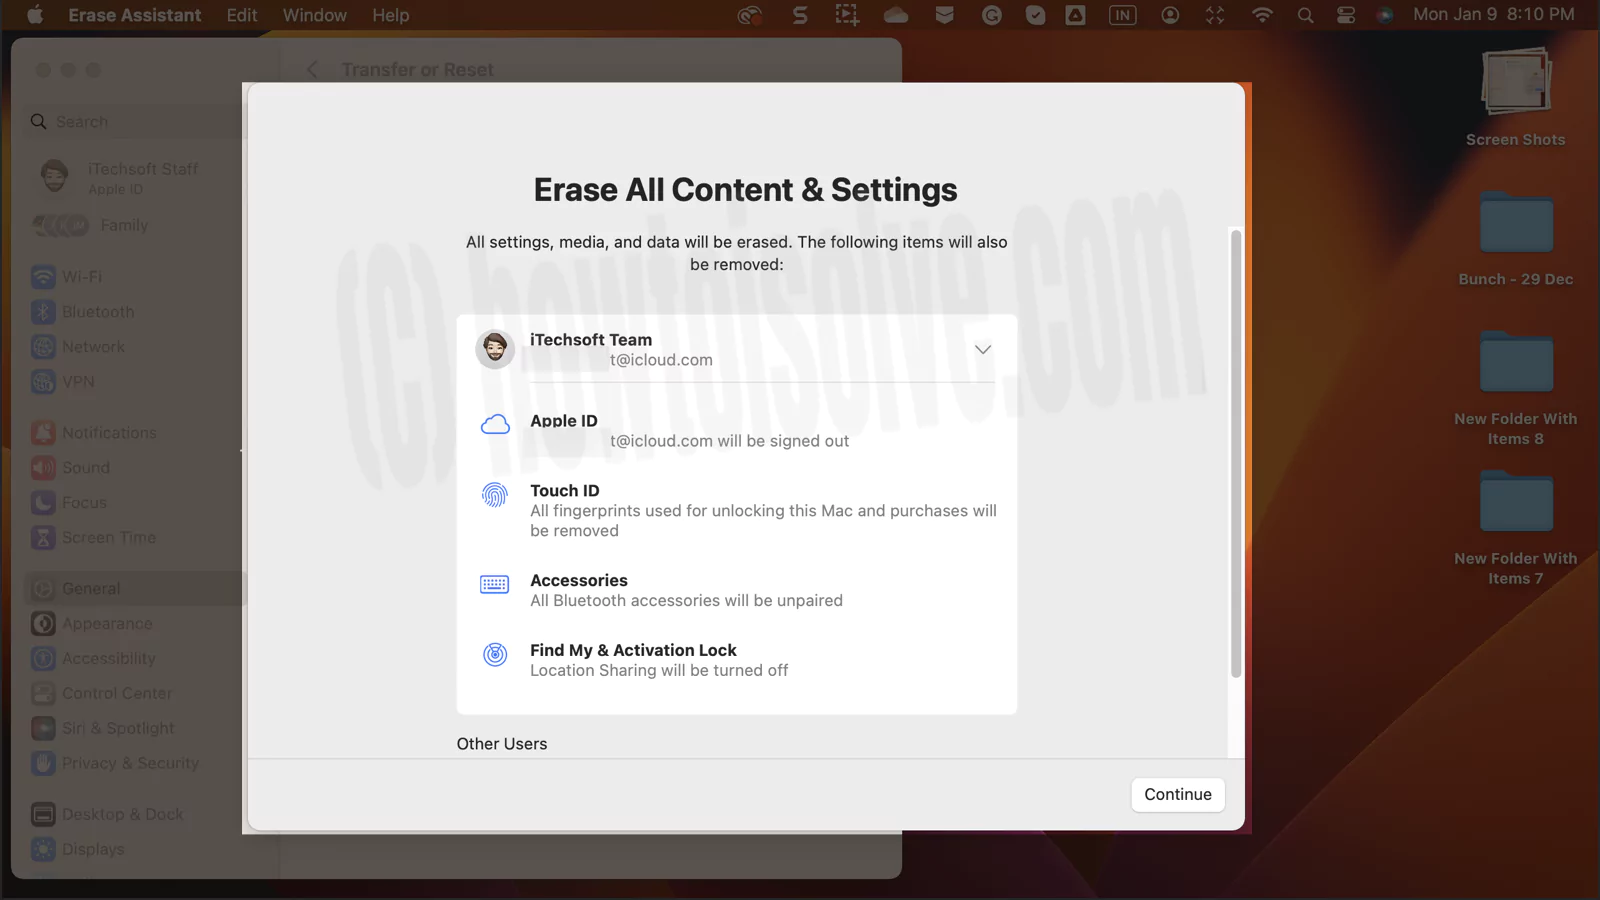
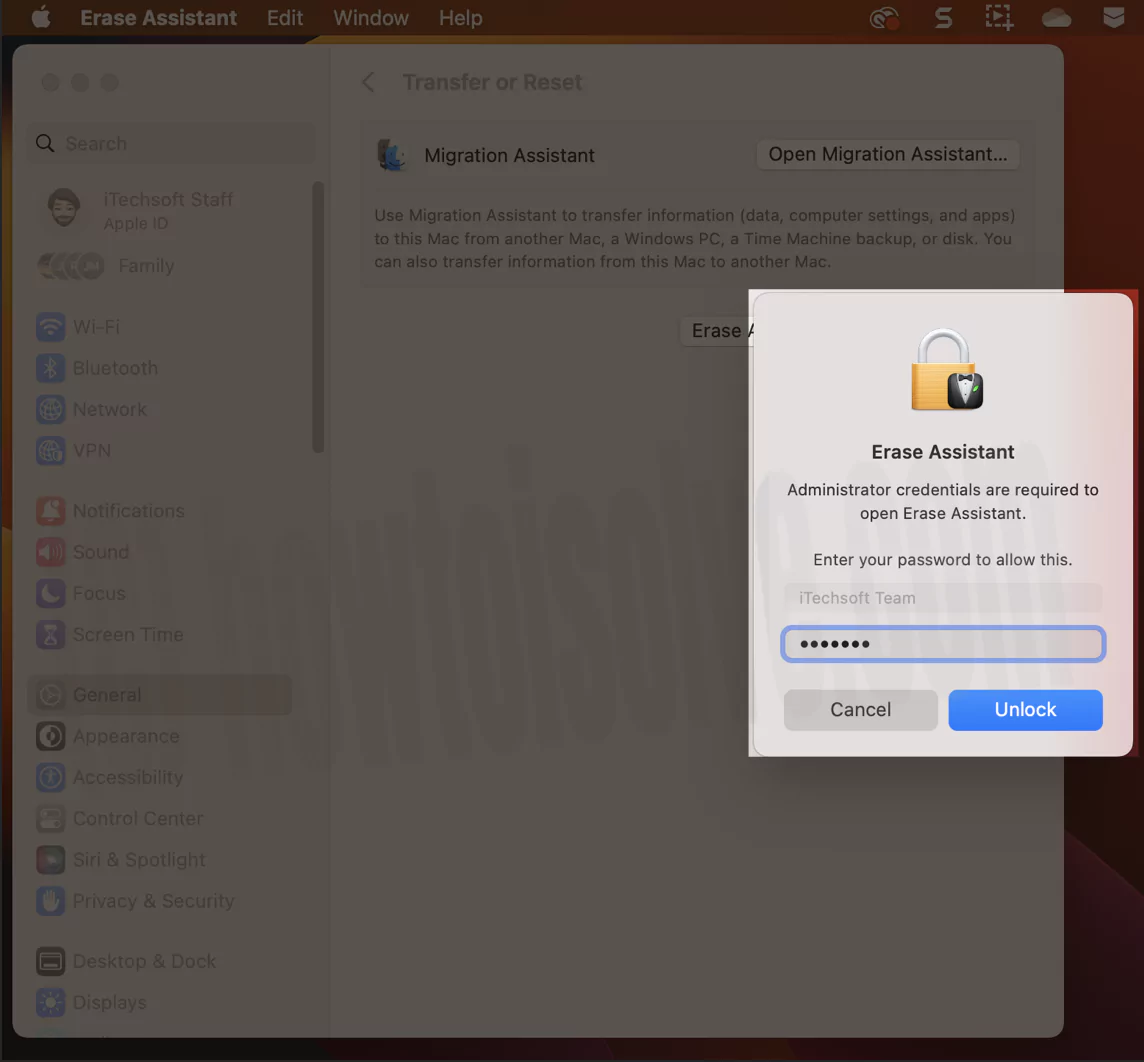
3→ Now, Click on “Erase All Content and Settings…“. Option. Enter your Mac Login password. Follow the on-screen setup.
4→ Select your Account, this will remove,

- Apple ID will be signed out
- Touch ID – All fingerprints used for unlocking this Mac and purchases will be removed
- Accessories – All Bluetooth accessories will be unpaired
- Find My & Activation Lock – Location Sharing will be turned off
Once you are done, now your Mac is ready for reselling. if something is not working, follow the manual steps to clear all accounts, Data, and macOS Settings.
For Earlier macOS, follow the below steps…
Cancel AppleCare Subscription Plan
The first and foremost thing you should do is cancel the AppleCare Subscription plan. Worry not, you will receive the refund for the duration and service you have used during the service. If you aren’t familiar with how to cancel AppleCare+ plan, click on this link.
Step 1: Backup your Mac, MacBook
Create Backup using Time Machine
To create Time Machine Backups on your Mac, MacBook, you’ll need external storage to store the backup. Here’s the list of external drives/storage you could possibly use to backup Mac.
- A FireWire, USB or Thunderbolt.
- NAS compatible with Time Machine over SMB
- AirPort Time Capsule
- Any Mac, MacBook Shared backup drive for Time Machine backup
- External storage that is connected to AirPort Extreme Base Station or AirPort Time Capsule.
Upon connecting the external drive to the Mac, the system will ask you, Do you want to use (External Drive Name) to back up with Time Machine? Choose Use as Backup Disk, but before doing that, make sure to check the Encrypt Backup Disk option, recommended by Apple itself.
What if Time Machine forgets to ask you to set a backup disk after connecting an external drive? Do not worry. From the system, you can do it manually.
On MacOS Ventura
1→ Go to the Apple Logo from the top Mac menu > System Settings.
2→ Next, Select General > Time Machine, Select Time Machine Backup drive, and Start backing up to an external drive on Mac. Get more details… set up and start using Time Machine on macOS Ventura and later versions, follow the steps below.
3→ Link up the external hard drive and enable the disk.
Fact: If you have created the backup on the Mac computer with macOS Monterey or later, the file on Mac will only be restored on Mac with macOS Big Sur or Later.
4→ Follow the steps from following:
- Set Up A Disk From The “Time Machine Can Back Up Your Mac” Dialogue: If you presently don’t have the Time Machine Disk setup, the screen will prompt you to want to use the disk for backup. Move the pointer and hold over the prompt that appears. Click on Options > Set Up.
- Set Up Disk In Time Machine Settings: Click on the Time Machine Icon from the menu bar; up next, click on Open Time Machine Settings.
If there is no time machine icon in the menu bar, select Apple Logo > System Settings… > Control Center. Next, swipe to Time Machine and choose “Show In Menu bar.”
5→ Click Add Backup Disk; alternatively, choose Add Button +.
On MacOS Monterey & Earlier
1→ Click on the Apple menu and select System Preferences, or from the top menu bar, click on Time Machine and then choose Time Machine preferences.
2→ Click on Time Machine.
3→ Click Select Backup Disk…..
4→ Choose the external disk that you want to use it for Time Machine Backup. Don’t forget to check the Encrypt backups box. And lastly click on Use Disk.
5→ If the disk format doesn’t match the Time Machine requirements, then you’ll be asked to Erase the disk. Follow the instructions and Erase the disk.
Usually, Time Machine takes backups periodically without any action. Still, since we have to prepare the Mac to sell, it would be wise to take backup manually and speed up the process.
Here’s how to backup Mac on Time Machine Manually
- Click on the Time Machine and select Back Up Now.
Create Backup on iCloud Drive
If you want to store a backup to access it remotely, iCloud Drive is a suggested option. Before using iCloud Drive to backup, make sure it has enough storage to store the backup.
Create Backup On iCloud macOS Ventura
- Go to Apple Logo.
- Choose System Settings…
- Select Apple ID.
- Click on iCloud Drive.
- Lastly, select Turn On Button from the window.
When you have enabled these settings on Mac, the data will sync across all Apple Peripherals with the same Apple ID.
Create Backup On iCloud macOS Monterey & Earlier
- Click on the Apple menu on the menu bar.
- Select System Preferences.
- Click on the Apple ID. macOS Mojave or Earlier users, skip this step.
- Choose iCloud.
- If asked then sign in with Apple ID.
- Now select the iCloud Drive.
- If your Mac is running macOS Sierra or later, then enable the Desktop and Documents to add the Mac Desktop and Documents folder directly to the iCloud Drive.
- All the files stored on the Mac can be located in the Desktop and Documents folders in the Finder beneath the iCloud.
- If you are thinking of adding a second Mac desktop, to merge the files of the first Mac with the second Mac, it won’t happen automatically. You can open the Desktop and Documents folder stored in the iCloud and find the folder named the same as mentioned in another Mac.
This was all about how to backup Mac, MacBook before selling them. Once the backup is completed, you need to sign out of iTunes.
The Mac, MacBook with macOS Catalina or later, users have to skip the iTunes Sign Out step since iTunes is out of support for macOS 10.15 or later.
Step 2: Sign out of iCloud on Mac, MacBook
Removing accounts from Mac is also necessary to protect your private information, and as you know, the iCloud ID contains all of your payment information, personal information, and more. That’s why, you don’t hand over the Mac without signing out of iCloud.
On MacOS Ventura
- Select Apple Logo from the top left corner.
- Choose System Settings…
- Click on your Apple ID from the top.
From the overview screen, swipe down to the bottom. And last, choose Sign-Out. If you are willing to create a copy of your iCloud Data before you sign out, ensure you check all the appropriate boxes. Furthermore, select Keep A Copy. Similarly, if you want to store Safari Password on your Mac, click on Keep On This Mac.
On macOS Monterey & Earlier
- Go to the System Preferences from the Apple menu.
- Then, click on Apple ID.
- Click on iCloud, on the sidebar.
- Disable Find My Mac.
- Next, click on Overview from the same sidebar and then Sign Out.
- macOS Mojave or earlier, click on the Apple menu and then System Preferences. Go to iCloud and Sign Out.
- When Mac asks to Keep a Copy of iCloud Data in the Mac, select Keep a Copy since you’ll have reformated the drive afterward.
- Signing Out from iCloud doesn’t delete any data from iCloud Drive. You can still access it from another Apple device using the same iCloud account.
Step 3: Sign Out of iMessage
Here are the steps to deregister iMessage on your Mac. If you don’t have a Mac or apple device, you can still deregister iMessage online for your Phone number.
On MacOS Ventura
- Open the iMessage on Mac and select Message from the menu bar.
- Choose Settings…
- Up next, select iMessage, and later, click on Settings.
- Select Sign-Out, and give further confirmation. However, when you sign out from iMessage, you will no longer receive messages.
Earlier macOS, Sign out iMessage
You’ll probably need to sign out of iMessage on macOS X Mountain Lion or later, launch the Messages app, and click on Message. Select Preferences > iMessage and Sign Out of the Messages app.
Step 4: Unpair all the Bluetooth Connected Peripherals
We all have Bluetooth devices from wireless keyboards to external speakers paired to Mac. However, this step is optional; even if you don’t unpair the paired Bluetooth devices, it won’t be a problem unless you have a plan to sell or give the Mac to your siblings or neighbors. Because the paired Bluetooth devices will automatically get connected if they are in range, and later can cause issues for the buyer or taker. Therefore, it is advisable to disconnect and unpair the Bluetooth peripherals such as a wireless keyboard, wireless mice, wireless headphones, speakers, and more.
On MacOS Ventura
- To unpair Bluetooth peripherals on Mac, navigate to Apple Logo.
- Select System Settings…
- Click Bluetooth from the left sidebar.
- Further, click on Disconnect next to the connected Bluetooth device.
On MacOS Monterey & Earlier
- Go to the Bluetooth settings, click on Apple menu and System Preferences.
- Take the mouse pointer on the Bluetooth device and click on (x) to remove the device.
Step 5: Erase hard drive and Clean install macOS
In macOS Monterey [M1 Mac]:- Just like iOS, Mac users can Erase all the Content and settings on Mac with the option given in the top mac menu. But intel mac users have to follow the manual action.
Lastly, after performing all the steps, you have to erase the hard drive and clean install macOS. Why reinstall macOS, because it will give your Mac a fresh start, and the buyer will have to set up the Mac as a fresh piece.
Prefer our detailed guide on how to Clean install macOS
Final Step:- Remove Mac from Apple ID (Activation Lock)
All Apple devices must be signed in with Apple ID to authenticate the device owner that’s called iCloud activation. And sync data across all Apple devices. But if you plan to sell or gift your Apple device to someone, you must manually remove it from your Apple ID account.
🕶 Tips: if you are Buying a Used Mac, then you should verify that iCloud activation lock is removed.
See the below alternate ways; here’s the complete guide on Remove Apple devices from Apple ID.
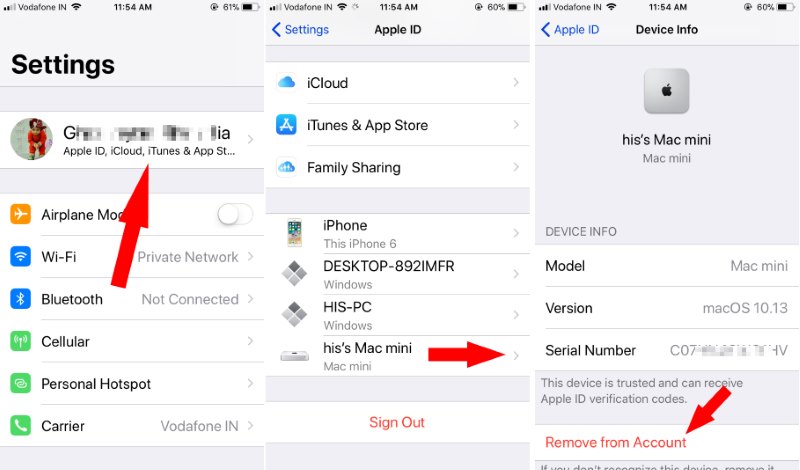
- Go to appleid.apple.com> Signed in with Same Apple ID and password > Devices section > Select Device > Remove from Account > and Confirm to remove it.

- On your iPhone/iPad: Open settings app > Tap on Profile name > Scroll to List of Devices > Select Device > Remove from account.

Also, check out: Best Place to Sell your Mac
Erase the drive completely and wipe all data forcefully, which you never get back or restore. Then install fresh OS X on Mac. Learn more about here. This is the most Hendy way to Prepare Mac to sell.
For old Mac, Sign out of iTunes (Only macOS Mojave or earlier)
- Launch the iTunes on your Mac. To do so, you can use Spotlight Search.
- Click on Account.
- Go to Authorizations and then select Deauthorize This Computer.
- For verification, you may need to enter the Apple ID and password.
- Finally, click on Deauthorize.


