Generally, there are many best document scanner apps available on Apple App Store, but iOS Dropbox version 11.2 has been released with a feature to scan documents.
So here I will guide you on how to Scan documents into Dropbox on iPhone. Using this feature, you can easily create a file on your iPhone. You can also scan already existing images such as .jpeg and Png.
The following guide will let you learn and eliminate other third-party scanner apps.
Once use this scanning feature of Dropbox, if you seem reasonable, uninstall the unnecessary scanner app and get space on your iPhone. iOS 8, iOS 9, and later users are only eligible to access this feature better.
Steps to Scan documents into Dropbox on iPhone, iPad
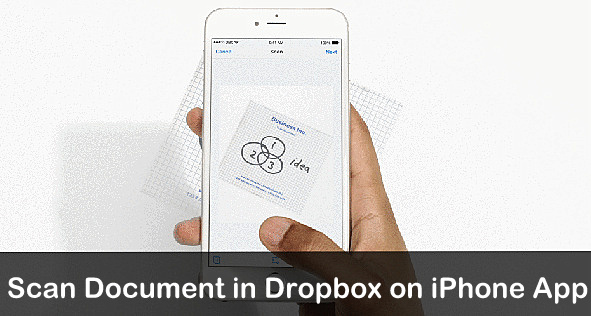
Step 1. Open the latest version of Dropbox on your iPhone.
Step 2. Tap the + Sign button.

Step 3. Now choose Scan Document.
- You would be open with the camera function so take a picture of content you want to transform into a document.
- Select an existing picture in your camera roll.
You can scan more than one document one by one up to ten pages. You can also edit your files with the help of the below-described functions.
Filter – B&W, Whiteboard, Original, Contrast.
Rotate screen.
Step 4. Tap on Next.
Enter the file name and choose File type PDF or PNG.

You can save it on your iPhone. Therefore set the location and keep it.
Please Note: you cannot save multi-page file scans as a .png file. So you need to keep it as a .pdf file. Apart from personal users, Dropbox business users access more features like full-text search scanned documents and copy text from within a .pdf file.
Let’s share your feedback and tell us how you tip to scan documents in Dropbox on iPhone. Liked it? Please share it.


