
If you’re searching for a Webcam for attaining video calls, or the webcam is no longer working, why not use your latest iPhone as a webcam on your computer? This way, you can take advantage of your iPhone camera and save hefty money on buying a new webcam. But being new users, many users aren’t familiar with a procedure on how to do so. If that’s the same with you, fuss not; here is how to use an iPhone as a webcam on a Mac. So, without any ado, let’s get started!
iPhone as webcam:- Mac & Windows
Here are different ways to use an iPhone as a webcam on a Mac.
1. How to use iPhone as a webcam for Mac with continuity camera
If you’re reading this guide, it means you have an iPhone. And for those with both iPhone and Mac, Apple has introduced the native solution to use iPhone as a webcam for Mac. Thanks to a new feature known as Continuity Camera, however, to use this feature, there are some requirements you need to fulfill.
Requirements to use Continuity Camera
- Both iPhone and Mac must be nearer to each other.
- Mac, iPhone, or iPad must be connected to Wi-Fi, and Bluetooth should be turned on.
- Similarly, both devices should be signed in with the same Apple ID along with two-factor authentication enabled.
- Your macOS should be updated to at least Mojave or above.
- Your iPhone & iPad are running iOS 12 and iPadOS 12 or above, respectively.
Here Below are list of application that supports continuity camera to take sketch, photos, or scan documents
- Finder
- Keynote
- Messages
- Notes
- Number 5.2 & later
- Pages 7.2 & later
- TextEdit
How to enable Continuity Camera webcam on iPhone
While the continuity camera is turned on by default on your iPhone, it’s best to verify the settings for a seamless experience. Here’s how you can do so.
Step 1: Head to the Settings App on your iPhone.
Step 2: Scroll down and tap General.
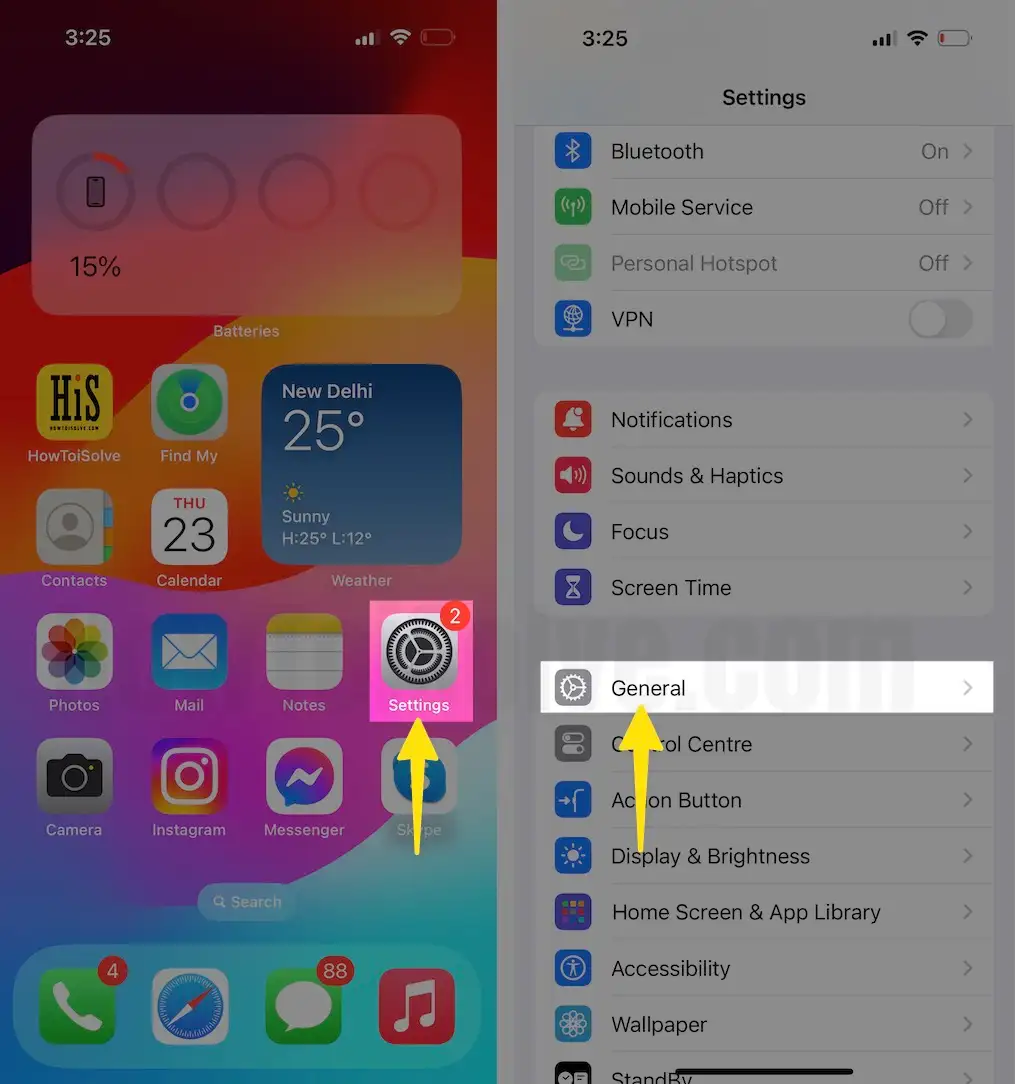
Step 3: Select AirPlay & Handoff and enable the toggle next to Continuity Camera.

Now that you can use your iPhone as a webcam with your Mac. It can record audio and capture video. So that you can upgrade your video quality and improve audio quality as well. Remember, you only use the rear camera as a webcam and also keep your iPhone closer to your Mac. Below are steps to use Continuity Camera within the downloaded apps on your Mac running the latest macOS.
Use a continuity camera in any video calling app on a Mac
You can use the Continuity Camera feature with any apps that support video calling, for instance, Zoom, Skype, FaceTime, etc. In the steps below, we have FaceTime as an example.
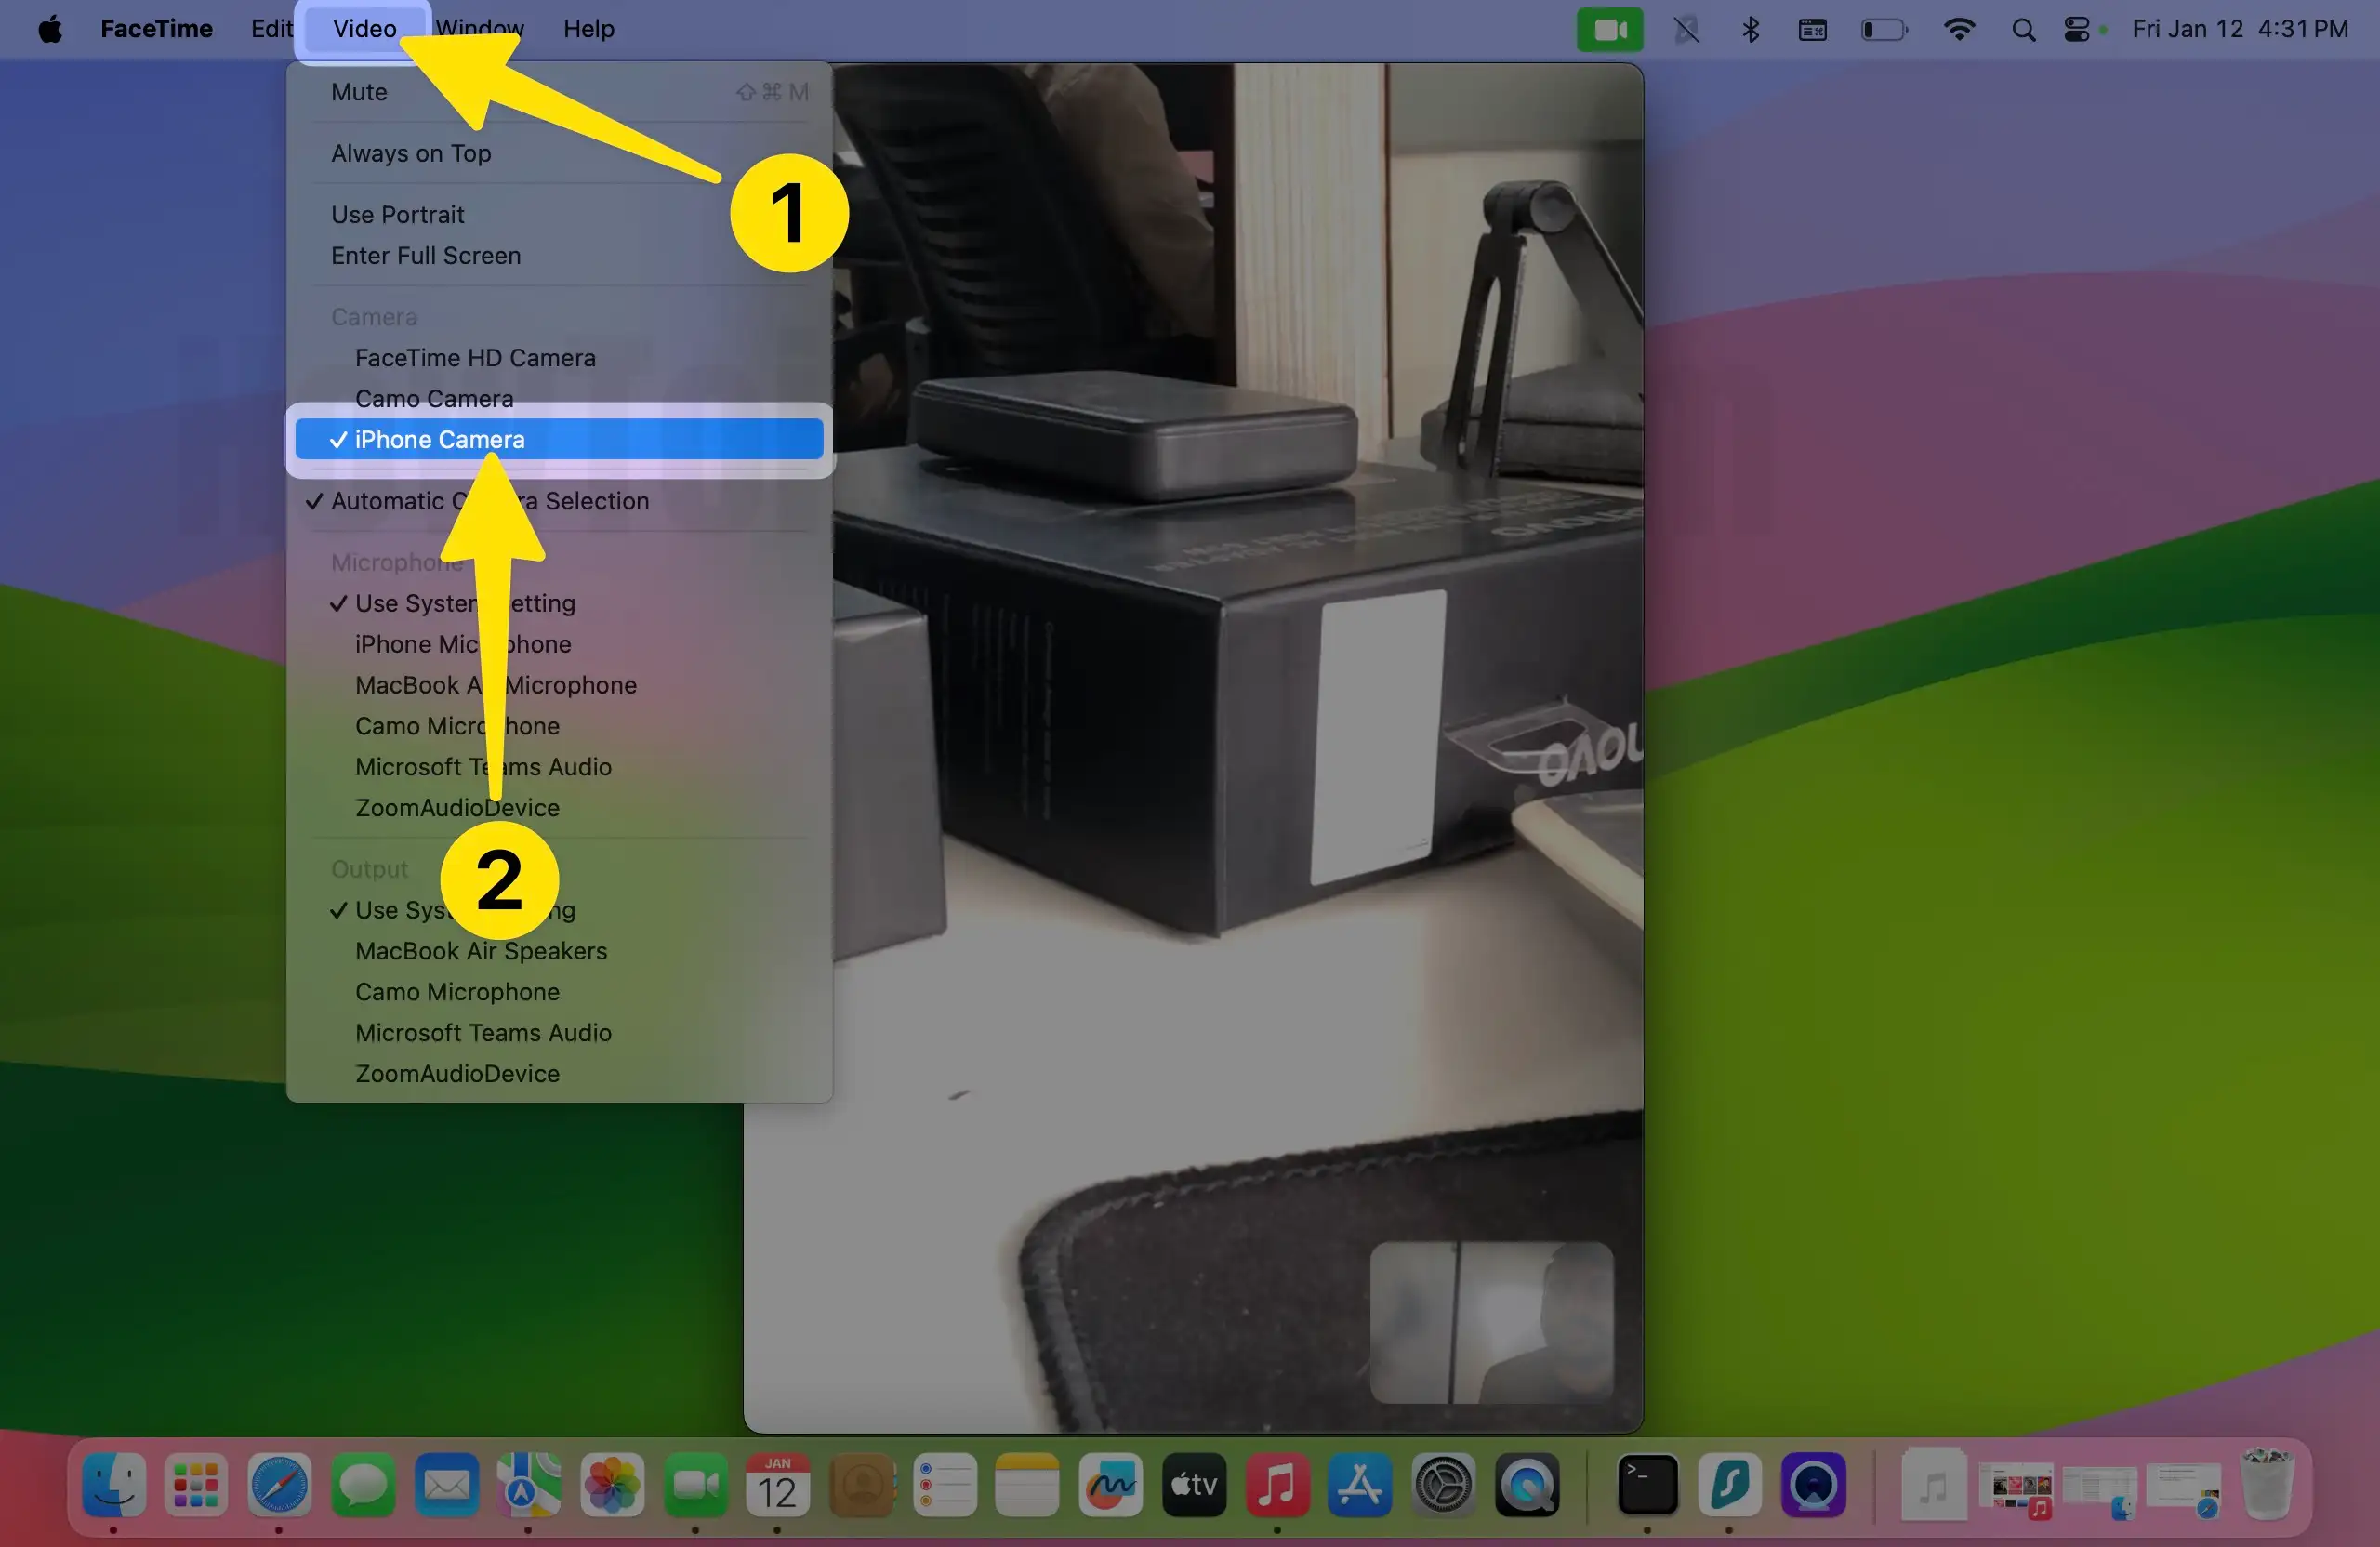
2. Use a Continuity Camera with FaceTime
Step 1: Press Command + Space to access Spotlight search. Enter FaceTime and click on it to open. Make sure both the Mac and iPhone is connected to Bluetooth and Wi-Fi.

Step 2: Select the Video located in the Mac menu bar. The title may differ based on the application you’re using.
Step 3: From the prompted menu, select your iPhone name. That’s it! Your iPhone will work as a webcam.
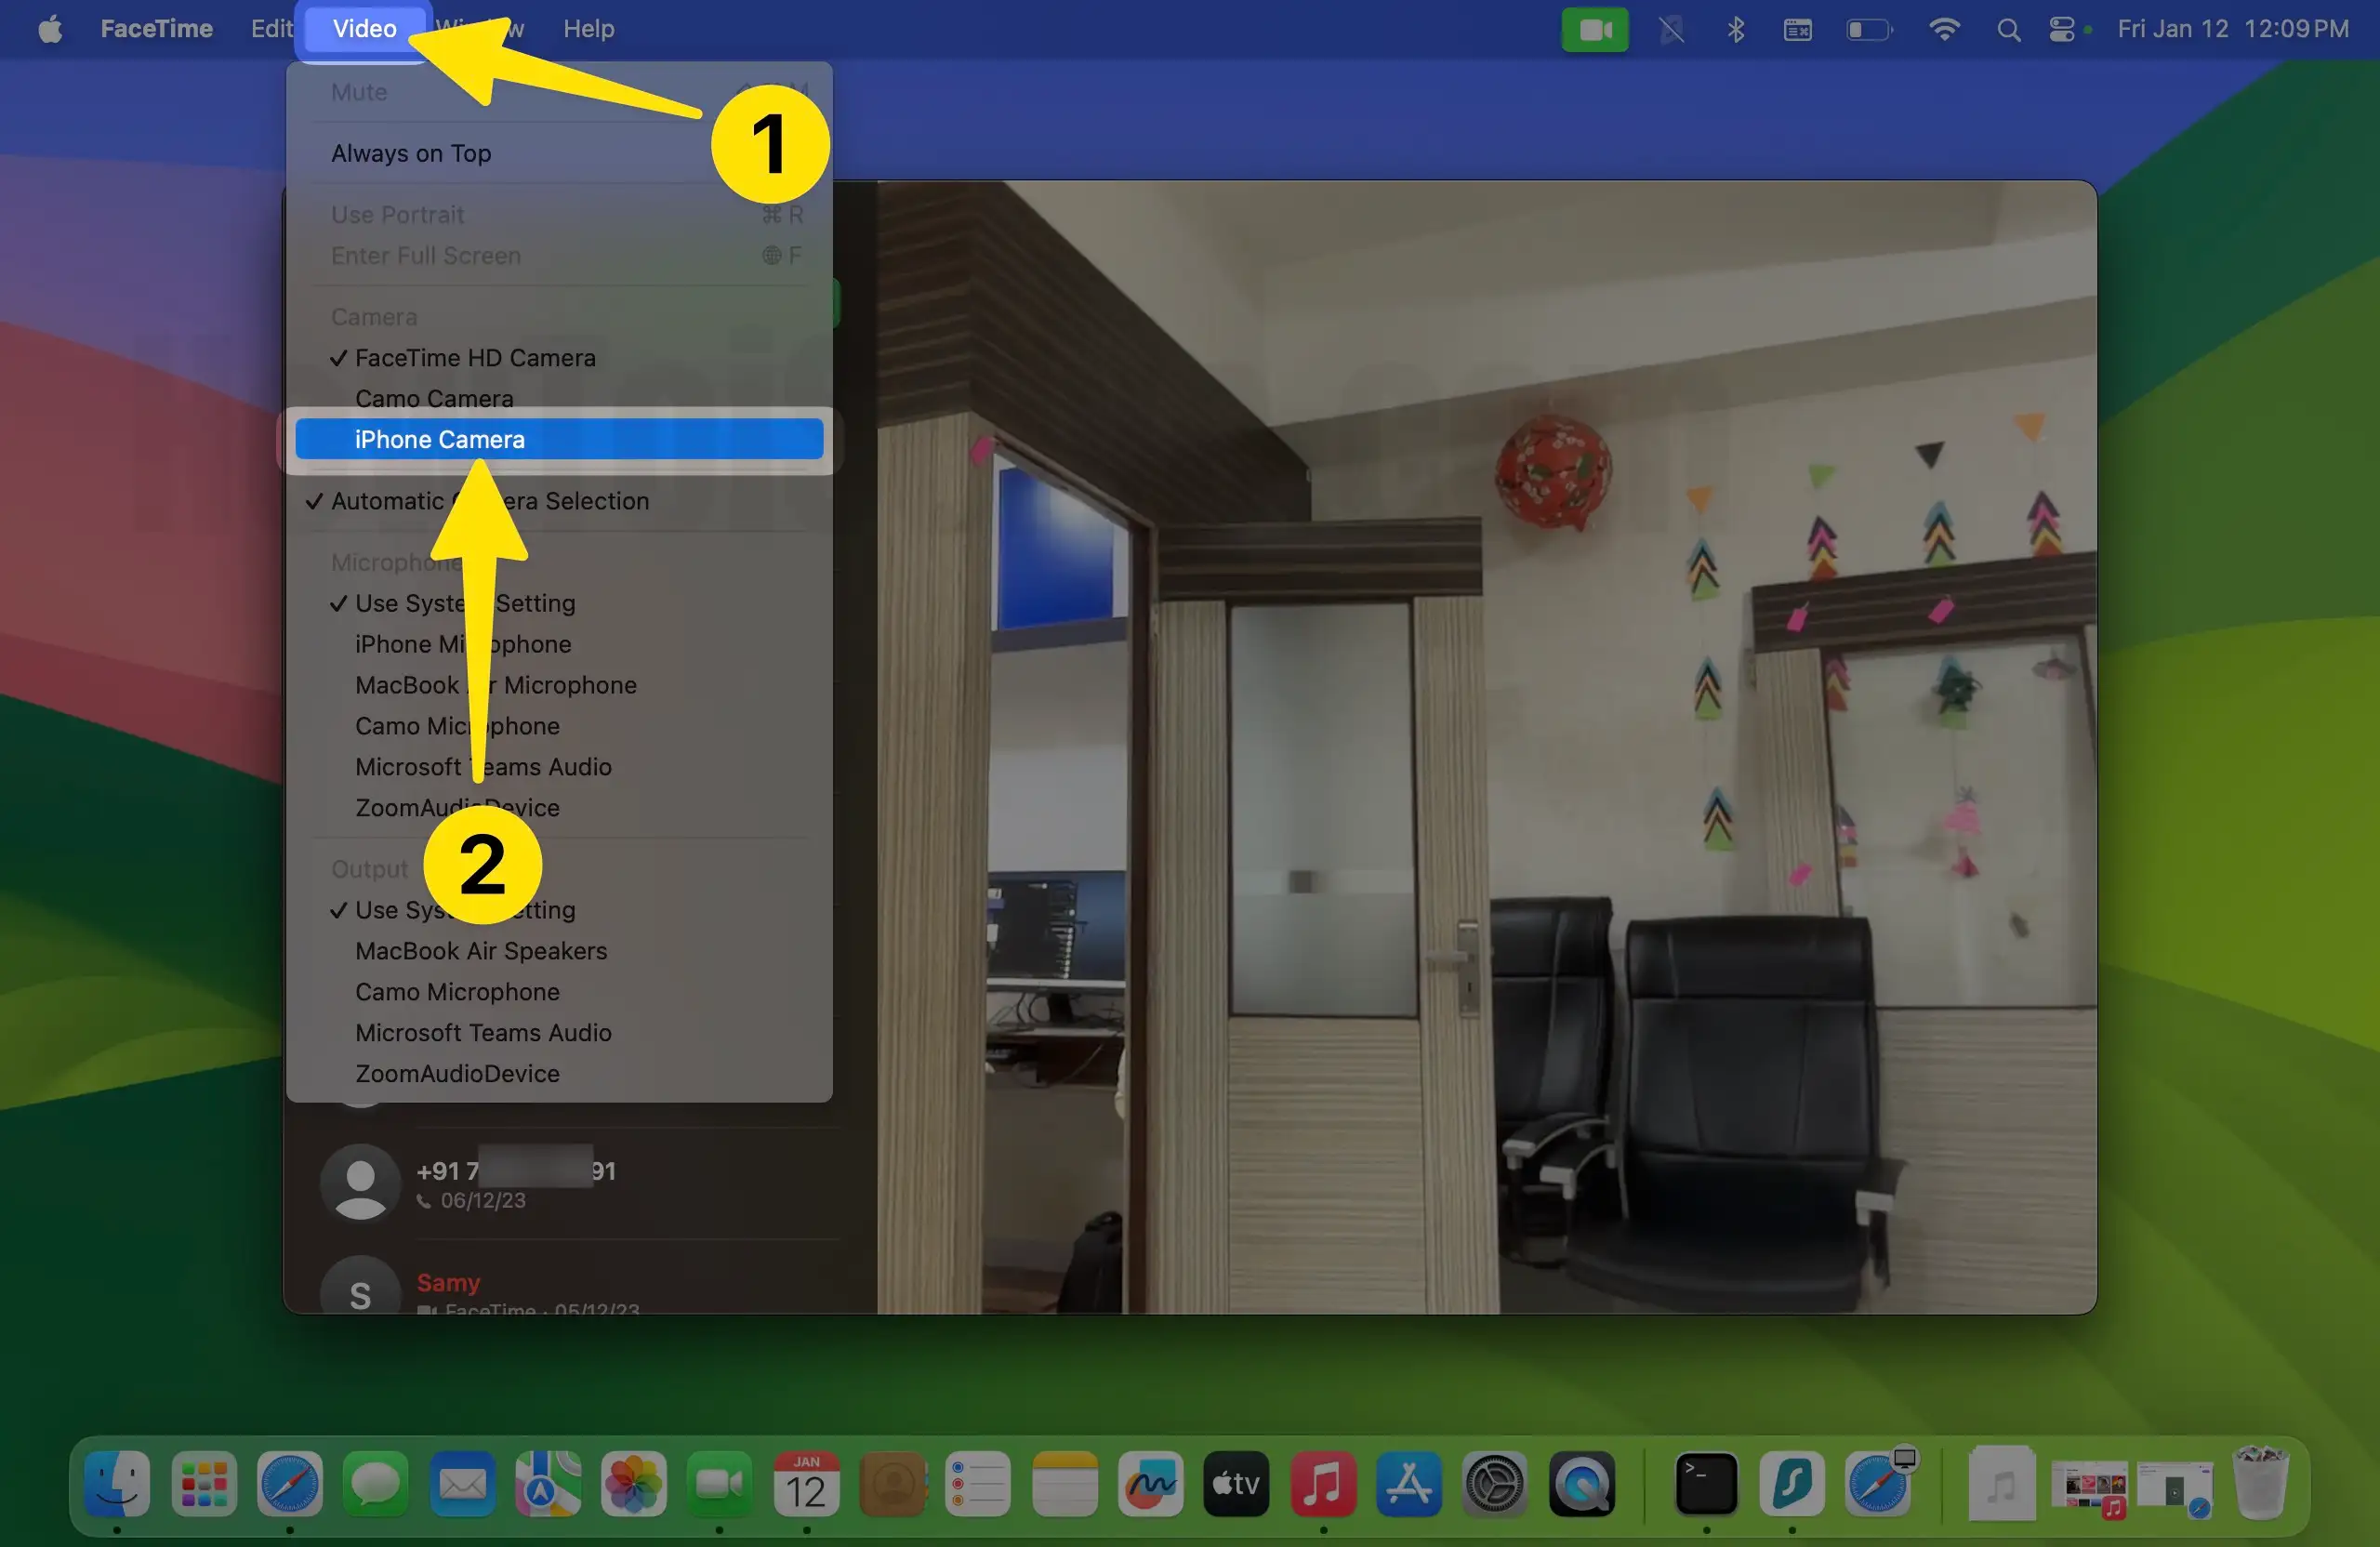
Step 4: Connected to your laptop Your iPhone will work as a webcam.

3. Use Continuity Camera with Google Meet
Step 1: Access Google Meet on your Mac. Make sure your iPhone and Mac is connected to Bluetooth & Wi-Fi
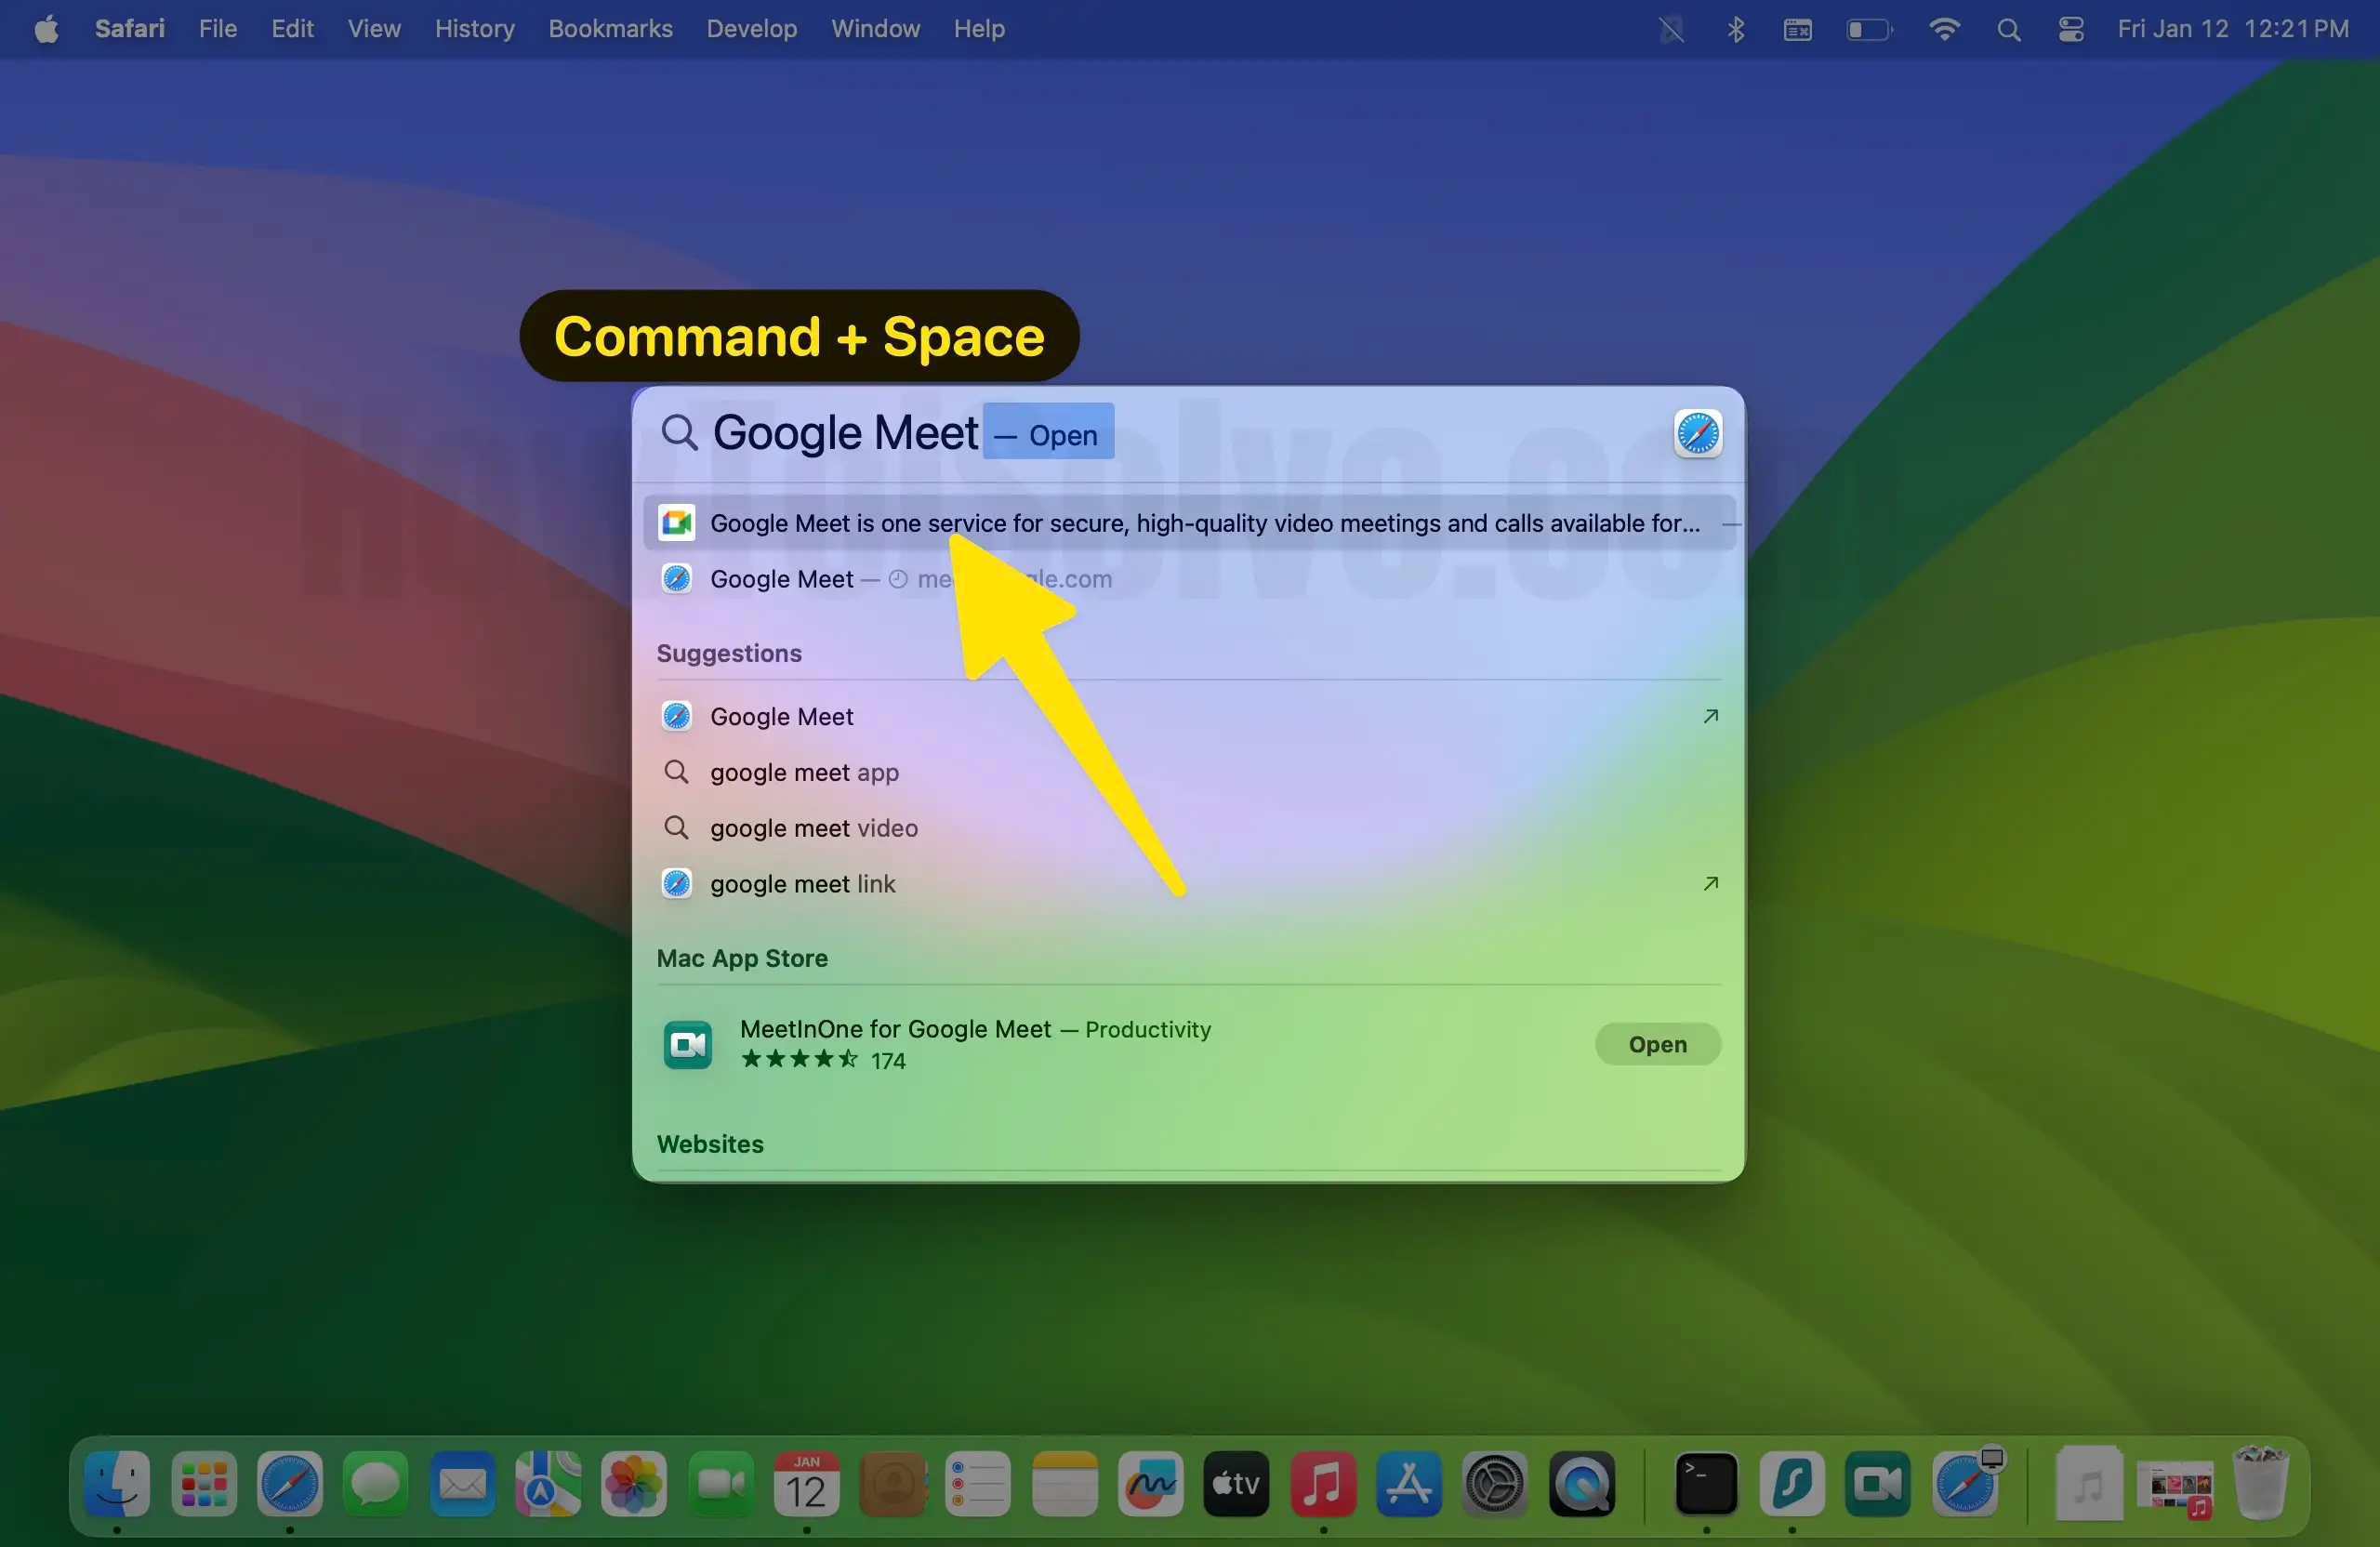
Step 2: Go to Settings.
Step 3: Select Video.
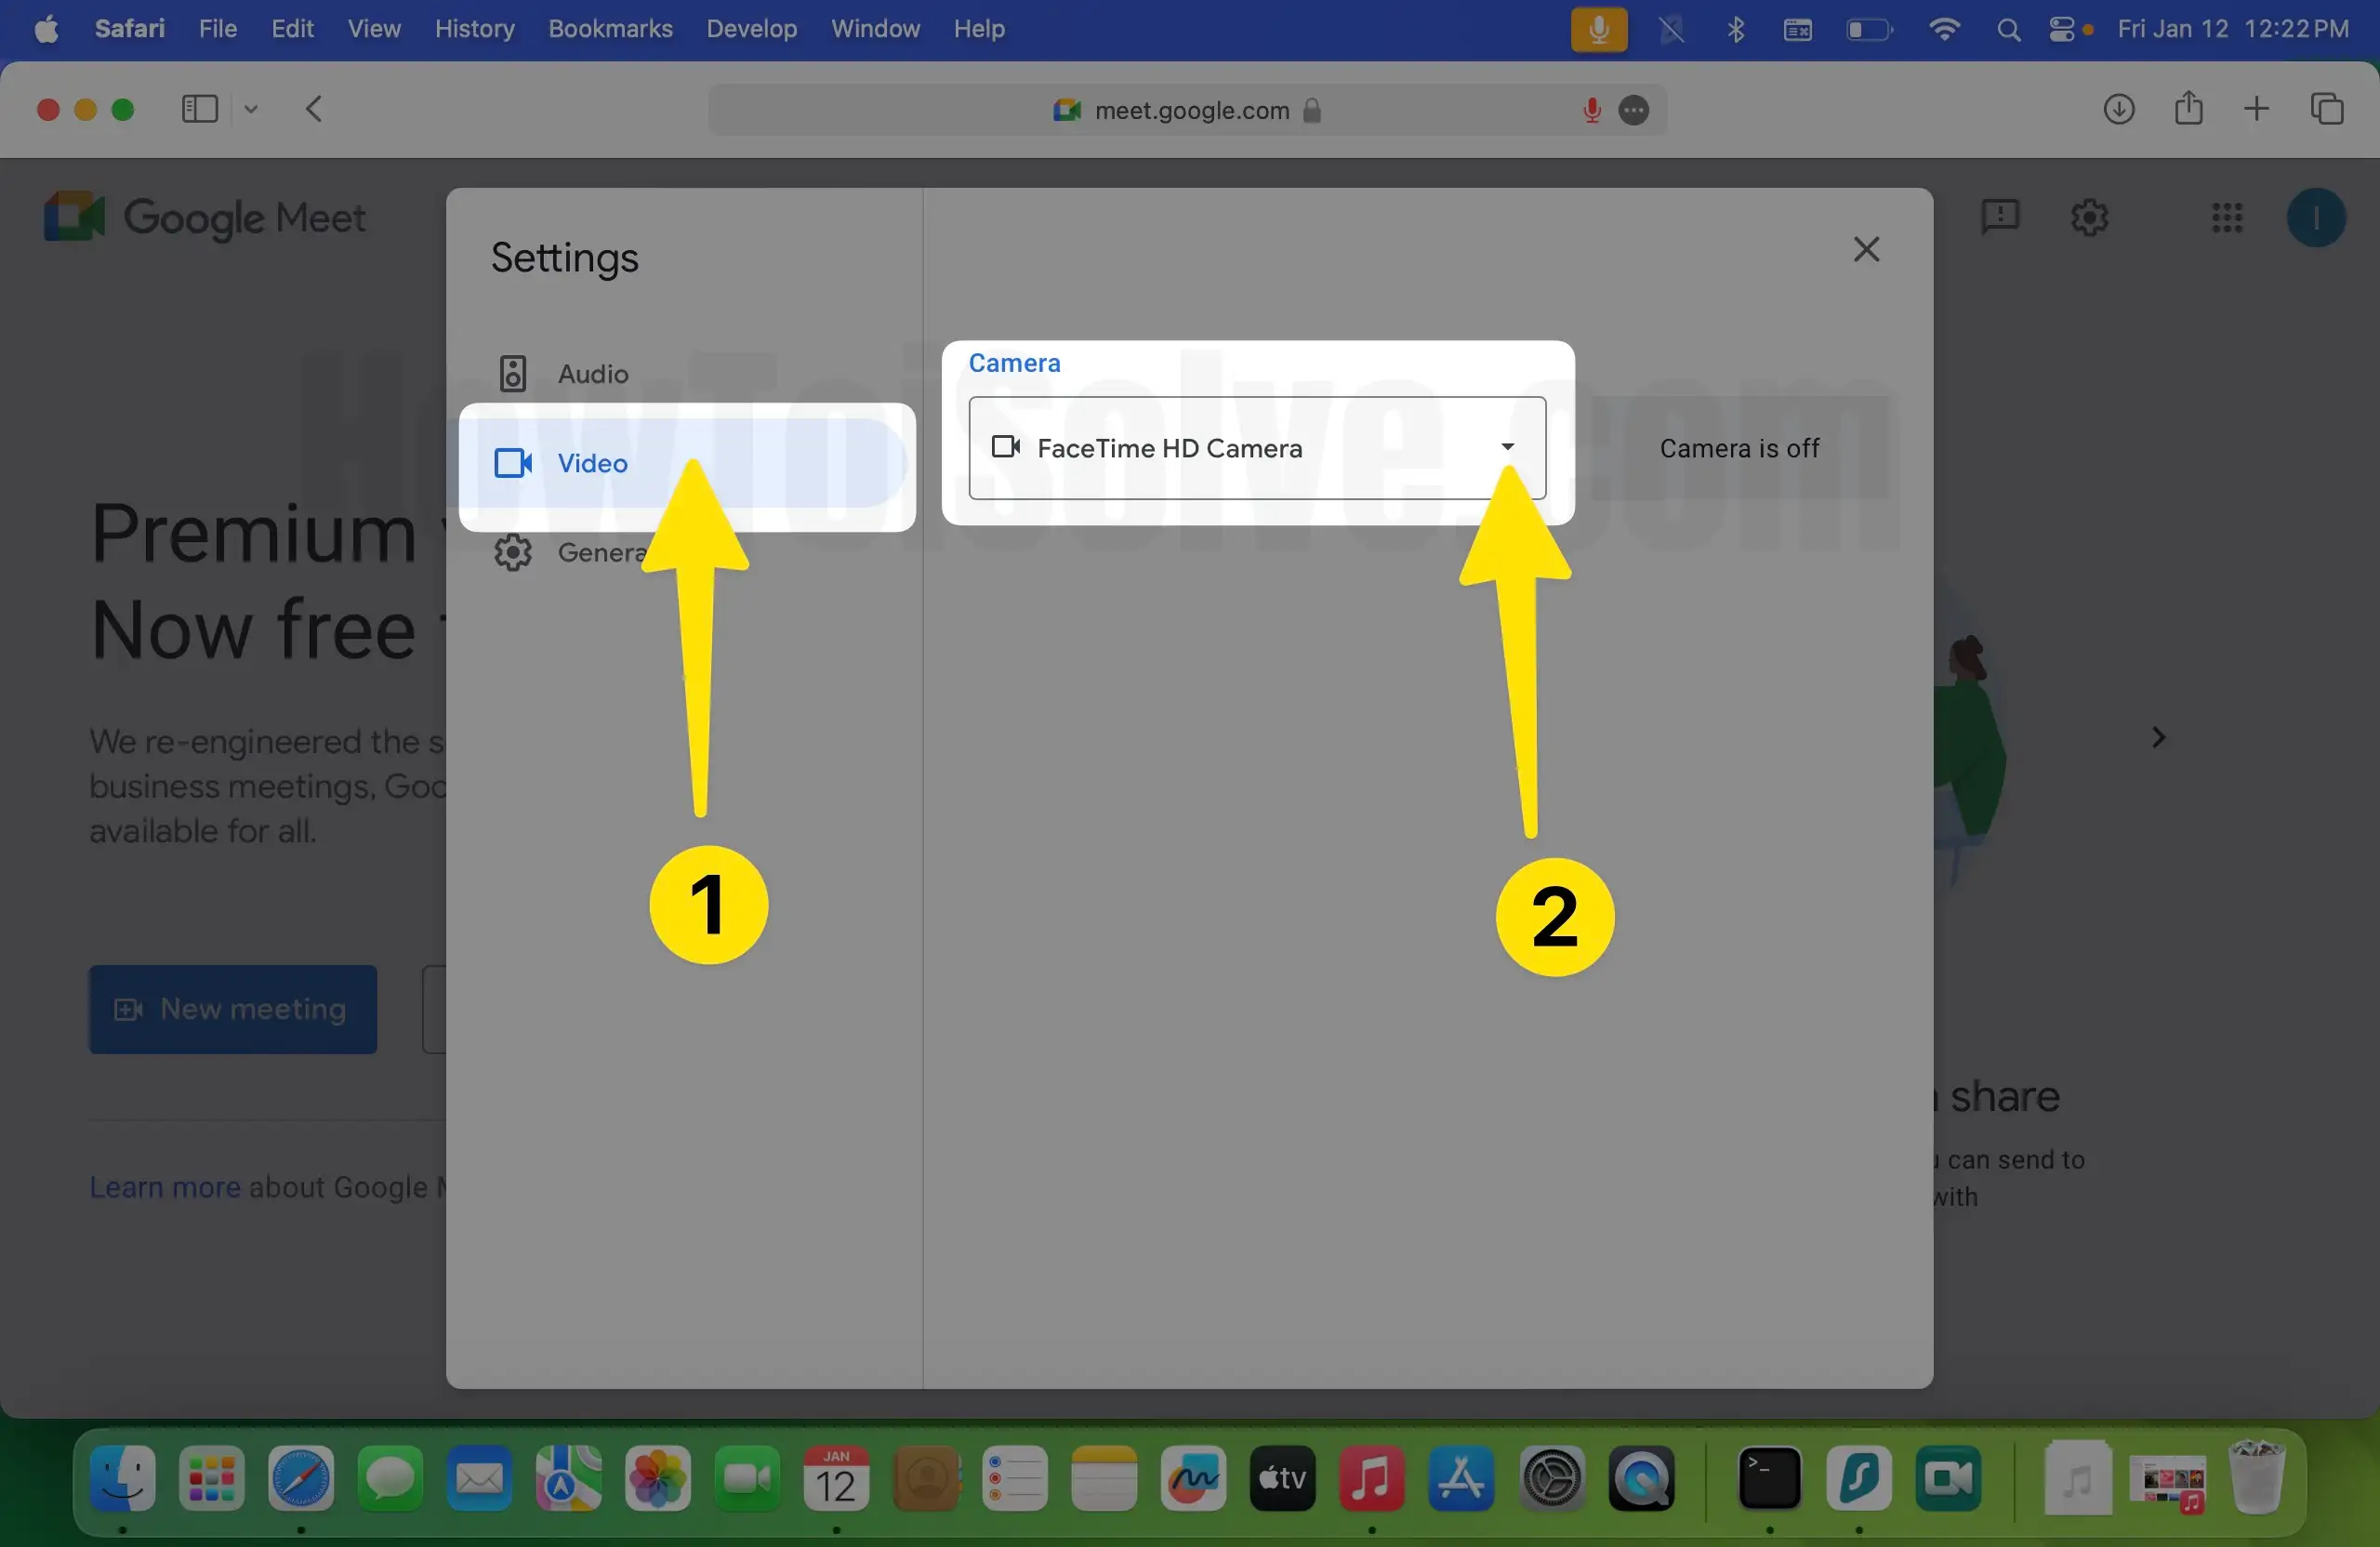
Step 4: Below in the camera section, choose your iPhone name from the list of devices.
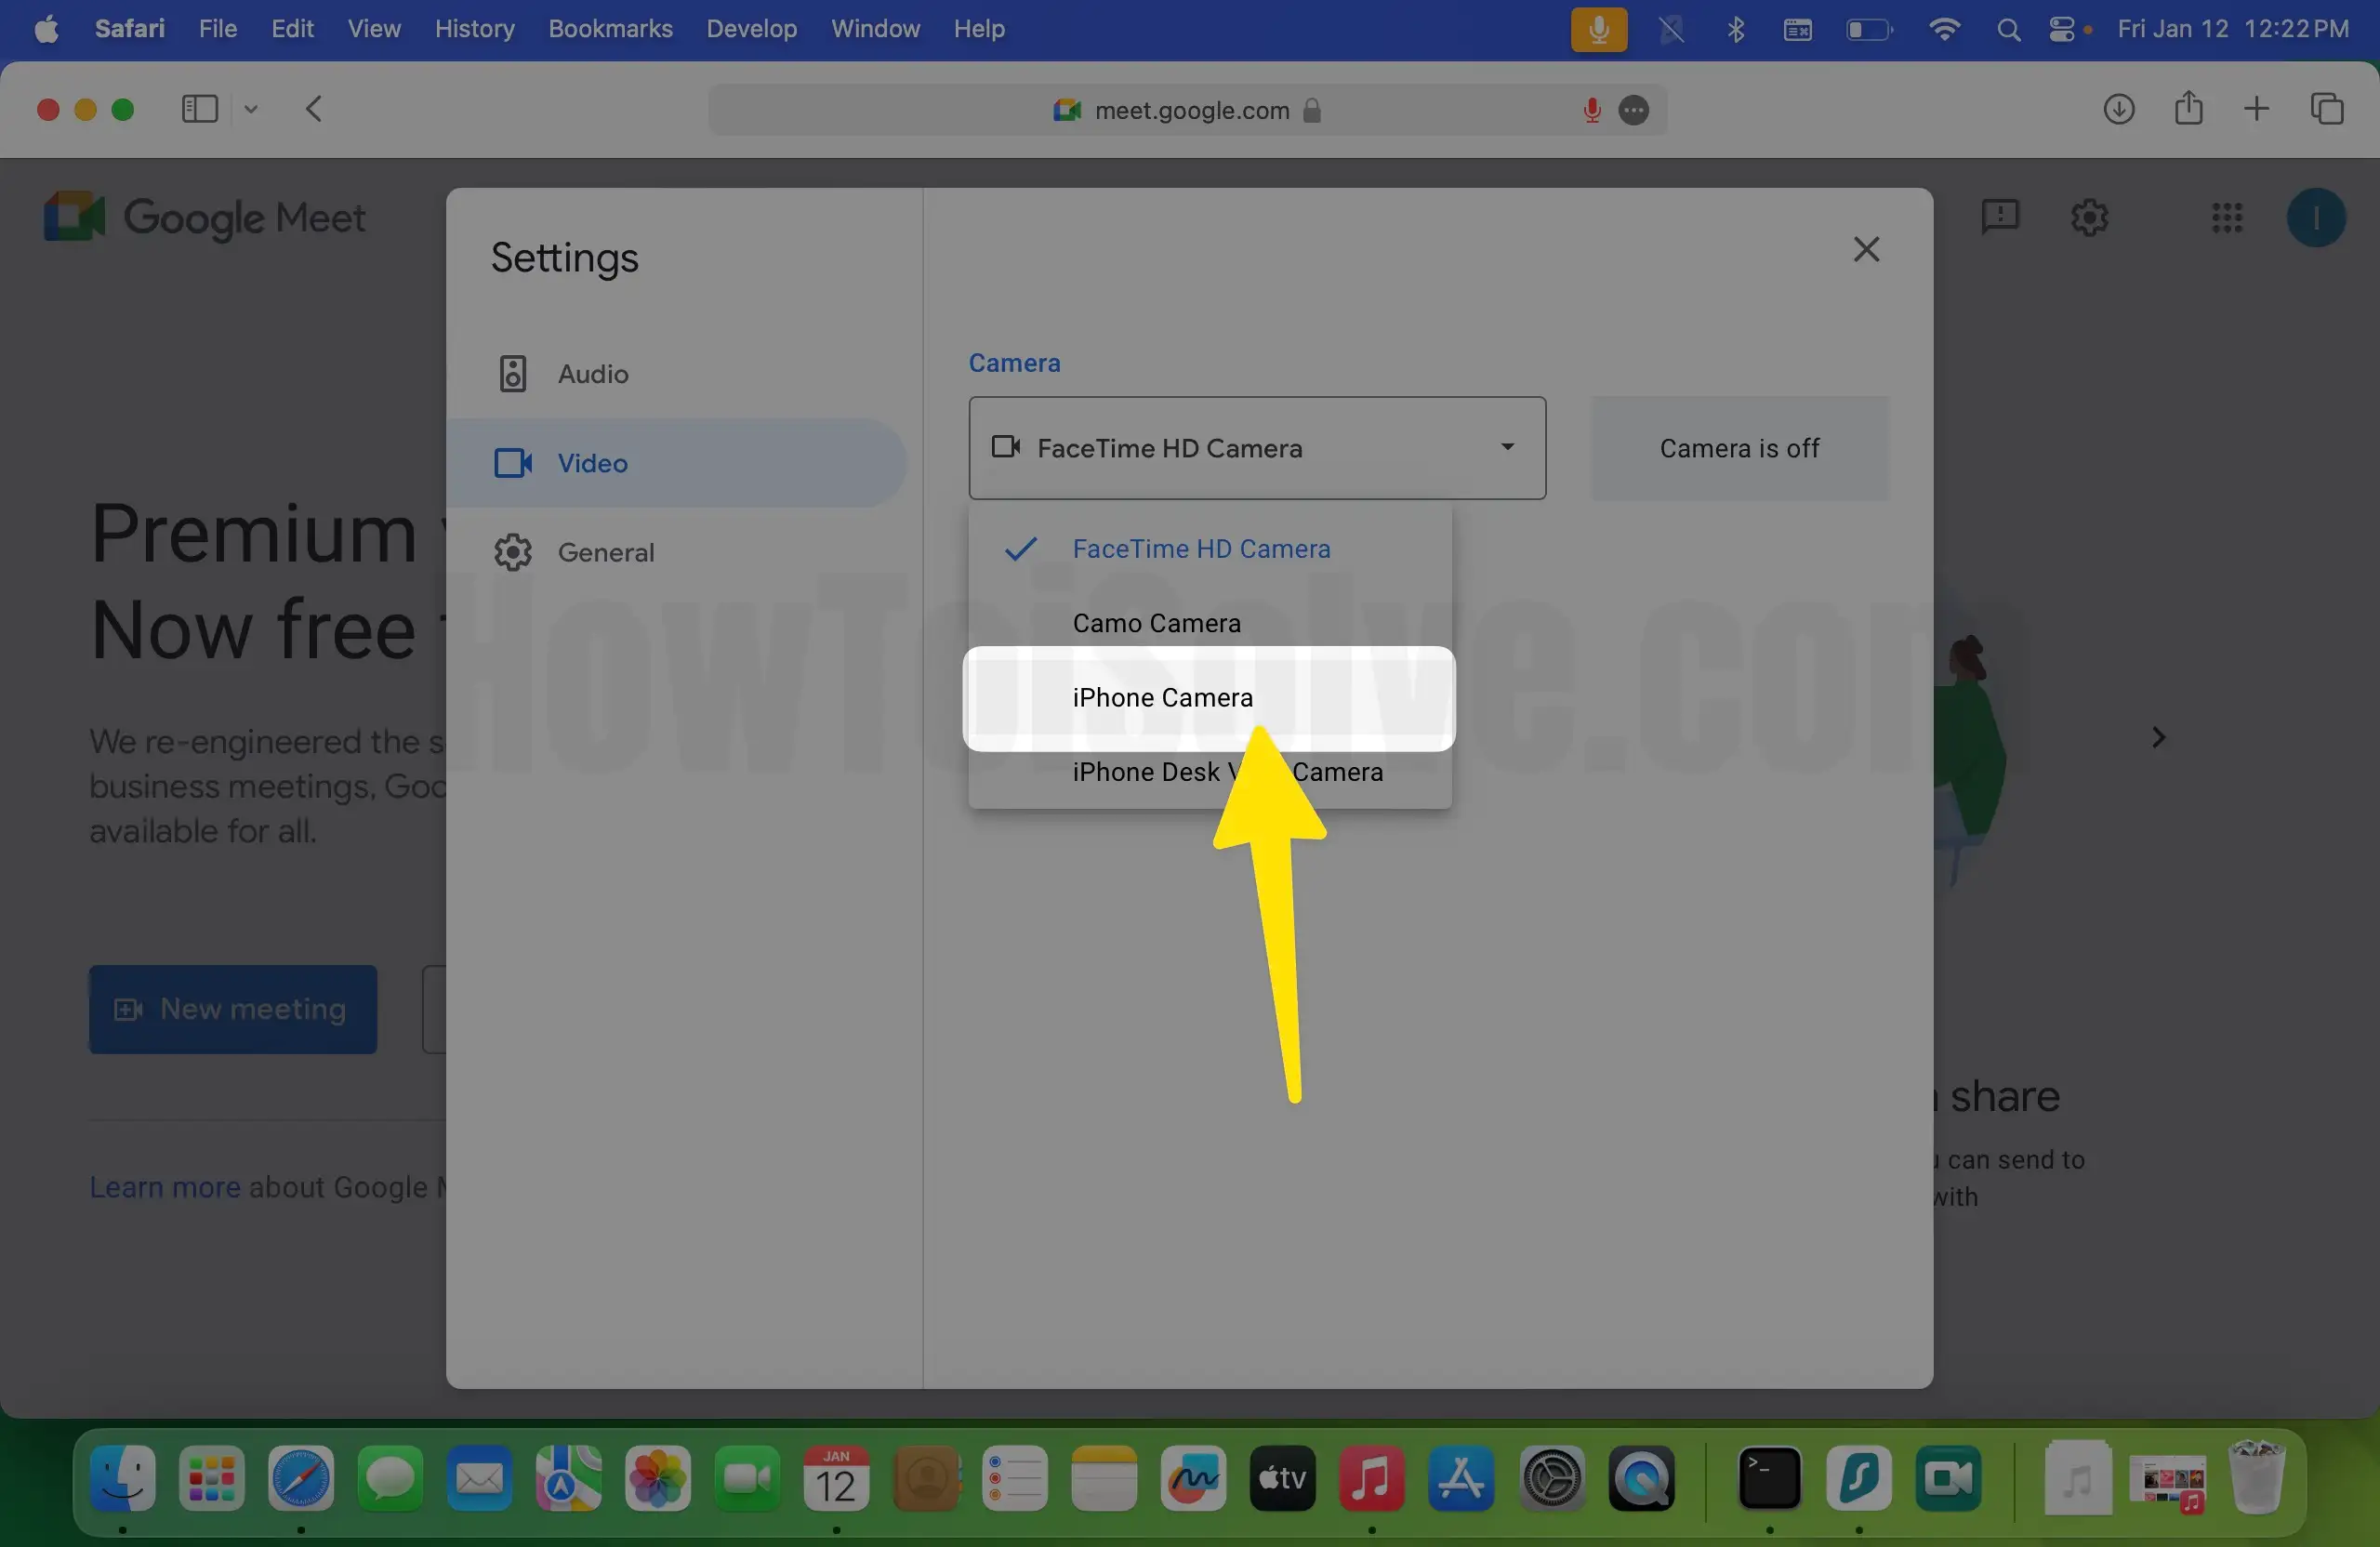
That’s It!
Note: You won’t be able to use your iPhone when it’s being used as a webcam with your Mac. If you no longer want to use your iPhone as a webcam, then tap Disconnect on your iPhone.
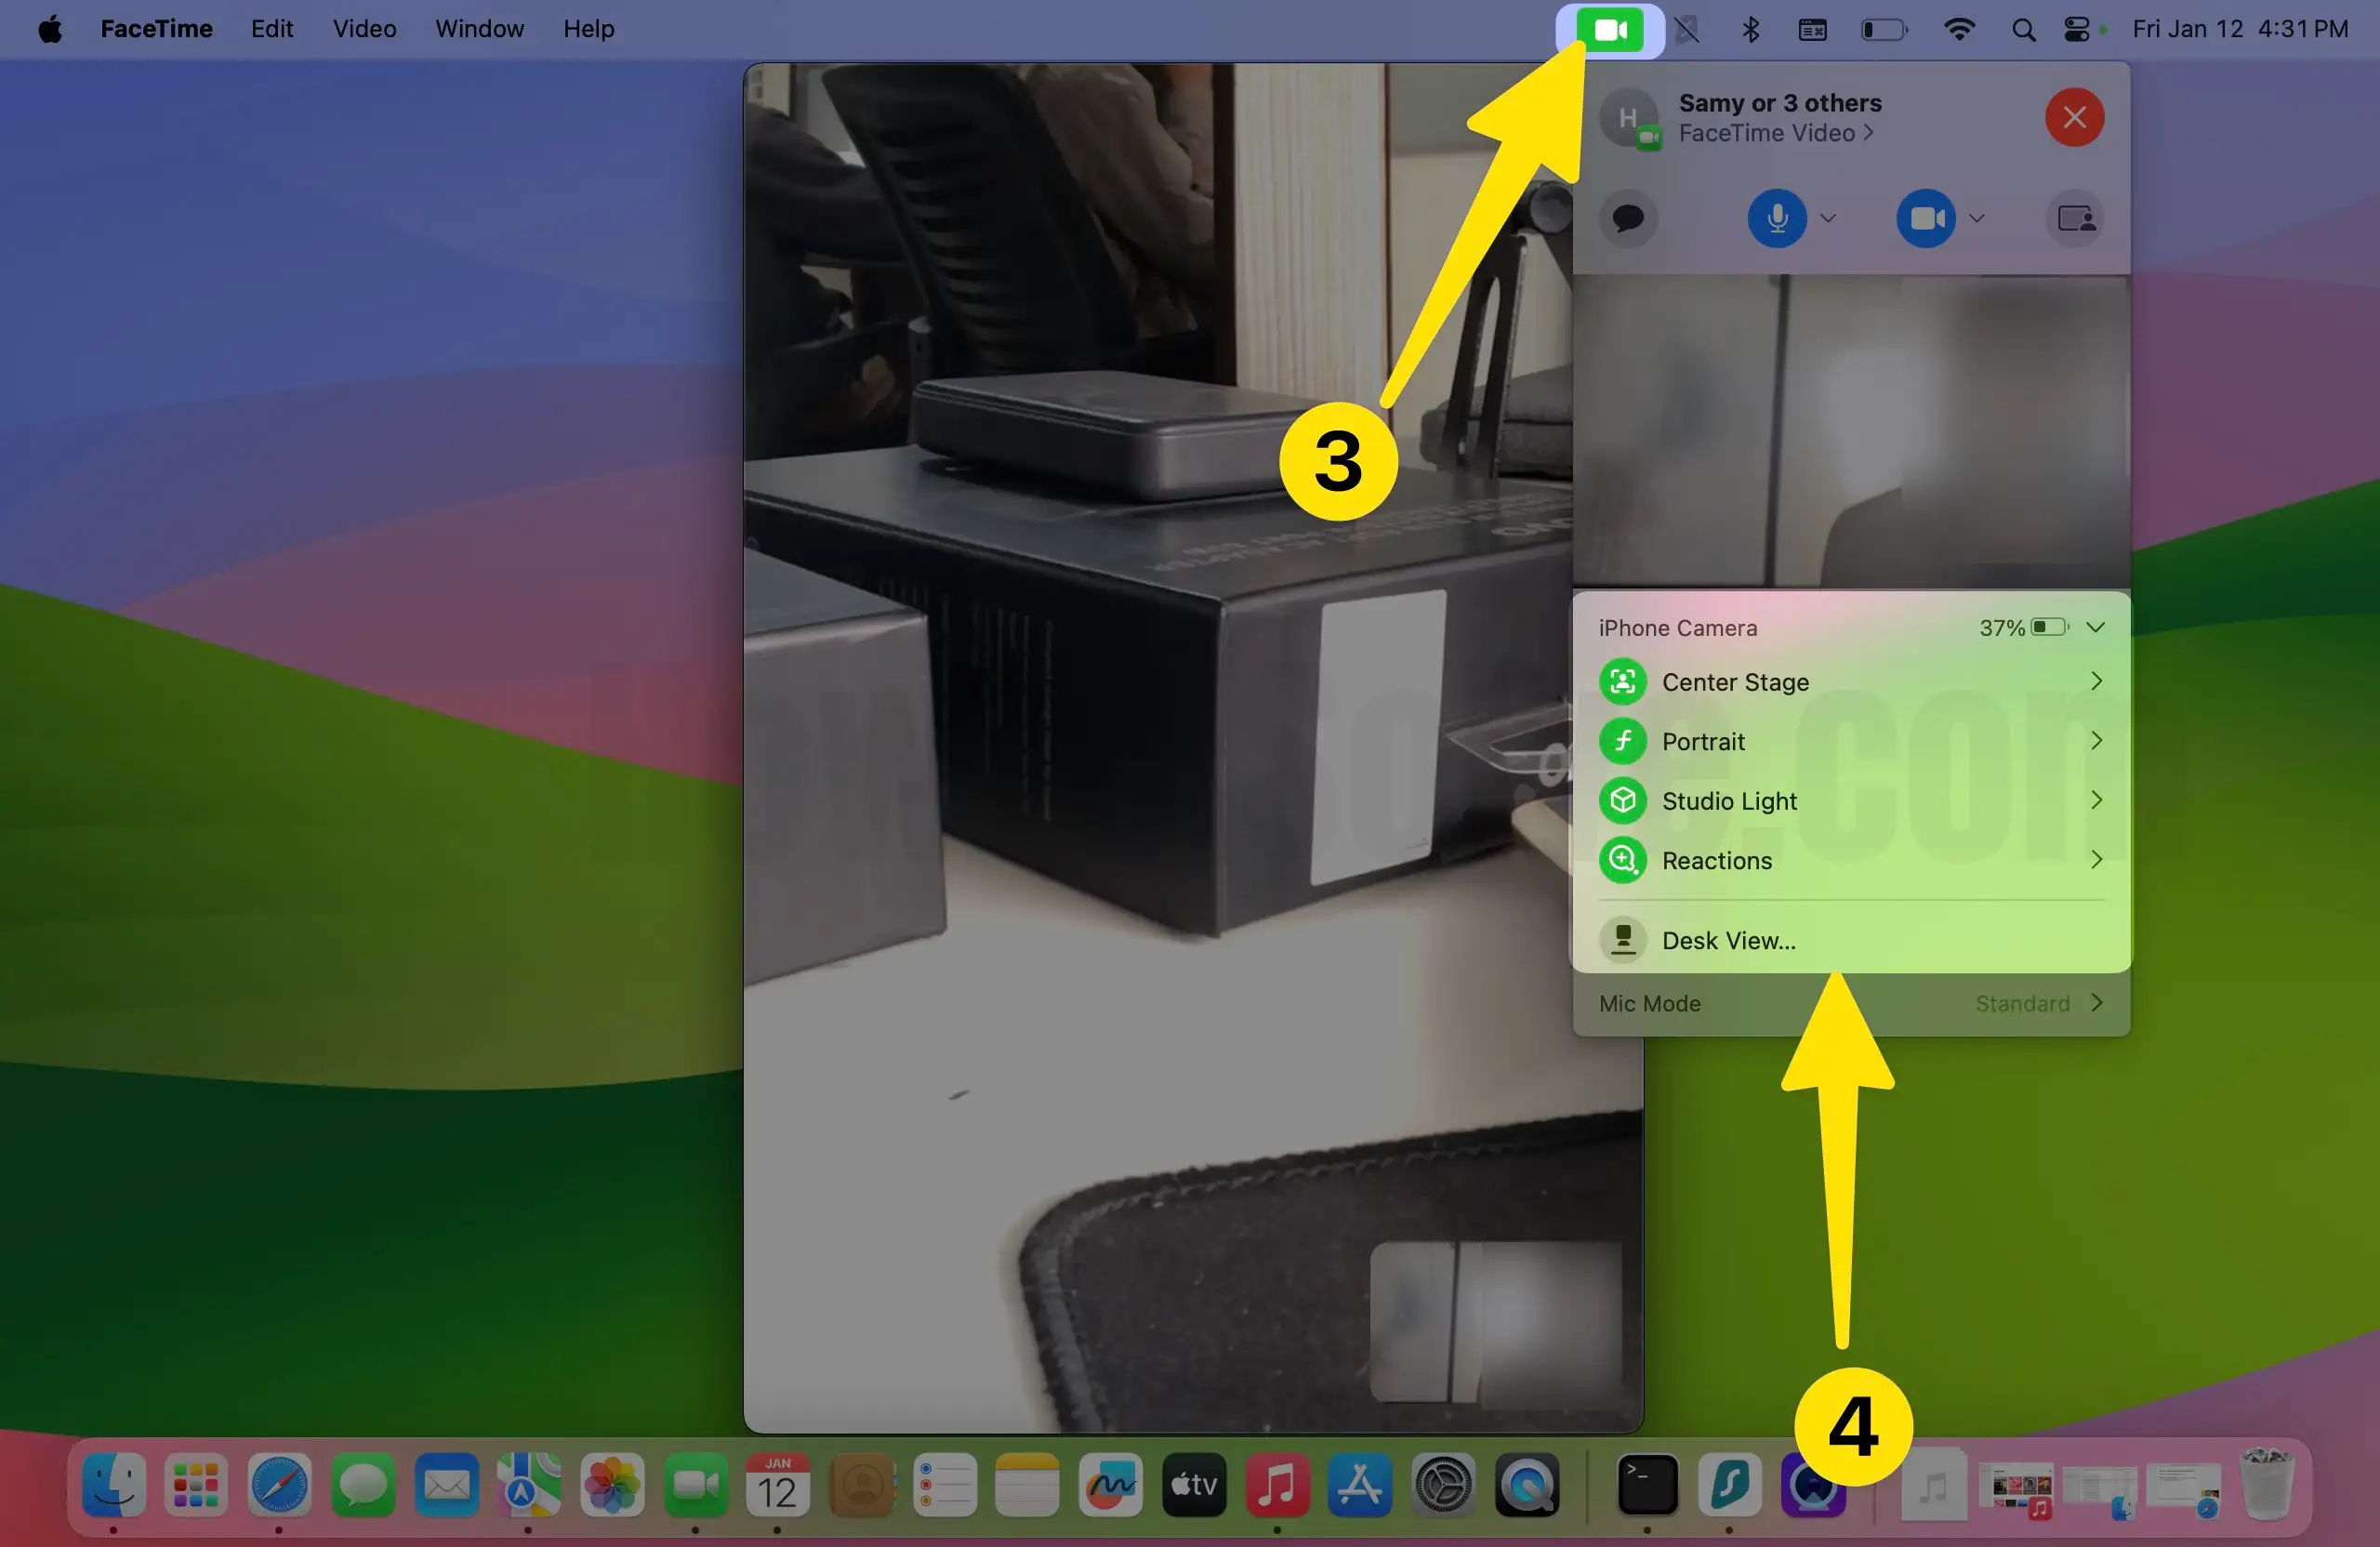
How to use Center Stage, Portrait Mode, Desk View, and Studio Light on Mac
Apple has done a great job in utilizing the iPhone’s hardware to its best advantage. One advantage of using an iPhone as a webcam is that you can access various features, like Portrait Mode, Desk View, Center Stage, and Studio light.
Center Stage: If you often use machine learning and adjust the ultrawide lens on your iPhone to track your movements. But if you move from one side to another, this aspect lets you keep in the center of frame. For instance, if more users enter the frame while on a call, the lens will automatically zoom out and reconfigure to extra people.
Studio lights: It darken the background and brighten up the subject.
Portrait Mode: The camera focuses on the main object and applies blurriness in the background of the video. It works like a Cinematic Mode found while recording video on the iPhone.
Well, that’s all said; here are the steps to use those effects on your Mac.
3. How to manage video effects in Continuity Camera
Step 1: Access the Top Menu Baar on your Mac.
Step 2: Select the Video Effects Tab.This feature is only available when using Contuinity Camera feature.

Step 3: Select from Portrait, Center Stage, or Studio Light.
Step 4: Choose Desk View to use the aspect.
4. Using EpocCam Mac App
The EpocCam software is compatible with both audio & video, and it supports video players such as YouTube and Skype. The best part is that the software is available in a free and paid version. However, in the free version, the software provides 640 x 480 video resolution and a watermark on the video. It is compatible with both Windows PC and Mac.
Step 1: First of all, download EpocCam app on your iPhone.
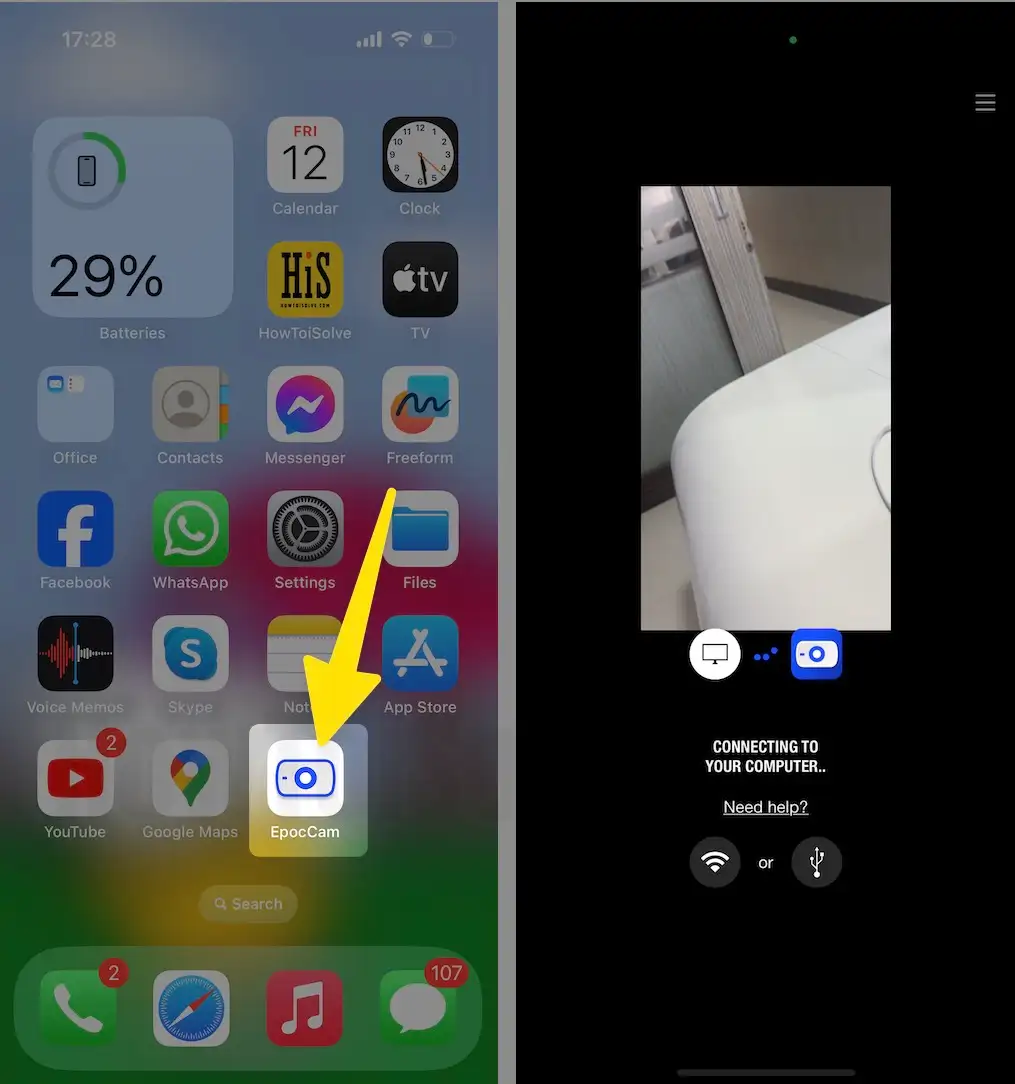
Step 2: After this, download and install the driver on your Mac and Windows from the Kinoni Site.

Step 3: Now, link your iPhone and computer with same Wi-Fi network.

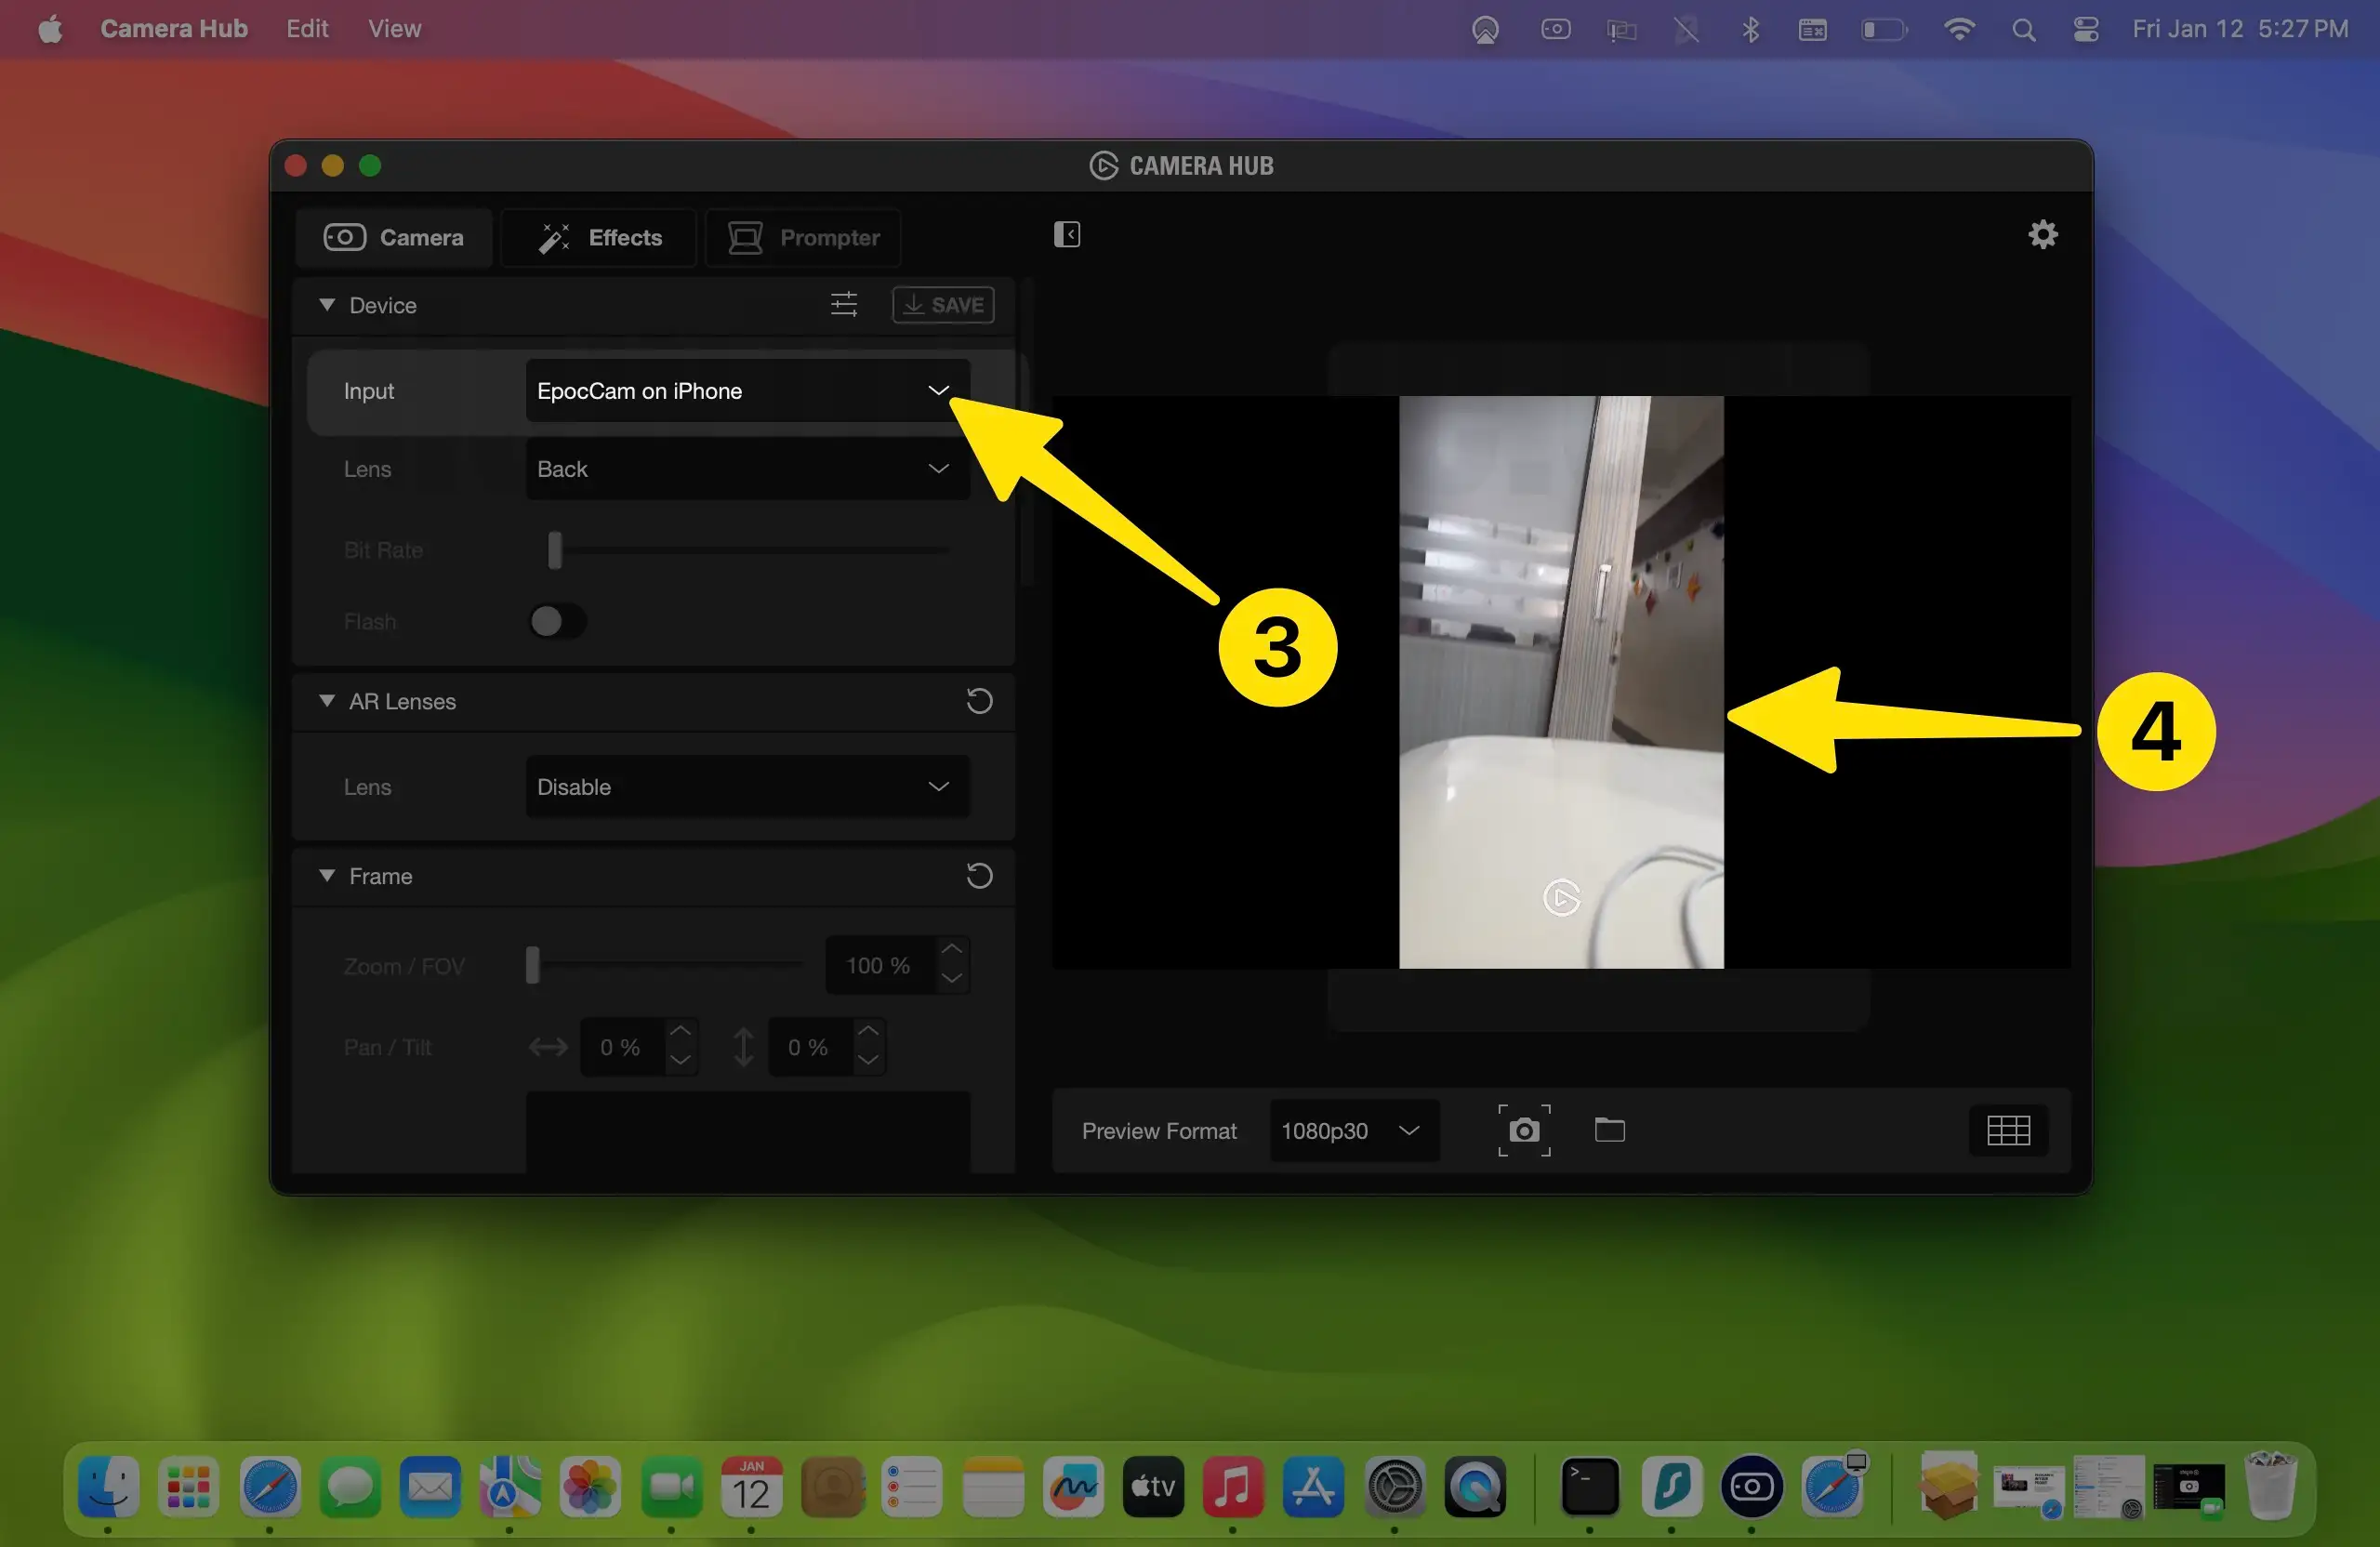
Step 4: Next, access EpocCam on your iPhone and access a video app on your Mac computer.

It will automatically connect instantly and feature the image. It’s handy as that.
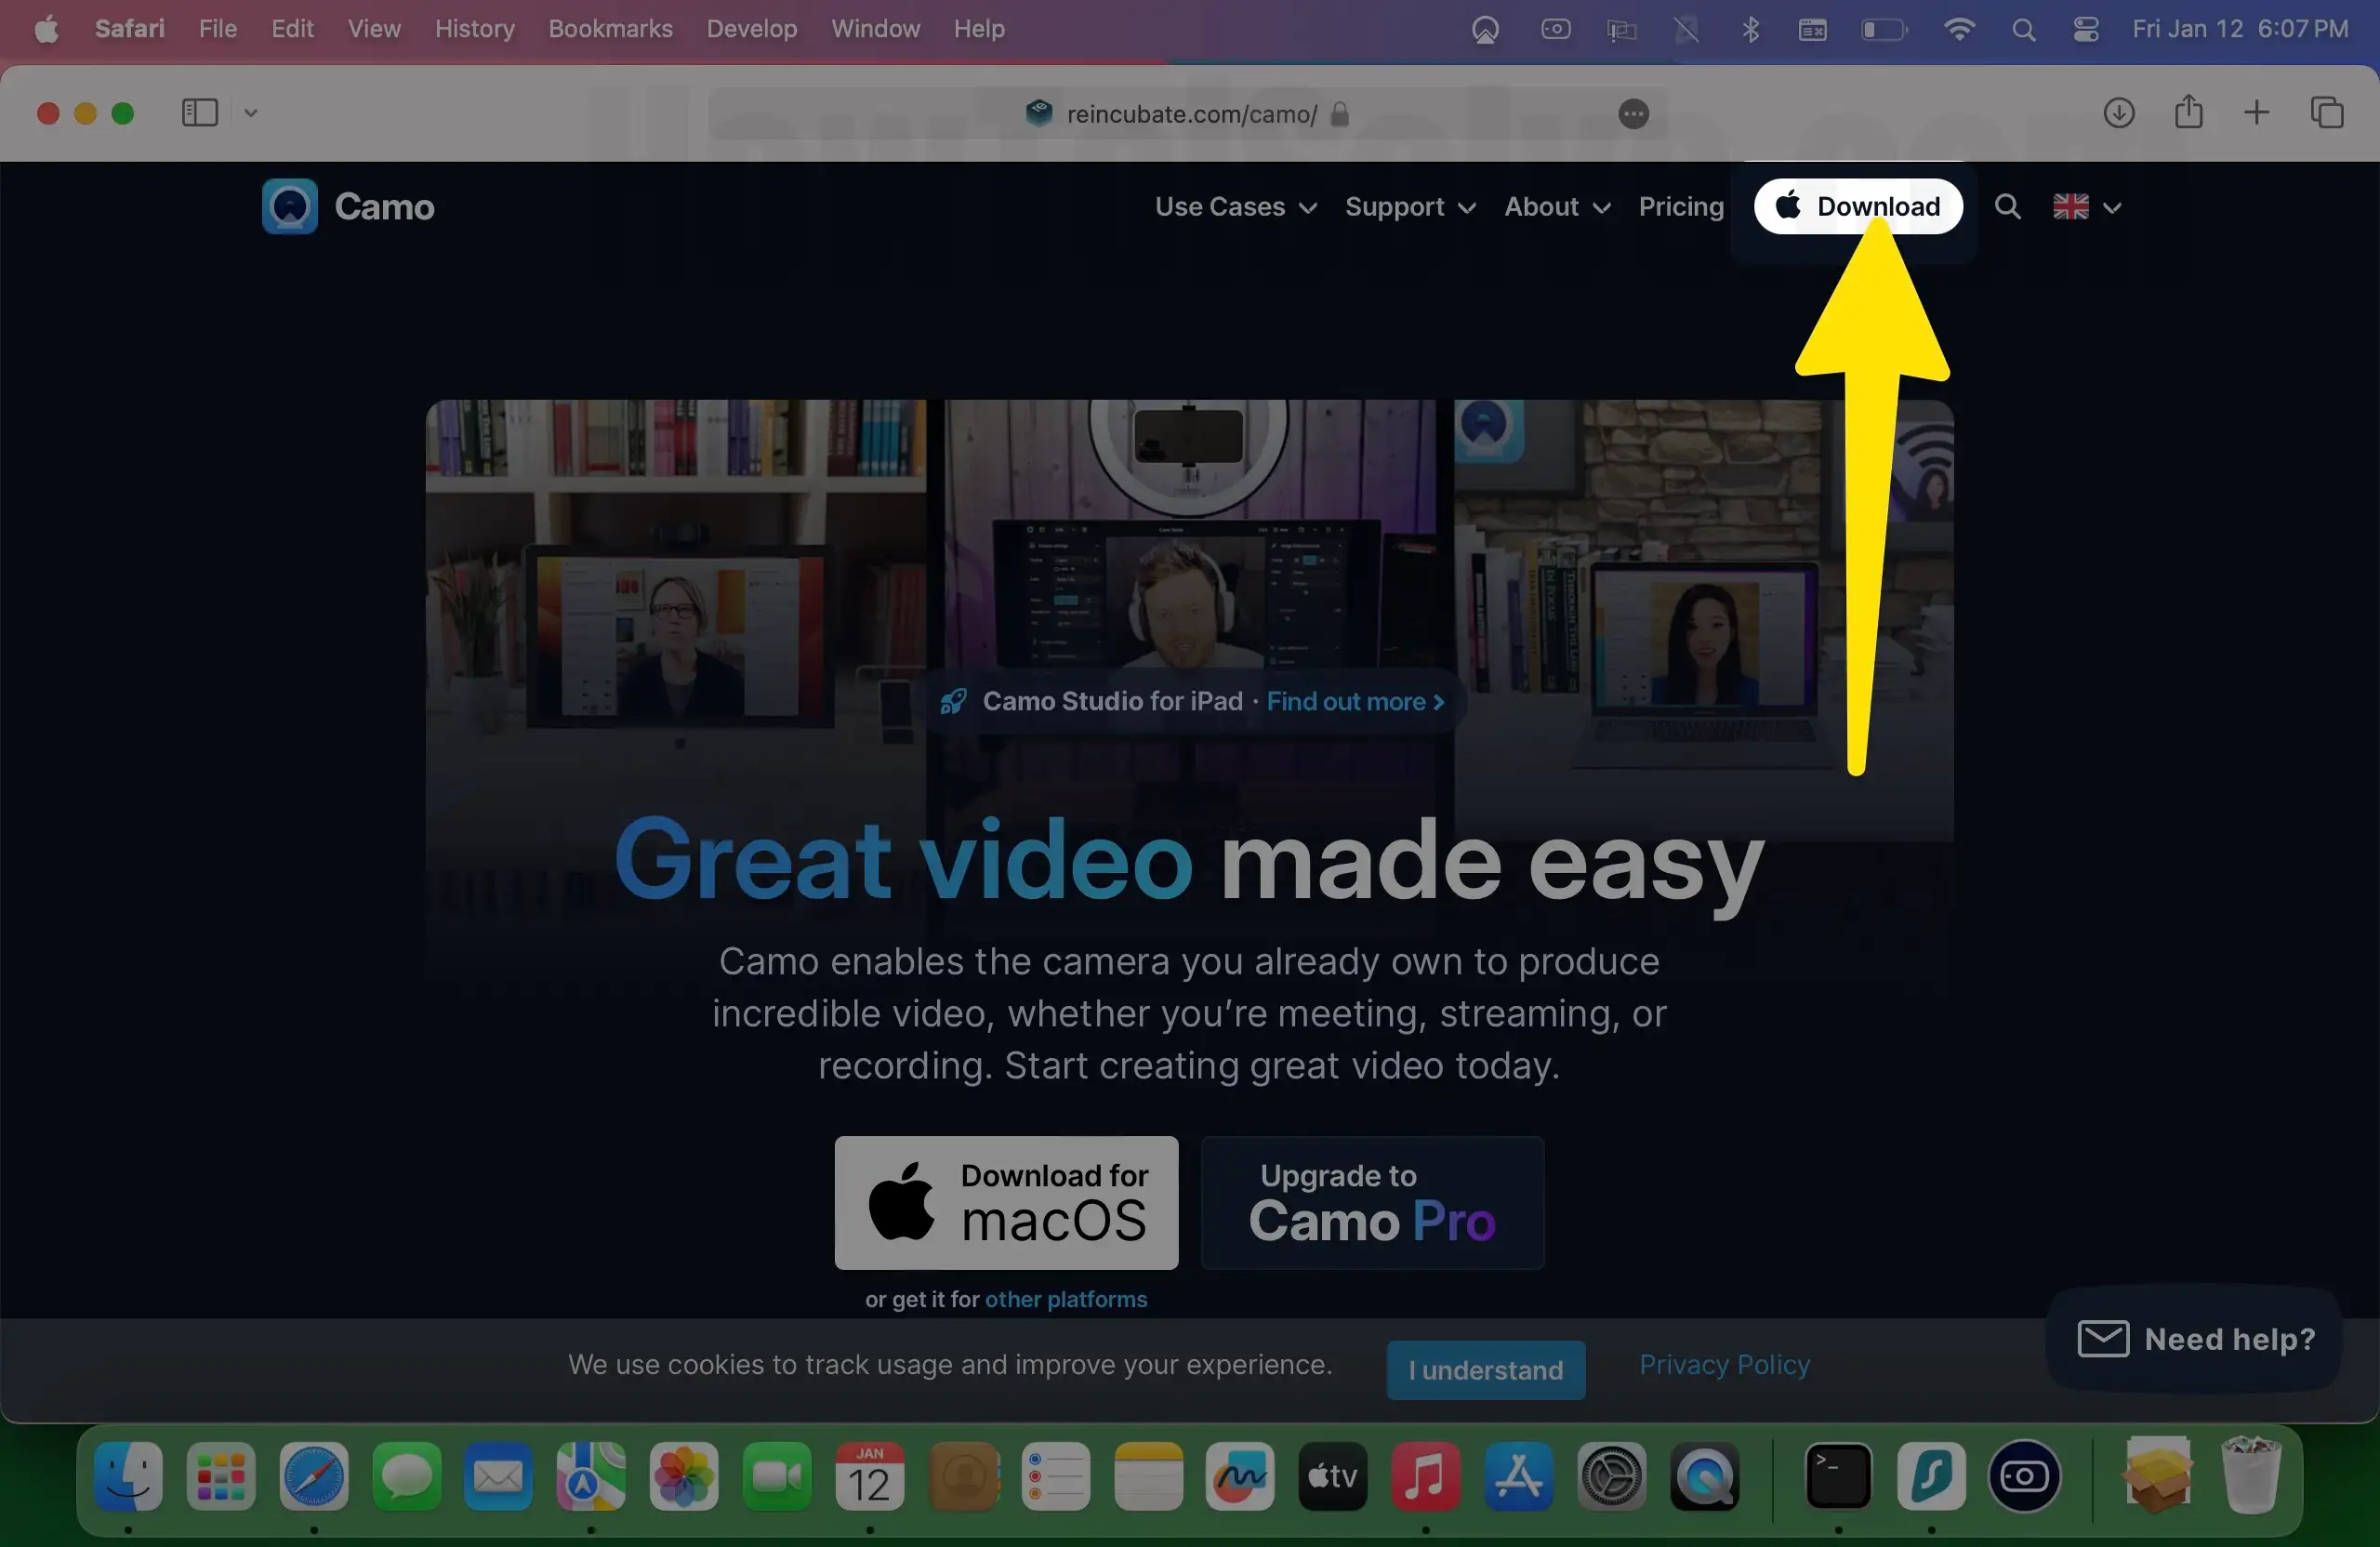
5. How to use iPhone as a webcam for Mac using Camo
iPhone as a webcam for Mac
Step 1: First thing first, download and install the Camo app on your iPhone. For that, go to the App Store. In the search bar, search for the Camo app and then tap the Get > Install Button to finish the downloading procedure.

Step 2: Simultaneously, install the Camo Studio on your Mac. Once the installation procedure is finished, give all the necessary permission to Camo.

Step 3: After this, connect your iPhone and Mac to the same Wi-Fi network.
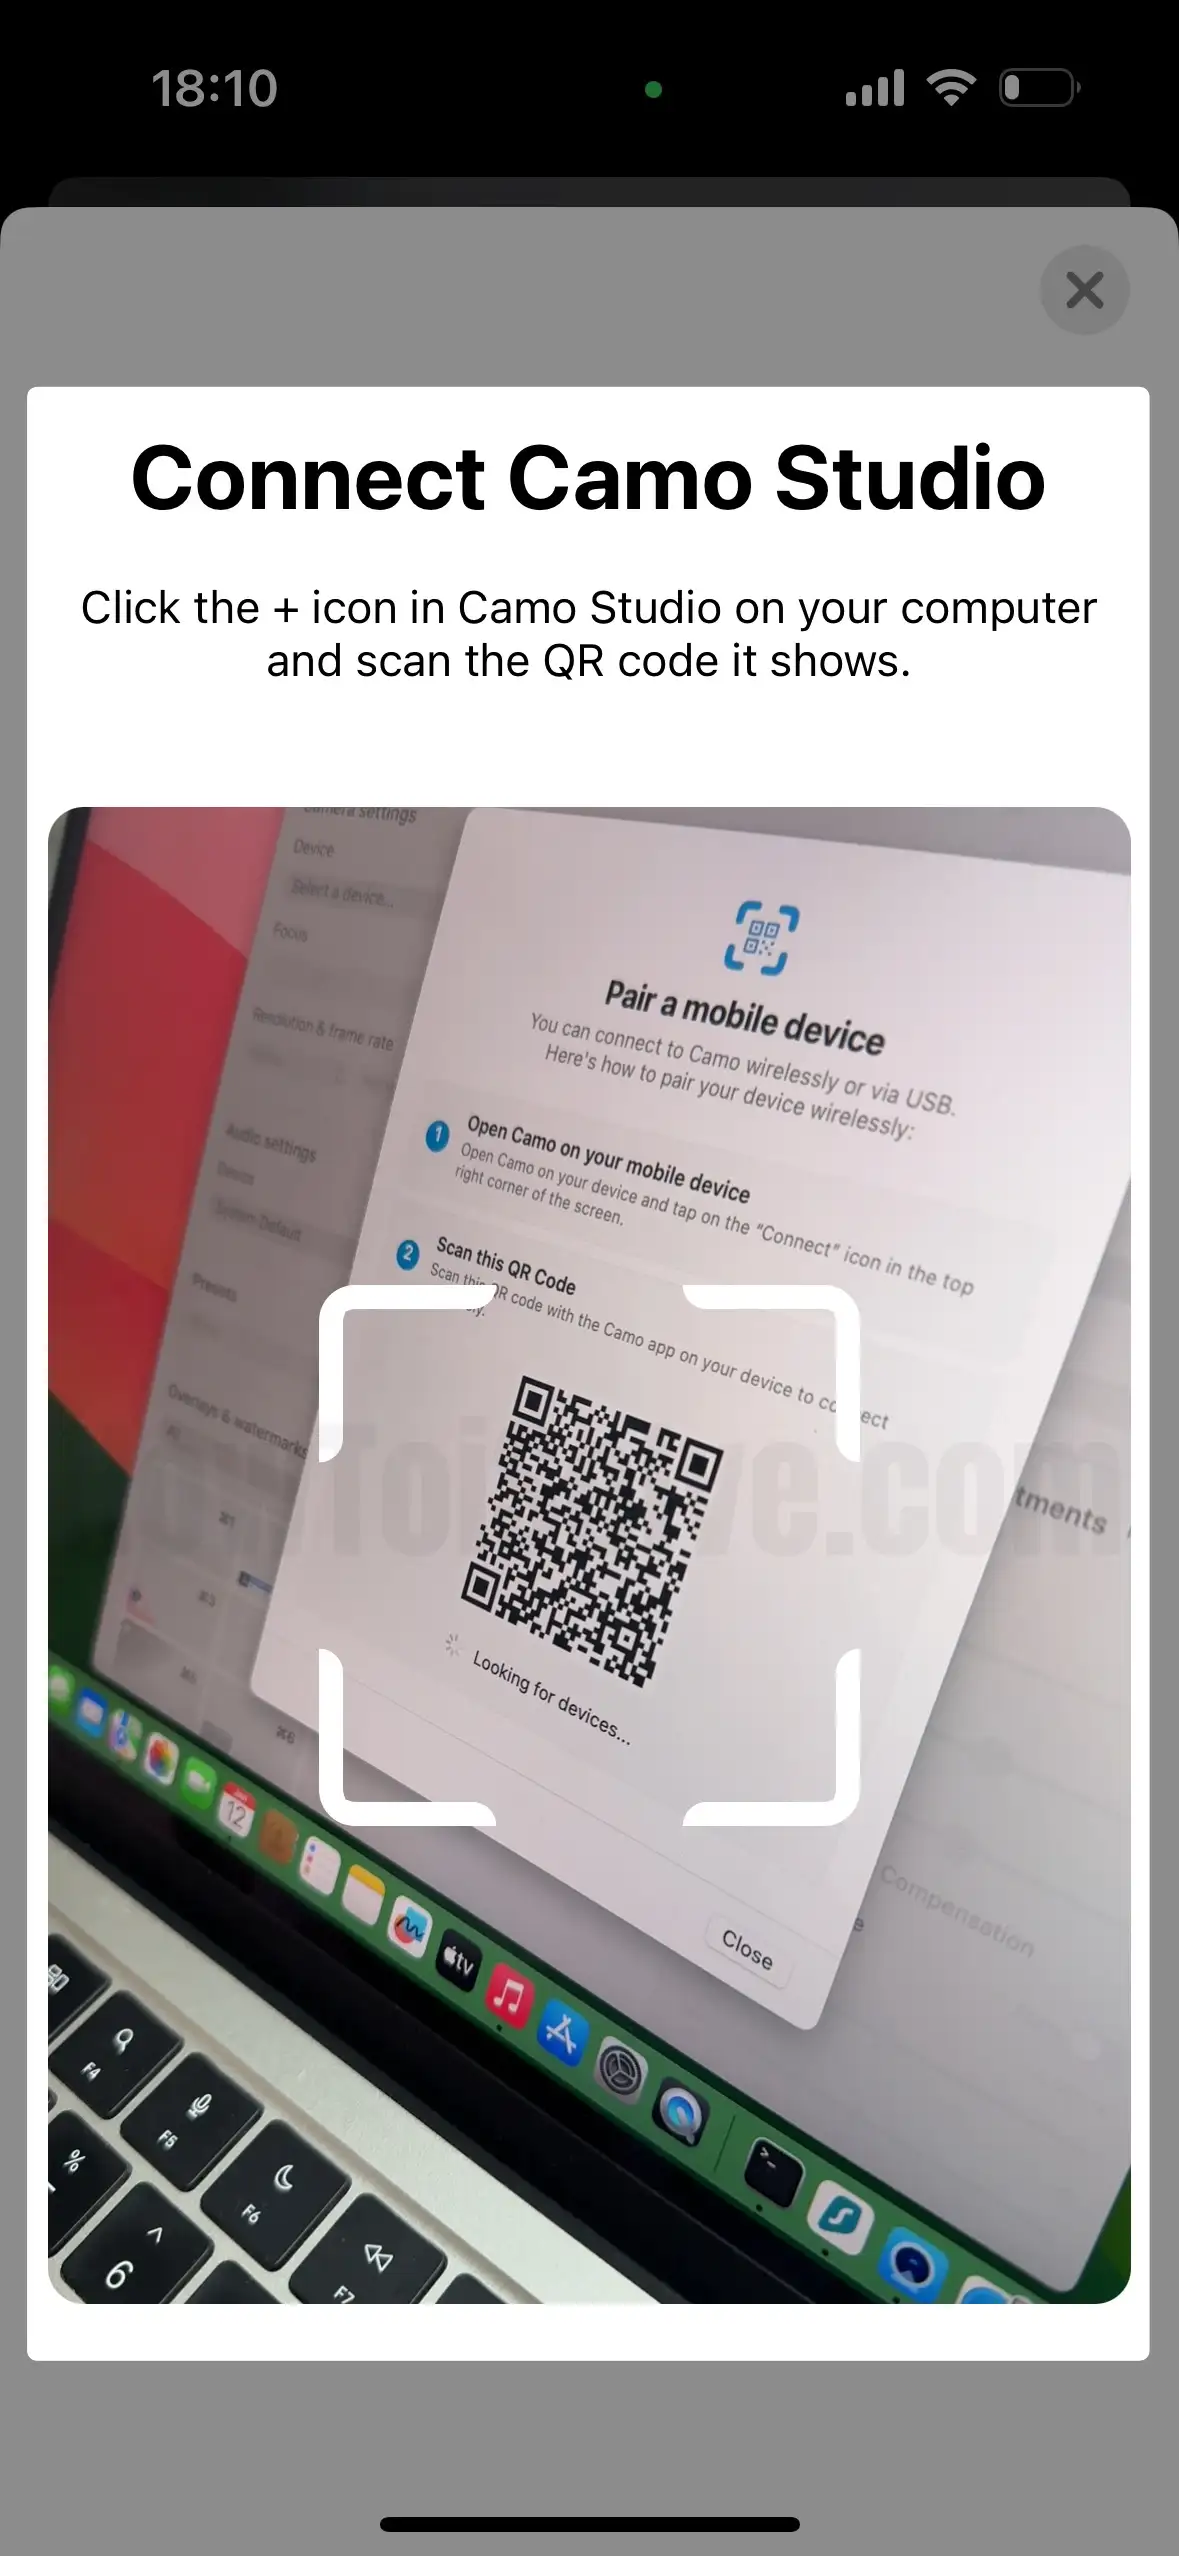
Step 4: Open the Camo App on your iPhone and Mac. And then, click on the drop-down below the Device in Camo app on your Mac. From the menu, select your iPhone. As soon as your iPhone camera will work as a webcam for Mac.
iPhone as a webcam for Windows
Step 1: First thing first, download and install Camo app on your iPhone. For that, go to the App Store. In the search bar, search for Camo app and then tap Get > Install Button to finish downloading procedure.
Step 2: Simultaneously, install the Camo Studio on your Windows PC. Once the installation procedure is finished, give all the necessary permission to Camo.

Step 3: After this, connect your iPhone and Windows with the same Wi-Fi network.
Step 4: Open the Camo App on your iPhone and Windows. And then, click on the drop-down below the Device in Camo app on your Windows. From the menu, select your iPhone. As soon as your iPhone camera will work as a webcam for Mac.
Final Verdict!
Which method did you use to convert your iPhone to a webcam for your Mac? Do let us know in the comment box below!


