
If you have bought a new MacBook or have recently upgraded macOS, then you should know about the changes and upgrades in features of the Wi-Fi settings of your Mac. There are plenty of things that you can do in the Wi-Fi settings of your macOS; these include- copying passwords, using the low data mode, limiting IP Address tracking, and much more.
This article will feature all the new and unique features of macOS Wi-Fi settings. In addition to informing you about these features, we will also discuss the steps and process of using the amazing features discussed earlier.
Wi-Fi Settings that you must know
1→ Stop Auto Join Wi-Fi on Mac
Every time you join or connect to a new Wi-Fi network, the Mac automatically saves the data for directly connecting to that network without manually entering the password. But if you want the Mac to stop the auto-join Wi-Fi feature, follow the instructions discussed here.
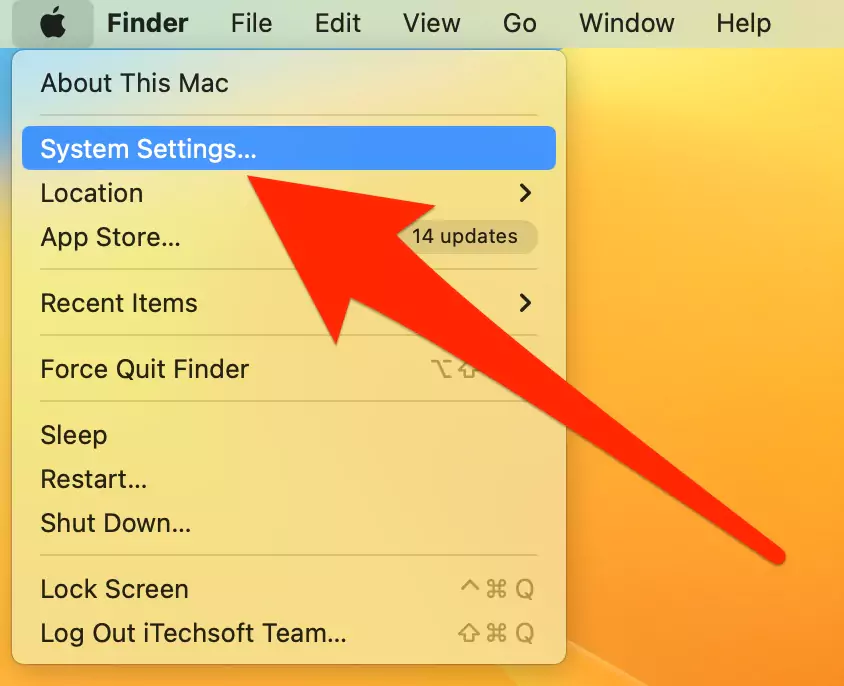
Step. 1→ First, on your Mac’s home screen, go to system settings using your mouse to left-click the Apple Logo Menu.
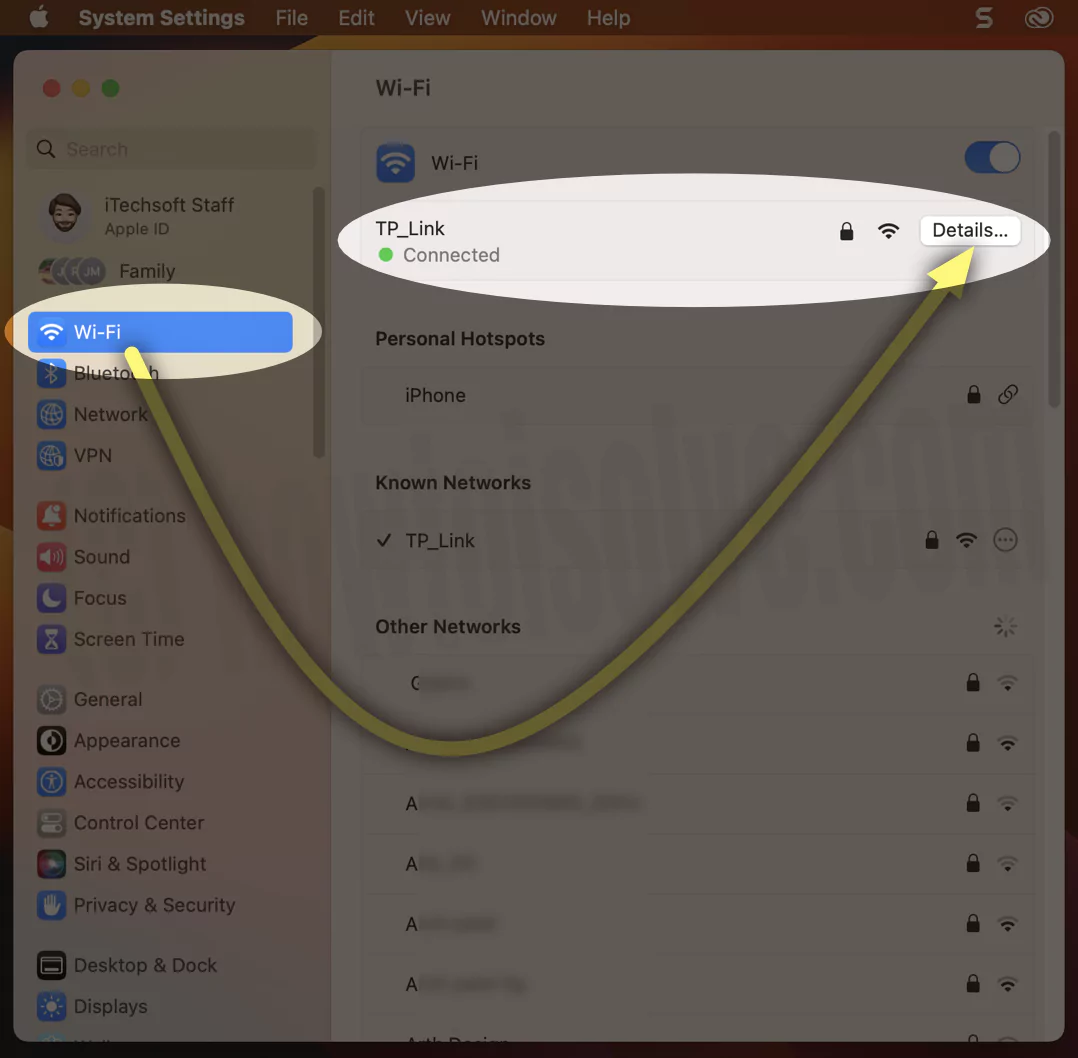
Step. 2→ Now, tap “Wi-Fi” in the menu on the left pane.
Step. 3→ Then, tap on the Wi-Fi network that your Mac is connected to and select the “Auto-Join” option.

Another way to find under the WiFi Network Details,
Step. 4→ Following that, a new window will open with different options. Toggle the bar in front of the “Automatically Join this network” option to disable it.

Step. 5→ At last, hit the “OK” button to save the changes.
This setting will stop the auto-join Wi-Fi feature on your Mac, and you will have to manually connect to the Wi-Fi network for which you have disabled this setting.
2→ Copy Wi-Fi Password
Another interesting and unique feature that has been added to the Mac Wi-Fi settings is allowing users to copy the Wi-Fi password for the networks already connected with the device. To copy your Wi-Fi password on macOS Sonoma, note the steps below.
Step. 1→ Initially, navigate to the system settings window from the Apple Logo menu and choose the “Wi-Fi” settings on the left tab.
Step. 2→ Now, tap on the Wi-Fi network connected to your Mac.
Step. 3→ In the drop-down menu, select the “copy password” option.

Once you have completed this step, your Wi-Fi network password will be copied to your Mac’s clipboard.
3→ Turn on Low Data Mode
If your Wi-Fi is running low on data or your Wi-Fi plan is about to expire, you might want to conserve the remaining data while being able to use the internet. In macOS, you can do this by enabling the low data mode that helps reduce Mac’s data usage over the Wi-Fi network of your choice. To turn on the low power mode on Mac, go through the procedure listed here.
Step. 1→ Use your mouse to left-click on the Apple logo and select the system settings option.
Step. 2→ Then, go to the “Wi-Fi” settings on the left tab.
Step. 3→ Click on the “details” button next to the Wi-Fi network connected to your Mac.
Step. 4→ Toggle the bar beside the “Low Data Mode” option to enable it.
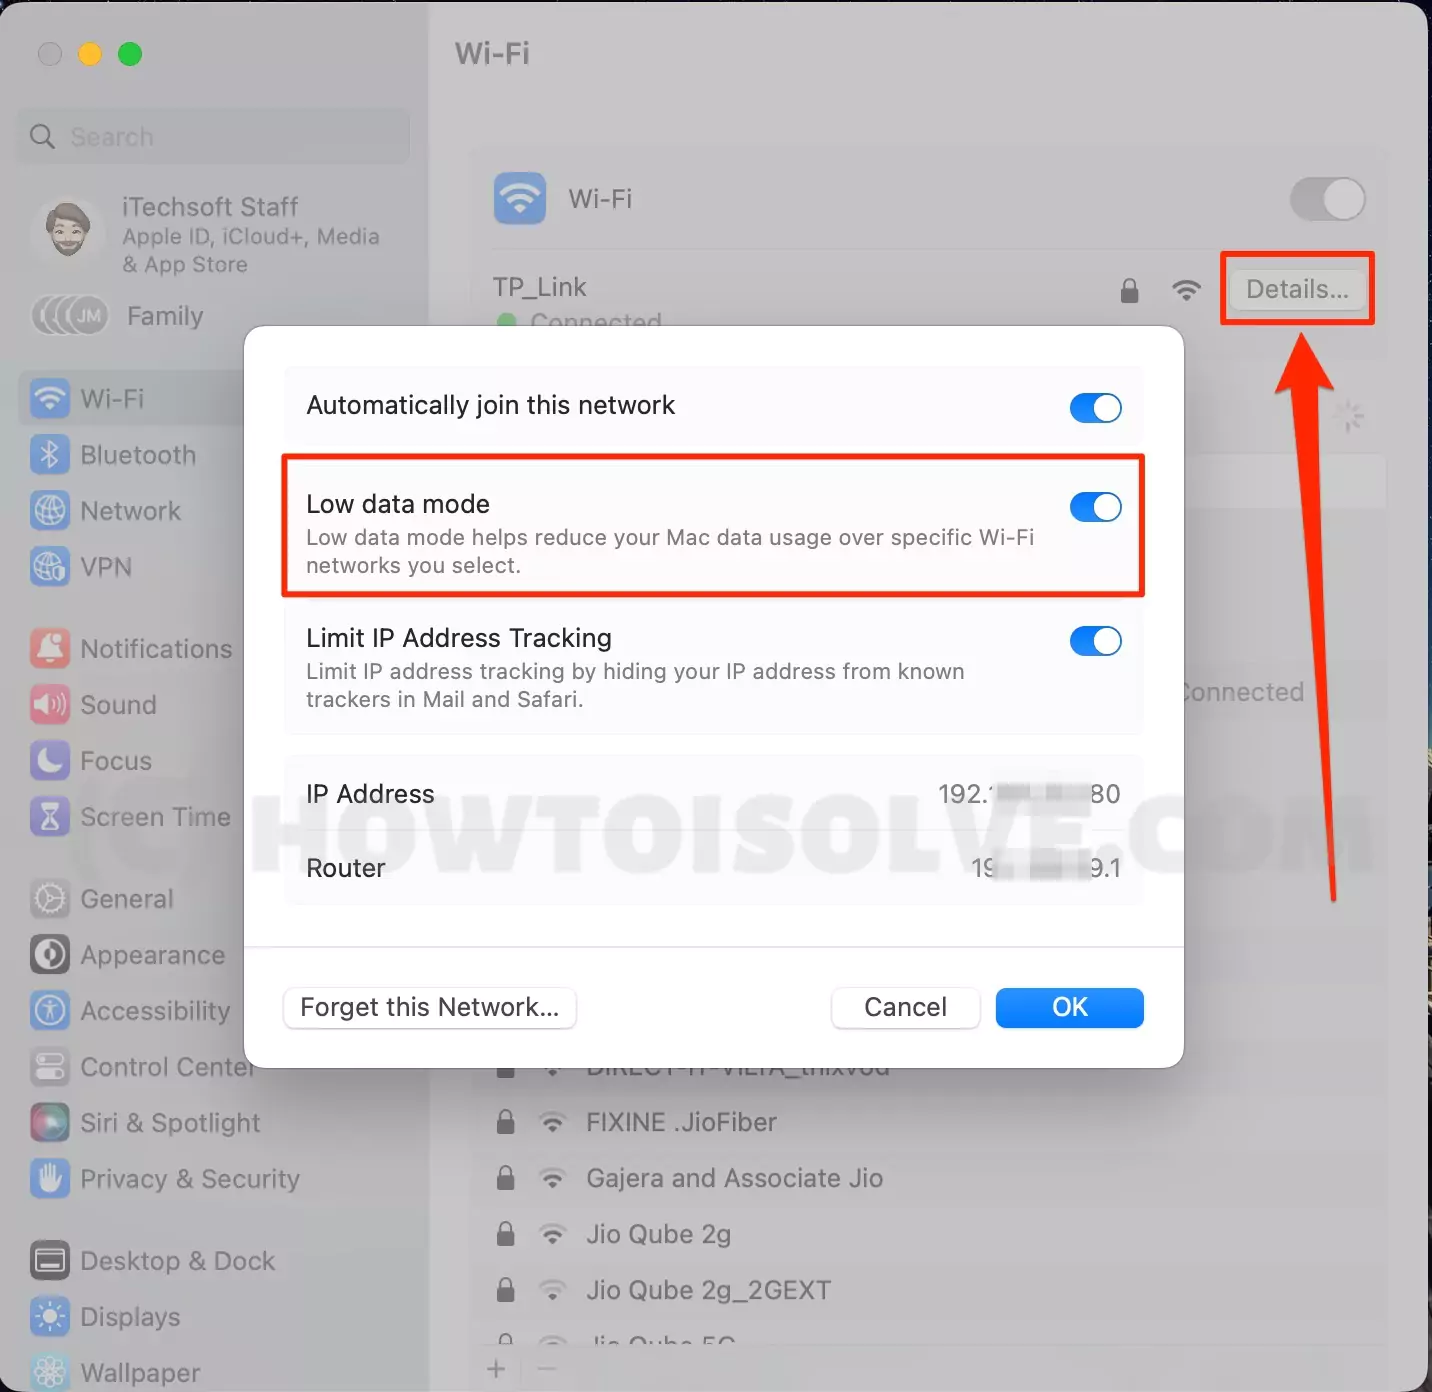
Step. 5→ Finally, hit “OK” to save the changes.
Once you save the changes, the Mac will configure the selected Wi-Fi network to conserve data while using the internet. However, the quality and speed of surfing will get lowered due to the low data mode.
4→ Limit IP Address Tracking
The limit IP Address tracking feature is the best for keeping your surfing or browsing process safe and secure. The user’s privacy is also safeguarded once they enable the limit IP address tracking feature as it restricts or limits the websites and apps from using or tracking your IP address. To enable the limit IP Address tracking feature, follow the below steps.
Step. 1→ Launch the system settings window from the Apple Logo icon at the top left.
Step. 2→ Go to the Wi-Fi settings by selecting “Wi-Fi” in the left tab.
Step. 3→ Hit the “details” button next to the Wi-Fi network for which you want to limit the IP address tracking.
Step. 4→ Now, press the toggle button close to the “Limit IP Address Tracking” to enable it on your Mac.
Step. 5→ Tap on OK to save the new settings.
5→ Know the Network IP Address and Router IP Address
Mac users can now know their network IP address and router IP address from the Wi-Fi settings of their macOS. Note the steps discussed here to know the Wi-Fi settings’ network and router IP address.
Step. 1→ Initially, launch the system settings window by clicking on the Apple logo at the top left corner.
Step. 2→ Now select “Wi-Fi” on the left pane of the system settings window.
Step. 3→ Tap on the “details” option next to the Wi-Fi network for which you want to know the network and router IP address.
Step. 4→ Then, in the new window that pops up, you can find the network and router IP address displayed under the limit IP Address Tracking option.
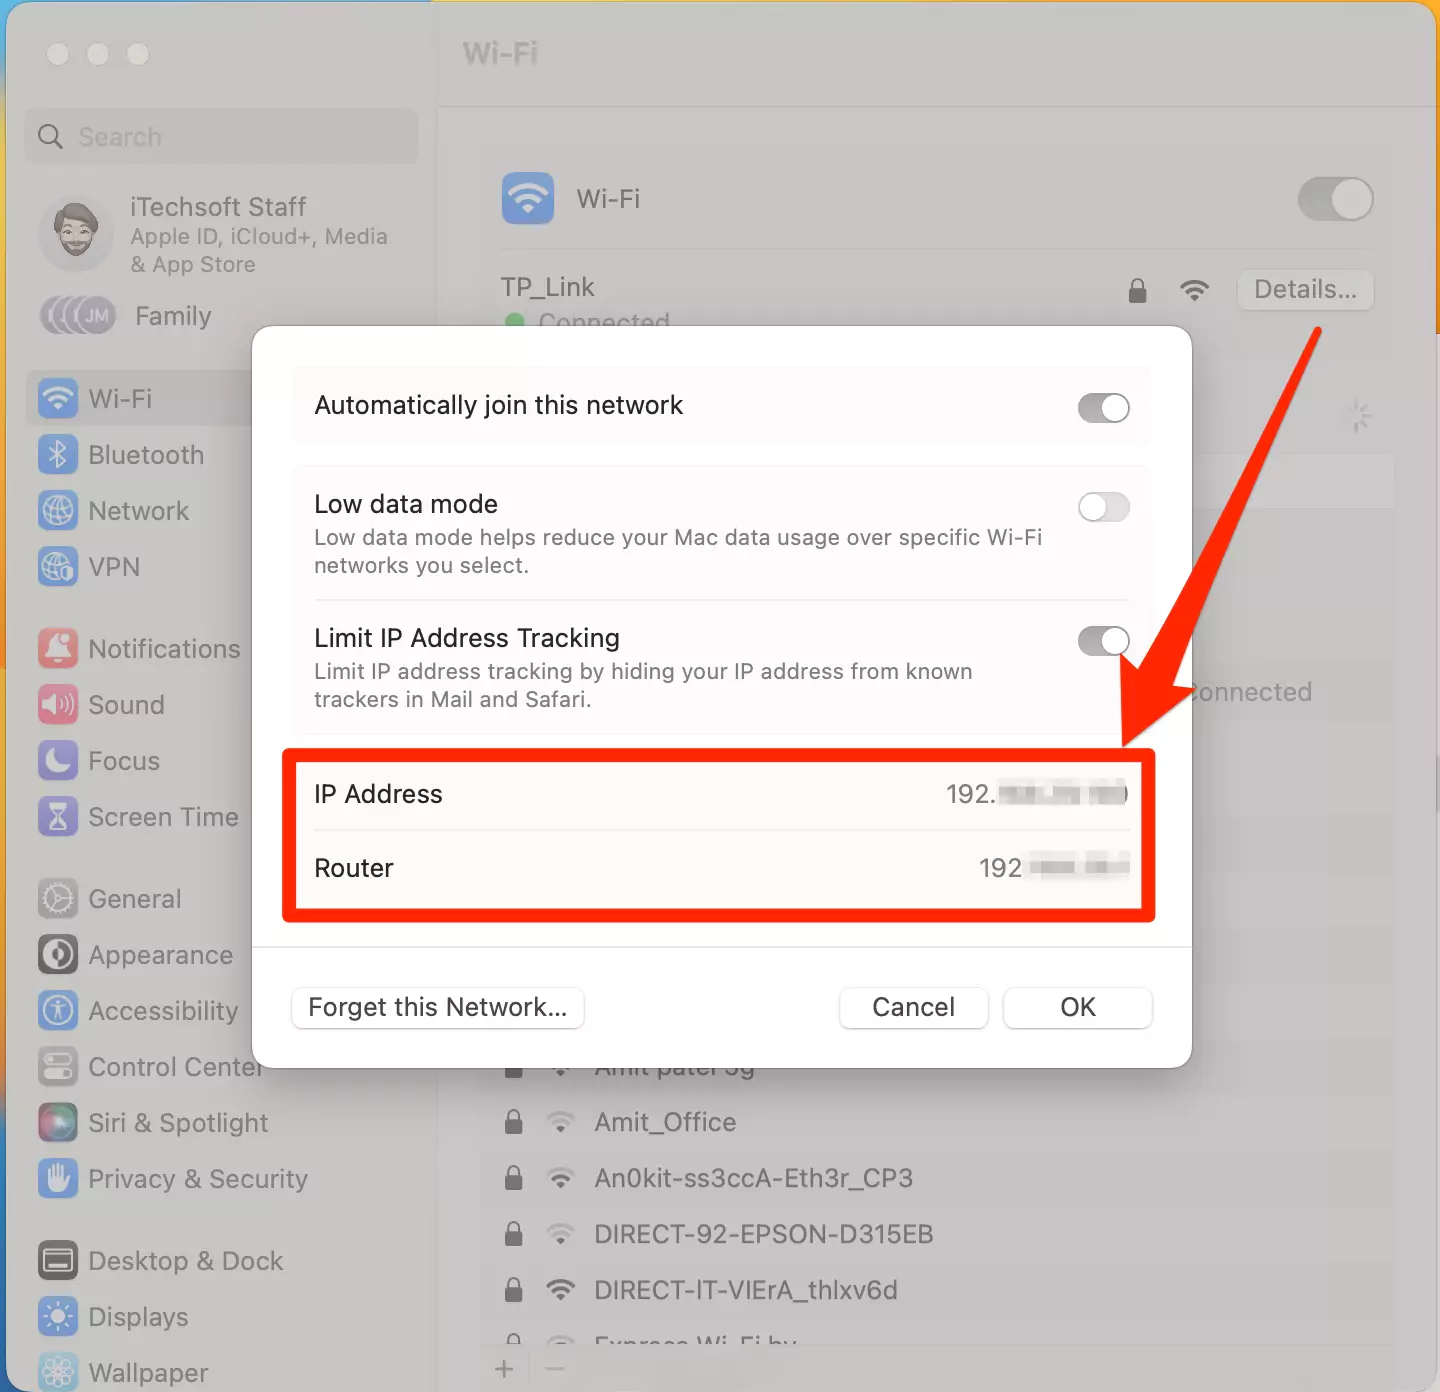
That’s it.
6→ Change Default DNS on Mac
Like Change DNS on iPhone, we can change or Update Default Mac DNS from Network Settings. There are some proxy DNS we can configure on Mac and Get High-Speed Internet access through a Browser or App. DNS, known as Domain Name Server, designs the domain name in the Internet Protocol. When used in conjunction with a search domain, it quickly reaches the website. Also, we can try Reset DNS Cache on Mac to Fix the Network issue caused by the local network. To update or Add new DNS follow the below steps,
1→ Go to Apple Menu, and click on System Settings…
2→ From the left side panel, click on WiFi.
3→ Select the Network to which you are connected. And then click Details… next to it.
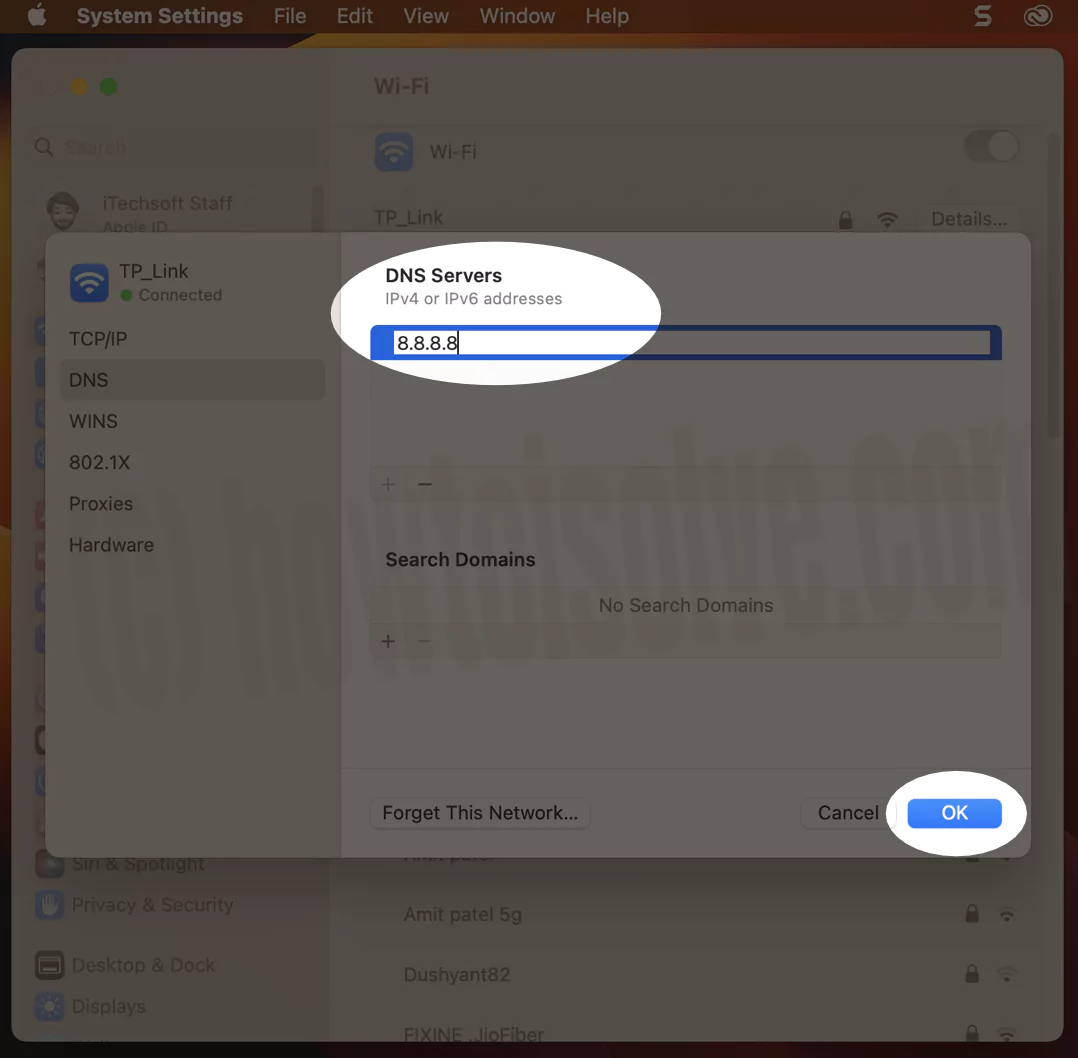
4→ Select the DNS from the left side panel > +.

5→ Click on the + Icon from there and then enter Google DNS(8.8.8.8). Lastly, choose OK. or Use Any of your Trusted DNS (Cloudflare is also a good option).
| DNS Provider | DNS Address |
|---|---|
| OpenDNS | 208.67.222.222 |
| Google Public DNS | 8.8.8.8 |
| Cloudflare | 1.1.1.1 |
| 1.1.1.1 with Warp | 1.1.1.1 |
| Comodo Secure DNS | 8.26.56.26 |
| Quad9 | 9.9.9.9 |
| Verisign Public DNS | 64.6.65.6 |
| OpenNIC | 13.239.157.177 |
| UncensoredDNS | 91.239.100.100 |
| CleanBrowsing | 185.228.168.168 |
| Yandex DNS | 77.88.8.7 |
| UltraRecursive DNS | 156.154.70.1 |
| Alternate DNS | 198.101.242.72 |
| AdGuard DNS | 176.103.130.130 |
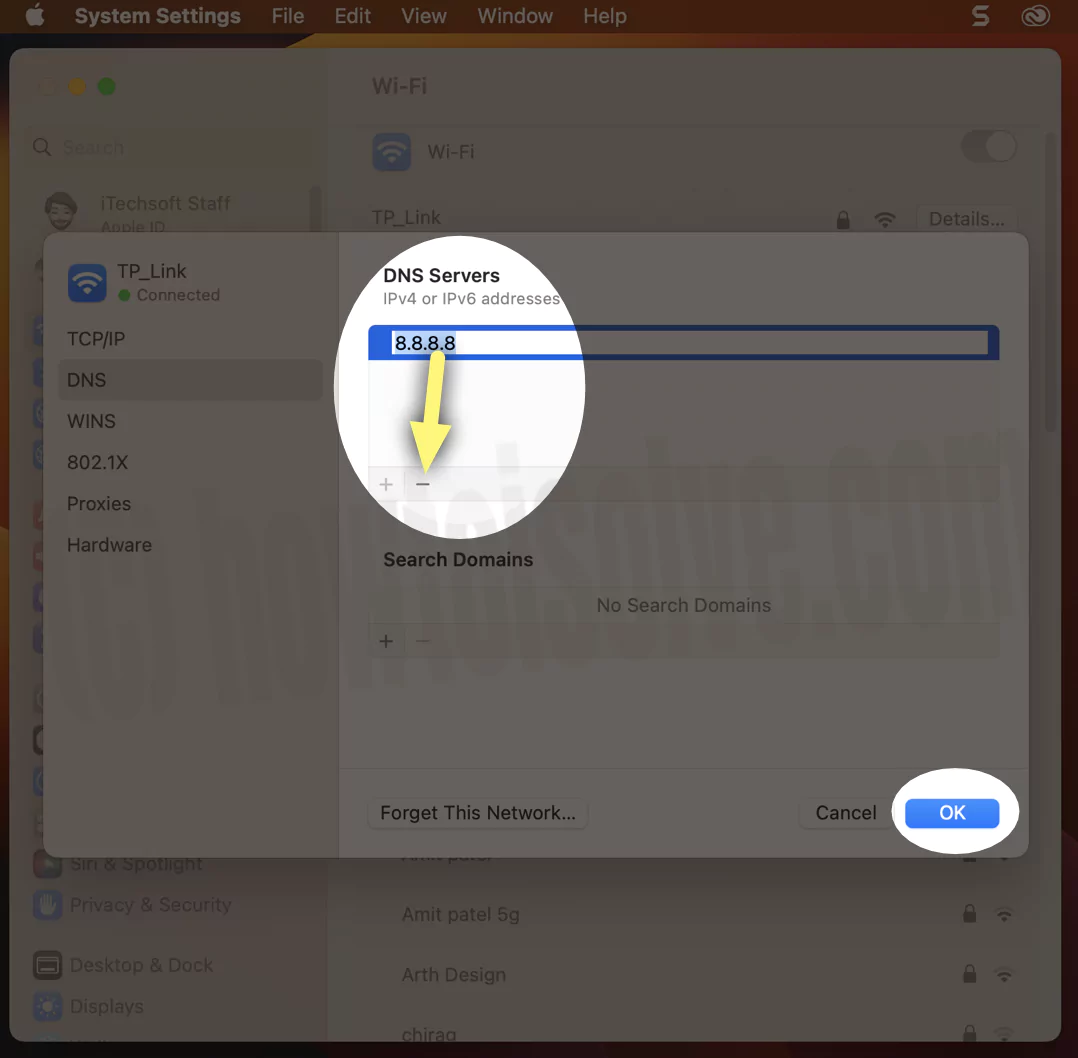
To Remove DNS on Mac or Change to Default DNS, Select DNS and Click on (-) to Remove, Ok to save.
That’s it.
Note: Still, are you facing WiFi issues on Mac, then Renew DHCF Lease, under the TCP/IP settings? Under the WiFi Details.
7→ Forget this Network on Mac
If the list of saved Wi-Fi networks on your MacBook gets full, you might want to delete some unused Wi-Fi networks from your system. Also, if you cannot connect to an already saved Wi-Fi network on your Mac, removing that network from your device and adding it again might fix this problem. So to remove a Wi-Fi network from your Mac, follow the process described in this section.
Step. 1→ Head to the system settings window by clicking on the Apple logo or Apple menu at the top.
Step. 2→ Launch Wi-Fi settings by tapping the “Wi-Fi” option on the side of the system settings window.
Step. 3→ Now click on “Details” beside the Wi-Fi network you want the Mac to forget.
Step. 4→ Then, tap on the “Forget this network…” button at the bottom of the new pop-up window.
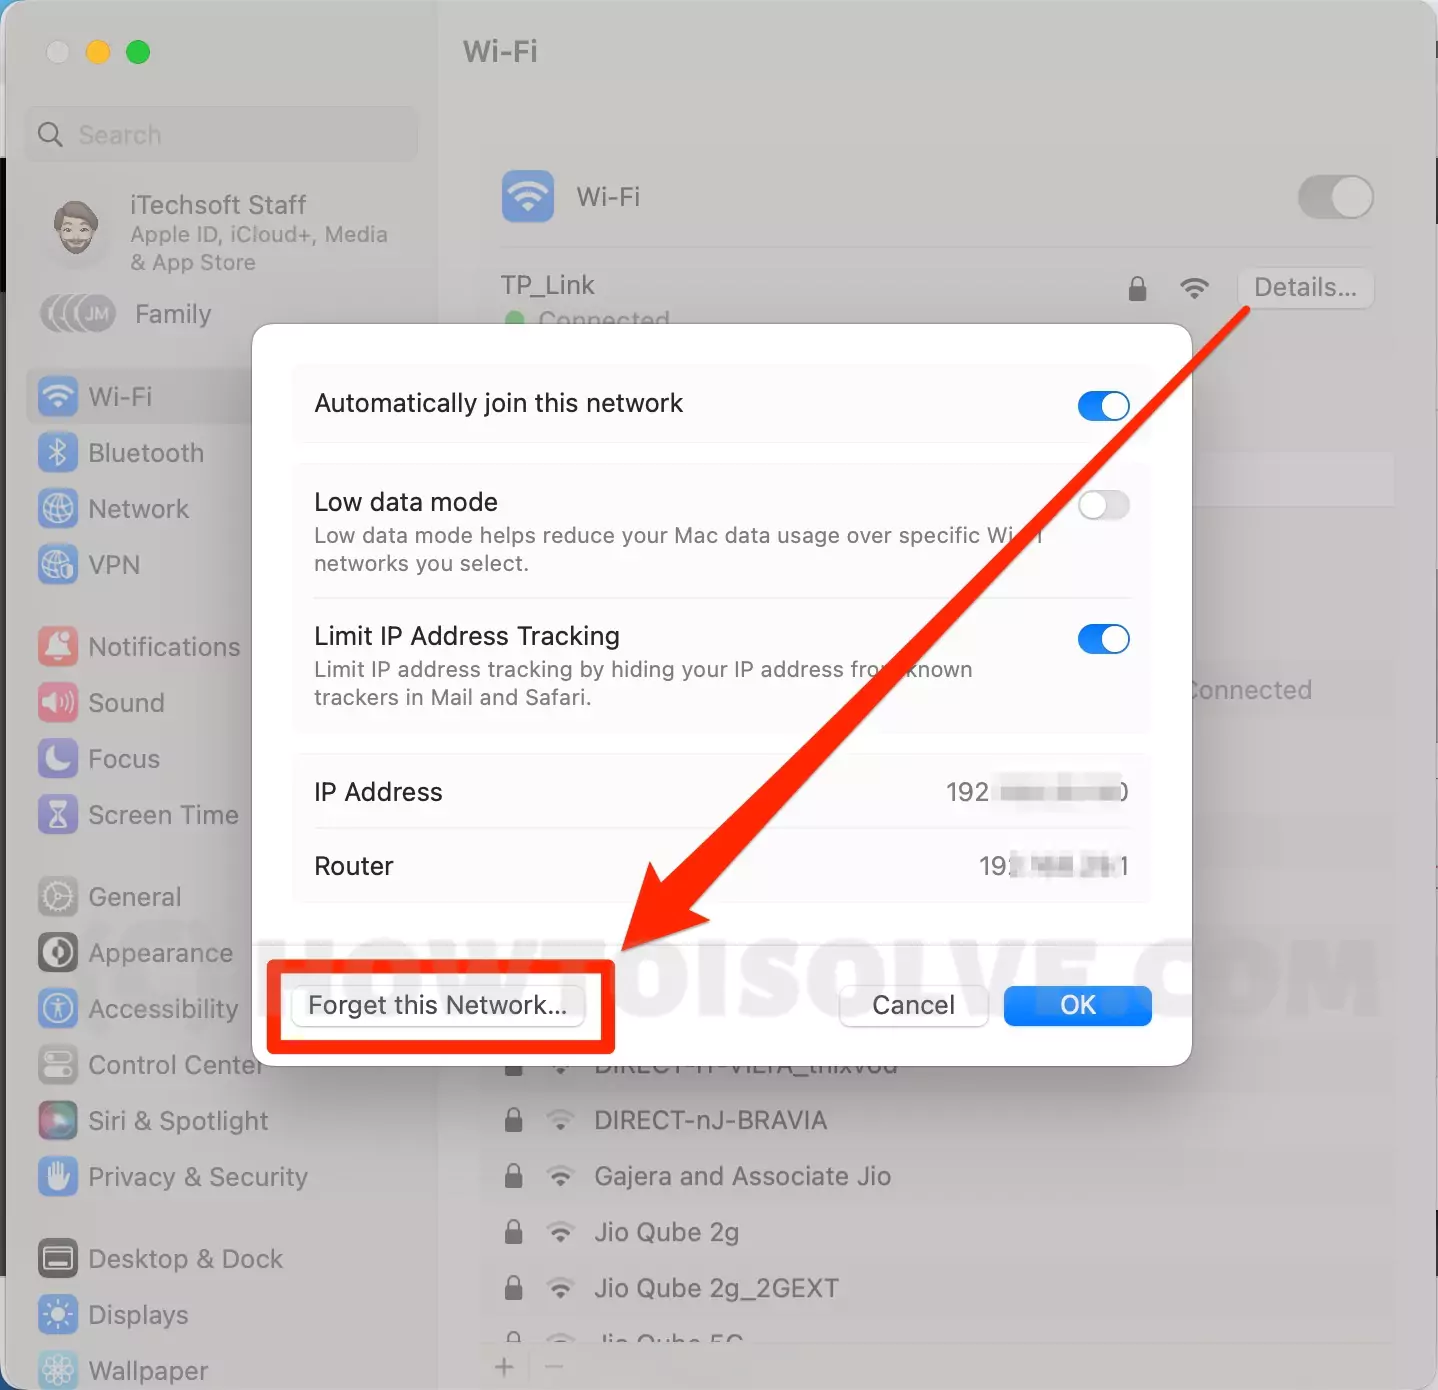
Step.5→ Finally, confirm that you want the Mac to forget this network.
After following the steps described above, the selected Wi-Fi network will be removed from your MacBook. You must manually enter the password again to connect to this Wi-Fi network.
8→ Enable & Disable Ask to join networks
Another crucial feature for keeping your device and the data stored on it is the “Ask to Join Networks” feature. This feature, when enabled, prevents your MacBook from automatically connecting to an open Wi-Fi network without asking you first to confirm connecting to this network. You can enable and disable the “ask to join network” feature on your Mac by going through the procedure discussed here.
Step. 1→ Open system settings and click on “Wi-Fi” to access the Wi-Fi settings.
Step. 2→ Now, scroll down until you see the “Ask to Join Networks” option.
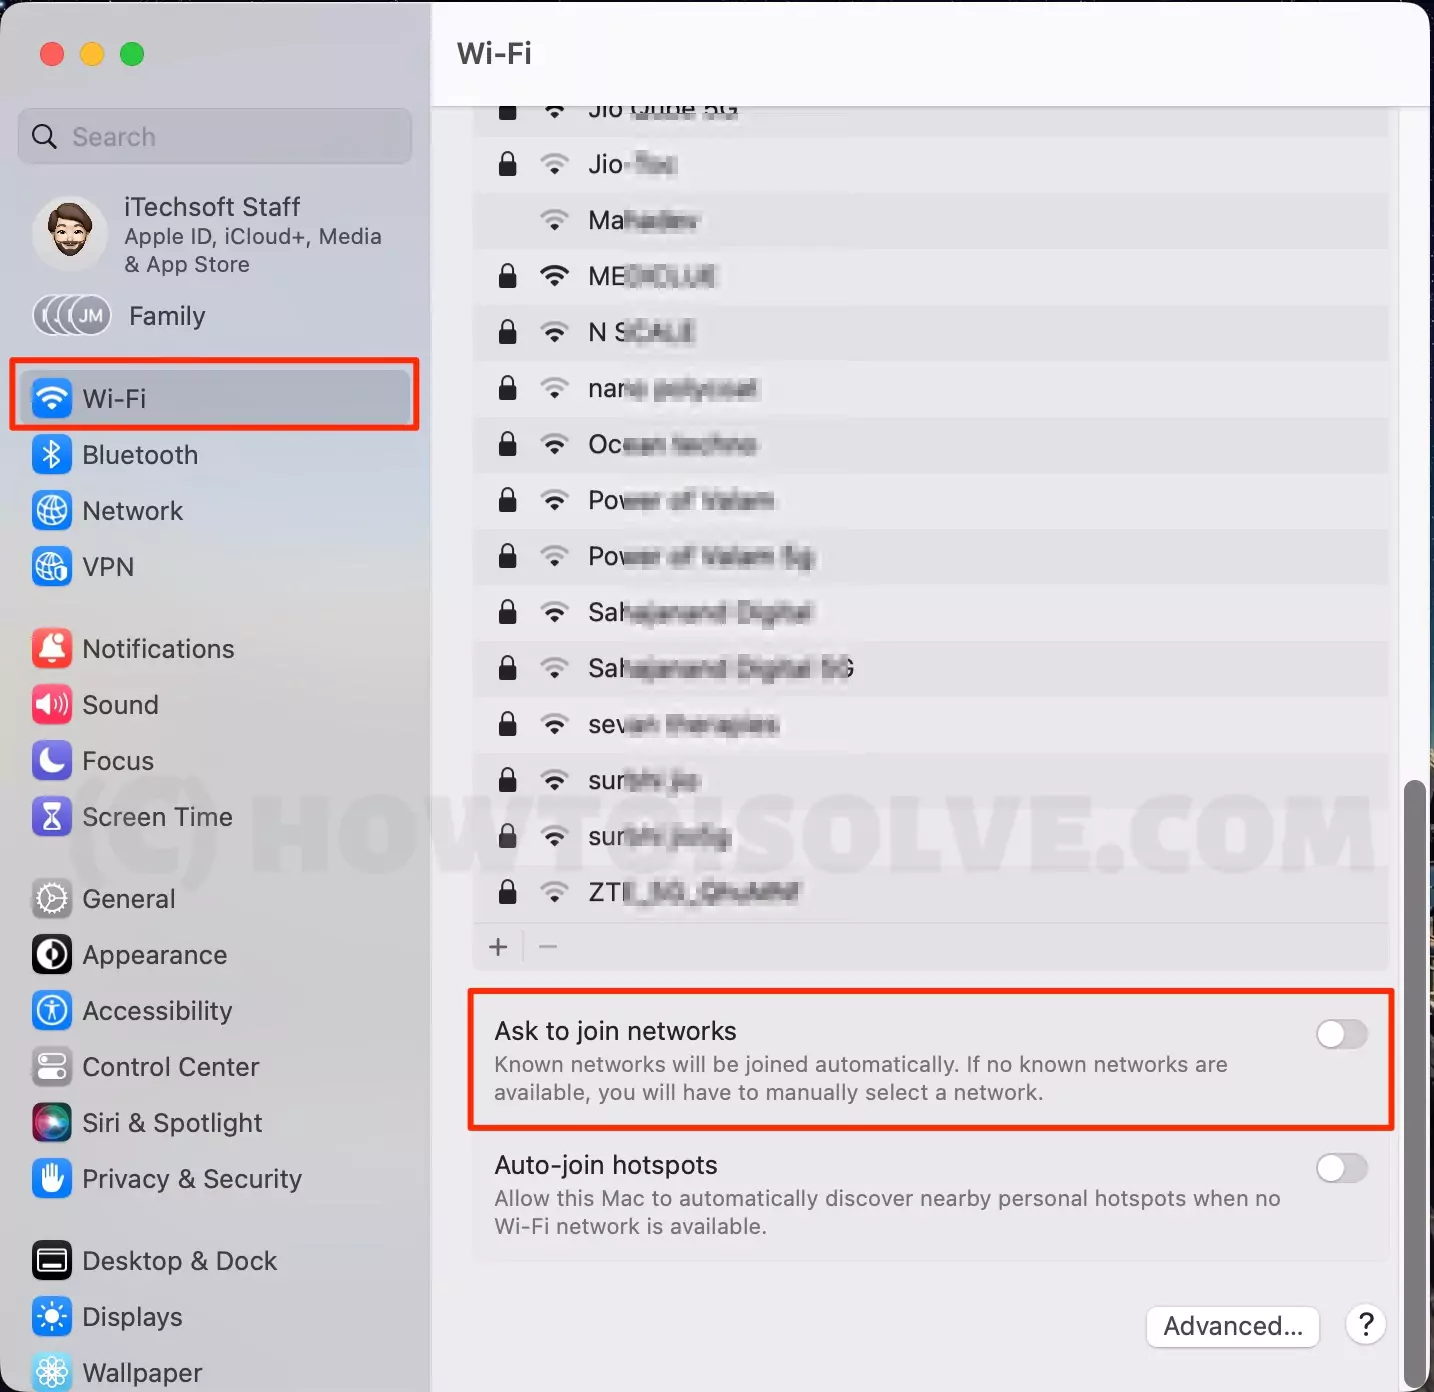
Step. 3→ Enable this feature by toggling the bar in front of it. If you want to disable it, toggle the bar to the left side.
Once this feature is enabled, you must manually select a network in case no known networks are available. The system will ask you if known networks are available before connecting to it.
9→ Stop Auto-join hotspots on Mac
If your MacBook is configured to auto-join hotspots and you don’t want it to keep connecting to hotspots automatically, you can do it in the all-new macOS Ventura in just a few simple steps. In order to stop the auto-join hotspots on Mac, mimic the steps listed here.
Step. 1→ Head over to the system settings window of your Mac from the spotlight search or Apple menu.
Step. 2→ Then, click “Wi-Fi” on the left side of the window and look for the “Auto-join Hotspots” option.
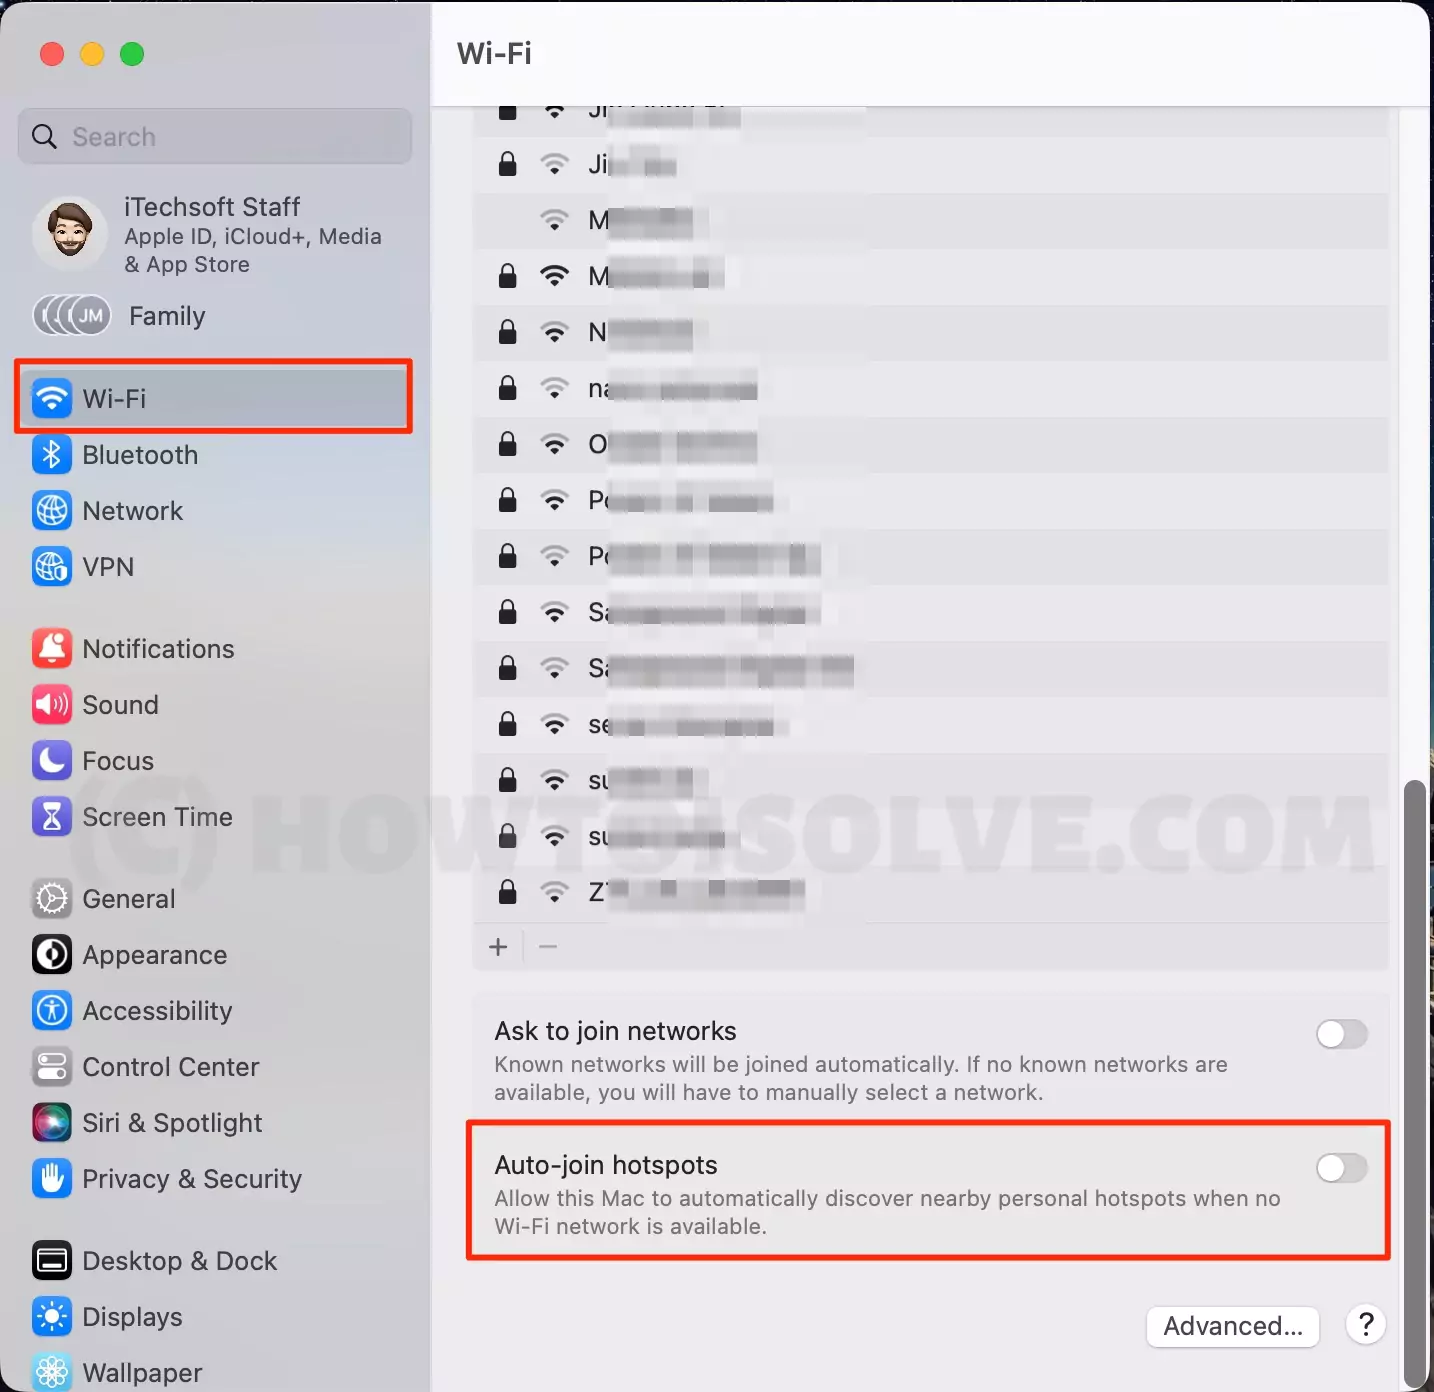
Step. 3→ Click on the button next to it to toggle it to the left to disable it.
Your MacBook will not automatically connect to the nearby hotspots until you want it to do so.
10→ Know Your Wi-Fi Mac Address
The macOS Ventura users can know their Wi-Fi Mac address in the Wi-Fi settings of their device. To know the Wi-Fi Mac Address follow the instructions given in this section.
Step. 1→ Go to the Wi-Fi settings of your MacBook by launching the system settings window from the Apple menu.
Step. 2→ Now tap on the “Advanced…” button at the bottom of the window.
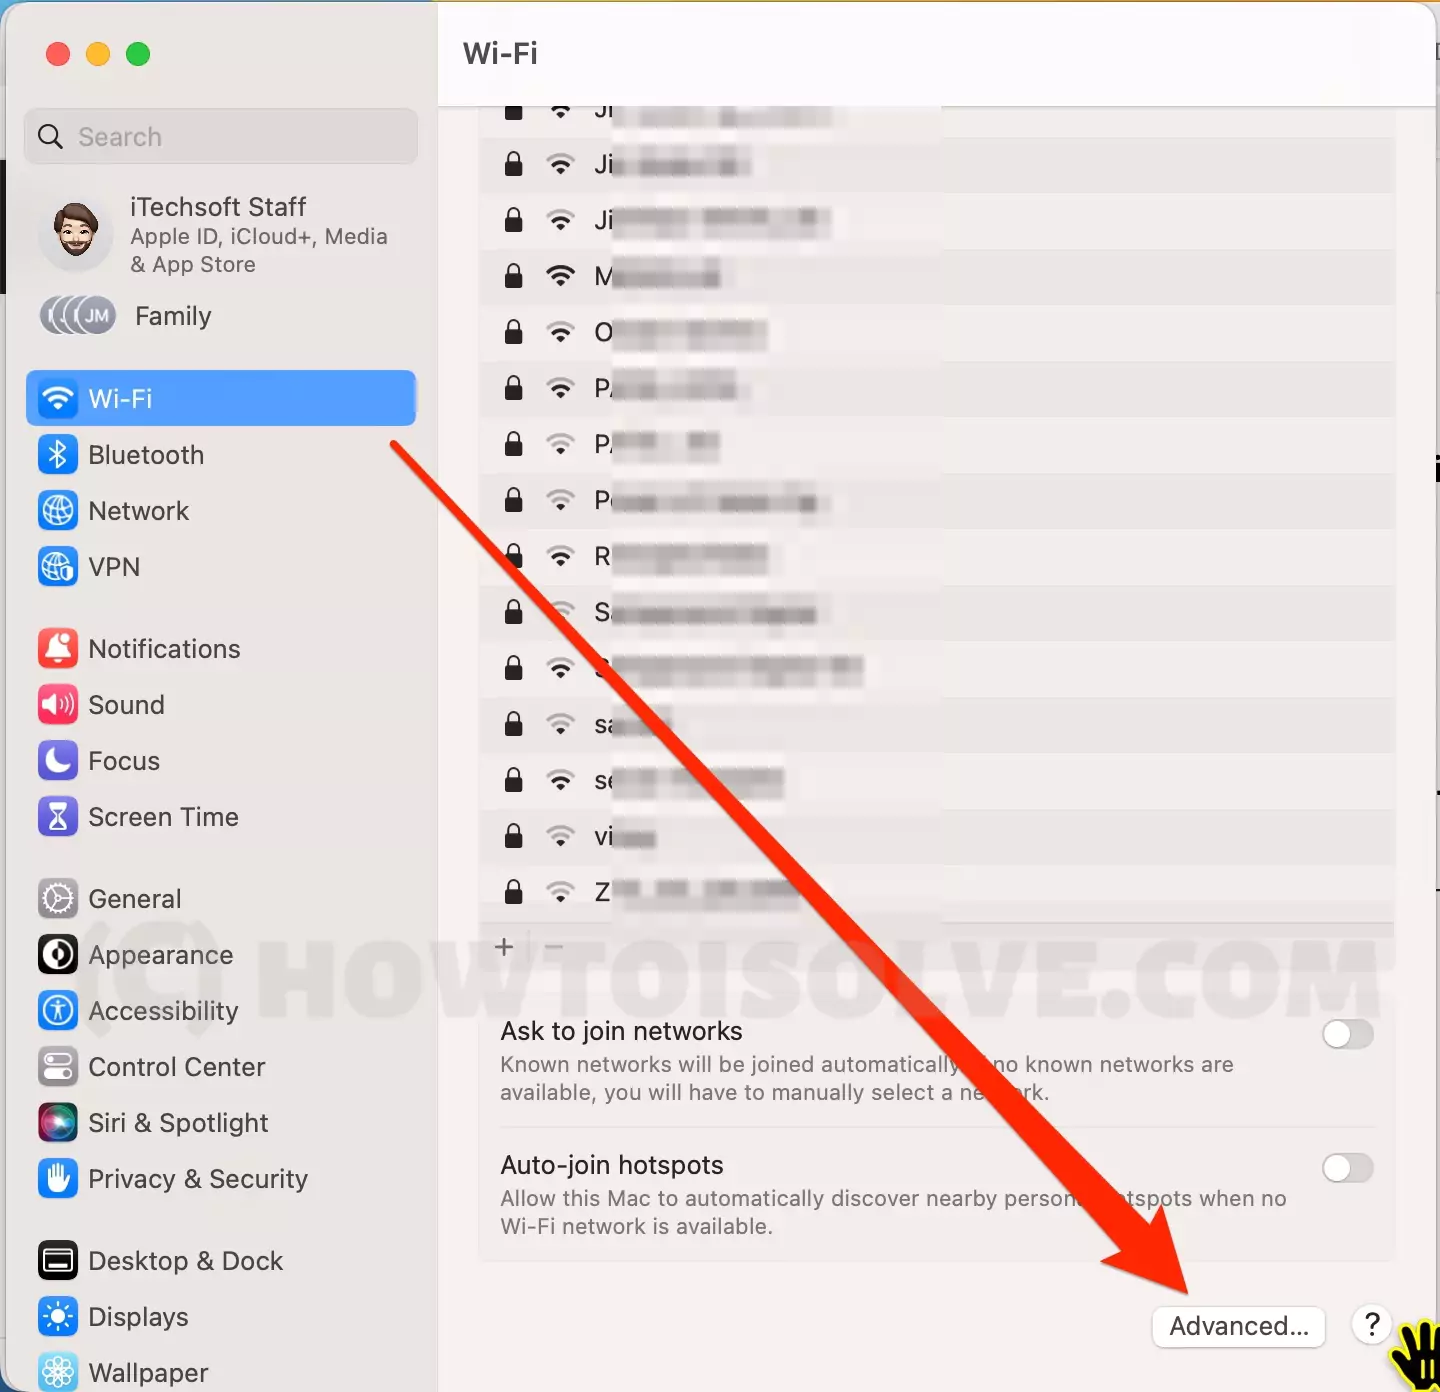
Step. 3→ At the bottom end of the advanced settings window, you will find the Wi-Fi Mac Address.

That’s a unique Address.
11→ Remove Known Network From List on Mac
Once you manually enter the Wi-Fi password on your MacBook, it automatically saves the Wi-Fi network in the known networks list of the Wi-Fi settings. So if you no longer use any network and want to remove it from the known network list of your Mac, follow the process described here.
Step. 1→ First, navigate to the system settings window from the spotlight search.
Step. 2→ Then, open the Wi-Fi settings tab by clicking “Wi-Fi” on the left side of the screen.
Step. 3→ Now, tap on the “advanced” button at the bottom of the window.
Step. 4→ Under the “Known Networks” heading, click on the three dots next to the Wi-Fi network you want to remove from your MacBook.

Step. 5→ Click on the “Remove from list” in the drop-down menu.
This process will remove the chosen Wi-Fi network from your Mac’s known network list.
12→ Add a New Wi-Fi Network Manually on Mac
The Mac Ventura also has a unique feature that allows users to manually add a new Wi-Fi network. It is a straightforward process and can be completed through the method explained below.
Step. 1→ Go to the Wi-Fi settings of your MacBook by following the steps in the earlier methods.
Step. 2→ Once in the Wi-Fi settings tab, click on the plus icon (+) at the bottom of the available Wi-Fi network list.

Step. 3→ In the pop-up window, enter the “Network Name, Security and Password” in the respective tabs. (You can also use the “show password” option to view the password while typing.)
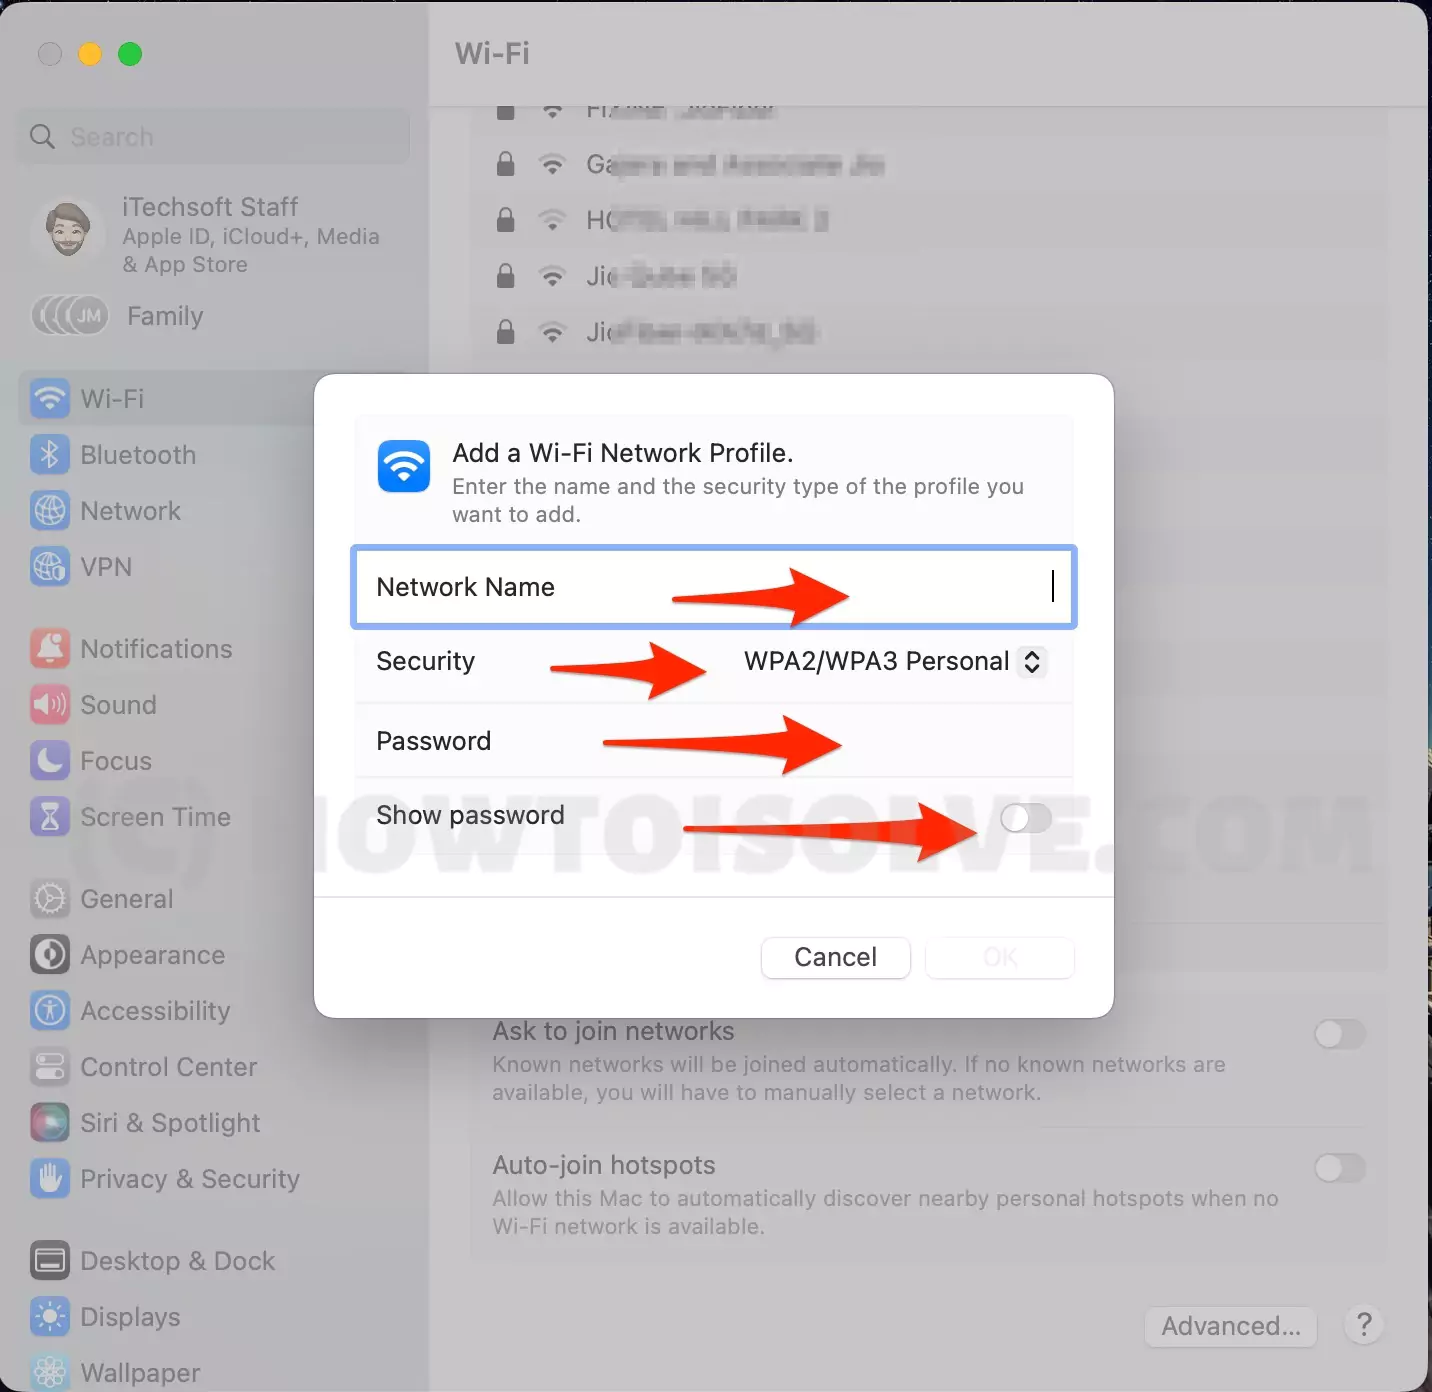
Step. 4→ Click on “Ok” to allow your Mac to join the Wi-Fi network.
This method is the most straightforward process for manually connecting to a Wi-Fi network on your Mac Ventura. Ensure to enter the Network name and password correctly to avoid errors.
13→ Reset Network Settings – Wi-Fi icon with an Exclamation mark on Mac
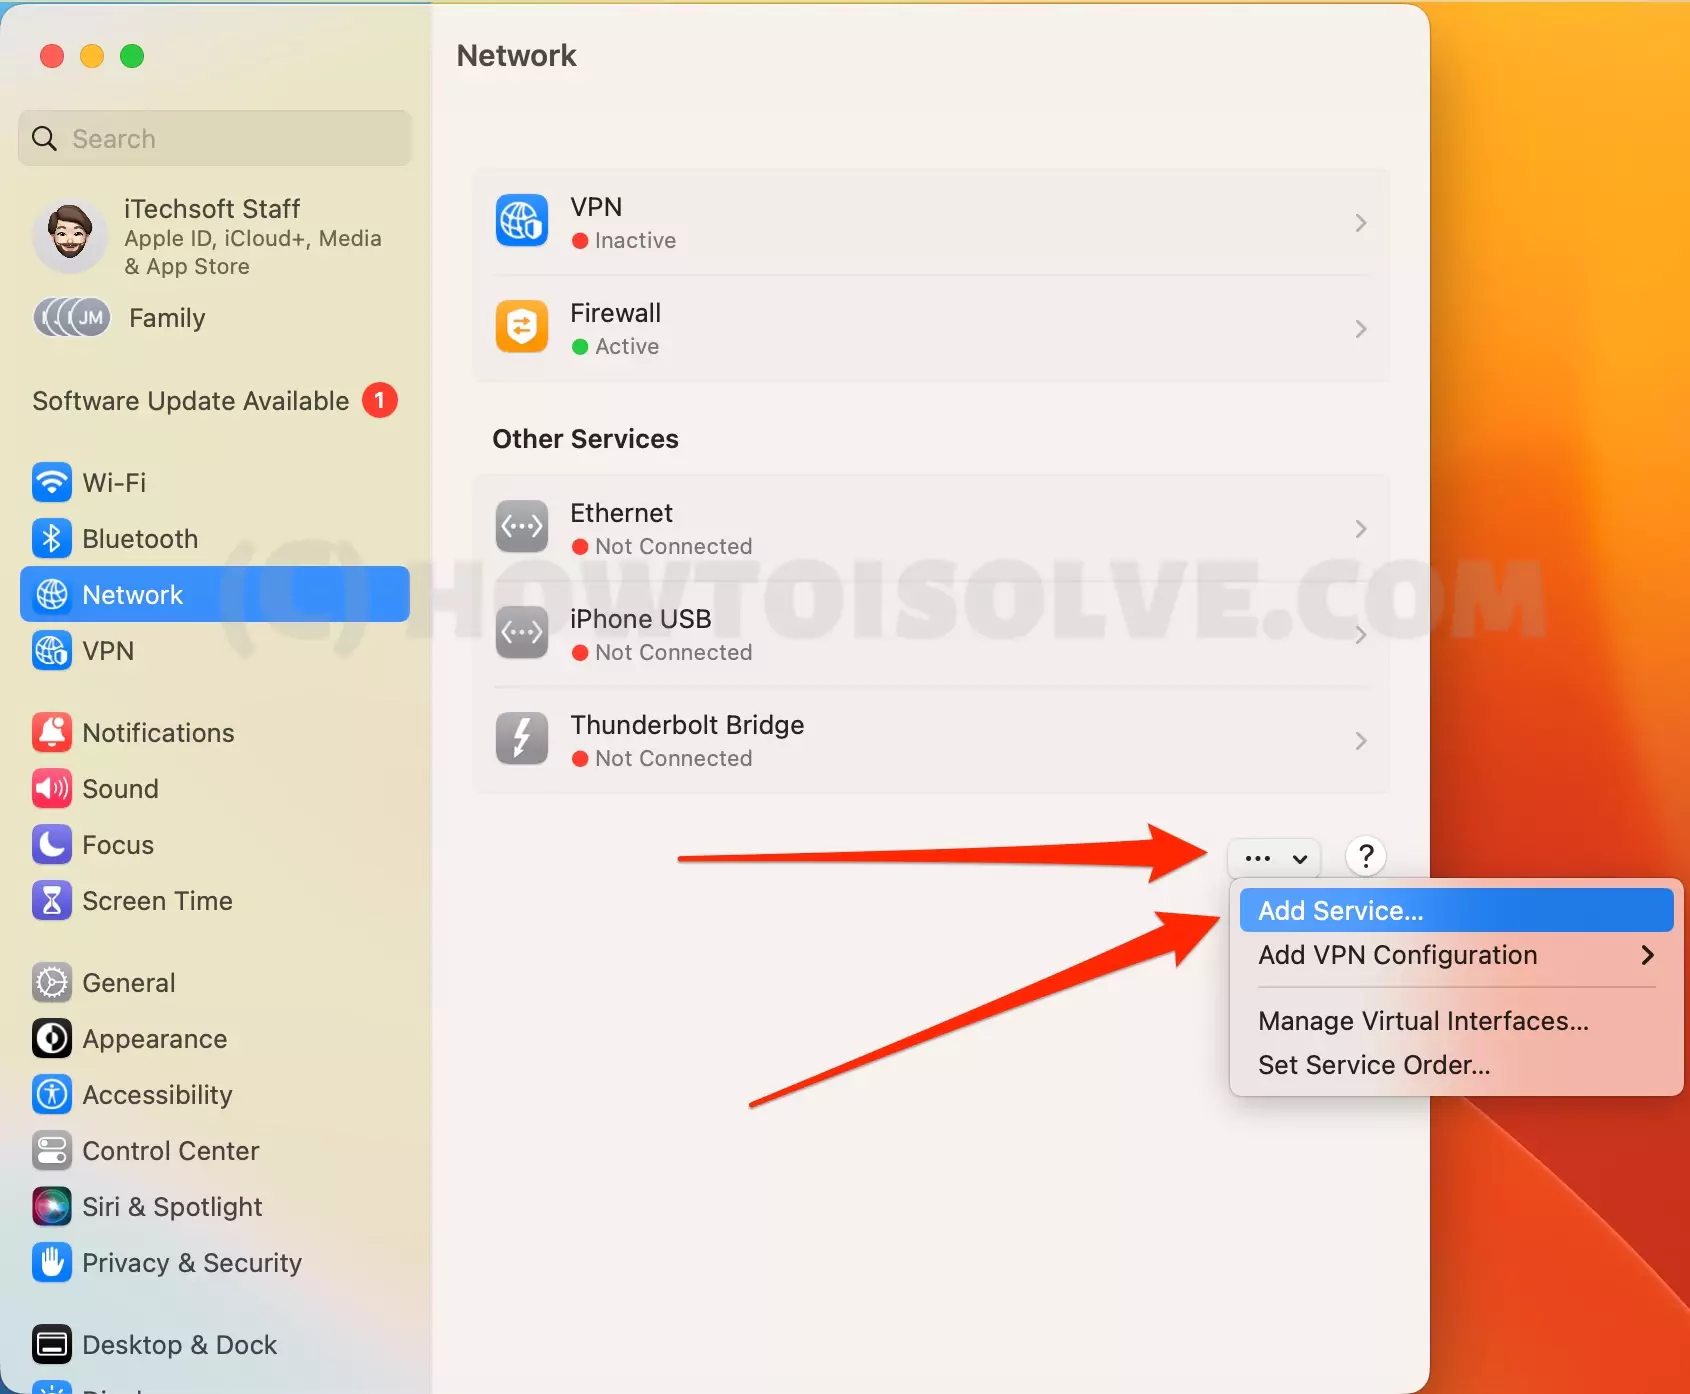
If you are joined or connected to a Wi-Fi network but are unable to use the internet or you see an exclamation mark next to the Wi-Fi icon, in that case, you need to remove the Wi-Fi network from your MacBook and add it again. Adding a new Wi-Fi service profile will fix your problem, and you can use the internet on the specified Wi-Fi network.
Step. 1→ Head over to the Network settings by following the steps in the methods discussed earlier.
Step. 2→ After that, right-click on the Wi-Fi network you want to remove.
Step. 3→ Now, select the “Delete Service…” option in the drop-down menu.
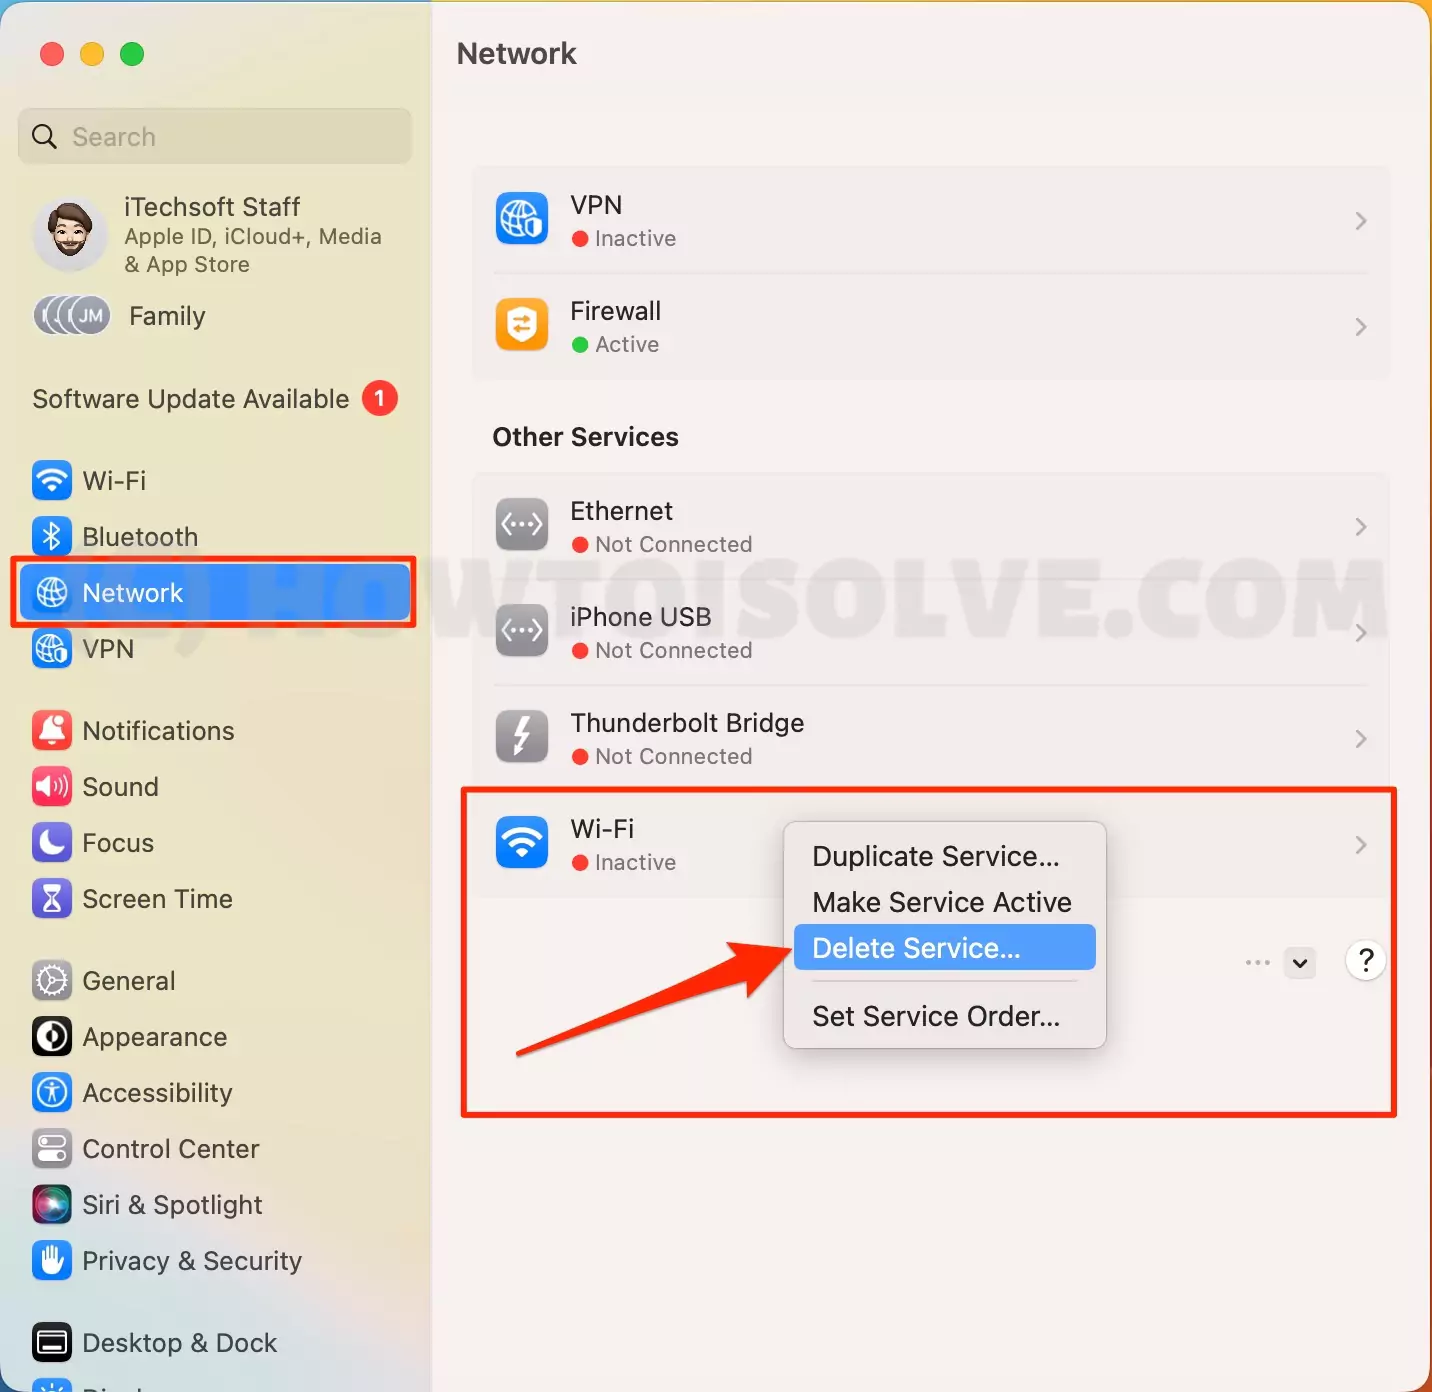
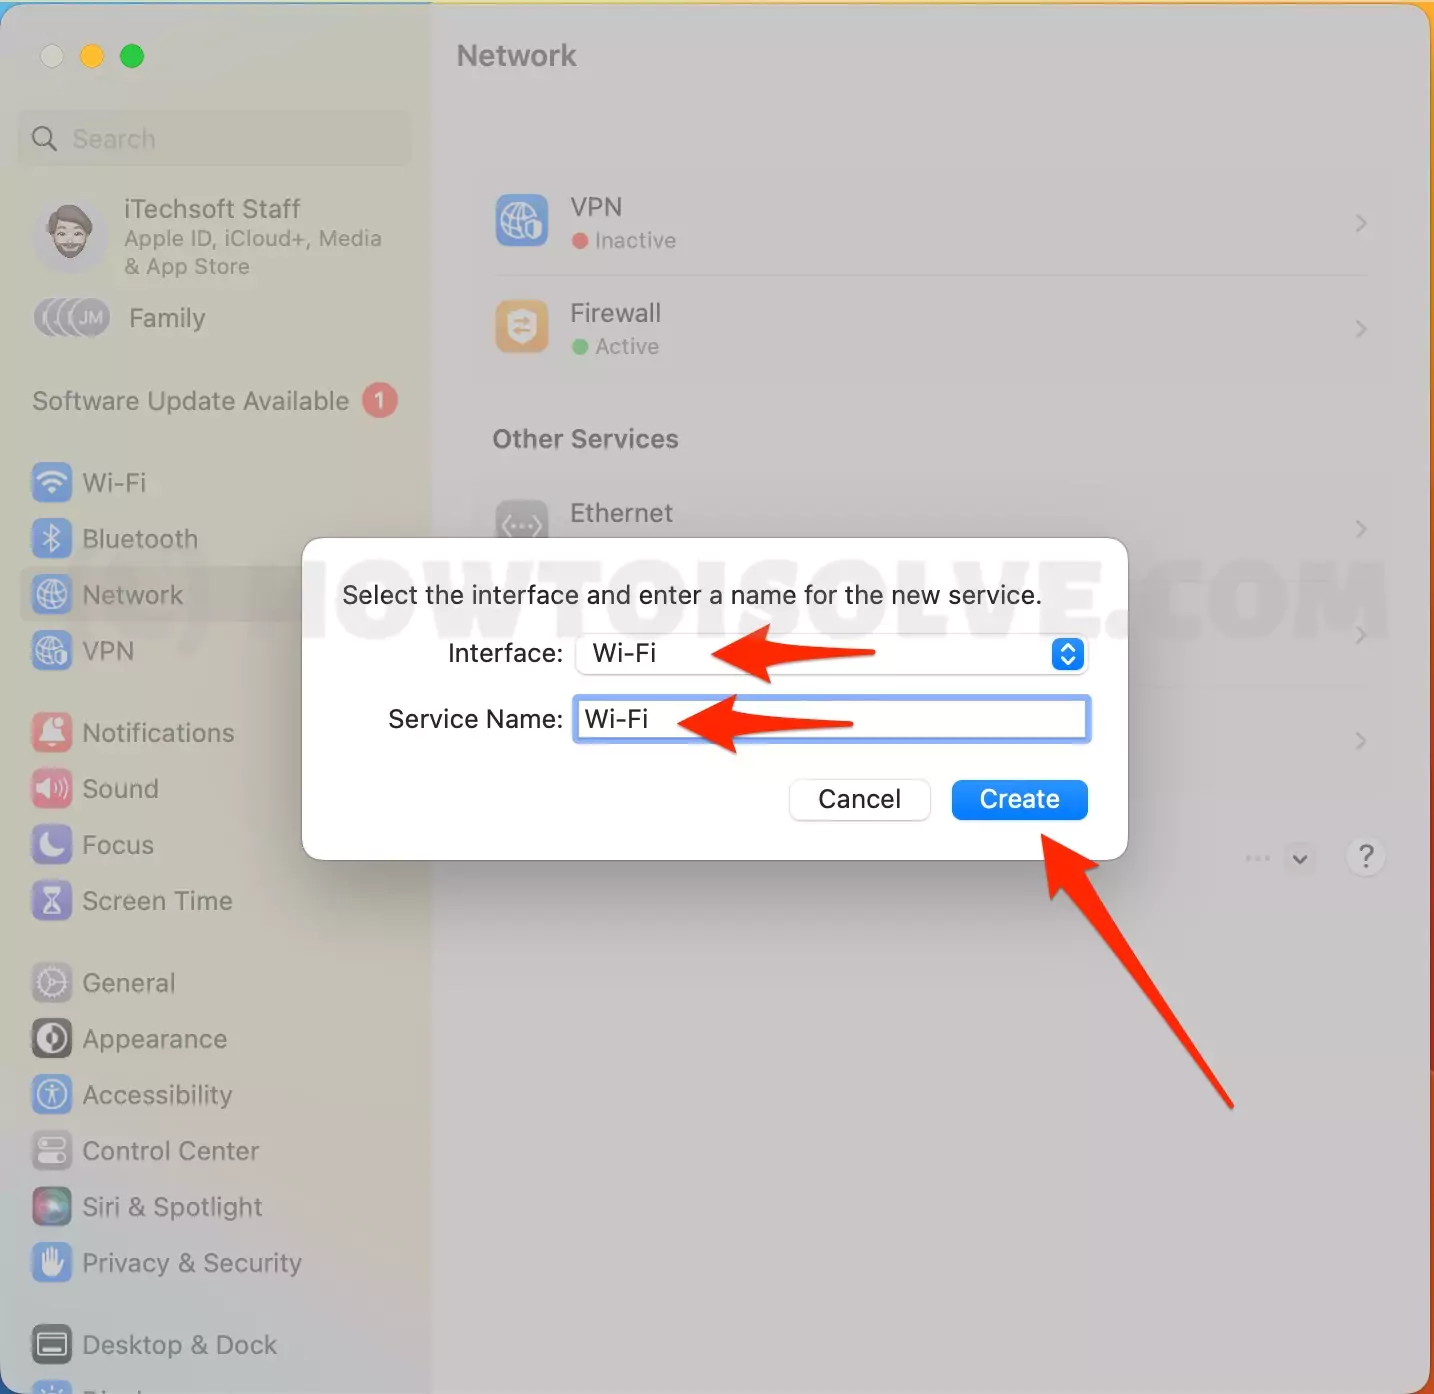
Step. 4→ After that, add that Wi-Fi network again to your MacBook
This should fix the issue of the exclamation mark popping up next to the Wi-Fi icon.
Still, the Exclamation Point won’t go away on WiFi, and Showing, Wi-Fi: Not Configured. Go with our full diagnostics guide.
14→ Enter TCP/IP Settings On Mac
If your network administrator and Internet Service Provider offers the network settings such as IPv6 and IPv4, you can now firmly enter them into the TCP/IP Settings. Here is how you can do so.
- On the Mac computer, select Apple Logo and then click on System Settings…
- On the right window, go to the Network to which you are connected and then choose Details…
- From the left sidebar of window, click on TCP/IP.
- If you receive an IPv4 Address, click Configure IPv4 drop-down. Select Option and then re-write IPv4 Address, router address, and subnet mask.
- If you receive an IPv6 Address, click on Configure IPv6 drop-down, select Option, then enter router address, Prefix Length, and IPv6 Address.
If you have received DHCP Client ID, enter it too. And click OK.
15→ Renew Your IP Address From The DHCP Server On Mac
The best part is that you can force your Mac computer if you receive an IP address from a DHCP server. Additionally, it can fix the Network related issues on Mac. This needs to perform frequently, where most of the computer uses a similar DHCP server. Follow the below-mentioned steps.
- On the Mac computer, navigate to the Apple Logo.
- Select System Settings… choose Networks.
- Click on Wi-Fi, and go to the Wi-Fi to which you are connected.
- Select Details… next to it.
- Now choose TCP/IP from left sidebar.
- Click on the Renew DHCP Lease, and lastly, OK.
16→ Set Hardware Option On Mac
In rare cases, the Hardware isn’t configured automatically. In some scenarios, you may require your Hardware to be configured Manually. However, your ISP or Network Administrator will notify you whether you need such settings.
Fact: Altering the network settings change the behavior of Mac towards the Network. Unless your ISP or Network Administrator offers preferable settings, always keep your Hardware automatic. From now on, the wrongly configured settings can result in a degradation in network performance.
- On the Mac computer, navigate to the Apple Logo.
- Select System Settings… choose Networks.
- Click on Wi-Fi, go to the Wi-Fi to which you are connected.
- Select Details… beside it.
- Choose Hardware.
- Select the Configure Drop down and select Manually.
Now enter the settings offered by the internet service provider, and lastly, choose OK.
17→ Enter WINS Settings On Mac
WINS, known as Windows Internet Naming Service, is an optimal part of Windows Server. The functionality maps the server name and location to an IP Address. If your Network needs to have it, follow the steps below.
- On your Mac computer, choose Apple Logo > System Settings…
- Select Network.
- Click on the Details… on the Network to which you want to set up WINS.
- From the next window, select WINS from the left sidebar.
- Jot down the NEBOIS Name you will receive from the network administrator. Also, enter the group name.
- Choose the + Icon and enter WINS IP Address. If you aren’t familiar with it, ask the network administrator.
- Lastly, click OK.
18→ Connect To An 802.1x Network On Mac
You can connect to Ethernet Cable or Wi-Fi protected by IEEE 802.1X. It is purposely designed to enhance the security of the local area network. Usually, the network configuration profile is shared by the network administrator.
Once you download and open it using mail, the Mac computer automatically recognizes the .mobileconfig extension and begins the installation process.
During the installation process, you have also entered the password and other information that isn’t mentioned in the profile.
- On your Mac computer, choose Apple Logo > System Settings…
- Select Network.
- Click on the Details… on the Network to which you want to set up 802.1x.
- Choose 802.1x from the left sidebar.
- Select the one if you have multiple profiles.
- Click Connect > OK.
19→ Change Proxy Settings On Mac
The proxy settings are configured when the Mac computer, connected to the Network, needs proxy servers to access the internet. This can be ignored when the computer is directly connected to the router or has been configured under the default gateway of internet.
Go to Apple Logo > System Settings… > Network. Choose Details… next to the Network to which you are connected. Now select Proxies from the left sidebar. And then configure the one you want.
So these were all the features of the macOS Wi-Fi settings and how to use them. Use these amazing and unique features to bring out the best of your MacBook and fix the problems related to Wi-Fi connectivity and other issues. We hope that we were able to assist you in getting the proper knowledge about the Wi-Fi settings of Mac.


