With data leakages being a regular thing on the global level, companies like Apple needed to introduce a system for safeguarding their customers’ privacy and data. Apple was one of the first leading companies to take strict action to protect their customers from data breaches and leaks.
The macOS operating system introduced severe limitations for using third-party apps by preventing them from accessing your contacts, microphone, camera, files, calendar, etc., as they are the sole reason for data breaches.
Hence, Full Disk Access is required for some third-party apps to work correctly on your MacBook, as the system restricts these apps.
This blog features all the information regarding Full Disk Access, how to grant full disk access on Mac when you should grant Full Disk Access, and much more. We will discuss each of these points in detail in the sections below.
What does Full Disk Access mean in a Mac?
Full Disk Access is an essential security feature of the Mac that allows the apps to access certain parts of your disk required by some apps to function correctly.
By granting the “Full Disk Access” permission to software, the Mac includes that application in its trusted or safe listed category of apps.
These trusted or safe listed applications are considered safe and do not misuse the data on your computer. While these trusted apps are granted full disk permission, all the other apps are served with a “You Shall Not Pass” error message and cannot be run without providing proper access.
Some Examples from those applications like Teamviewer, helpx, Sophos, cortex XDR, Bitdefender, fpsaud, and avast require you to grant full disk access to use their features fully.
Even after granting Full Disk Access to the applications, it doesn’t give the application or developer complete access to your files and information. With this being said, you might have a question-
What if an application tries to go past its permissible limit?
In this case, Apple has put out a statement saying, “If any application or software makes an attempt to go beyond its permissible limit to access any information or data, the system will automatically shut that application down.” Meaning the application trying to go beyond this allowed permission will crash or shut down automatically by the system.
Is Full Disk Access Something You Should Avoid?
Almost all software and applications ask for specific permissions after installing them on your device. Nearly all apps are much more regulated and secure than in the past.
Still, it is recommended to download the applications only from their official websites or developer web pages to prevent any complications. or Only From App Store
Unless you download the applications from an unreliable or third-party source, you need not worry about granting them permissions as they all follow the official data guidelines and rules, for instance, EULA.
The conclusion is you should worry about giving Full Disk Access to apps downloaded from a trusted source, as it is not economical for apps to misuse your data.
Monitor The Security Aspects of your Mac
If you are still paranoid about granting Full Disk Access to certain apps or how to give full disk access Mac, you should check the security features of your Mac to see what permissions are granted to the app.
You can monitor the disk permissions given to the apps by going to the steps given for macOS installed on your Mac. You can see and assign the folder for open access in the Files and Folders pane.
You can also check which applications are using your Microphone, Camera, and Screen Recording, as these are the leading causes of data breaches.
How To Grant Full Disk Access On Mac?
Since we have discussed and studied Full Disk Access, it is time to learn how to grant full disk access on Mac when you should grant Full Disk Access and all the other necessary information describing it. Stick to the procedure to give Full Disk Access to your MacBook.
On macOS Ventura, Sonoma – Full Disk Access
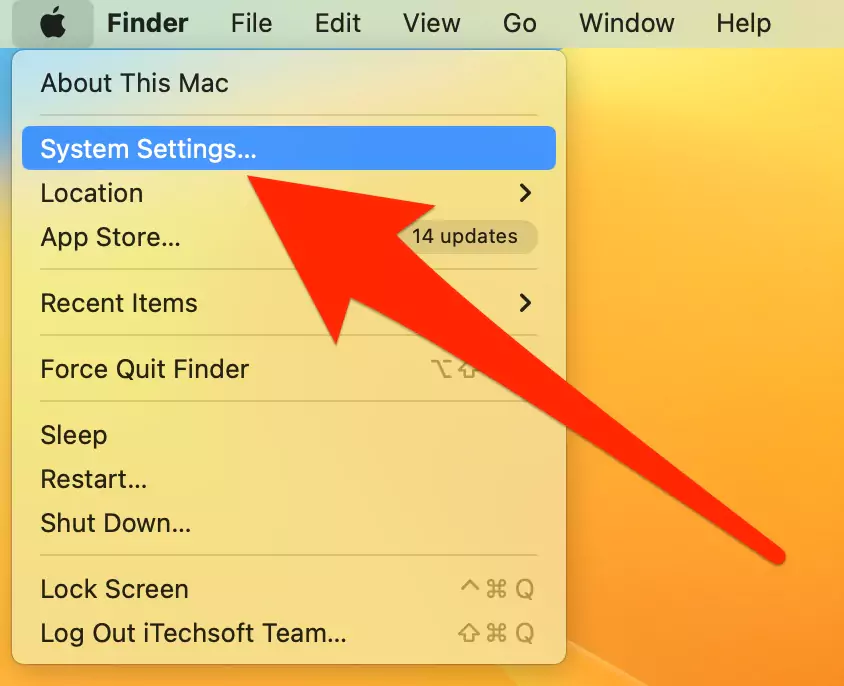
Step. 1→ Go to the Apple Logo > Launch the system settings window from the Apple menu.
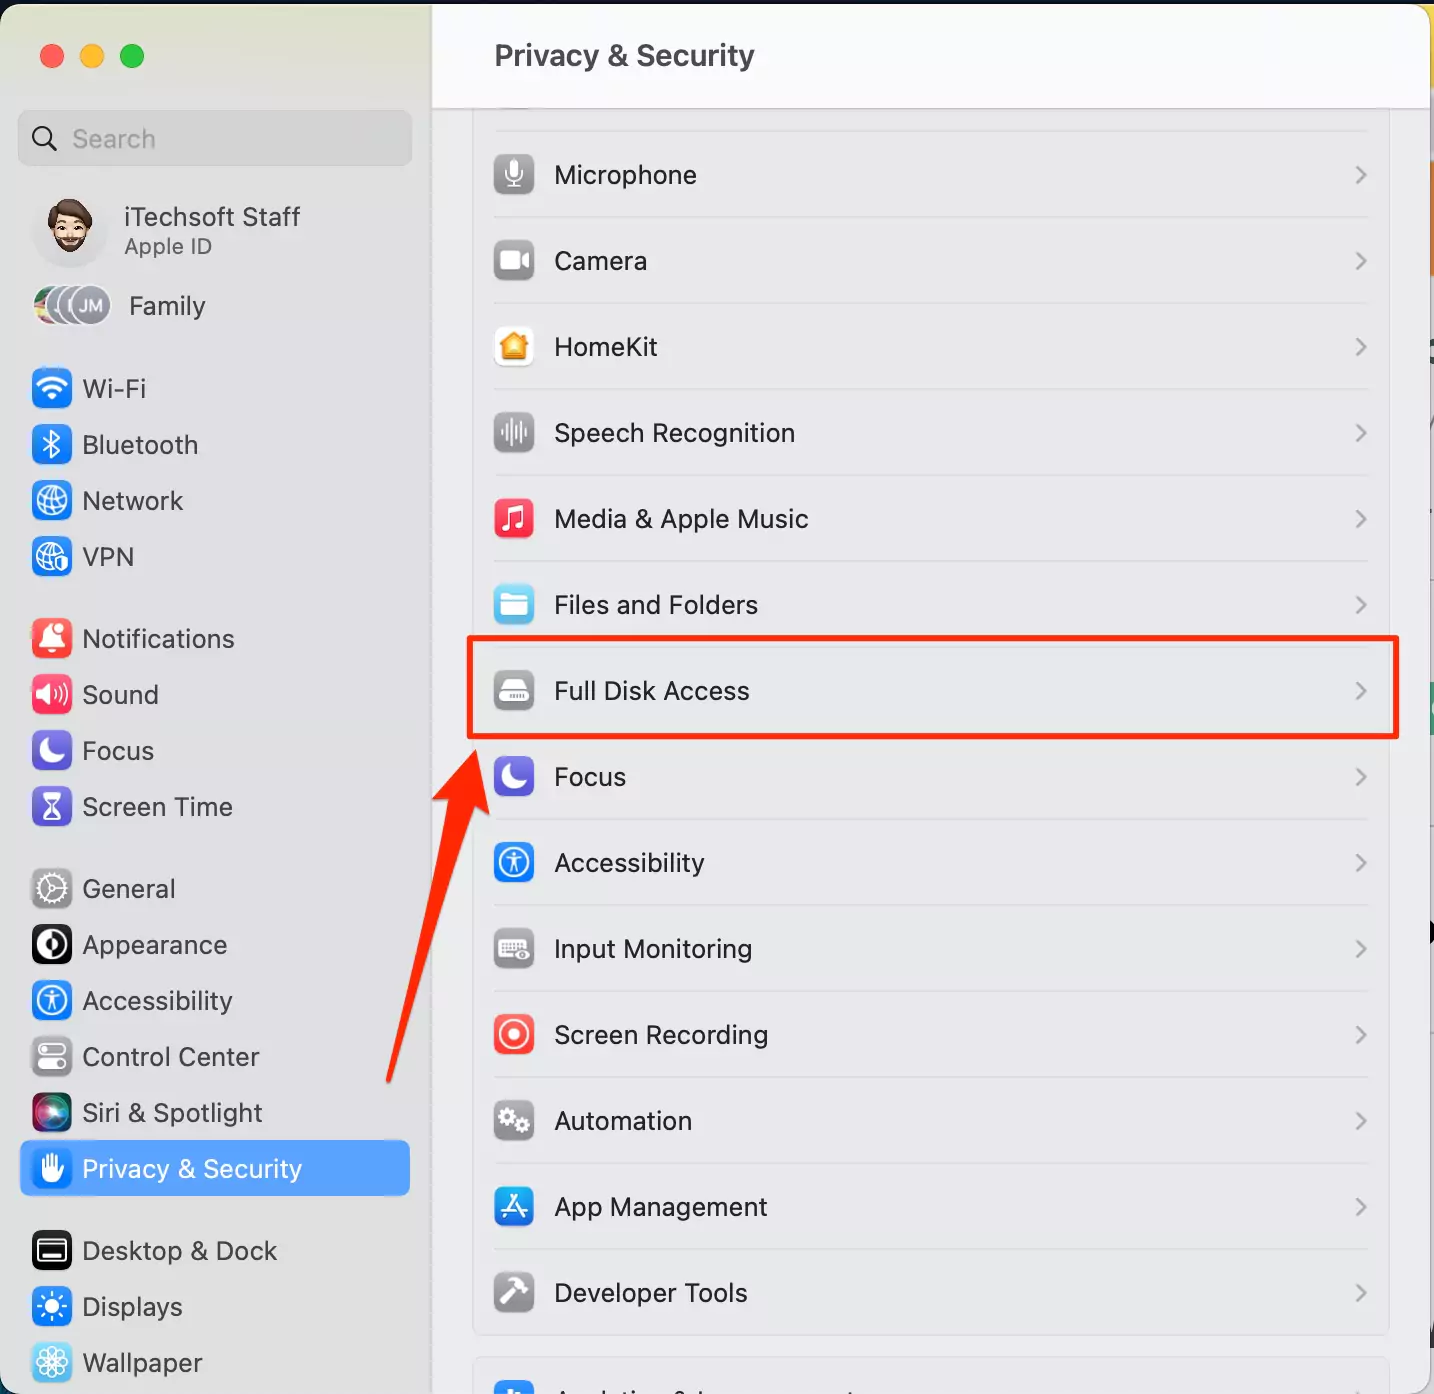
Step. 2→. Click on the “Privacy & Security” tab.
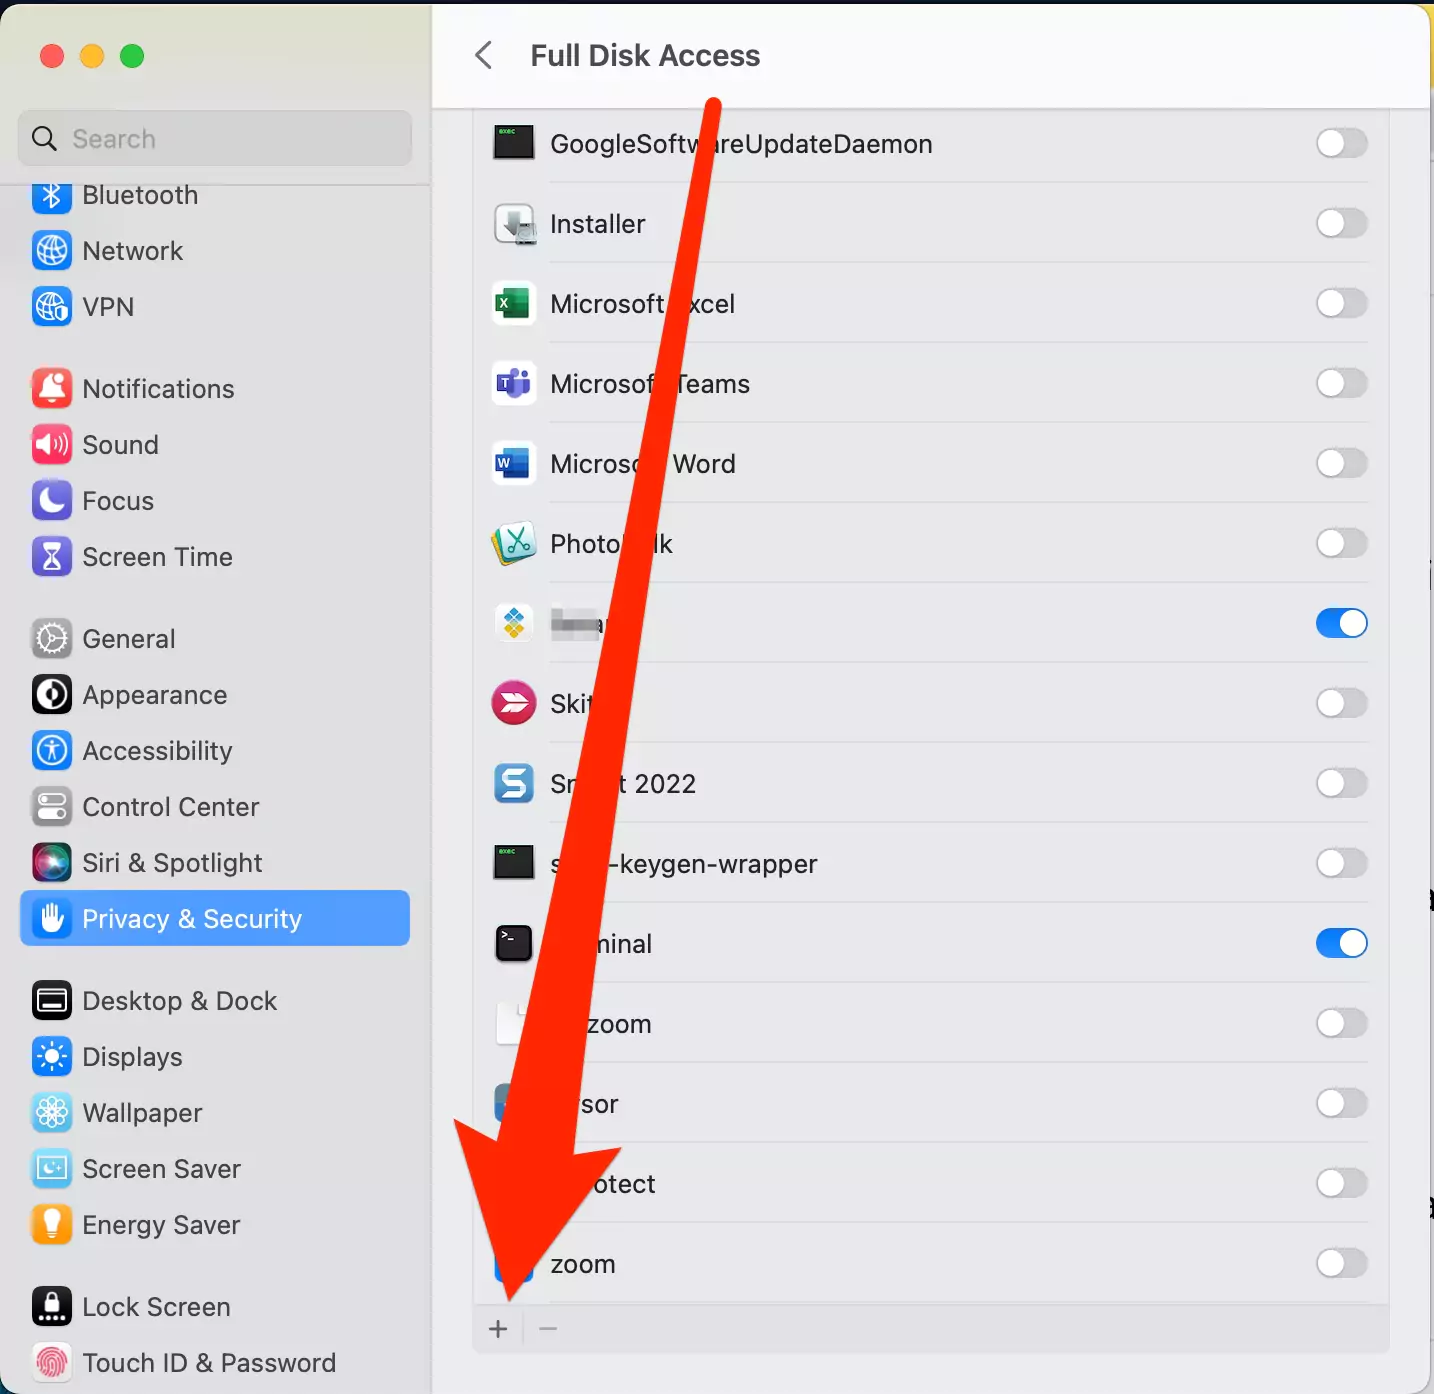
Step. 3→. Head over to the “Full Disk Access” window.
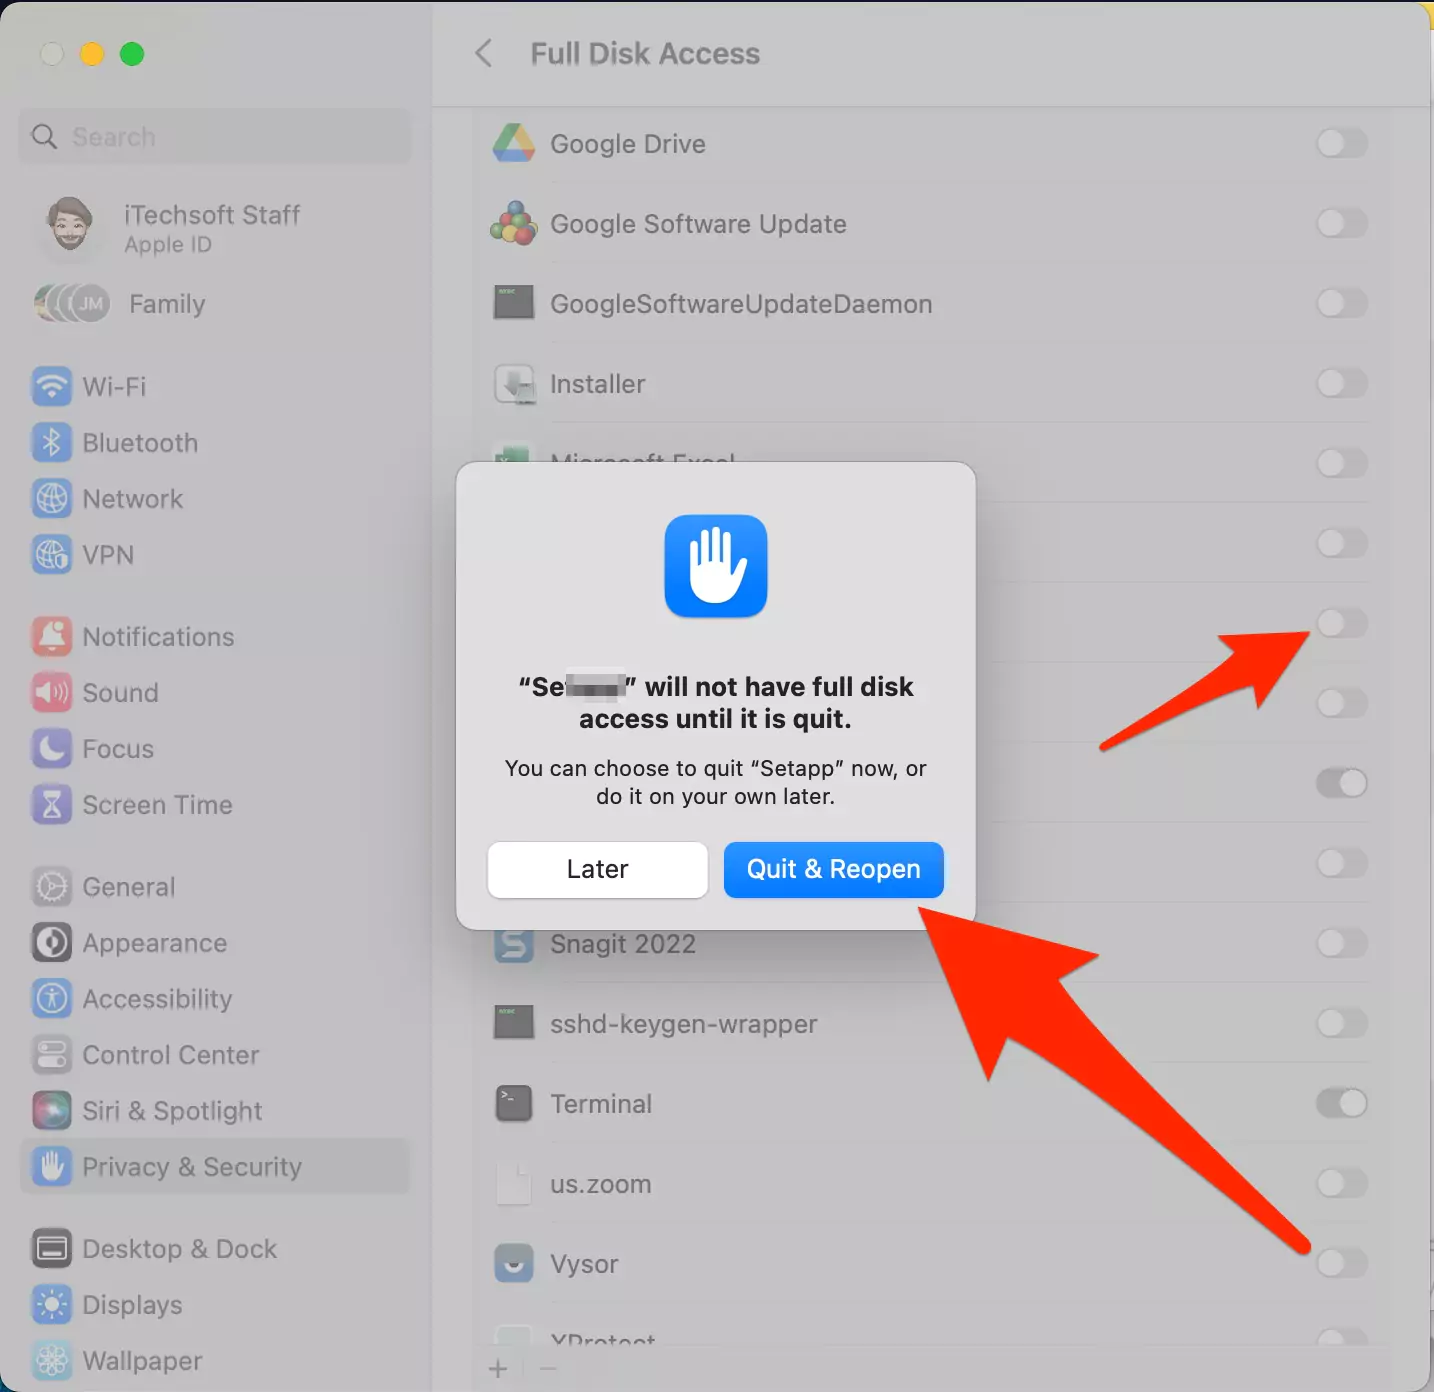
Step 4→ See the toggle for all installed apps, and Enable the toggle for apps to allow Full Disk Access Permission.
To Add a New app manually,
Step. 4→. Use your mouse to click the plus (+) icon and select the application you want to grant Full Disk Access that’s not in the list.
Step. 5→. Finally, select “Quit & Reopen” to apply the changes and relaunch the application.
Anytime we can check full disk access mac and Stop grant after use or when the app is not in use.
On macOS Monterey and Earlier- Full Disk Access
Step. 1→. First, open the system preferences tab from the Apple logo at the top of the display.
Step. 2→. Select “Security & Privacy” in the system preferences tab.
Step. 3→. Now go to the “Privacy” pane.
Step. 4→. In the left tab or panel, scroll down and select “Full Disk Access.”
Step. 5→ After that, click on the lock logo at the bottom of the window.
Step. 6→. Enter your login credentials or the touch ID to verify that you want to make the changes.
Step. 7→ Tap on the plus (+) icon and choose the application for which you want to grant Full Disk Access.
Step. 8→. At last, hit the “open” button and click on the “quit” button if asked.
The above-explained process will successfully grant the selected application Full Disk Permission, and you can use all the application functions fully.
When should we give Full disk Access to an app or software?
Understanding what applications need Full Disk Access is crucial for safeguarding personal data. You should only give Full Disk Access to apps whose developers are trusted or safe listed by Apple. If Apple trusts an app, it likely follows all the security and safety guidelines for ensuring the customers’ safety.
For example, an app with your daily schedule or any other application that belongs to the “Productivity” bracket will work efficiently and properly if you provide access to your calendar. In contrast, if a gaming application requests to access your photos, mail, or contacts, you should not grant Full Disk Access as it might be misusing your data.
In simple words, the trusted applications usually specify the need for accessing the contents of your disk and the limitations to their usage. For instance, software for creating your disk’s backup is developed to analyze and monitor the contents of your disk to perform its job correctly.
Hence, granting Full Disk Access to these applications seems sensible. Although, if you don’t permit these apps, they will keep working by retaining some of their usability.
Therefore, you should consider two things before granting Full Disk Permission to an app: it should be from a reliable source, and the reasoning for the FDA should be appropriate.
How to Give Full Disk Access Mac Terminal
So Mac user has no command to access the privacy settings using the terminal command. So you have to manually enable the app permission for disk access from the Privacy settings on Mac that are given in the above steps. But if you wish to allow Read, Write and execute permission to file and folder, run the below command with File/Folder’ Path.
Step 1→ Open Terminal on Mac (Go to finder > Applications > Utilities > Terminal or use Spotlight Search) > Type the command “chmod 755” Then Drag the File/Folder to the Terminal.
chmod 755 <Drag File or Folder>Step 2→ Hit the Return to run the command. and Allow File/Folder access permission.

That’s it.
Having Trouble Giving Full Disk Access?
If you are facing some difficulty granting Full Disk Access or full disk access Mac not showing, then you can use an app called CleanMyMac X to fix this issue. If you have decided to fix this problem, consider following the steps below.
Step. 1→ Download and install the CleanMyMac X app from the official website.
Step. 2→. Launch the app and click on the Maintenance panel.
Step. 3→. Following this, select the “Repair Disk Permissions” option.
Step. 4→. Click on the “Run” button at the bottom of the window to perform the check and resolve the issue.
By performing this check, the software will look for potential problems with the permissions and fix them to resolve them.
Granting Full Disk Access to applications trusted or safe listed by Apple is fine as they brief the users about all the contents and their usage in advance. And even if you don’t grant the permission, these apps work fine with certain functions being limited. It is highly advised not to give Full Disk Access to apps that appear fishy and ask for permissions unrelated to their implementation. Hence, download all the apps from trusted and credible websites and developers to avoid data leaks.
FAQs→
What does full disk access do to a Mac?
→ A detailed explanation of what full disk access is and what it does to your Mac is given in this article or post for your reference. Please go through it to understand what full disk access does to a Mac.
Is it safe to grant access to macOS?
→ Yes, giving Full Disk Access to macOS is entirely safe as it will help the operating system work efficiently and use its resources to the fullest. Avoid giving disk permissions to torrent trackers and other unreliable apps to avoid data breaches.
How do I get Mac to stop asking for permission?
→ You can stop your MacBook from asking for permission now and then by granting it Full Disk Access by referring to the method described in this post.
How do I get to Security and Privacy on Mac?
→ If you own or have a MacBook, click on the Apple menu > System Preferences > Privacy & Security to open the security and privacy window.
How do I grant full disk access to clean my Mac?
→ Follow the steps listed in the “How To Grant Full Disk Access On Mac?” section of this article to grant full disk access to your MacBook.
How do I enable full disk access on my Mac Ventura?
→ The entire process of enabling Full Disk Access on macOS Ventura is explained in this article. Please refer to it to grant the required permissions.
How do I grant an app to the full disk?
→ You can grant Full Disk Access to an application by adding to the Full Disk Access tab in your Mac’s security and privacy window. Refer to this article or post for a detailed explanation of the same.
Does Malwarebytes require full disk access?
→ Yes, Malwarebytes is one of the software that requires Full Disk Access for running correctly and using all its functions on a MacBook.
What is Aeserver on a Mac?
→ AEServer refers to the Apple Events Server. This feature controls and monitors the Apple Events intercepted from other Macs. You check if the remote Apple Events is enabled on your Mac by clicking on System Preferences > Sharing.
Is Bitdefender’s full disk access grant safe?
→ No, granting Bitdefender complete disk access is not a good idea as it uses system resources while providing no benefit. Hence, it is best to uninstall it from your computer.
Should I grant Clean My Mac full disk access?
→ Yes, you can grant full disk access to CleanMyMac as it is a cleaning tool that requires access to your startup disk to search for caches, junk files, useless files, etc.
What permissions does TeamViewer need?
→ TeamViewer requires specific accessibility permissions for interacting between computers. Check the necessary licenses to use the app on their official website.
How do I give full disk access to Teamviewer Mac?
→ Follow the procedure or steps in the “How To Grant Full Disk Access On Mac?” section of this post to give full disk access to the TeamViewer app on your MacBook.
How do I give permission to AnyDesk on a Mac?
→ The process of permitting AnyDesk on a Mac is the same as given in this article. So kindly refer to it to get a better understanding of the same.


