In general, headphones and headphone jack in Mac computers enhances the sound quality. You can hear more immersive sound without any kind of disturbance. But sometimes it can play wrong, and that’s what many users are going through “headphone jack not working on Mac.” It could be due to software bugs, serious hardware problems, misconfigured Mac settings, and more. Luckily, fixing it is pretty handy. Here are effective solutions for the headphone jack not working on Mac. So, without any ado, let’s get started.
Headphone Jack Problems On Mac
Here are nine ways to fix the iMac headphone jack not working.
Solution #1. Clean headphone jack port
Experts always suggest cleaning the keyboard and Clean mac screen frequently. Also, cleaning the Mac ports is something you always need to take care of. If you are using the Mac computer all day, dirt and debris may accumulate inside the headphone jack. You can use a microfiber cloth to remove all dirt. After this, try connecting your earphones or headphones and cross-verify the problem.

Solution #2. Check your headphone cable for damage
Carefully notice your headphone cable and see if you notice any severe damage or cuts. If you do, this may be the reason why your headphone jack is not working on Mac.
If you don’t find any damage on the headphone cable, try using it on your friend and family member’s MacBook. See if it works, and if not, you need to resolve it instead of fixing your Mac headphone jack.
Sometimes, the reason why the headphone jack is not working on Mac is due to the corrupted headphone cable. Therefore, it’s always a good bet to invest in the best headphones. ]

Solution #3. Ensure that the headphone cable is plugged in
A loose or misaligned headphone connection could lead to confusion headphone jack not working on Mac. In this scenario, we suggest disconnecting and reconnecting it.
Solution #4. Cross-verify the output source
There are chances that the output source on your Mac computer is configured to a built-in speaker. So, if cleaning the headphone port doesn’t work for you, we suggest verifying the sound output source. To do so, follow the steps below.
Step 1: Go to the Apple Menu from the top left corner of the Mac Screen. Select System Settings…
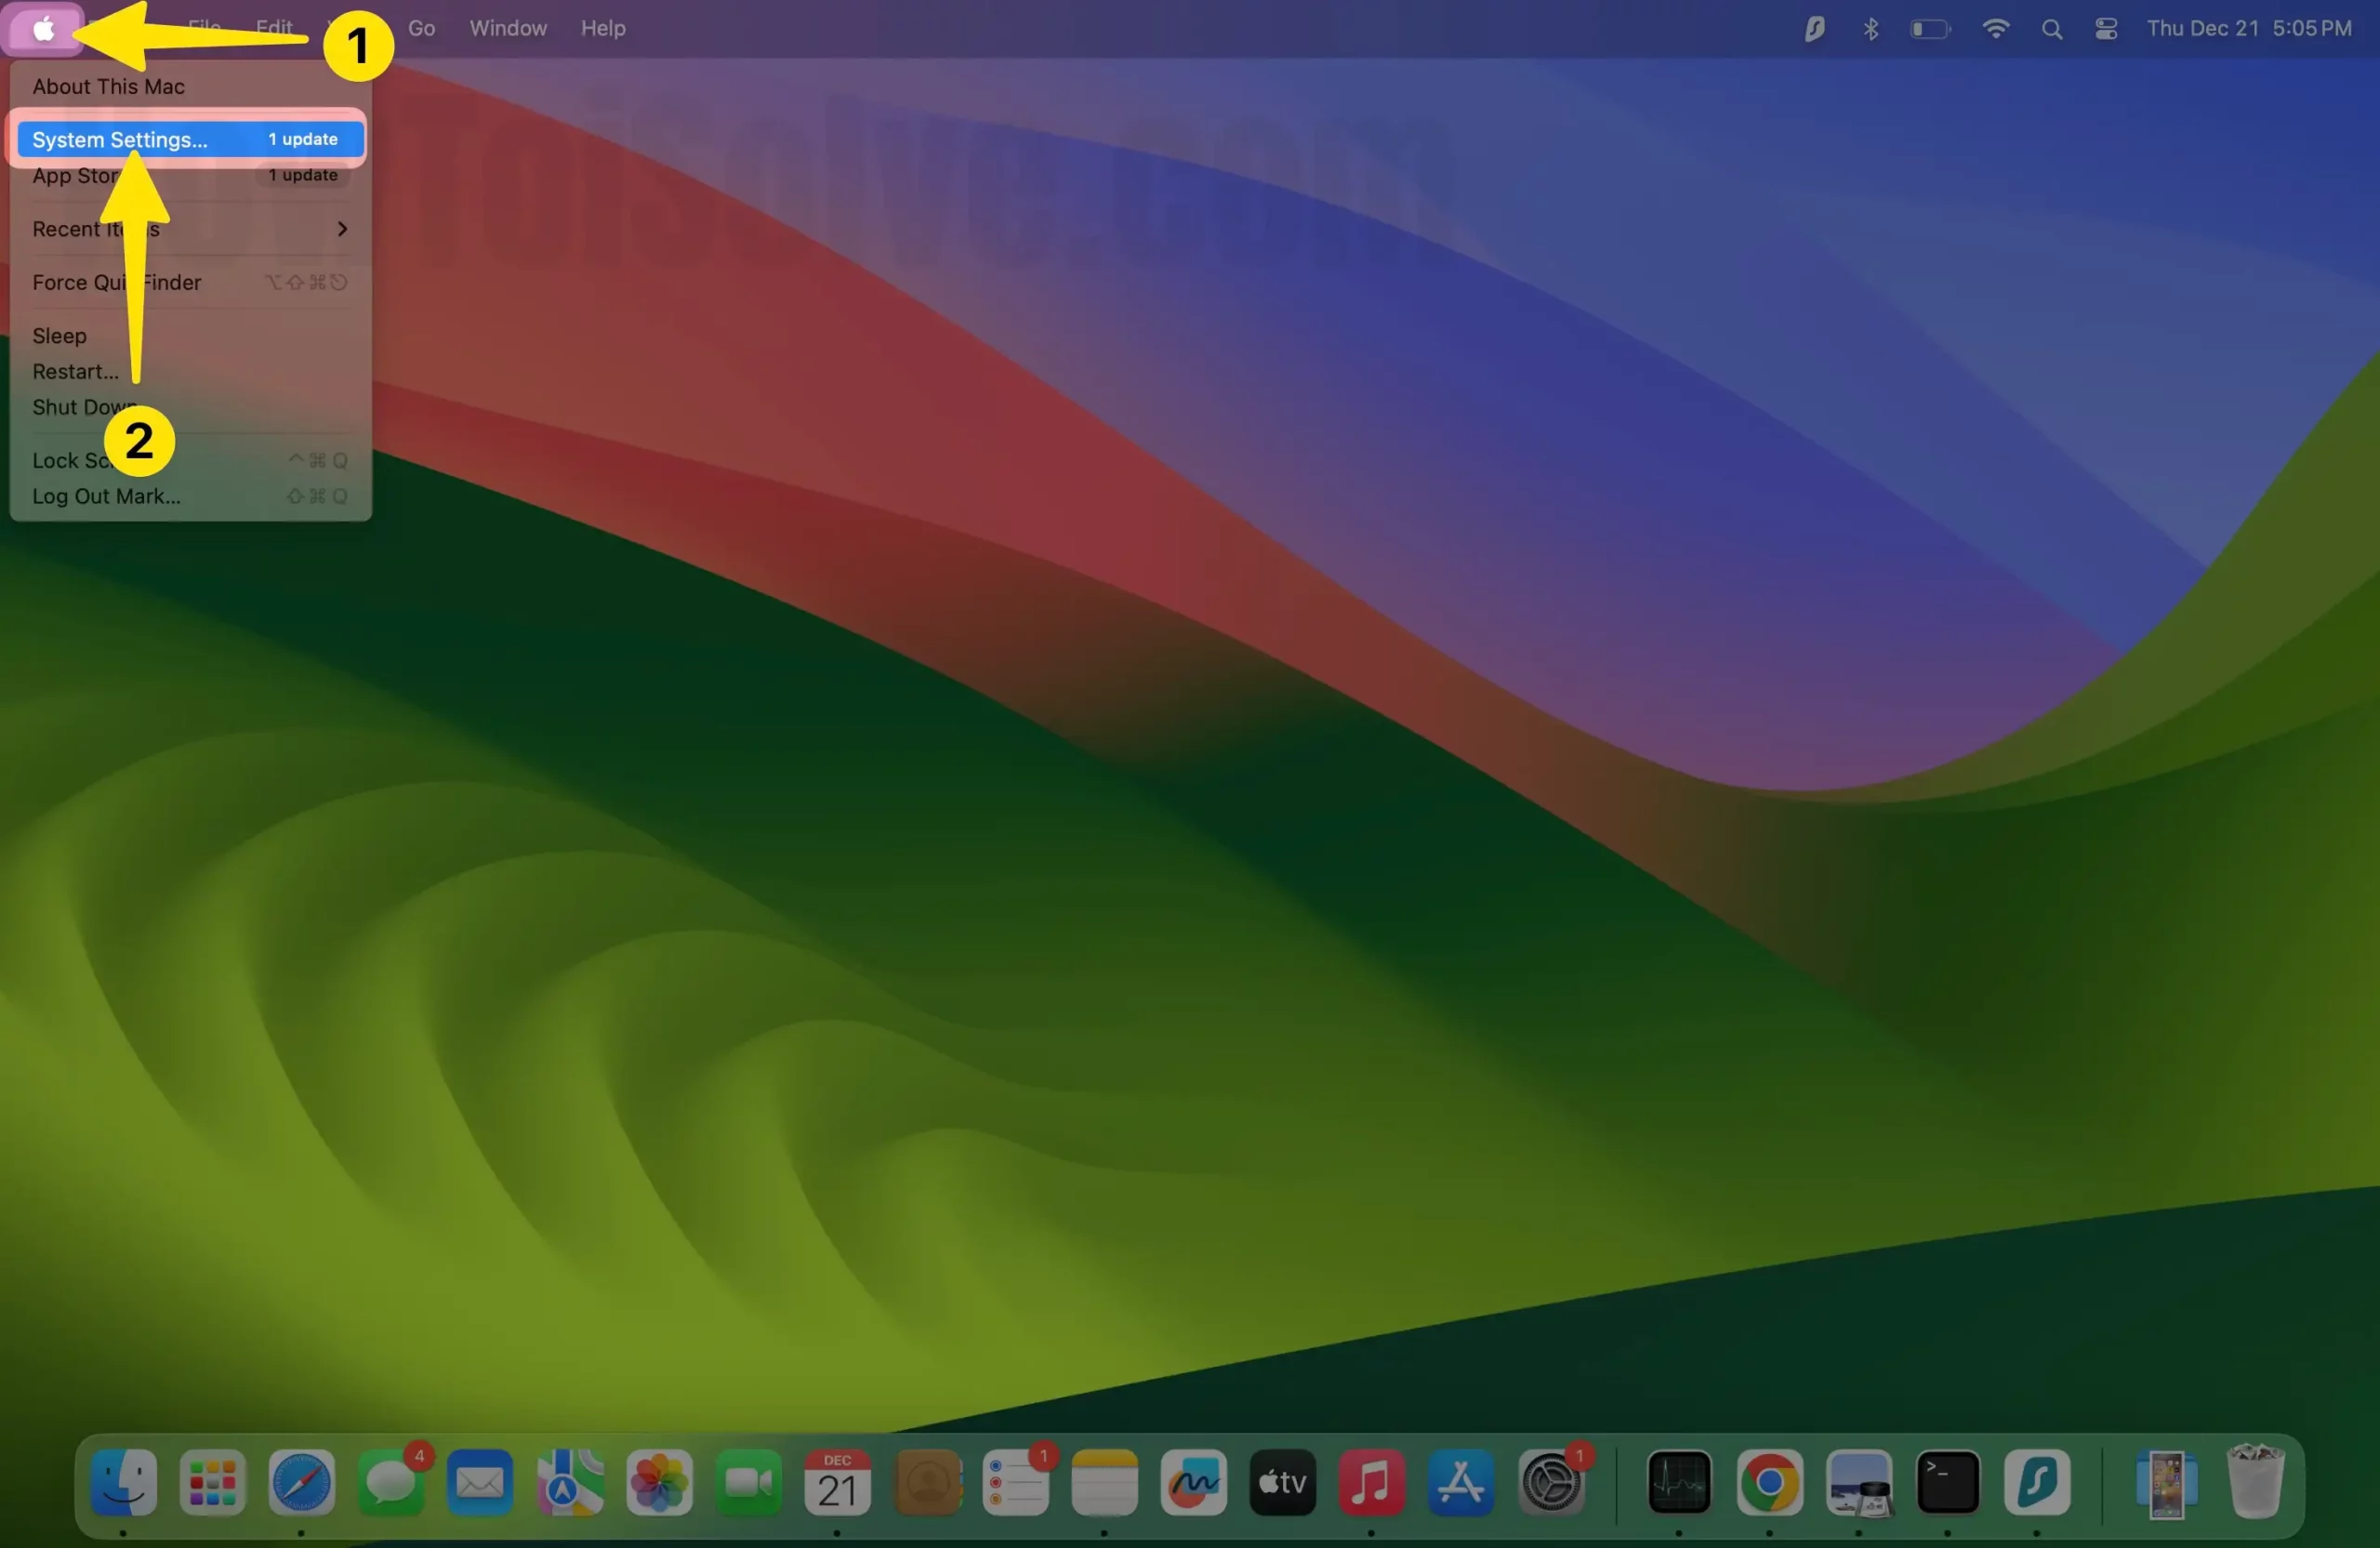
Step 2: From the menu and then select, click on Sound from the left pane.
Step 3: In the Output & Input menu, click on the Output Tab and select your headphones.

Hopefully, changing the Output source will resolve your problem. But if the issue continues, move forward to the following solution.
Solution #5. Restart your Mac
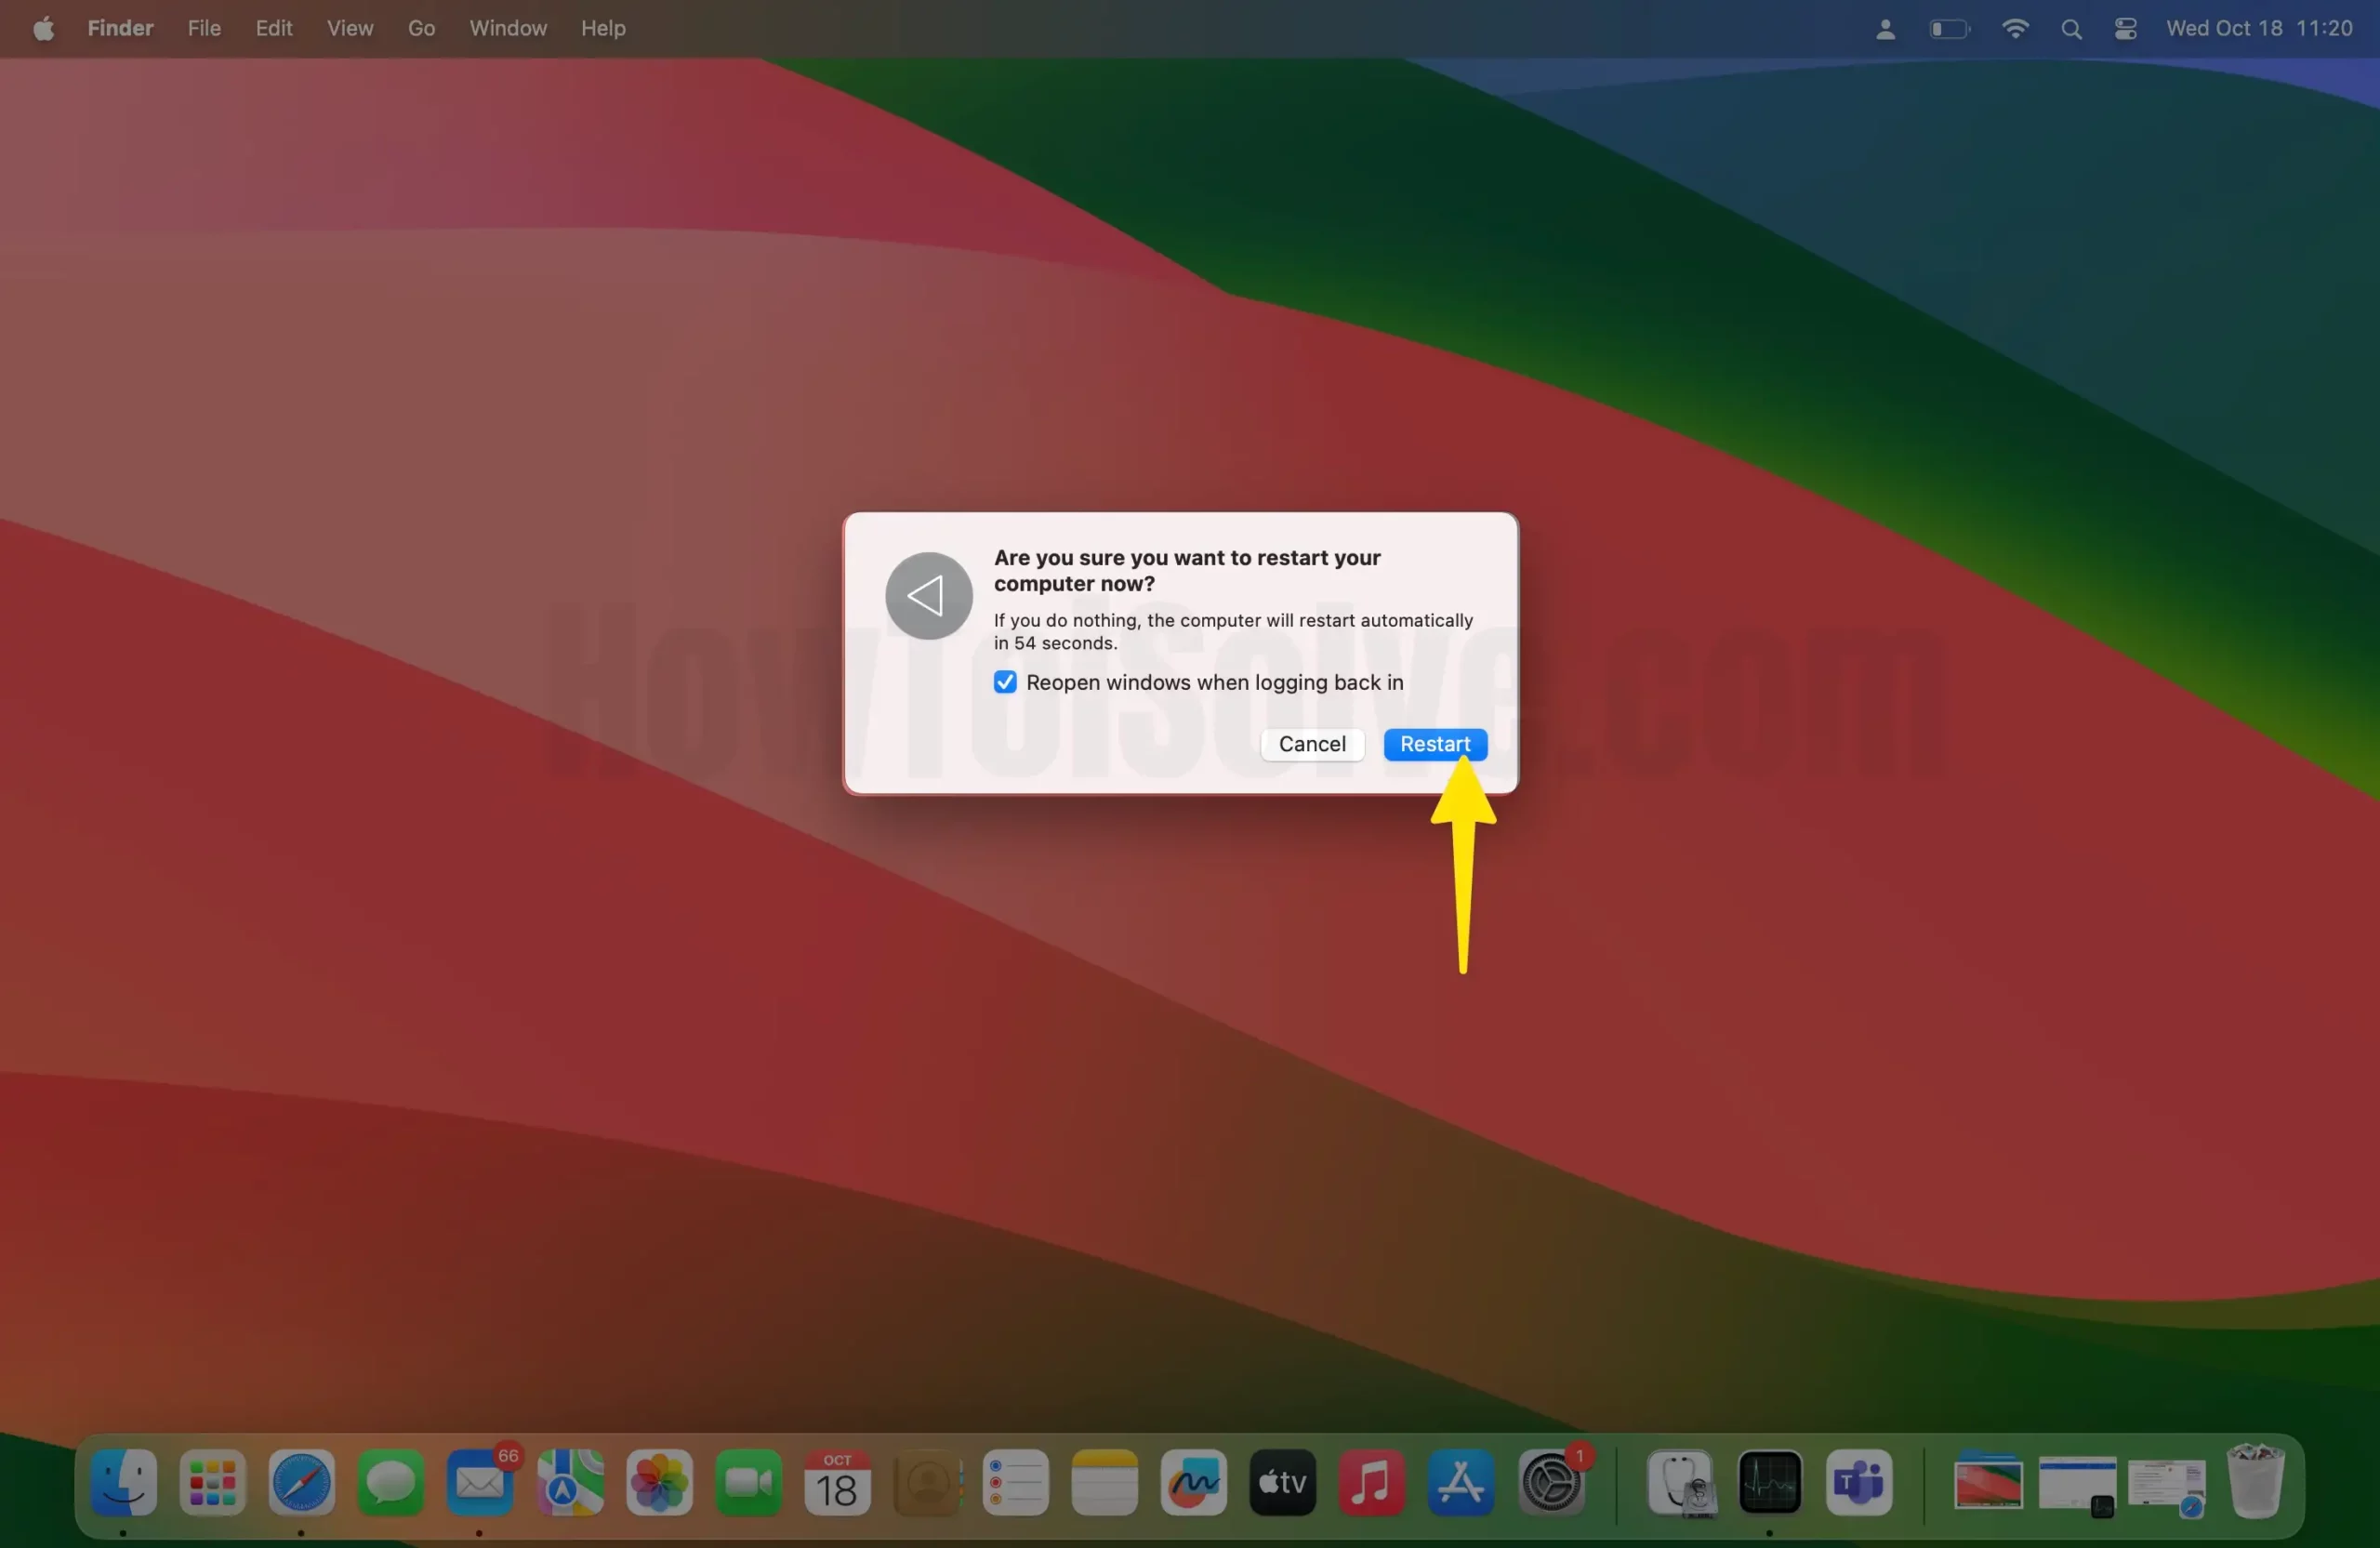
Anything from the software error may prevent your Mac headphone jack from working. Luckily, to fix it, all you need to do is restart your Mac computer. For that, go to the Apple Menu > Restart > Restart…

Solution #6. Restart Sound Controlller
Let’s go to the high-end solutions. The Mac comes with a built-in sound controller known as core audio. It’s nothing but a low-level API designed to handle various needs of Mac applications, including audio playback. And since the Audio jack is also linked with audio playback, you can try restarting the sound controller by following the steps below.
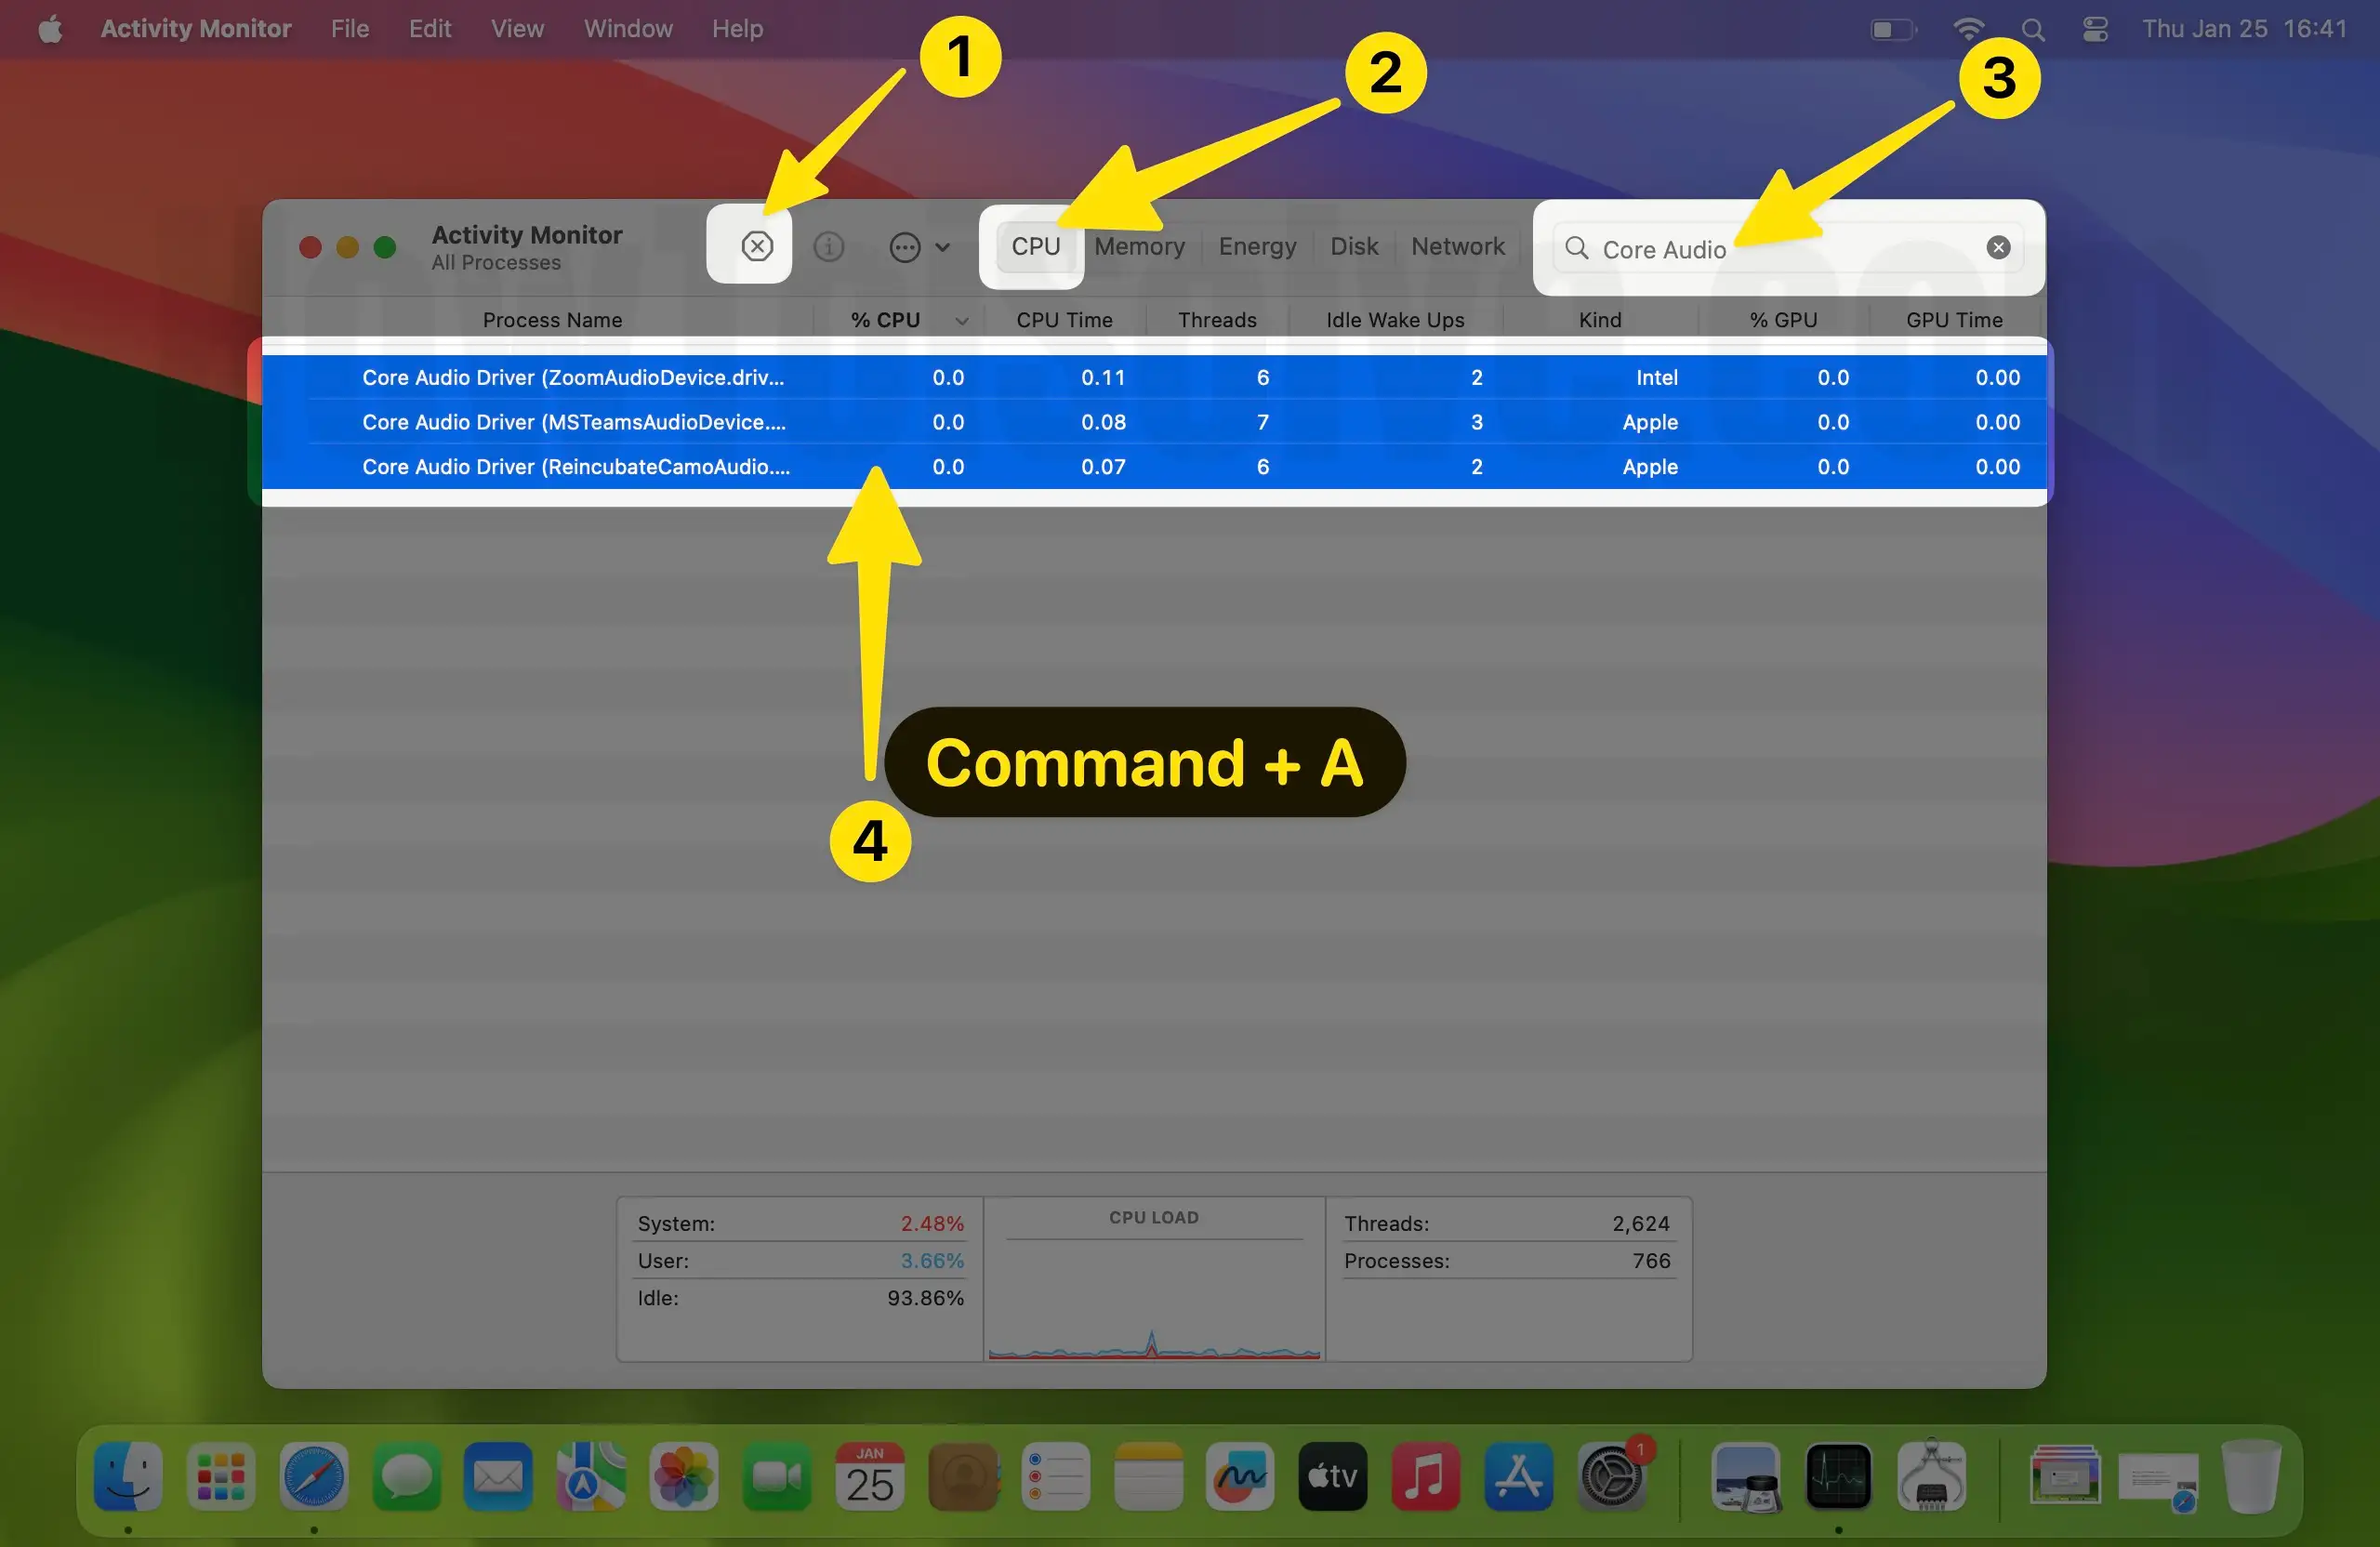
Step 1: Press Command + Space to access the Activity Monitor. Enter Activity Monitor and click on it to open.

Step 2: Select the CPU Tab from the Activity Monitor toolbar.
Step 3: Next, search for CoreAudio in the search bar.
Step 4: Select CoreAudio and click X Icon to stop the process.
Step 5: Are you sure you want to quit the process? The process core audio is owned by _coreaudiod. Do you really want to quit “core audio”? Select Force Quit.

After this, close Activity Monitor and restart your mac computer.
Solution #7. Reset SMC on Intel-based Mac
SMC, aka System Management Controller, takes care of every vital hardware function, including the headphone jack. If you have an Intel-based Mac, then you try resetting SMC. To do so, we have created a separate article to learn how to reset SMC on an Intel-based Mac.
Solution #8. Update macOS
To resolve software bugs and enhance performance, Apple frequently launches software updates. Thus, you can check for updates if your headphone jack is not working on your Mac. To do so, follow the steps below.
Step 1: Click on the Apple Menu at the top left corner. Choose System Settings… from the menu.

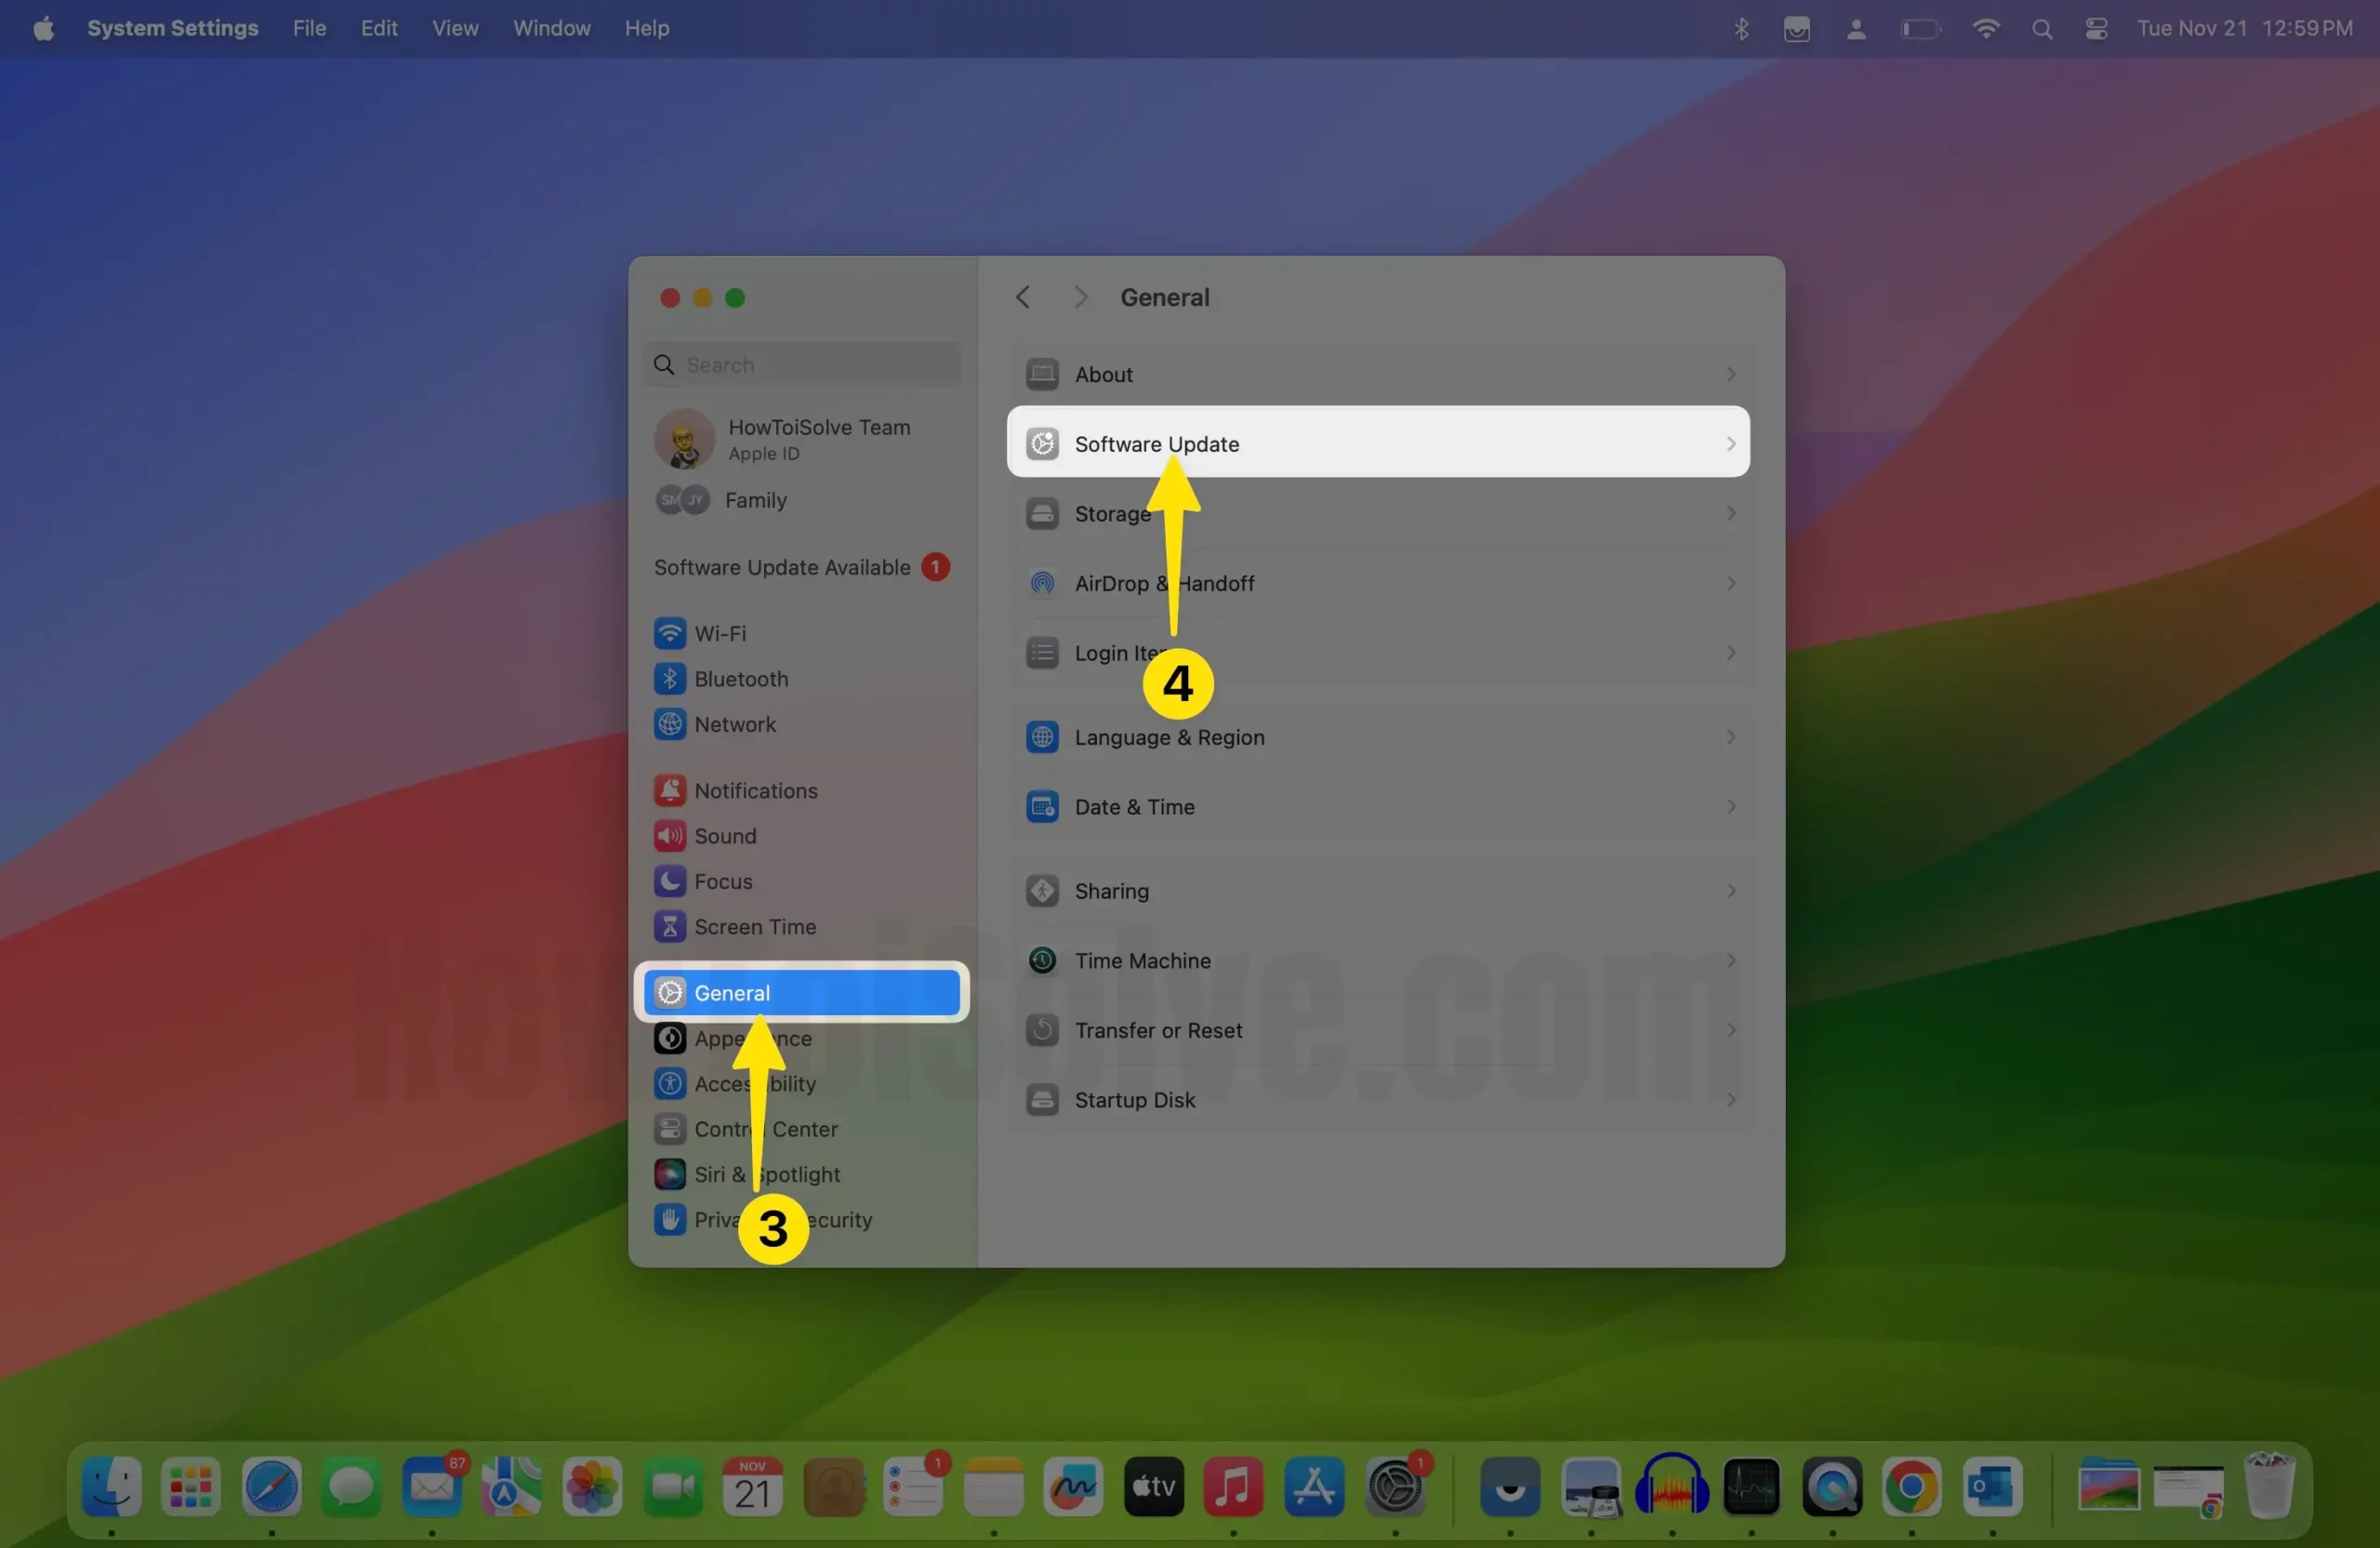
Step 2: Click on General from the left pane.
Step 3: Select Software Update from the right side.
Step 4: Now, let your Mac check for updates…
Step 5: If available, click on Install Now.
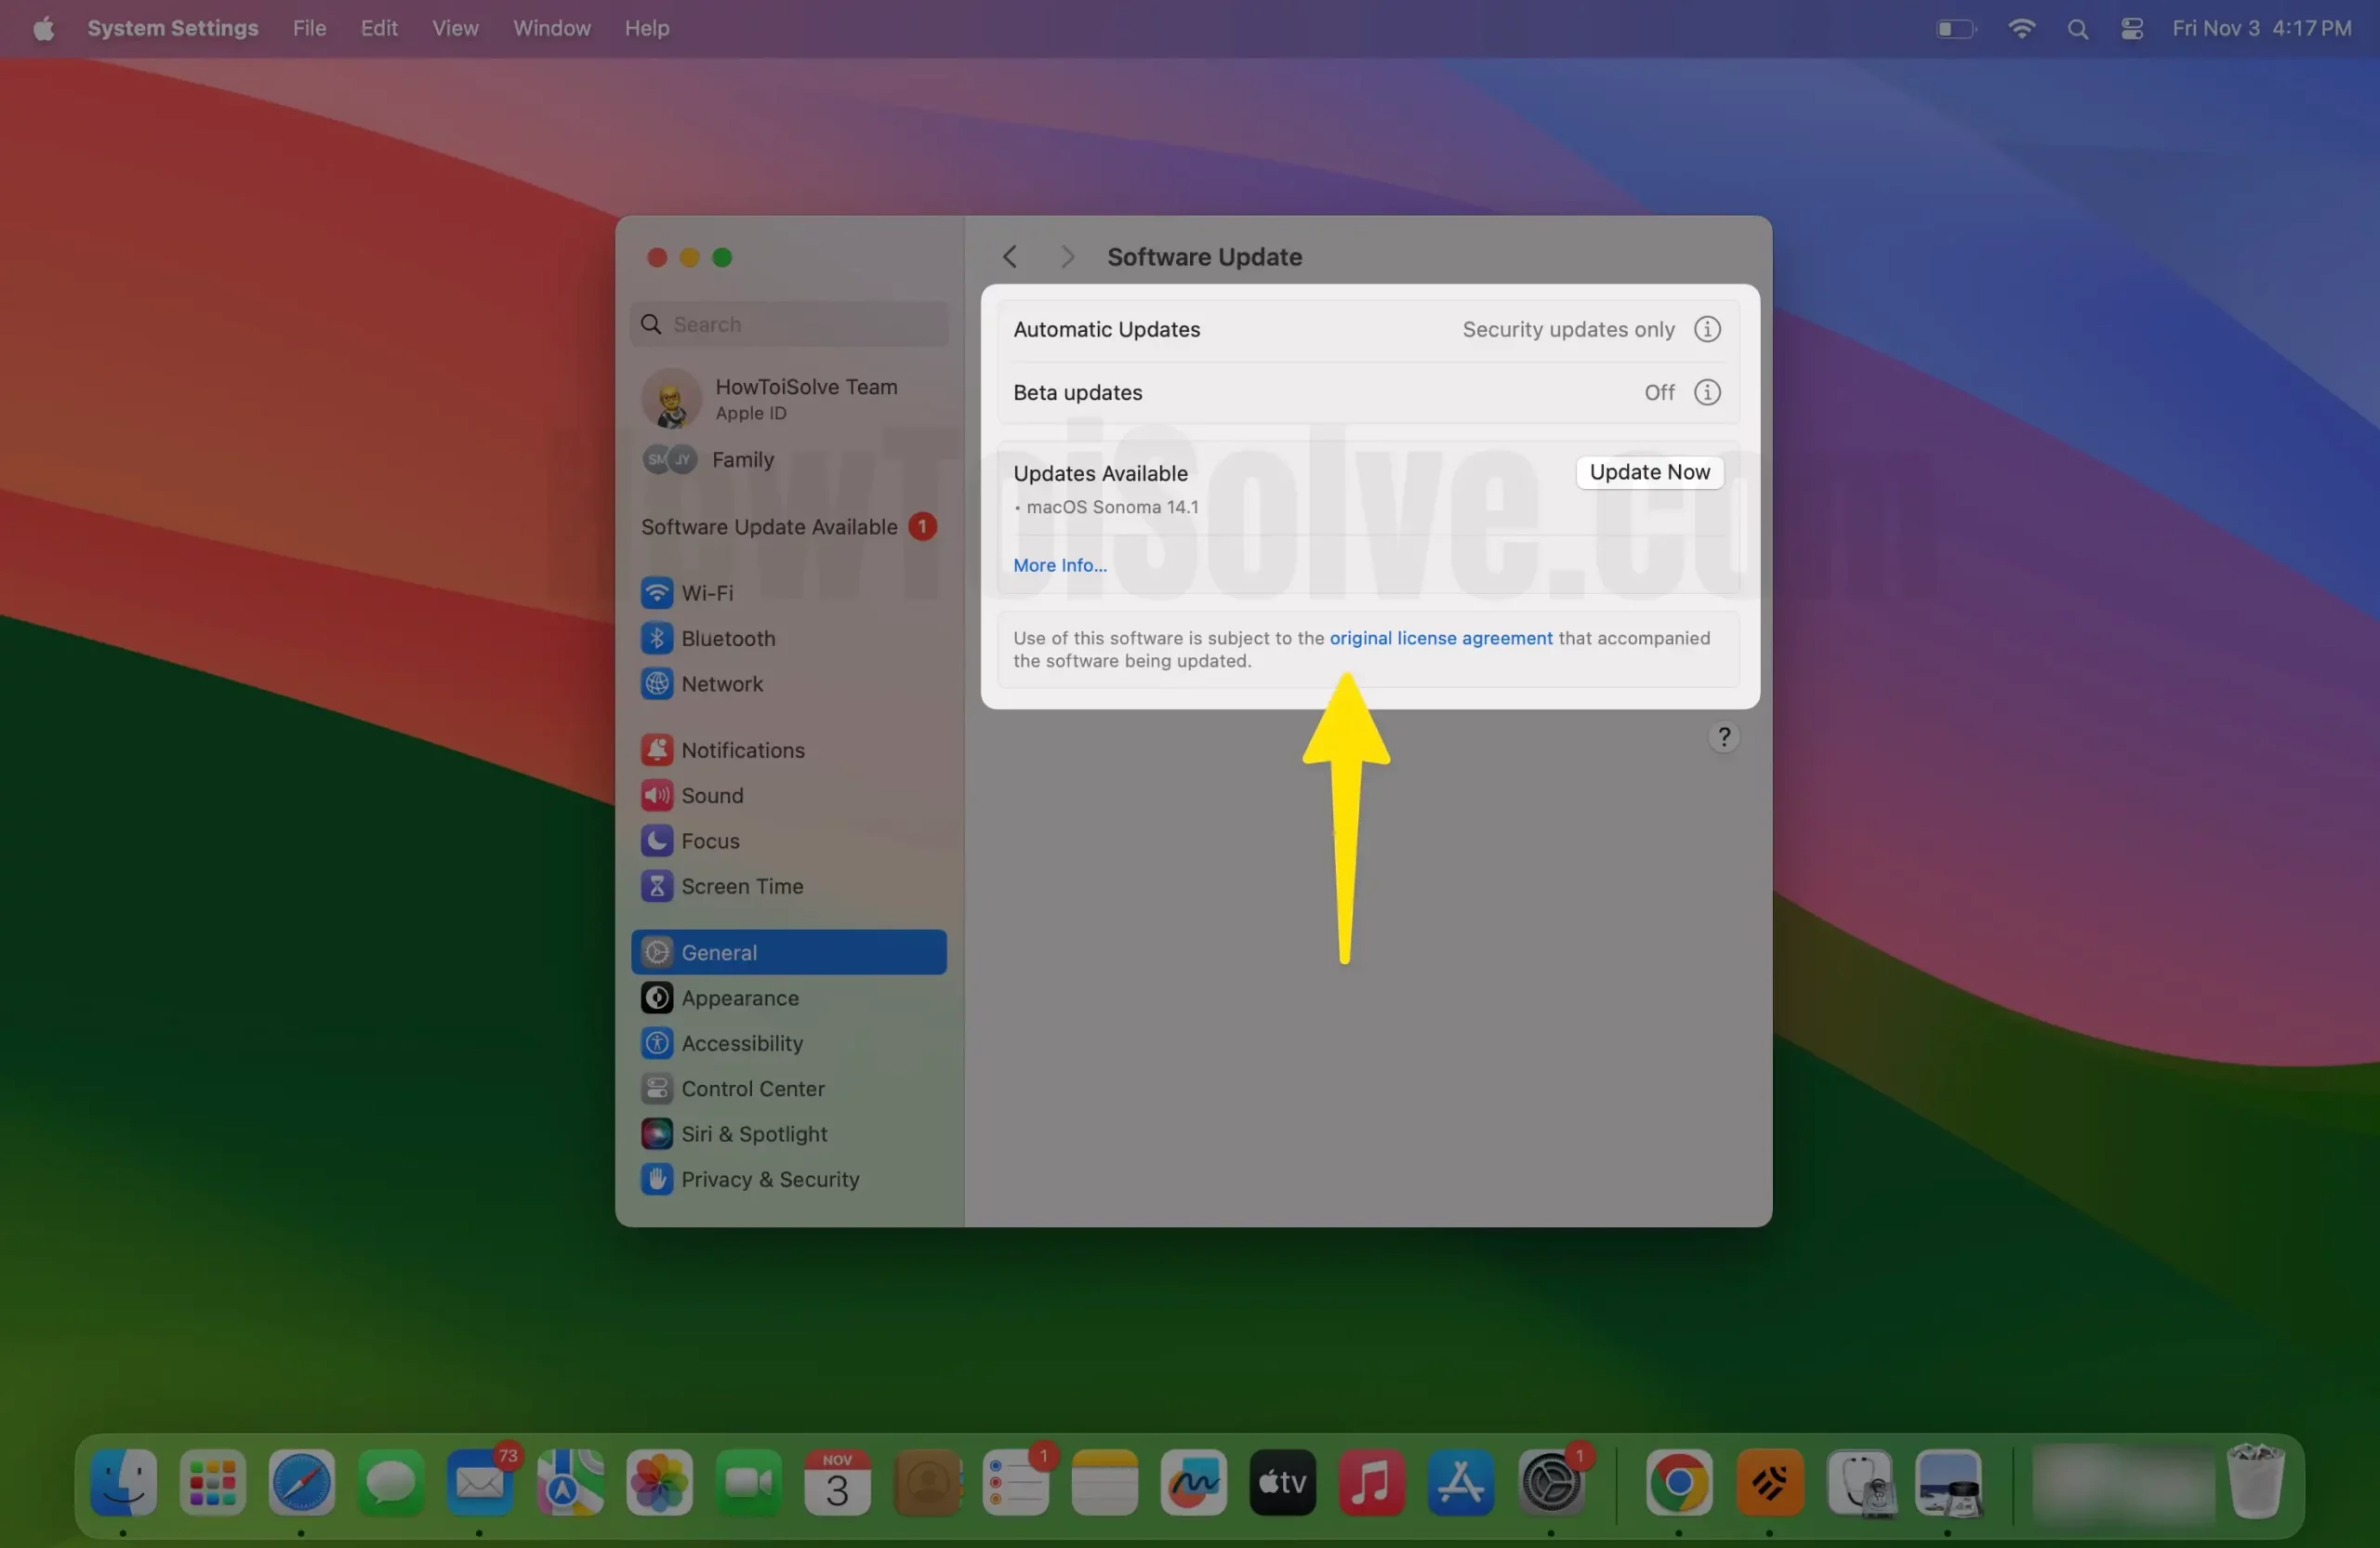
Hopefully, updating the Mac to the latest macOS will fix the headphone jack issue.
Solution #9. Verify audio input info
If none of the above solutions worked for you, it’s feasible that the headphone jack is physically damaged and needs to be repaired. To verify if that’s not the reason why the Mac mini headphone jack is not working, follow the steps below.
Step 1: First, connect your earphones or headphones to a Mac.
Step 2: Click on the Apple Icon at the top left corner. Select About This Mac from the menu.
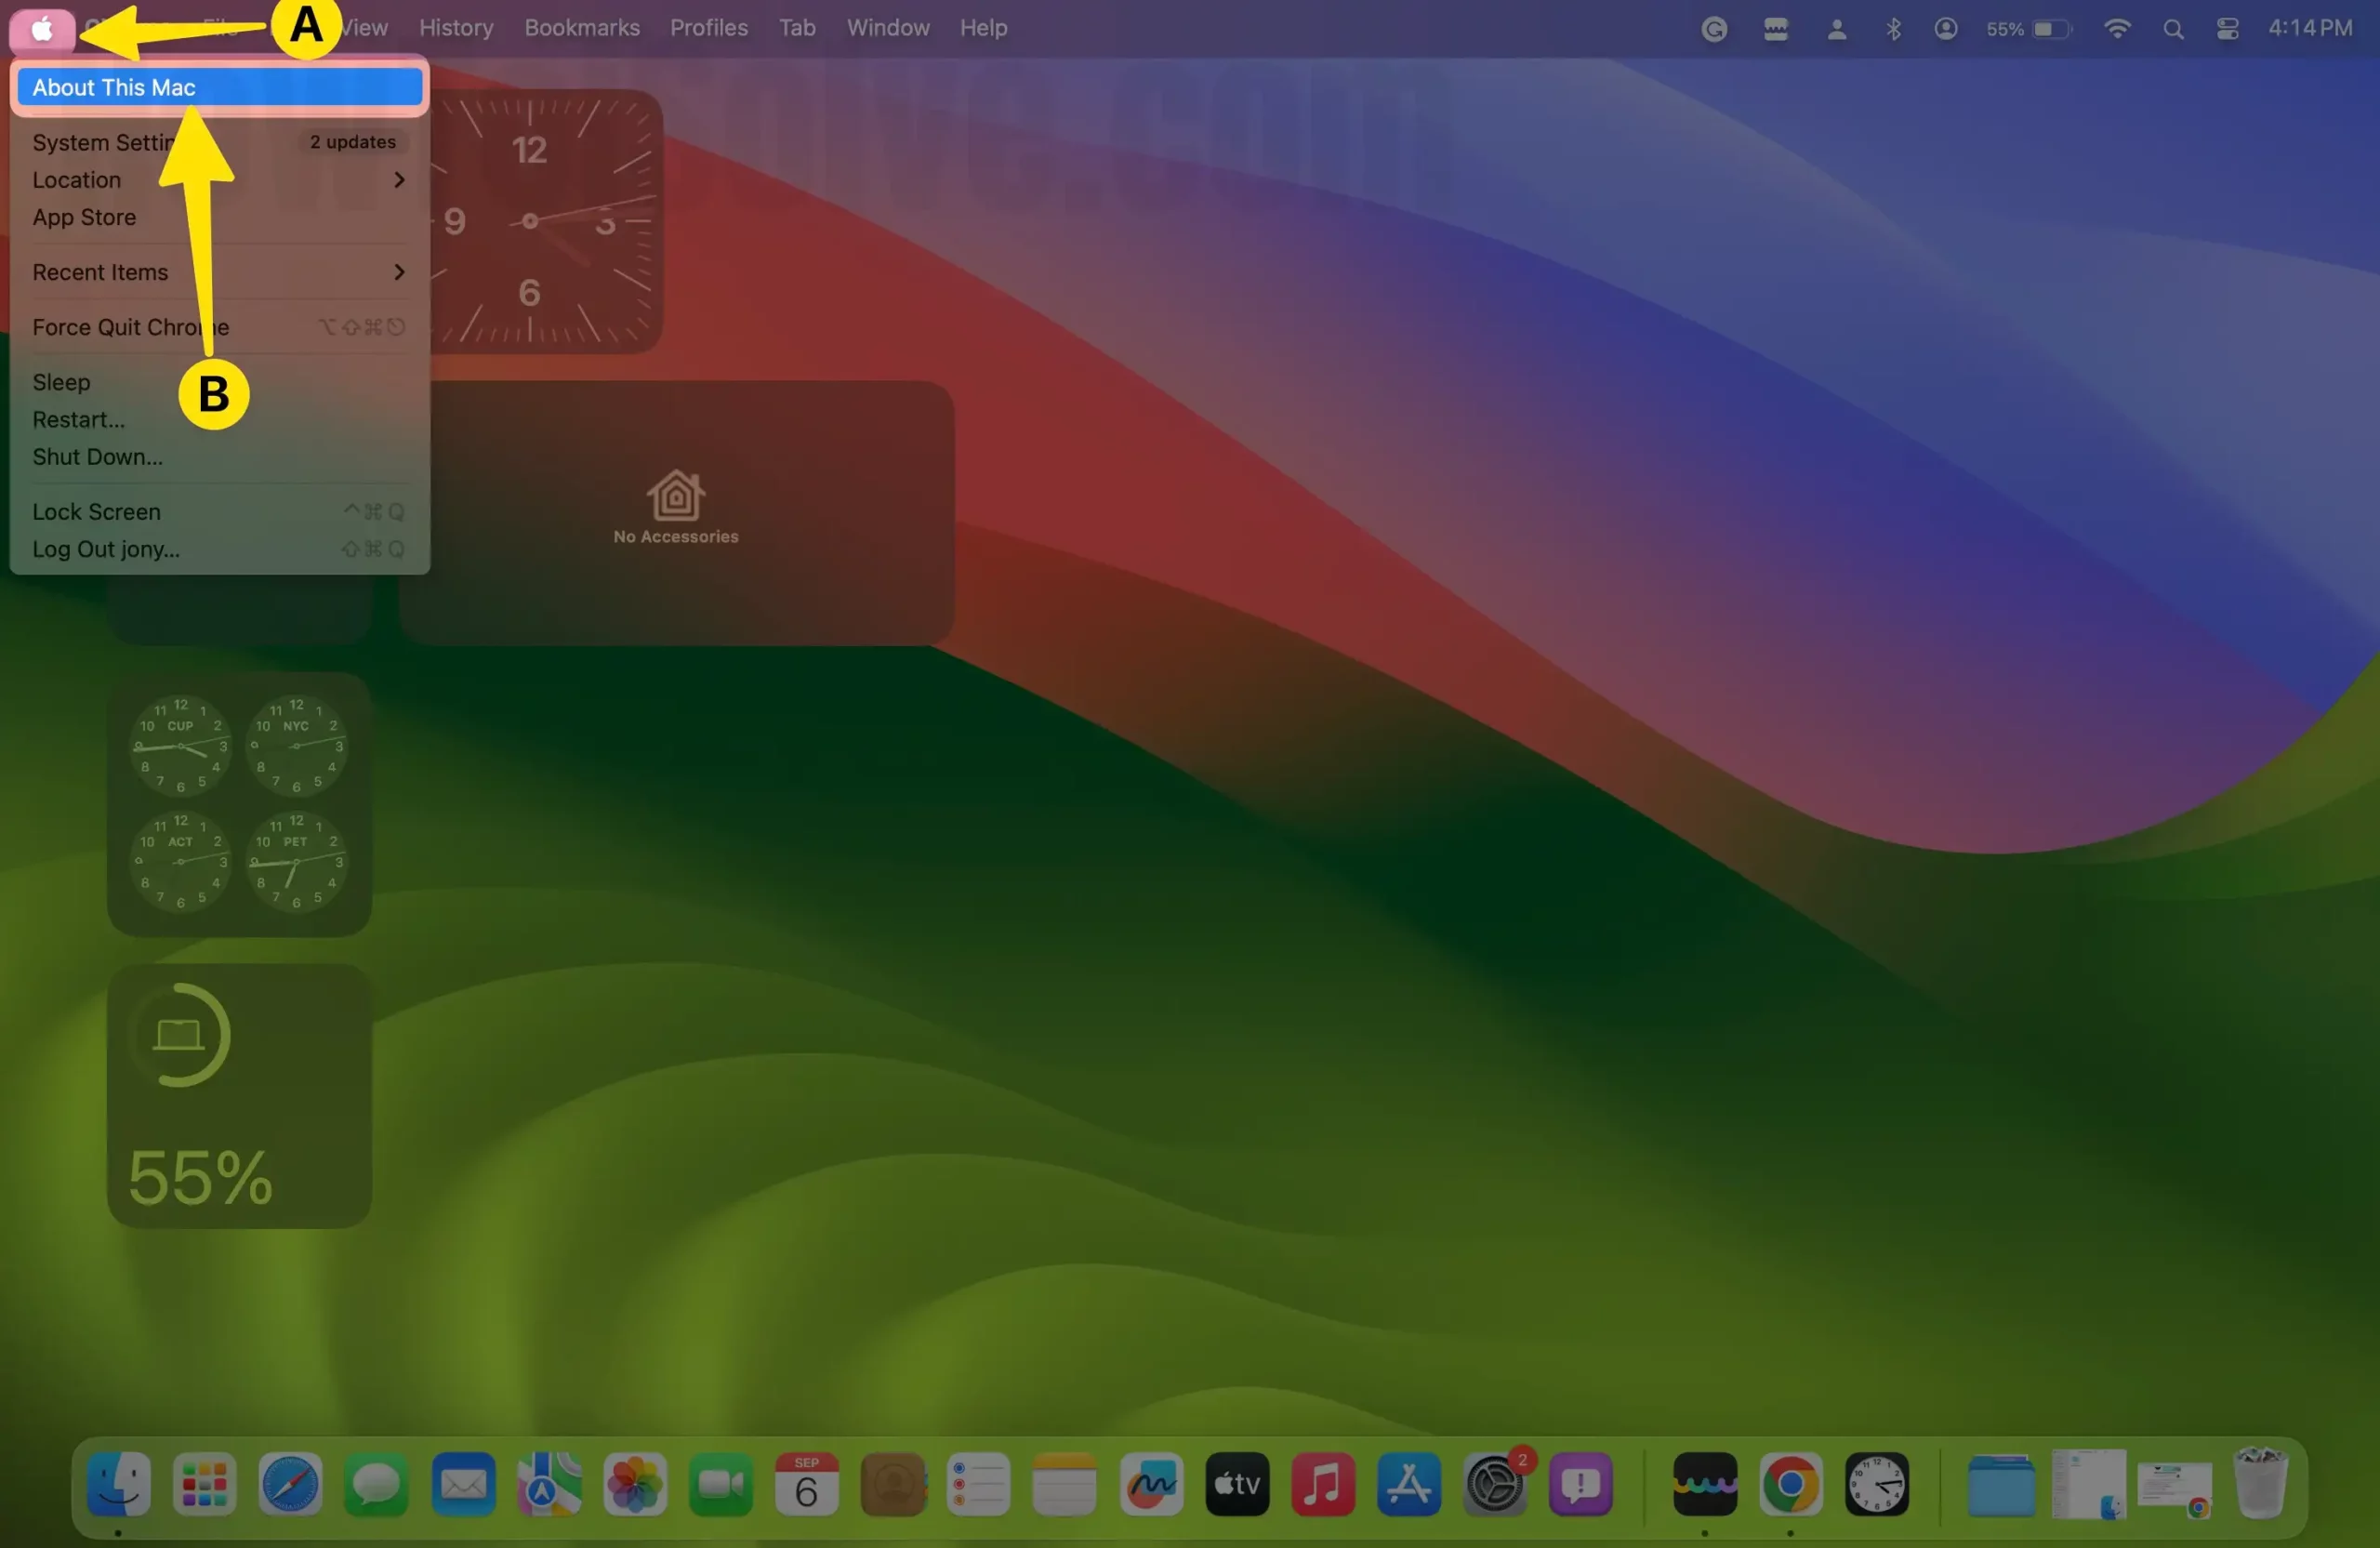
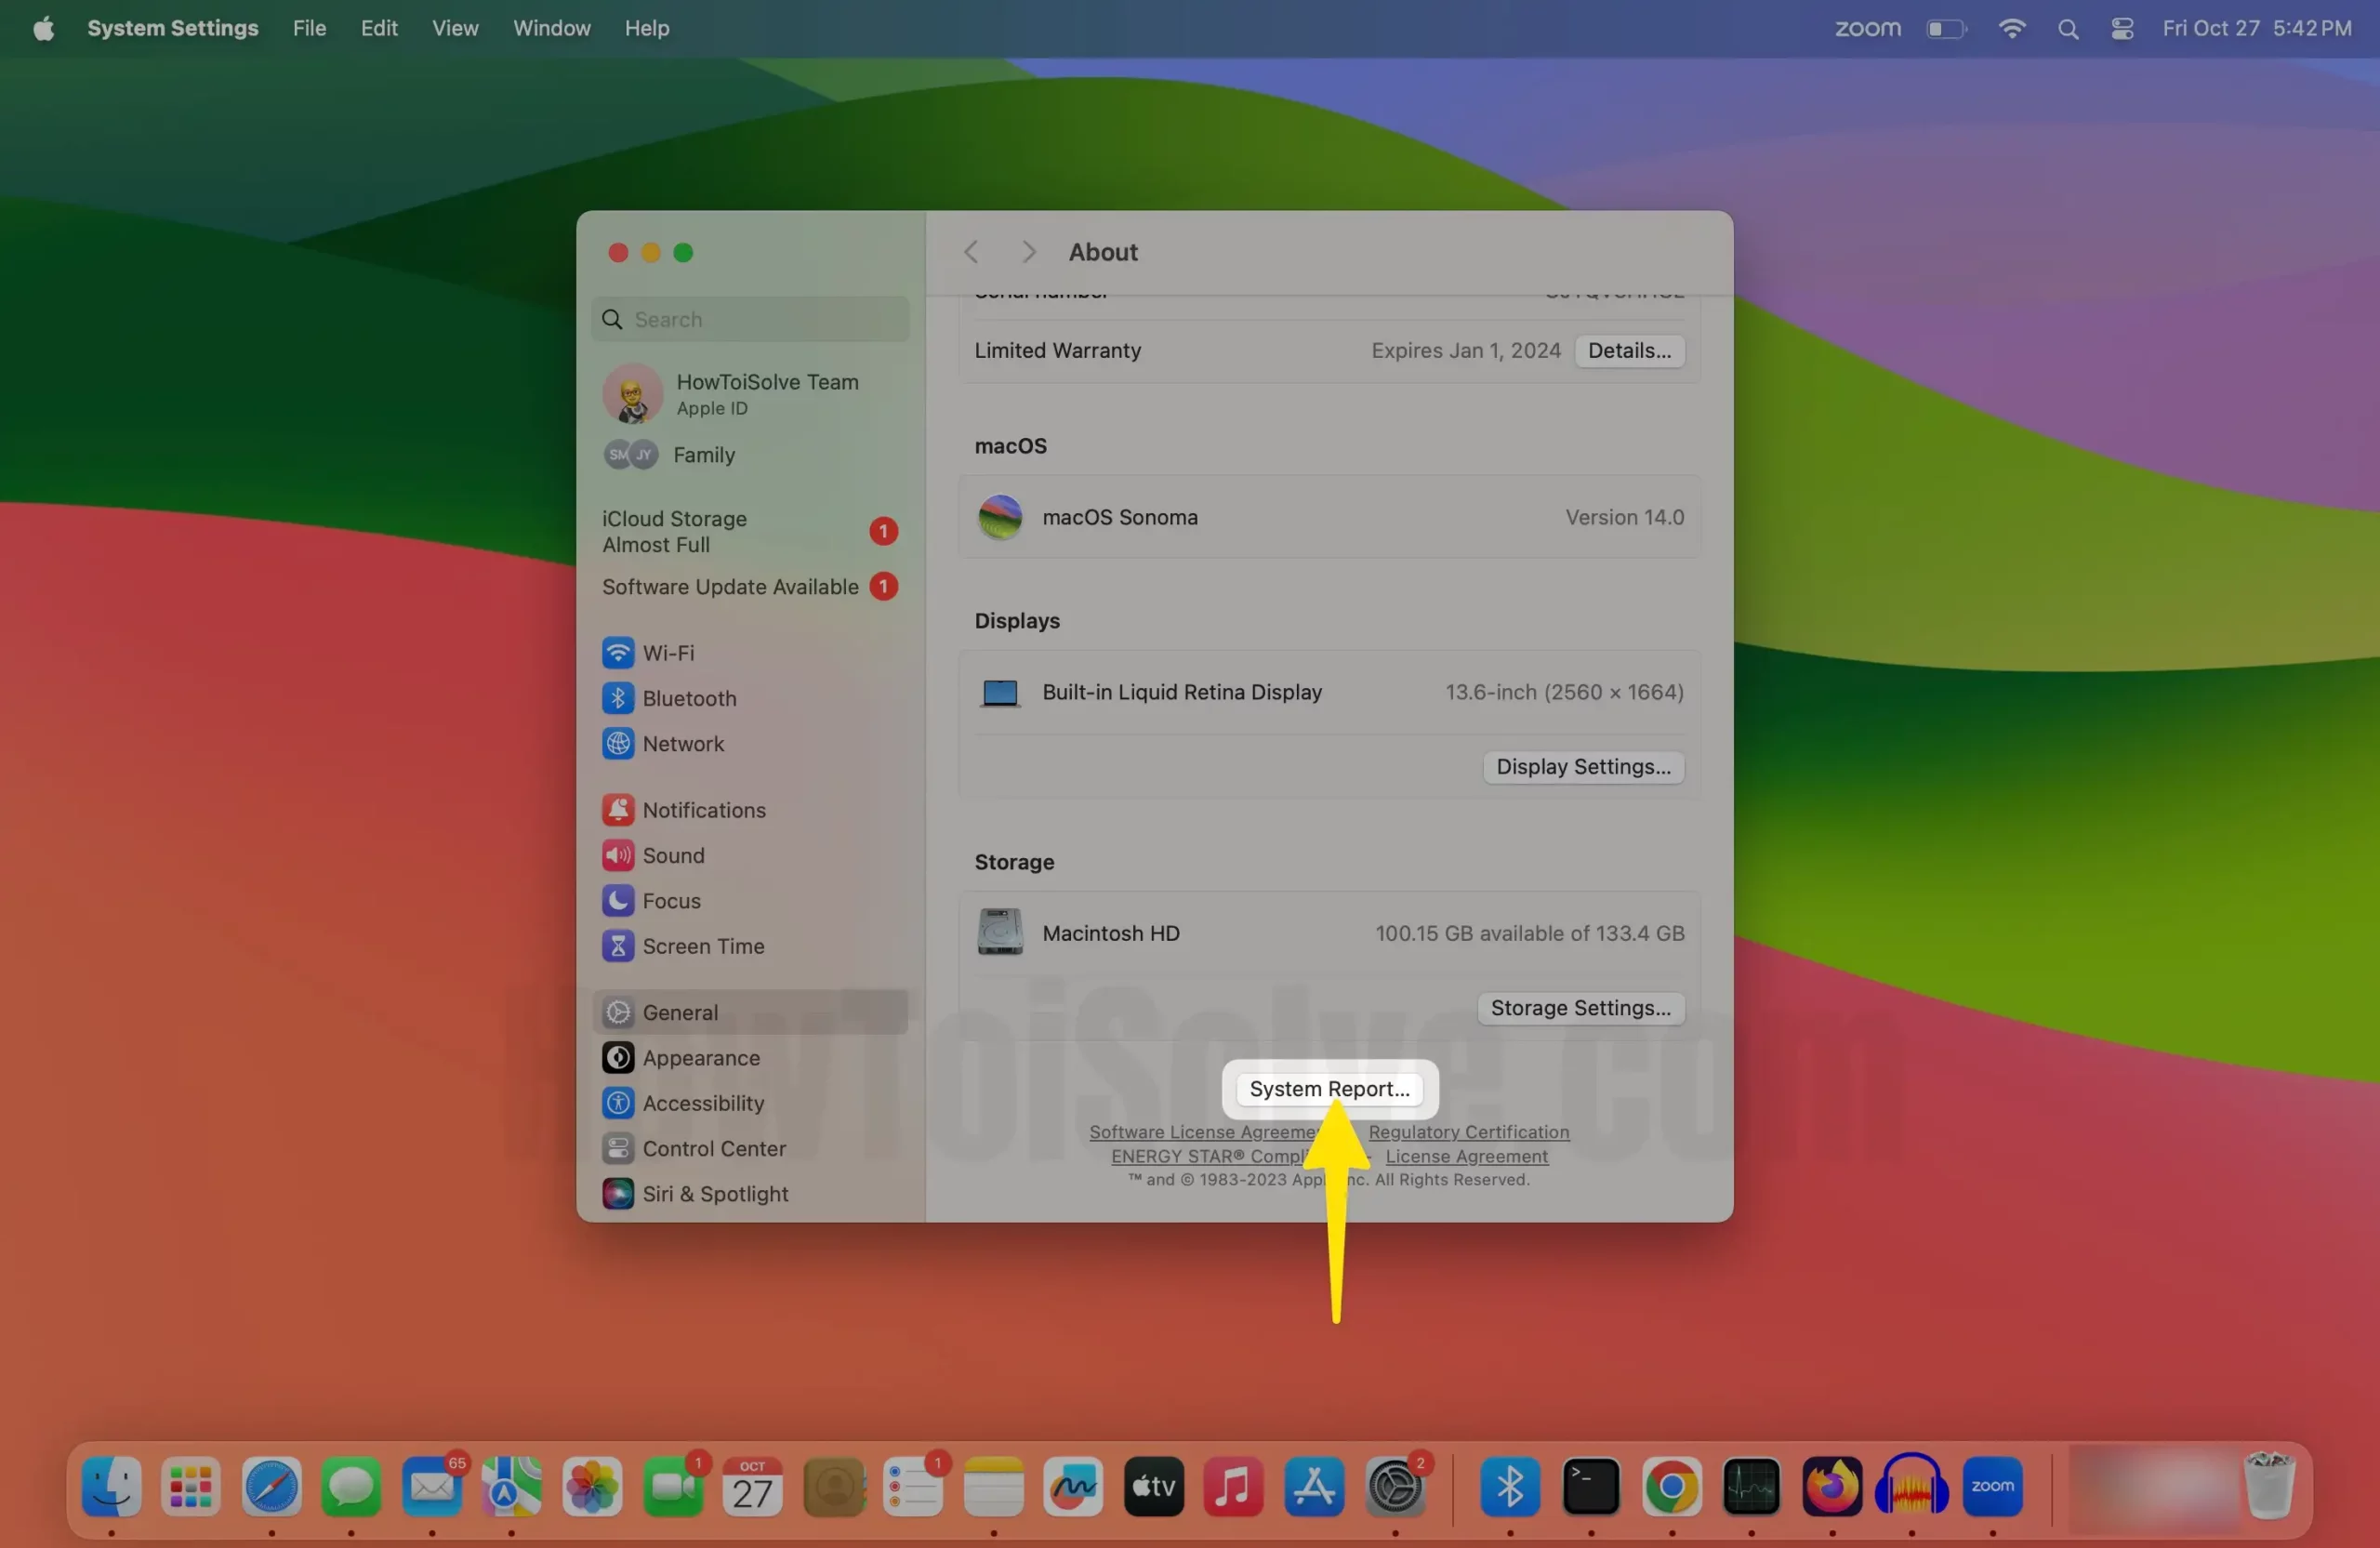
Step 3: In the next window, select More Info…

Step 4: Select System Report… on the right side.
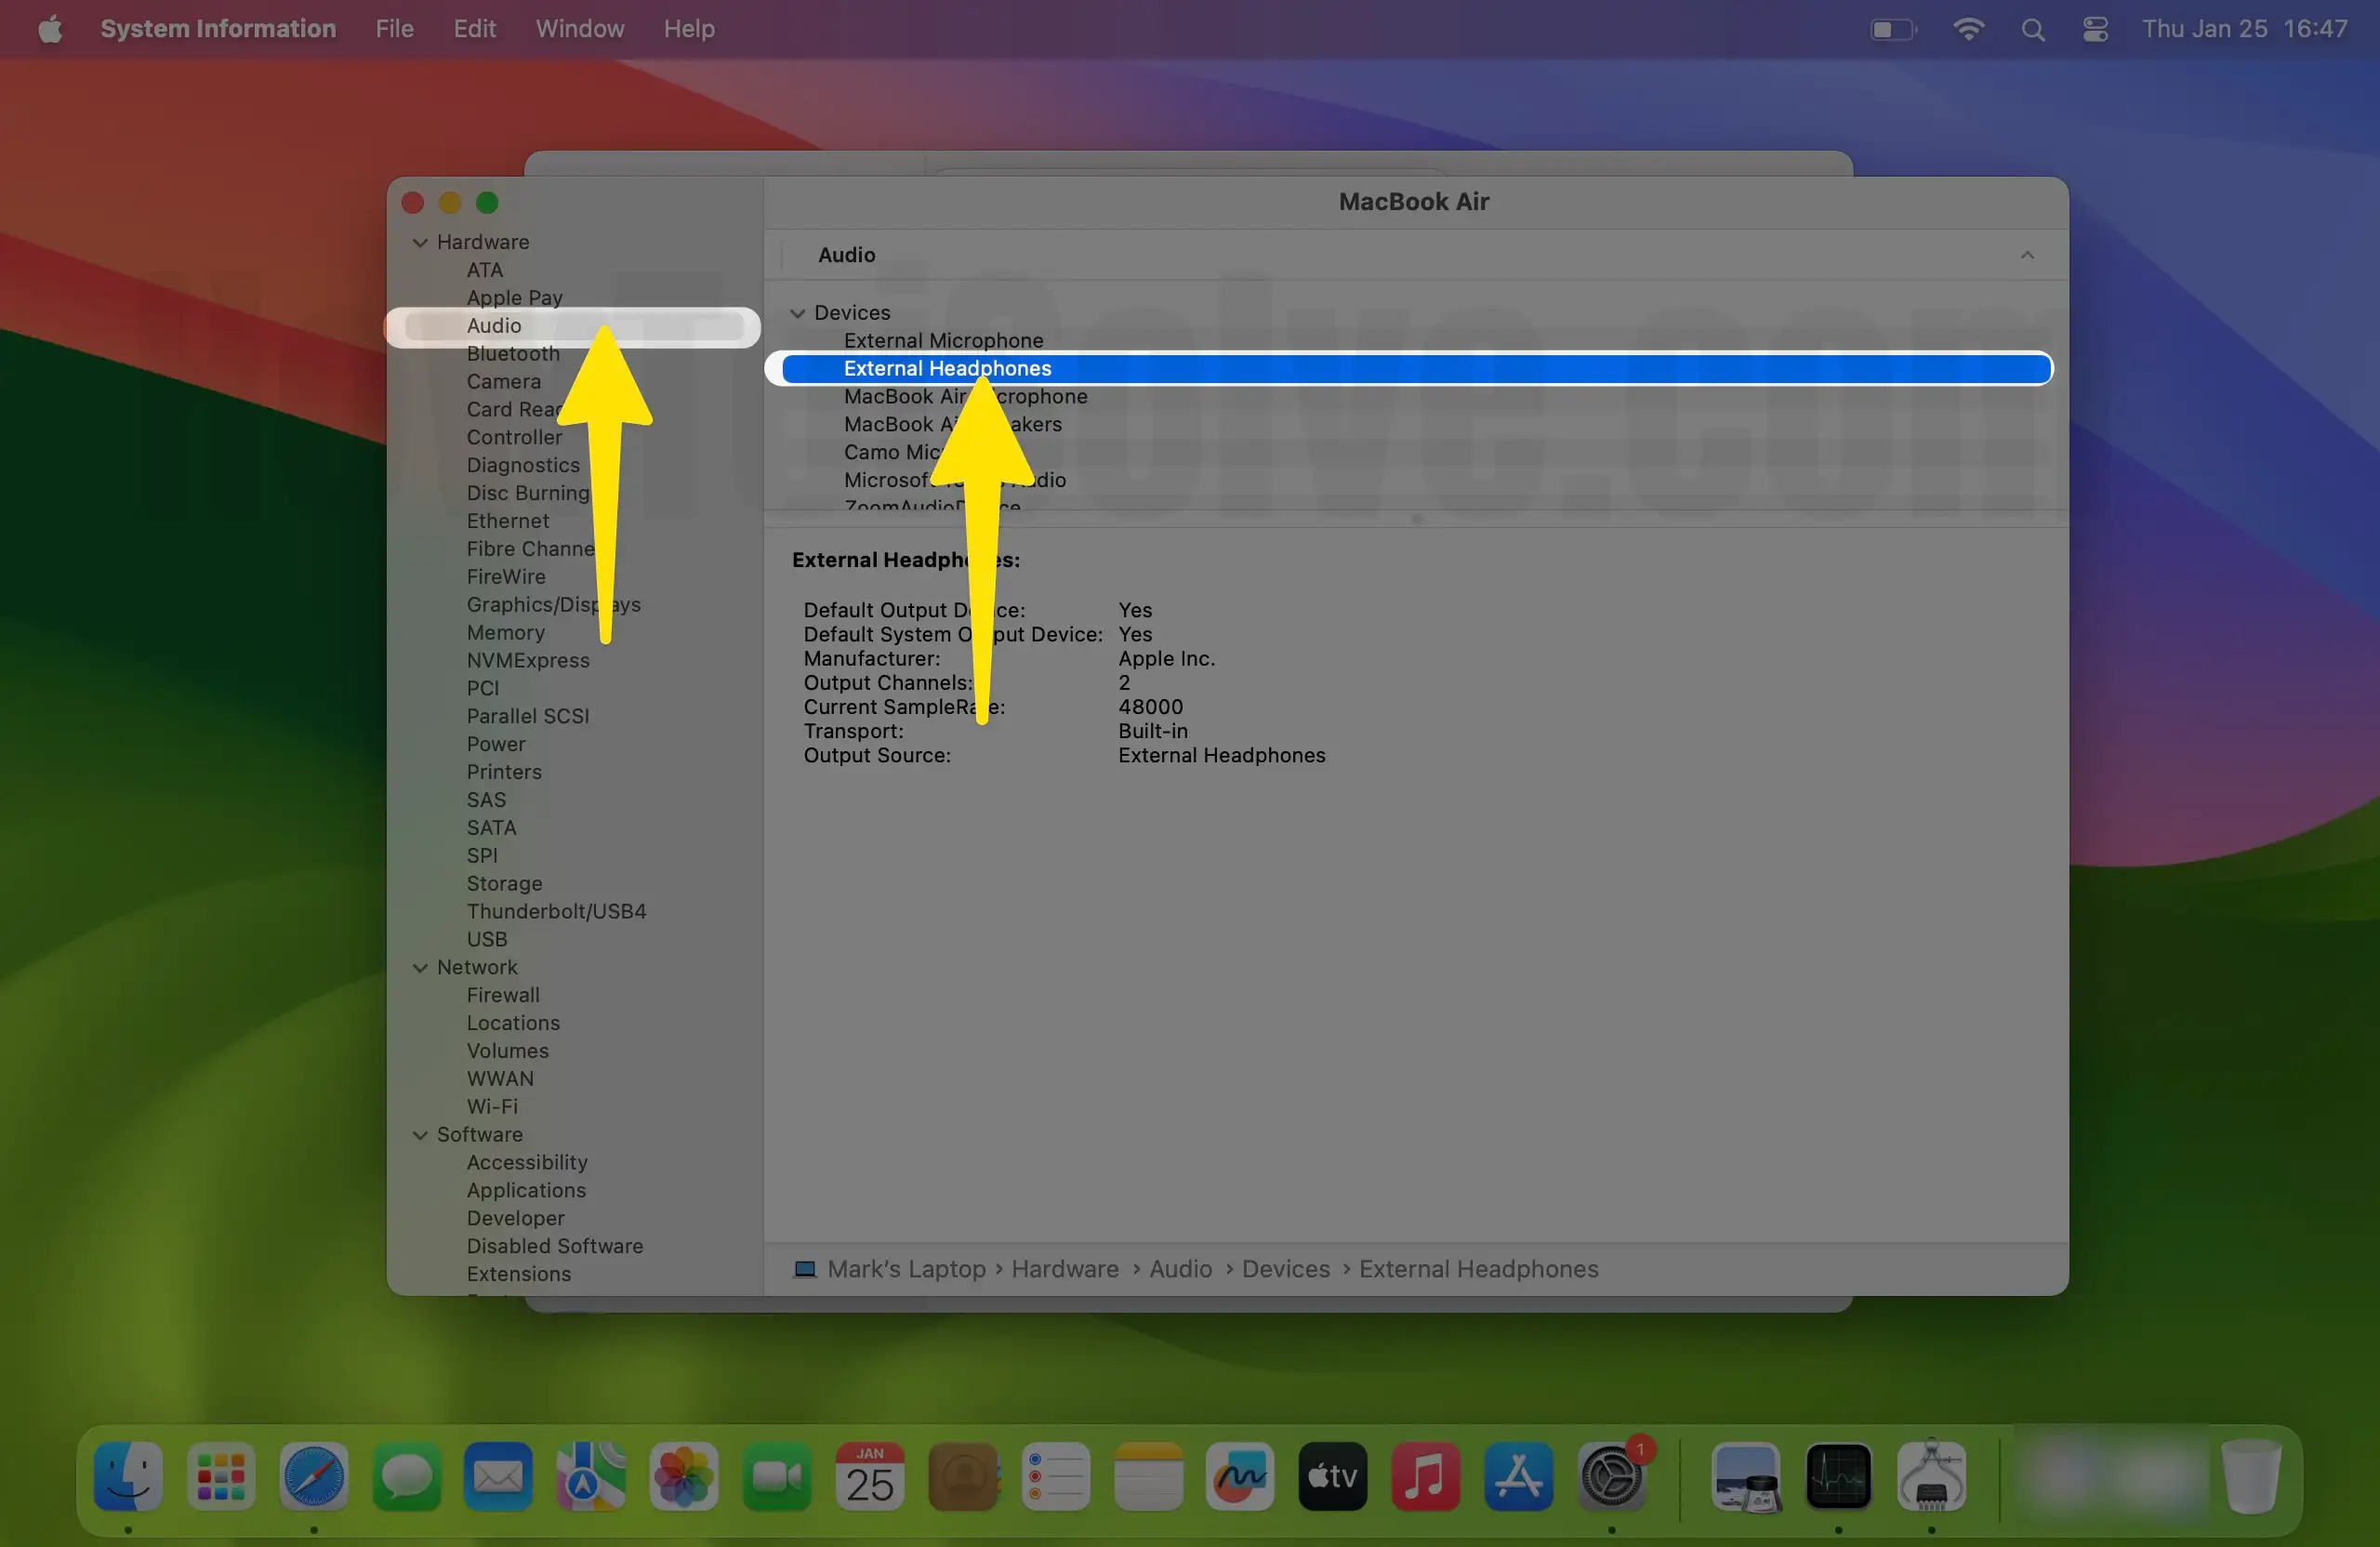
Step 5: Click on Audio from the left panel and check if your external headphone connected to your Mac is mentioned over there. If not, then carry it to the nearest Apple Service Station and ask for repair.
That’s It!
Final Verdict!
These are the practical solutions to fix Mac not detecting wired headphones. However, if the issue continues even after performing the solutions, then it’s fair to say it could be due to hardware problems. In this scenario, you can either Contact the Apple Support Team or go to the nearest Apple Service station and ask for repair.
