
🗓️ November 22, 2023, By ✍️ Karly Wood
Your YouTube App is not limited to the watching videos and trailers, it comes with dozens of features that we might not use in our daily life. We have prepared this article illustrating the detailed steps on how to upload a video to YouTube from iPhone, as well as how to Go Live on YouTube iPhone App. Thankfully, the YouTube app lets you record and upload videos directly from the iPhone, no need to turn on PC.
All you need is YouTube App installed on the iPhone, leave everything on us, the detailed steps will make it quicker to upload YouTube video for you, even if you are a newbie in this field. Alongside, like other social applications, YouTube Live is available right in the YouTube app, don’t forget to learn how to Go Live on YouTube.
How to Upload Video to YouTube on iPhone and Go Live on YouTube
Prerequisite to Upload Video to YouTube
- The latest version of the YouTube App. Update YouTube App before going through the tutorial.
- You must have YouTube Channel to upload YouTube videos. If you don’t have YouTube Channel, then while uploading a video to YouTube, you’ll be asked to create a YouTube Channel.
- YouTube lets you upload the Videos from iPhone Storage as well as you can record from the YouTube App and upload it.
- Only verified YouTube-Account can upload videos of up to 12 Hours or 128GB.
- The unverified YouTube-Account can only upload videos up to 15 minutes.
How to Upload Videos to YouTube on iPhone, iPad
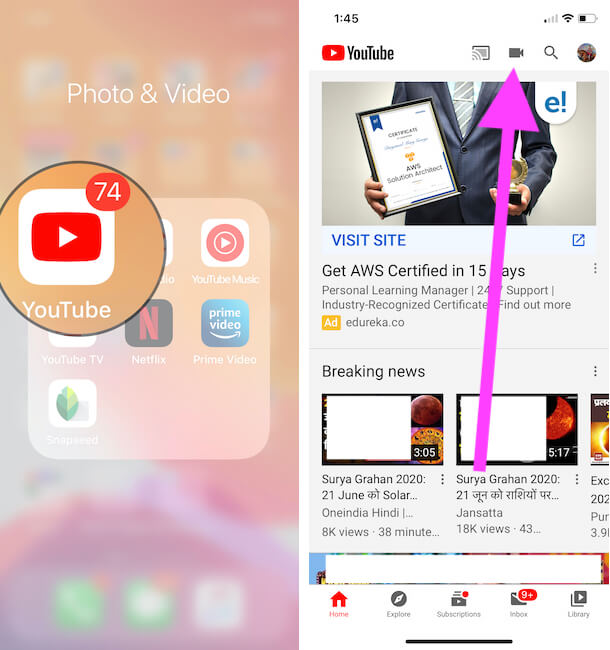
- Navigate to the YouTube App on iOS Device.
- Sign In to YouTube if you already haven’t done yet. Tap on the upper-left corner on the Account, to Sign in.
- Hit the Camera button.

Upload Video To YouTube Option on iPhone
- If it’s your first time uploading the YouTube Videos, then grant the permissions to access the Camera, Photos, Microphone.
- From there, you can Go Live, Record Videos, or Upload the Existing Videos to YouTube.

Video Upload Option for YouTube Video on iPhone App
- Here’s i uploaded video from my iPhone Camera roll (Photos app).
Apply Different Video Filter on iPhone YouTube Video Before Upload
- Once you are done with Recording Video or choosing existing videos from iPhone, YouTube will offer certain editing tools to enhance the video.
- Trim Video before Upload: YouTube App lets you trim the video, to make it better, although, YouTube won’t let you upload the video longer than 15minutes until the account is verified. So if your video is longer than 15 minutes, then the Trimming tool could be of help.
- Alternatively, try one of these best Video Editing Apps for iPhone to make editing easier and healthier.
- To add Music, tap on the Music button.
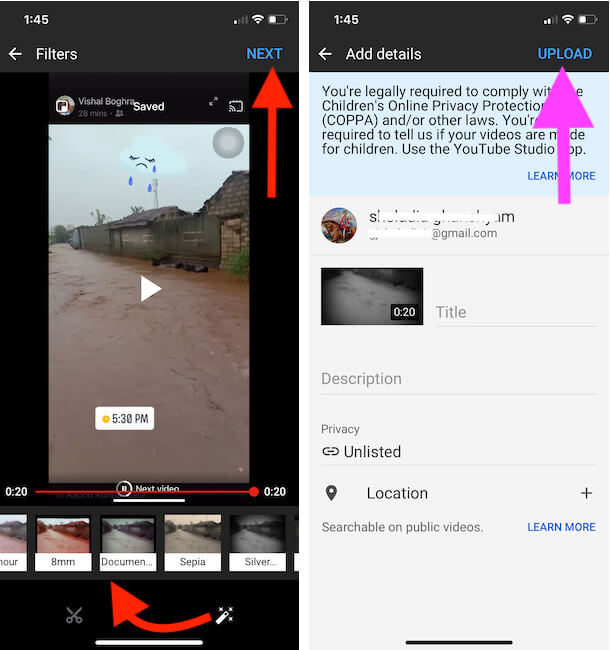
- Choose from various Filters.
- If you want to keep the video natural, then don’t make any editing, directly skip to the next step.
- Tap Done to proceed further.
Apply Different Video Filter on iPhone YouTube Video Before Upload
- Give your video a catchy Name. Also, add a few lines describing what the video is about. You can add title up to 100 characters, and the description of up to 5000 characters.
- Now, its time to choose the Privacy for the video, whether you want to upload video Public, Unlisted or Private.
- Public: This option will make the video available to everyone.
- Unlisted: It will ensure your video doesn’t appear in Search Results, however, anyone can view when the YouTube Video URL is shared.
- Private: No one can view except you.
- Choose one option.
- Tap Upload.
- Wait until the video is uploaded to YouTube.

How to Verify YouTube Account?
You can’t upload the videos to YouTube for more than 15 minutes unless your account is verified by the YouTube. So here’s how to verify YouTube Channel on iPhone.
- Visit the YouTube Verify Link on any browser and follow the instructions to complete the verification process.
How Do I Know If My YouTube Account is Verified?
- Visit the YouTube Account Features section, where you can get to know whether the account is verified or not.
How to Go Live on YouTube iPhone
Requirements to Go Live on YouTube Mobile
- Update the YouTube App, to avoid errors.
- If you have more than 1000 subscribers, then only you can Go Live on YouTube Mobile App. Otherwise, use Computer the Live Stream from your YouTube Channel.
- If you are Going Live for the first time, then it might 24 hours, to enable Live option for you.
- The YouTube-Account must be verified.
- The iPhone updated with iOS 8 or later.
How to Go Live on iPhone YouTube App
- Open the YouTube App.
- Sign In to your account, tap on the upper-right Account
- Select the Camera button.
- Tap Go Live.
- Grant essential permissions such as Camera, Microphone, Location, etc.
- You can choose from the Camera button and Phone button.
- When you tap the Camera option, it will use the iPhone’s camera for the live stream.
- On selecting the Phone option, Live Stream will show the iPhone’s screen.
- Enter a Name.
- Set the Privacy.
- Tap on the More menu to change certain settings like Live Chat, Age Restrictions, Scheduling, Monetization, etc.
- Tap Next, set Thumbnail.
- Choose Share.
- Hit Go Live.
- Once you are done with Live Stream, then tap Finish.
Comment me for more information on how we can upload YouTube video and How to Be a smart YouTube Creators. Thanks for Visiting and Supporting us!


