Now it’s time to use the leading features of macOS and iOS together. Since macOS and iOS bring up the Continuity camera feature, which allows you to take pictures in iPhone and transfer them immediately on your Mac. It’s like when you are taking a picture on iPhone corresponding, you can see that picture in Mac.
For instance, if you are working on a project and you require a picture of something to add in that document, then you can immediately click a picture using your iPhone and transfer to your mac using continuity camera.
AirDrop doesn’t require to sync to transfer photo from your iPhone to document. “The “Scan Documents” service could not be used”. Reboot both Mac and iOS device.
For the First Time use of this feature will surprise you! How Continuity camera works on Mac and iPhone/iPad/ iPod. Follow the Simple Easy steps given here. Both
Pre-Requisite conditions to use Continuity Camera That is Not Working
- Both Device (Mac and iOS) Running Same Apple ID
- iDevice connected on same WiFi networks & Bluetooth turned on Both the Devices.
- iOS device installed iOS 12 or later and Mac device installed MacOS Mojave or Later
- This Feature we can use with Apple Apps (Notes, Mail, Pages) only, But not Supporting to Finder, Keynote, and Numbers.
Look and learn how to use continuity cameras on macOS and iOS.
How to Add Photos With Continuity Camera on your Mac’s Document from iPhone Camera
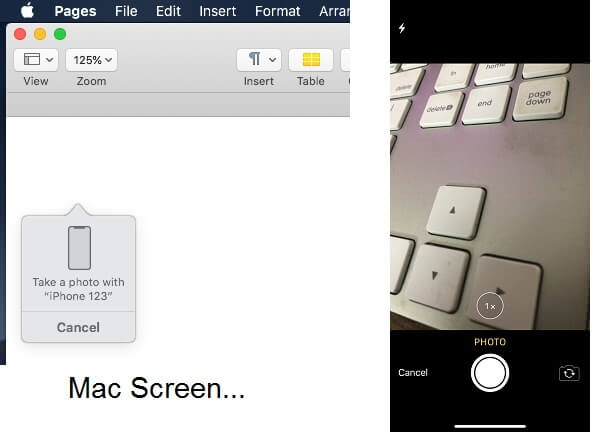
Step 1: Click on the document or file to open, in apps like TextEdit, Pages or Keynote.
Step 2: Select the location in the document where you want to add the picture by control-click, two-finger-click or right-click.
Step 3: Click on “Insert from your iPhone or iPad” and tap “Take Photo”.
Step 4: Now, “take a photo” on iPhone.

Step 5: After taking a photo, click “Use Photo”.
Step 6: The photo would appear exactly where you have clicked.

Step 7: To add information, “double-click on the picture” on Mac’s document.
Step 8: You can insert URL, description, and title in that photo.
Step 9: Tap “Remove Photo” or “Delete Button” in the pop-up if you want to remove it.
Without AirDrop or Wire connection, you can insert or import live photo from your iPhone Camera to your Mac device’s document open on the screen.
Like it! Share it! More tricks and troubleshooting guide. Any problem to use Continuity Camera on MacOS and iOS, Comment to me!


