To go live on Facebook from your Mac, you’ll need to follow a few simple steps to set up and stream your broadcast. Whether you’re using Facebook’s built-in tools or a third-party software, the process is straightforward and can help you reach your audience in real time. In this article, we’ll walk you through the steps of going live on Facebook using your Mac, including configuring your webcam, setting up the stream, and tips for engaging your viewers. Let’s get started!
Steps for turning on Facebook Live video on a MacBook
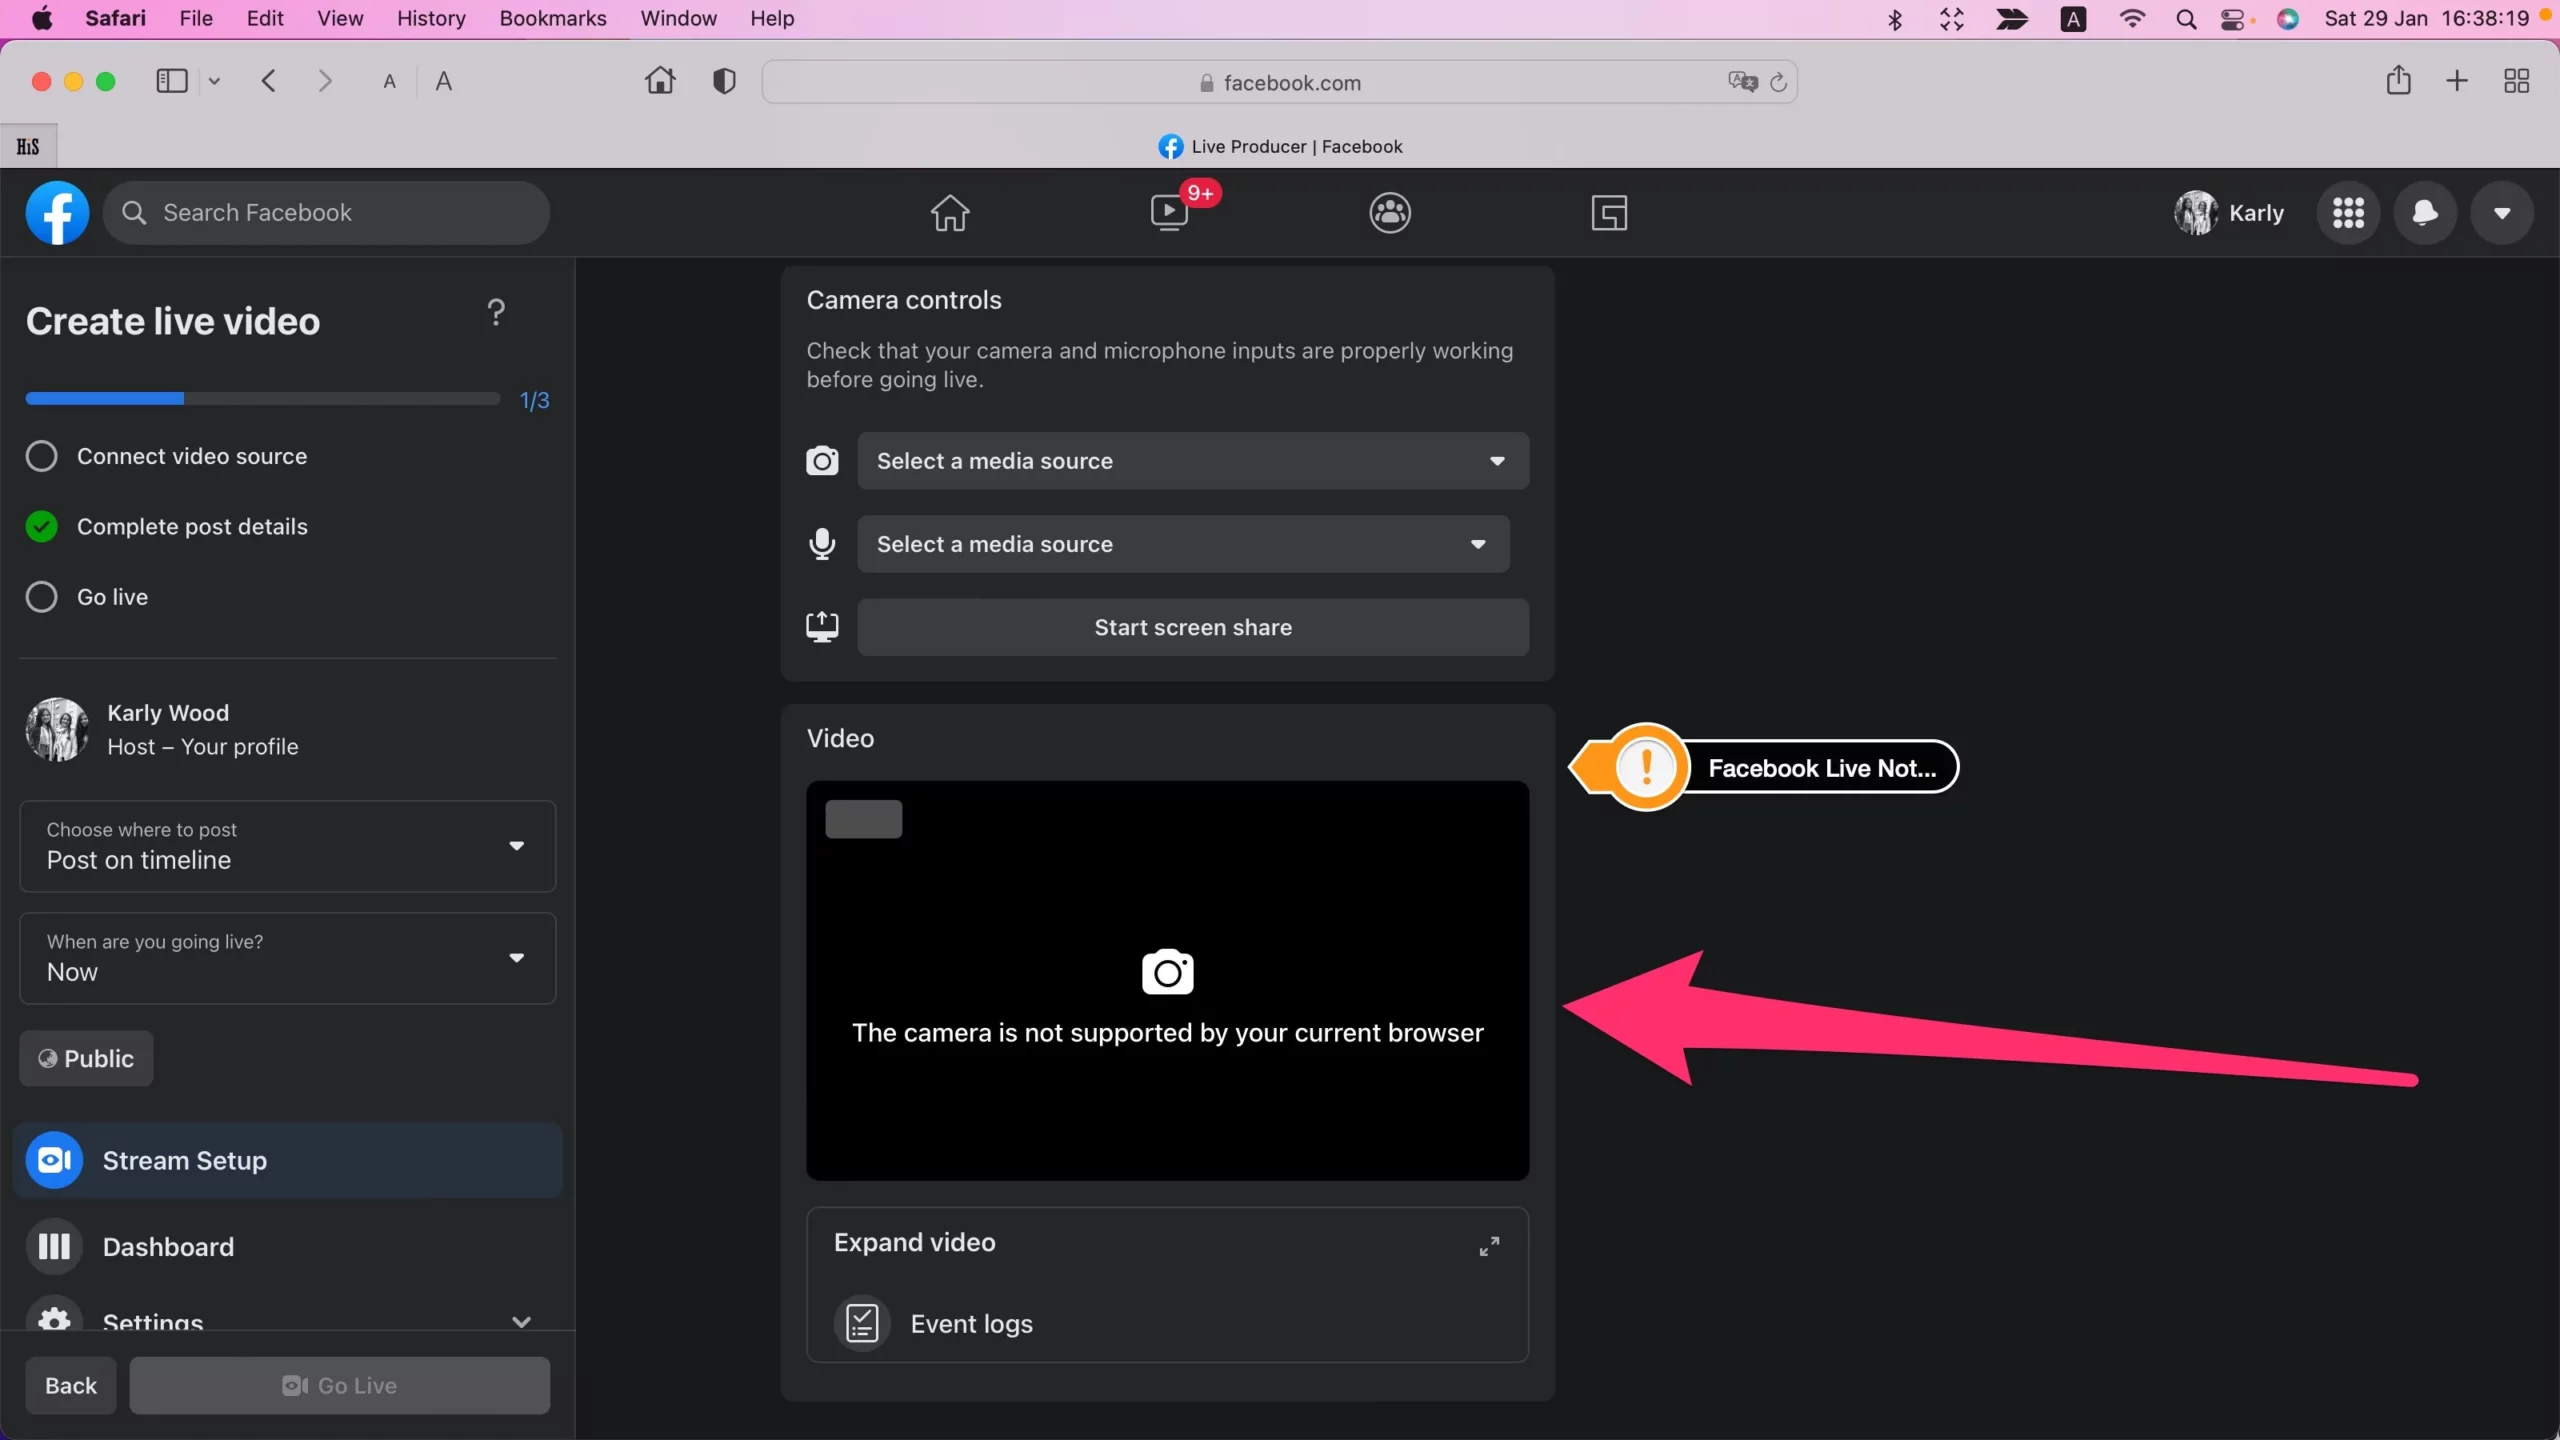
Note: if “The camera is not supported by your current browser” while you use Safari Browser on Mac, Use an Alternate Browser like Google Chrome on your Mac, Or Use External Third-Party Camera and Microphone to Use FaceBook Live on Safari Mac.
For the Privacy, Mac camera doesn’t accessible on FaceBook live Safari Browser, use Streaming Software is also alternate method.
How do you go live on Facebook using the Livestream option?
Open Google Chrome on your Mac, On the Latest Safari Browser, FaceBook Live doesn’t support – Mac’s Camera and Microphone don’t support on Facebook Live. But Google Chrome is. Otherwise, we have to use Third-Party Streaming Software with Safari as a second option. as Explained next in this article. So, let’s jump to the Way to go live on Facebook using a Mac.
Step 1: Open Google Chrome browser on Mac, log in to your Facebook account, click on your Profile name, or from the Facebook home page, see the “Live Video” Option.
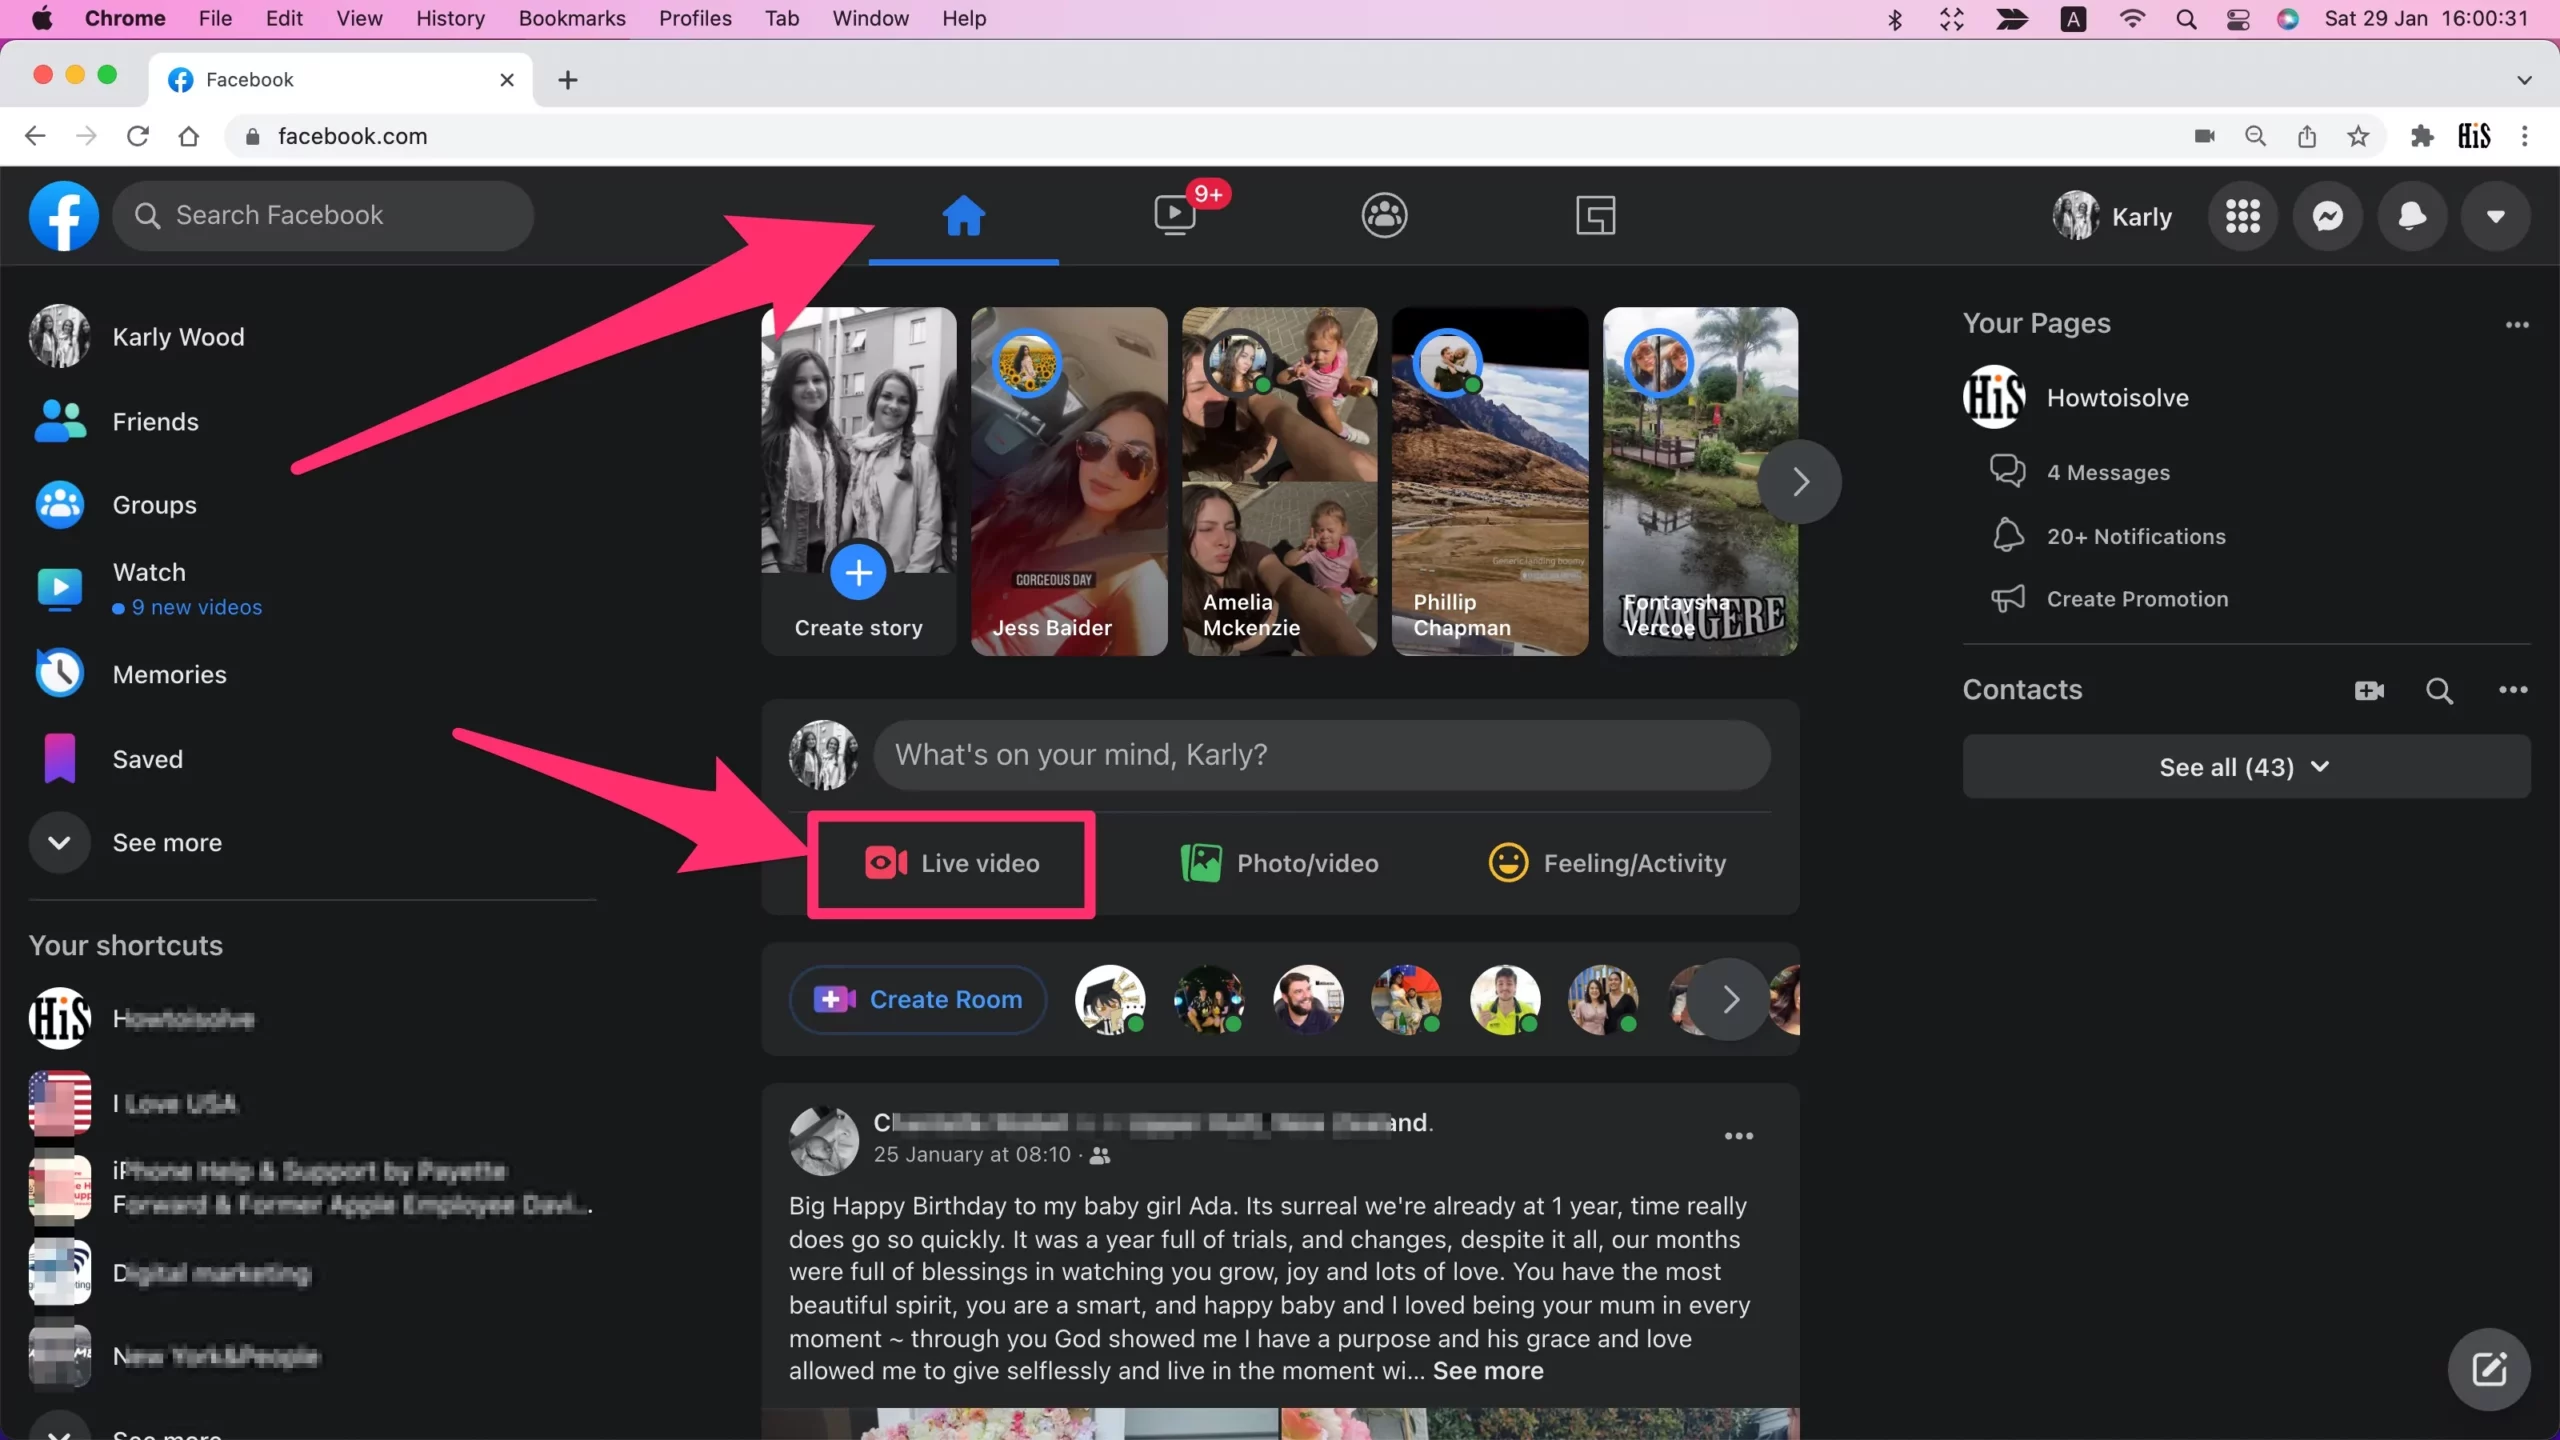
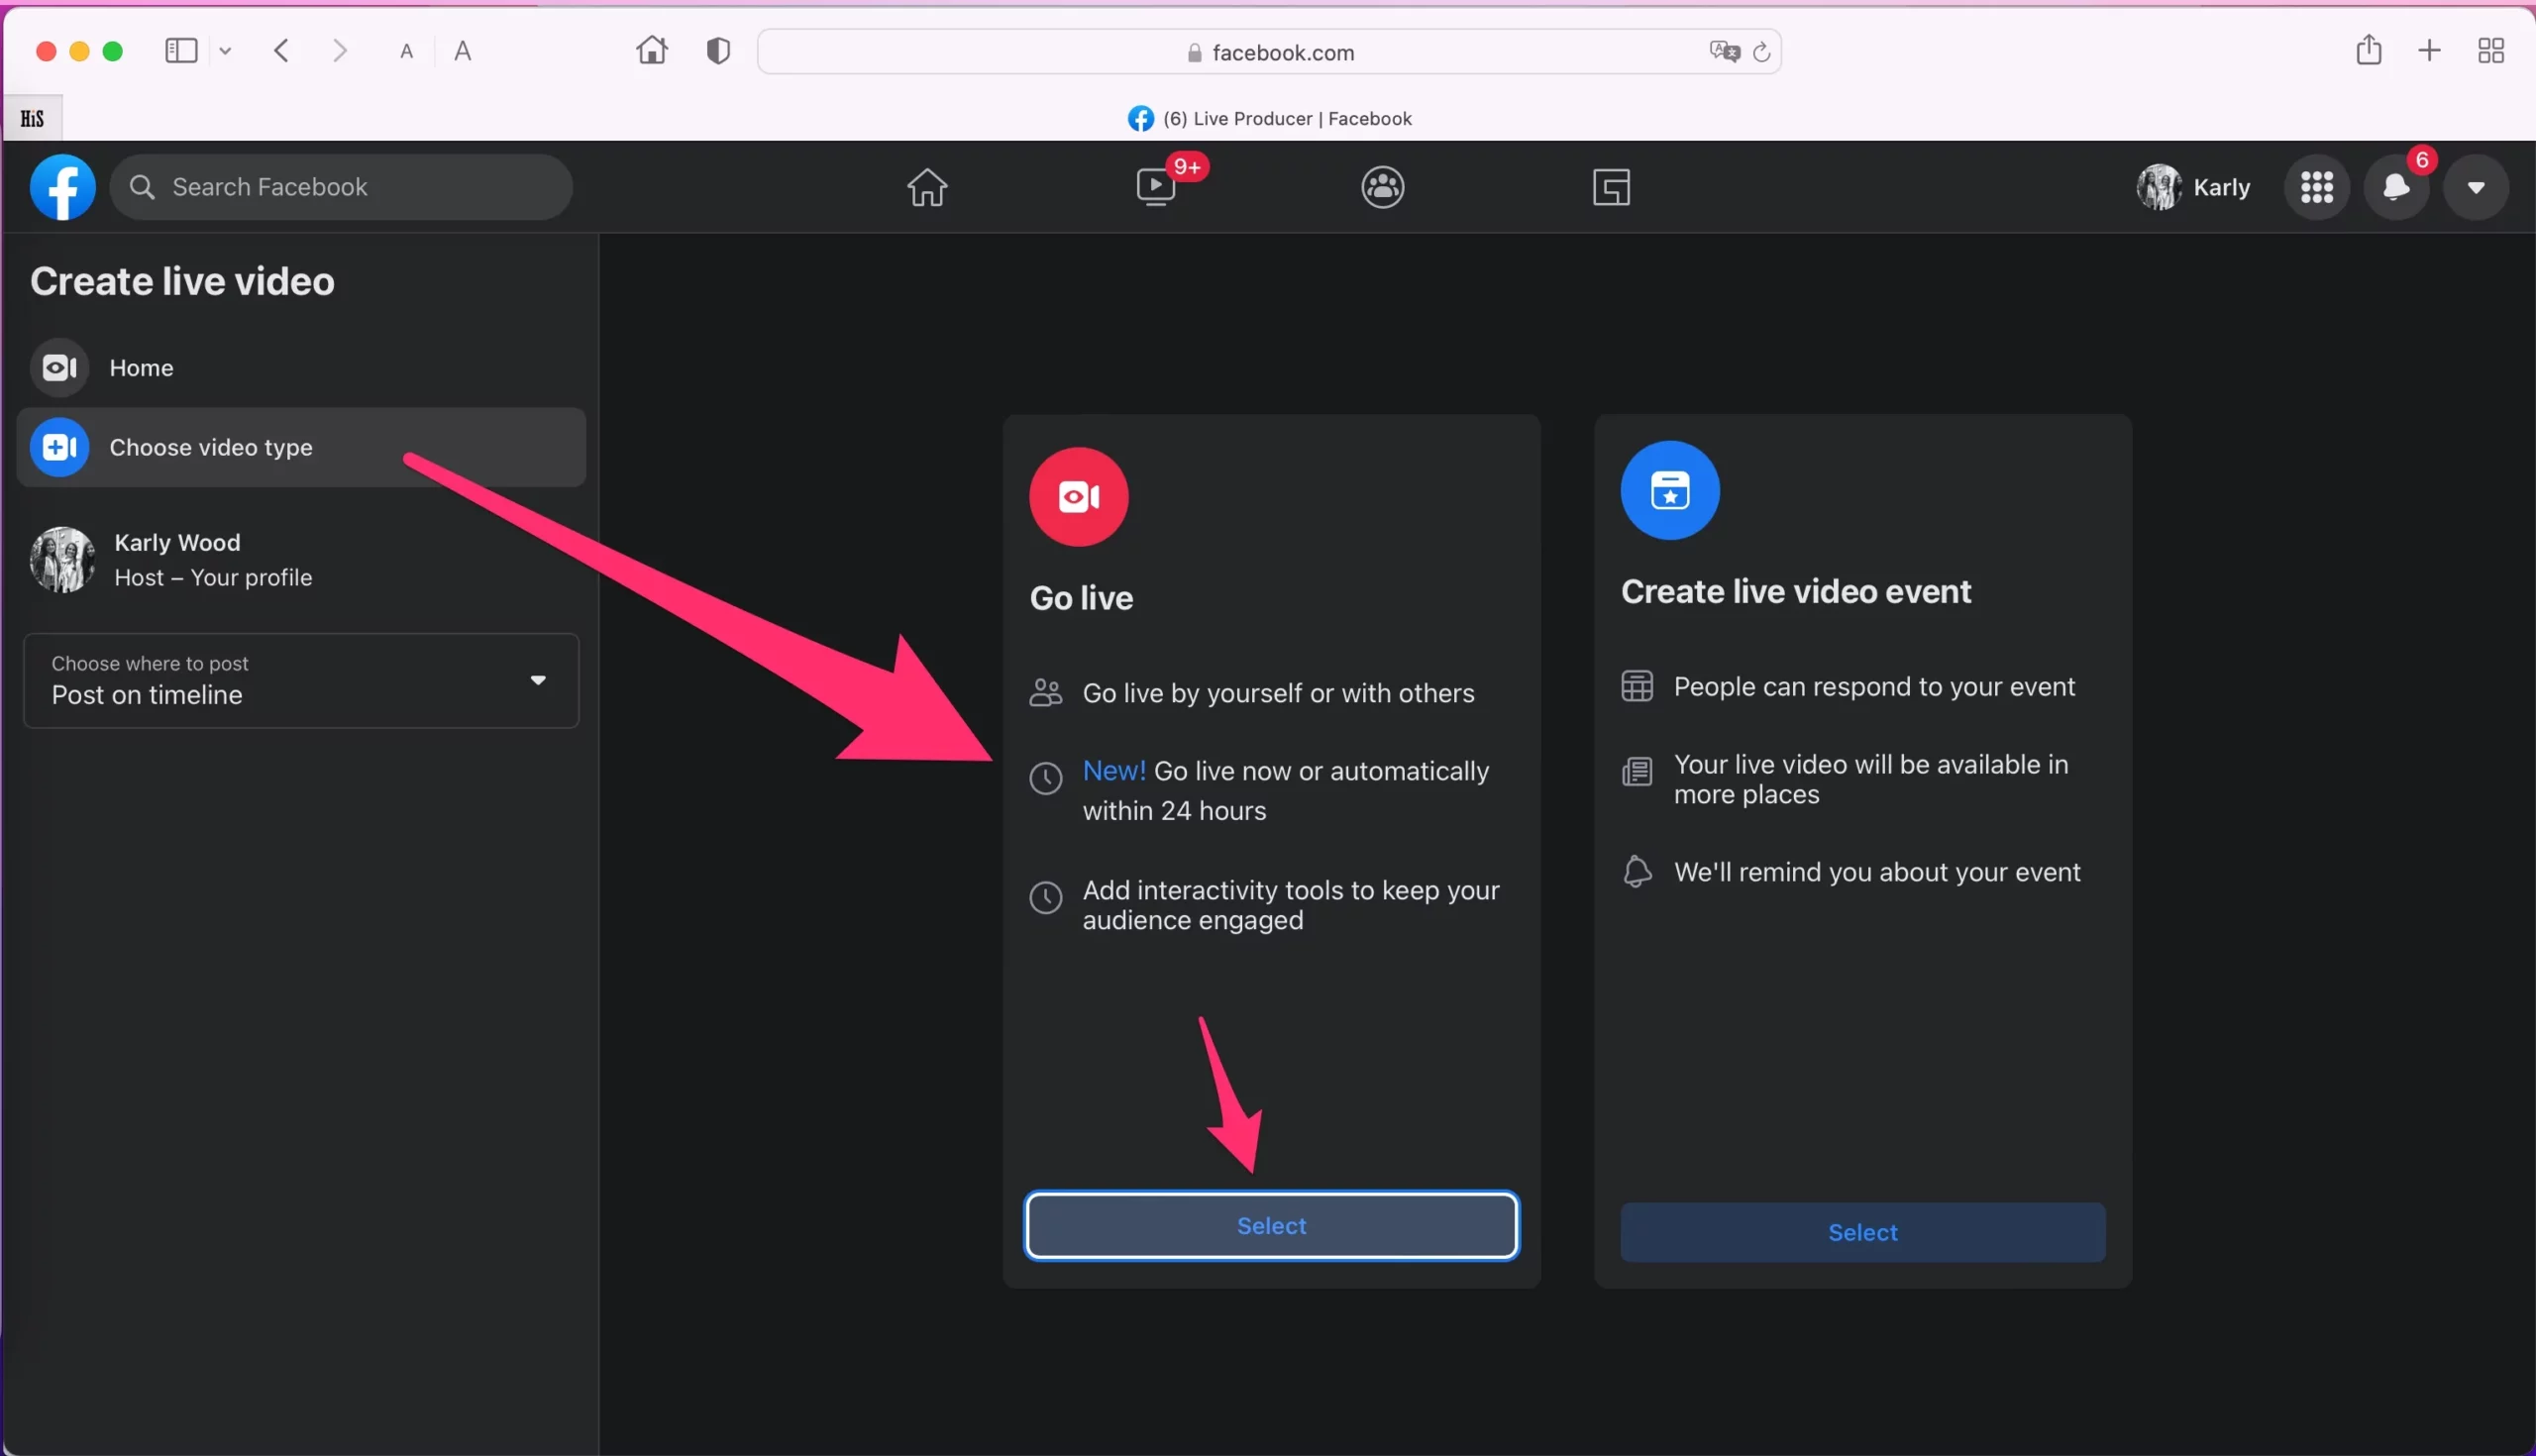
Step 2: Go to the Option Choose Video Type, Select Go Live [By Yourself] or Create Video Event [To Notify Before you go live. Click on the Select Option for the Go Live option.
Click on to create a new Facebook post, find the Facebook live option, near the photo and video.
Before Get Started section has different options for setting your camera, Microphone, and Screen Sharing (Share your Work and Mac screen to your Friends or Public). Allow using Microphone and Camera, for Chrome Browser,
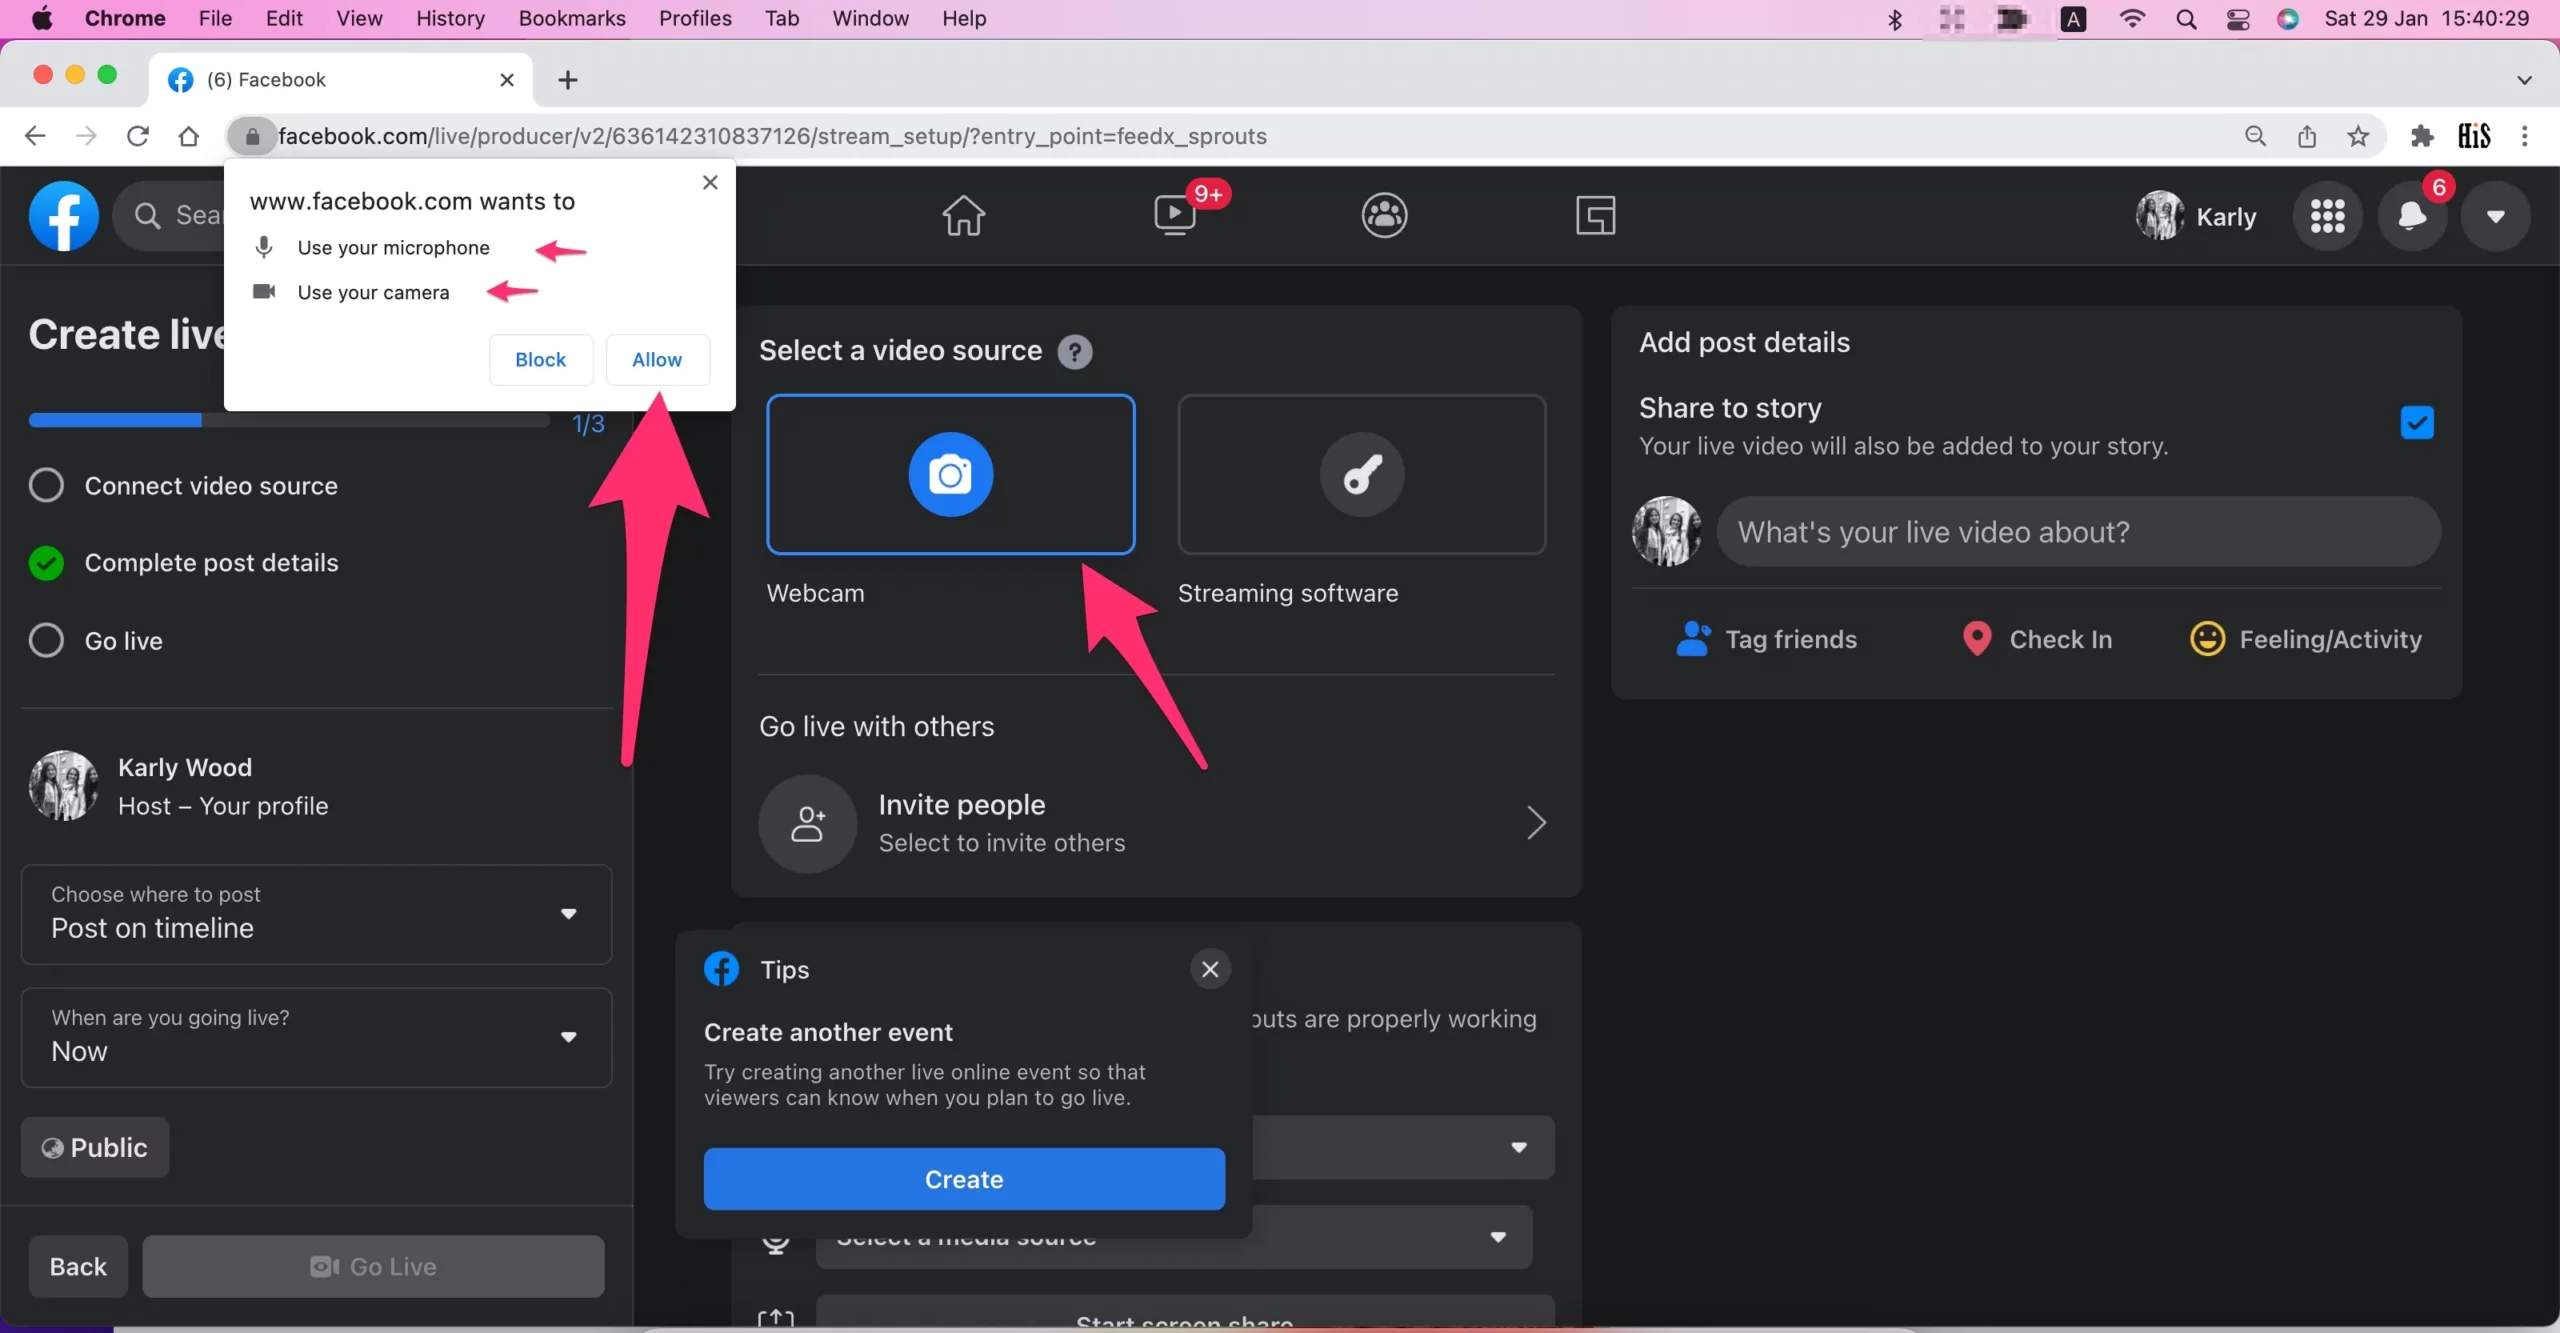
- If you are not getting this pop-up, then go with the Manual steps. Go to the Apple Logo > System Preferences > Security & Privacy > Privacy Tab > Select Google Chrome for Camera & Microphone.
If you wish to change the Default Camera or Microphone, then change it from the Camera icon showing in the Address bar on your Browser.

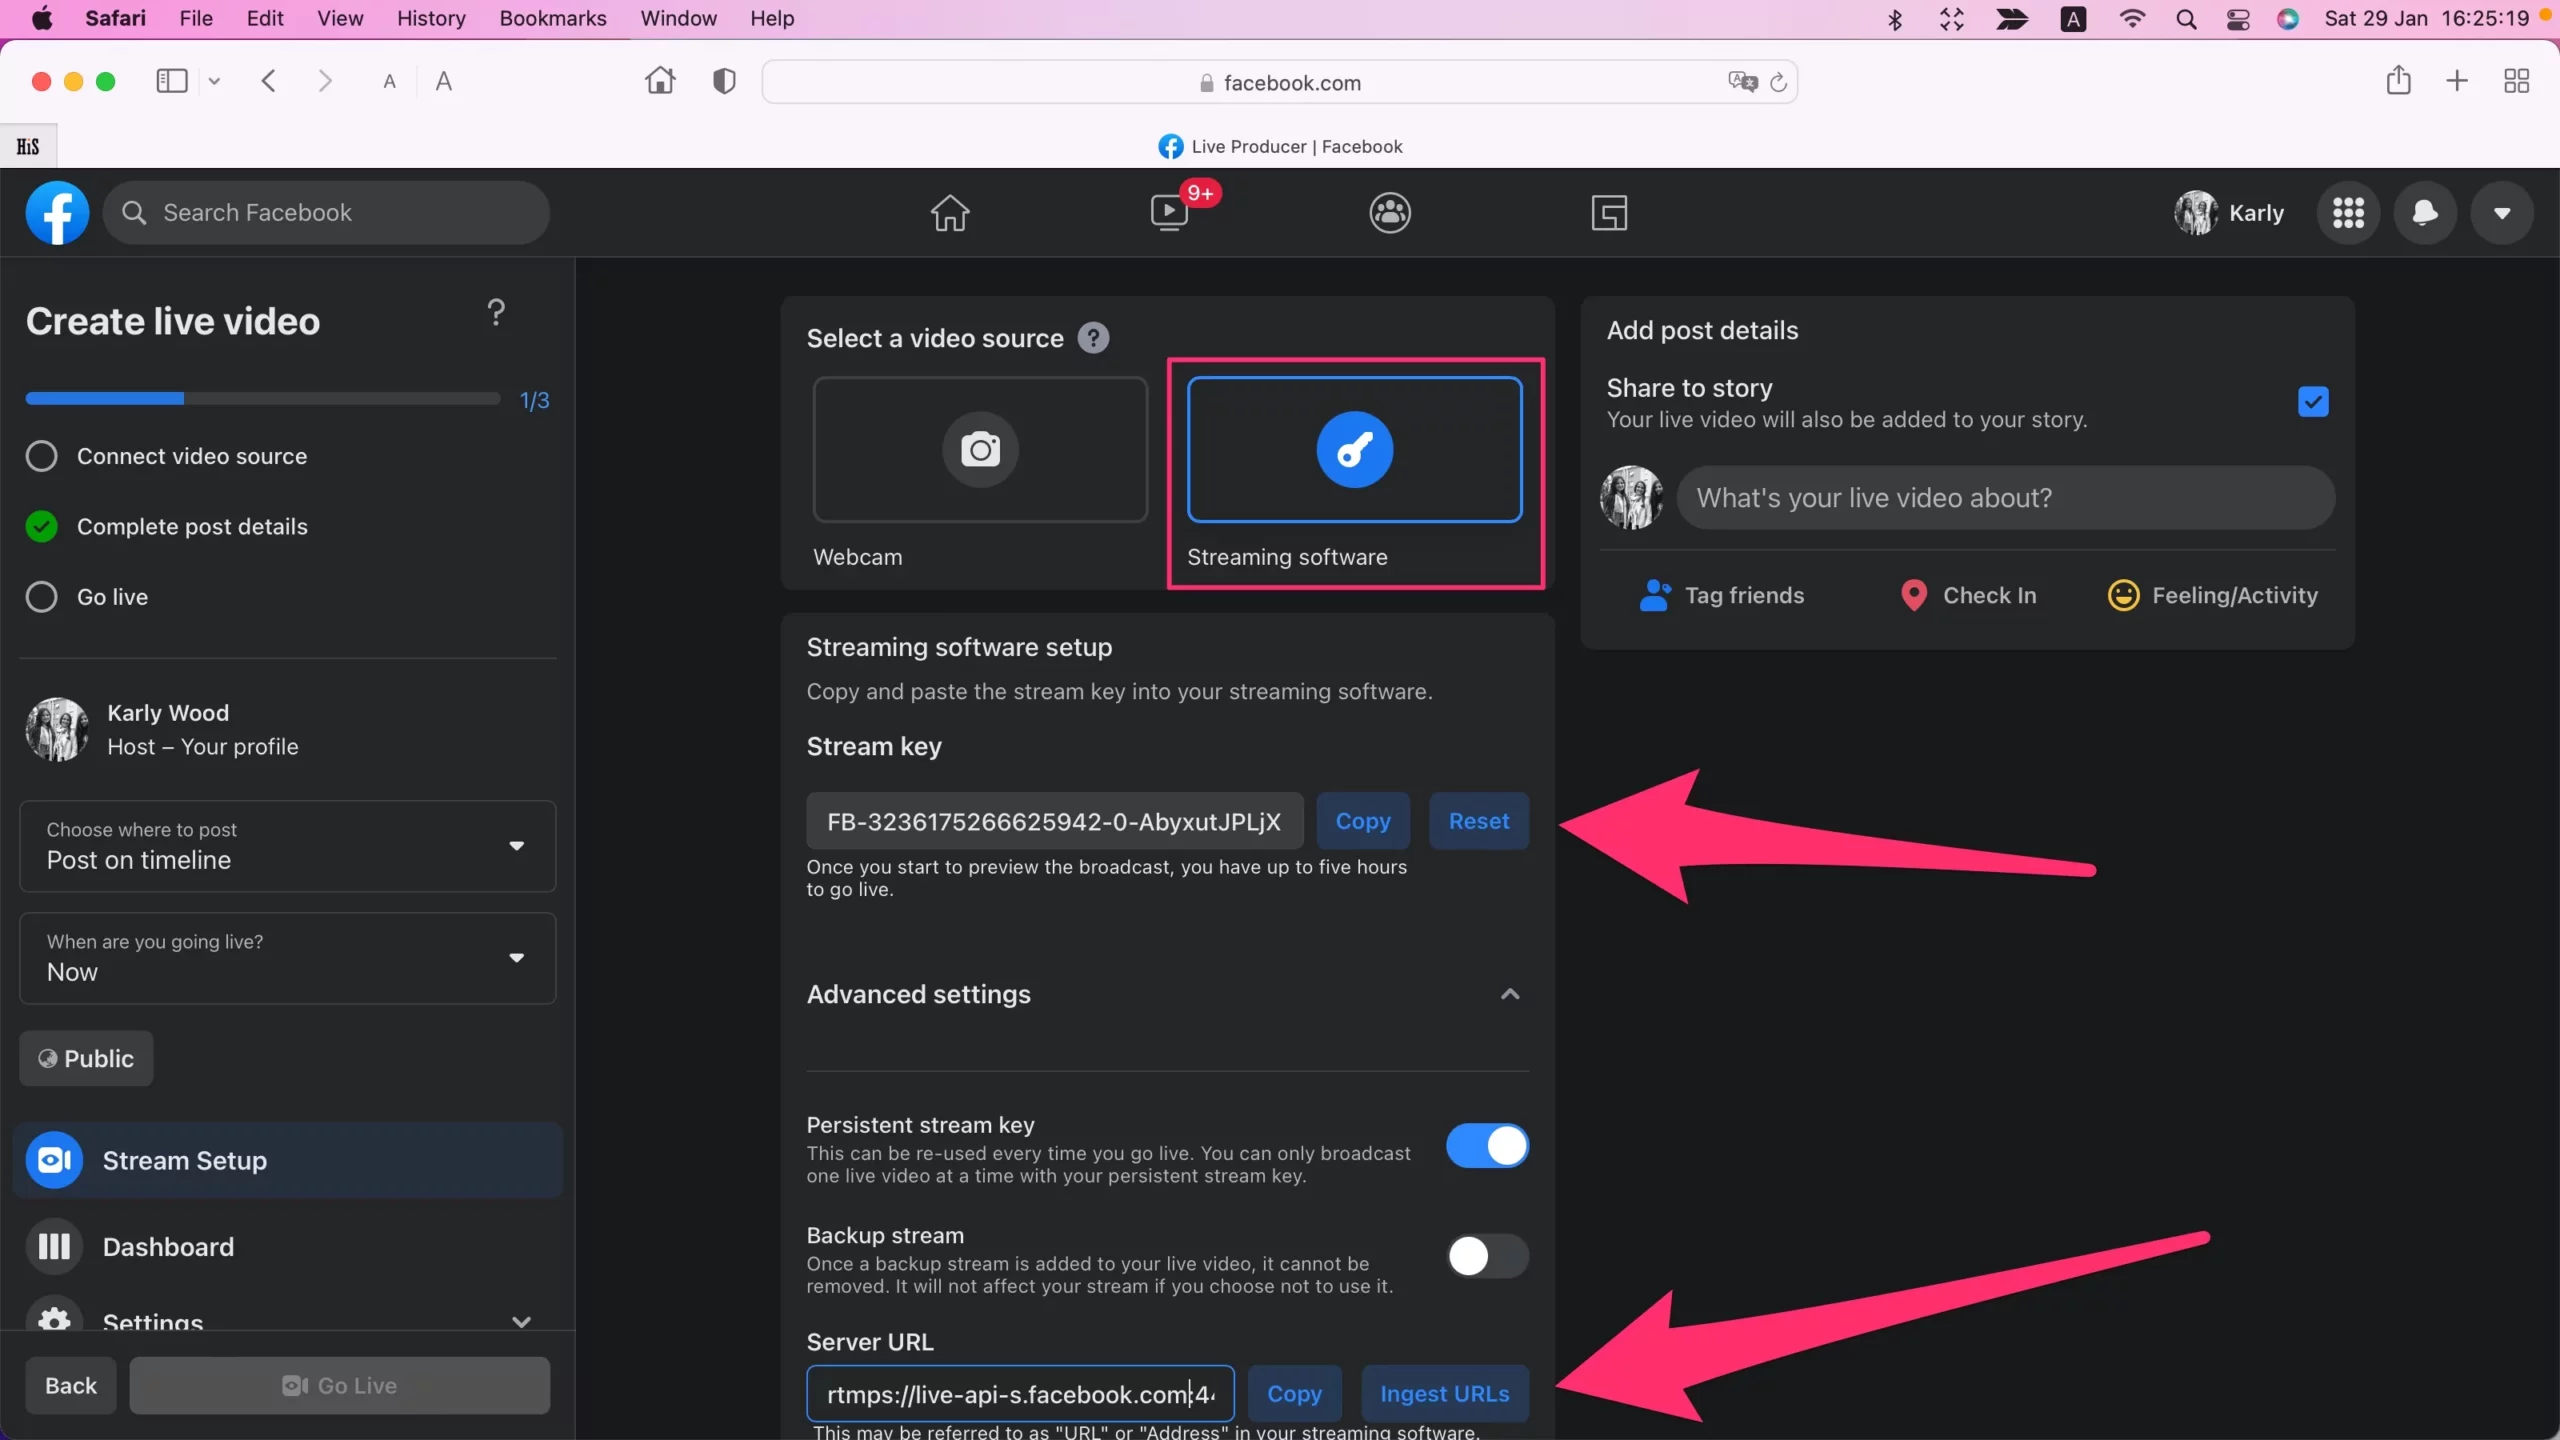
- Select Camera: Use Stream Keys, Use Paired Encoders, Camera.
- Setup section – Select Camera media, Microphone, and Screen Share.
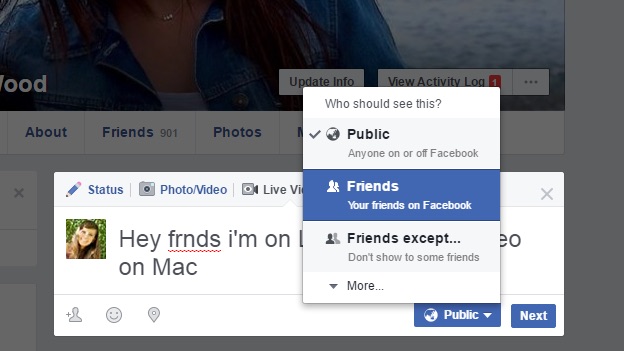
Step 3: Set the Privacy Before starting the live Facebook video from the Left side panel, will show in Public, Friends, Friends Except.., Specific Friends, Only Me…
Step 4: Set Live Video Title, Description Prepare before going live on Facebook

Built-in Webcam not working for Facebook Live: Problems & Solutions
Fix “The camera is not supported by your current browser” on Safari while using your MacBook Pro/Air, iMac, or Mac mini. The reason is related to privacy, so users have to go with the alternative way to start Facebook Live from Mac or change the Method to go live on Facebook.
Still, are you trying to access the Camera and Microphone in Safari for Facebook Live? But it will not work, because there are no privacy settings for Camera and Microphone access through Safari Browser, like Other Third-Party browsers.
- Use Third-Party Browser:- Google Chrome for Mac, Mozila Firefox, Opera.. or Other Best Browser for Mac.
- Buddy chance, if you don’t find a proper solution, I suggest you should try:
- External Webcam
- Broadcasting using OBS Studio – unfortuneatly, the external camera also doesn’t work for you then until facebook not fix an issue, you only have an option that is OBS Studio to feed Facebook Live.
- Use Streaming software:- Facebook Live now supports Third-Party streaming software. Just copy the Key from your Facebook page and enter it in the software from where you want to broadcast. Follow the FaceBook Live setup explained earlier, and select “Streaming Software” then Use Key or URL in Broadcasting software to Turn on FaceBook Live.

- Use Private Browsing on your Safari or Chrom Browser, Some Extension isn’t loaded the page and creating a problem. Open Safari > From Top Menu File Options > New Private Window.
- Remove VPN from Mac if it’s installed. Uninstall VPN Software from Launchpad or Allocations folder on the Finder window.
- Update your MacOS to the Latest Version, Outdated Safari Auto Updated. Go to the Apple Logo from top Mac Menu > System Preferences > Software Update > Download & Install.
- Create a New Account on Mac, Try on Newly Created Account. Go to the Apple Logo from top Mac Menu > System Preferences > Users & Group > (+) to add new account.
First, you will see “Unable to find a camera” “Please connect the camera in order to broadcast”.

and the solution is this, From the top right corner click on the Camera icon > Always allow Facebook Microphone and Camera.

Start Preview, check everything is okay, then go live by clicking on “Go Live”.

On a close live video, you can find the option for Save on your Timeline or Delete (Not publish to later view).

Done: It will publish on Timeline
Delete: Completely remove the whole video from Facebook. (After that, you can’t find or recover deleted live Facebook video)
If you want to go with Delete, then you will have to do nothing more.
Earlier Facebook Live View User Interface on Browser: Mac, Windows PC
Add some text, or say something about live video in your language. Add privacy to who can see your live Facebook streaming.
Click on the Next button to turn on the Camera.
Publish the live video on Facebook timeline, Mac, or PC
Press “Done” and publish the video on the Facebook timeline. Now, more settings related to this video you can change under video settings.
Click on the Settings gear icon available on video, Then Go to More settings.

Next, Windows sees the option for Change Facebook live video quality, Autoplay video, Enable or Disable caption, and Change caption on video.

Are you using Facebook Live with an External Camera?
Don’t have a built-in camera or not working in your iMac, MacBook Pro, or Air. So you can try some of the very best video encoding software, XSplit, OBS, Wirecast.
Slow video or Low-resolution video
Live video and audio recording quality also depend on your camera resolution and internet speed. To get a high-quality result you should update or upgrade hardware with the very best webcam for Mac or PC. Or Use the iPhone as a Webcam on a Mac.
Are you interested in experiencing Facebook Live video on the iPhone, try it. Share the experience that you like and recommend to others via the comment box.