Get here all about how to import or transfer iPhone or iPad Pictures and movies on your Apple Macintosh using Apple’s image capture app. Free ways to find image capture, how to connect devices, and fix image capture not working on Mac.
So you went out with your family, friends, or loved ones, took a lot of great photos to remember the quality time that you spent with them, and you came home and thought that you wanted to create a backup for them all on your Mac, but you got stuck and found no solution to it.
If you are familiar with this situation, then do not worry. In this article, we will inform you about the most effective way to import your images from your iPhone or iPad. Using image capture will save you tons of time and peace of mind. You can use Image capture for multiple works, such as importing and scanning images. Follow along as we will show you a step-by-step guide to securely importing your photos through iPhone or iPad.
What is Image Capture on Mac?

Image Capture is a powerful tool that allows you to import and capture any screen, whether it’s your Mac desktop or a web page. You can also use Image Capture to record video and audio. The program works with all versions of macOS and supports multiple formats, including QuickTime, MPEG4, AVI, MOV, and more.
When you launch the application for the first time, it will ask you how you want to capture images (screen or webcam). If you choose a webcam, then Image Capture will open your camera in full-screen mode so you can totally focus on what you want to capture.
It is a built-in tool that lets you take screenshots of your Mac screen and save them to the clipboard. It also allows you to capture images from different applications, including Preview, Safari, Mail, and other apps. The captured image can be saved in PNG or JPEG format and then sent via email or uploaded to Dropbox or iCloud. You can also use Image Capture as an alternative way of taking notes on your Mac with the help of the Quick Notes feature.
How to find image capture on Mac?
If you are a Mac user and have the Apple ecosystem, you must be familiar with it. Most people, such as photographers or content creators, use Image capture app to back up their data on the go quickly.
Image Capture is a pre-installed app available on Apple’s Mac Computer (OS X or macOS) that simply allows users to upload, back up, and store images and videos from their iPhone, iPad, Digital Camera, and Scanner.
The people who are using it for the first time might have trouble finding it.
Here are three ways you can easily find Image Capture on Mac
Read More: – How to take a Screenshot on your Mac
Using The Launch Pad To Open Image Capture:
Where is the Image Capture app on my Mac? Newbies and rare users of the image capture application forget that the image capture app is stored on Mac; this definitely it happens due to human beings’ nature of forgetting things. Same for me, too, haha. Let’s see how to turn on Image capture on your Mac computer using different-different ways.
Step 1: The first step is just simply clicking on the Launchpad option available on the doc and opening the Launchpad.

Step 2: Then, a folder named “Other” will appear, which is the default location of Image Capture.
Step 3: Now, the Image Capture app will appear. Click on it.
Find Image Capture Using Spotlight Search on Mac
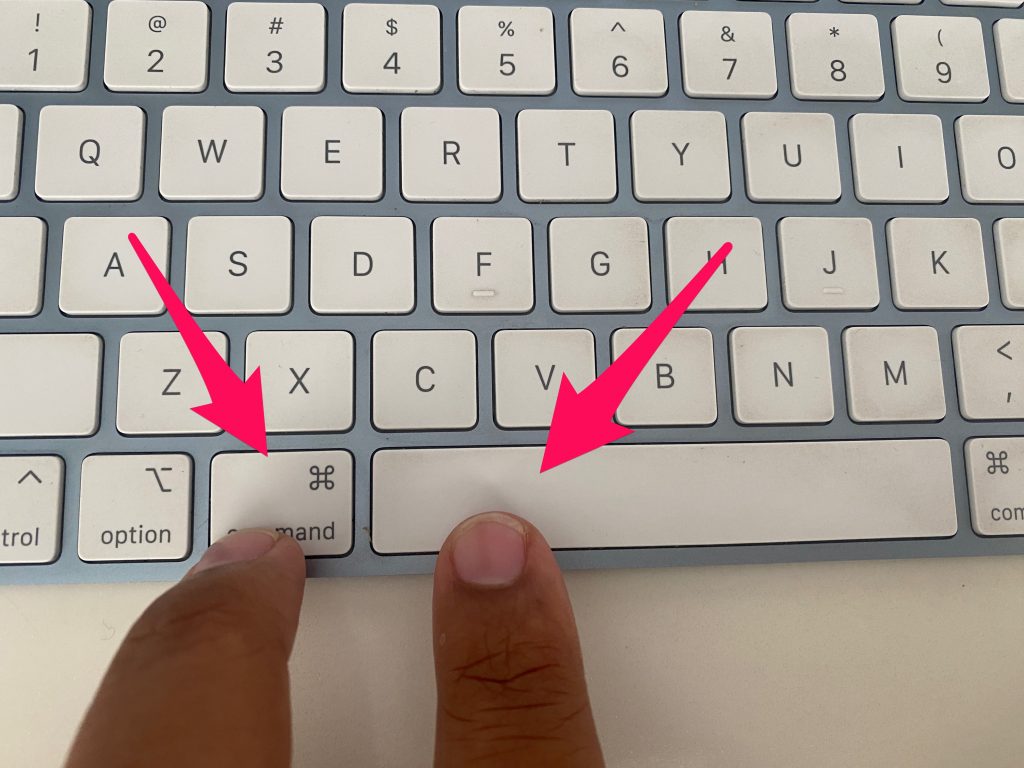
Step 1: You will find a magnifying glass icon at the right of the menu bar (or you can use the shortcut on your keyboard command + spacebar). Click on the icon and search for Image Capture.
Step 2: Now, in that search option, type Image Capture, and you will find the tool over there.
Step 3: Now click on the Image Capture application to open it up using your magic mouse or trackpad.
if you can’t find an application using Spotlight Search on your Mac, it means Spotlight search not working on your Mac, Don’t worry, go with the next way to find an image capture app.
Find Image Capture By Using the Finder on Mac Computer
Step 1: Open the Finder app on your Mac,
Step 2: Next locate the menu bar at the top of your screen and click on Go.
Step 2: Next, select the Applications tab or you can Pree Shift + command + A keys to directly open the Applications folder on Finder.
Step 3: In the applications section, look for the Image Capture.app and click on it. For Example, you can see in the given below Mac screen.
You can also use the Finder search bar to find any application out of the list. For example; here you should type image capture in the Finder search bar that appears on the right side of the Applications window of the Finder app.
If Finder Searchbar not working on your Mac, read this article carefully to fix an issue.
Shortcuts to Open image Captura on Mac computer
To quickly open the Image Capture app on your Mac, you can put it into the Dock as well as add it into the Open at Login time items. hence, both are the ideal and shortcuts ideas to open the image capture app on your Mac computer. – Open & Find the Image capture app in Dock, right-click on Image capture app – Choose Options – three items will appear – Keep in Dock, Open at Login, and Find in Finder. For example, you can view the picture example given below.
By Default Image Capture Look on MacBook and iMac Desktop
it doesn’t matter that you have Apple’s Silicon M1-series, M1 Pro (MacBook Pro), M1 Max (MacBook Pro & Mac Studio), M1 ultra (Mac Studio), M2 chip of 2022 (MacBook Pro & MacBook Air) Or Intel chip Mac computer, the Image capture app user interface is the same looking.

by default, image capture does show No camera or scanner selected. it means there isn’t any device connected to your Mac; Or the device connected but locked by a passcode.
On the same screen, the left side panel shows you two options; the first is a device and the second is shared.
- in Device, you can see the connected device on your mac – For Example; iPhone, iPad, and Digital Camera.
- in the shared section – users can view the scanner.
How to Use Mac Image Capture with an iPhone?
When you want to use Image Capture on Mac with an iPhone, you must first download the latest version of Image Capture for Mac. Once it is downloaded onto your Mac, you are good to go.
Steps To Follow To Use Image Capture On Mac With An iPhone:
Step 1: Firstly, plug in your iPhone using the USB or USB-C cable and grant access after entering the Digit password or using Face ID.


Step 2: Launch Spotlight by pressing Command+Space Bar on your keyboard and typing Image Capture.
Read More: Fix iPhone not Showing in image capture App on Mac
Step 3: Under the device heading, locate and select your phone. Make sure to unlock your phone to grant access.
Read More: – How to Fix the error “Could not open a connection to the device module in Image Capture On Mac.”
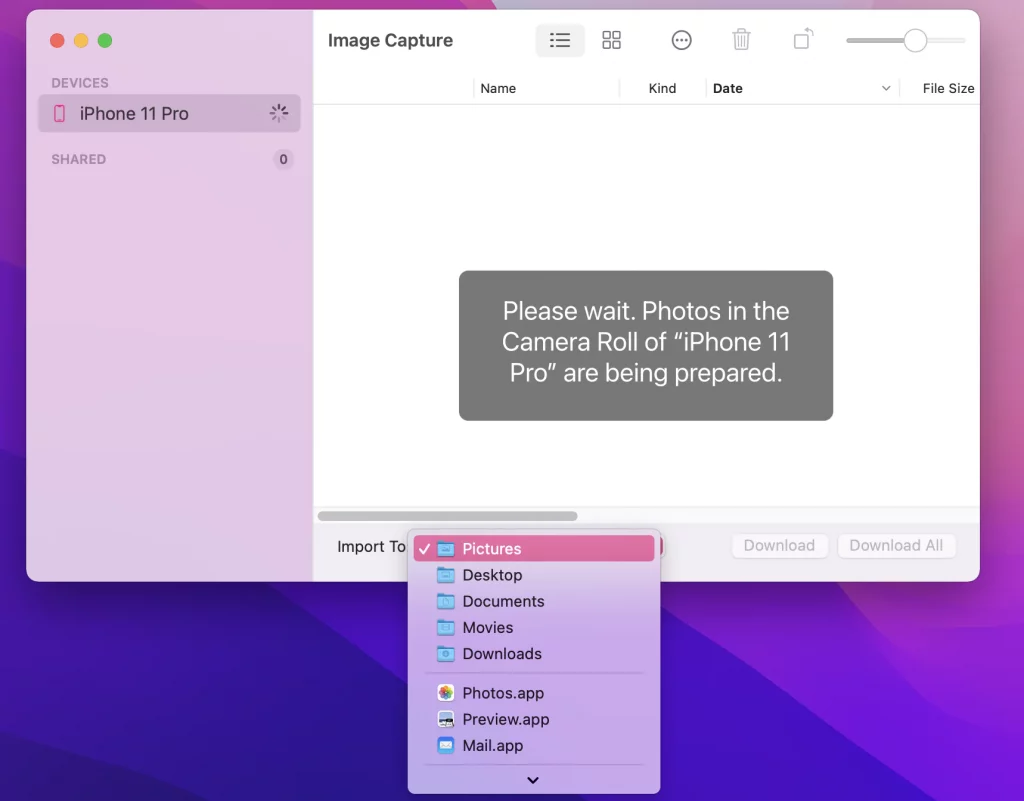
Step 4: At the bottom of the Image Capture window, pick up the location where you want to import your photos and videos.

Step 5: Now, you have to select the files you want to import and click on Import for selected files or Import All for all of the files.
After connecting your iPhone to your Mac, it will show you in the image capture app side panel as like as your device appears in Finder App,
if you are facing any error on your Image capture app’s Mac screen, Please share it in the comment box below.
How to Filter iPhone or iPad Pictures in Image capture on your Mac
Users can filter using Name, kind, Date, File Size, Width, height, Location, Aperature, Color Space, and Shutter Speed.
For Example, if you want to find pictures that are taken in Newyork City, then Click on the location filter that appears on the head of the Image capture window pan.
Now, you can view all pictures in sequence location-wise.
The next step is download; before that, you should choose the location to save. Choose Import to: (Pictures, Desktop, Documents, Movies, Downloads, Make Subfolder per camera is optional, Photos.app, Preview.app, Mail.app, MakePDF.app, Build Web page.app, Or go with Other to choose your desired location on your Mac to save pictures from iPhone to Mac)
There are two buttons that appear lower-right side of the corner – The one is Download and the second is Download All
Select multiple pictures using your magic mouse or Mac notebook trackpad and click on Download to save photos on your Mac.
To back up all your iPhone pictures on your Mac, simply click on Download All.
That’s it.
Why does my Mac not have image capture?
You might also come across a situation when Image Capture isn’t pre-installed and does not show up on your Mac, or you are unable to see the device you have connected, such as an iPhone or an iPad. So, what to do in that particular case?
If your device doesn’t show it.
Ensure that your device, such as an iPhone or an iPad, is unlocked and adequately connected using a USB cable and that you have permission before importing your files.
If your Mac does not have Image Capture.
If your device doesn’t have image capture, you can also go for alternatives such as IMagazine and IExplorer. Both programs are free and Mac-compatible, allowing you to import images into your Apple devices easily.
Conclusion:
The first thing people think of after clicking a picture is to safely back it up so it can be safely accessible anytime and anywhere. For the Mac user, image capture has made this thing easy. I hope this article was in some way helpful to you, and now you can quickly import your pictures clicked on your iPhone or iPad. If this blog has benefited you, please consider sharing it. Thank you for reading.


