
It is expected that the everyday users of MacBook might have a lot of photos, documents, videos, Apps, and other media files stored in their devices. However, it can become increasingly difficult to locate these files on your Mac over time due to the accumulation of a large amount of data. So, the spotlight search on Macbooks helps users look for those files within a few seconds and very quickly.
Although this function is beneficial, there are some cases where the spotlight search does not show applications or the Spotlight Search Freezes on Mac after Tahoe update. Unfortunately, this has become a very common problem, and in this article, we will discuss how the users can fix this problem.
Tips: How do enable Spotlight search on my Mac?
Troubleshooting: Spotlight Search is not working on Mac
1. Restart the Mac
However, restarting the MacBook may seem like an effortless and unnecessary step; it has proven to solve this issue in many cases. So it is recommended that the users try to restart, shut down, wake, sleep, or log out from their Macs and try using the Spotlight search to see if the problem of “Spotlight Search Freezes on Mac” still exists. Then, if you still face the problem, move on to the next step described below.
2. Rebuild the Spotlight index on your MacBook
If the users use spotlight search to look for their photos, videos, and other stuff but end up with unexpected search results or Slow Spotlight Search on Mac, they should try rebuilding the spotlight index to fix this issue. This is a swift and straightforward process and can be done by taking note of the following steps.
How do I change Spotlight settings on Mac? Here are the steps to Find out which macOS your Mac is using.
On MacOS Ventura & Later: Rebuild Spotlight
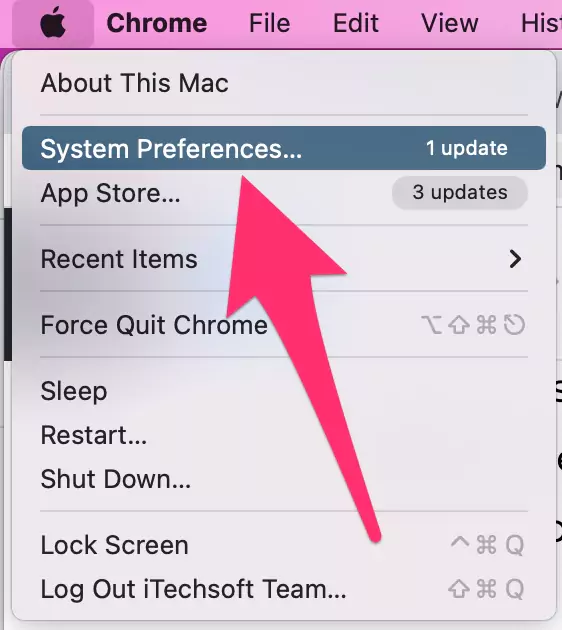
1→ Go to the Apple Logo from the top menu > System Settings.
2→ Find & Open “Siri & Spotlight” > Under the Search Results, Only selected categories will appear in Spotlight search results. make sure you have selected those categories that’s not showing in the Spotlight search Like Folders, Music, Documents and more…
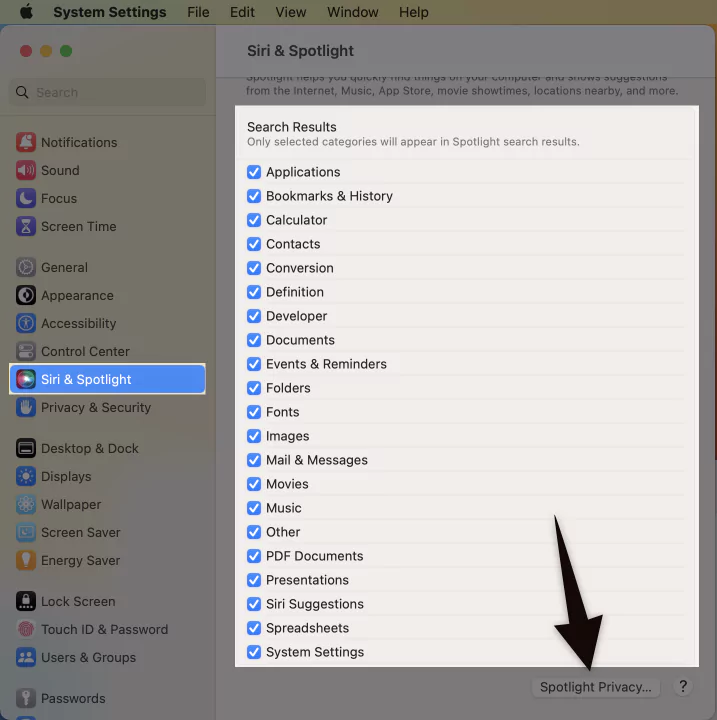
3→ More customization in Spotlight Search is under Spotlight Privacy…
4→ Here are the Folders or files that are excluded from the Spotlight Search result.
5→ Select it and Click on Minus to remove it from the list and Done to save the changes.

That’s it.
On MacOS Monterey & Earlier: Rebuild Spotlight
Step. 1→ Click on the Apple Logo menu of your Mac and open system preferences.
Step. 2→ Then, select Spotlight from the variety of settings available.

Step. 4→ Look for the Search Results tab and Check all the Types of content to get results Using Spotlight Search.

Step. 3→ Look for the Privacy tab and click on it.

Step. 4→ Drag or pull down the folders or disk that you wish to index again to the list of locations from which Spotlight is restricted to search. You can also do this by simply clicking on the add icon denoted by (+) and selecting the folder or disk to add.
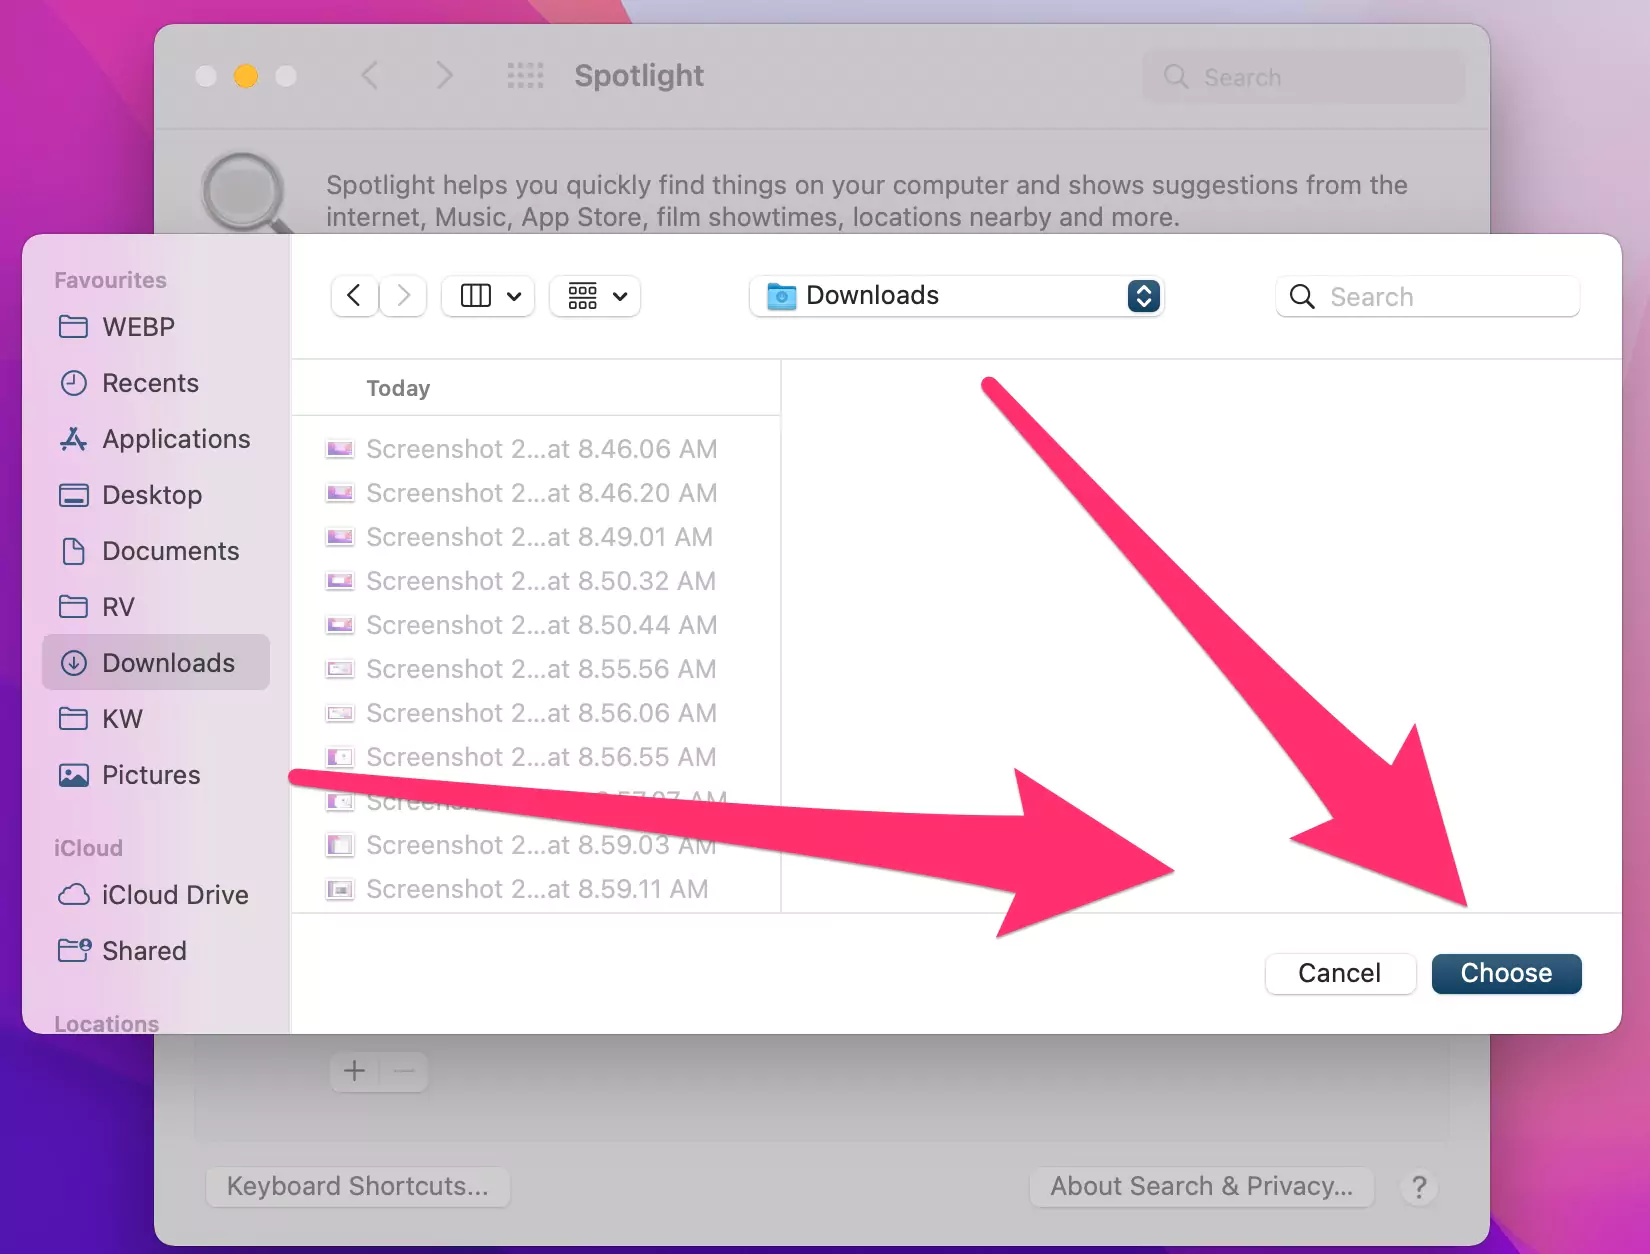
Step. 5→ After that, from the same list of locations, select the folder or disk that you just added and click on the remove icon denoted by (-) to remove it from the list.

Step. 6→ Finally, exit the system preferences tab by clicking on the cross mark.
This will allow the Spotlight to reindex the contents of the folders and disk that it previously had trouble searching. This procedure can take some time, depending on the amount of data to be indexed. Once it’s done, try searching for the files again to see if the issue of Slow Spotlight Search on Mac and unwanted results persists.
3. Use the Terminal application to rebuild the Spotlight index
If rebuilding the spotlight index through system preferences does not fix your problem, try using the terminal app to rebuild the spotlight index. The rebuilding process through the terminal app can be done by the method prescribed below.
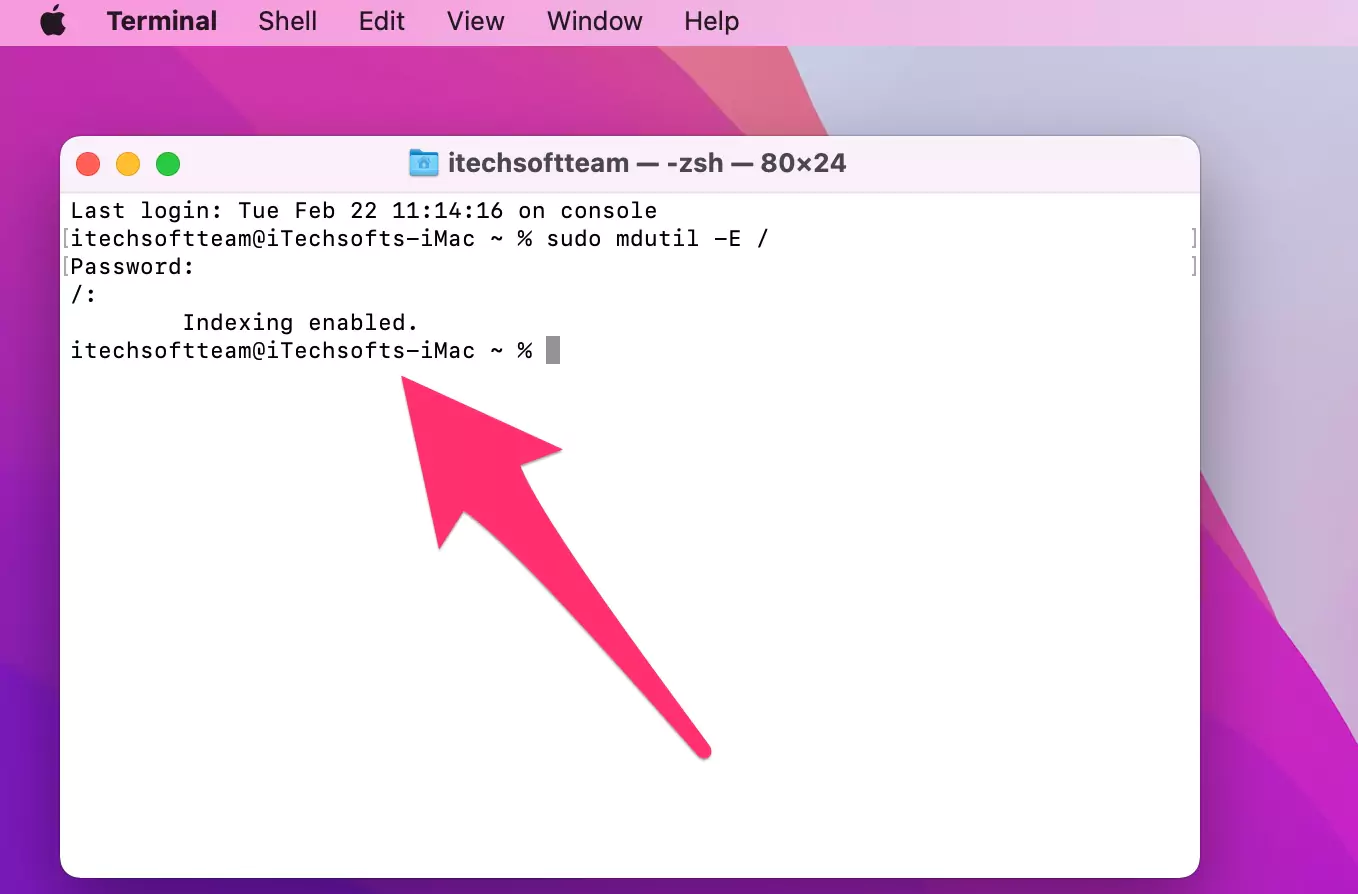
Step. 1→ Launch the terminal app by going to Applications > Utility folder and double-clicking on the terminal button.
Step. 2→ Then, in the dialog box, type the command- sudo mdutil -E / and hit enter.
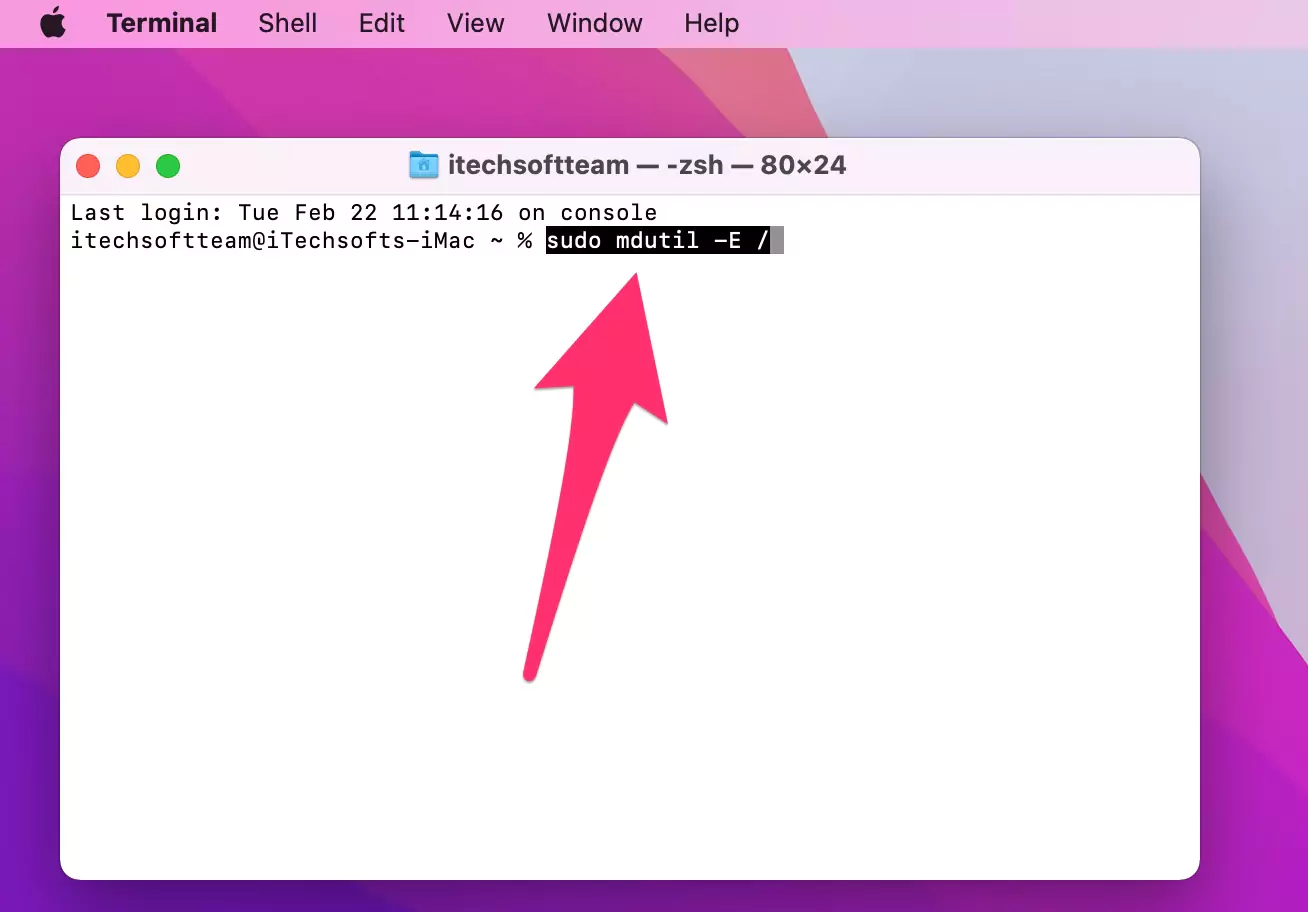
Step. 3→ Enter your administrator password if asked for by the system.

This process will erase and rebuild and rebuild the Spotlight index on your Mac and take care of your problem of Spotlight not functioning correctly or slow spotlight search on Mac to provide a better search experience.
That’s it. Wait for Few Time and Get your Mac Spotlight to search fast and fix.
4. Repair the Disk Using Disk Utility
Repairing the disk or folder that is having difficulty opening with the help of disk utility can fix many problems like slow spotlight search on Mac, among many other issues. The disk repairing process can be initiated by following the steps given below.
On M1 Mac:-
Step. 1→ First, Shut Down your Mac and hold the Power button when to start recovery mode, Until you see the Startup volumes and Options on the screen. Click on Options > And Wait for the MacOS Recovery screen. You mac might be asked to enter a login password. Now, you will see the macOS Utility window.
Step. 2→ Select Disk Utility at the recovery mode screen prompt.
Step. 3→ Select Your Mac’s Startup disk from the sidebar and From the various tabs at the top of the screen, choose First Aid.

Step. 3→ Go with the Run Option. and Wait for the issue to fix itself.

On Intel Mac:-
Step. 1→ First, restart your Mac and hold command + R keys when booting up to open the recovery mode.
Step. 2→ Select Disk Utility at the recovery mode screen prompt.
Step. 3→ From the various tabs at the top of the screen, choose First Aid.
Step. 4→ Hit the Run button to initiate the recovery engine to check for errors on the disk and repair them.
Step. 5→ After the repair is finished, restart your MacBook normally.
Open the spotlight search again and type in the file or disk that you want it to search, and check if the problem has been resolved or not.
5. Check the Spotlight Preferences
Sometimes the spotlight search excludes some of the folders or disks from the search results due to the app preferences set by the user. So it is crucial to monitor the app preferences set in the spotlight search app to ensure that it is not the reason for Spotlight not working correctly or the Spotlight Search Freezing on Mac. To check the spotlight preference of your device, go through the process described below.
Step. 1→ Initially, click on the Apple Logo menu at the top left corner of the screen.
Step. 2→ From the drop-down menu, select system preferences and go to the Spotlight.
Step. 3→ Check the search preference tab for the list of apps and see the app preferences of Spotlight.
If you have excluded those apps from the Spotlight, they will not appear in the search result, so make sure to allow those folders or disks on Spotlight and try searching for them again to fix the problem.
6. Restart SystemUIServer
If rebuilding does not fix our problem, then try restarting the SystemUIServer. The SystemUIServer is a process that runs in the background and controls various aspects of the macOS, so restarting it may fix many issues related to slow spotlight search on Mac. The users can restart the SystemUIServer by the following method.
Step. 1→ Open the Activity Monitor by going to Applications/Utilities/

Step. 2→ Look for the setting named SystemUIServer from all the options available. The users can also use the search bar at the top right corner to locate this setting.

Step. 3→ Then, double click on SystemUIServer and hit the quit button.
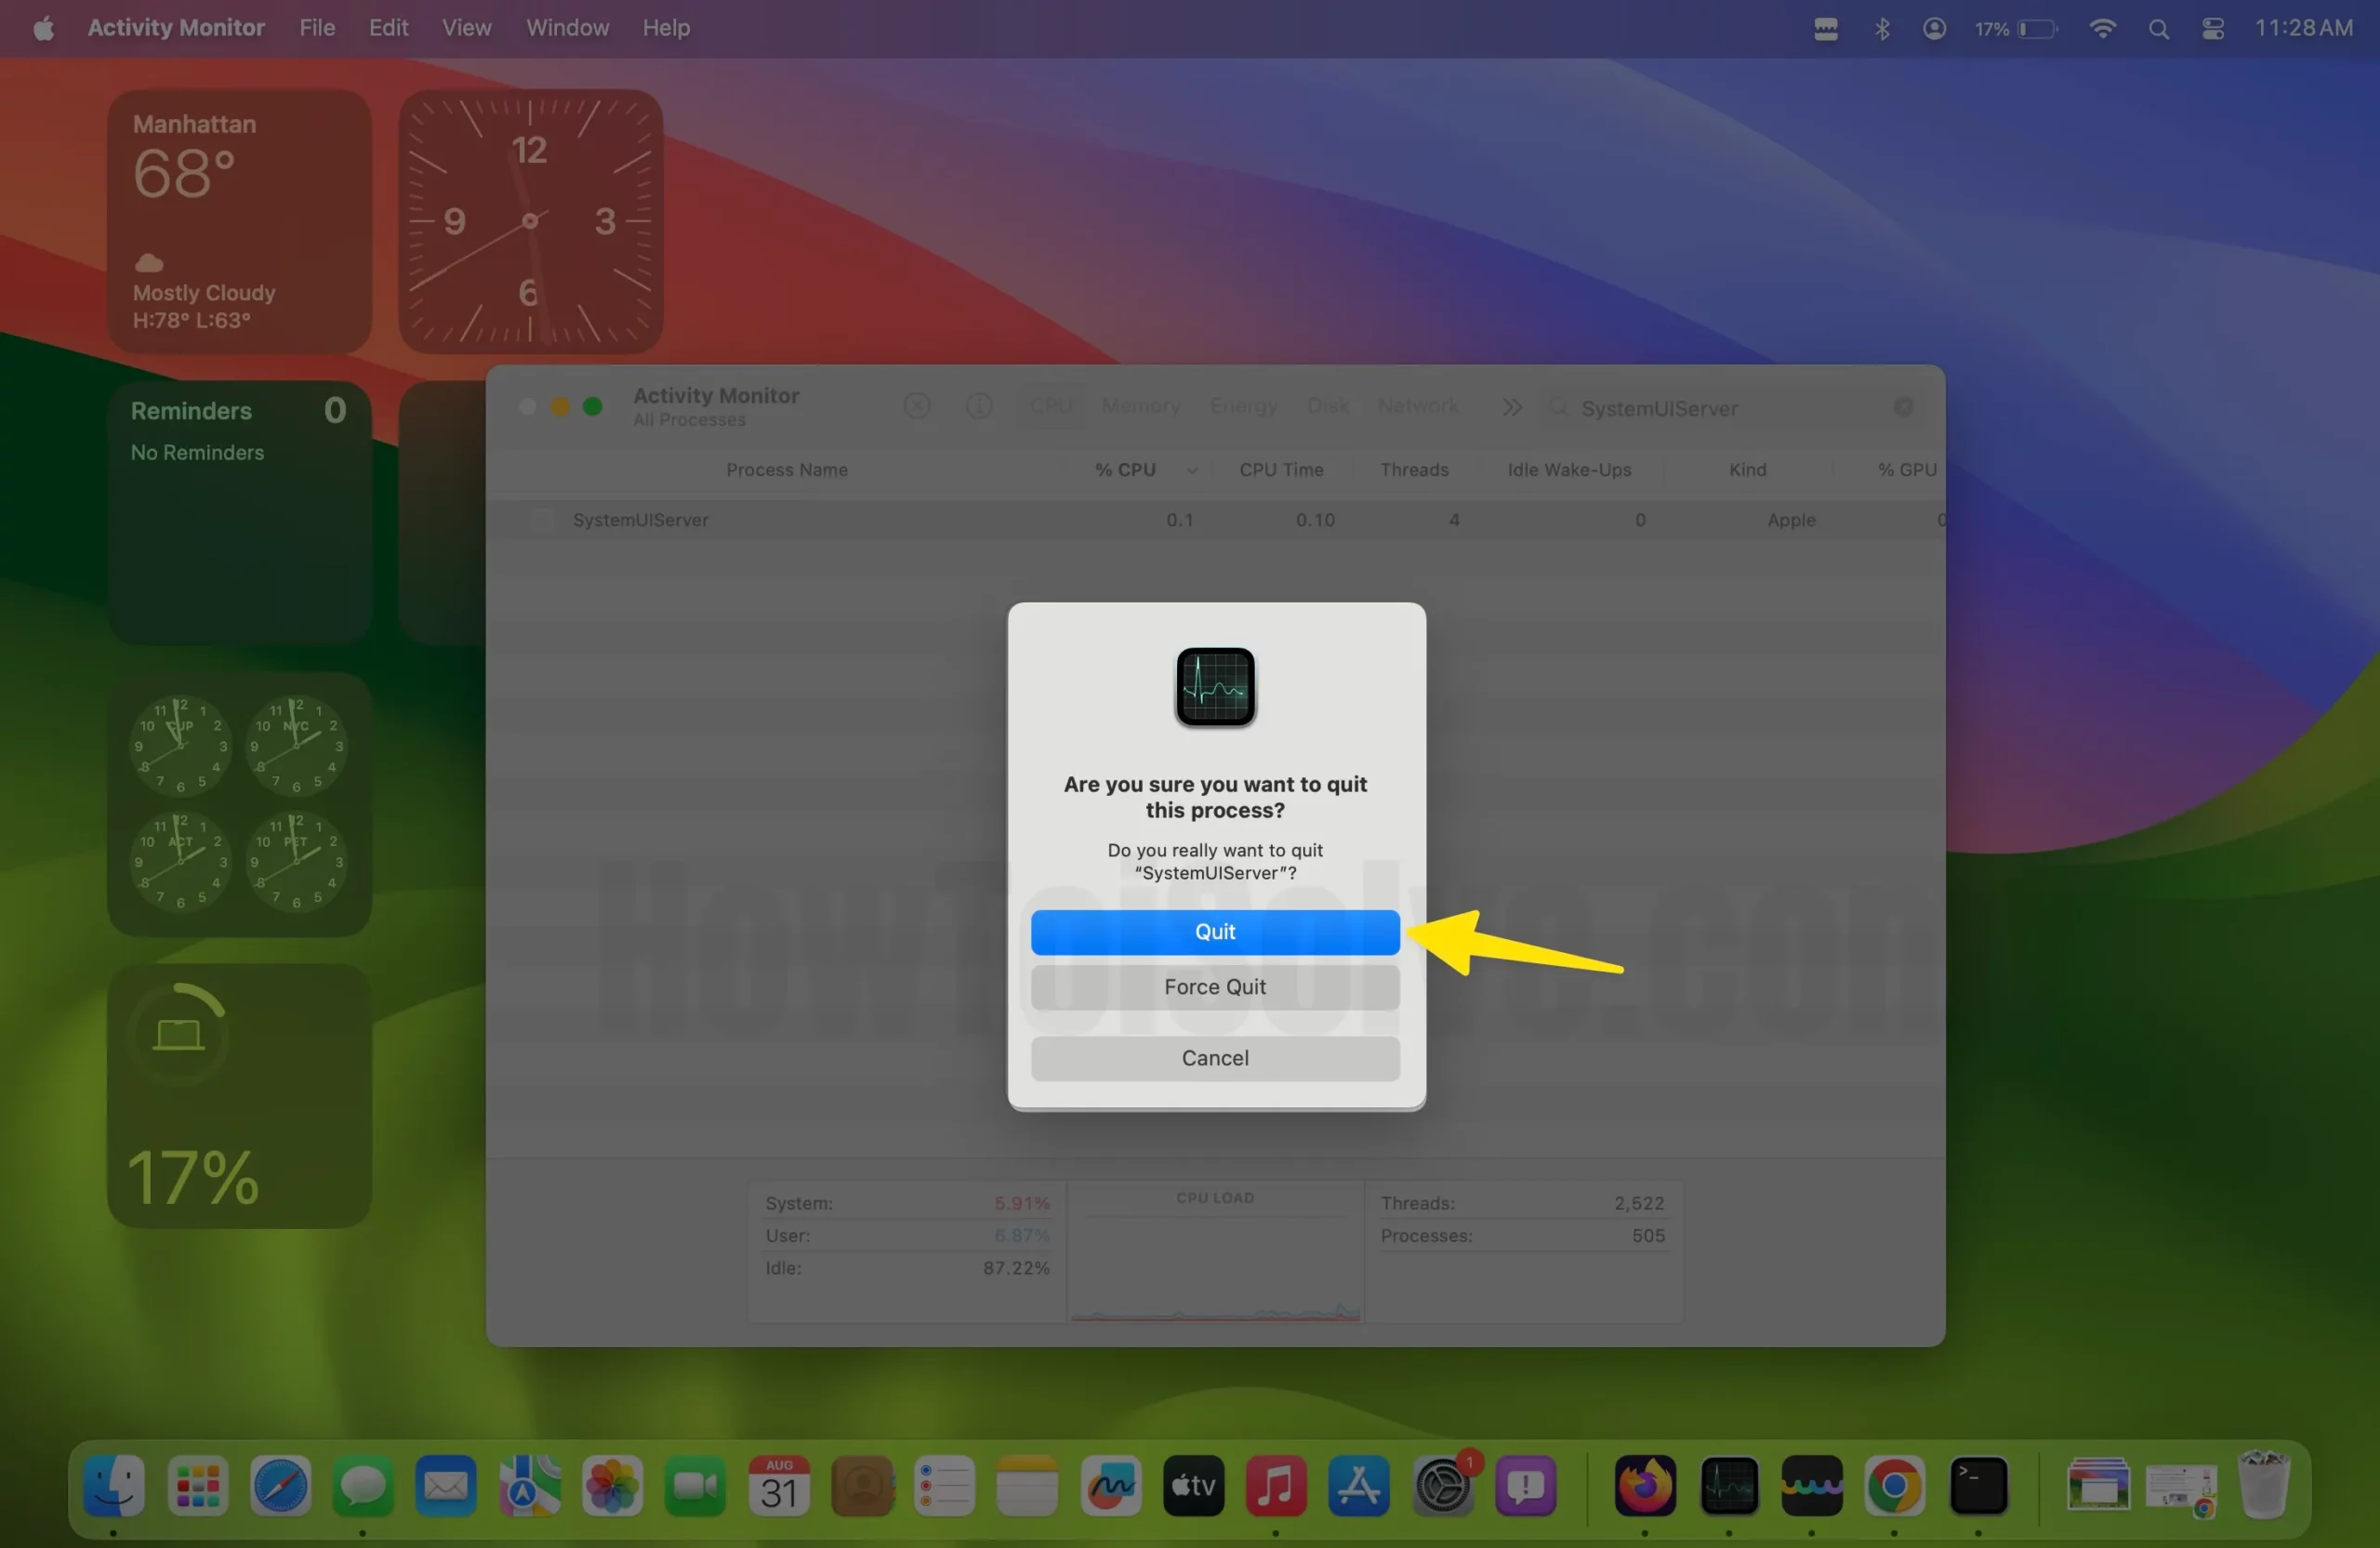
Step. 4→ At last, wait for a few seconds for macOS to restart the process again.
This will restart the SystemUIServer on your macOS. Then, open the spotlight app again and check whether it is working correctly.
7. Update or Upgrade your Mac
Many users have complained about spotlight search not functioning properly on their MacBook after the macOS upgrade to Monterey. This problem is bound to occur as each new update comes with some bugs or glitches, which are then fixed in the later upgrades. So keep checking for new updates for your Mac, and you can do this by taking note of the following steps.
Step. 1→ Go to the Apple logo at the top of the screen.
Step. 2→ Settings… from the drop-down menu.
Step. 3→ Then, Select General > software update and check for the updates.
If there is an update available, we recommend you upgrade to the latest version to fix the problem of spotlight freezing on Mac.
8. Safe Mode
is it a Bug or Software issue because of installed Apps on your Mac? Let’s fix the issue because some apps create a problem while turning on Mac. Safe mode checks the software issue on Mac from starting up. Follow the given below steps to Put your Mac in safe mode on M1 or Intel Mac.
M1 mac:-
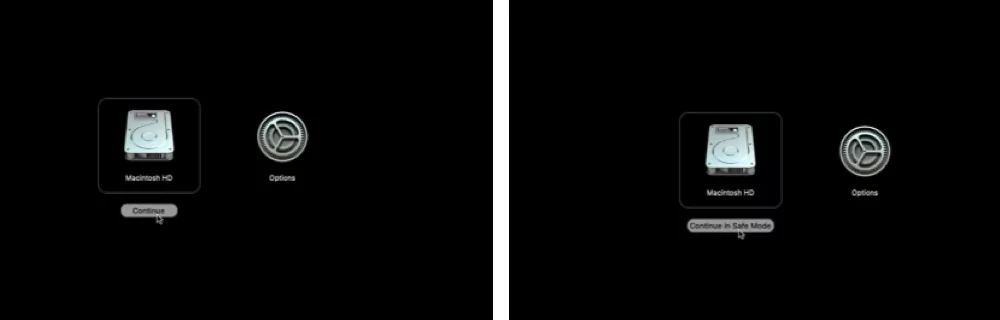
- First Shutdown your Mac. and After wait for 20 seconds, Turn on your Mac. Long press and Hold on Power button until your Mac showing Starup login options with Startup volumes on screen.
- Select Startup volume, then Press Shift key from keyboard and Click on Continue in safe mode.

- it will take sometime becuase, during this process your Mac will fix the issue automatically.
- Now, Login your Mac and check the issue is solved or not.
You can exit Safe mode on the next restart of your Mac.
Intel Mac:-
- Shut Down your Mac. After Wait for 10 seconds, Turn on your Mac.
- Imidiately, Press and Hold on Shift key, until your Mac see Login screen window with Safe boot lable option at top Right corner of the screen.
- That’s it.
9. Reinstall macOS
are your MacOS Buggy and any software issue? then I recommend reinstalling the new Copy of MacOS on your Mac.
Without Erase your Mac content and Settings, Reinstall macOS on your Mac. During this process, your Mac will install a new copy of the Mac from the internet and install it on your Mac without Delete data.
Here’s a full guide for Reinstall macOS on mac.
All the methods and processes described in this article have proven to work for almost all of the users facing this issue of slow spotlight search on Mac and Spotlight not working on Mac Monterey after the update. We advise you to go through each method and see what works for you, as these procedures result from in-depth analysis and research.
FAQs→
1. How do I check Spotlight indexing in Monterey?
How do I know if the MacBook is reindexing? or how to see spotlight indexing progress is running on your Mac [M1 or Intel]!
→ The users can monitor the reindexing process of their Macs by going to the Activity monitor > CPU and searching for “mdworker” in the search bar at the top. This will show the users all of the reindexing processes related to the spotlight search.
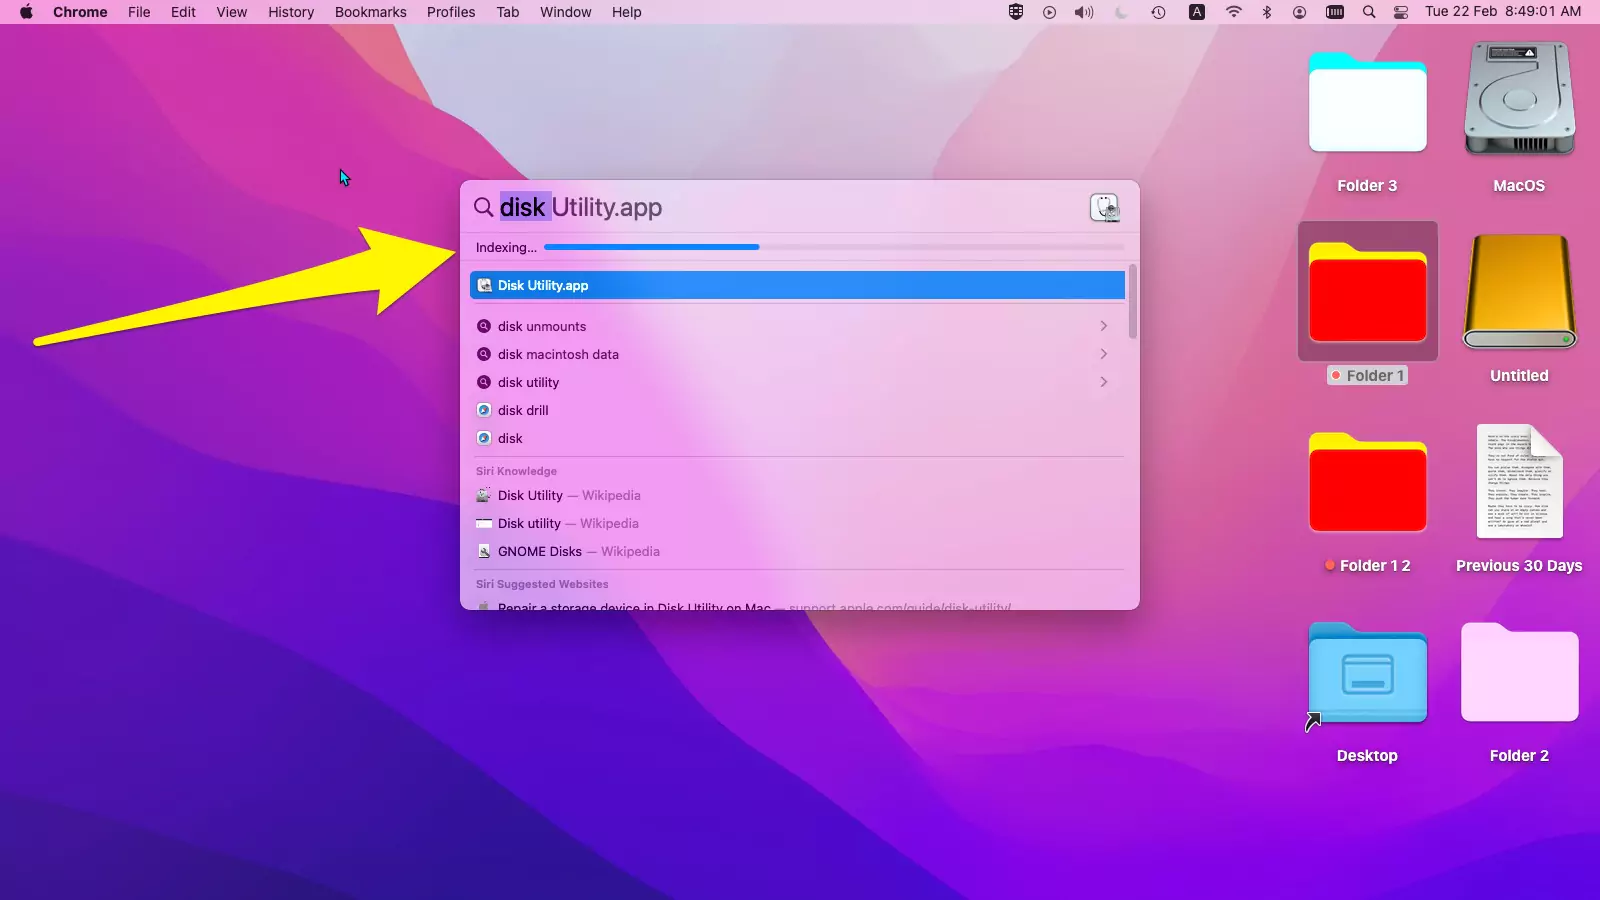
Or While you use Spotlight search, you will see the Indexing progress bar at the top in the Search Result of Spotlight search.
2. Why is my Mac taking SO long to index?
→ The time for reindexing depends solely upon the number of files or data being indexed. Therefore, the larger the data size, the longer the time for indexing.
3. What can I find using Spotlight search on Mac?
→ Spotlight search is an app that lets the users search for almost anything on their MacBooks. Anyone can use the spotlight search to find music, videos, documents, contacts, emails, apps, and plenty of other information.
4. What can Spotlight do on a Mac?
→ Spotlight is Mac’s very own search engine that lets you look for photos, videos, documents, emails, apps, and other files by typing their names in the app.
5. What can Spotlight search do?
→ Spotlight can look for almost anything on our MacBook, from videos and photos to emails and contacts and more…
6. Can you see Spotlight search history?
→ No, you cannot see the spotlight search history as the spotlight app does not keep track of your search history.
7. Are Spotlight searches saved?
→ No, the spotlight searches are not saved as the spotlight search does not keep track of the search history.
8. How to use Spotlight search Without a keyboard?
→ The users can access the spotlight app by clicking on the spotlight button, which looks like a magnifying glass, in the menu bar without using the keyboard.

9. Spotlight Search Keyboard Shortcut on Mac
→ Two Ways, You can open Spotlight by pressing the command + space or Press Search Button given on your Keyboard [also called F4 Key] keys on your keyboard.


