
For a long time, Apple has introduced the Touch ID feature and the password in Mac, iMac, MacBooks & Mac Mini. In the recent models of the device, the touch ID is integrated into the MacBook accessories, like the Magic Keyboards. This fingerprint sensor can be found at the top right corner of the keyboard of your MacBook and can be used to login into your device, authorize purchases and log into some of the third-party apps.
We will bring into light the steps of adding the touch ID for unlocking your MacBook, Apple Pay, auto-filling passwords, iTunes, etc., in this post. Since macOS Sonoma is the latest available operating system for Macs, we will talk about the process of enabling the touch ID in Macs running on latest macOS.
Manage your Touch ID and Password Settings on your Mac
Touch ID is widely used on Mac for all kinds of secure authentications like In-App Purchase on Mac App Store, log in your Mac window (Here’s top best Window manager for macOS), Autofill password in Browser and app, Fast User Switching, and Apple Pay.
Tip.1→ How to change Login Password on Mac
For the people who want to modify or change the login password of their MacBooks, it might be a little difficult for them to navigate to the password settings since the operating system and a completely new and different user interfaces as compared to the previous versions. Hence, go through the following steps to change the login password of your MacBook with macOS Ventura.
Step. 1→ First, click on the Apple Logo menu at the top and select system settings in the drop-down menu.
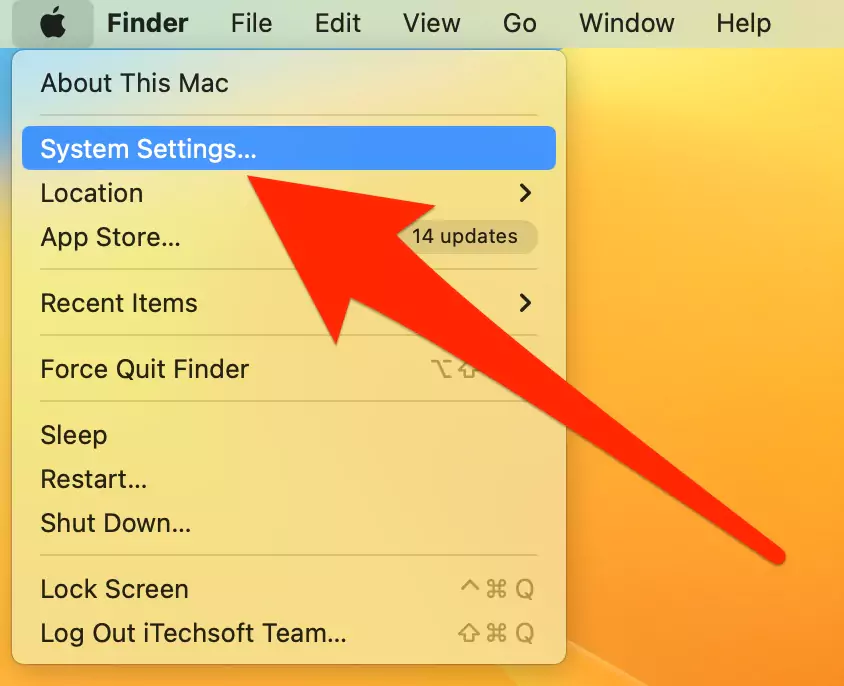
Step. 2→ Now, on the tab to the left side of the settings window, look for the “Touch ID & Password” settings and click on it.

Step. 3→ Verify and unlock mac using your Mac Administrator [Login] password, You will now find the first option under the password section: “A login password has been set for this user.”

Step. 4→ After that, click on the “change…” button next to this option.
Step. 5→ Enter the administrator password of your Mac when asked.
Step. 6→ Type in the new password and save the changes.
Hint: – Free tips to create secure login Password on Mac

Step. 7→ That’s it.
Also Read→ How to Change or Reset Apple ID Password on Your Mac Computer
Tip. 2→ How to Add & Remove Touch ID On Mac
Now that we have seen how to change your Mac’s login password, let us look at the process of removing and adding the touch ID on macOS. Follow the step-by-step instructions below to add and remove the touch ID on your MacBook.
Step. 1→ Initially, tap on the Apple Logo icon and go to the system settings of your Mac.
Step. 2→ Now, hover or scroll down the list of settings on the left tab and click on “Touch ID & Password.”
Step. 3→ Following that, click on the “Add Fingerprint” option under the Touch ID section.

Step. 4→ Now, use your finger to tap on the Touch ID at the top right corner and follow the on-screen instructions for adding the touch ID for the respective finger.

Way to Remove Touch ID on macOS Ventura & later Mac’s Software

Mac customers can save up to five fingerprints on their MacBook and three on a single account or profile. You can also remove the added fingerprint by clicking it and selecting the “Remove” button in the pop-up box, but you might have to enter the login password if asked for it.
How do rename my fingerprint on Mac? (Ventura, Sonoma)

Click on fingerprint name to edit fingerprint name or Remove the name and set it to the default name. Under the Apple Logo > System Settings > Touch ID & Password > Click on Touch ID name. and Type your New name.
Tip. 3→ How to Enable Use Touch ID to unlock your Mac
After you have added the fingerprint to your Mac, you want to use it to unlock the MacBook. Read the instructions in this section for enabling the touch ID to unlock or log into your MacBook.
Step. 1→ Head over to system settings by tapping on the Apple menu at the top.
Step. 2→ Now, navigate the “Touch ID & Password” settings in the left pane.
Step. 3→ Then, under the “Touch ID” section, toggle the bar in front of the “Use Touch ID to unlock your Mac” option.
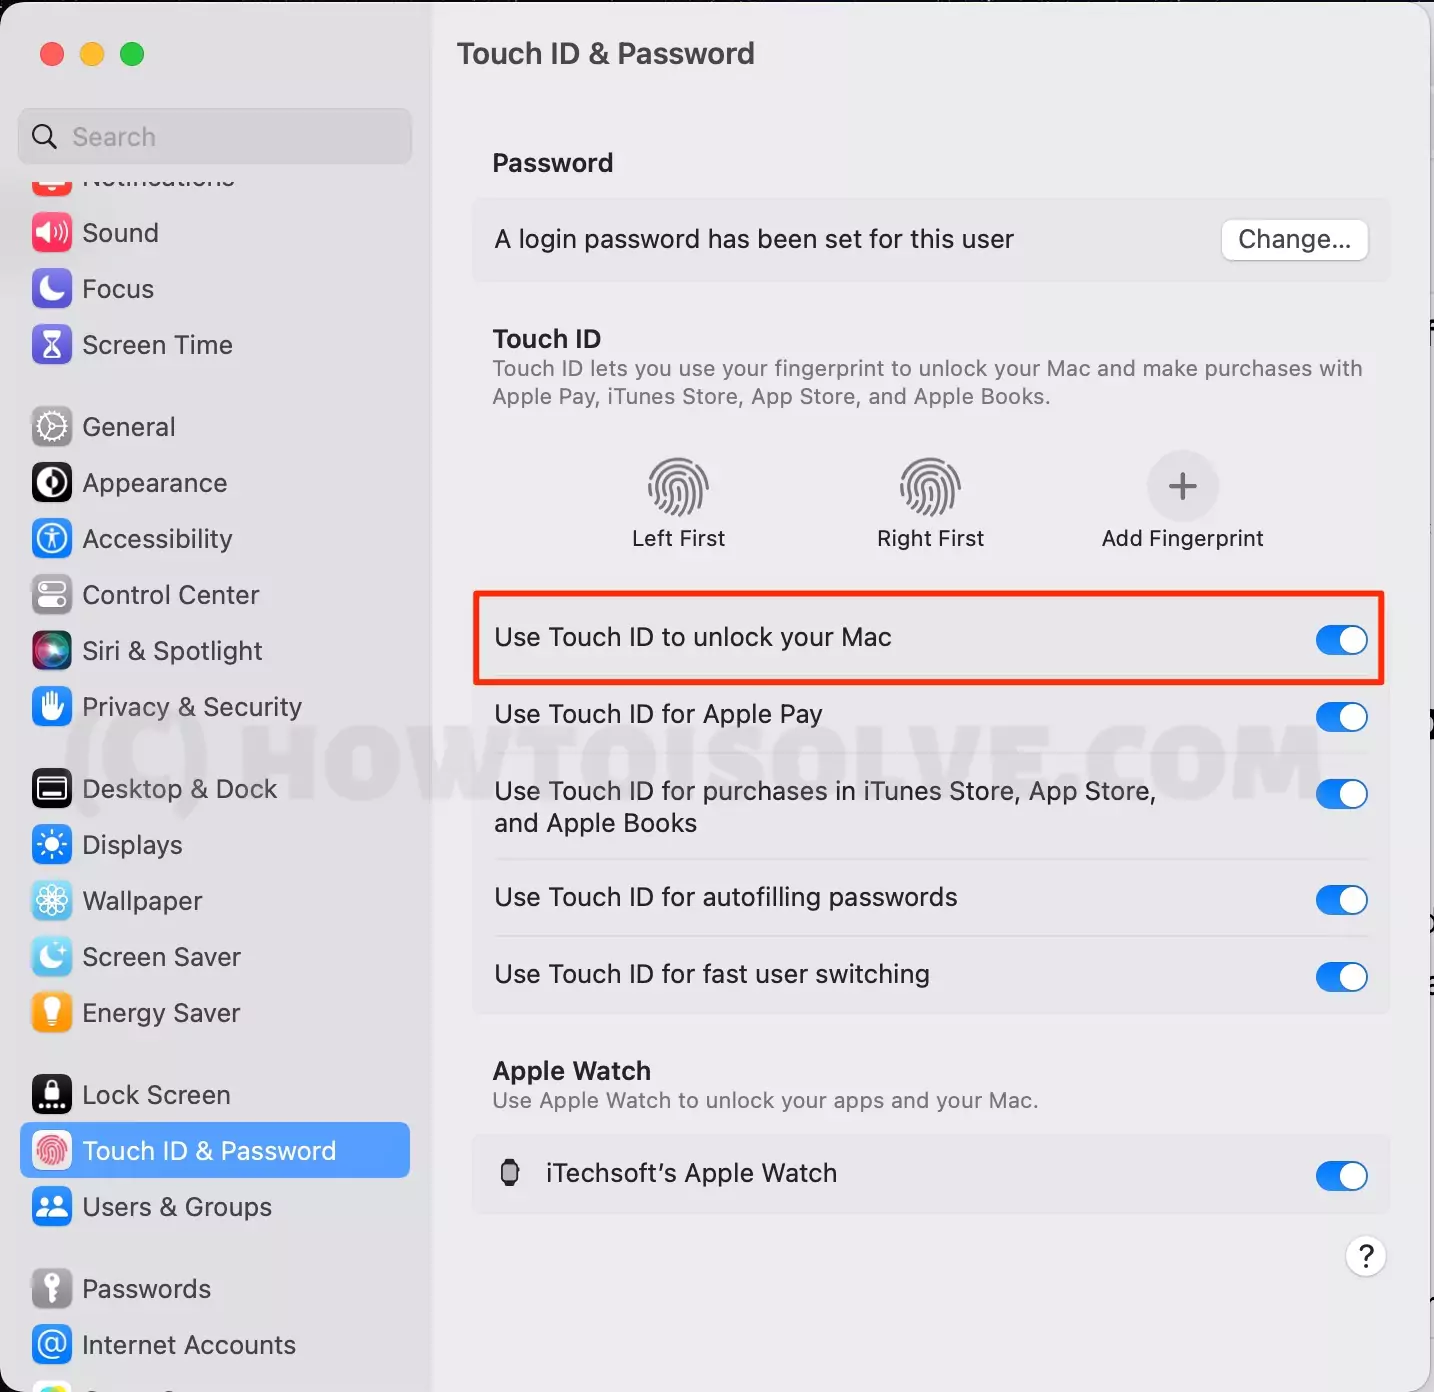
Please make sure to add your fingerprint before enabling this option. If not, the system will prompt you to save your fingerprint first, and the setting for unlocking your MacBook using the touch ID will be enabled.
Tip. 4→ How to Enable the use of Touch ID for Apple Pay on Mac
The people who have been using a MacBook for a while might already know that you can use your device’s touch ID to authorize transactions on Apple Pay. To turn on the “Use Touch ID for Apple Pay on MacBook,” take note of the process mentioned here.
Step. 1→ First, Head to the system settings of your MacBook from the Apple Menu at the top left.
Step. 2→ Then, search for the “Touch ID & Password” setting on the left pane of the Settings window.
Step. 3→ After that, toggle the button next to the “Use Apple ID for Apple Pay” under the touch ID section.
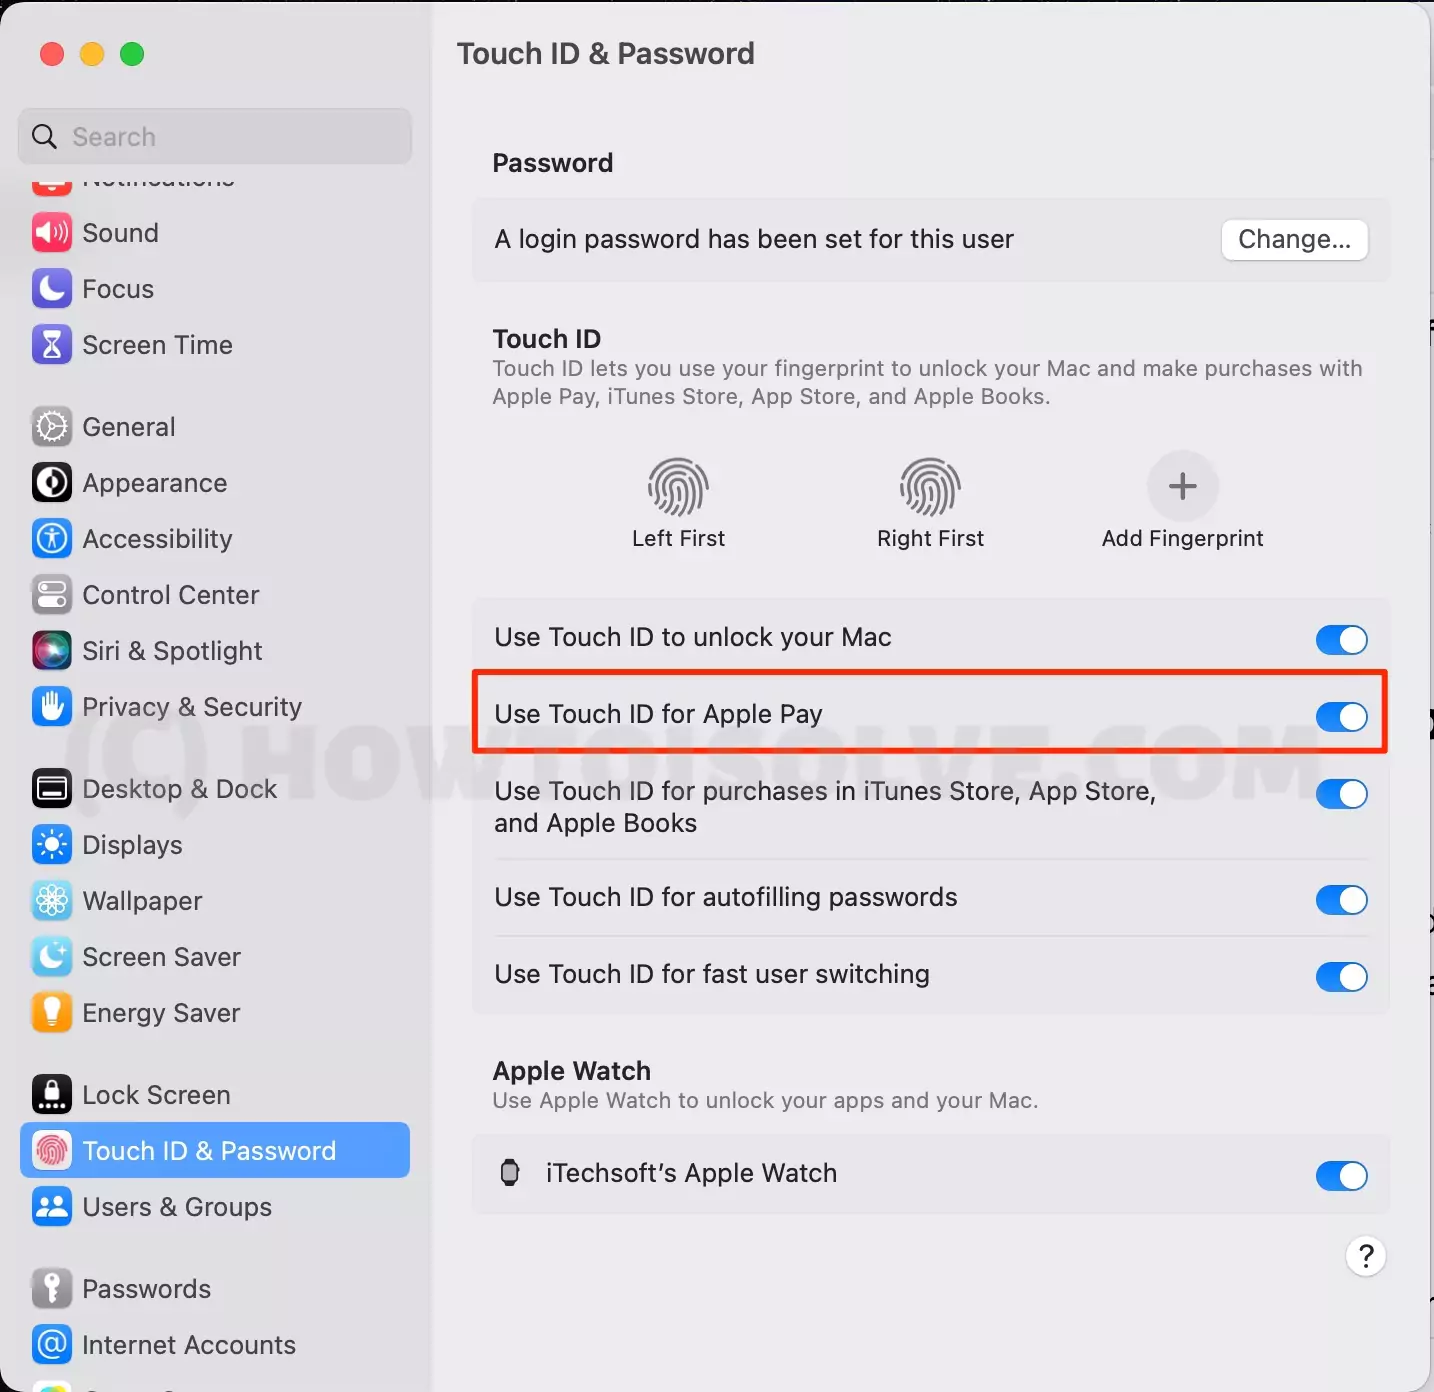
Once you have enabled the above-mentioned setting, you can use your touch ID to initiate and authorize the Apple Pay transactions through your MacBook with a finger tap.
Tip. 5→ How to Enable Touch ID for purchases in iTunes Store, App Store, and Apple Books
Another interesting feature associated with the touch ID of your MacBook is the ability to complete or verify the purchases made in iTunes Store, App Store, and Apple Books. You can enable this setting by taking note of the instructions listed below.
Step. 1→ Launch the system settings window on your MacBook from the Apple menu.
Step. 2→ Now, Head over to the “Touch ID & Password” settings in the tab on the left side of the screen.
Step. 3→ Under the Touch ID tab, enable the “Use Touch ID for purchases in iTunes Store, App Store, and Apple Books” option by toggling the button next to it.
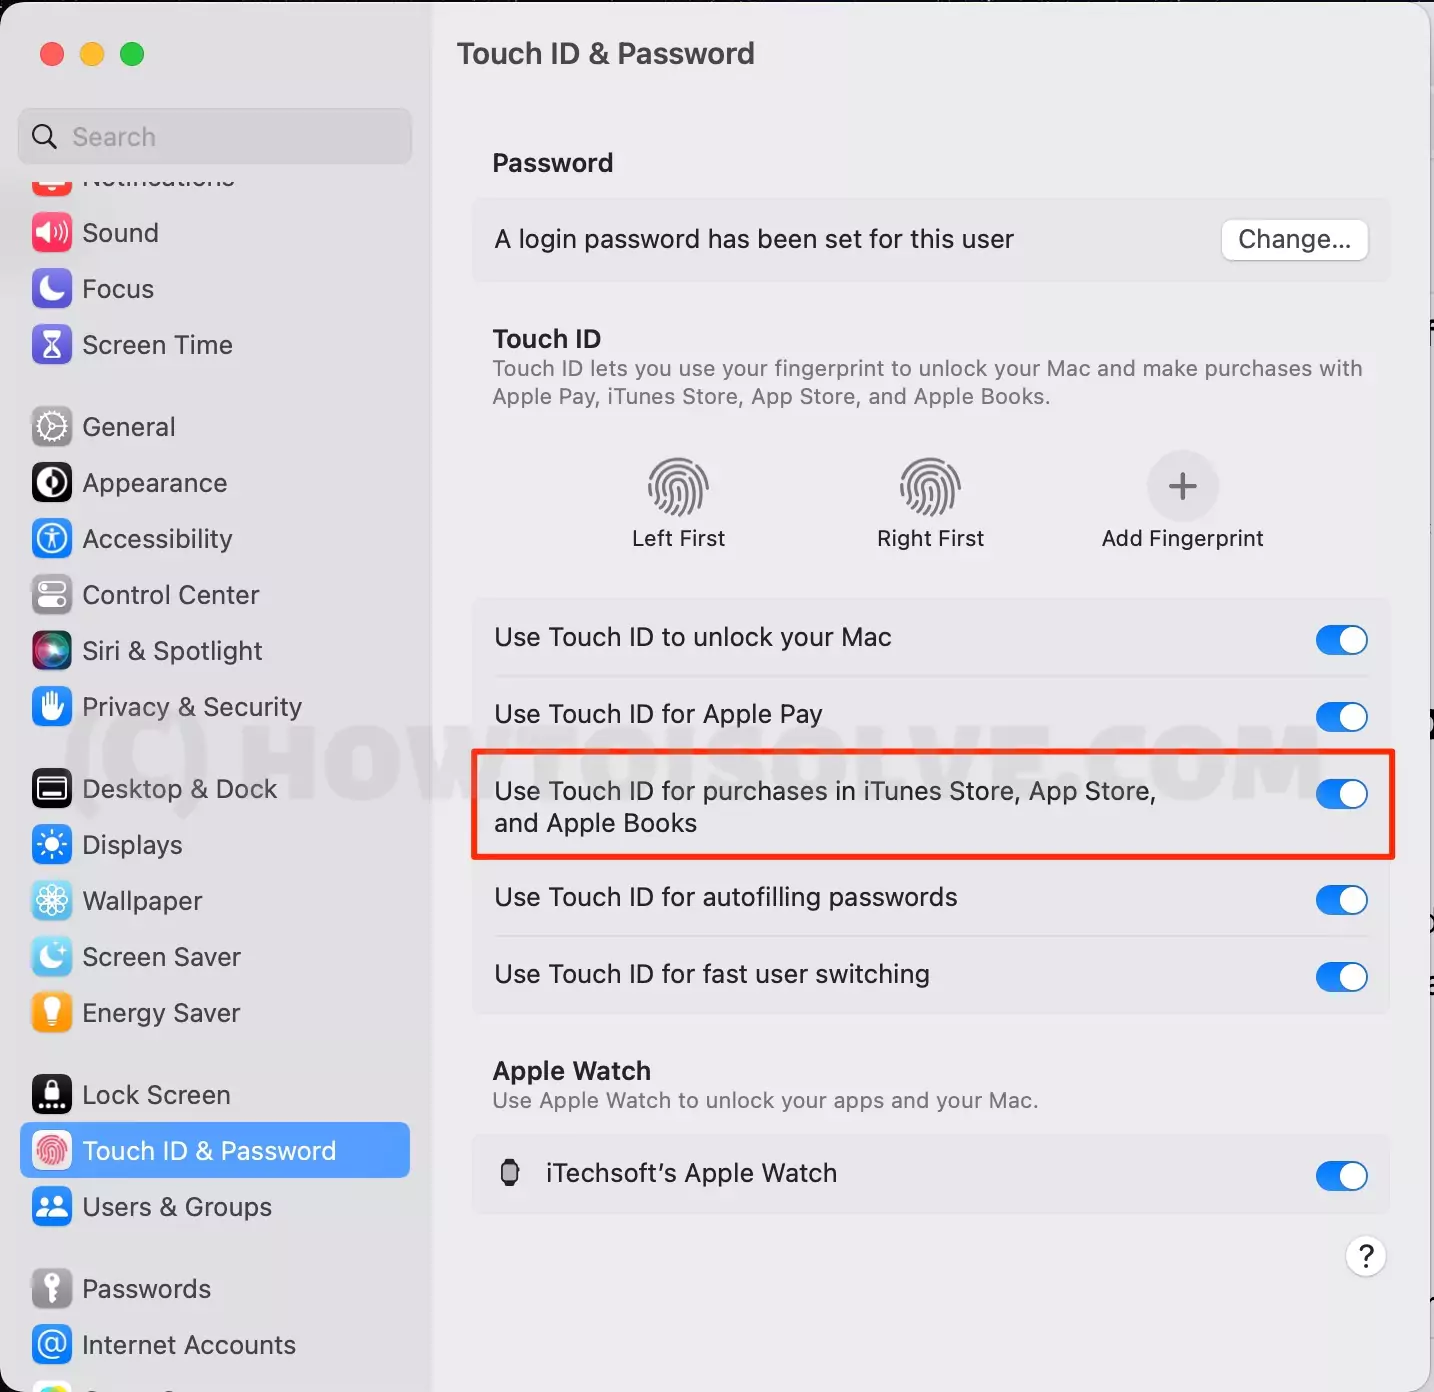
This process will enable your touch ID to make in-app purchases in iTunes, the App Store, and Apple Books with a single touch of your finger.
Tip. 6→ How to Enable Use Touch ID for auto-filling passwords in Safari and App on Mac
You can also use the touch ID of your MacBook for auto-filling the saved passwords in Safari and other apps that require a login ID and password for their work. This makes it easier for you to log in to various accounts even if you don’t remember the password of that account. It is also a very secure method as any unauthorized person will not be able to use these saved passwords for signing in and misusing your account without your fingerprint. So follow the steps given here for enabling touch ID for auto-filling passwords.
Step. 1→ Select system settings in the drop-down window of the Apple Menu.
Step. 2→ Now, click on the “Touch ID & Password” option in the menu on the left side of the window.
Step. 3→ Toggle the button in front of the “Use Touch ID for auto-filling passwords” to enable this setting on your MacBook.
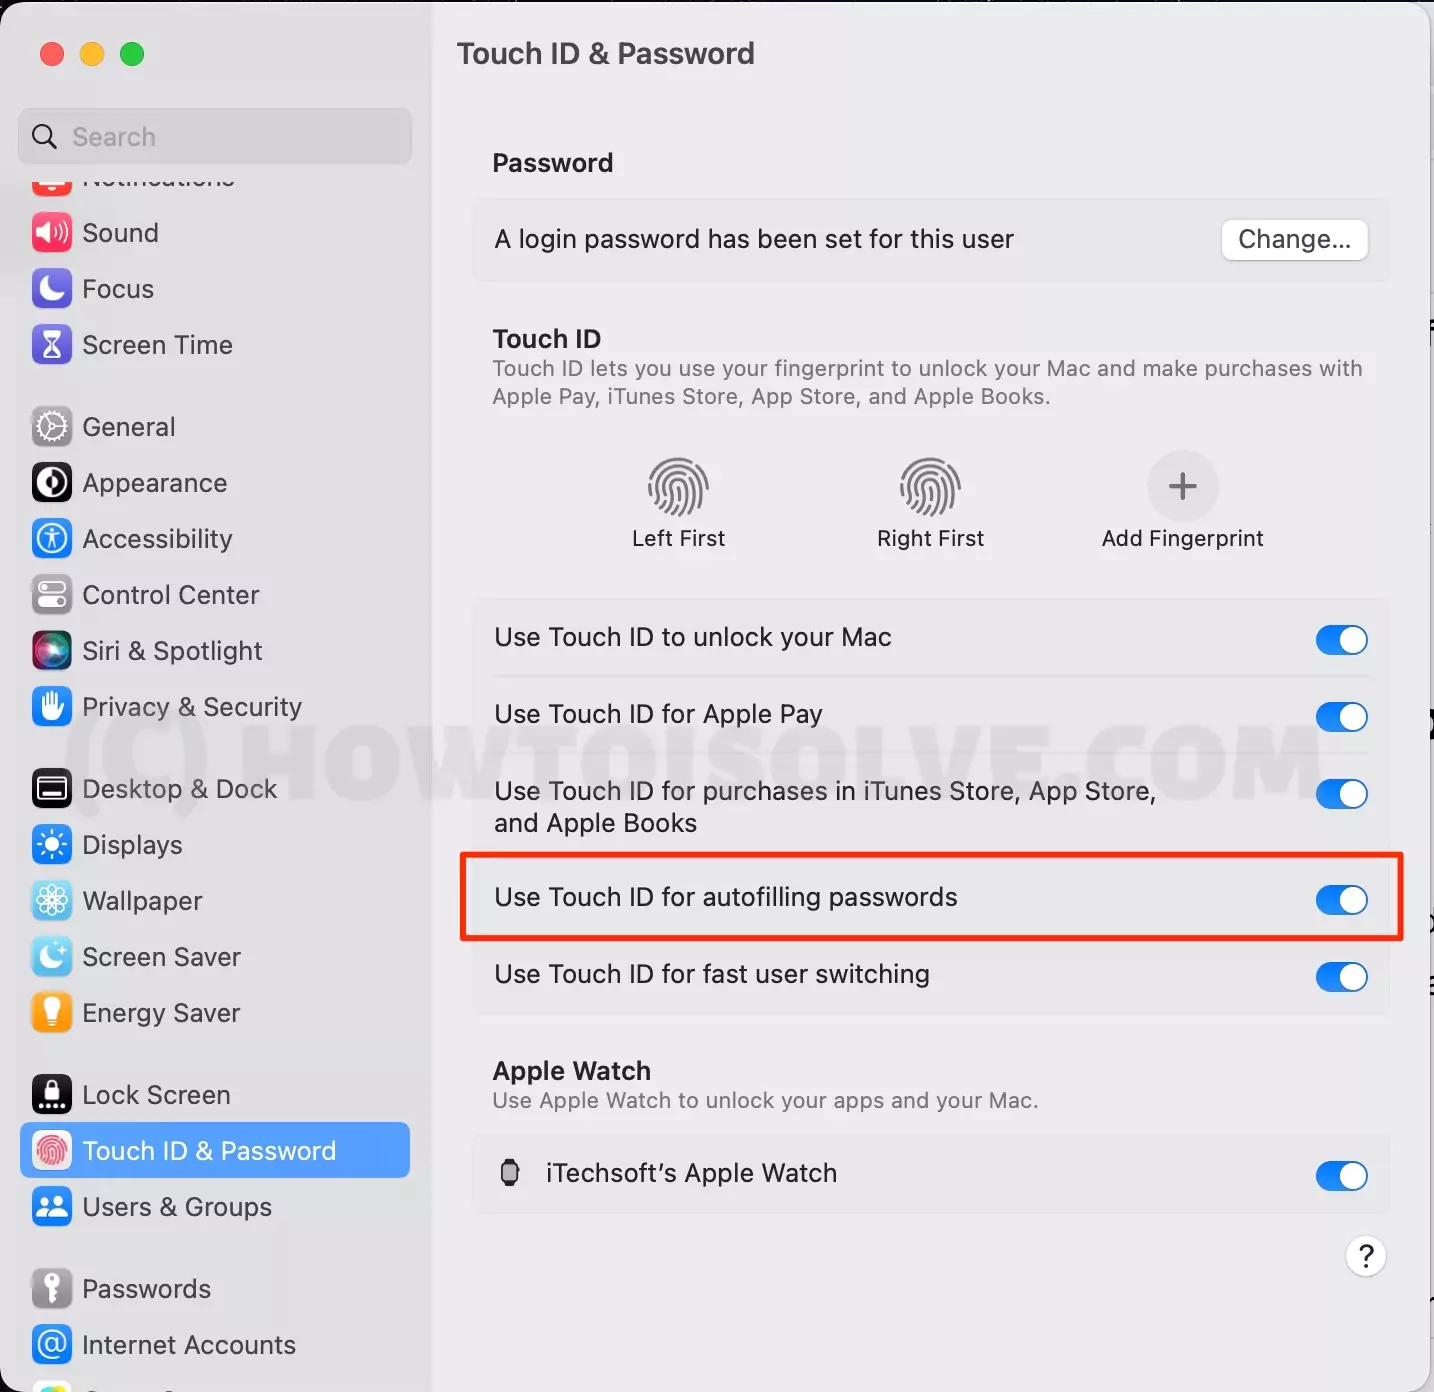
After enabling the setting mentioned earlier, the Mac will ask you to use the Touch ID for auto-filling passwords whenever you want to access an account on Safari or any other application.
Tip. 7→ How to enable Use Touch ID for fast user switching on Mac
If you have multiple user accounts or profiles added to your MacBook, you can easily switch between them in an instant with the help of your fingerprint scanner or Touch ID. To learn how to enable the “Use Touch ID for fast user switching” feature on your Mac, take note of the method explained here.
First Enable Fast User Switching on Mac from system settings and use the Below settings to log in using Touch ID.
Step. 1→ Open system settings by hitting the Apple icon at the top left corner of your Mac.
Step. 2→ Then, in the “Touch ID & Password” section, enable the “Use Touch ID for fast user switching” button by toggling it.
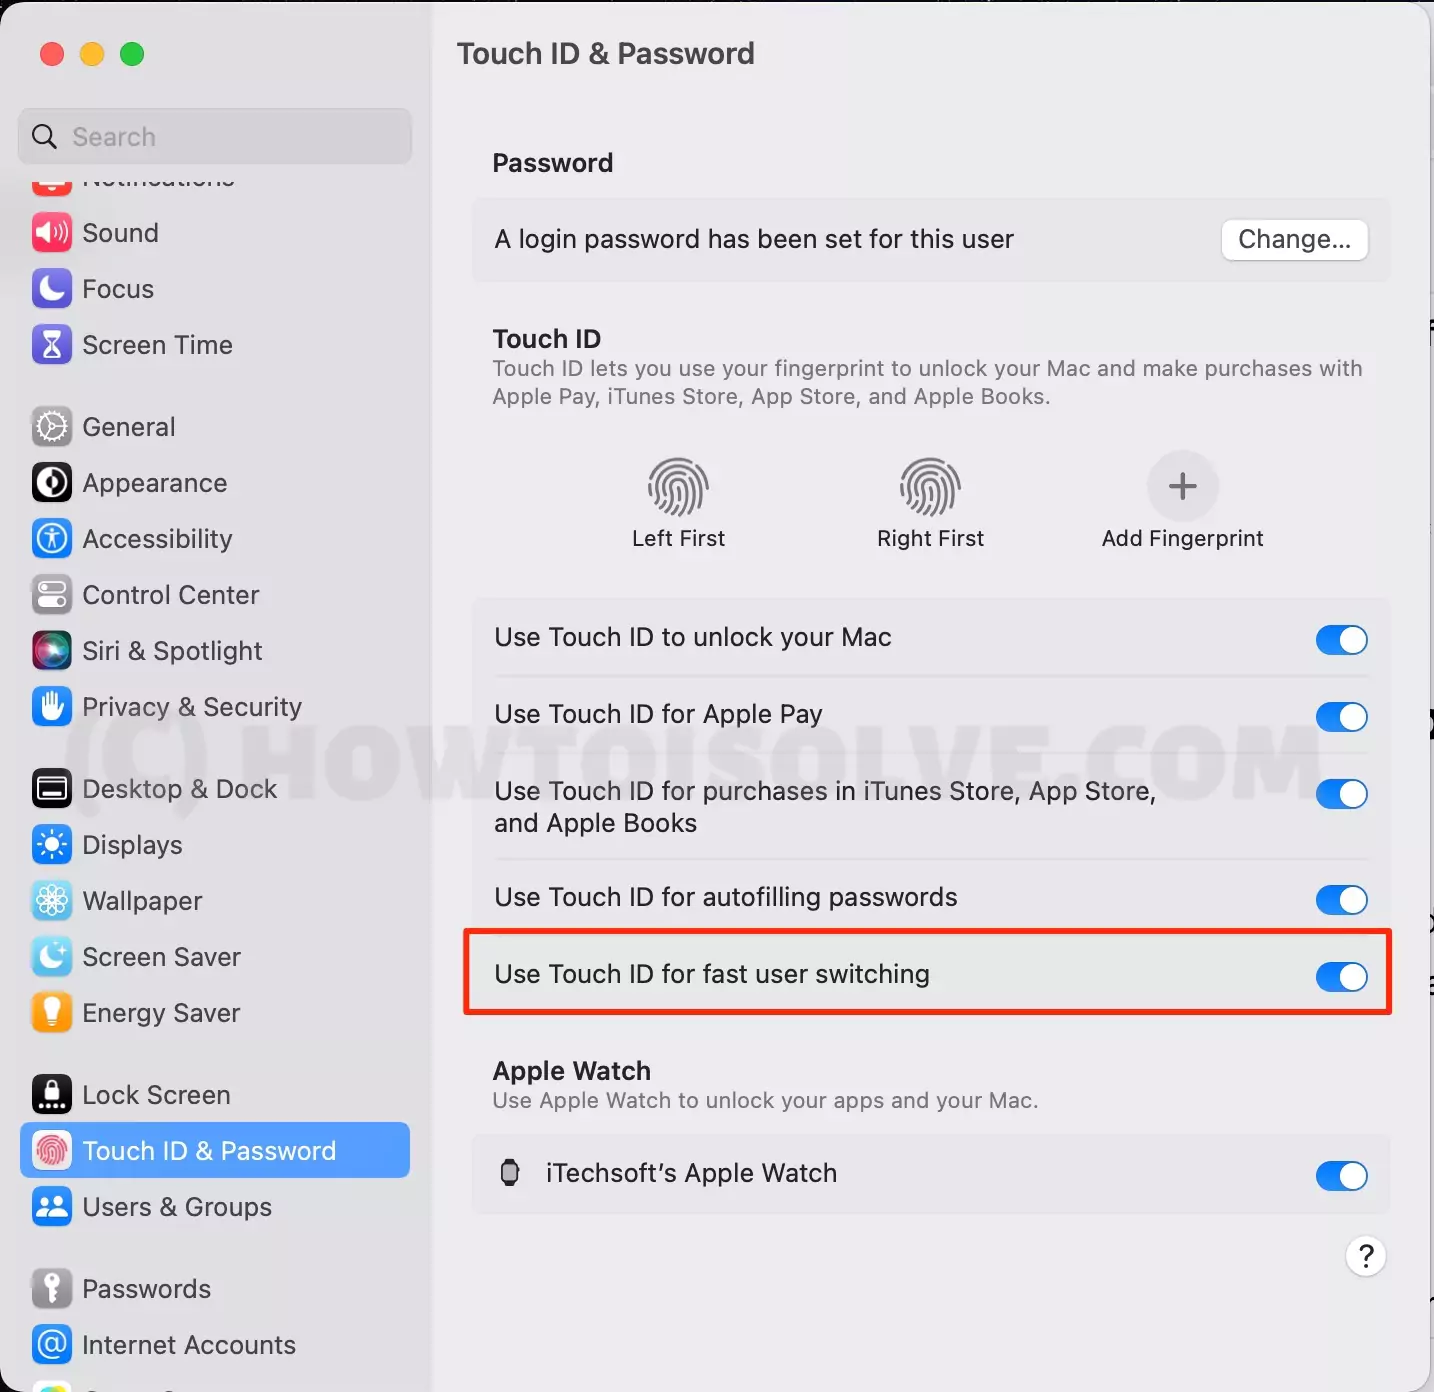
After this, you can switch between different user profiles on your MacBook by clicking the switch profile button and using the touch ID to verify the admin details.
Tip. 8→ Enable Use Apple Watch to unlock your apps and your Mac
Another interesting feature of the MacBook is that you can use a couple of other devices like the Apple Watch with it and use it to unlock various applications on your MacBook. So read along to learn about turning on this feature on your MacBook.
Step. 1→ First, connect the Apple Watch to your MacBook.
Step. 2→ Launch the system settings window on your MacBook from the spotlight search or the Apple menu.
Step. 3→ Then, select the “Touch ID & Password” action in the left tab.
Step. 4→ Finally, click on the toggle button under the Apple Watch section next to the name of your Apple Watch to enable it.
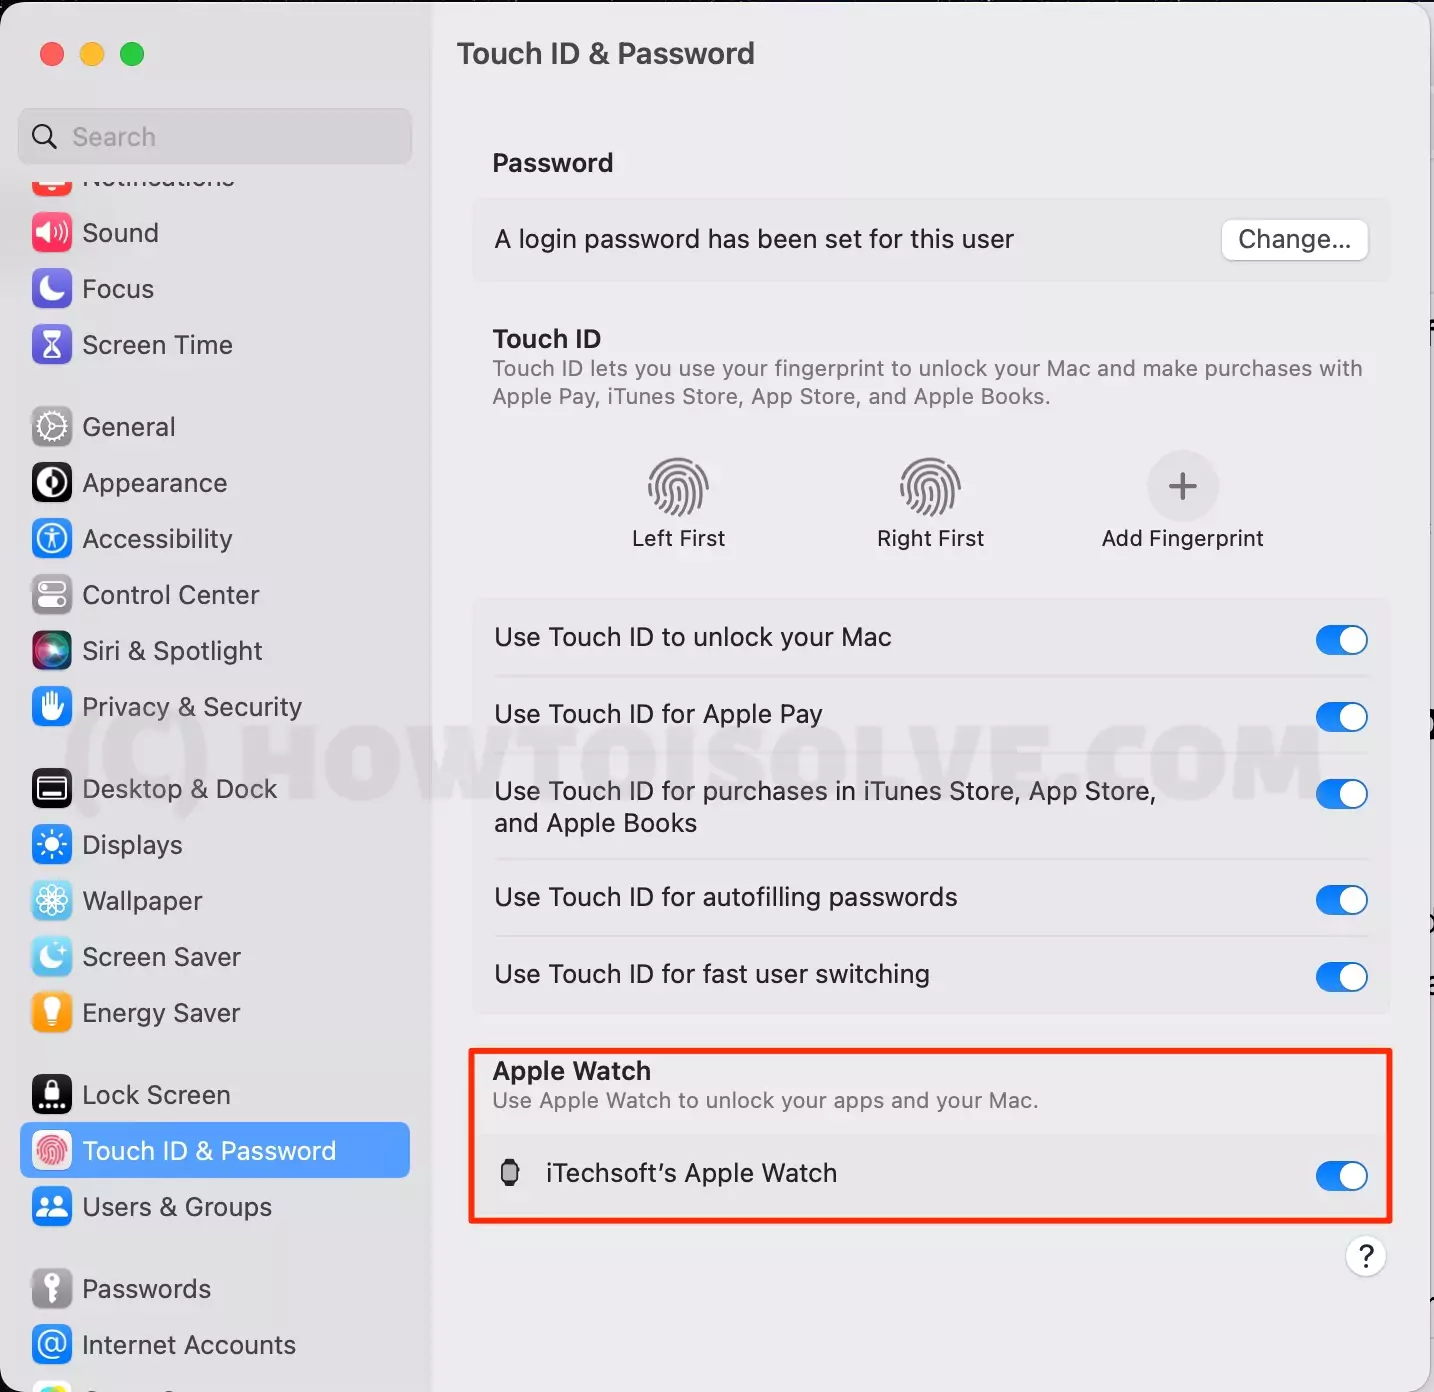
Once this setting is applied or enabled, you can use your Apple Watch to open certain Applications and software on your MacBook without using the mouse or keyboard.
So these were the interesting tips and methods for using your Touch ID, password, and Apple Watch for launching various apps, initiating in-app purchases in iTunes and App Store, and completing the Apple Pay payments, among other uses. Therefore, we recommend you enable the settings listed in this post for the easy, safe, quick and secure logging in and purchasing experience on your MacBook.
FAQs→
→ You can refer to tip number two explained in this article for adding a touch ID to your MacBook or iMac, Mac Mini that’s setup with a Touch ID Keyboard.
→ Yes, the MacBook Air has a fingerprint sensor. The power button also acts as the touch ID with the fingerprint sensor present on top of it.
→ Yes, the Magic Keyboards have a Touch ID which makes it easier for the user to log in to their Macs, make in-app purchases in the iTunes Store or App Store, or authorize the transaction of Apple Pay with just a single touch of your fingertip.
→ As far as the speed, accuracy, and security are concerned, the Face ID is much better than the Touch ID. The face ID is even more difficult to spoof as it uses the user’s facial features to unlock the device.
→ The only market that Apple has not stepped into is the touch screen laptops or MacBooks. No MacBook to date has a touch screen which includes the MacBook Air.
→ No, the 2015 MacBook does not have the Touch ID feature. Touch ID was first introduced in MacBooks in 2016.
→ The 2017 MacBook Pro comes with Touch ID, and the users can use it to open various accounts and apps, process payments of Apple Pay, and other apps like iTunes, App Store, etc.
→ You can get the Touch ID settings in the system settings window of your MacBook. At the same time, the fingerprint scanner can be found at the top right corner of your Mac’s keyboard on top of the power button.
→ You can convert your MacBook Air to have a touch screen display by connecting it with the AirBar sensor. With this sensor, you can interact with the display of your MacBook.
→ No, the 2013 MacBook Pro does not have a Touch ID, but you can use your iPhone or iPad to unlock it.
→ The 2012 MacBook Pro features a Touch ID and requires you to type in the password to unlock the device manually.
→ If your MacBook supports Touch ID but cannot add or use it on your device, then you can follow the steps given in the Apple Support Center to fix this problem.


