“Are you experiencing WiFi problems after Updating your iPhone and iPad, respectively? Does Wi-Fi get disconnected when the screen is locked, or Wi-Fi is dropping network automatically? Recently, my iPad dropped network randomly after updating to the final iOS. Sometimes, the iPhone’s Wi-Fi becomes unresponsive while using the device.
Luckily, after trying some tricks, I had repeatedly solved Wi-Fi not working on my iPhone and iPad when watching movies, browsing, or Gaming. And let’s learn how to get fix all kinds of WiFi issues all the time.
Troubleshooting for Wi-Fi not working on iPhone and iPad
WiFi is the biggest problem of throwing errors on our iPhone, iPad screen while using Apps like Mail app, Messages, Social Apps, Chat apps, and Online games.
Fix 1: Quick Fix iPhone WiFi automatically disconnected
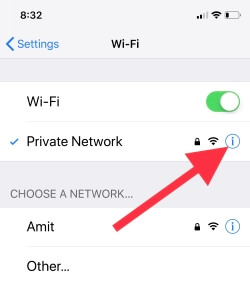
- 1: Open “Settings” and tap “Wi-Fi”.
- 2: Tap on the small information (i) icon, which is near the connected “Wi-Fi Network”.
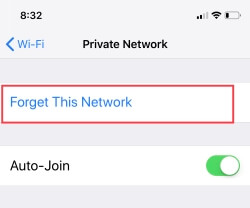
- 3: Tap on “Forget This Network” and confirm it.
- 4: Now, disable “Wi-Fi.”
- 5: Restart iPhone/iPad.
Again, Turn on Wifi under the iPhone settings app, Open Settings app on iPhone > WiFi > Select WiFi name and Enter the Correct wifi password to join successfully.
I hope it will fix the issue. But still not working, then harden solution to find on your device is the VPN problem. VPN leverages the device’s security, which is against Apple’s policy.
Fix 2: Disable VPN or Delete VPN profile
If you are using a VPN, there are chances that it might be affecting the Wi-Fi network. Disable VPN and connect to the Wi-Fi network.
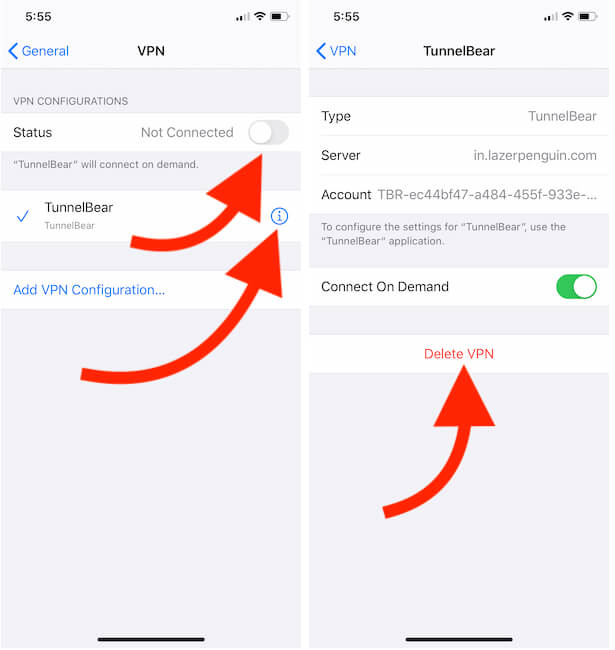
Turn off VPN And Try
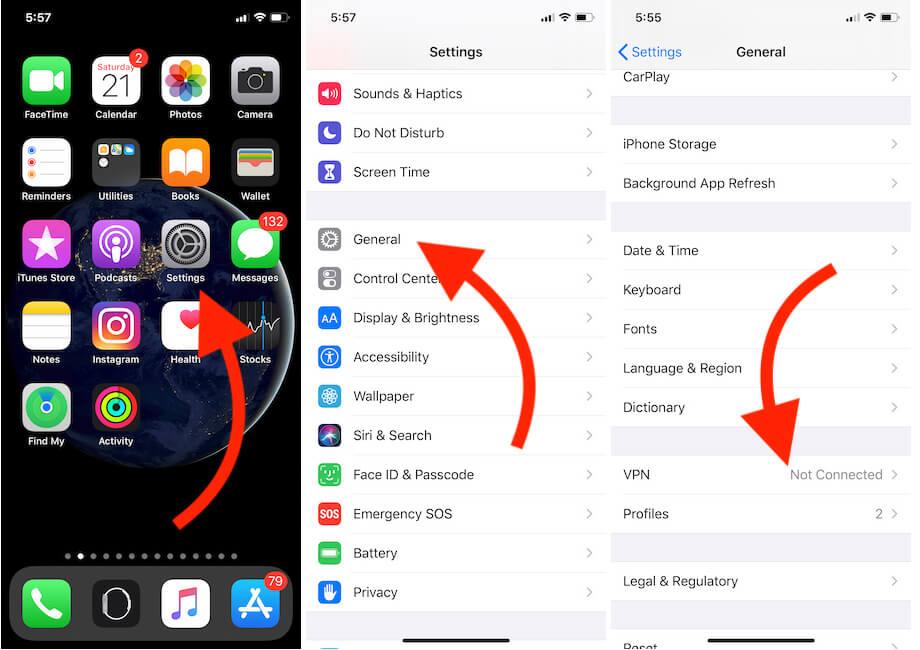
- Open “Settings,” Tap “General”.
- Scroll down, tap on “VPN & Device Management” or “VPN” and disconnect it.
Delete VPN and Try
- Open the Settings app on the iPhone.
- Next, Tap on General.
- Scroll to VPN & Device Management > Tap on the (i) button to find the Delete profile option.
Force Restart your iPhone,
- Press and release the Volume Up button.
- Press and release the Volume Down button.
- Press and hold the Side button and release it when you see the Apple logo. After a wait for 30 seconds, Turn on back using the side or power button only.
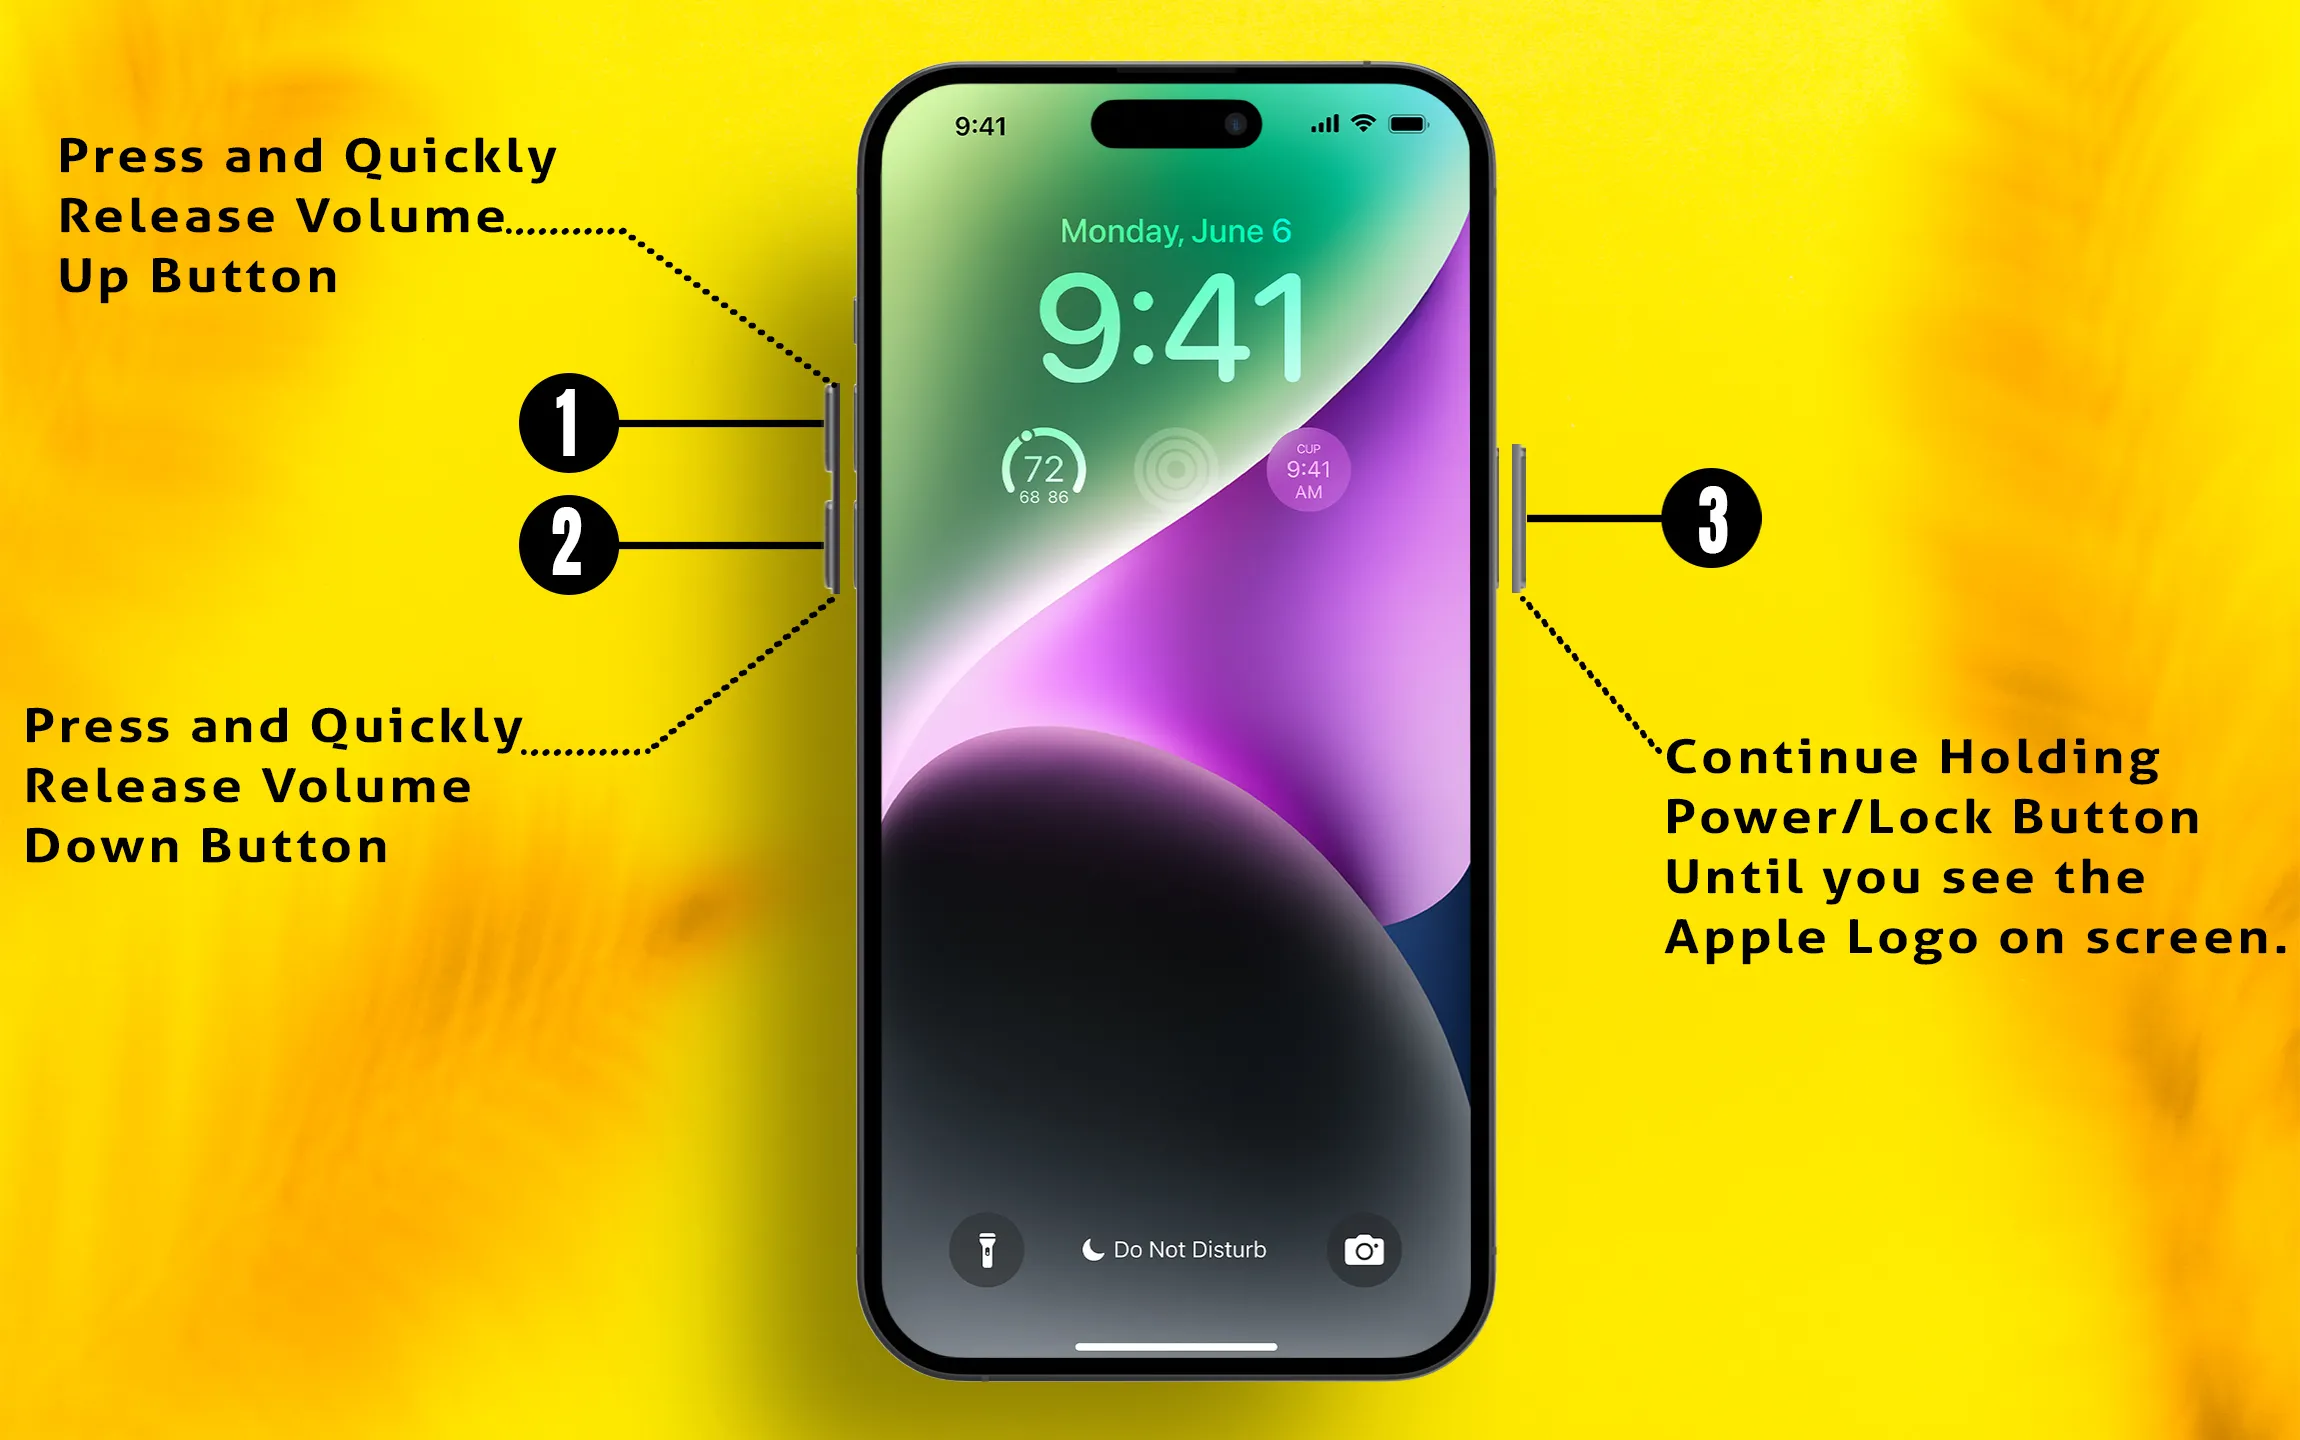
- Tip to Force restart iPhone [Home Button – iPhone SE]
Press and hold the Volume Down button and Power button until the Apple logo appears on the screen.
- Tip for other iPhone/iPad
Press and hold the Home button and Side button together and release when the Apple logo comes on the screen.
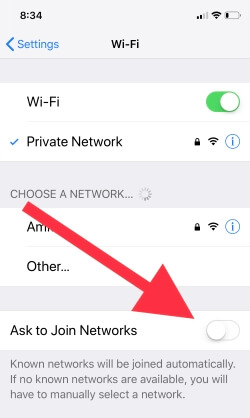
Fix 3: Disable/Enable Ask to Join Networks
At your Home or Office, Different WiFi connections automatically switch as per WiFi connectivity. Keep this toggle off and allow the Device to connect with the best WiFi network (nearby) automatically.
- Step 1: Open “Settings” and tap “Wi-Fi”.
- Step 2: Disable “Ask to Join Networks”.
Now restart the iPhone and again enable “Ask to Join Networks.”
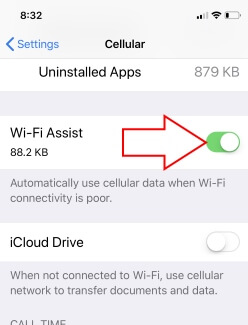
Fix 4: Turn Off/On Wi-Fi Assist
Disabling and enabling the Wi-Fi assist have sometimes worked for me. Also, your WiFi and Mobile Data connection switch automatically while you are out of range. You decided to work only on WiFi, then turn off Mobile data. And Also, follow the below steps,
- Step 1: Go to “Settings” on the iPhone.
- Step 2: Open “Mobile Data” or “Cellular”.
- Step 3: Scroll down to the last of the screen, Find and Disable “Wi-Fi Assist”.
Fix 5: Reset Network Settings
iOS 17 Cannot connect to WiFi on iPhone, iPad. Every network-oriented problem can be resolved by a small reset is Reset Network Settings.
For the latest iOS 15 and later users:-
Step #1: Open up “Settings”.
Step #2: Open “General” and then tap “Transfer or Reset iPhone”.
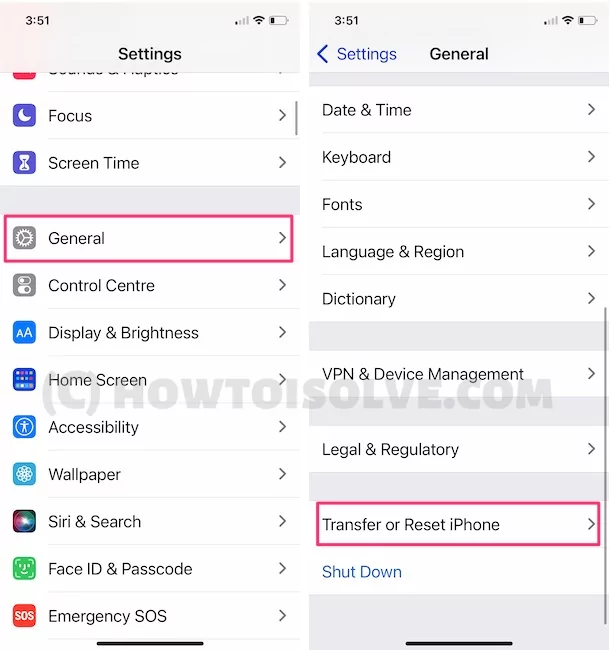
Step #3: Lastly, tap “Reset” > “Reset Network Settings” > Enter your iPhone Lock passcode and Try afrer Reboot once.
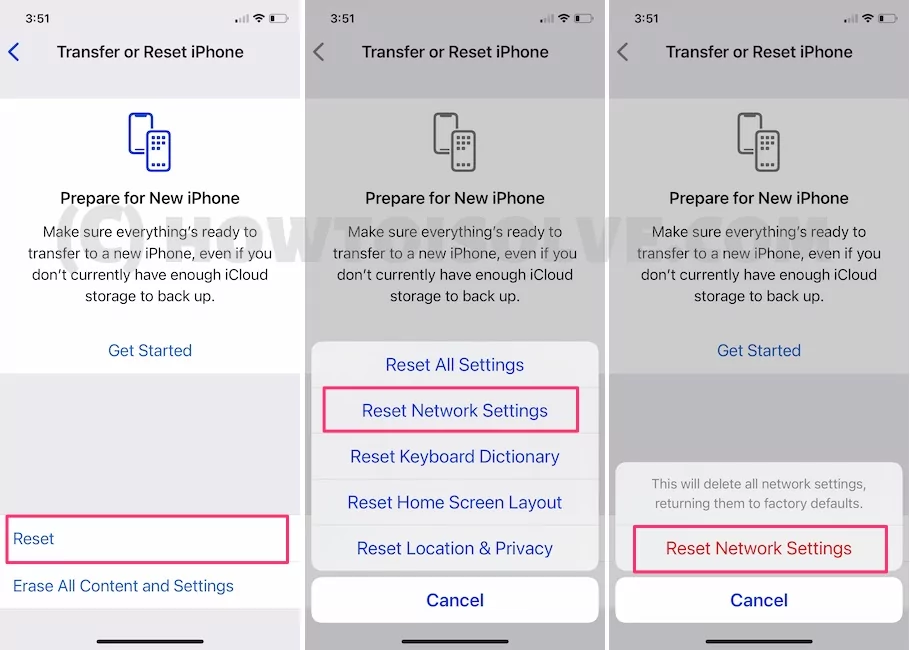
Try to connect with your WiFi. Also, check your WiFi router password.
iOS 14:-
- Step 1: From the “Settings”, open “General”.
- Step 2: Next, open “Reset” and tap “Reset Network Settings”.
- Step 3: Confirm it and enter the passcode to proceed.
- Re-fix all the network-related settings only remove network data only.
Fix 6: Check your Wi-Fi Router

If the Wi-Fi router is causing any issues, it is better to remove the power source and plug it back in again.
On Mac, use the command prompt to flush or Reset DNS Cache on your Mac & Windows (Open command prompt (“Windows + R key” > type “CMD”) and run this command: ipconfig/flushdns)
Fix 7: Set Custom DNS! Speed Up Slow WiFi with a Faster DNS Server
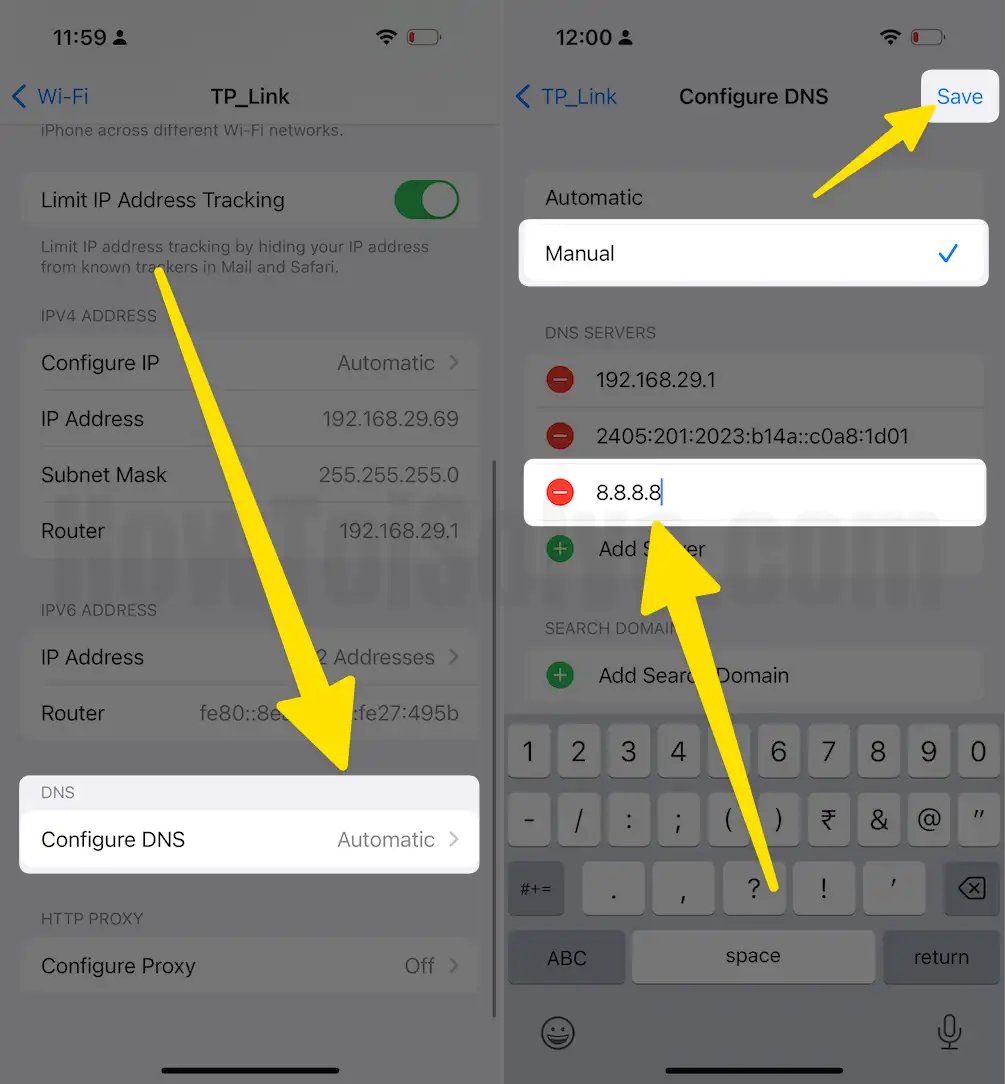
You can also try this solution. It works sometimes. The Open/Public DNS networks are Google DNS. Follow the below steps to switch your current DNS to Google DNS. It will work (recommended for fast internet speed).
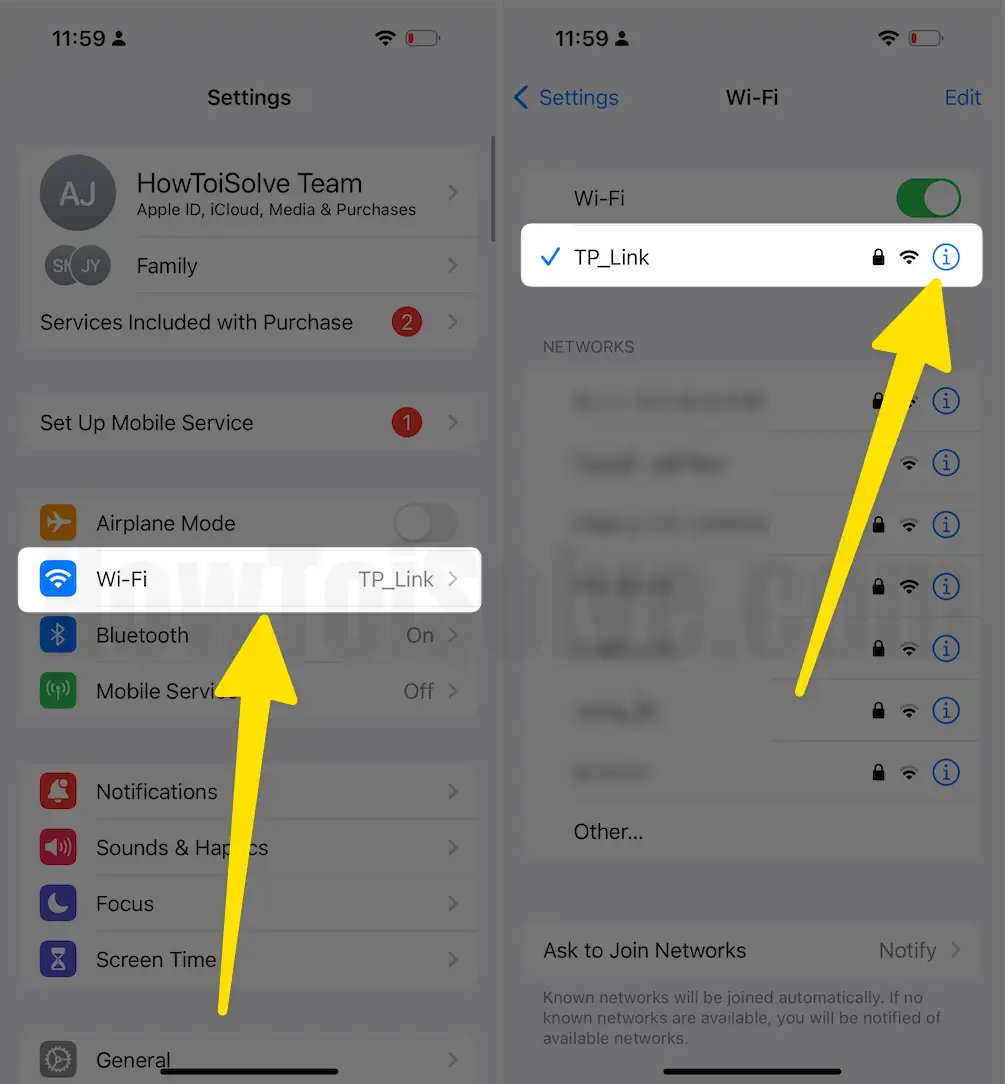
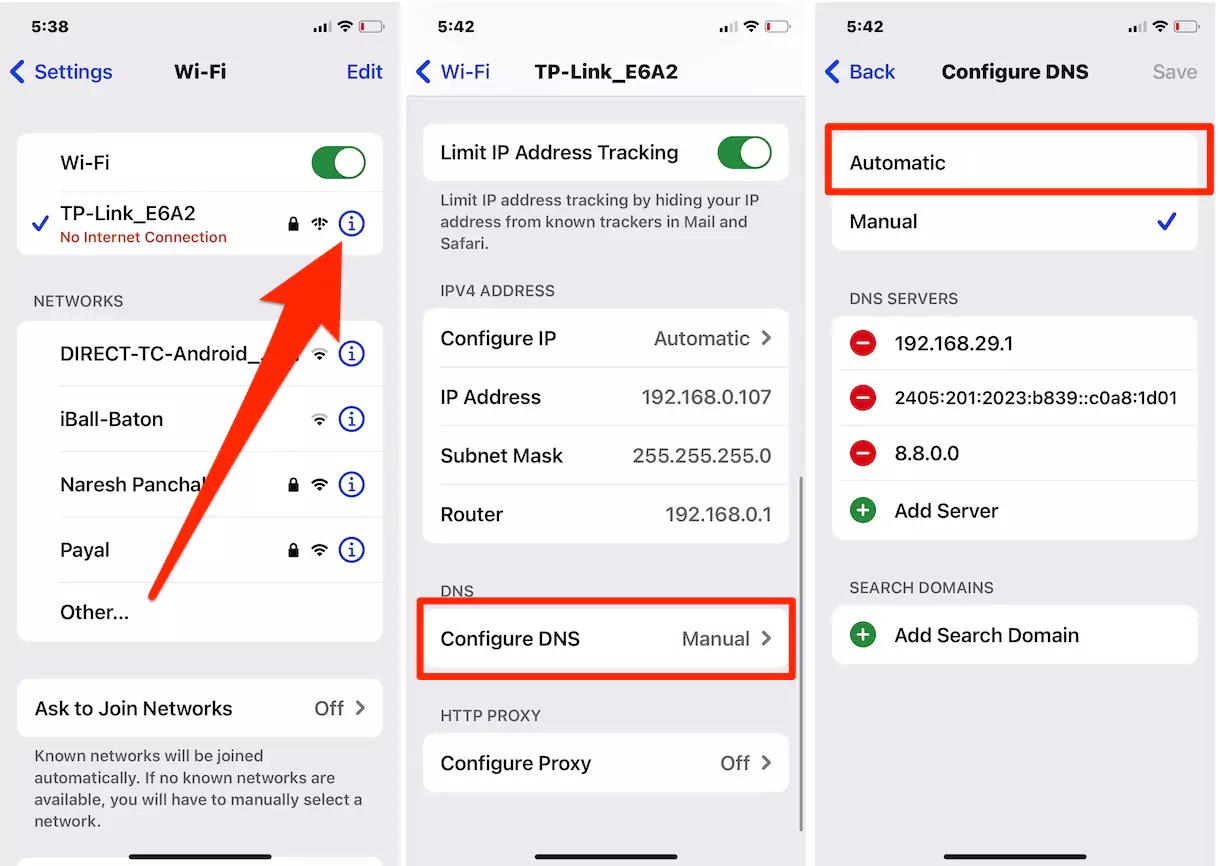
Change or Update DNS IP address with custom details, Open Settings app > “WiFi” > “Tap on (i)”.
WiFi information > “Configure DNS” > Select “Manual” and Enter “(8.8.8.8)” by selecting Manual. That’s it
Or Fix 7.1: If you already Set custom DNS, then Set it to Manually: No Internet Connection in iOS 17
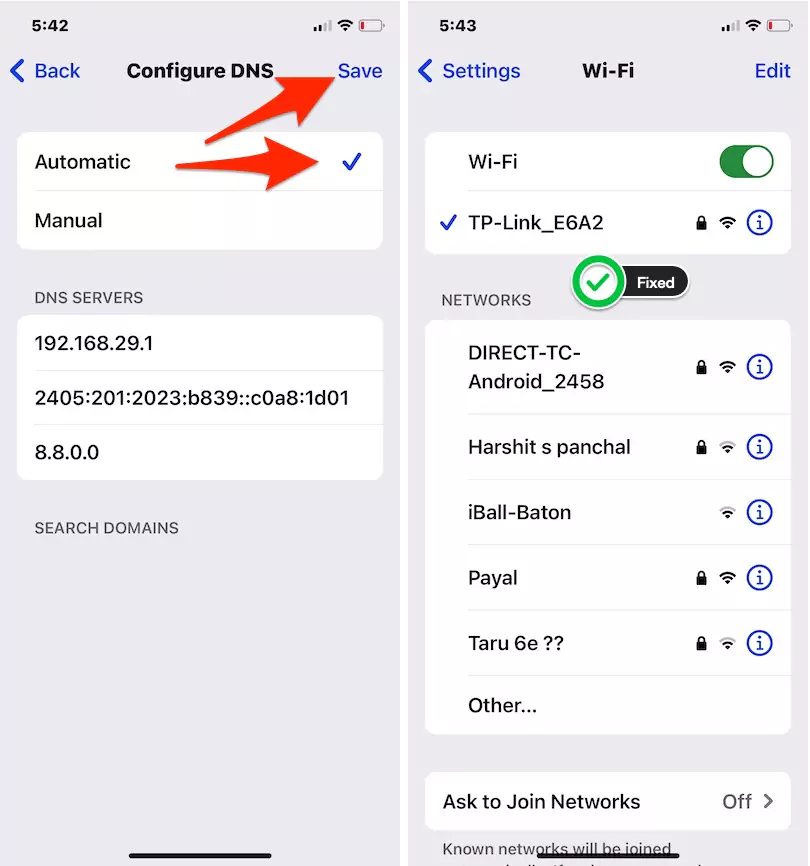
In the recent iOS update, Several users found No Internet connection on WiFi settings if it’s already connected. Tried rebooting iPhone, Restarting the router, and another Device is working fine on the same WiFi connection. Not the Problem is with the Custom DNS Set in your WiFi settings. Change and Set to Automatic.
Step 1:- Go to the WiFi settings on your iPhone (Settings > WiFi).
Step 2:- Tap on (i) button next to the WiFi name and see the DNS Section “Configure DNS“, From manual to Automatic > Save.
Step 3:- Now, your WiFi work normally. Still shows No Internet connection, then check after restarting your Device.
Fix 8: Disable Wi-Fi Networking Services
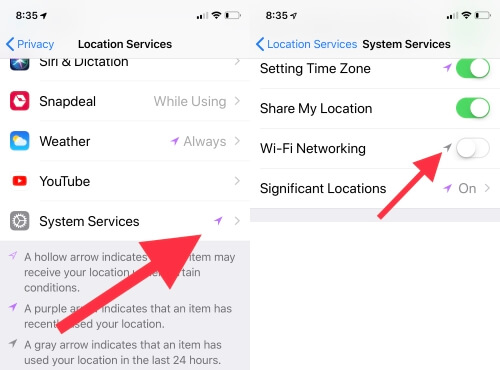
When you disable Wi-Fi networking services, it will not disable Wi-Fi if you directly turn off the location services for Wi-Fi networking.
- Step 1: Launch the “Settings” app.
- Step 2: Tap “Privacy & Security” and open “Location Services”.
- Step 3: Scroll down to the bottom and tap “System Services”.
Step 4: Toggle off the “Wi-Fi Networking.”
Fix 9: Update iPhone/iPad
Is your iPhone/iPad updated to iOS 17? If you haven’t updated yet, quickly update the iPhone to the latest version.
- 1: Go to “Settings” and open “General”.
- 2: Tap “Software Update” and search for updates.
- Download and install the latest firmware version.
Fix 10: Restore the iPhone to its factory settings
Our last option is to fix Wi-Fi not working on iPhone/iPad. So have faith and do it. Back up the device before restoring it to prevent data loss.
Backup iPhone, if Data is essential for you.
- Step 1: Go to “Settings” and open “General”.
- Step 2: Tap “Reset” and then tap on “Erase All Contents and Settings”.
After resetting or erasing your iPhone, Restore Data on iPhone like new.
Are you looking for Fix: Laptop or Mac not connecting to iPhone’s Personal Hotspot
Hardware issue
Still, the issue is not fixed; you should diagnose the hardware issue with the help of Apple support. If your iPhone is under warranty, Check iPhone Warranty status online, find an Apple service center near you, or Talk with apple support via phone call, chat, or Email and Book an Appointment at apple genius bar.
Wrap up!
WiFi dropping or Disconnecting is the most common problem in all devices. Unfortunately, not only are you on the list, but others are also. So, don’t miss sharing the important fixes on iOS 17 WiFi issues with your iPhone, iPad, or iPod Touch.
My iPhone XsMax some of app not working like tik tok, botim other apps also but YouTube is working fb in these are working but when I connect other wifi then al are working
I’ve had some success with turning off the location services toggle. (Privacy and security— location services toggle) I had tried all the suggestions that I could find and zilch. This was a last stab before I brought the IOS back to a previous version something I really didn’t want to attempt. This has improved the connectivity of my iPad pretty well. It’s not perfect and I miss location services and now have to turn it back on ever so often for weather and map apps. Still waiting for the fix but it has saved me from throwing the iPad across the room.