
🗓️ November 22, 2023, By ✍️ Karly Wood
Just like always, Apple never misses a chance to unveil iOS and MacOS, every year in June, this fall, Apple has upgraded the macOS with the latest macOS Big Sur Update, wait and watch, I bet you are going to love each and every feature of MacOS Big Sur. From Safari Privacy Report to Enhanced Dock, to Control Center, I can’t express how amazed I’m after using it. I have summoned up the best features and tips and tricks for macOS Big Sur that you don’t want to miss it. Plus, after so many years, Apple has changed the naming pattern of macOS, to macOS Big Sur 11, from this you can guess how huge this update can be for us and for Apple.
Step by step check out the new features of macOS Big Sur and enjoy the redesigned and powerful Mac, better than ever. Also, don’t miss to download the HD Wallpapers of macOS Big Sur, to decorate the Mac Desktop.
You Should Know this – macOS Sonoma Hidden Features
What are New & Tips & Tricks For MacOS Big Sur
A Glimpse at MacOS Big Sur
- Streamlined apps

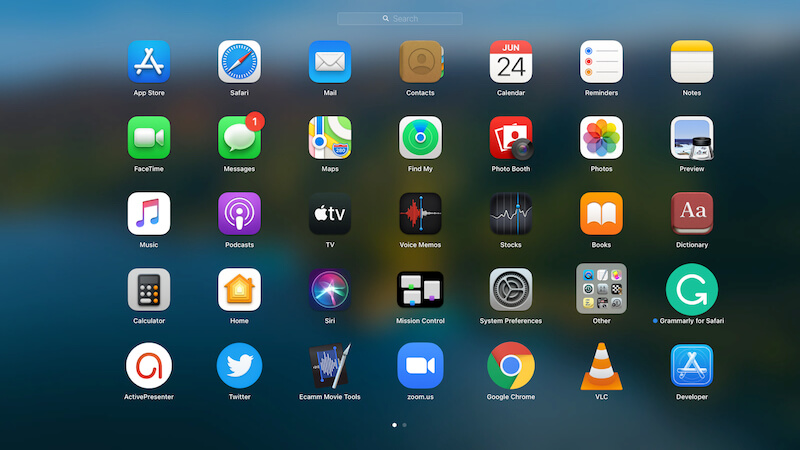
Launch pad look on macOS Big Sur
- Refreshed Dock

Dock Preview on macOS Big Sur From MacBook
- Control Center for Mac
- Notification Center
- Improvement in Safari (Built-in Translator, Privacy Report and more)
- Messages on Mac
- Better Maps

Enhanced Design
Notably, all the default Applications of Mac got redesigned interface that you might notice. Apple has reduced the clutter, to make the Dock transparent and clearer than ever, that’s the very first thing you might have noticed.
The applications stored on Mac’s dock got the elegant design, sort of highlighted with rounded-edges, and increase in translucency whether it is the entire dock or particular app located on the dock.
If we talk about the changes in Mac Apps, I’d like to take the example of Finder. Launch the Finder for once, and see how amazing the left bar is, from top to bottom, it is totally redesigned. The gaps between each option, the icons of the menu, transparency between the window, and much more.
Finder on MacOS Big Sur or Later
On the Finder’s Main Window, those four buttons arranged symmetrically lets you change the view of the folder, contents, media or whatever you’ve stored in the Finder, try each one and see which one fits your need.
Commonly the sidebar is changed for all the applications including Mail App, Photos, Podcast, Music App, and more.
Control Center
Wait what? Control Center in the Mac, is this for real? Well, it’s obvious to be surprised seeing Control Center on the Mac, I was too. Apple has implemented the same Control Center that we are habituated using on iOS devices, which certainly makes it easy to access the Wi-Fi, Bluetooth, Adjusting Sound Levels, Enabling DND, Controlling Display Brightness, AirDrop, and more, all at the one place.
macOS Big Sur Control Center and use Display Brightness
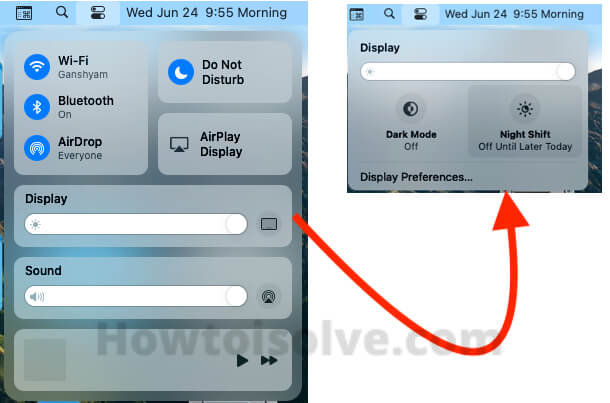
Display Settings on macOS Control Center
macOS Big Sur Control Center and use Display Volume
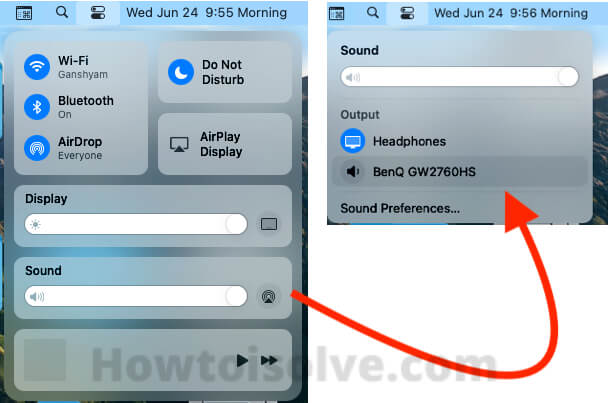
Sound Settings on MacOS Control center on macOS big Sur
macOS Big Sur Control Center and use AirDrop
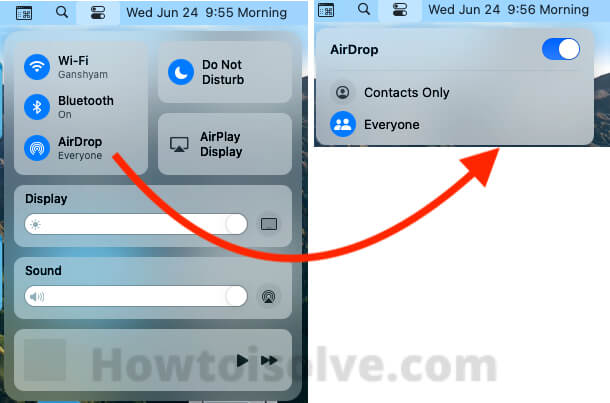
macOS Big Sur AirDrop Settings on Control center
macOS Big Sur Control Center and use WiFi
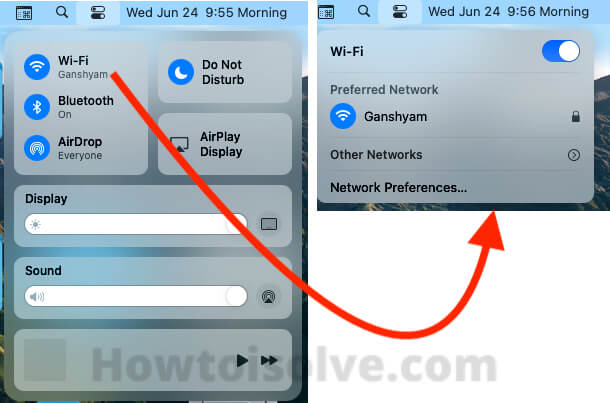
macOS Big Sur WiFi Settings on Control center
macOS Big Sur Control Center and use Bluetooth

Add Shortcut from Control center to Top mac menu
No matter which app you are using, simply click on the Control Center on the top menu bar and manage the basic settings that I’ve mentioned above.
Plus, if you want one-click access to the Wi-Fi, Bluetooth, or any of the settings, then open the Control Center, drag whatever setting you would want to appear in the top menu bar, as simple as it is.
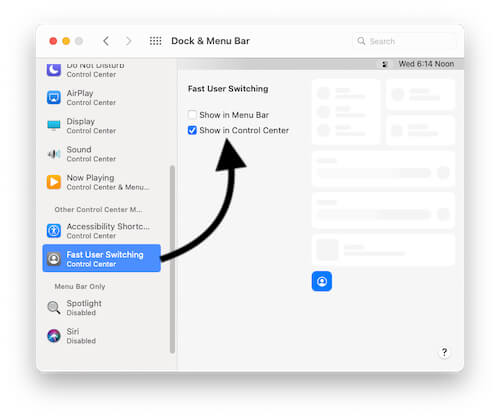
Customize The Control Center on MacOS Big Sur
Yes, We can customize the control center. But not all the settings and Shortcuts but only add new Fast Users Switching and Accessibility Shortcuts settings in your control center on macOS Big Sur. Follow these steps to customize your CC on macOS Big Sur.
- Click on Apple Logo () From Top Mac Menu > Click on System Preferences option.
- Next, click on the Dock & Menu Bar Settings. Now, Select the Accessibility and Users switching settings under the Other Control center section from the left side panel and Enable the checkbox for Show in the control center.

Accessibility Shortcut on Control center on macOS big Sur
Fast User Switching in Control Center on MacOS Big Sur
- Now from the top right corner of the Mac menu, Click on the Control center and See the Newley added shortcut. and use it as quickly as possible.
- That’s it.

Messages on Mac
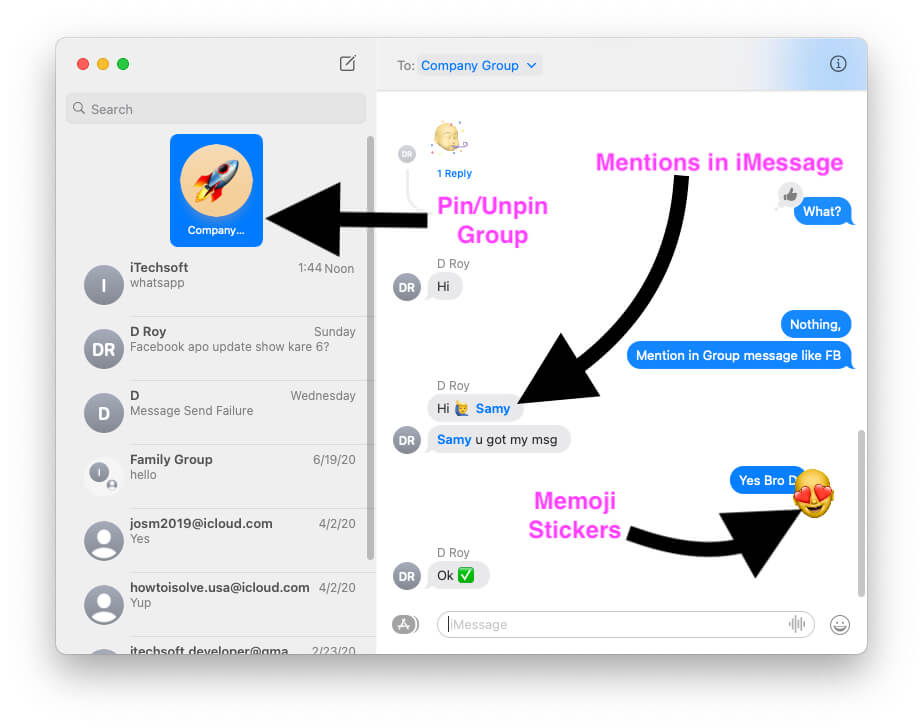
messages app on mac with Custom Memoji Sticker, Pin-Unpin,
Messages App on Mac is no less than the Messages App of iOS 14, all the major features like @mentions, pinned conversations, inline replies, etc have been included in the macOS Big Sur. These are few basic functionalities, alongside, it supports the Memoji Sticker, which also allows you to create custom Memoji stickers right from the Messages App on Mac.
The left sidebar’s all about quick access to the Contacts, Messages, or anything that is available in the conversation, just click on the Search and start finding. Besides, the photo picker, makes it faster to find the photos or videos across the Mac, while showing the trending photos and GIFs, just for fun.
The Maps: Find & Save Guides, Cycling Routes and More
Get the enlarged view around the city, sitting at a desk, create guides of the places that you would want to visit on vacation, add favorite restaurants, indoor maps, and so on.
You can also track the ETA shared from the iPhone to your Mac, its good, you know to track your friend’s, family, if they are visiting at your place for the first time, isn’t it great?
Change Miles to Km on the map app on macOS Big Sur
Get distance from two places on your mac in Miles and Kilometers, We can change from Maps preferences.
- Open Map App on your Mac.
- Go to the File menu from the top mac menu.
- Click on the Preferences option.

Maps Preferences on mac in macOS Big Sur
- Under the Distance section, Select Miles and Kilometers. Now, Whenever you search for a new location, the distance will available on Kilometers.

Change Distance Miles and Kilometers on MacBook Mac in macOS Big Sur
- That’s it.


Faster, Safer Safari
First of all, let me show you the key features of Safari added in the macOS Big Sur,
- Privacy Control
- Extensions
- Customizable Background
- Faster Performance
- Battery Efficient
- Redesigned Tabs
- Inbuilt Translation
The significant features of Safari are Extensions and Privacy Report, most importantly Privacy Reports that aren’t offered by any other browser to date. When you browse any website on Safari, the Privacy Report will show you the detailed list of trackers used by that site to track you, also you can easily control them right away.

Privacy Report Settings for Each Website on macOS Big sur
The Safari Extensions have given a separate section in the Mac App Store to search, discover, and download the Web Extension for Safari App. When you click the Safari Extension, it will ask you permission whether you want to Allow for One Day, Always Allow on This Website, and Always Allow on Every Website, this is how you control the use of extension on Safari App.
Want to personalize the Safari Start Page with your own Photo or default designs? Click on the bottom-right setting icon and select Background Image, from the same settings, you can Show Favorites to the Safari Home Page, Privacy Reports, Reading List, and more, take a glance.

Customize Safari Home screen on macOS Big Sur
The effective upgrade in the Tab gives you a quick view of the website when you hover on the specific tab. This is very helpful when you have more than 20-25 active tabs at a time.
Quick Preview of Webpage on Safari Tab,

Quick Preview of Tab on MacOS Big Sur Safari
Close Tabs at Once on Safari,

Close Tab to Right on Safari macOS Big Sur
Rearrange Tabs on Safari,

Arrange Tabs on Safari macOS Big Sur
Likewise in iOS 14, Safari on MacOS Big Sur has also got a one-click Translation tool, that translates the page in a single click from seven different languages.
Track Battery Usage
You can call it as a hidden feature, a couple of Mac users are aware that with macOS Big Sur, they have added a special battery usage section, that genuinely tracks the past 24 hours battery consumption on Mac and also reports the last 10 days for the same.
- Click on the Apple
- Select System Preferences.
- Then click Battery.
- Choose from the Last 24 Hours or Last 10 Days, whatever you want.
Improvements Mac Catalyst App
Catalyst was launched last year, it helps the developer to create the iOS and iPadOS Applications for the Mac. If you are a developer or looking forward to making a career in developing Mac Apps, then Mac Catalyst is your first and last choice to create something better that fits Mac, possibly works best in Mac.
With macOS Big Sur, Catalyst App got some new designs, clear view, easy interface, full control to the app you develop on the Catalyst via Keyboard, and much more.
Grouped Notifications on macOS Big Sur: By App, Automatic, Off
MacOS Big Sur is more like iOS 14, mostly all the major features of iOS 14 is added in the Mac via macOS Big Sur. Group Notification’s the one. Suffice to say, we don’t want to clutter the Notification Centre by a single application, rather group the notifications for the particular application and expand them whenever we need to check the alerts.
- Go to Apple Logo from top Mac menu.
- Next, Click on System Preferences option.
- Now, Click on Notifications option > Select the App for that you want to manage the notifications.
- Last Option is Group Notification. Select Any of your Prefer options like Automatic, Off or By App.

Group By Automatic on mcOS Big Sur Notifications Settings
- Automatic option showing all the notification in well managed formate, You can see the Notification for Individual Group, Personal conversation for one app in group.
- By App: See all the Notification for particular app in one Group only.
- Off: See all the Notification list as you received.

Smart Folders and Enhanced Sound in Voice Memos
Smart Folders
Tired of organizing the Voice Memos recordings on Mac? The macOS Big Sur has added three categories to the Voice Memos, All Recordings, Favorites, and Recently Deleted. If you find recording important, then from the All Recordings section, you can move it to Favorites, use the mouse and swipe the recording from left to right and click Favorite icon.
By default, these three folders will be available, plus, Voice Memos lets you create a custom folder to store the recordings separately. Create Folder and drag the voice memos into it.
To delete the Voice Memos, swipe from right to left and click on the Trash icon.
Enhanced Sound
There’s one more thing to be considered when you hit the Enhanced Sound icon, the Mac will intelligently reduce the background interruption and will clean the recording.
Click on the Enhanced Sound icon as shown in the image to reduce background noise from Voice Memo Recording.
Search the Entire Notes App
If you don’t remember or find the lost note, in such case, use one of the signature words that you have used in the Notes, and search it in the Notes, this will bring all the notes and text on the main screen in which the search term is used.


