
Flush DNS Mac with MacOS Tahoe & Earlier macOS is easy on All Macs (iMac, MacBook, MacBook Pro, MacBook Air, Mac Mini). We have listed some of the best methods to do so. Periodically users need to reset the DNS cache because sometimes a specific domain or name server is cached or Mac DNS settings have been changed. At that time, you need to remove the existing DNS cache. So moving further, we will see how to reset the DNS cache on Mac.
Execute Command in Terminal: The commands below are case-sensitive, so use a space where required.
How to Flush DNS Cache On Mac in 2 Ways
1→ Launch “Terminal” directly from the Home screen using Spotlight. Or “Applications” > “Utilities” > “Terminal.app” or Type “Terminal” in Spotlight search.
2→ Now, enter the command below, To execute, use your Mac’s system administrator password [Not an Apple ID].
sudo killall -HUP mDNSResponder; sleep 2; echo macOS DNS Cache Reset | say
3→ Hit “return key” and then enter the Admin password and again enter.
4→ Wait until “DNS cache has been cleared” appears on the terminal screen.
5→ Quit “Terminal”.
You must close all the applications running & connect to the internet and wait for the changes to occur. Sometimes the changes take place through a simple refresh in the apps.
If in case the above terminal code doesn’t work for you, then you should break that command and write like this,
sudo killall -HUP mDNSResponder && echo macOS DNS Cache ResetMethod 1: How to clear DNS Cache on Mac
If you have made DNS servers and still haven’t encountered any changes, you should clear the DNS cache and check this workaround again. Closing all the applications that use DNS, like Firefox, Safari, and other web browsers is unnecessary.
- Launch “Terminal” from the “Utilities” which you will find in “Applications”.
- Enter the command with accuracy,
Sudo killall –HUP mDNSResponder;say DNS cache has been flushed
- Hit return key and enter the Admin password.
- It will take some time to “clear DNS cache”.
Also, you will get a kind of voice message from the system that DNS cache has been flushed.
Alternatively, we have one more command to clear DNS cache if the above one doesn’t work for you,
sudo killall -HUP mDNSResponder;sudo killall mDNSResponderHelper;sudo dscacheutil -flushcache;say MacOS DNS cache has been cleared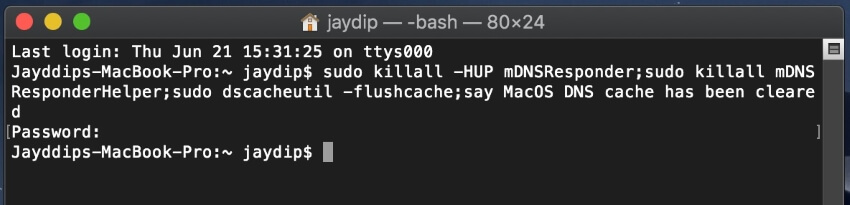
Method 2: How to Clean DNS Cache on Mac
Follow the steps to Reset and flush the DNS Cache.
- Launch “Terminal”.
- Enter the following command,
sudo killall -HUP mDNSResponder && echo macOS DNS Cache Reset- Once you enter the command, tap the return key and enter the Admin password.
- It will take a few moments to clear the cache.
Using Dig to Check Query Times
This method is used to check whether the DNS is working perfectly.
Step 1: Open “Terminal”.
Step 2: Type “dig howtoisolve.com”. In place of our website, you can enter any website to check the query time.
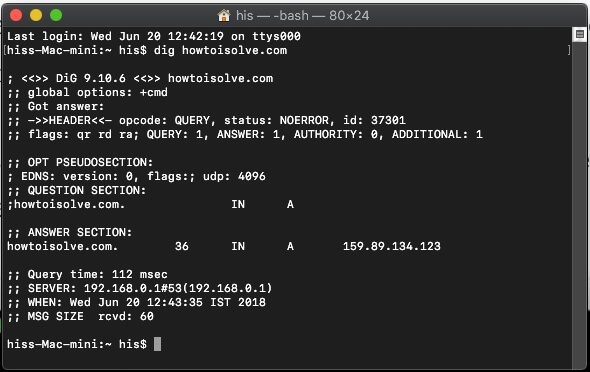
Step 3: You can check the result in “Query Time”. If the query time is more, then change macOS DNS settings to Google DNS.
After changing the DNS server to Google DNS, you can verify the query time again by the same dig command.
What are the reasons for flushing the DNS cache on a Mac?
To Improve Mac Security
You might be thinking, how could flushing a DNS Cache improve the security of my Mac? It does! Safari stores information like your browsing history, downloading history, and more on Mac. So, anyone with your Mac’s password can access that information. But if you clear the DNS cache, all that data will be removed from the Mac.
To Speed Up Mac
DNS Cache creates an extra load on your Mac. No doubt it also boosts up site loading speed while browsing. However, flushing the DNS cache regularly is beneficial when Mac slows down or faces internet hiccups in performance.
To fix Bad Network Connections
As you know, network connections and DNS cache depend on each other, and if any of them starts misbehaving, it should be fixed. Therefore, if Wi-Fi stops working or Mac shows lousy network connections, DNS Cache Flush should be done.
Flush DNS Cache for Windows PC!
Run the command on Windows’ command prompt, Use Windows + R key to open the run window. Type the below command and press the enter key to run.
ipconfig/flushdnsThanks for visiting us, I Hope you guys successfully run the command on Your Mac that Clear or Flush DNS Cache on Mac and Network.
More help and related queries.


