Recently on my MacBook, there is a gray border around the home screen and I don’t know how it came on screen. But then I searched on Google and found that there are other people having the same issue with the gray border on their MacBook. As of now, I have used macOS a lot and with some good experience in troubleshooting macOS problems, I have concluded three solutions to fix the Gray Square Border on my MacBook.
These are very basic tricks that will definitely help you get rid of this dilemma. If you can’t fix the problem with the help of the techniques below, then you should run to your Local Apple Store and show them what you are dealing with.
Troubleshooting for My Mac Screen Showing a Translucent Gray Border Around the Mac Screen
Solution 1: Restart the MacBook
A gray square border around the MacBook rarely occurs due to some unknown system glitch. Yet, the actual reason behind this issue isn’t detected. However, you can try to fix Gray Frame around MacBook by force restarting the MacBook. Here’s how to restart a MacBook,
- Press and hold the Power button until the screen goes off.
- After the MacBook turns off, press the Power button to boot up the MacBook.
Solution 2: Use the Kill All Dock command
Another troubleshoot to fix Gray Square Border on MacBook is to close all the applications running on Dock. Though it is difficult and time-consuming to kill all the dock one by one, so we will take help from the Terminal. By entering one command in the Terminal section, you will be able to kill all Finder, App from the Dock in a single click. Follow the procedure to use the Kill All Dock command,
- Press the Command+Space key on your keyboard.
- Search for “Terminal” and hit Return.
- Type “killall Dock”.
- Press the Return key,
- Now, the Dock will restart.
- Exit the Terminal.
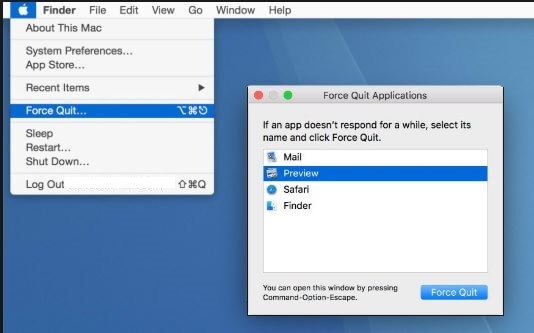
Solution 3: Force Quit app on Mac: From Apple Menu or Using Activity Monitor app
Option 1: Quit all running apps and Finder from Apple Mac or MacBook, Go to the Apple logo on Mac Menu > Quite Apps > Select App the You to want Force Quite and Click on Quit an app.
Option 2: Open Spotlight Search (Command + Space) and Type to Open Activity Monitor app on your Mac. Select App that running on your Mac and Click on Quit to Close app from Background.

Useful Solution on My Mac Won’t Force Quit an app.
Solution 4: Check for the Updates
Is your MacBook updated to the latest firmware? If not, make a habit of updating MacOS, as it can cause several other issues like this. Alternatively, turn on Automatic Updates so that whenever Apple releases a new update, your MacBook will automatically get updated.
For macOS Ventura:
- Click on the “Apple Logo” top menubar on your Mac laptop.
- Select “System Settings”.
- Click General
- Locate and click “Software Update”.
For Earlier macOS Versions
- Launch the “App Store”.
- Click “Updates”, which is on the top of the screen.
- Lastly, update the Apps and macOS by clicking on the Update button.
Wrap Up!
Most of the problem on a screen that related to lines shown on screen fix with the above solutions. But if there is a hardware issue inside your Mac. Contact Apple Support and Get Free Assistance and Repair if your MacBook is under warranty.
Write back to us, How we can help you in details with your Mac Problem. also, Share your Feedback and suggestion in the comment box.


