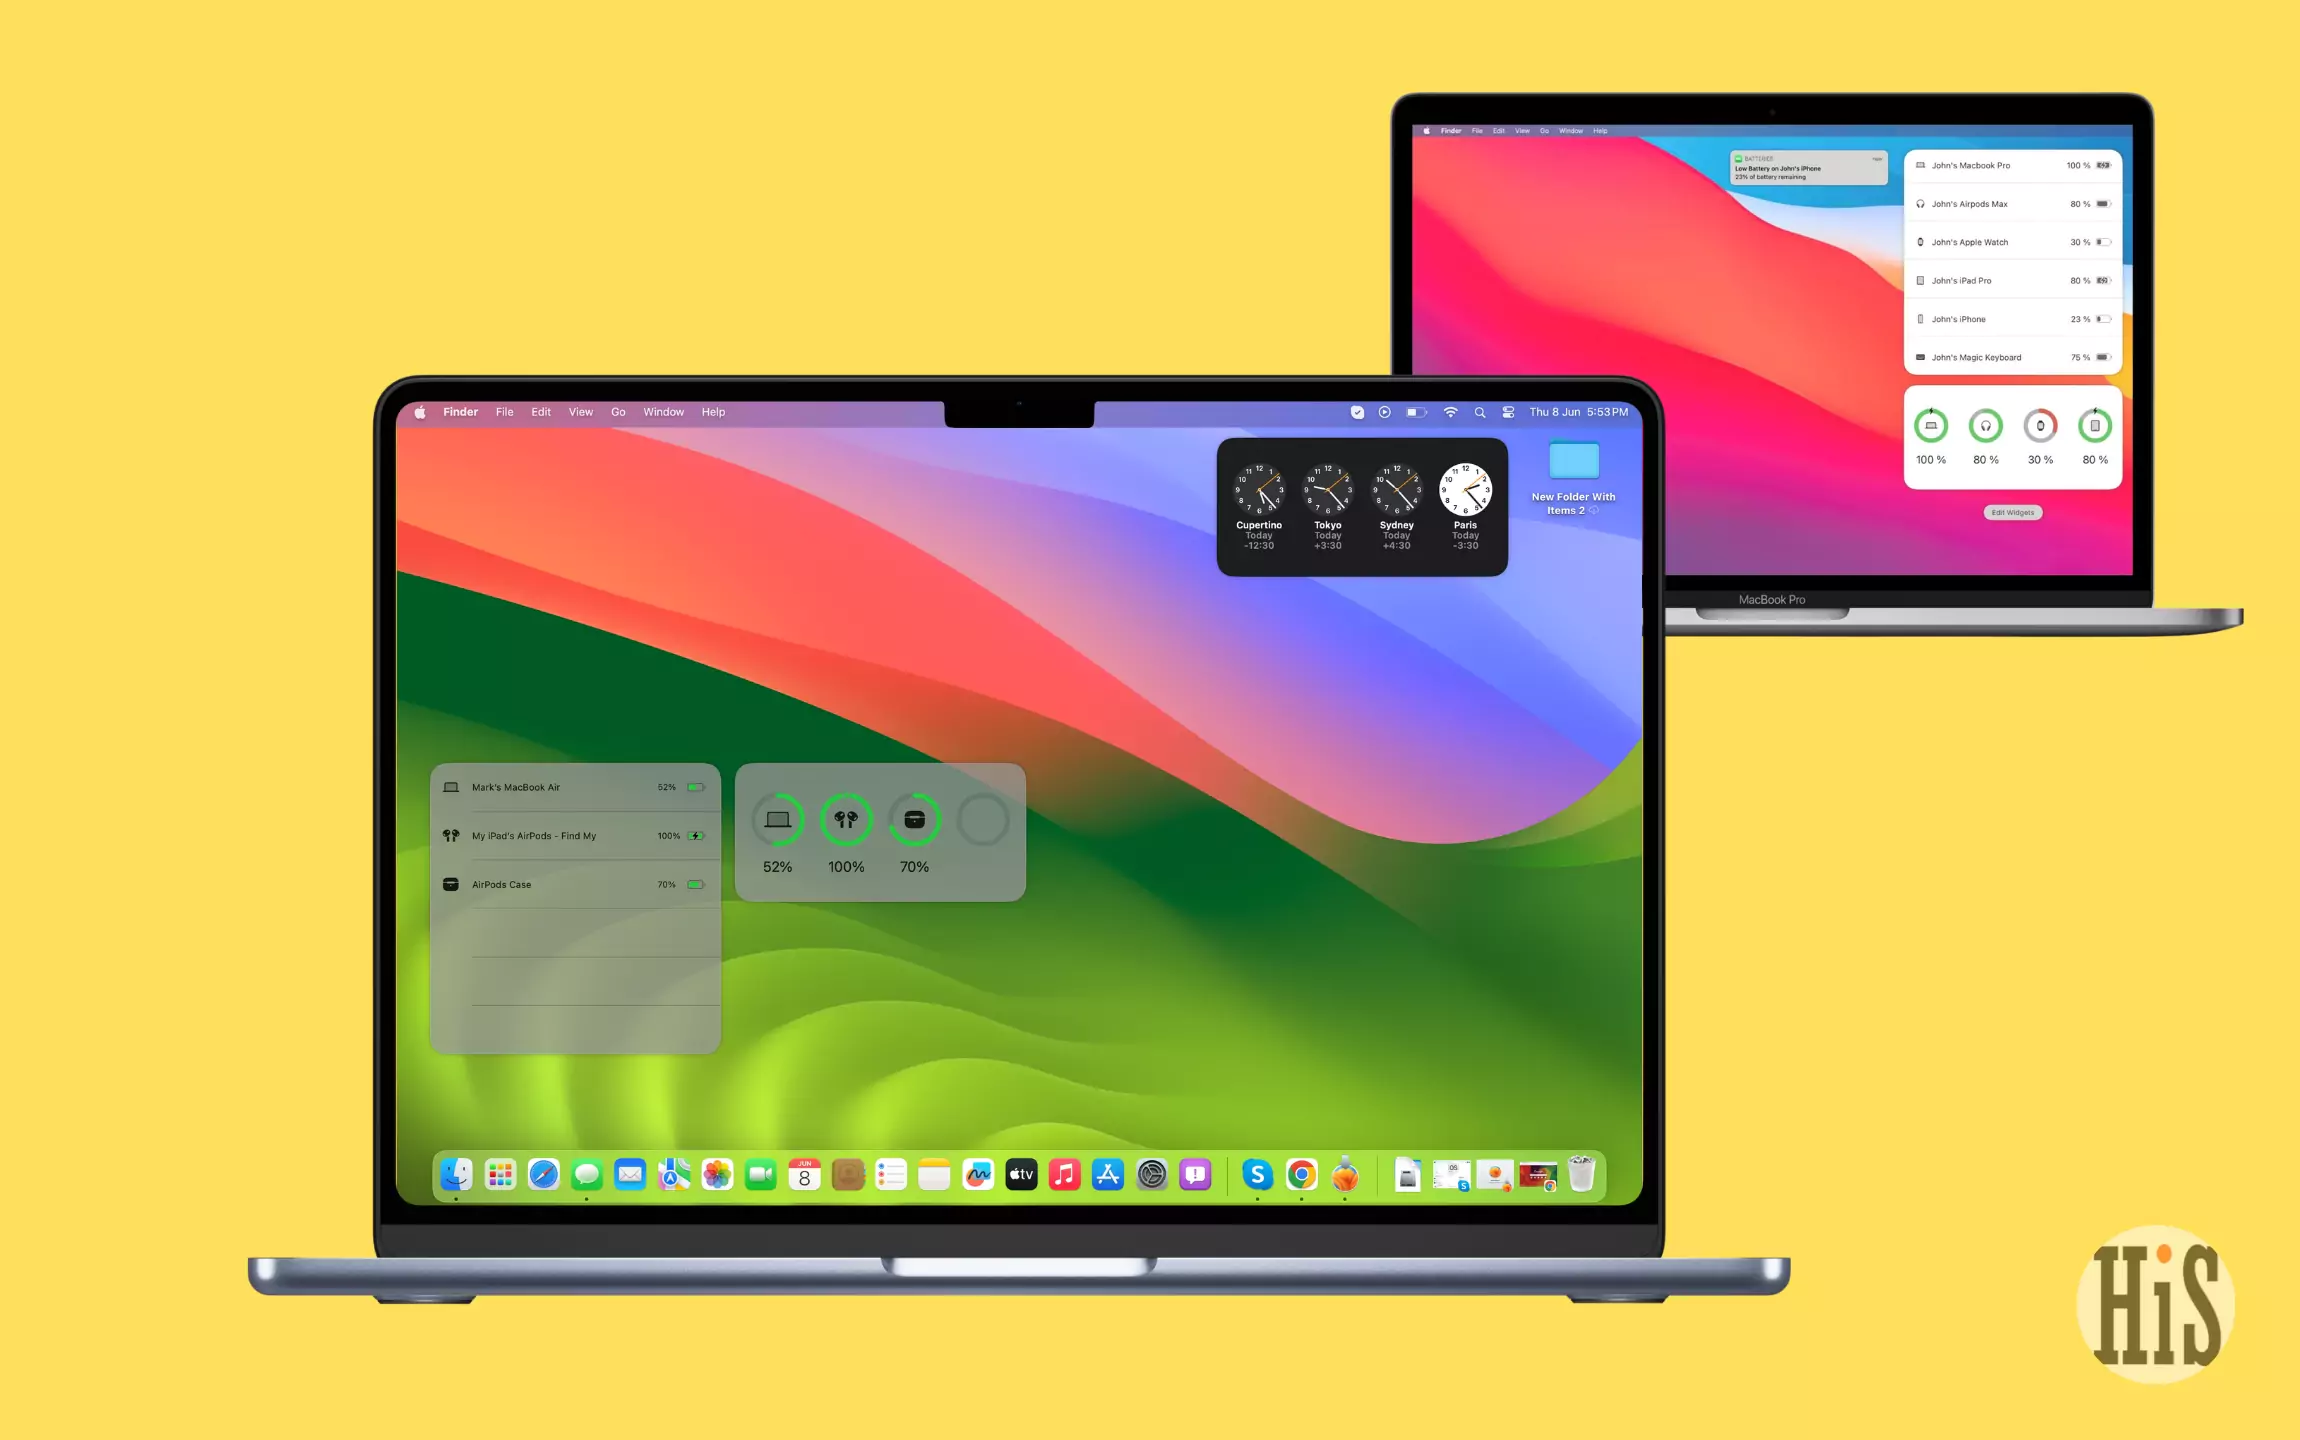
Are you missing Mac’s battery percentage information or of any Bluetooth accessories connected to it, for instance, your iPhone, iPad, or AirPods? If you’re looking for a way to add Battery Widget to your Mac, this step-by-step guide walks you through the complete process. In just a few clicks, you can add the Battery Widget and keep battery status always visible on your Mac Desktop. So, without further delay, let’s start with the procedure to add Battery Widget.
Add Battery Widget to Desktop & Top Menu
Remember, from macOS Sonoma, you will get the default Batteries Widget. In older macOS (macOS Ventura & earlier), you won’t get a default battery widget, so if you’ve Mac with older macOS, in this scenario, you’ll have to use a third-party battery widget. Fuss not; we’ve covered all for you.
How to Add Battery Widget to Your Mac Desktop
You can add interactive battery widgets in two different ways on macOS: from the Notification Center and by right-clicking on the desktop. The method for both procedures are demonstrated below.
Method 1: Add Battery Widget using right-click
1→ Go to your Mac Desktop (Option + Click ), right-click anywhere on the empty spot, and select Edit Widgets.

2→ From the left sidebar, select Batteries.

3→ From the right side, select the desired Battery Widget Style and drag & drop to your desktop or click on Green Plus Icon.

Method 2: Add Battery Widget using Notification Center
1→ Click on Time Present next to the Control Center in the top right corner of the Mac screen.
2→ Select Edit Widgets or right-click anywhere on Mac Desktop, then select Edit Widgets…

3→ You will see the Widget Gallery Window as soon as you do so.
4→ From the Widget Gallery Window, click on Batteries in the left sidebar.

5→ Drag and drop the desired type of Batteries Widget on your Mac Desktop.

How to add Battery Widget to Your Mac (macOS Ventura & earlier)
If running your Mac on macOS Ventura & earlier, you will have to use Paid Widgets to keep track of the Battery percentage of your Mac and other Bluetooth peripherals.
In the below procedure, we will use Batteries for Mac Widget.
Pros
Initially, it offers a 14-day free trial.
Cons
It’s a paid widget, a One-Time purchase for lifetime updates.
1→ Open Safari and navigate to Batteries for Mac.

2→ Click on the Download 14 Days Trial.
3→ Select Allow and wait until the file gets downloaded.
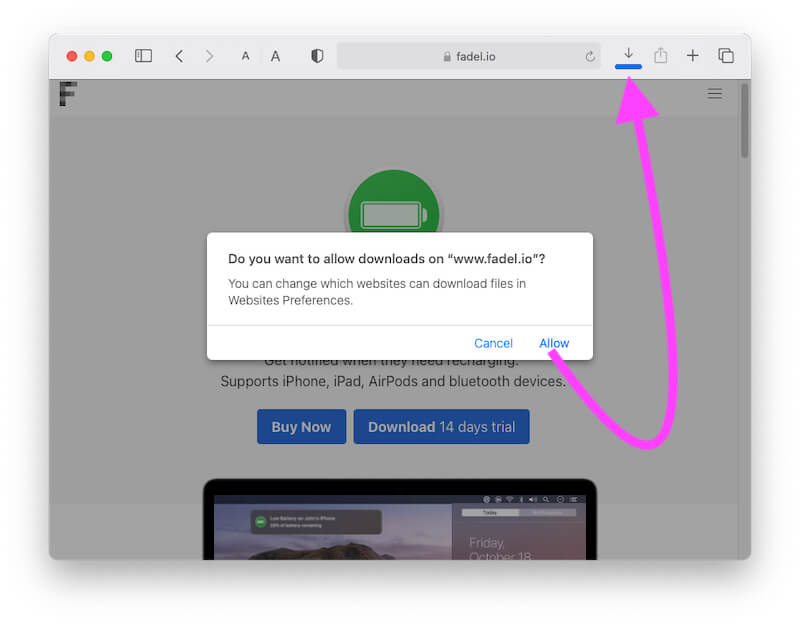
4→ After this, select Download Icon at the top right corner in Safari and then double-click on File to open.

5→ Drag the Batteries Icon to the Applications Folder and close the window.

6→ Now, select Launchpad from Dock.

7→ Double-click Batteries Icon. From the prompt, click on Open Button.

8→ After this, you will receive some of the settings for the Batteries for Mac Widget, make changes as per your preferences, and exit the window.

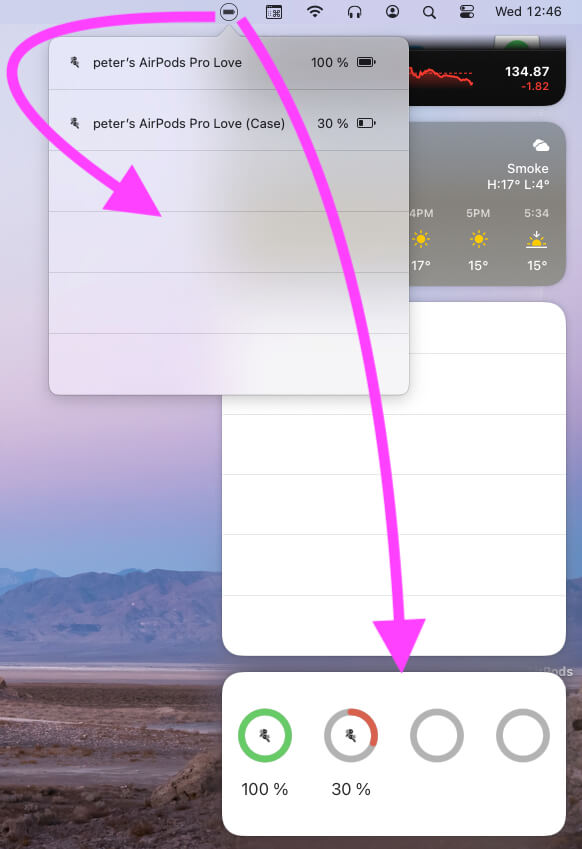
9→ Now, click on the Time next to the Control Center in the menu bar. Select Edit Widgets.

10→ In the Widget Gallery, you will see Batteries in the left sidebar.

11→ At last, drag and drop the Batteries Widget right in the notification center.
That’s It!
How to Check Battery Status Using Widget on MacBook & Mac
Note: macOS Big Sur & later macOS updates: users can turn on the Battery Widget in Mac Control Center from System Preferences. Check out the Tips to Display Battery Percentage on iPhone Home Screen.
- On MacOS Venture or Later:- Go to the Apple Logo from the top menu > System Settings > Batteries > Show in the top menu.
- On MacOS Monterey & Earlier:– Go to the Apple Logo from the top Mac Menu > System Preferences > Docks & Menu Bar > Battery from the sidebar of Window > And Enable Checkbox for “Show Percentage”. This step is limited and only works to check your own MacBook’s battery level.
- Use the Above methods to Check the Battery Level of accessories connected to your Mac, like AirPods, Pro, AirPods Max, Bluetooth Headphone and Trackpad, and Keyboard.
Batteries Widget Not Working on MacBook, Mac
If you have any questions or troubleshooting on the use of the Battery widget on Mac, then read below or comment to me in the comment box.
1. Sometimes battery data is not loading; then force close it and re-Open the application from the launchpad.
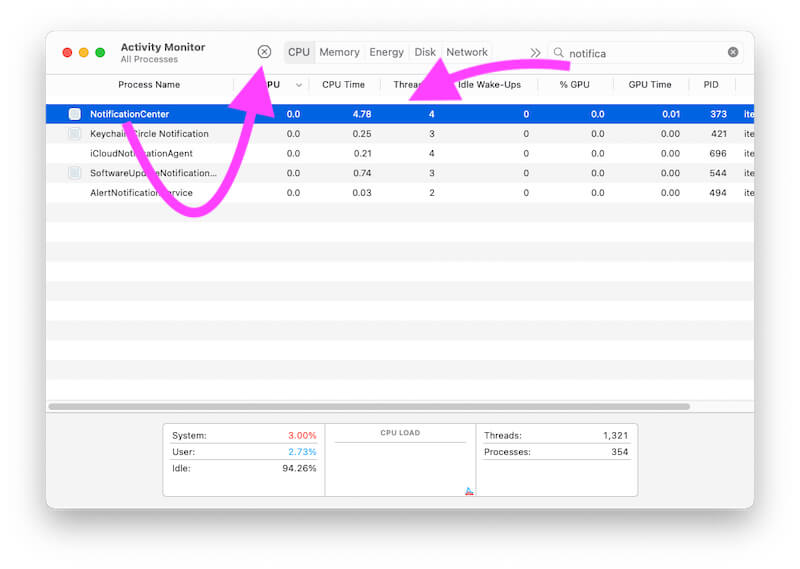
2. Force Close the Notification Center Process from Activity Monitor. Open the Activity Monitor, Search NotificationCenter Process, Select Process, and Close it.
3. Bluetooth devices or accessories must be in range and connected under the Bluetooth preferences. [Go to the Apple logo from the top Mac menu > System Preferences > Bluetooth > Device must be connected].
4. If the low battery notification is not showing, then enable notifications for the Batteries app from System Preferences. [Go to the Apple Logo from top Mac menu > System Preferences > Notifications > Enable Notifications].

Uninstall Batteries for Mac From MacBook, Mac
The uninstalling process is sometimes very difficult on Mac, and the Mac doesn’t allow you to delete or remove third-party apps from Launchpad. So we have to remove it from the Applications folder. if you are seeing a pop-up like the application is opened on Mac and unable to remove it. Then close the app background process from Activity Monitor. Here are the Multiple ways to delete the app on Mac.
- Open Finder on Mac, MacBook, and open the Applications folder from the sidebar.
- Find the Batteries app and right-click on it > Move to Bin.

Final Thought!
This is how you can easily add the Battery Widget to your Mac. While it’s handy to set up on macOS Sonoma, the simple drag-and-drop may take a few minutes. However, once you complete the setup procedure, it functions flawlessly.


