
Let me know you how to reduce the JPEG format pictures on your Apple macOS. As our digital cameras are getting more advanced and capable of clicking high-resolution photos, we are so fond of clicking pictures and trying to capture every moment, but that leads to filling the storage of our device, so what to do now? Should we delete the old photos to make space for the new ones? And what if we want to mail someone the images, and we cannot do so because of the large file size?
The answer is no. You do not need to delete your older pictures to take new ones; you will also be able to attach your photos over the mail. All you have to do is to reduce the JPEG file size, and it will automatically create storage. You can also do this on your Mac without installing any third-party software to reduce JPEG files. If you have accumulated many photos and need to reduce their file size, grab your Mac and follow this blog. We promise that after reading this, you can quickly reduce the JPEG file size on your Mac.
Way to Reduce JPEG file size on Mac Using the Preview App
The first thing that may come to mind before trying to compress JPEG files is that you will lose image quality.
Is it going to affect the previous quality of my images? So let us first discuss it
You need to understand that there are two types of image conversion: lossless and lossy.
Lossless conversion is converting a file from one format to another without losing any information. Lossless conversion can be done in several ways, but the most common way is using the default image converter available on Mac computers, named Preview. The quality of lossless conversions is excellent, and you won’t notice any difference between lossy and lossless conversions.
Lossless means that there will be no quality degradation in the output file and will not affect the original image quality. The only goal of lossless compression is to compress an image to the smallest possible number of bits without losing the actual quality of your data.
Lossy compression is a unique way of compressing data that retains some information from the original File. One of the most common forms of lossy compression is JPEG, which uses run-length encoding to encode an image into a series of bits. This type of file conversion can have a significant impact on its overall quality and can also distort the final product. It’s important to note that many files are compressed by default, as they are stored on your computer for faster access.
So if you want to reduce the JPEG file size using Preview, follow these steps:
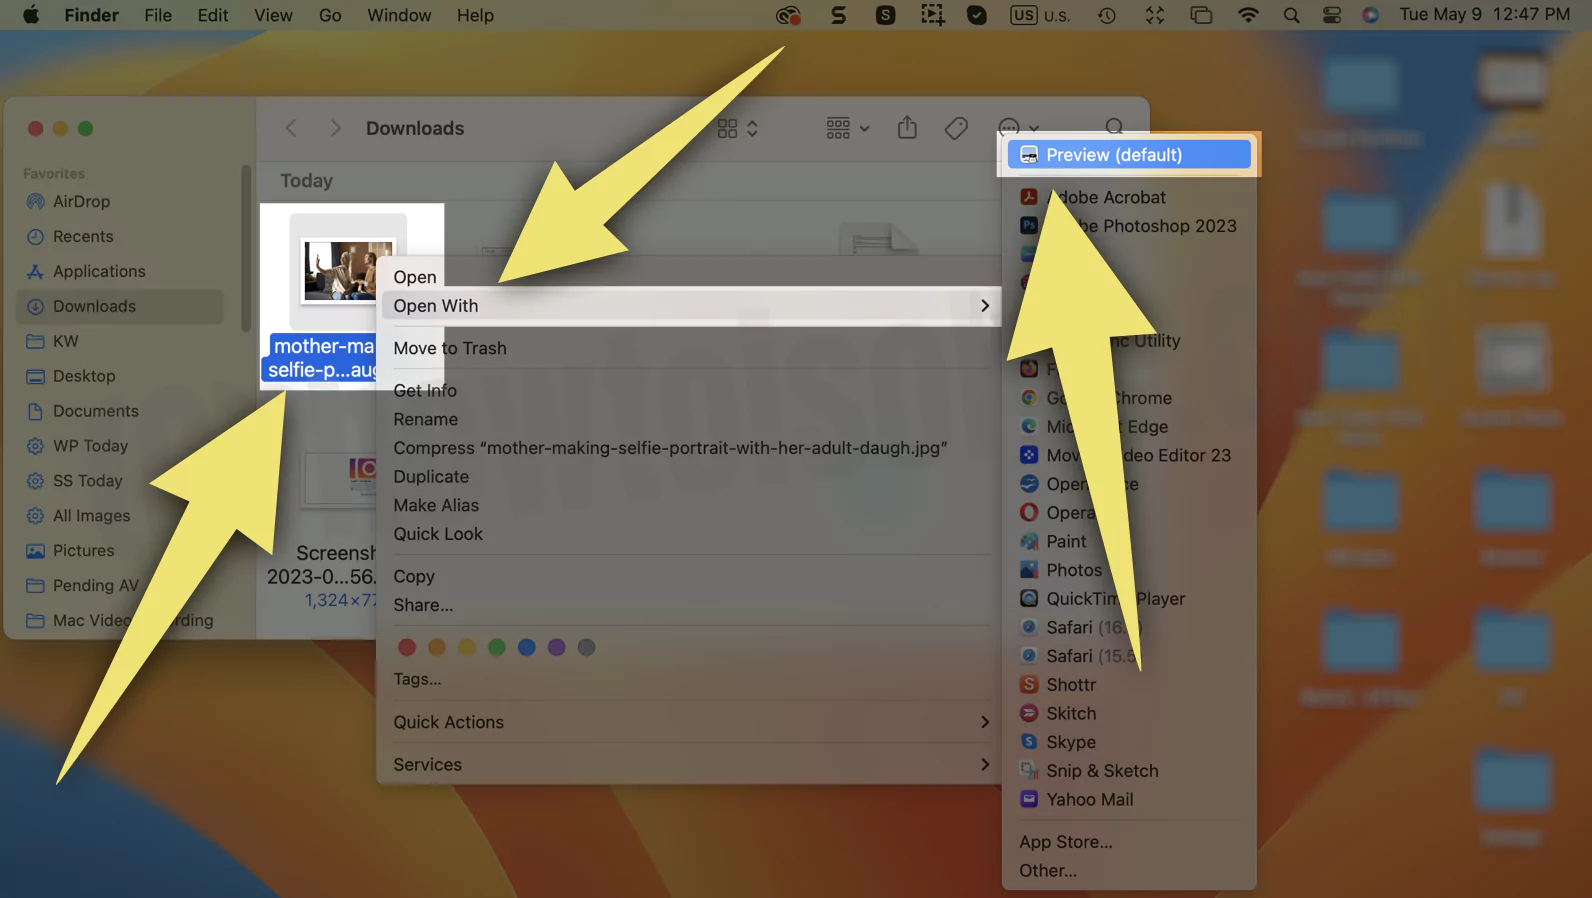
1→ Select Multiple or Single image file from Finder > Right click (Control + Click) on it > Open With > Preview.
2→ Now, go to the menu bar and select Tools, then Adjust Size….

3→ A pop-up window will now be opened where you will get the options: Resolution, Width, and Height, which measure the measurement of the selected image. Here you have to change the resolution, reducing the image size.
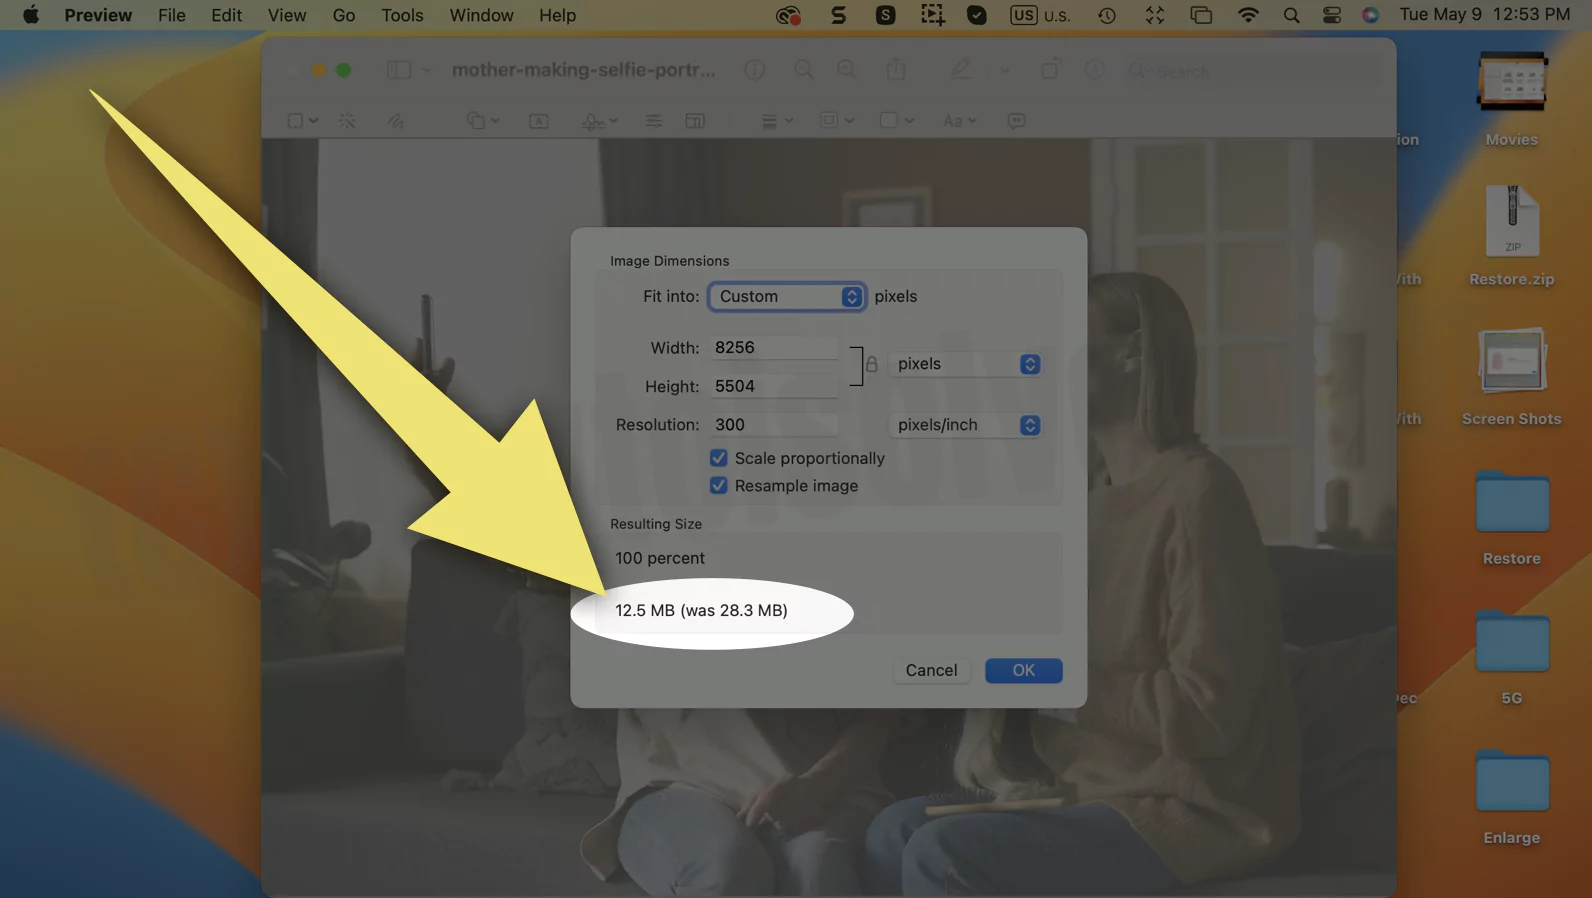
4→ Type the exact dimensions for height and width and click “OK.”
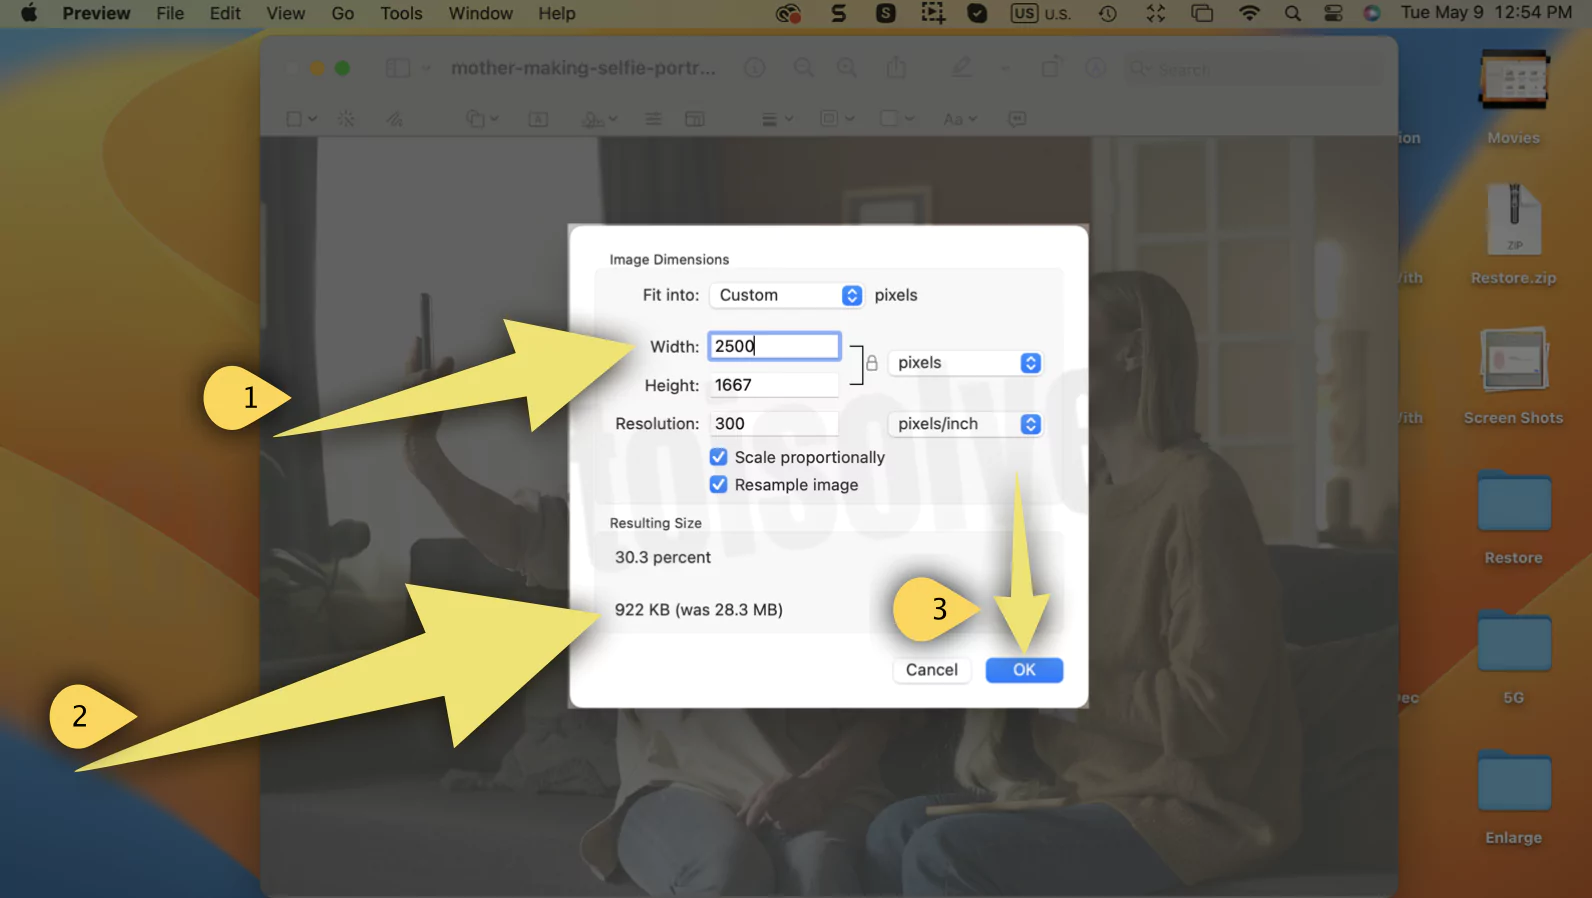
5→ Check the compressed Size of the image. If you think it is still high, choose a lower dimension again.
6→ Now, Again Open the Image in Preview, From the top Menu File > Export.

7→ For the JPEG file type, we can change the image quality between, Least <…> Best.
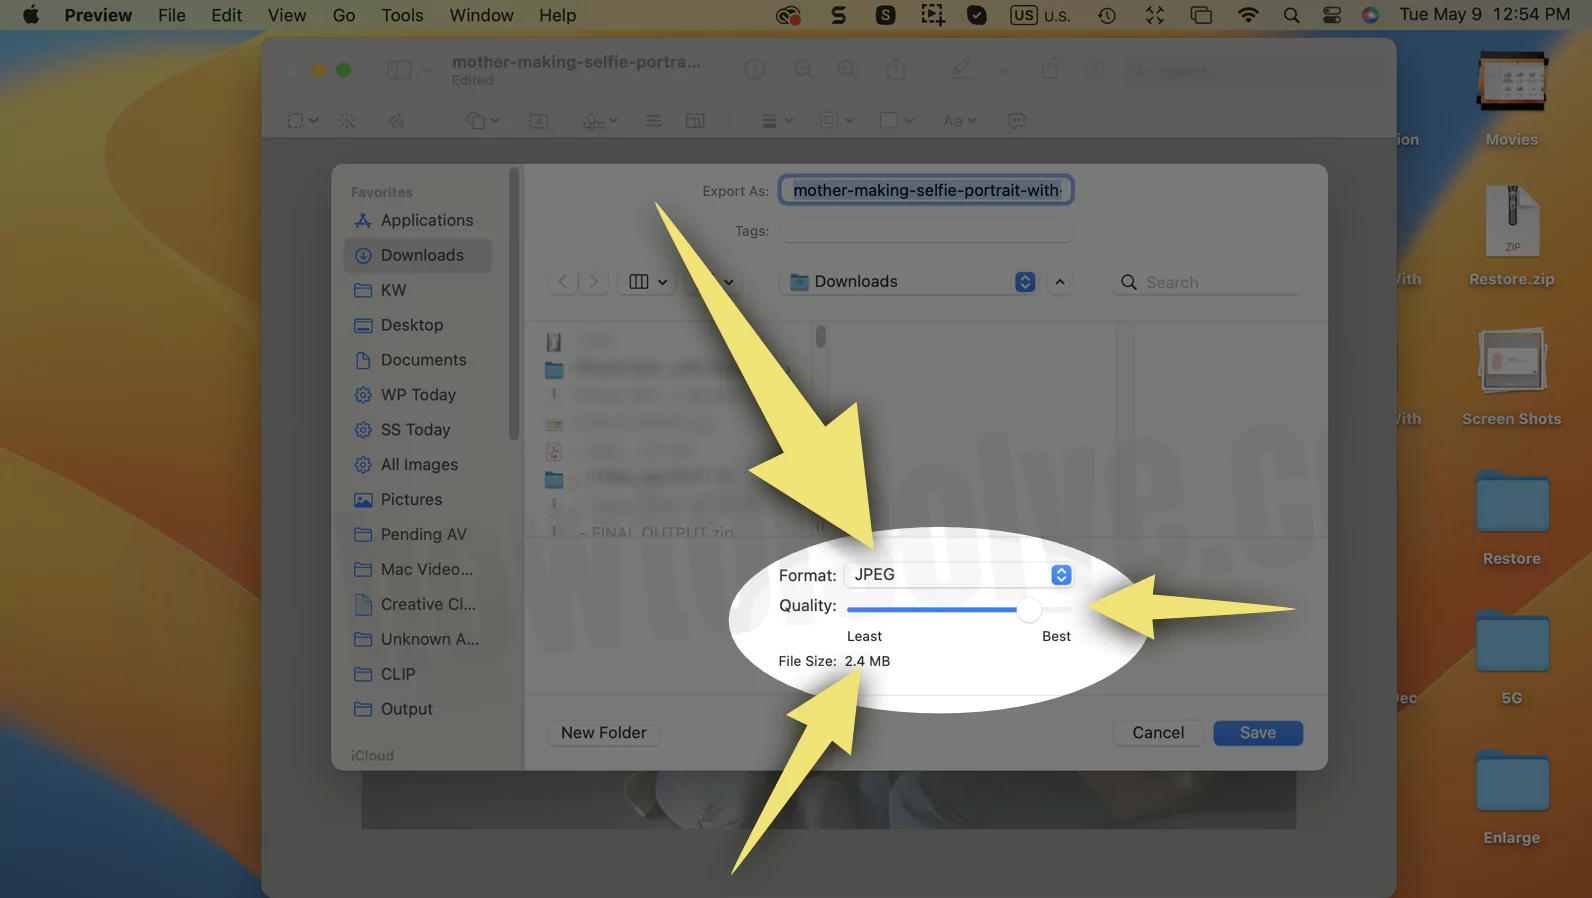
8→ sees the final file size before saving the image.

That’s it. Suppose you don’t want to resize, here are the alternate ways to resize jpg file without losing quality.
How To Shrink JPEG Files Without Losing Quality?
Although the most straightforward way to compress JPEG files is by changing their dimensions, as we have seen in the above section, this method will definitely affect the image quality, which we do not want. So, is there any alternative way to compress the JPEG file while retaining the quality?
Yes, there is, and here are the steps that you have to follow to compress the JPEG file in the Preview application:
1→ Right Click (Control + Click) on Image > Open With > Preview. or Pick an image that you want to resize. Double-click on it to open it in Preview.
2→ Then, from the menu bar, click on File and choose Export.
Step 3: Open the Format drop-down menu, select TIFF and export it in TIFF format.

Step 4: Go to the Compression menu and select JPEG.

Step 5: Select the “Save” option.
Step 6: After you’ve saved the File, open it in Preview and go to File> Export.
Step 7: Finally, export the File as JPEG, and do not do anything to the quality option unless you wish to decrease the quality.
Step 8: Rename the File and save it if necessary.
So now your image will be saved in JPEG format after reducing its Size, and do not bother about the quality because it will be retained as much as possible.
Your Mac has ways to compress photos in bulk
The solution we have discussed until now was regarding compressing a single photo. But what if you have a folder of multiple images? You may have hundreds or thousands of them and want to compress them all in at once?
We do have a solution for that as well. Before starting, please organize all of your photos into a folder.
Here are the easy steps you can follow to compress your photos.
Step 1: Locate the folder containing the images you wish to compress and right-click on it.
You will then see several options from which you must select to compress with a folder name.
Step 3: A new “.zip” folder will be created after a few seconds. You now have a zip file that contains all the compressed images in your folder.
You can easily unzip images by double-clicking on the folder when you need to use them. This is the most effective way to compress and store the bulk of your photos.
Conclusion
We hope that storing or attaching the files via mail will not be trouble for you because you know how easy it is to reduce the JPEG size on your MAC without using any third-party application.


