While attempting to download an upgrade to macOS Latest version, the Mac may get stuck at the Checking for updates error messages screen. This issue is frequent during the macOS upgrade. A variety of factors can cause this issue. Each of these needs a different remedy.
When this problem occurs, the reason is something minor that you can resolve with an effortless Mac restart or a Wi-Fi connection reset. However, in some circumstances, a lack of storage space on your Mac or a momentary defect in the computer’s NVRAM, which causes the upgrade procedure to become stuck, might freeze from installs the latest.
In this piece, we’ll go through the most common causes of this problem on your Mac and the troubleshooting approaches that will resolve it.
Let’s Start!
How to Fix Mac Update stuck “Checking for Updates” Issue?
Before we fix the checking of upgrades stuck issue on Mac for the latest version of macOS, back up your Mac operating system before proceeding to protect crucial data, therefore, you guarantee you can restore your data if an issue happens during the update.
With that, let’s look at the possible troubleshooting issue:
Fix 1: Make sure you have a proper Internet connection
Slow internet speed can also create this issue. If your Internet connection is down, your Mac won’t be able to connect to the updated servers. Try disconnecting and re-plugging the power cable on your router or modem. Alternatively, you can reset your Mac’s network settings if that doesn’t work.
Follow these steps to reset network settings on Mac:
Steps for macOS Ventura and Up version:-
First, Remove your WiFi Profile, Add a New WiFi Profile then Connect your WiFi network to your Mac.
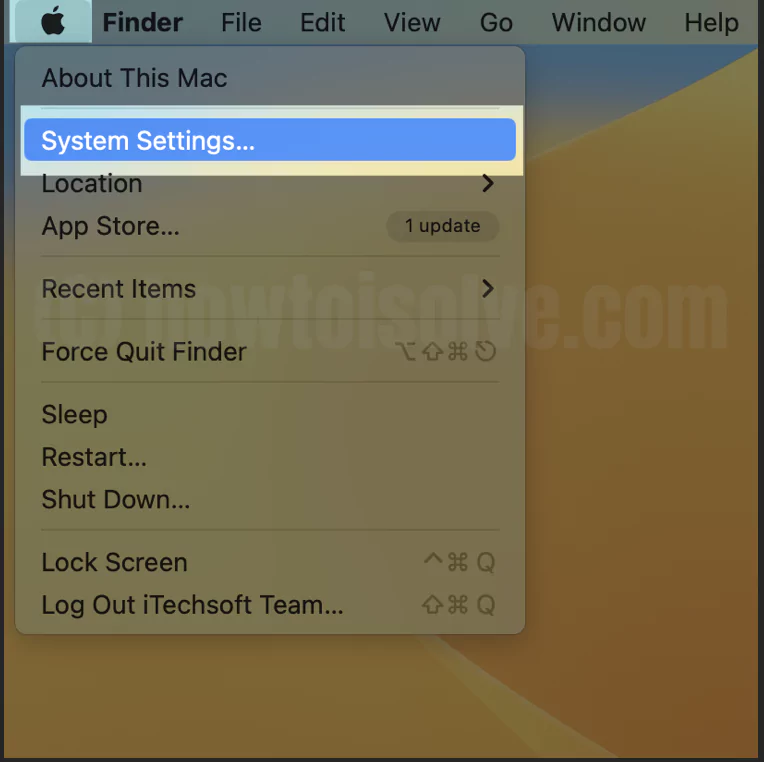
1→ Go to the Apple Logo from the top-left side menubar > Click on System Settings…
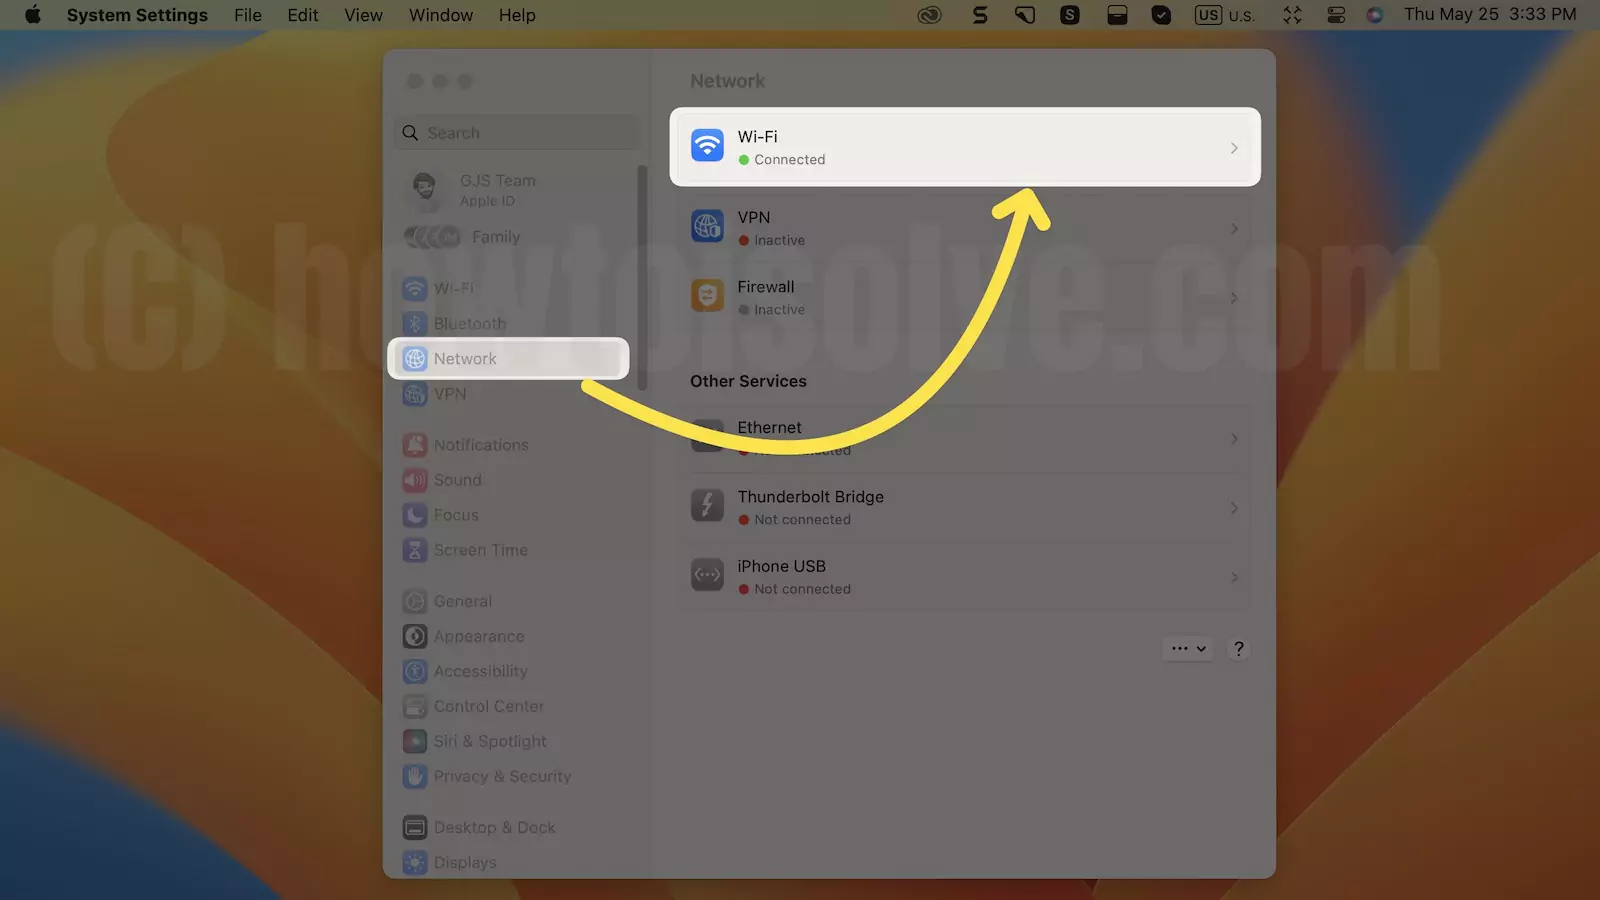
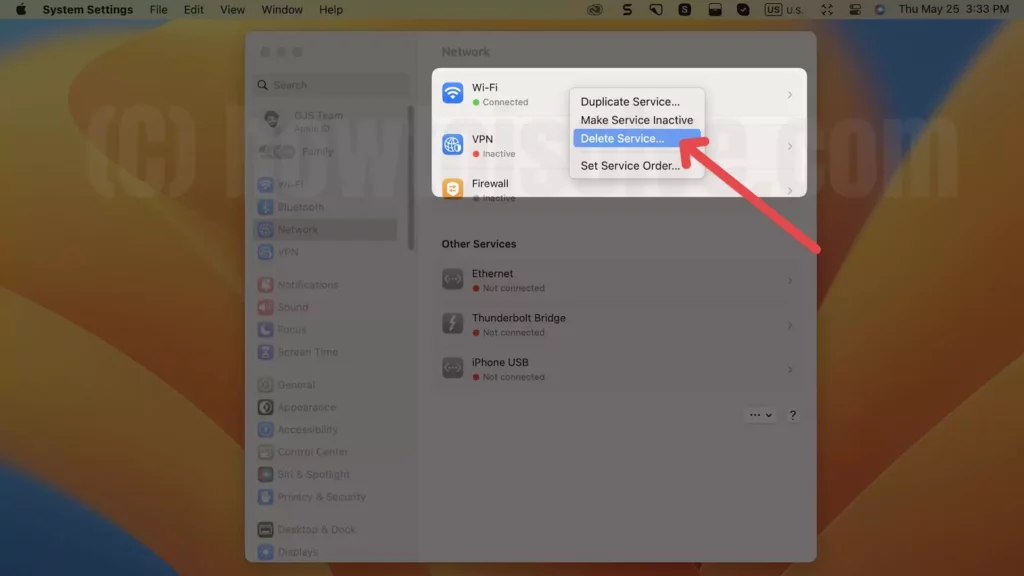
2→ Choose Network > Right-click on Wi-Fi (Control + Click).
3→ (Delete Service…). Confirm the Delete.

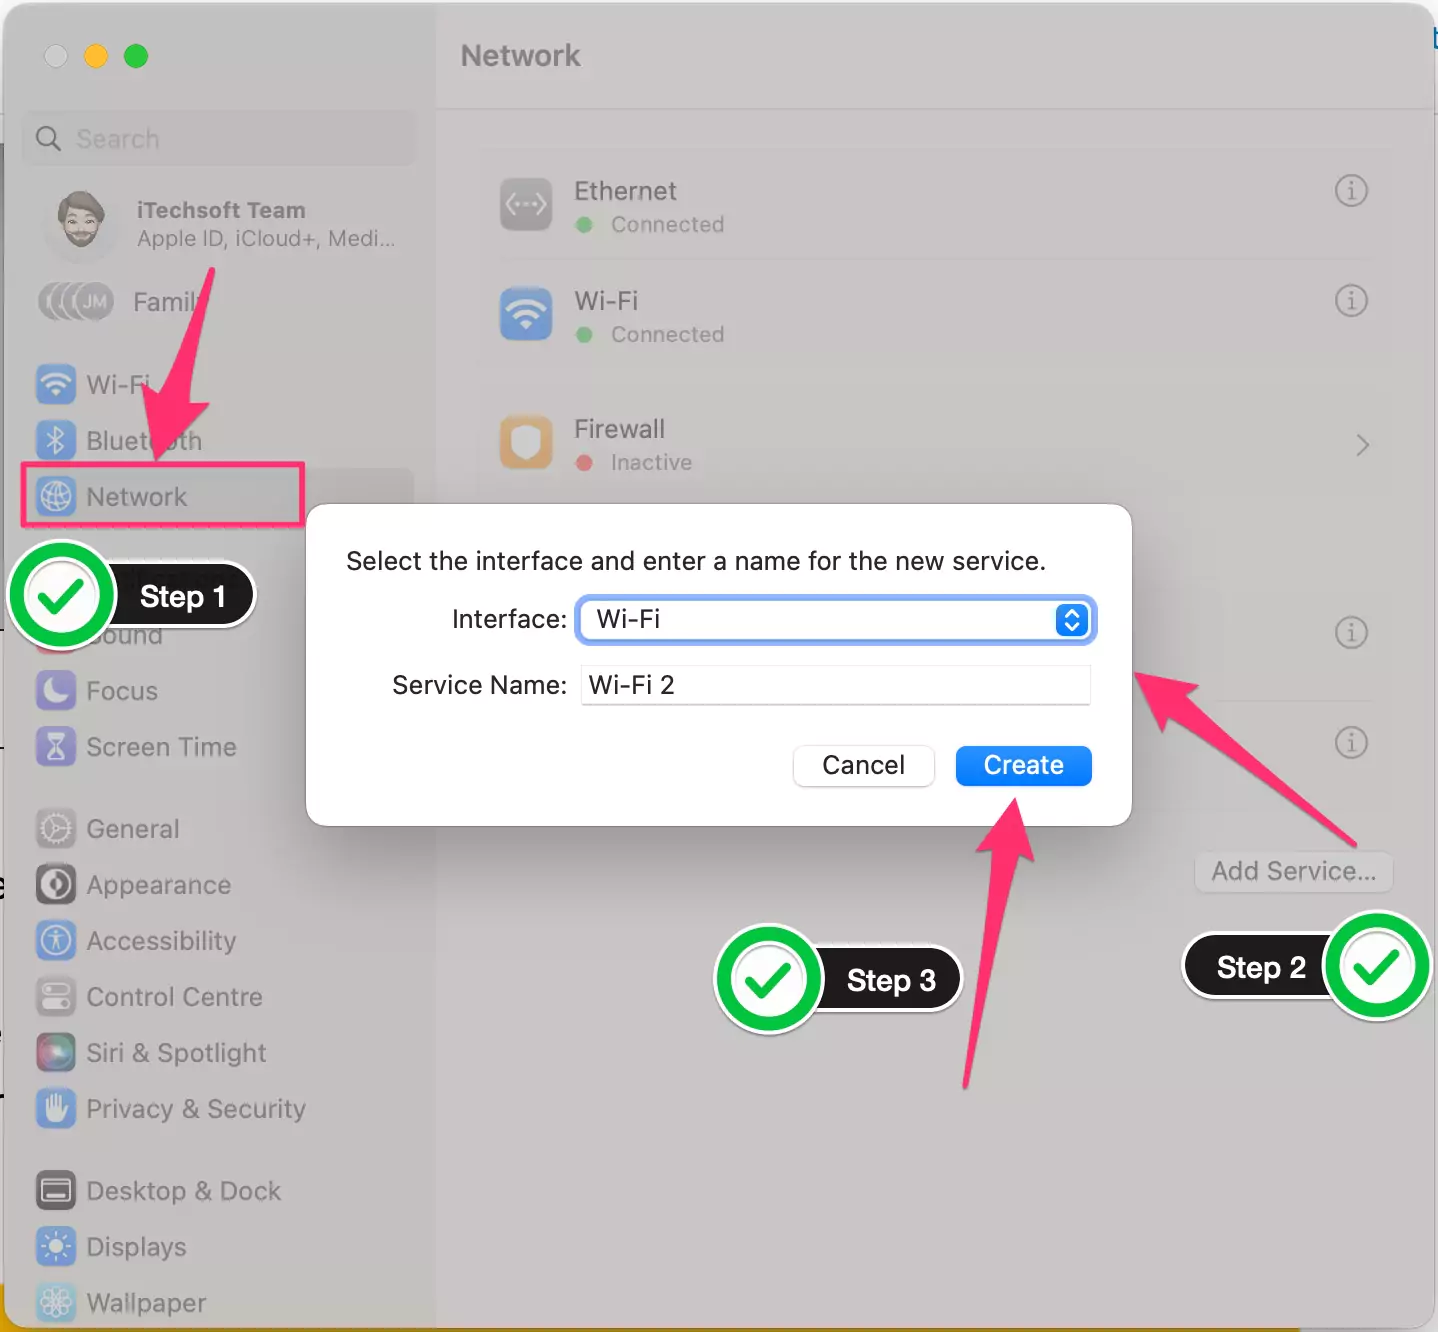
3→ Network > Add Service > Select Add Service… > Select WiFi as Interface and Service name > Click on Create.
Steps for macOS Monterey & down version
1→ First, go to the Apple Logo menu. Then, select System Preferences.
2→ Then choose Network. Select your Wi-Fi connection.
3→ Under the list of connections, click the (-) symbol.

4→ Apply the changes.
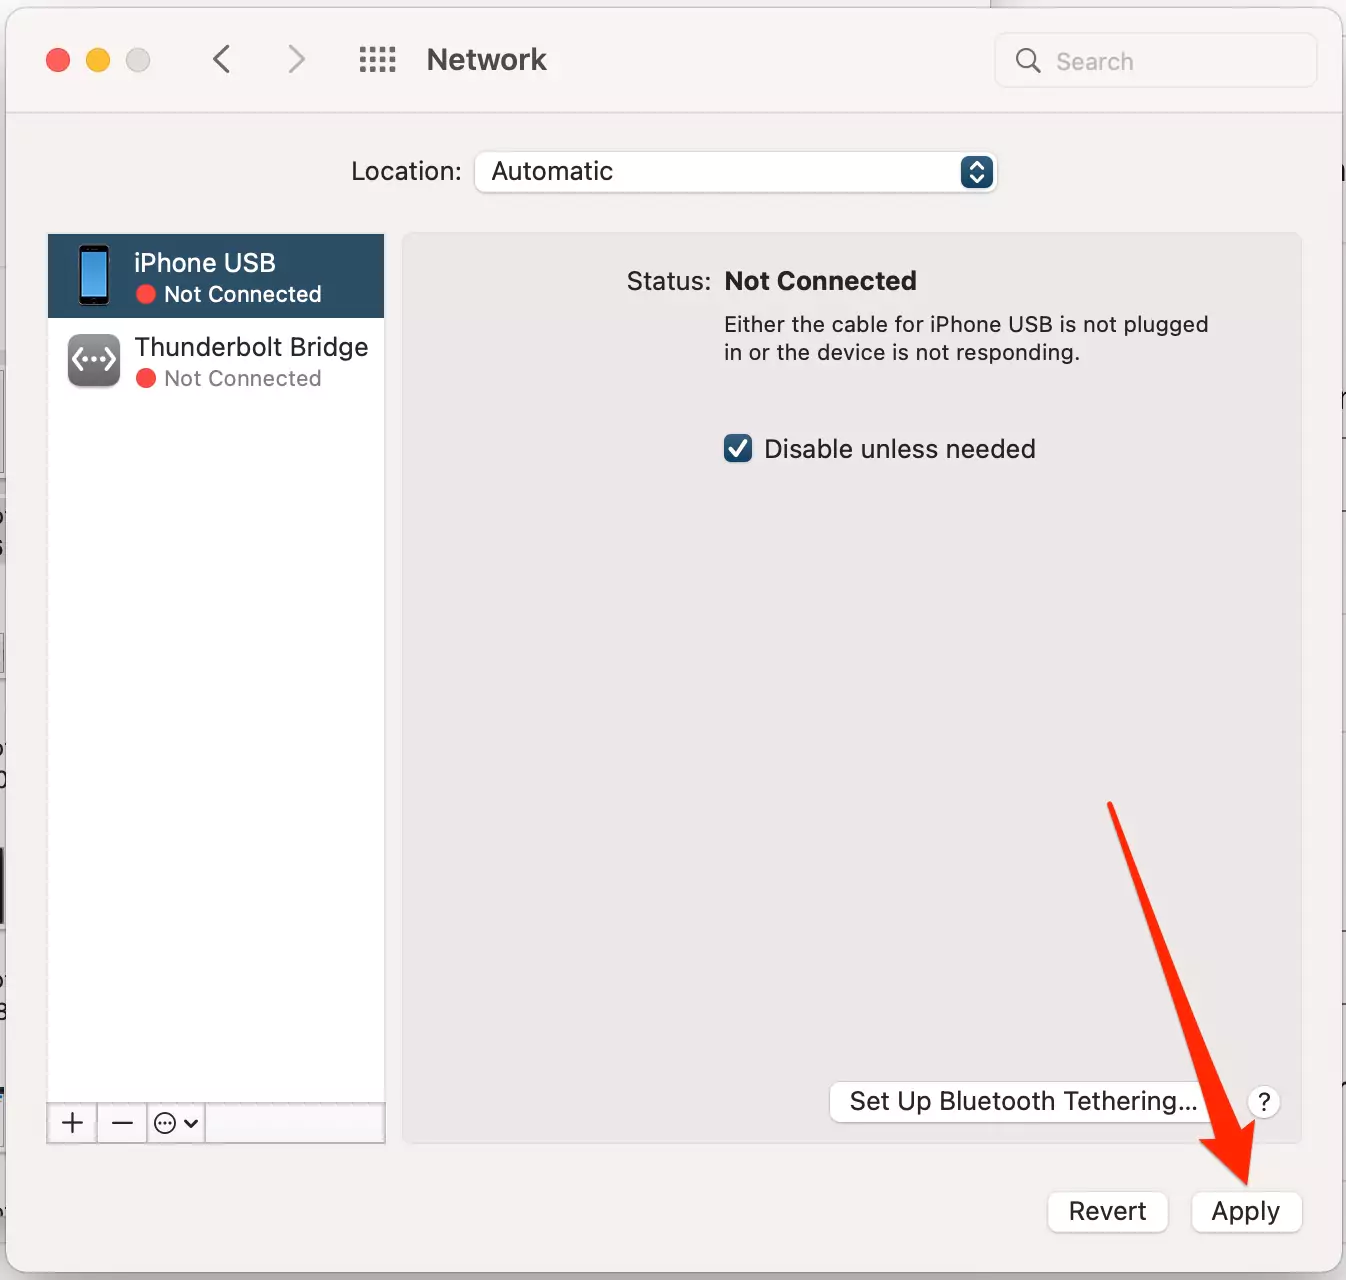
5→ Finally, click the (+) symbol and re-add your Wi-Fi connection, just as you did the first time. And Apply the changes.

Similarly, if you have antivirus software, turn it off for a while and try again. Again, the issue may stem from your antivirus software. Third-party security and cleaning programs are examples of software that may impact upgrades.
If you have a problem with the WiFi connection, connect your Mac with an Ethernet connection Port and Check for a software update.
Fix 2: Clear App Store Cache on Mac
This solution is also most helpful in such cases, your Mac won’t update apps in the Mac app store, and macOS software updates as well.
Reset the configuration for the app store app on Mac. Then, recheck to download a new copy of macOS On your Mac. Follow the below steps,
1→ Open Finder on Mac, click on Go > select Go to Folder… from the top menu.

2→ Copy the below path, ~/Library/Caches/com.apple.appstore

3→ Now Delete the folder, right-click on the folder, and click on Move to bin.

That’s it.
Now, Restart your Mac and check whether the issue is fixed or not.
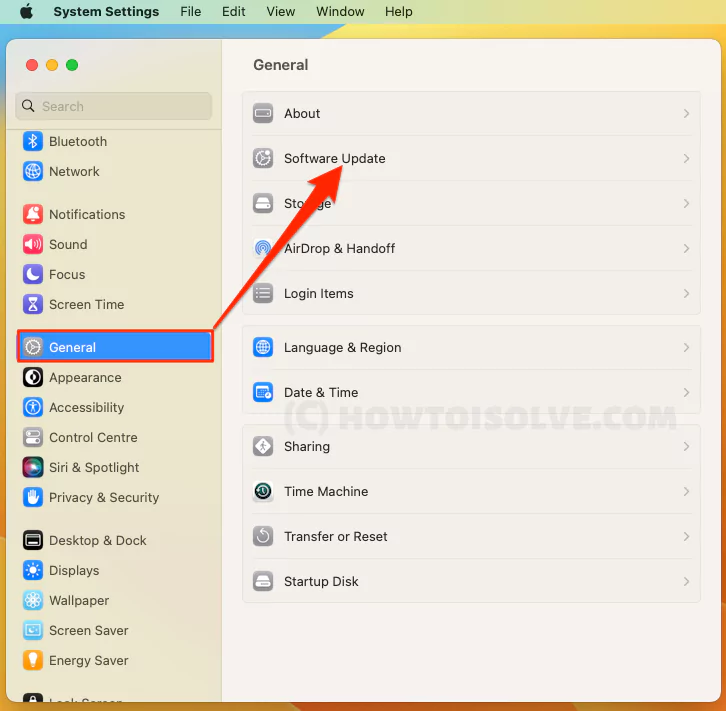
Go to the Apple logo > System Settings > Click General > Software Update > Download and Install.
Fix 3: Examine Apple’s servers.
If your internet is working, the next step is to verify if Apple is experiencing a server outage. Again, Apple may encounter some problems. It’s something you can readily verify.
Find the macOS Software Update option on the Apple System Status page at
https://www.apple.com/support/systemstatus/ In Other countries, Check Apple System Status online.
If you see a green indicator, it implies that the servers are working fine. You will see a red dot if there is an issue with the server.
If you see the green indicator, there is some other issue. But there is no need to worry. Just follow the rest of the methods to fix the issue quickly.
Fix 4: Check the amount of storage free space left on your Mac and Do space on your Mac
The following troubleshooting method checks the amount of storage space left on your device.
To check and manage your Mac’s available storage space:
- In the left corner of the main menu, click on the Apple Logo.
- From this menu, go to About This Mac.
- Now Click on More Info… So you will access the About page of the system setting. Please scroll the pane to check the Storage settings.
- If the space available is less than 30GB, you need to remove some unwanted files and applications from your Mac, to create optimal storage space.
- Alternatively, you can use various third-party applications to free up some space.
After creating ample space, try reinstalling the Mac upgrade. Otherwise, you can try other fixes.
Fix 5: Switch & Try Different WiFi Network
Sometimes your WiFi connection not working on your Mac to Download new Software updates. Because Network blocked Apple’s server connection, usually Office and Public Place, users can’t use the Network for Download activity like this because of Slow down connectivity to other users.
In such cases, use a different Private home or own office wifi network. Also, make sure VPN Is turned off. Explained in the next solution.
Fix 6: Turn off VPN on Mac
VPN loses privacy and Blocks data packets in the Proxy networks. That’s why your Mac cannot request to the Apple server about the new software update. So your Mac screen will always be stuck on Checking for updates. So the solution is to turn off VPN completely on Mac or try after uninstalling.
Open the VPN software on Mac and Disconnect the option. Or Get a complete guide on Turning off or Removing VPN from Mac.
Alternatively, If you need to Activate VPN On your Mac, then Whitelist apple.com and check again.
Fix 7: Use Safe Mode
There might be a faulty element or an incompatible third-party program if your system has faced the issue for some time. Here, using your Mac in safe mode can be helpful.
With Safe Mode, you can remove any barriers interfering with the installation. But the Procedure is different on M1 and Intel Mac, let’s follow accordingly.
The following steps will help you:
Steps for Apple Silicon M1/M2 chip Mac user,
- Shut down your Mac and Wait for 10 seconds.
- Next, Press and Hold on the power button until you see the Startup volumes and Options on the screen. Select Startup volume.
- Now, Press and Hold on Shift Key from the keyboard > Continue in Safe Mode.

- That’s it. Log in to your Mac, after the macOS Recovery screen. and Check the issue is fixed now.
- So, Download and update Mac in safe mode. and Exit safe mode on the next mac restart.
Steps for Intel Mac users,
- First, shut down your Mac usually.
- Then, hold down the Shift key while rebooting your Mac.
- The Safe Mode for macOS will launch in a few seconds.
You can then attempt to run the macOS update normally, hoping that it will go smoothly this time.
Fix 8: Disabling FileVault
It is a privacy tool that helps prevent unwanted exposure to your system’s start-up drive data. But, it can sometimes cause Apple installations to malfunction because it gets caught trying to secure the new operating version in a circle.
To disable FileVault, follow these steps:
Steps for macOS Ventura:-
- Go to the Apple Logo > System Settings.
- Next, Scroll to Security & Privacy > Scroll to the last “FileVault“.
- Enter your Mac login password and Again Turn Off Encryption.
- That’s it.
macOS Monterey:-
- To begin, go to the Apple Logo.
- Then, select System Preferences.
- In the System Preferences window, locate the Security and Privacy icon. Double-click on it to open it.
- You will see four tabs at the top in the Security and Privacy window. Go to the FileVault tab.
- Click the Turn Off FileVault button.
Soon you’ll be able to update your Mac. If you want the added security of full-disk encryption, you may try re-enabling FileVault after finishing the upgrade.
If you can still face the issue, we have other methods that you can try.
Fix 9: Fix the NVRAM Bug
Skip this Solution for M1 Mac, Only Restart Mac is required.
NVRAM is a component of your Mac’s RAM that stores some of your Mac’s settings. If it has a flaw, it may cause a range of mistakes and unforeseen problems, such as the one we are discussing. Often, restarting the NVRAM will resolve any issues with it.
Here’s how to resolve the NVRAM issue:
- Start by turning your Mac off.
- After the computer has shut down, hit the Power Button, restarting it.
- Before it boots, holds down the Option, Command, P, and R keys simultaneously.
- Hold the keys in this position for around 20 seconds, or until your Mac restarts.
- If your Mac makes a sound when it starts up, you may press and hold the four keys until the sound stops.
By the time your Mac restarts, the NVRAM should’ve adequately been refreshed, and you will not be encountering the troubles that brought you here in the first place.
Fix 10: Delete the Downloaded macOS File and Re-download
Apple’s all devices download the new Software update after downloading a copy of the software update in System storage. on Mac, we can download the macOS dmg file on Mac’s applications folder.
Sometimes outdated and Buggy Software update files won’t allow replacing the new Software Update file. at that time, Download a fresh and new copy of macOS On your Mac after deleting the old file.
1→ Open Finder on Mac > Applications from the finder sidebar or Go > Applications.
2→ Find the MacOS software update file, right-click on it > Move to Bin.

3→ Restart your Mac, and check again for a software update. Go to the Apple logo on the top menu bar> System Settings… > General > Software Update > Download and Install.
That’s it.
Fix 11: Reinstall macOS
Something is stuck, and you won’t be able to get a new macOS update on your Mac. Then I recommend reinstalling macOS On your Mac without Data loss and Settings. Still, I recommend Backup your Mac data in Time Machine. and Reinstalling macOS In Recovery mode.
Endnote
The “Checking for updates…” problem is critical. We’ve shown you how to resolve this problem on your Mac. Hopefully, the actions outlined above will resolve your issue. If not, we’ve written on comparable topics before.

