
I recently updated my MacBook Pro to macOS Tahoe 26, and everything looked fresh and exciting—until I noticed one annoying problem: my Mac started booting up painfully slow. What used to take seconds now feels like a full minute just to reach the desktop.
If you’ve also upgraded to macOS Tahoe and your Mac is dragging its feet at startup, you’re not alone. The good news is that it’s usually not a hardware issue; a few simple tweaks can make your Mac boot up as fast as it did before the update.
In this guide, I’ll share 14 proven tips to fix slow boot-up on Mac Tahoe—the same steps I used to speed up my own MacBook Pro. Whether you’re dealing with startup items, storage bloat, or background processes, these tips can help you reclaim that snappy startup your Mac deserves.
Speed Up Your Mac Running on the latest macOS
Fix 1: Close System Consuming Process: Keep Eye on it
Mac is full of assets, few are useful and some are just eating the power and slowing down the Mac for no reason. However, there is a way through which you can find the resource-hungry process and shut them down to speed up Ventura.
- Open the Application folder
- Utilities
- Activity Monitor or directly make a spotlight search for Activity Monitor.
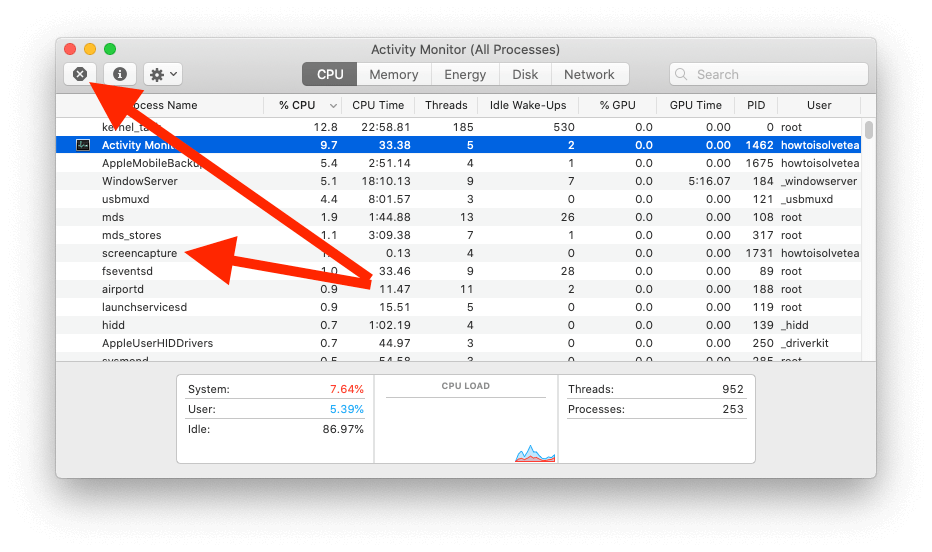
The Activity Monitor is mainly divided into CPU, Memory, Disk, Energy, and Network. But our primary goal is to speed up macOS Ventura or any Mac, so click on the CPU tab. The CPU tab will show, which processes or software are eating most of the memory. Multiple factors are used to show memory usage by applications, so check under % CPU, which app is consuming the processor of Mac.
Click on the process to select and close it by clicking on X, which is on the upper-left side of the screen.
Fix 2: Remove Startup Programs
Startup programs are responsible for the slow performance of the Mac, right when you press the Power button to boot the system. And if the system starts slowly, it will definitely take time to launch applications like Chrome, Safari, or anything. How to speed up MacBook after macOS Ventura Update? The answer is, to remove startup programs- once you do so, the Mac will start fast, and eventually, other applications will perform better.
Get here – How to Remove Startup Programs on macOS
On MacOS Ventura, Sonoma
Step 1: Go to the Apple Logo from the top menu > System Settings.
Step 2: Next, Select General > Login Items.

Step 3: Remove Login Items from the list, Select App name > Click on (-) to Remove from the list.

On MacOS Monterey and earlier,
Step 1: Go to Apple Logo > Click System Preferences.
Step 2: Users & Groups > Select User > under Login Items Tab and Select the programs you don’t need during startup and click (-).

Fix 3: Disable Visual Effects
Visual Effects are pretty good on iMac and MacBook, but they really affect the system’s performance. So turn off Visual Effects on your Mac and improve the lousy performance of your Mac in a second.
On macOS Ventura, Sonoma,
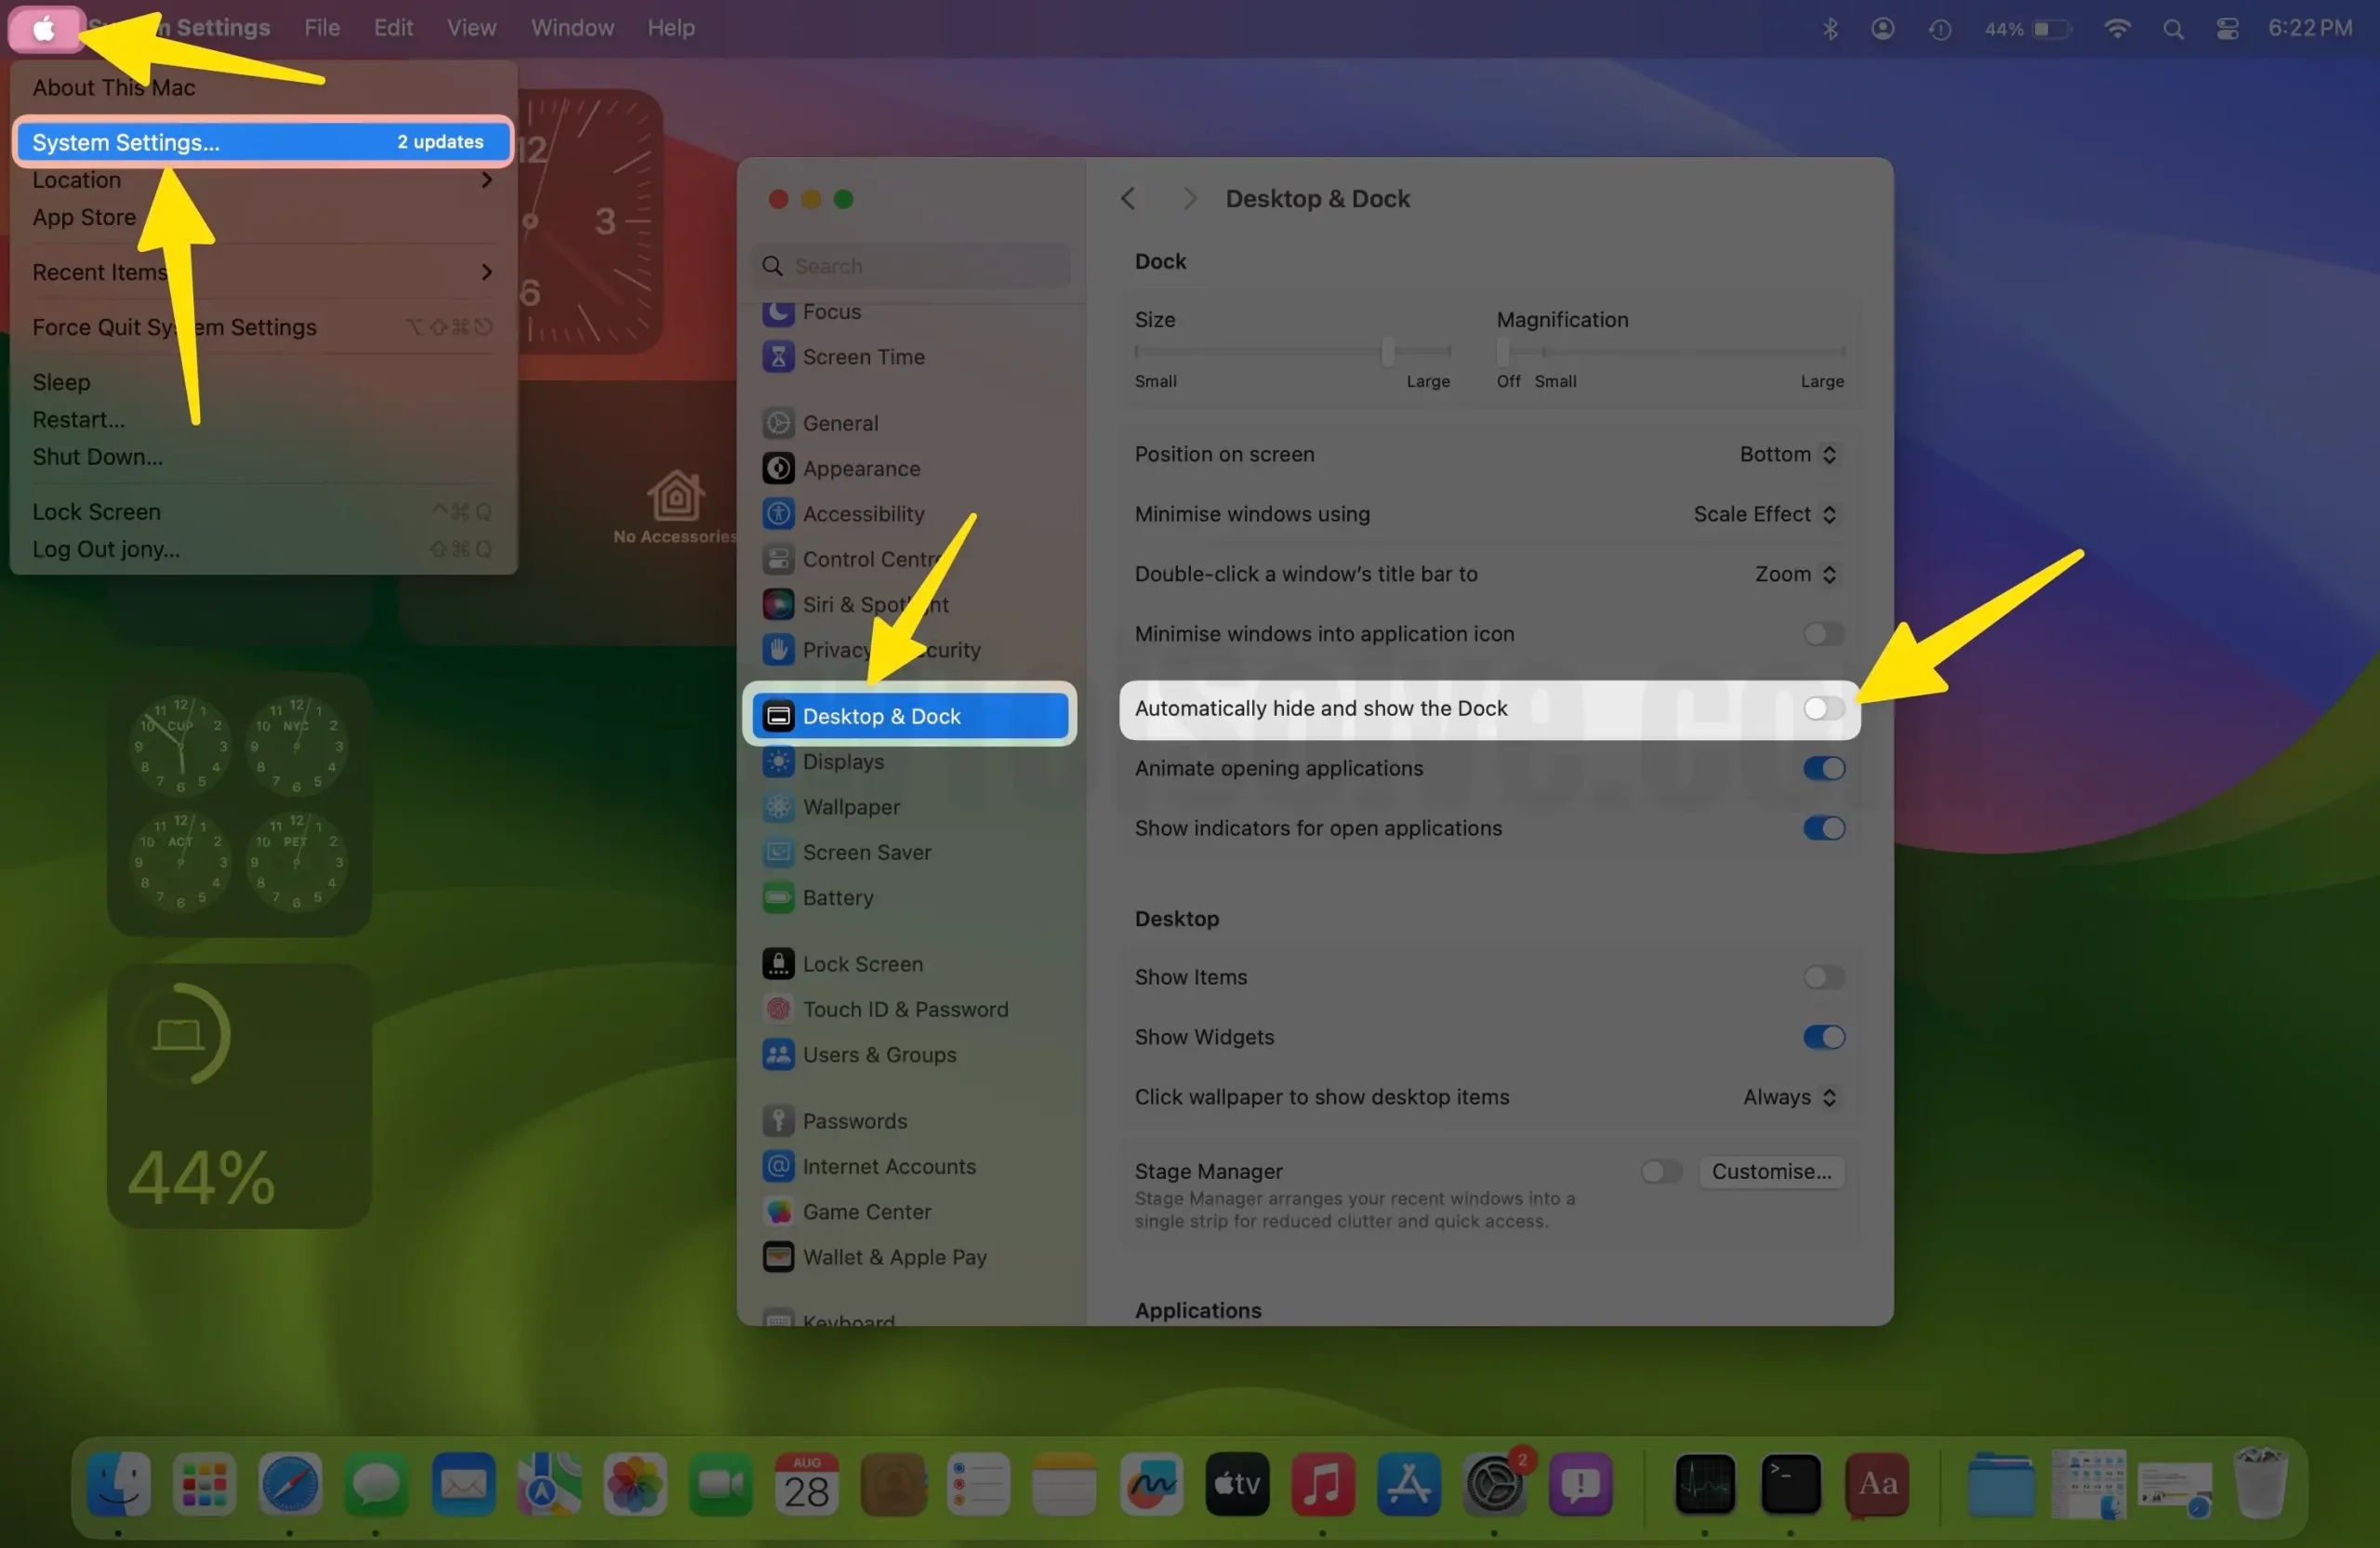
Step 1: Go to the Apple Logo () from the top menu > System Settings.
Step 2: Next, Select Desktop & Dock > Disable ‘Automatically hide and show the Dock‘, ‘Animate opening applications‘ and Keep ‘Minimize windows using‘ to Scale Effect.
On macOS Monterey and Earlier,
- Apple Logo() from the top menu > System Preferences > Dock.
- Uncheck Automatically hide and show Dock as well as Animate opening applications.
- Also, replace the Genie effect with the Scale effect.

Now, all the unhelpful visual effects will not appear on your Mac.
Fix 4: Delete Browser Extensions
Before removing extra extensions from different browsers, I would like to suggest you delete the browser if it is unused. Some people keep Google Chrome and Firefox, and they have Safari by default. Therefore, if you are not using any one of them, delete the third-party browsers to speed up your Mac. In addition, do you know how many extensions are installed on your Mac’s browser? These add-ons continuously grab a more significant part of the MacBook’s processor and slow down. If you feel any extensions are useless, remove them from the browser.

How to Remove Extension from Mac
For Safari,
- Main Menu Safari > Safari Extensions.
For Chrome,
- Menu > More Tools > Extensions.
For Firefox,
- Tools > Add-ons.
How to Delete Browser from Mac
- Launch “Finder” on Mac.
- Click on “Applications” from the left-hand sidebar. or (Shift + Command + A).
- Drag the Browser application to the “Trash”.
Fix 5: Re-index Spotlight
Mac suddenly performed very slowly after the update, just after updating Mac. If you are facing problems with the speed of Mac, then the spotlight is probably stuck while indexing. The spotlight indexing takes some time, but if you feel Mac is consuming more than enough time, then you should re-index the spotlight. Here’s how to re-index spotlight search on MacBook/Mac,
- Go to Apple Logo and click “System Settings/Preferences”.
- Click “Siri & Spotlight”.
- Select the “Spotlight Privacy…” tab.

- Drag/Put the Hard Drive into the Privacy tab from Finder.
- After adding Hard Drive to the Privacy tab, click on (-).
- This will re-index the spotlight.

Wait for a while, till the spotlight gets indexed.
Fix 6: Manage Desktop Applications
Reducing desktop cluttering could really boost Mac’s performance and speed up macOS. And so with the macOS 13 Ventura update, Apple has introduced a new feature called Desktop Stacks to manage the desktop applications, folders, and files. Or if you don’t have macOS Ventura, merely delete the applications/files or move them to other locations.

Fix 7: Clear Cache on Mac
I assumed you are aware of the word Cache. A cache is usually meant to speed up the processes, but if the cache files exceed, it gradually decreases the system’s performance. There are three types of cache: System Cache, Browser Cache, and User Cache. We do not recommend deleting the App Cache as it may corrupt the application.
How to Clear User Cache on Mac
Step #1: Launch “Finder”.
Step #2: Click on “Go” and choose “Go to Folder”.
Step #3: Enter the path, ~/Library/Caches, and proceed.
Step #4: Open every folder and delete the cache files.
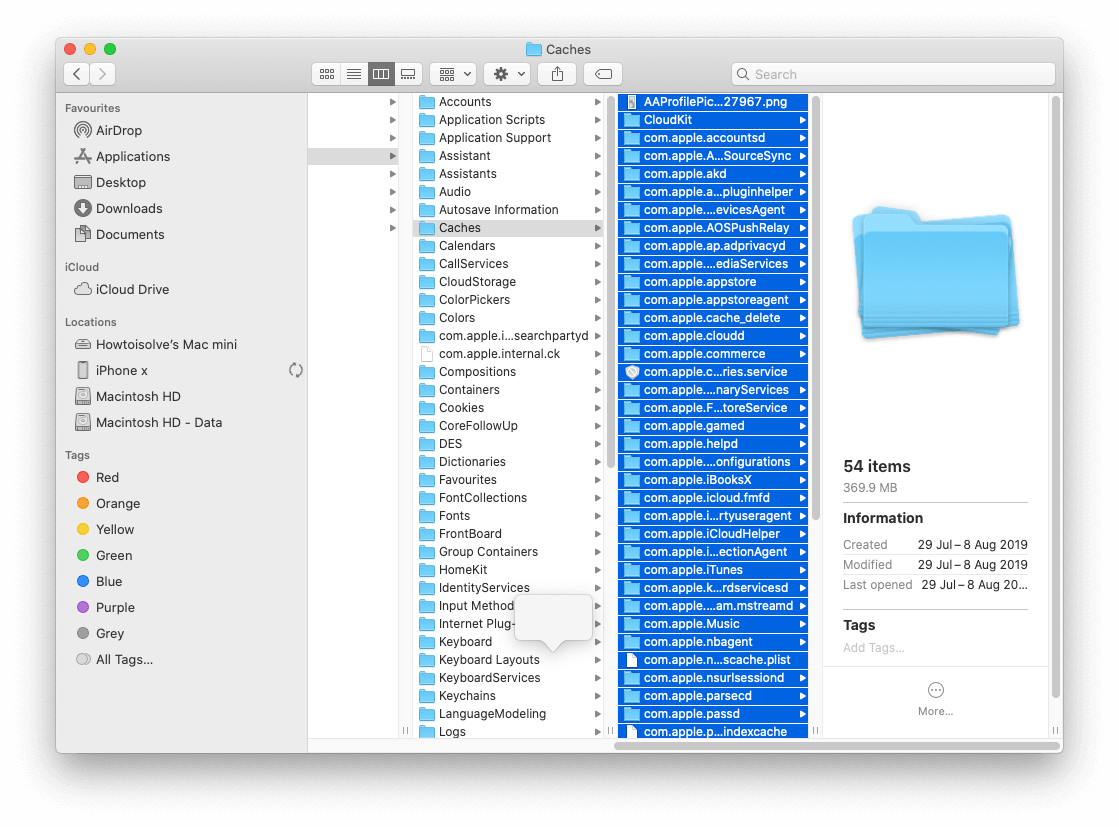
Note: Don’t delete the folder, just open each folder and delete the files.
Once you have emptied all the folders, type the /Library/Caches path by following the above steps and clean these folders too.
Make sure to Empty Trash after clearing the cache files.
How to Clear Browser Cache on Mac
Browser cache could really free up junk files. Most of the junk files are stored in the Browser as we are always lurking on the browser. But clearing the browser cache has one downside: it will also remove history and other information for privacy factors.
For Safari,
- Launch Safari > Preferences > Advanced tab > Check the Show Develop menu in the menu bar > Now, Go to Develop Menu > Empty Caches. Read this to Reset Safari to Default on Mac.

For Chrome,
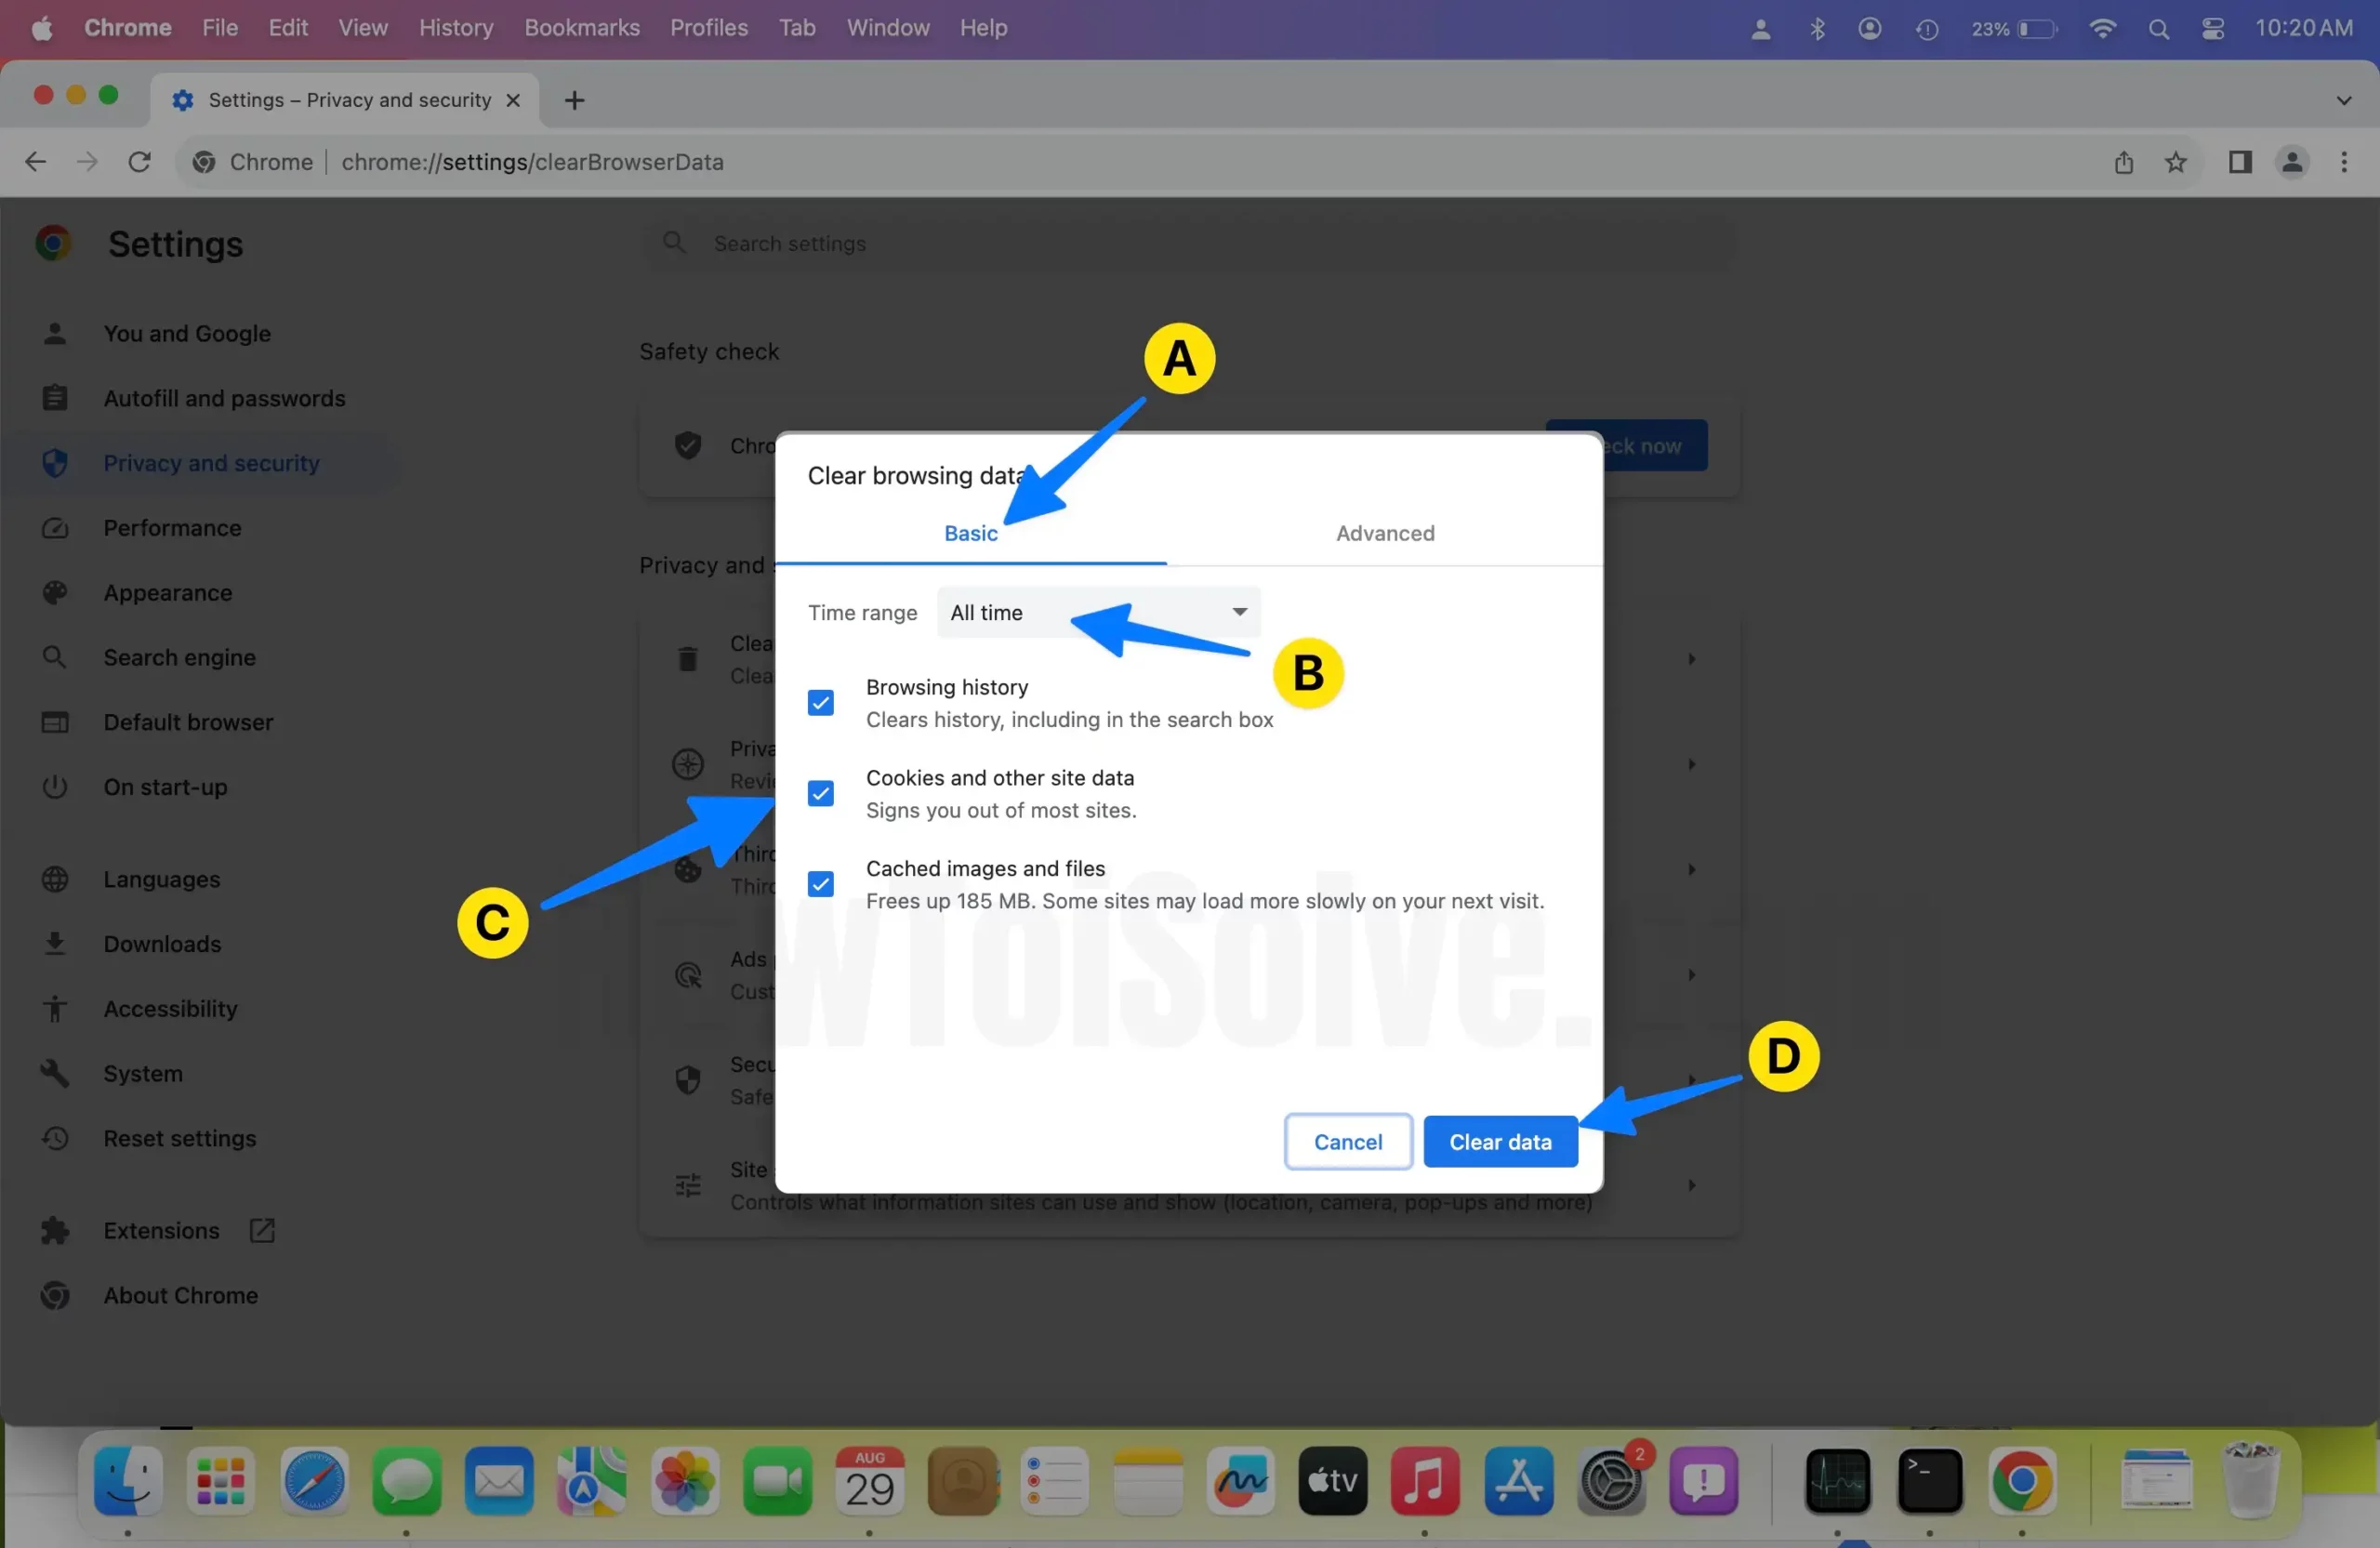
Step 1: Open Chrome Settings on Mac. From the top menu, Chrome > Settings.
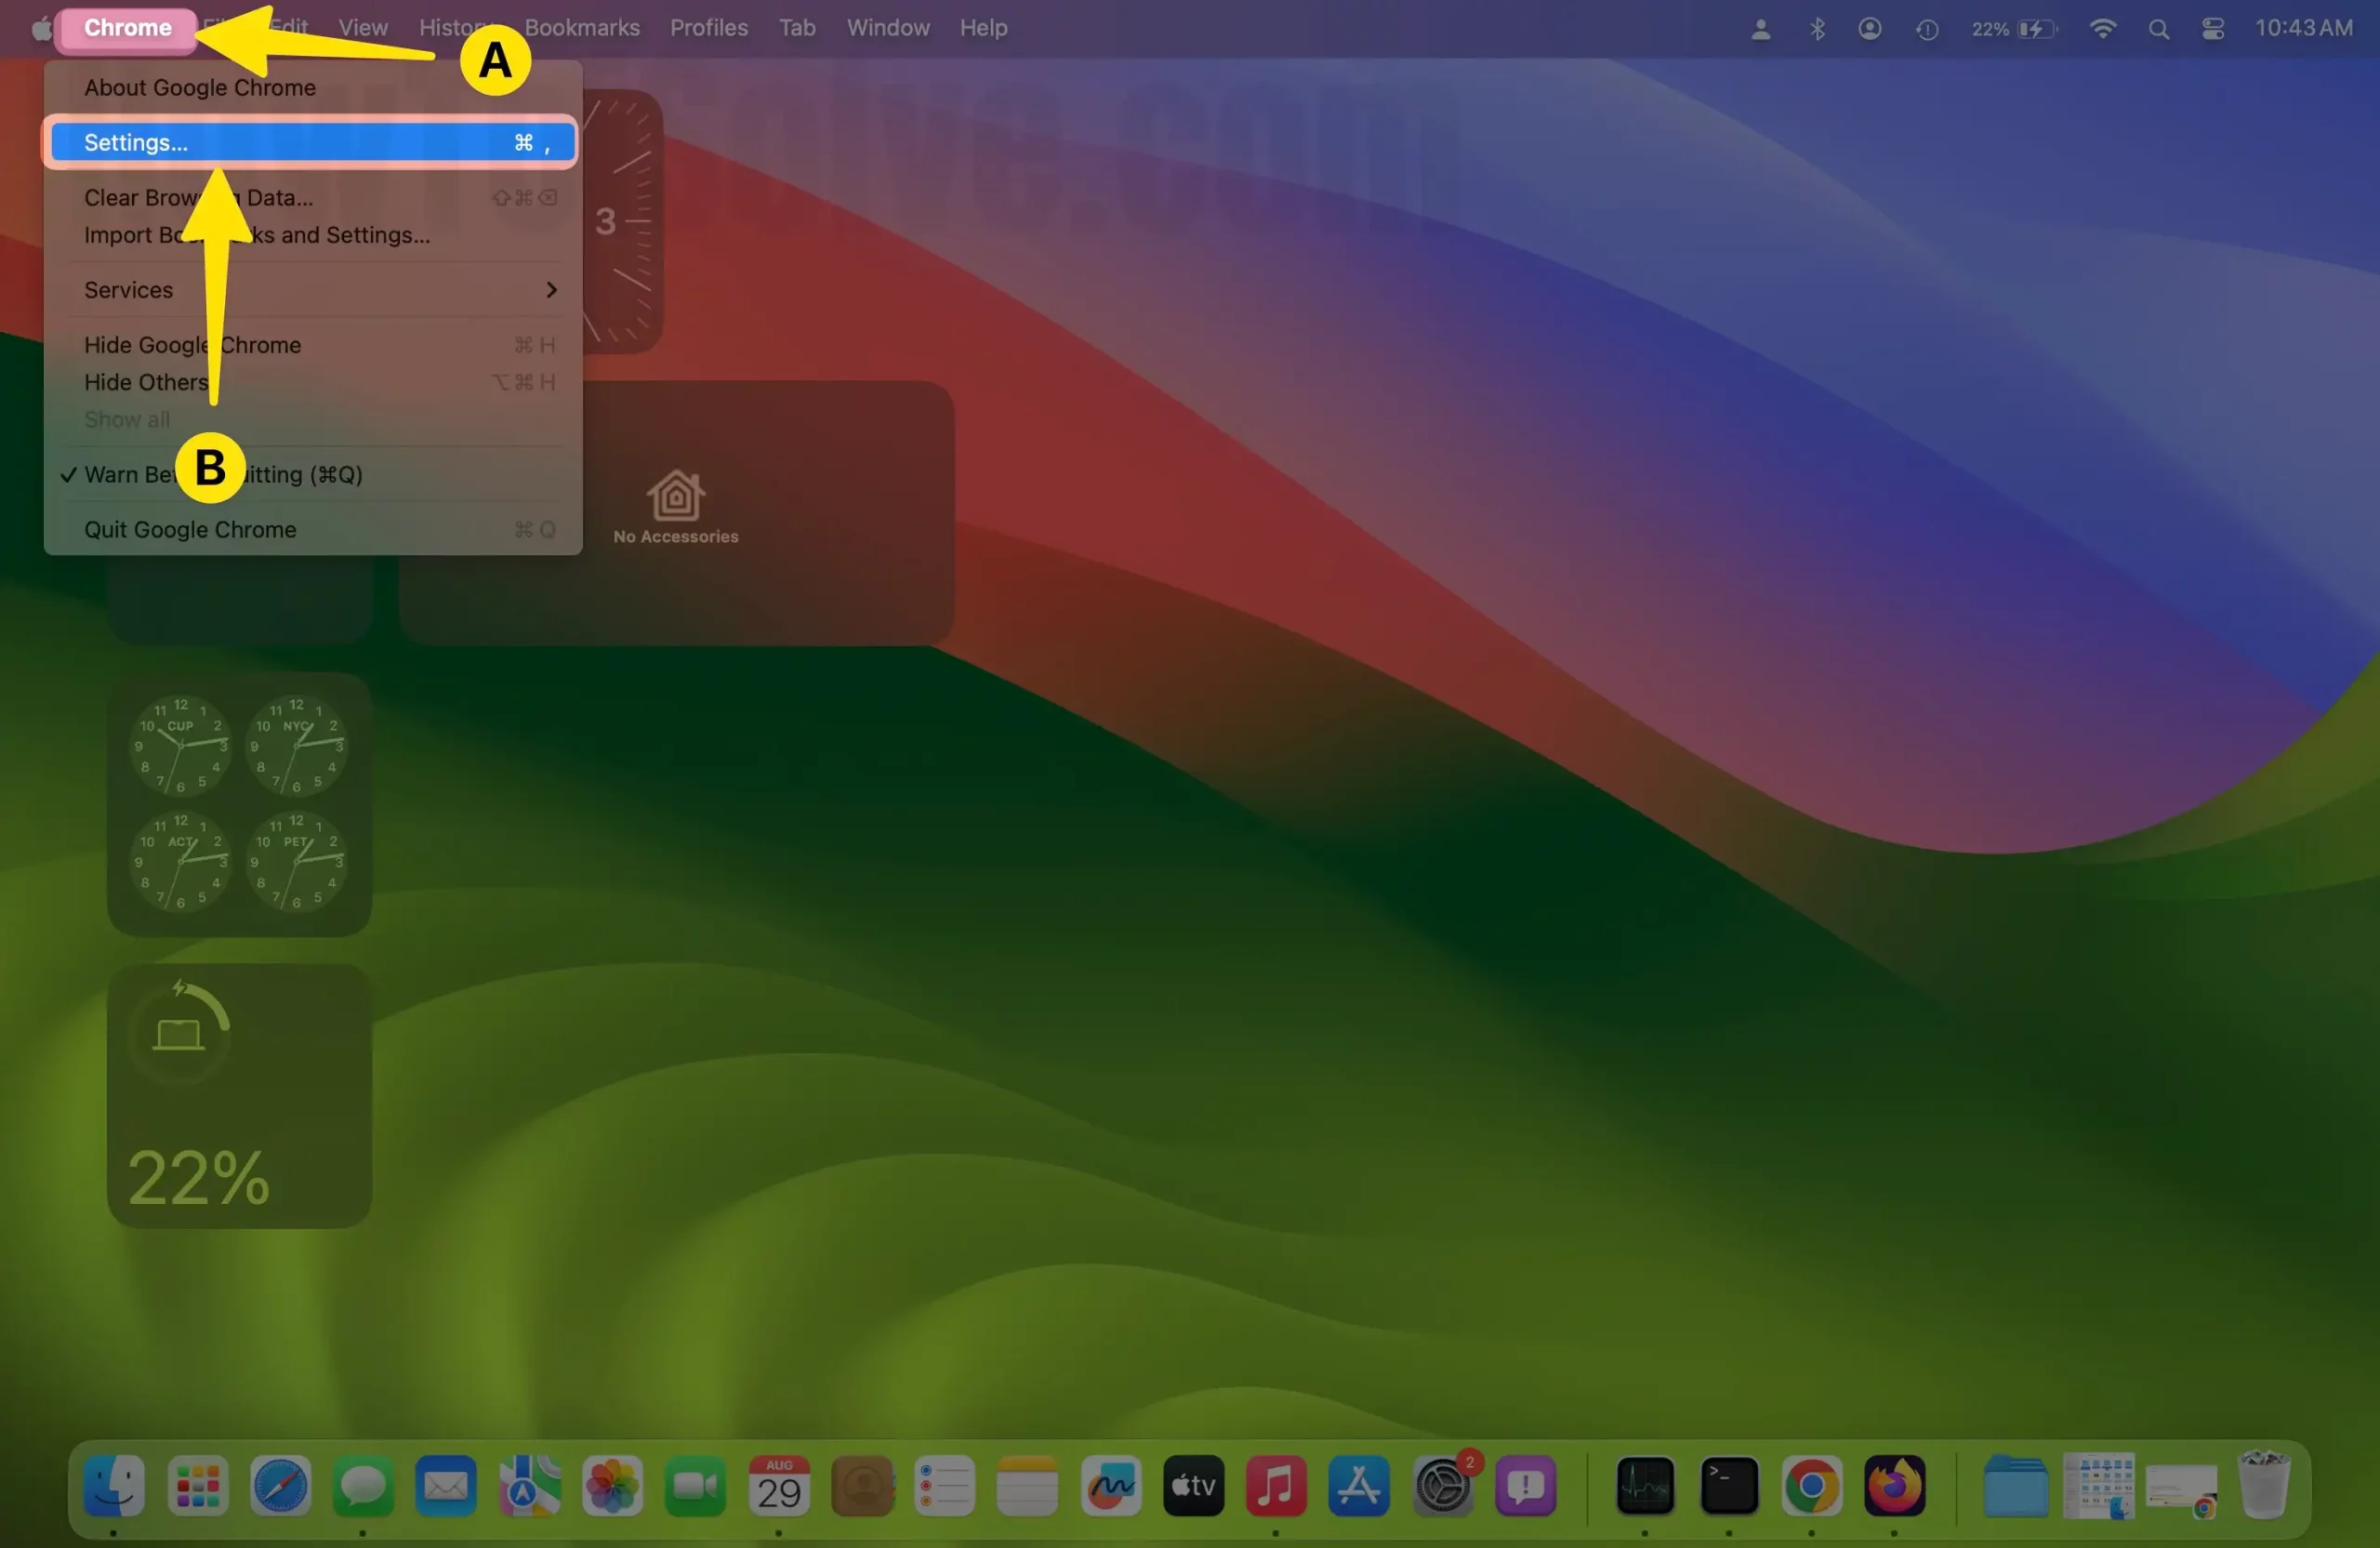
Step 2: Select Privacy & Security > Clear browsing data.
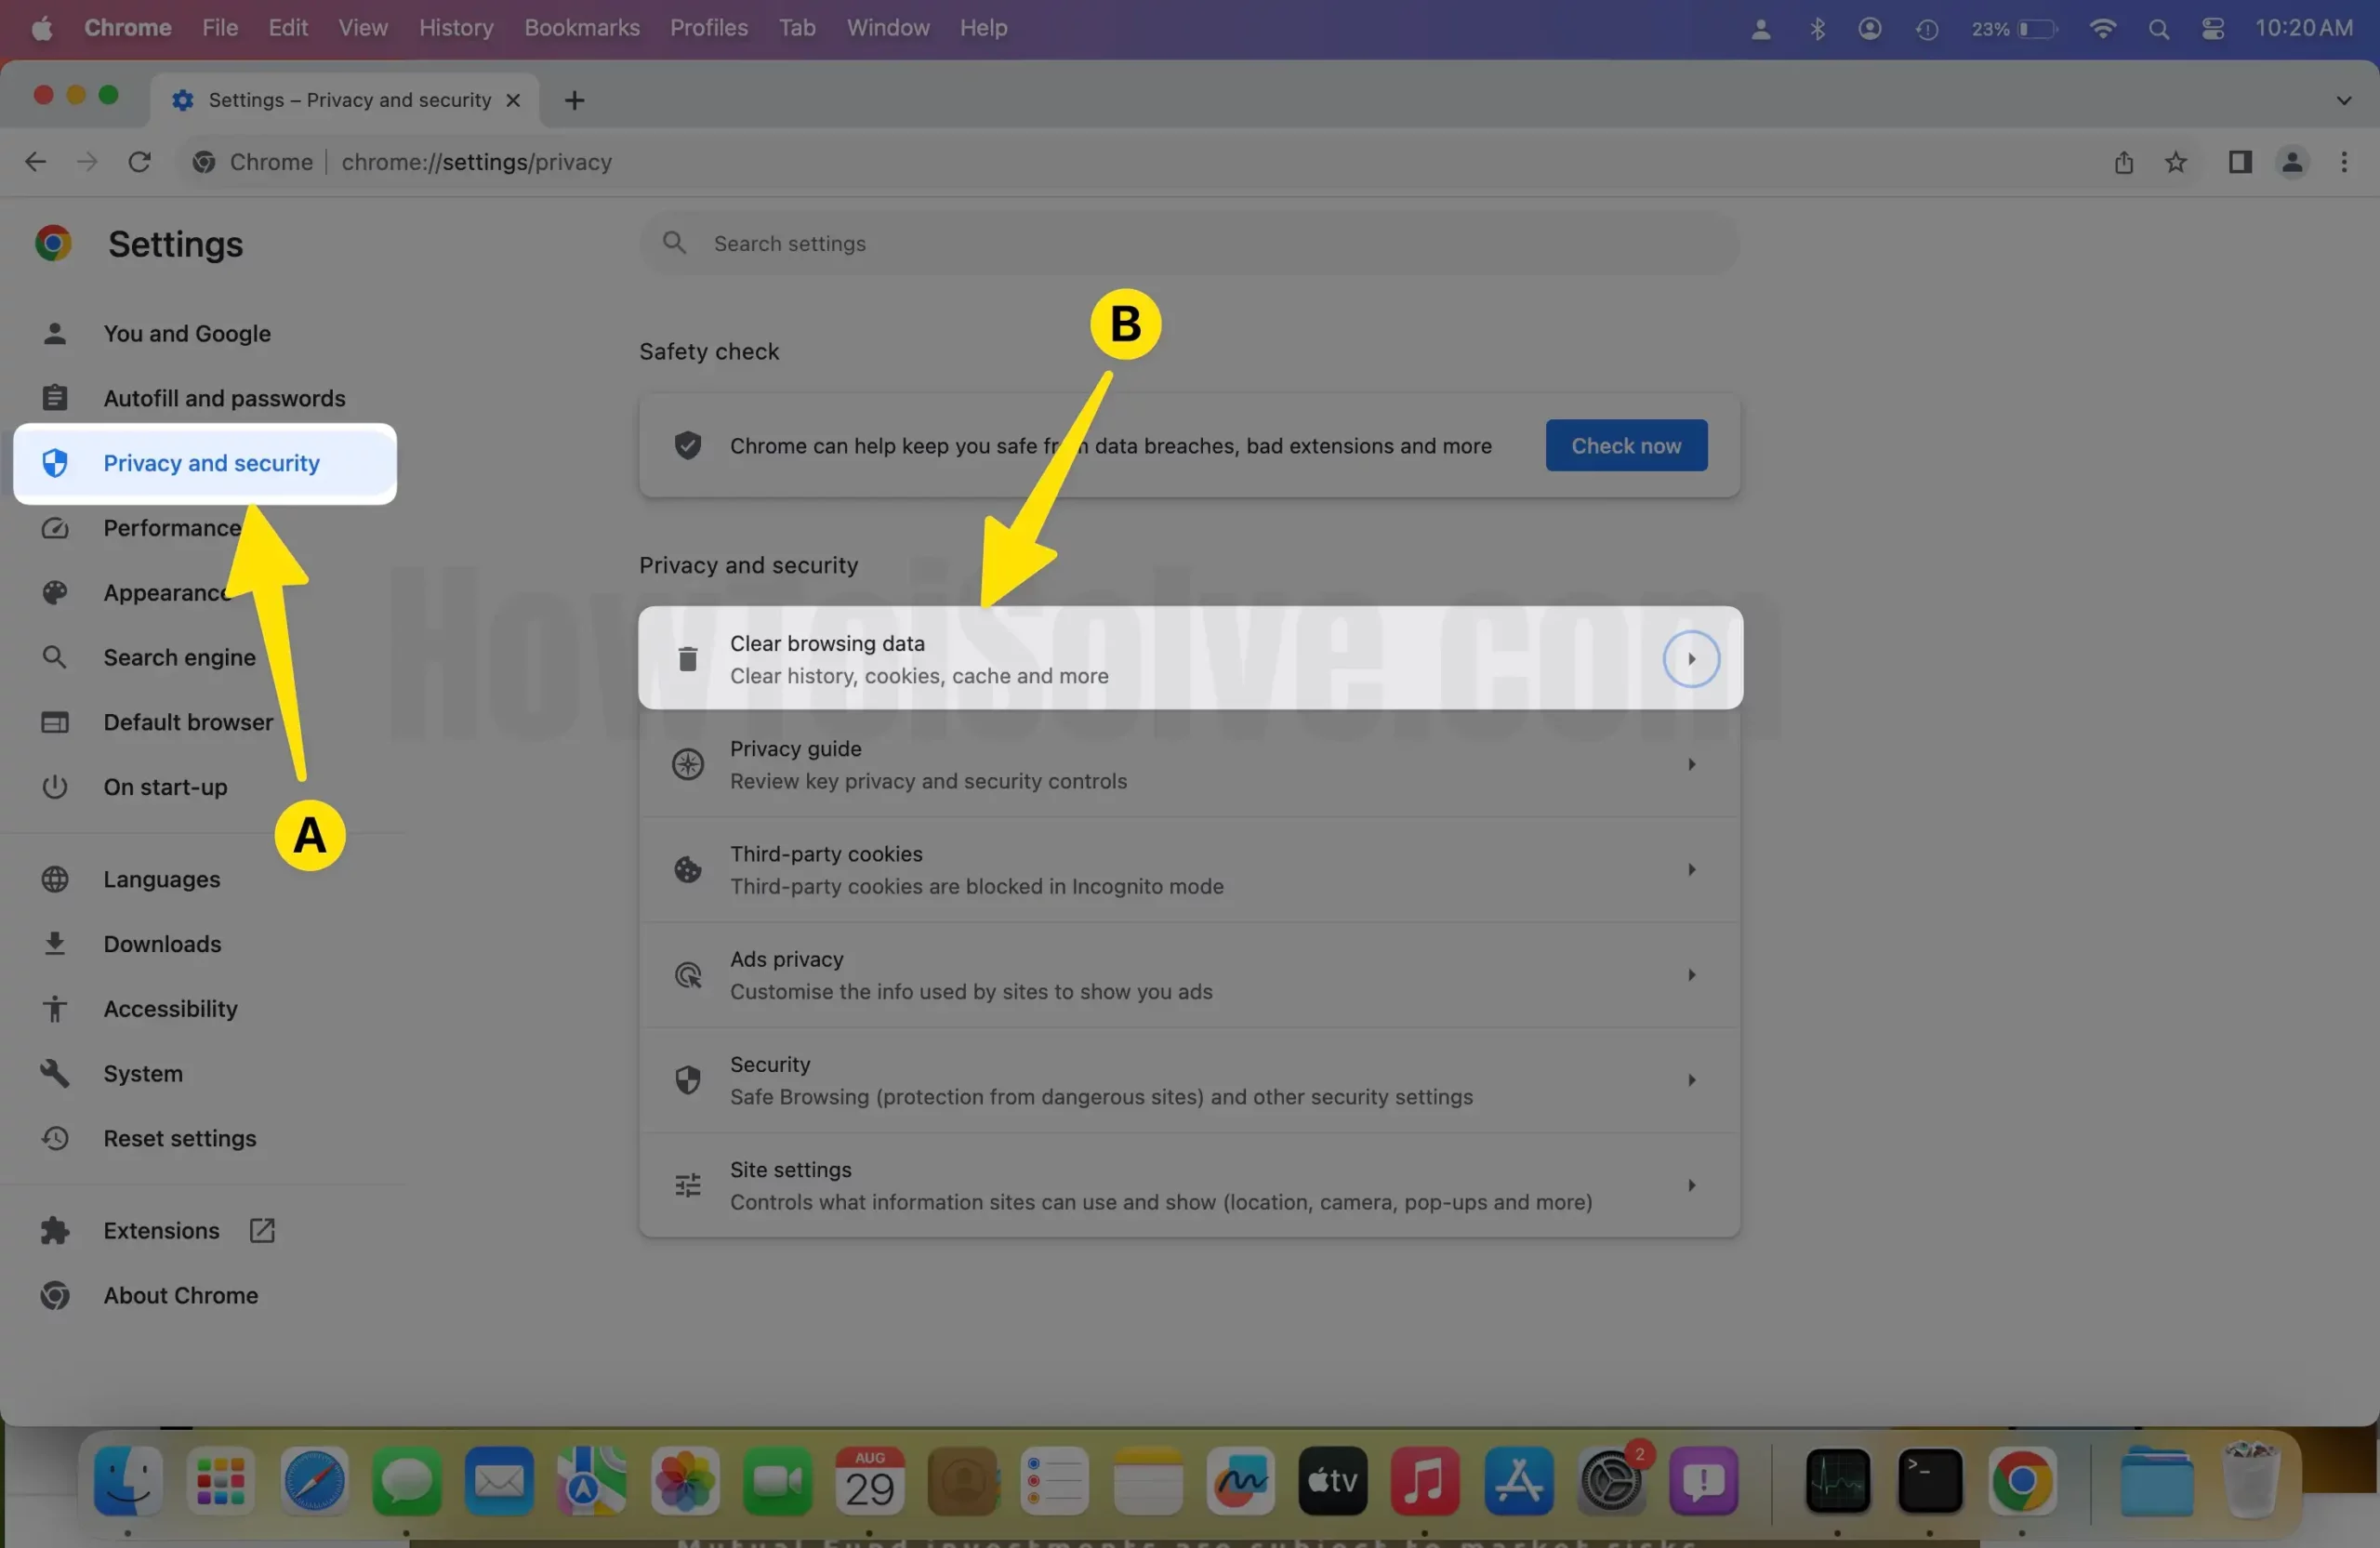
Step 3: Select Types of Data to Clear and Clear Data.
For Firefox,
Step 1: Open Firefox on Mac, from the top menu Firefox > Settings.

Step 2: Select “Privacy & Security” > “Clear Data…”.

Step 3: Clear All Data.

8. Use Low Power Mode
If you have updated the Mac to macOS Ventura or a later version, then Low Power Mode could be useful for you. Low Power Mode on Mac disables the additional processing programs that won’t need actually. While the Low Power Mode is enabled, it disables background updates, visual effects, reduces screen brightness, etc. Ultimately, it will optimize the performance by reducing the power consumption and relatively boosting the performance.
Supported Models: Available on MacBook (Early 2016 and later) and MacBook Pro (Early 2016 and later).
macOS Ventura & Sonoma,
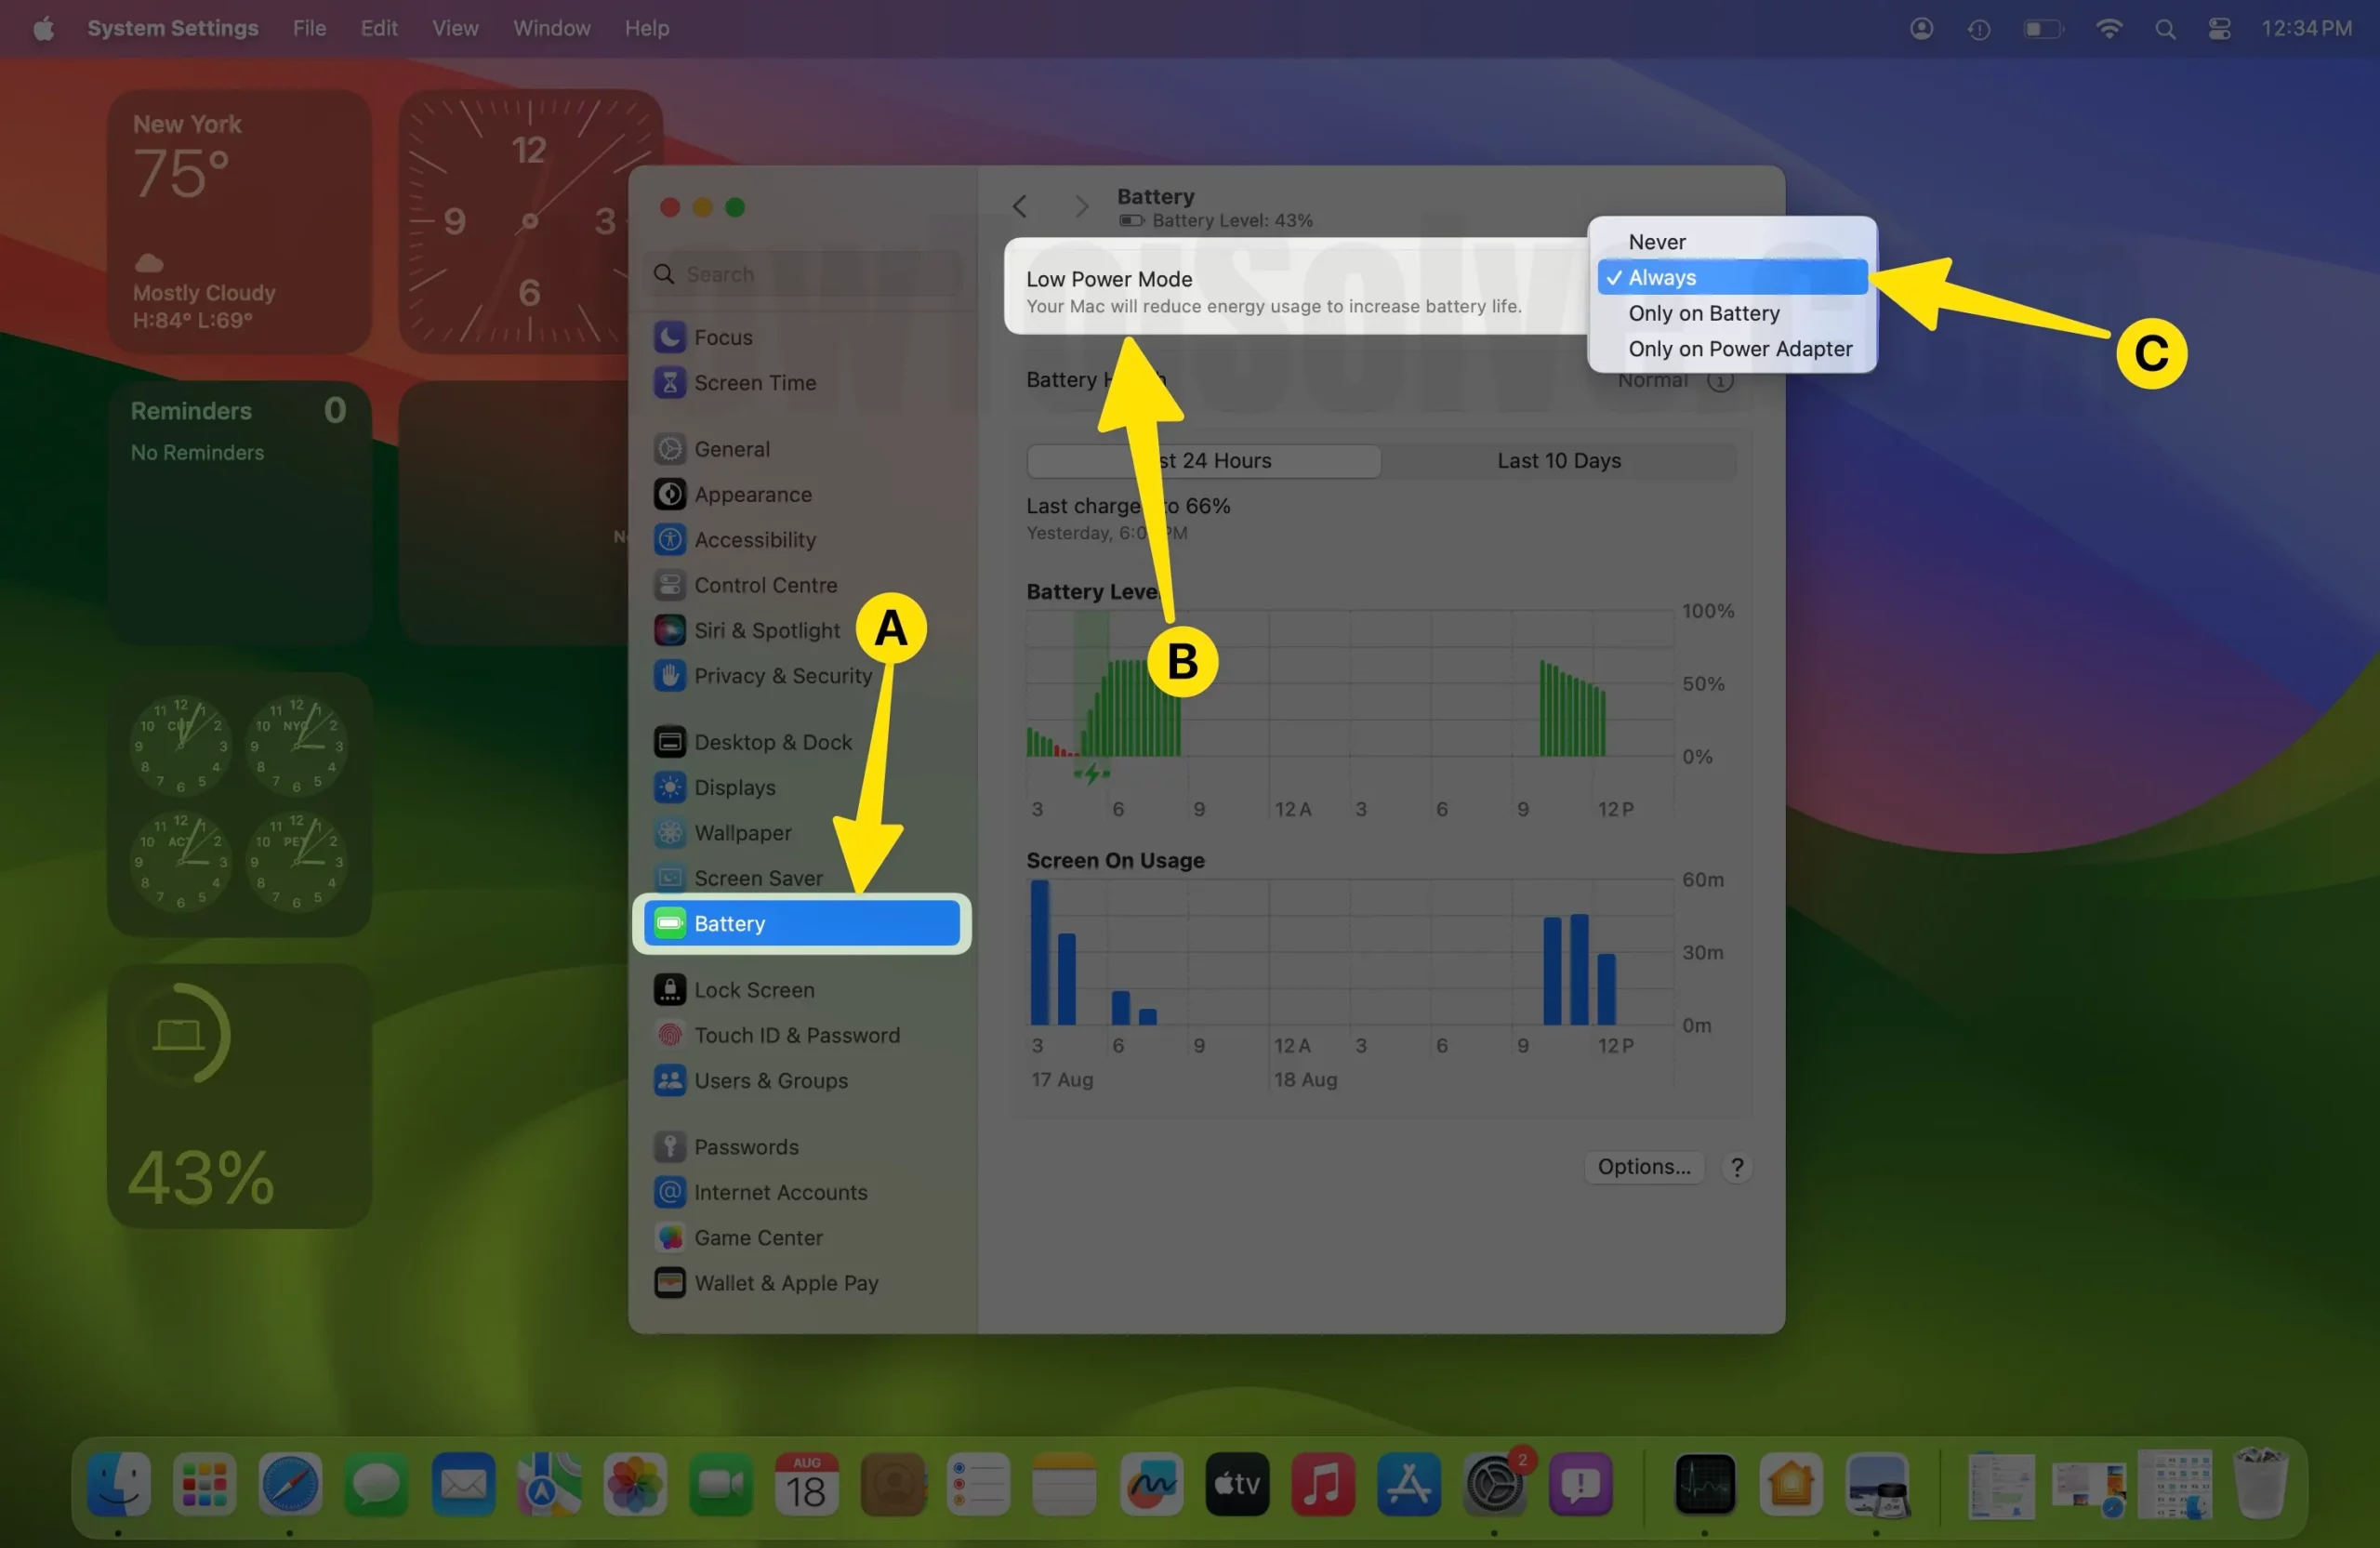
Step 1: Go to the Apple Logo from the top menu > System Settings.
Step 2: Select Battery from the left side > Enable Low Power Mode Always.
MacOS Monterey & Earlier,
Step 1: Click on the Apple Logo () menu. Select System Preferences.
Step 2: Click on Battery, Select Checkmark for Low Power Mode.

Again, select the Battery option from the sidebar.
Turn On Low Power Mode.
Fix 9: Delete Unused Applications
Another way to speed up your Mac or MacBook is to delete all the unused applications you are not using currently or don’t use anymore. It’s better to remove unwanted applications from the Mac to improve the system’s performance in every way. However, dragging and dropping the application to Trash isn’t enough to free up space on Mac. Here’s the complete guide to delete the app in macOS.
Free Up RAM
RAM plays a very important role in the performance of the macOS or any device. Once you free up RAM using the Terminal app on Mac, it may be restored at the same speed. So when any particular app starts to freeze or gets stuck in between then you should clean up RAM.
Step #1: Launch “Terminal”.
Step #2: Type the following command, sudo purge, and hit enter.
Step #3: Enter the System Password to proceed.

Fix 10: Reinstall macOS Without Erase Drive or After Erase Drive
We can perform the Reinstall MacOS in Two ways, First is only install the New MacOS that your Mac is running on. And the second way is to Erase Data before installing and Installing a new copy of MacOS on Mac. After that, we can restore backup data to Mac if we have taken in a time machine and If we wish.
I recommend this because I had massive success with the second option. Finally, I love my Mac to use like my Windows OS. I guess the New MacOS Ventura is hanging while I use it on my Mac Mini 2014 Model. Also, the startup screen will take too much time, and sometimes it reboots itself and crashes on the app launch.
A faulty macOS update could affect the speed of Mac. To avoid this situation, reinstall the macOS on your MacBook or Mac. Here’s how it can be done on your M1 or Intel Mac,
For M1 Mac:-
Step #1: Shut down your Mac. Wait for 20 seconds.
Step #2: Now, Press and Hold the Power Button [Touch ID] until your Mac shows the Startup logo and then Startup Volume with Options. Select Options > In MacOS Recovery Screen,

Step #3: Select Reinstall macOS and Continue. Follow the on-screen process to complete the installation.
For Intel Mac:-
Step #1: Reboot Mac.
Step #2: Hold the Command+R when the Mac turns on.
Step #3: Select “Reinstall macOS”.
Step #4: Click “Continue”.
Step #5: Choose the Hard Drive.
Step #6: Click “Install” and wait for a while until Mac reinstalls the OS.
Note: Do not close the MacBook or don’t let Mac sleep otherwise the installation will pause and won’t complete.
Step #7: Hold the Command+Q once the installation gets completed.
Step #8: Shut down the Mac.

Perform Clean Install on Mac
The clean install resembles wiping out the data and installing the macOS again. Whereas in reinstalling, the data stays in the system. So, if you have decided to perform a clean install on Mac, consider the flow to clean install macOS on Mac. Full tutorial on a clean install on Mac.
- Step 1: Backup your Mac Before Erase Drive
Step #1: “Launch Time Machine”.
Step #2: Click on “Select Disk”.
Step #3: Select where do you want to take backup.
Step #4: Turn on “Time Machine”.
Step #5: Click on “Time Machine Arrow Clock” and then on “Backup Now” at the upper part of the screen.
- Step 2: Erase Mac Drive
Step #1: Restart Mac.
Step #2: Press and hold the Command+R when the Mac restarts.
Step #3: Click on “Disk Utility” and “Continue”.
Step #4: Choose the “Startup Disk”.
Step #5: Then, click on the “Erase” tab at the top of the screen.
Step #6: From the Format-List, select “Mac OS Extended (Journaled)” if Mac is running on HFS+, and for APFS, select “APFS” format.
Step #7: Choose “GUID Partition Map”, if Schema is there.
Step #8: Click “Erase”.

- Step 3: Reinstall Mac
Step #1: Click on “Reinstall macOS”.
Step #2: Click “Continue” and again “Continue”.
Step #3: Select the hard drive.
Step #4: Click “Install”.

- Restore Data from Time Machine any time
The restoring process is easy and Automatic. That we can perform this after installing a New copy of MacOS on Mac. Again Restart your Mac > Press Command + R Keys > Select Restore From Time Machine Backup on macOS utility windows show on a screen like above.
Fix 11: Reset SMC & PRAM
M1 Apple Silicon mac users don’t have to reset SMC or PRAM. This process will be handled automatically on system Restart. To reset SMC or PRAM, Reboot your Mac once.
SMC(System Management Controller) and PRAM(Parameter RAM) are the elementary parts to fix macOS when you observe any misbehaving in hardware like the Keyboard or the MacBook shuts down itself. At last, all such problems slow down the Mac. A simple restart for such a dramatic change won’t work. You will need to reset SMC and PRAM.
Reset SMC On Apple Mac Notebook
For MacBook Air, MacBook Pro, and MacBook (Non-removable battery)
- Shut down the MacBook.
- Press and hold Shift+Control+Option keys along with the Power button for 10 seconds.
- After 10 seconds, release all the buttons.
- Now, turn up the Mac by pressing the Power button.
For MacBook Air, MacBook Pro, and MacBook (Removable battery)
- Shut down the MacBook.
- Remove the battery from the MacBook.
- Press the Power button for five seconds.
- Put back the battery and power up the MacBook.
For iMac, Mac Mini, and Mac Pro
- Shut down the Mac.
- Unplug the Power Adapter from the power source.
- Wait for 15 seconds and plug back the cord.
- Again wait for 5 seconds and then turn on the Mac.
Reset PRAM
- Shut down the Mac.
- Press the Power key to turn on Mac.
- Now, press the Command+Option+P+R until Mac restarts.
- Release all the keys when Mac restarts.
Fix 12: Update Your Mac Software
Apple regularly releases firmware updates, whether it is iPhone or Mac. So if your Mac or MacBook isn’t set with auto-update, they check for the updates manually. Here’s how you can update your Mac manually.
tip for macOS Ventura and later
Go to Apple Logo (top menubar) – System Settings – General – Software Update – check for a software update. To get more info, Read this article.
For macOS Monterey & later,
- Apple menu > System Preferences > Software Updates > Check for updates.
Earlier macOS versions,
- App Store > Update
Click on the Update buttons to update macOS.
Fix 13: Create a new user Profile
Alternatively, you can create a new user profile to speed up macOS Boot. Because when the profile got cluttered with various files and logs, it might slow down the macOS Ventura. Without deleting or knowing what the logs are, merely create a new user profile.
On MacOS Ventura & later,
Step 1: Go to the Apple Logo from the top menu > System Settings.
Step 2: Next, Select “Users & Groups” > “Add User…“.
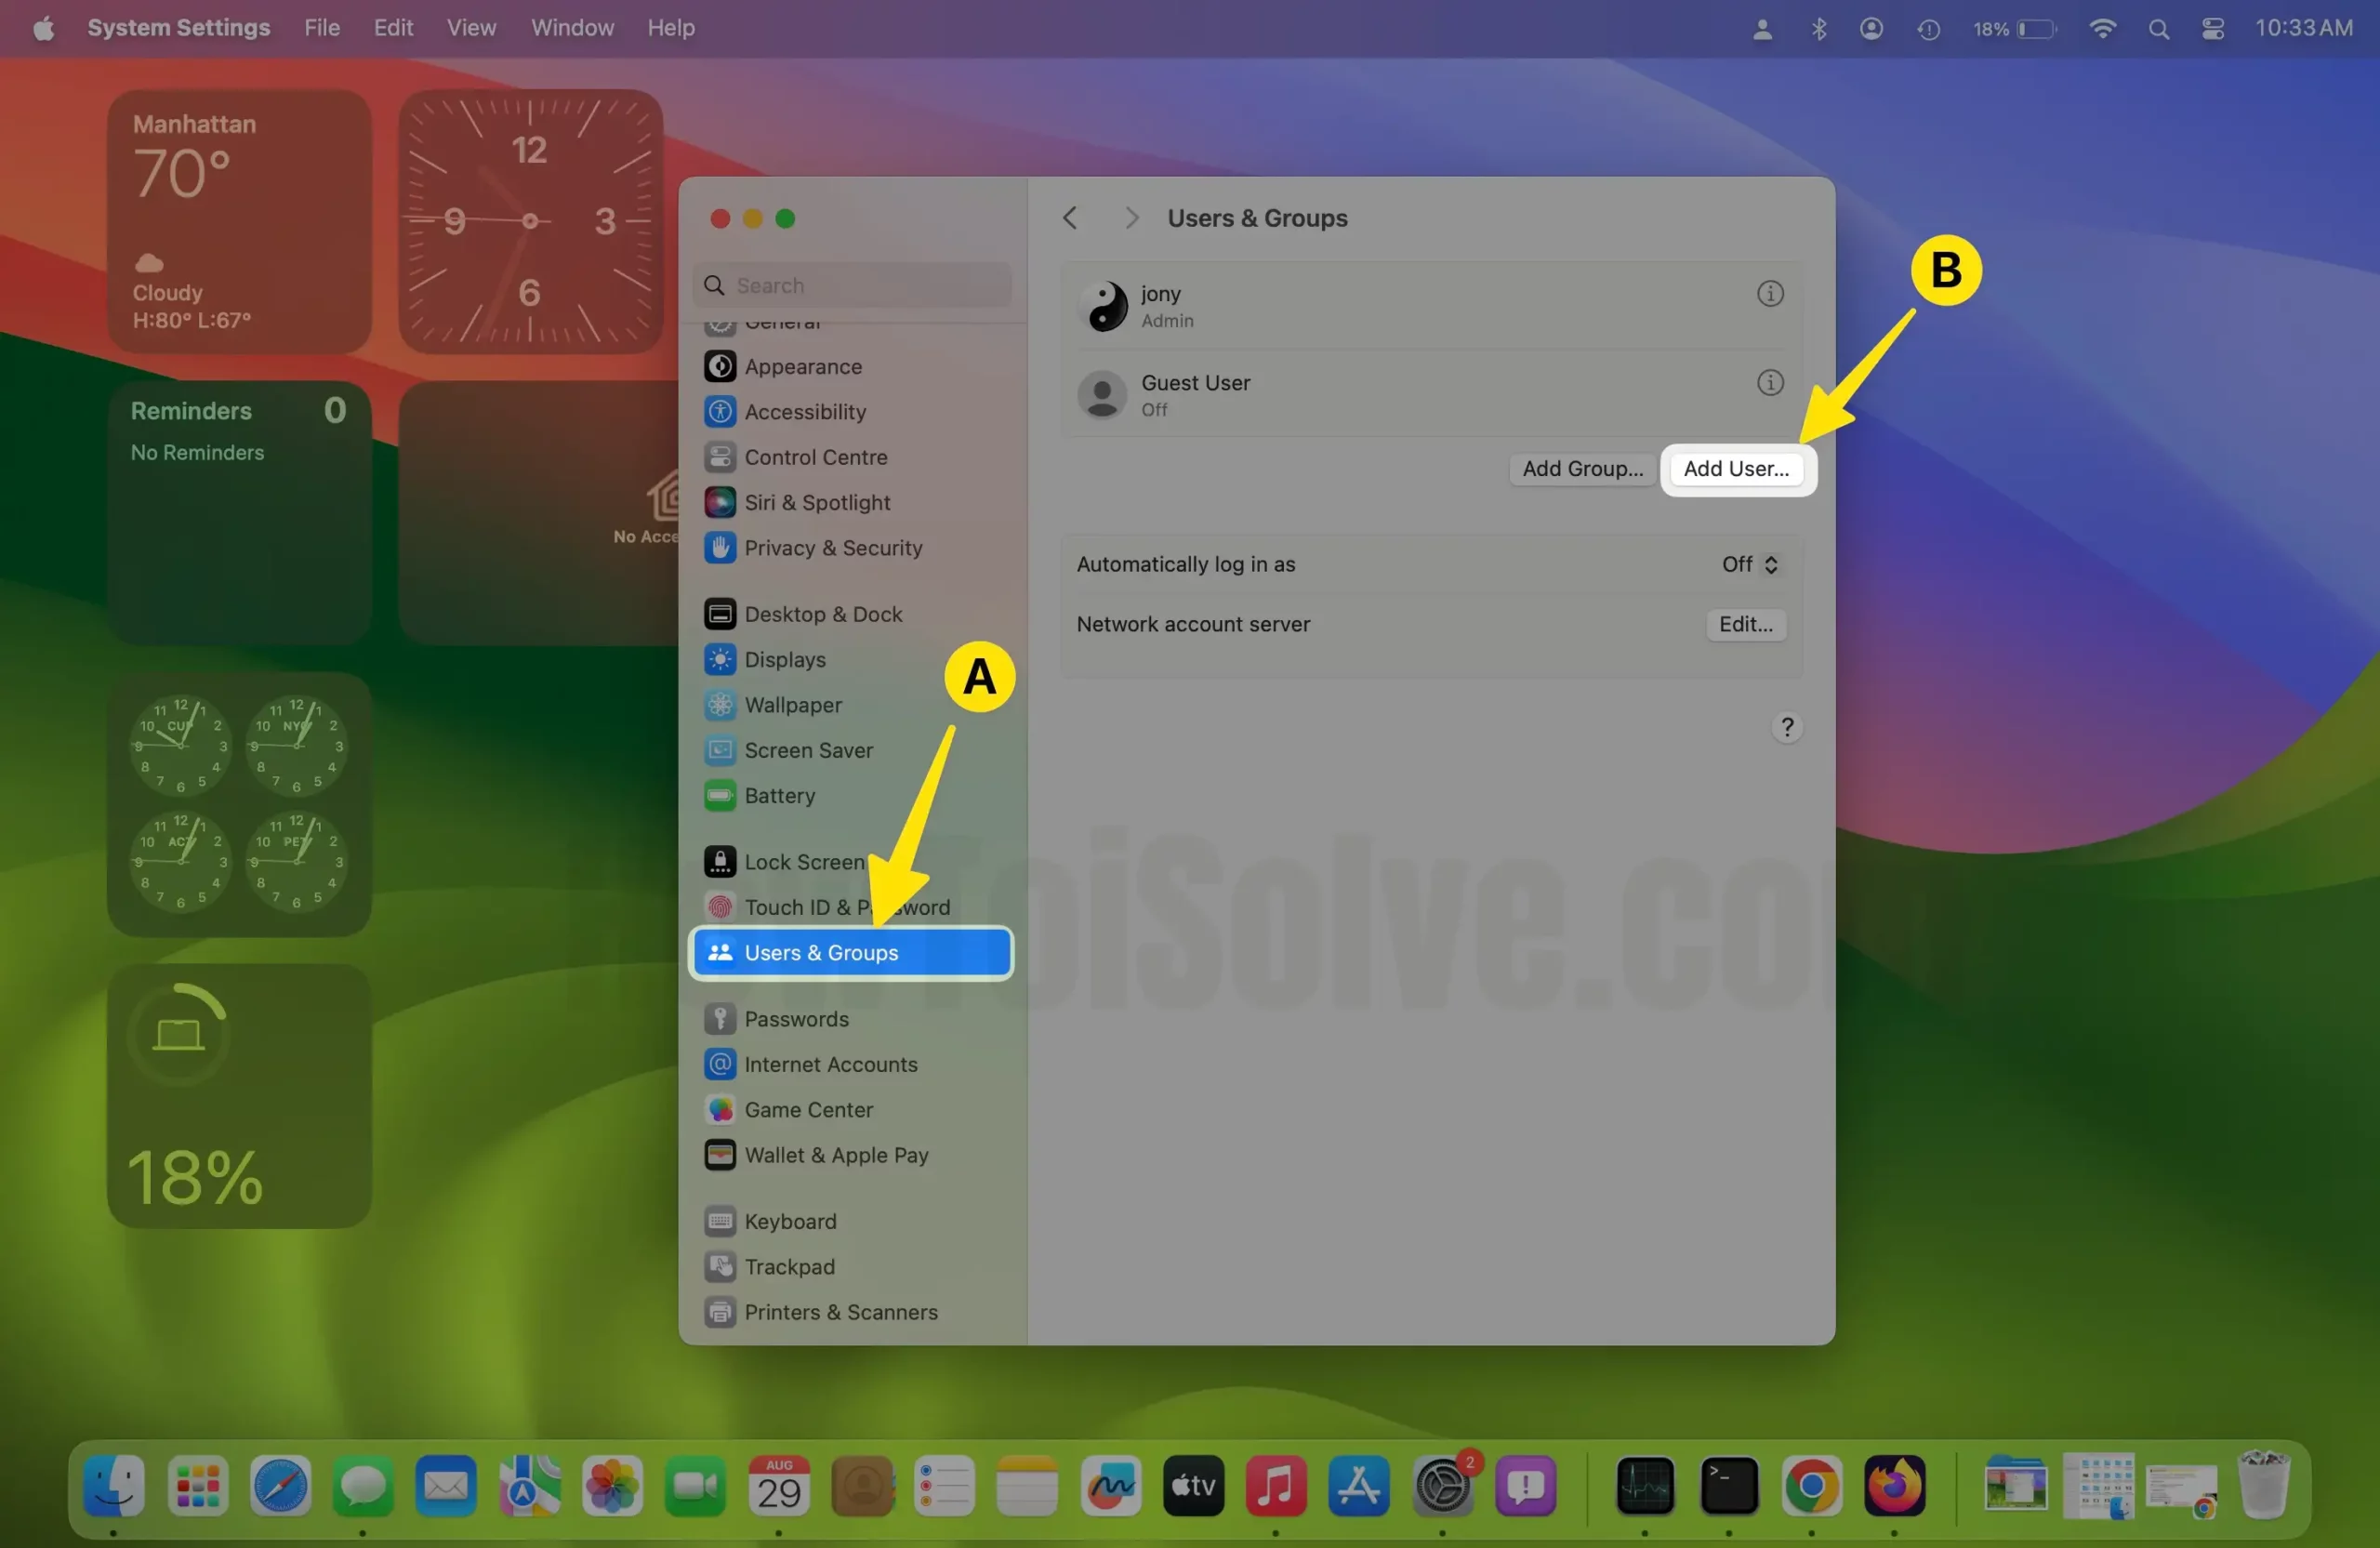
Step 3: Add the “Administrator” account to your Mac and check the issue is fixed.

On MacOS Sonoma & Later,
Step #1: Go to the “Apple logo”.
Step #2: Click “System Preferences”.
Step #3: Select “Users & Groups” option.
Step #4: Click on Lock (at the lower left side)
Step #5: Add a new user, by clicking on (+).
Now, after creating a new user account, you must be looking for all the data that is currently not available on the new profile but can be imported like this,
Finder > Go > Computer > Macintosh HD > Users.
All you have to do is drop the files and documents and then log in to a new profile.
Fix 14: Update HDD to SSD
Hardware changes in the sense, you should upgrade the Mac’s HDD to SSD then test the performance, later on, we can add more RAM to the device if we need it. Both the changes could really improve the performance of the Mac or MacBook. The SSD is quite robust compared to a normal HDD and can really help the system speed up.
We recommend you to go to the Apple Store or any expert who has immense knowledge on how to replace HDD with SSD or how to add RAM. Otherwise, you can refer to the online YouTube video and install High Performace Crucial SSD MX 500


