
You probably just set up External Display With Mac or MacBook to increase productivity in your corresponding task. However, there are certain hoops to jump through when using such a setup. And one of the common hoops to jump for Mac owners is how to screenshot on Mac for External Monitor/Display.
As of now, the users want to preserve what they see on display. Luckily, the Apple Mac includes a built-in tool for such a task. But at the end of the day, they don’t know how to take a screenshot on mac for External Monitor. So here’s everything you need to know about capturing screens and recording videos(Using Shortcut, Screenshot Toolbar) -on an external display when connected to Mac.
How to Screenshot & Record your Screen For an External monitor on Mac
Take a Screenshot/Screen recording on Mac isn’t the big question; simply press; press Shift + Command + 3 or Shift + Command + 5, and work is done. But is it the same way for external displays? First, let’s clear it out from this article.
External Monitor: Record Screen & Take Screenshot Using Shift + Command + 5
On every External Device connected to the Mac Computer, you can Record & Capture, and Modify to share them as per your fit. You will receive the options of Recording Entire Screen, Recording a Selected Portion, Capturing Entire Screen, Capturing a Selected Window, and Capturing a Select Portion of an external screen. And what’s excellent is pressing the combination of Three Keys(Shift + Command +5).
Take A Screenshot On External Monitor With Mac
- Press Shift + Command + 5 to feature Screenshot Toolbar.
- From the Screenshot Toolbar, you will receive three options, Choose the Option and Move your Pointer to the External display screen from the Exit edge of your Mac:

- Capture Entire Screen: This feature takes a Screenshot of the entire external screen. or When your cursor is on the External monitor screen, Directly Press Shift + Command + 3 to Capture the Entire Screen of the External monitor.
- Capture Select Window: This aspect takes a Screenshot of the select window on the external screen. Or When your cursor is on the External monitor screen, Directly Press Shift + Command + 4 + Space bar.
- Capture Select Portion: This feature takes a Screenshot of the Portion from the Entire Screen or Window. Or Directly Press Shift + Command + 4, and select a portion of the External monitor Screen.
Note: In the Options Drop-Down, you will receive the same features except Microphone, as mentioned above in the Screen Recording discussion.
3. After selecting the desired option from the Screenshot Toolbar, move the cursor from the Built-in display to external display and execute the task to take a screenshot on Mac for External Monitor.
Shortcut In Mac For Screenshot On External Display…

To Capture The Selected Portion Of External, press Shift + Command + 4; you will receive + Icon as a replacement for Traditional Cursor Symbol. Next, hover it to the External Display Desktop; crop out the select Portion, and that’s it!
Copy External Monitor Screenshot To Clipboard on Mac
Are you searching for a way to capture the Screenshot and then want to copy the Screenshot to the clipboard? Don’t panic! Press Shift + Control + Command + 4, and you will receive the Plus Icon instead of traditional Icon. Next, select the Portion from the external display you want to copy the Screenshot to the clipboard. Next, move app and press Command + V to copy Screenshot to clipboard without saving them.
Note: You can’t take the Screenshot of the entire screen using Shift + Control + Command + 3. As of now, it simultaneously captures the screen of both external and built-in display. However, if you still print a screenshot on mac, press Shift + Control + Command + 4 and select the entire external screen.
Record Screen Of External Monitor On Mac
- Press Shift + Command +5 to feature Screenshot Toolbar.
- From the Screenshot Menu, you will receive two options:
- Record Entire Screen: Selecting this option will let you record the entire screen of the External Monitor. Also you will get the option to Record Display with Number. – Display 1 is for Record Mac screen and Display 2 is Record External Monitor screen.

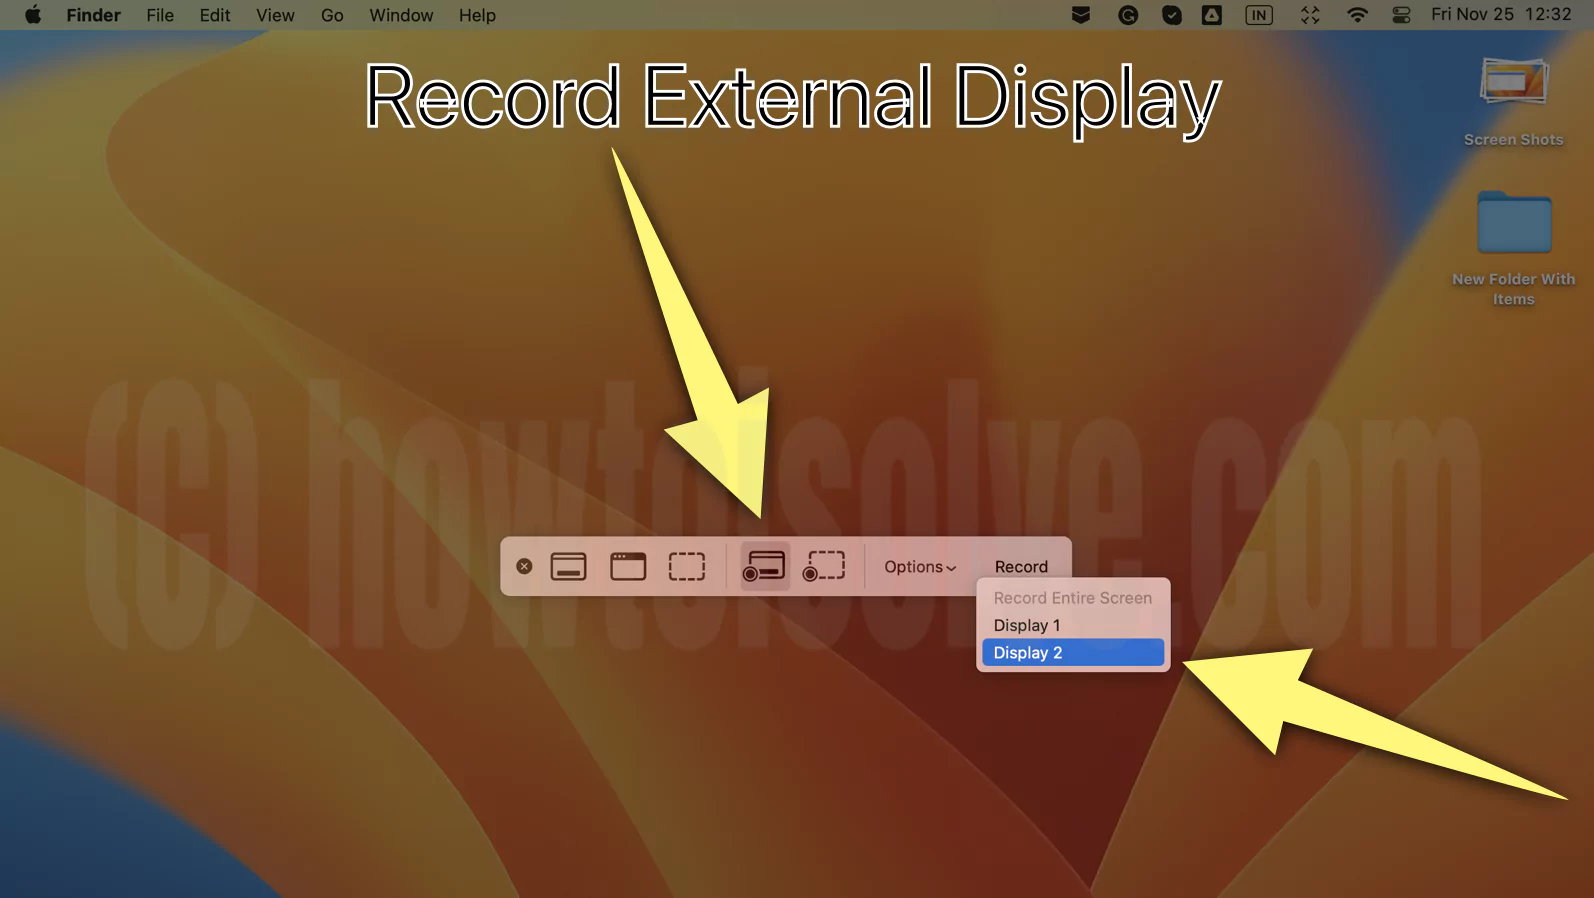
Or Move to Screen and Hit the Return to Start your Mac or External Monitor screen recording.
- Record Selected Portion: This option will let you record the Selected Portion of the External Monitor.
3. Select Recording option according to your preferences; up next, on the left side; you will receive the Options Drop Down; click on it.
- Save To: Under the Save Option, you select the location of the video where it needs to be saved after the completion of recording.
- Timer: Choose the timer as soon as you click on the Record to start recording.
- Microphone: Select the Microphone as a source of audio when recording the video from an external display.
- Options: Within the option, you will receive three options; Show Floating Thumbnail, Remember Last Selection, and Show Mouse Click; choose the options accordingly.
3. After configuring mentioned features per your need, click on the Drag the mouse to the External Display and click on Record Button.
Bottom Line
Taking screenshots and recording on the external connection to Mac is pretty straightforward. Gently, press Shift + Command + 5 and choose the appropriate option. or Use Direct Shortcut (Capture Entire Screen, Capture Selected Windows & Capture Selected portion) explained in this tutorial.
FAQs
To take a screenshot on a Mac, press Shift + Command + 4 for the selected Portion. And to screenshot the entire webpage Mac, press Shift + Command + 3. For the External monitor, Move Pointer to External Display and use the same Shortcut.
By default, screenshots are saved on Desktop. But still, you can change the location of the Screenshot to be saved from the Options Drop Down in the screenshot toolbar.
There is no identified way for such activity, but increasing the screen resolutions can eventually result in high-resolution screenshots on mac. Vice versa, decreasing screen resolution will result in Mac Screenshots with Lower Resolution. To change the Resolution, Go to the Apple logo > System Settings > Displays > See the Scaling. use Default to get Maximum or High Resolution or More space. To change Screen Resolution for the External monitor, Select External monitor under the Displays section and find the Resolutions.
Mac Screenshot Settings entirely relies upon the display resolution. So, either decreasing or increasing screen resolution will hinder the quality of Screenshot. Depends on which display resolution want to change, To change the Resolution, Go to the Apple logo > System Settings > Displays > See the Scaling. use Default to get Maximum or High Resolution or More space. To change Screen Resolution for the External monitor, Select External monitor under the Displays section and find the Resolutions.


