The Apple Medical Help feature is lifesaving in an emergency. But only when you know how to access Medical ID from the iPhone’s and Apple Watch’s lock screens. Here’s what you should know about it and how it works with Emergency SOS.
Your iPhone’s Health App has predefined features that alert emergency services to share lifesaving info about your medical conditions and allergies, even when the iPhone is locked and without adding a passcode. However, the feature is only available in Canada and the USA, and text to 911 may only be available in some regions.
Ignoring all this, this guide is for you if you want to know how to access Medical ID on the lock screen on an older or latest iPhone & Apple Watch.
Access & Update Medical ID Information
Here is the complete guide on how to set up medical ID, edit emergency contacts, and access medical ID from the lock screen on all iPhone and Apple Watch models.
Access Medical ID on a Locked iPhone
Assume that you guys set up a medical ID for your device. Then follow the steps below, or First, Do the set-up given in this tutorial.
For iPhone X or Later (No Home Button iPhone),
Note: To access your medical ID on the locked iPhone screen, you have to keep Show When Lock enabled (Settings > Health > Medical ID > Edit > Scroll down and enable Show When Lock).
Accessing Medical ID on iPhone X and above differs entirely from the older version. To do so, within the lock screen, press the Side Button and the Volume Button (up or down). Next, drag the Medical ID Slider up. You will now be directed to the Medical ID Screen. Tap on the number to make an emergency call.

Or
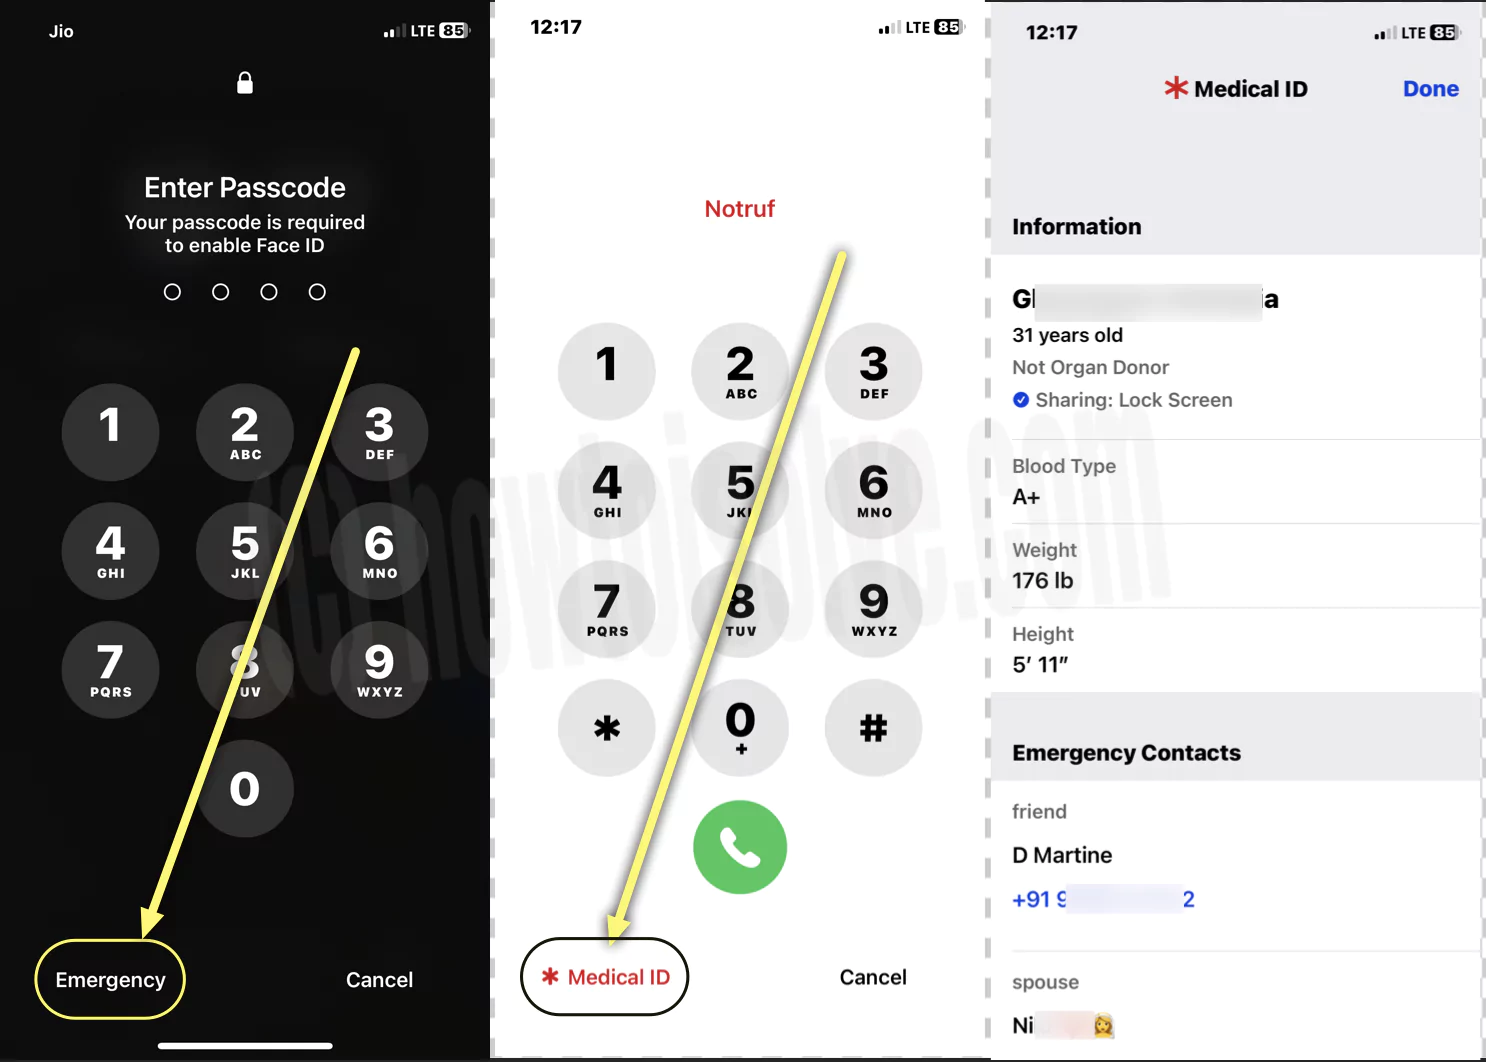
Access Medical ID from the Passcode lock screen,
On the Passcode lock screen, Click on Emergency at the bottom left corner > Again, Tap on Medical ID from the bottom left corner. Check the medical ID information, tap on “Emergency contacts,” and make a call on the locked screen of your iPhone.
For iPhone 8 & Earlier,
If you encounter someone who is unfamiliar with Medical ID, you can access it on a locked iPhone (but only when you set it up). Follow the steps below.
Note: You have to keep Show When Lock enabled (Settings > Health > Medical ID > Edit > Scroll down and enable Show When Lock) to access your medical ID on a locked iPhone with the home button.
- Press the Home Key to feature up the Passcode/Lock Screen.
- Now, select the Emergency Option from the screen’s bottom left corner.
- Next, click on the Red Medical ID from the bottom left corner of the dial pad screen.
You will now navigate to the medical ID screen. Tap on anyone to make a call.
Access Medical ID on Apple Watch
Long-press the flat Side Button on the right side of the Apple Watch to make the power-off screen visible. Next, slide the Medical ID Button to access emergency contacts and health details. Finally, hit the number to make calls.

Note: If you want to make an emergency call, your Watch must have a cellular plan. If not, you must be connected to an iPhone.
How To Set Up Your Medical ID
First, before you know the steps to access medical ID on your iPhone’s lock screen, you need to set it up. Here are the steps you need to follow.
Note: If the emergency SOS is disabled on your iPhone, you won’t be able to share medical information with emergency contacts. To enable Emergency SOS, go to Settings > Privacy > Location Services > System Services and enable it.
1. Navigate to the Health App and select the Summary Tab from the bottom.
2. Hit on the Profile at the top left corner.
3. From the next screen, choose Medical ID. If this is your first, select Create Medical ID.
4. Choose Edit from the upper right corner.

5. Register all health information: Date Of Birth, Medical Condition, Medical Notes, Allergies And Reactions, Medications, Blood Type, and Allergies.
6. Move to the Emergency Contacts menu and tap + Add Emergency Contact. This will open your contact list; select the one you want, and from the Relationship prompt, select the suitable one.
7. To access it from the Lock Screen, enable the toggle next to Show When Locked from the bottom of the screen. In a state of emergency, this will share the information with the person who wants to help. To parcel your Medical ID to the responder, enable Share During Emergency Call. When you send a message or call, your Medical ID will automatically be shared with emergency services.
8. At last, hit Next > Done.

Alternatively, you can go to Settings > Health. From the Medical Details Menu, hit Medical ID. Now, from the top right corner, click on Edit. Enter all health information and Emergency Contacts as mentioned above.
How to Setup Medical ID On Apple Watch
After setting up the Medical ID on your iPhone, it is also important to configure it on your Apple Watch. Emergency responders are often trained to check the watch for this information. Therefore, it’s essential to ensure that your Apple Watch is set up with a Medical ID as well. If you haven’t done this yet, follow the steps below.
- Access the Watch Application on iPhone.
- Move to My Watch and then select Health.
- Tap on Medical ID. Ensure all details are accurately entered.
- And turn on the option Show When Locked.
How To Edit Emergency Contacts (Health App)
If you want to add, remove, or edit the contact you saved under the emergency contacts on the Health App, follow the steps below.
- Search and open the Health App.
- Click on the Summary Tab.
- From the upright corner, click on the Profile Icon.
- In the Profile Icon screen, choose Medical ID.
- Hit on Edit from the top right corner.
- Scroll down to Emergency Contacts; click on + Add Emergency Contact if you want to add one. Select one from the contact list. Next, from the Relationship prompt, choose the suitable one.
If you want to remove the contact, tap on the – Minus Icon next to the desired contact. For further confirmation, click Delete.
Add And Remove Emergency Contacts On iPhone
This is the shortcut way to add and remove emergency contacts. To find out, follow the steps below.
Add From Contact App
- Go to the Contacts App.
- Hit on the Contact you want to add to the list of emergency contacts.
- Swipe down and hit on the Add To Emergency Contacts.
- Tap on Relationship Status. After this, it will appear on the Medical ID. And then hit Done.
As confirmation, a red icon will appear beside the contact you set up inside the Emergency Contacts. Additionally, it will be automatically synced with your Apple Watch.
Remove From the Contact App
- Access the Contacts App.
- Select Contact you want to remove from the emergency contacts list.
- Swipe down and select Remove From Emergency Contacts.
In the next pop-up, re-tap on the Remove From Emergency Contacts for further confirmation.
How To Add And Remove Emergency Contacts From Apple Watch
Why must we remove the iPhone from the pocket to add or remove emergency contacts? Since you can do it from your wrist, it’s an Apple Watch!
Add From Apple Watch
- Go to Settings. Select Health.
- From the next screen, swipe and select Medical ID.
- Scroll down and tap Edit Medical ID.
- Tap Add Emergency Contacts.
From the contact list, select the desired and add the relationship status. Lastly, tap Done.
Remove From Apple Watch
- Go to Settings. Select Health.
- From the next screen, swipe and select Medical ID.
- Scroll down and tap Edit Medical ID.
Swipe down to the contact; slide from left to right on the contact you want to remove. And tap X Icon.
Bottom Line
Knowing how to access your medical ID on the lock screen makes everything easier. The best part is that no one, even Apple, can access your medical ID until your iPhone isn’t physically accessed.
Can You Add Multiple Emergency Contacts?
Yes, you can add multiple contacts to Emergency Contacts in Medical ID. You can do this from both the Health App and the Contact App. If you aren’t familiar with the steps, read our article.
Is It Safe to Use a Medical ID on an iPhone?
Unfortunately, there is no way of limiting Medical ID filled with information to your personnel. Therefore, anyone with physical access to your iPhone can firmly steal your Medical Information. To prevent such a situation, you need to learn to protect your iPhone; at the same point, you need always to hold the iPhone to avoid such possibilities. The best part is that no third-party application can steal your Medical ID, and even Apple cannot do so.
Why Is Medical ID Missing On Lock Screen iPhone?
This is because you did not enable the Show When Locked feature during the setup. To do so, navigate to Settings and choose Health. Next, move to the Medical Details Menu and tap on Medical ID. Click on Edit. Swipe down and tap on the toggle to enable Show When Locked.
Related latest iOS Lock Screen Settings for iPhone, iPad, iPod


