Apple has transformed from the back-end iCloud storage for applications and services to the front-end for users. But still, where iCloud is on Mac is the trending question amongst users.
Why is it trending? Because iCloud is a one-stop solution to manage the data across all your Apple Peripherals with the same Apple ID. So whether you use iCloud for collaboration of folders or want to manage iCloud Storage, Everything can be done from the System Settings…(System Preferences…macOS Monterey And Earlier)
So, if you get stuck with it, keep reading the article, as here we show you how to access iCloud on a Mac.
How To Access iCloud On Mac
Follow the guide and know where and how to access iCloud on the latest macOS.
Where is iCloud Preferences on Mac?
Manage Apps Permission to use iCloud on Mac; also Find the New Apps that use iCloud to sync Account and App Settings across all Apple Devices.
macOS Ventura And Later
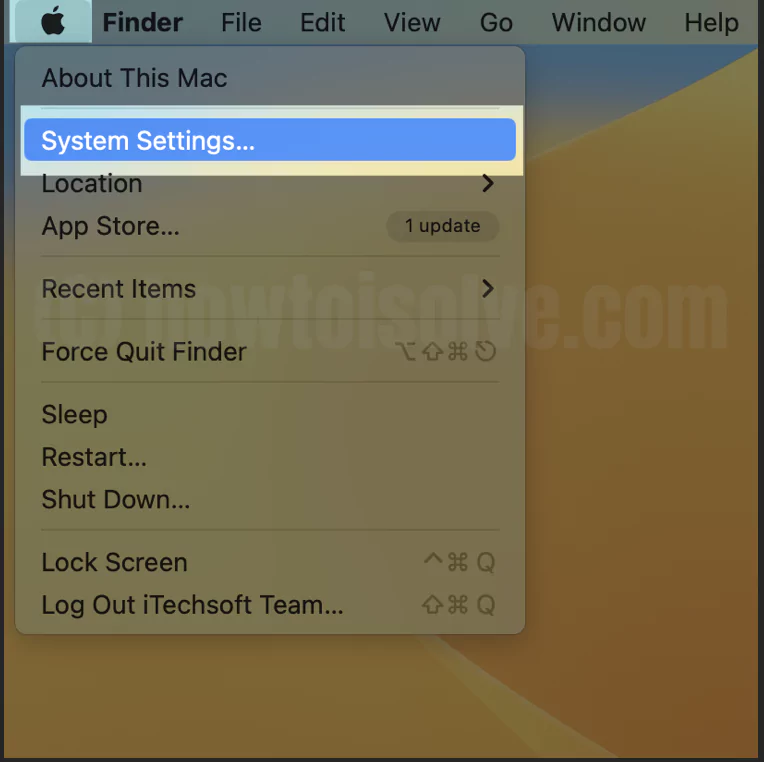
- Click on the Apple Logo from the Menu bar.
- Choose System Settings…
- Next, click on your name and then choose iCloud.

- Now toggle to enable or disable the application on your Mac using iCloud.


- iCloud Drive
- Photos
- Contacts
- Calendar
- Reminders
- Safari
- Notes
- Siri
- Keychain
- Find My Mac
- Stocks
- Home, Freeform, and more…
Older macOS (macOS Monterey And Earlier)
- Click on “Apple Logo” in the top menu.
- Select “System Preferences.”
- Go to “Apple ID” From the left sidebar, select iCloud.
- On the left pane, click “iCloud.”
Now, you can enable and disable the applications on your Mac using iCloud.
Manage & Upgrade iCloud Storage on Mac
If you are willing to Manage storage on Manage storage of iCloud and aren’t familiar with the process. Go through the steps mentioned below.
macOS Ventura And Later
- Click on the Apple Icon from the upper left corner of the screen.
- From the drop-down, select System Settings… You can access System Settings from the dock or using the Spotlight Search.
- Now select Apple ID[Your Name] and click iCloud.
- And then choose Manage.

macOS Monterey And Earlier
- Select Apple Logo from the upper left corner and choose System Preferences…
- Click on the Apple ID from the top right corner.
- Go to iCloud, and from the bottom right corner, select Manage…
And now, follow any of the below settings,

Upgrade Your Storage: Select Storage Plan or Change Storage Plan and then go through the on-screen instructions.
The upgrade storage bill will be sent to the Family Organizer Account if you are enrolled in the Family Sharing group with the same Apple ID.
See How An App Is Using iCloud Storage: Pick out the app from the window and then go through the storage information. If you are willing to delete or save copies of documents, you can do so from there.
Remove iOS And iPadOS Device Backup: Click on Backup and pick out the device. Furthermore, click on the backup you want to delete and choose Remove.
iCloud Data Protection: Enable your Data privacy from the settings given under the iCloud on Mac.

Turn Off Siri And Remove Siri-Related Data: Select Siri and then Disable > Delete.
5. Click Done.
How To Access iCloud Drive On Mac
If you want to access the iCloud drive, it needs to be enabled under iCloud. Go to System Settings…(System Preferences…macOS Monterey And Earlier). From there, click on your Apple ID. Select iCloud and then enable the toggle next to iCloud Drive(check box next to iCloud on macOS Monterey And Earlier). Once you do so, follow the steps below.
Access iCloud Drive Using Finder
- Open the Finder. Next, select Finder from the menu bar. Choose Settings…(Preferences…macOS Monterey And Earlier).
- Select the Sidebar Tab and check the box next to iCloud Drive.

However, you can also Access iCloud Drive Using Terminal.
Enable Find My Mac
Find My aspect on Apple Devices allows you to retrieve your stolen or lost device. But if you are Preparing a Mac For Sale, ensure the feature is turned off.
First Thing First, Enable Location Services
macOS Ventura And Later
1. On your Mac Computer, go to Apple Logo. Select System Settings…
2. Click on Privacy & Security. Select the Location Services.

3. Enable Location Services, and then turn on Find My App from the list of apps.

macOS Monterey And Earlier
- On your Mac Computer, go to Apple Logo. Select System Preferences…
- Click on Security & Privacy > Privacy. Then click on the Lock Icon at the bottom left corner and enter the Administrator Name And Password.
- Choose Location Services. And turn on Location Services. And then, search for Find My App and select it.
If there is no Find My in the list, head to System Services > Details. And then enable Find My Mac.
Finally, Setup Find My Mac
Steps to set up Find My Mac varies in macOS. However, we have covered all, so do follow as per the macOS Installed on your device.
macOS Ventura And Earlier
1. Go to Apple Logo. From the drop-down, select System Settings…
2. Then click on Apple ID[Name]. If there is no Apple ID, click on Sign In With Apple ID, or learn how to create an Apple ID.

3. Enter your Password and then Continue on Mac.
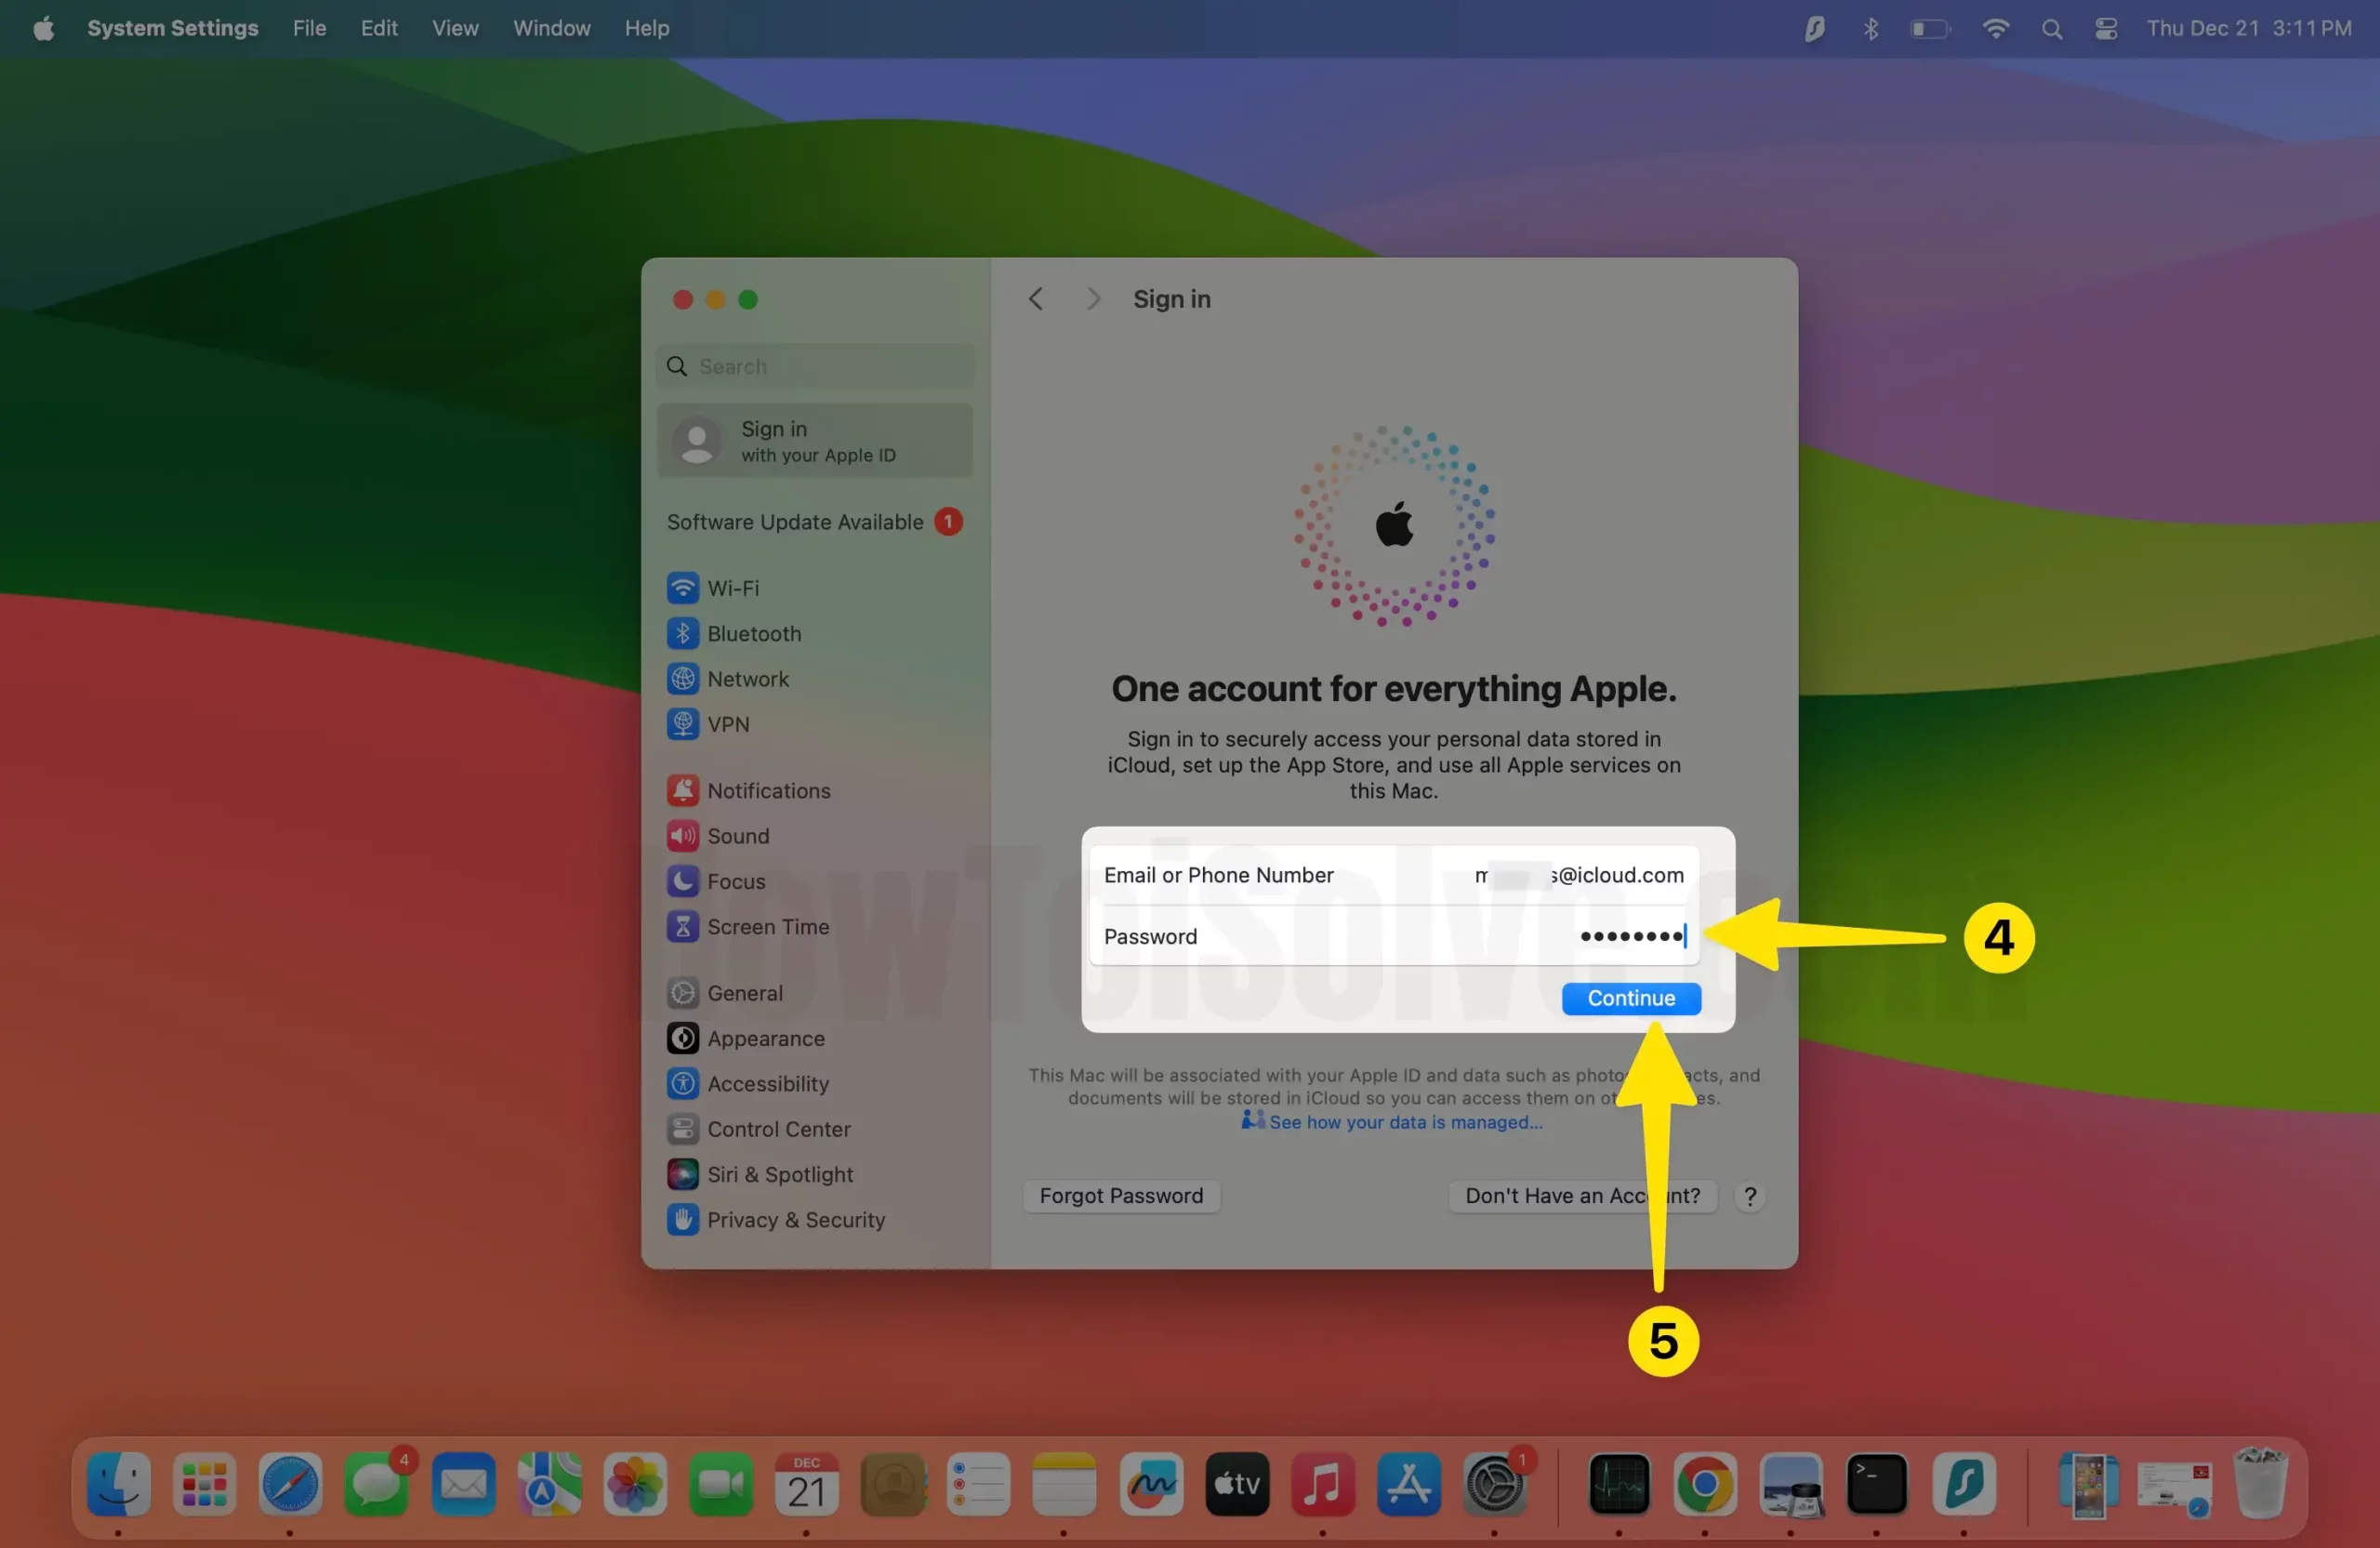
4. Enter the Verification Code in the Apple ID profile name.

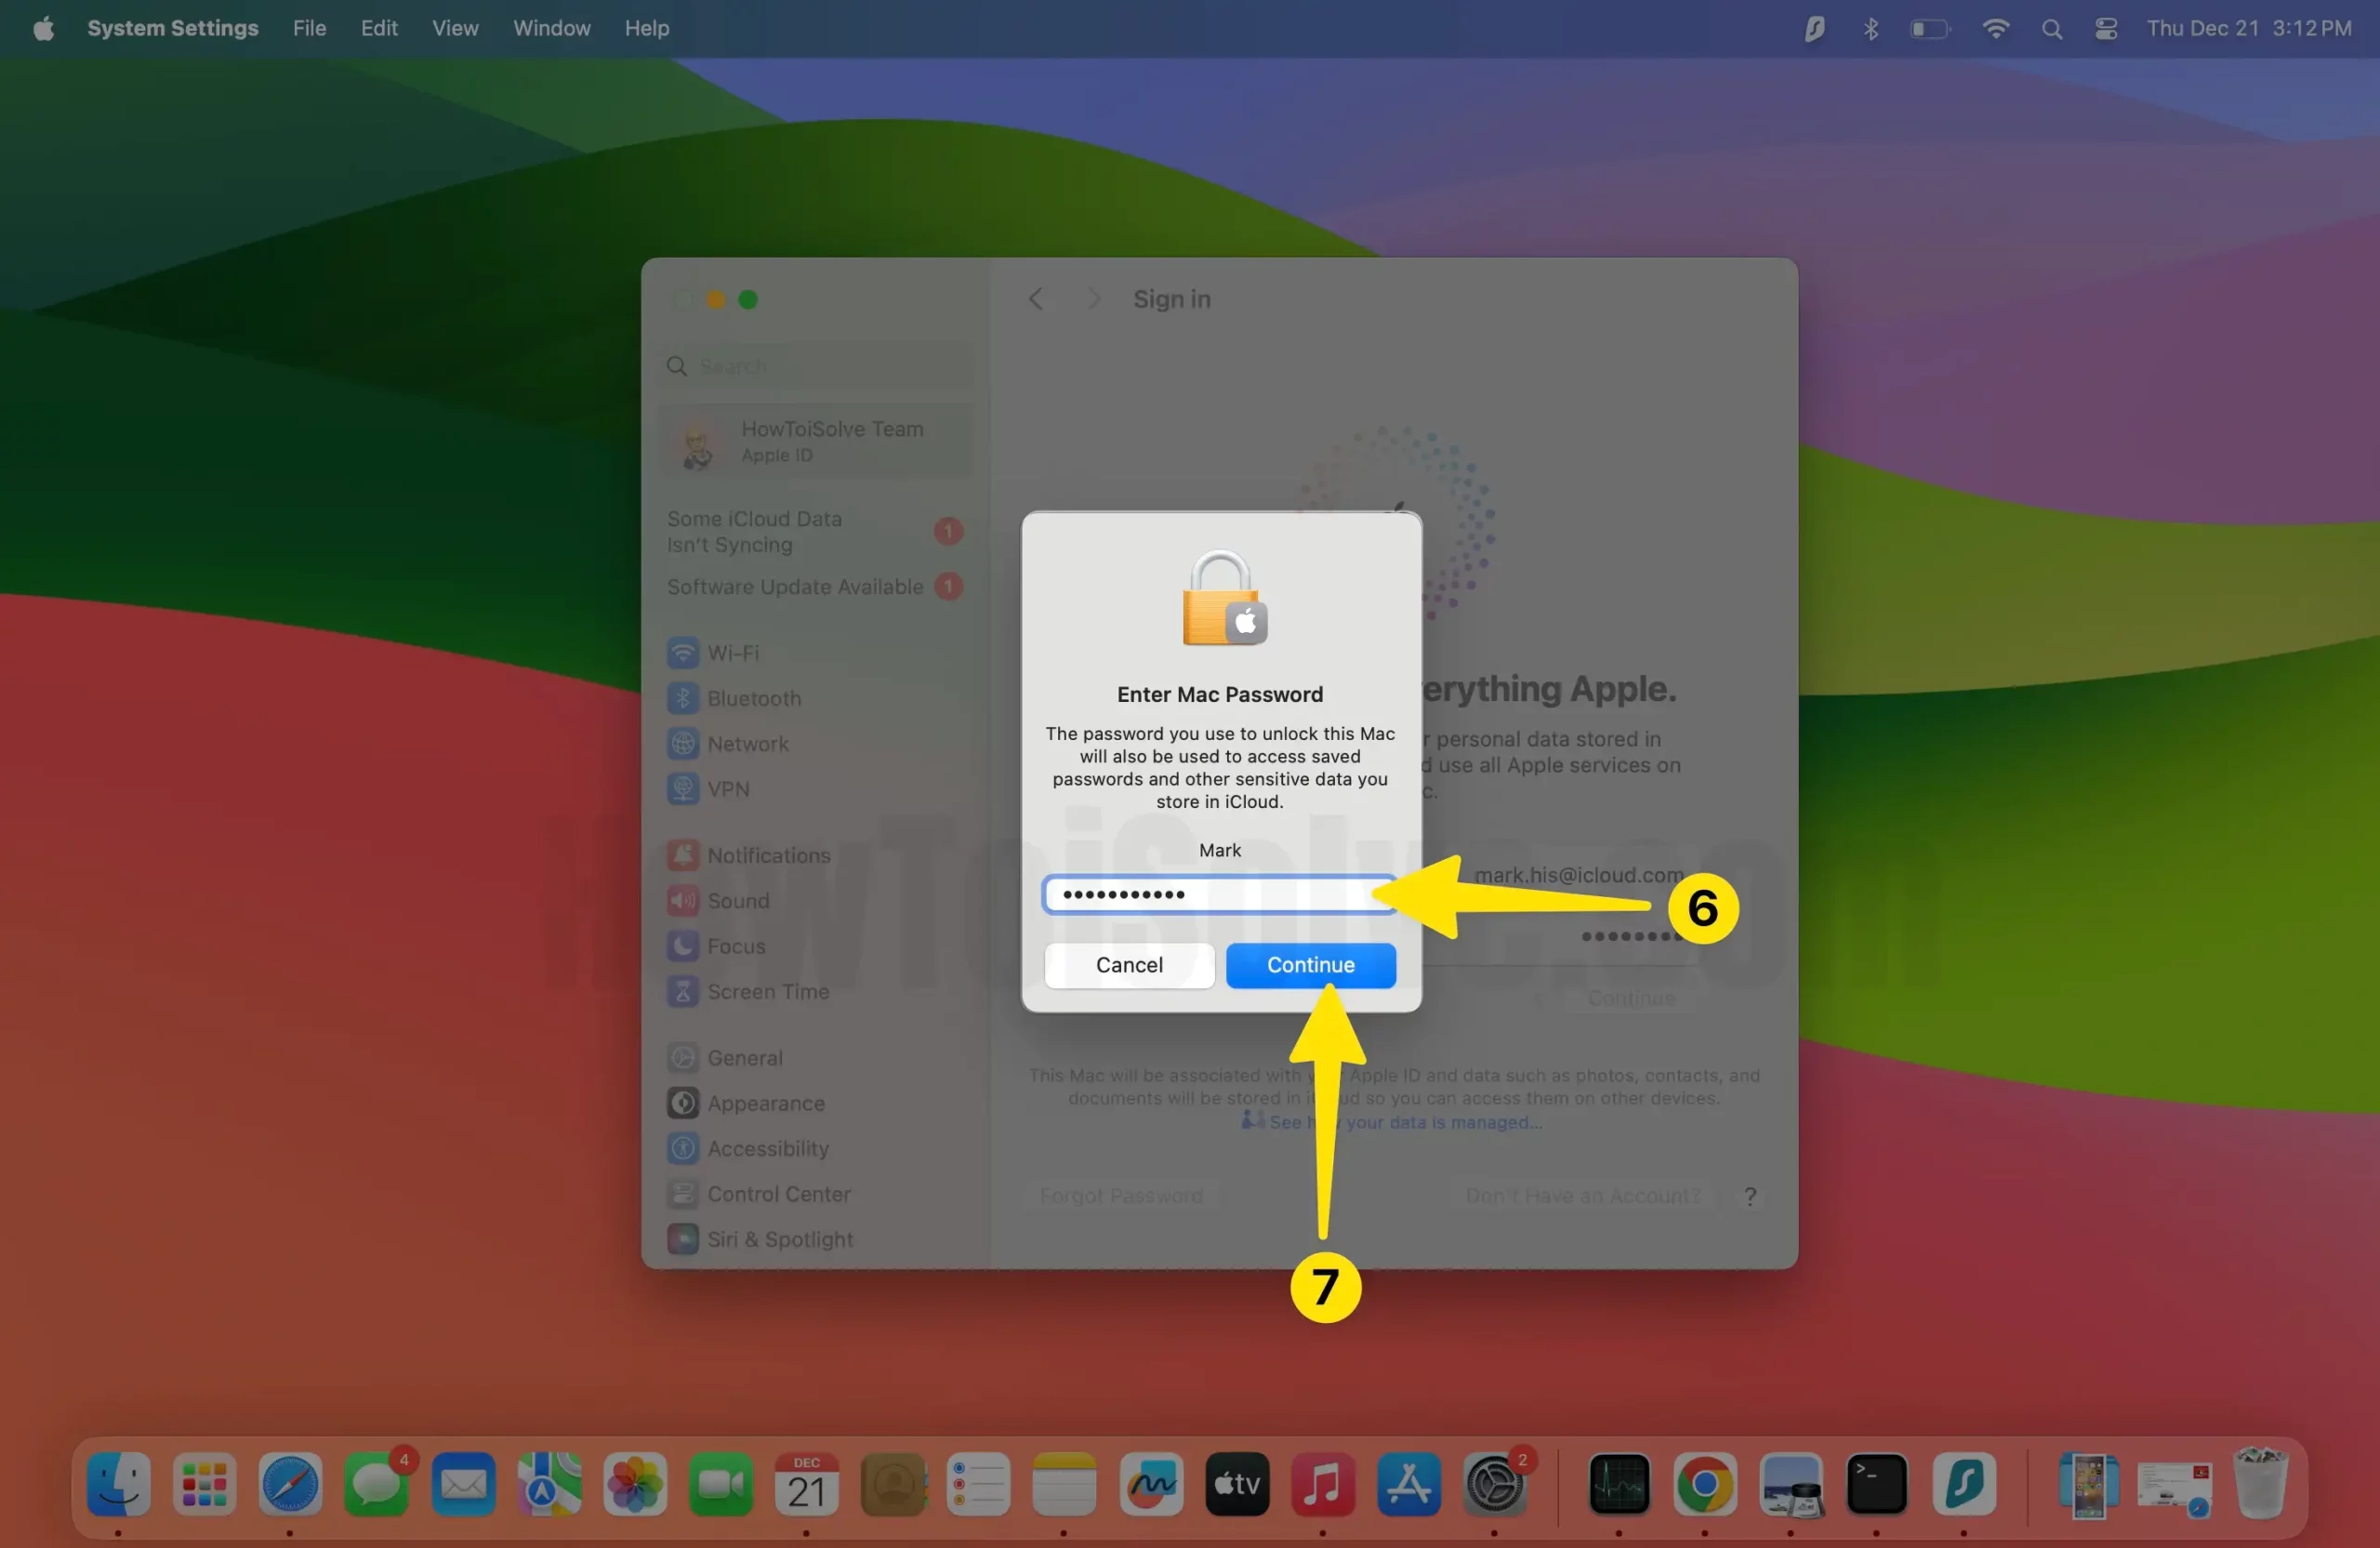
5. Enter Mac Password. Click Continue on Mac.
6. Choose the Merge in iCloud.

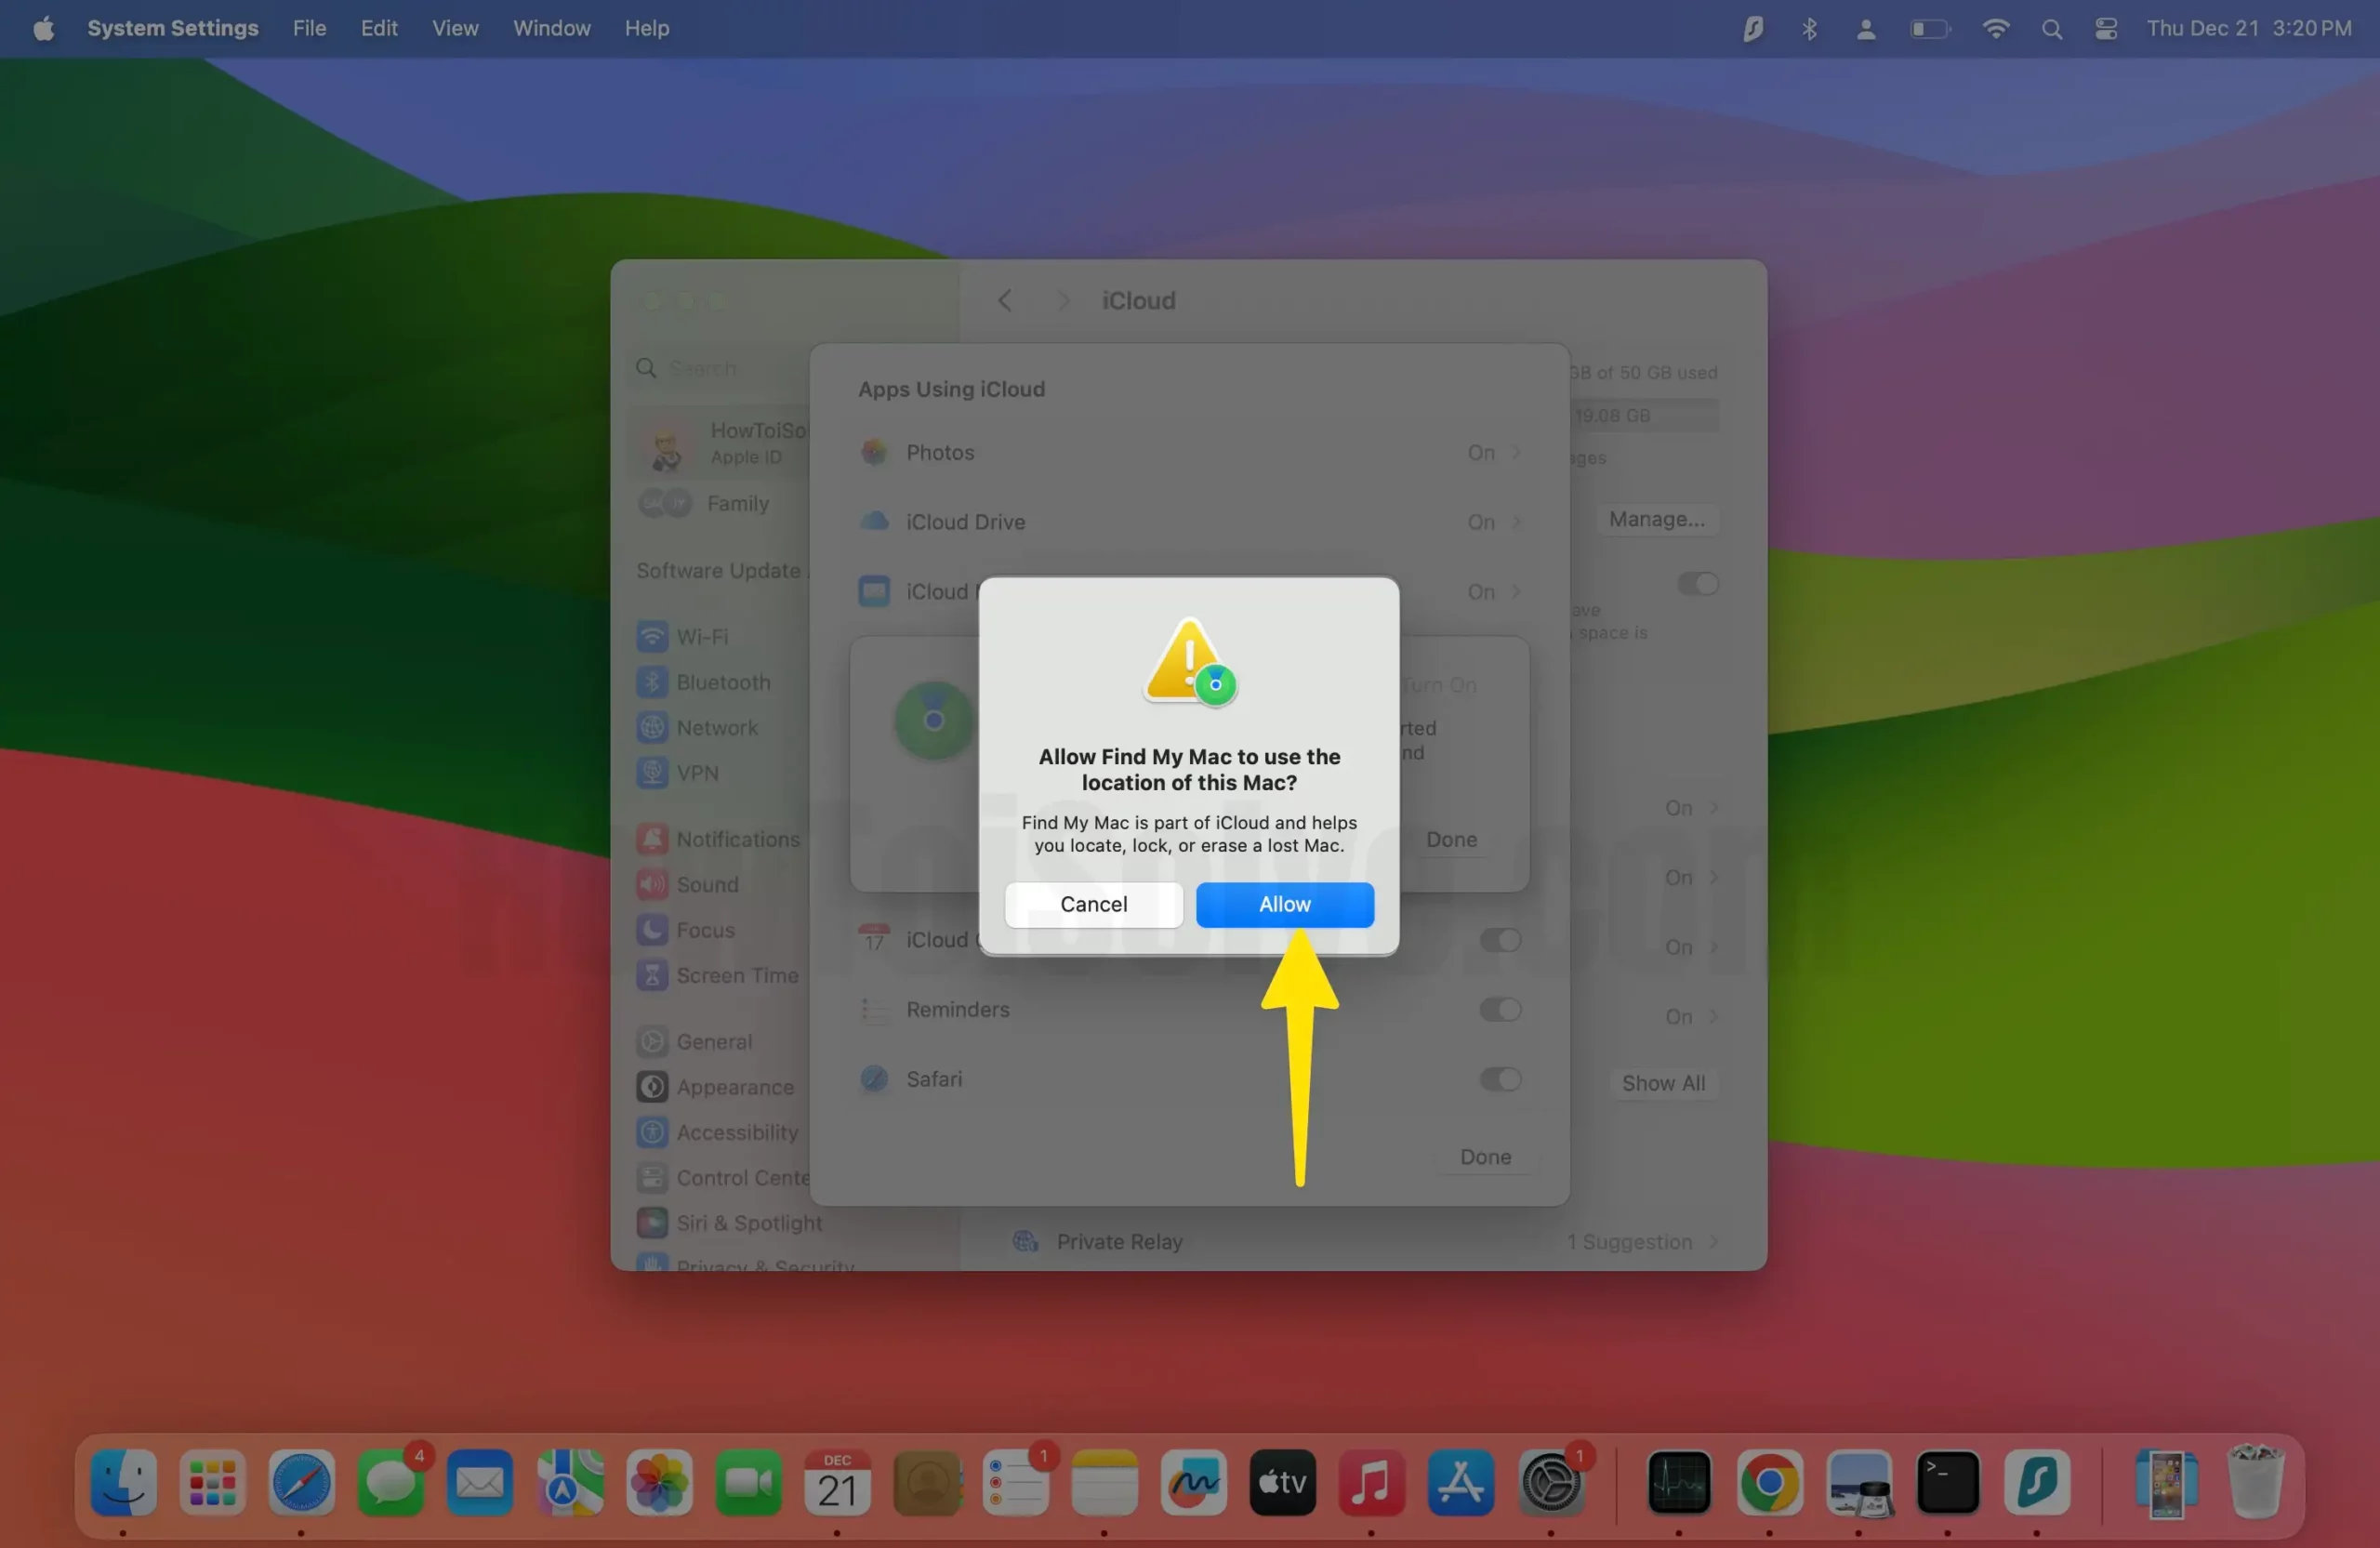
7. Select the Allow Button in Mac.
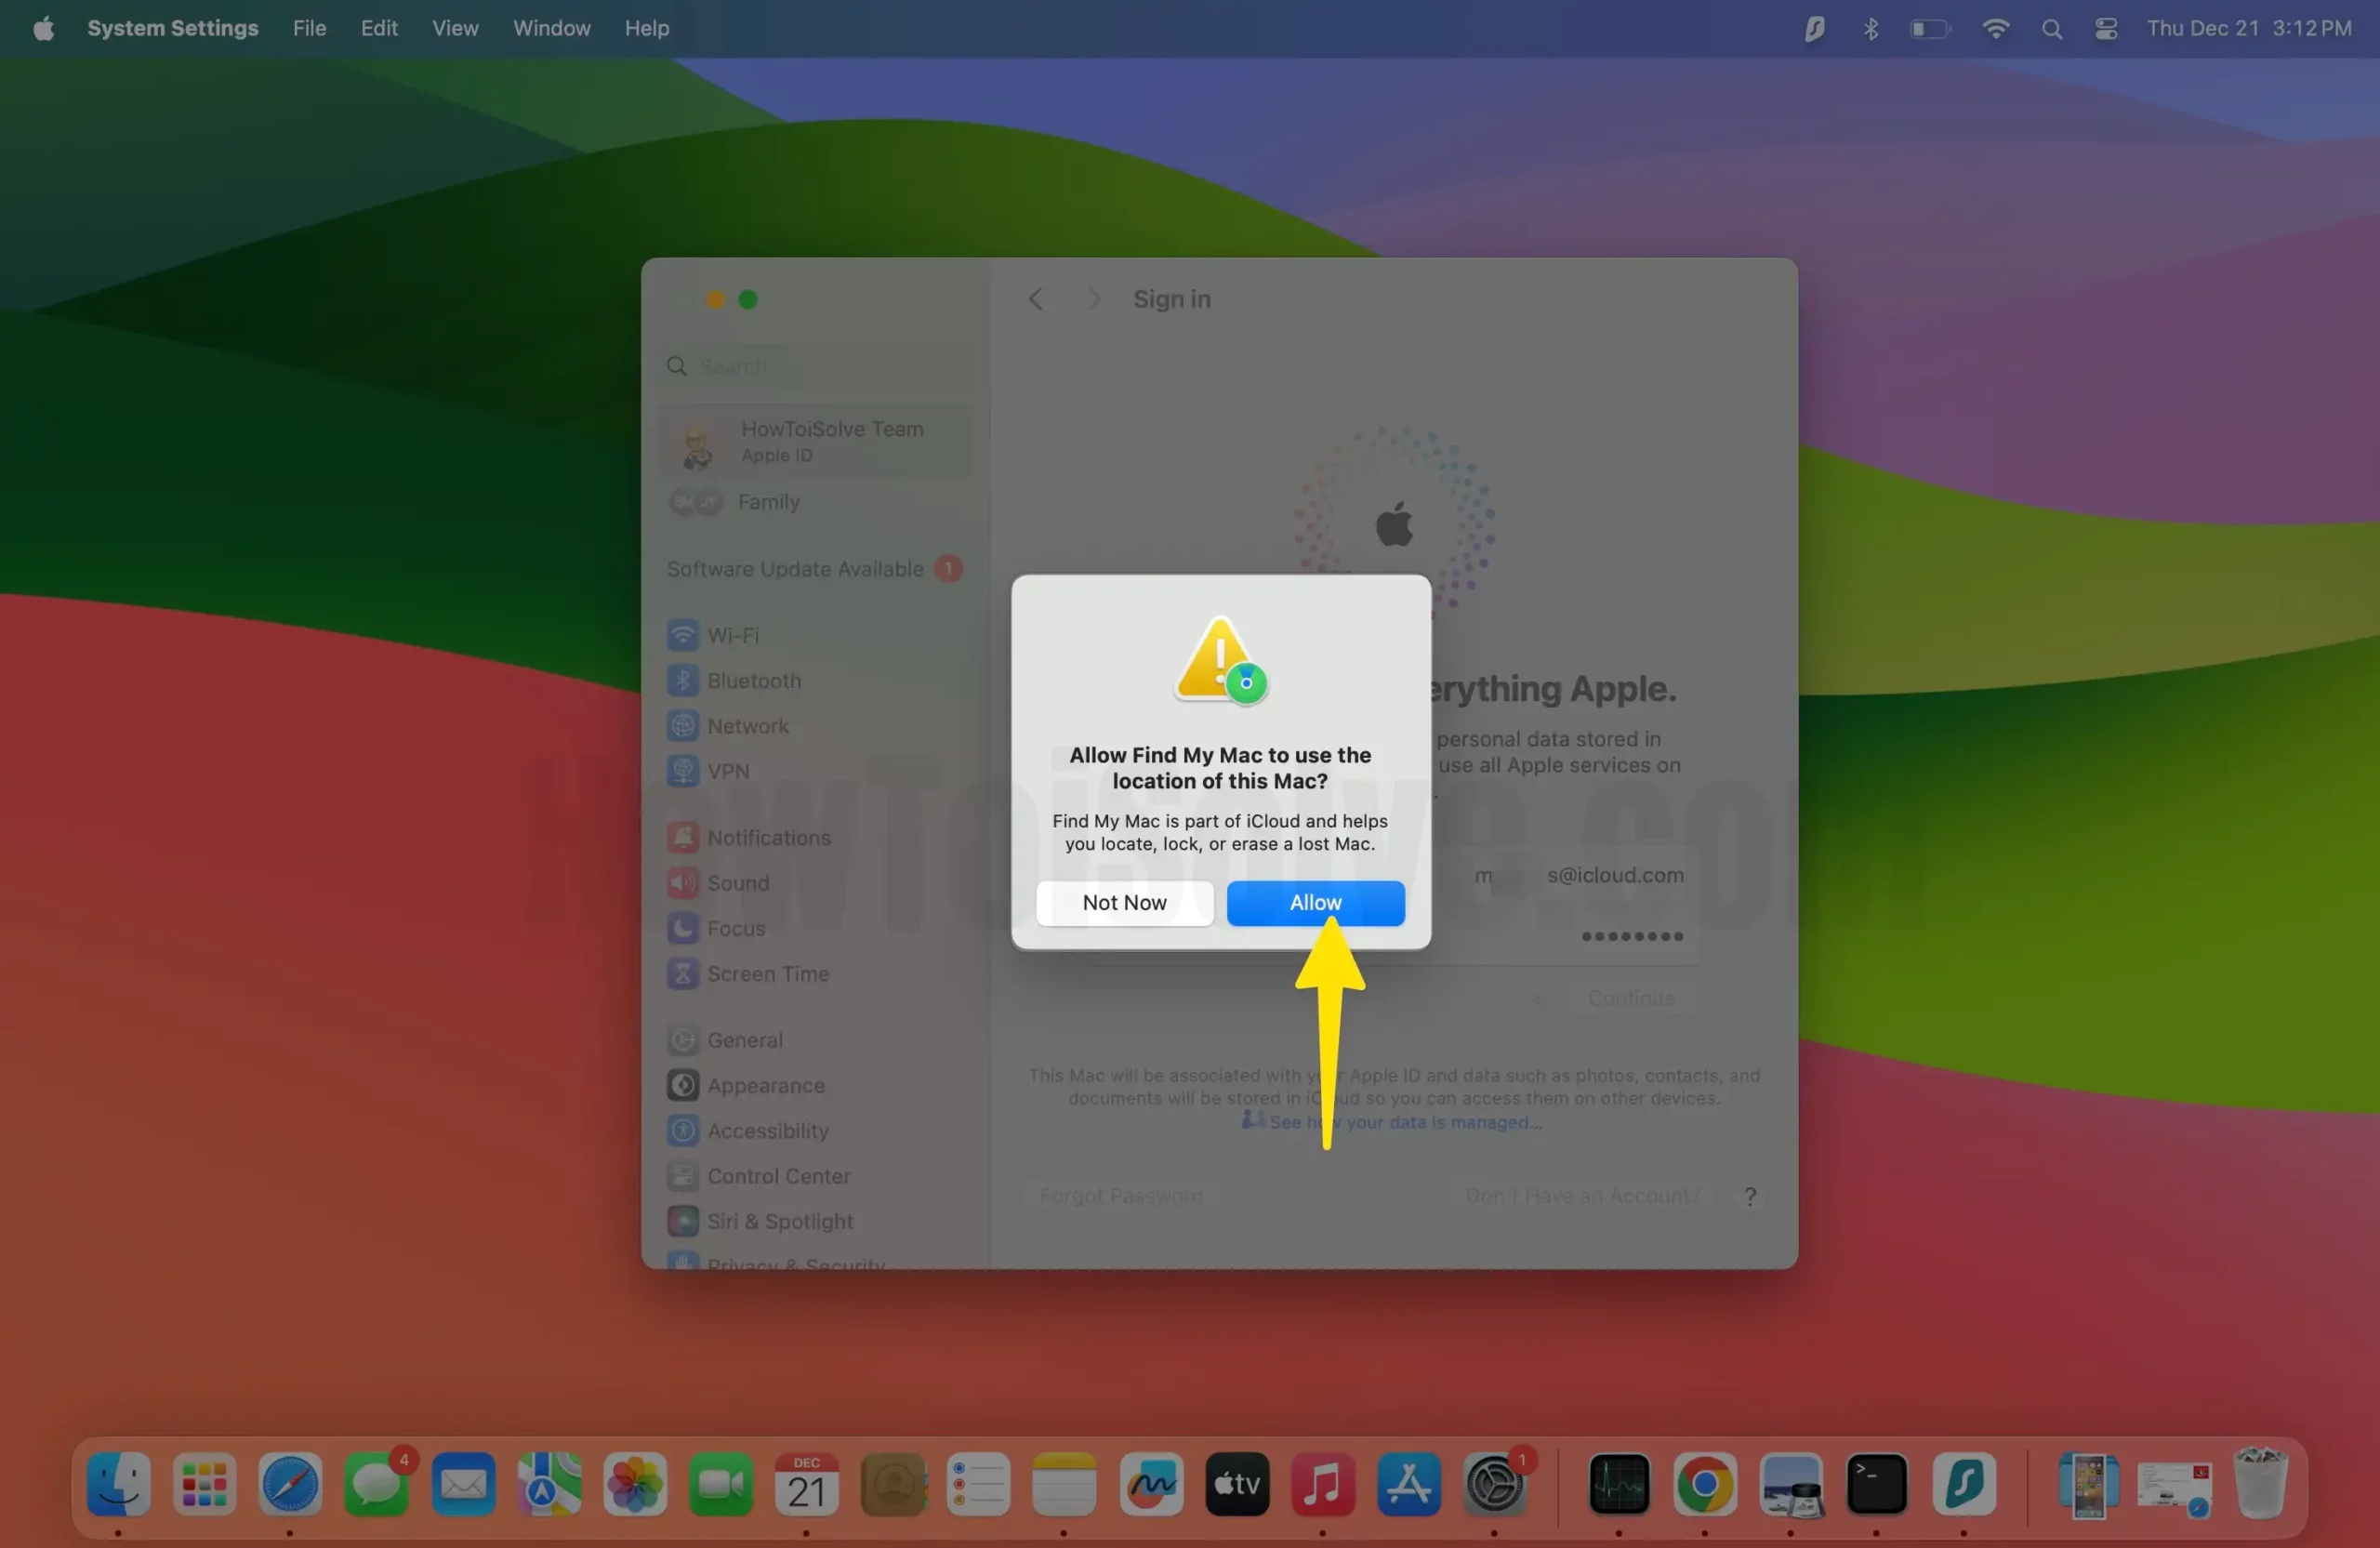
8. Enter your Find My Mac Password in the OK button.
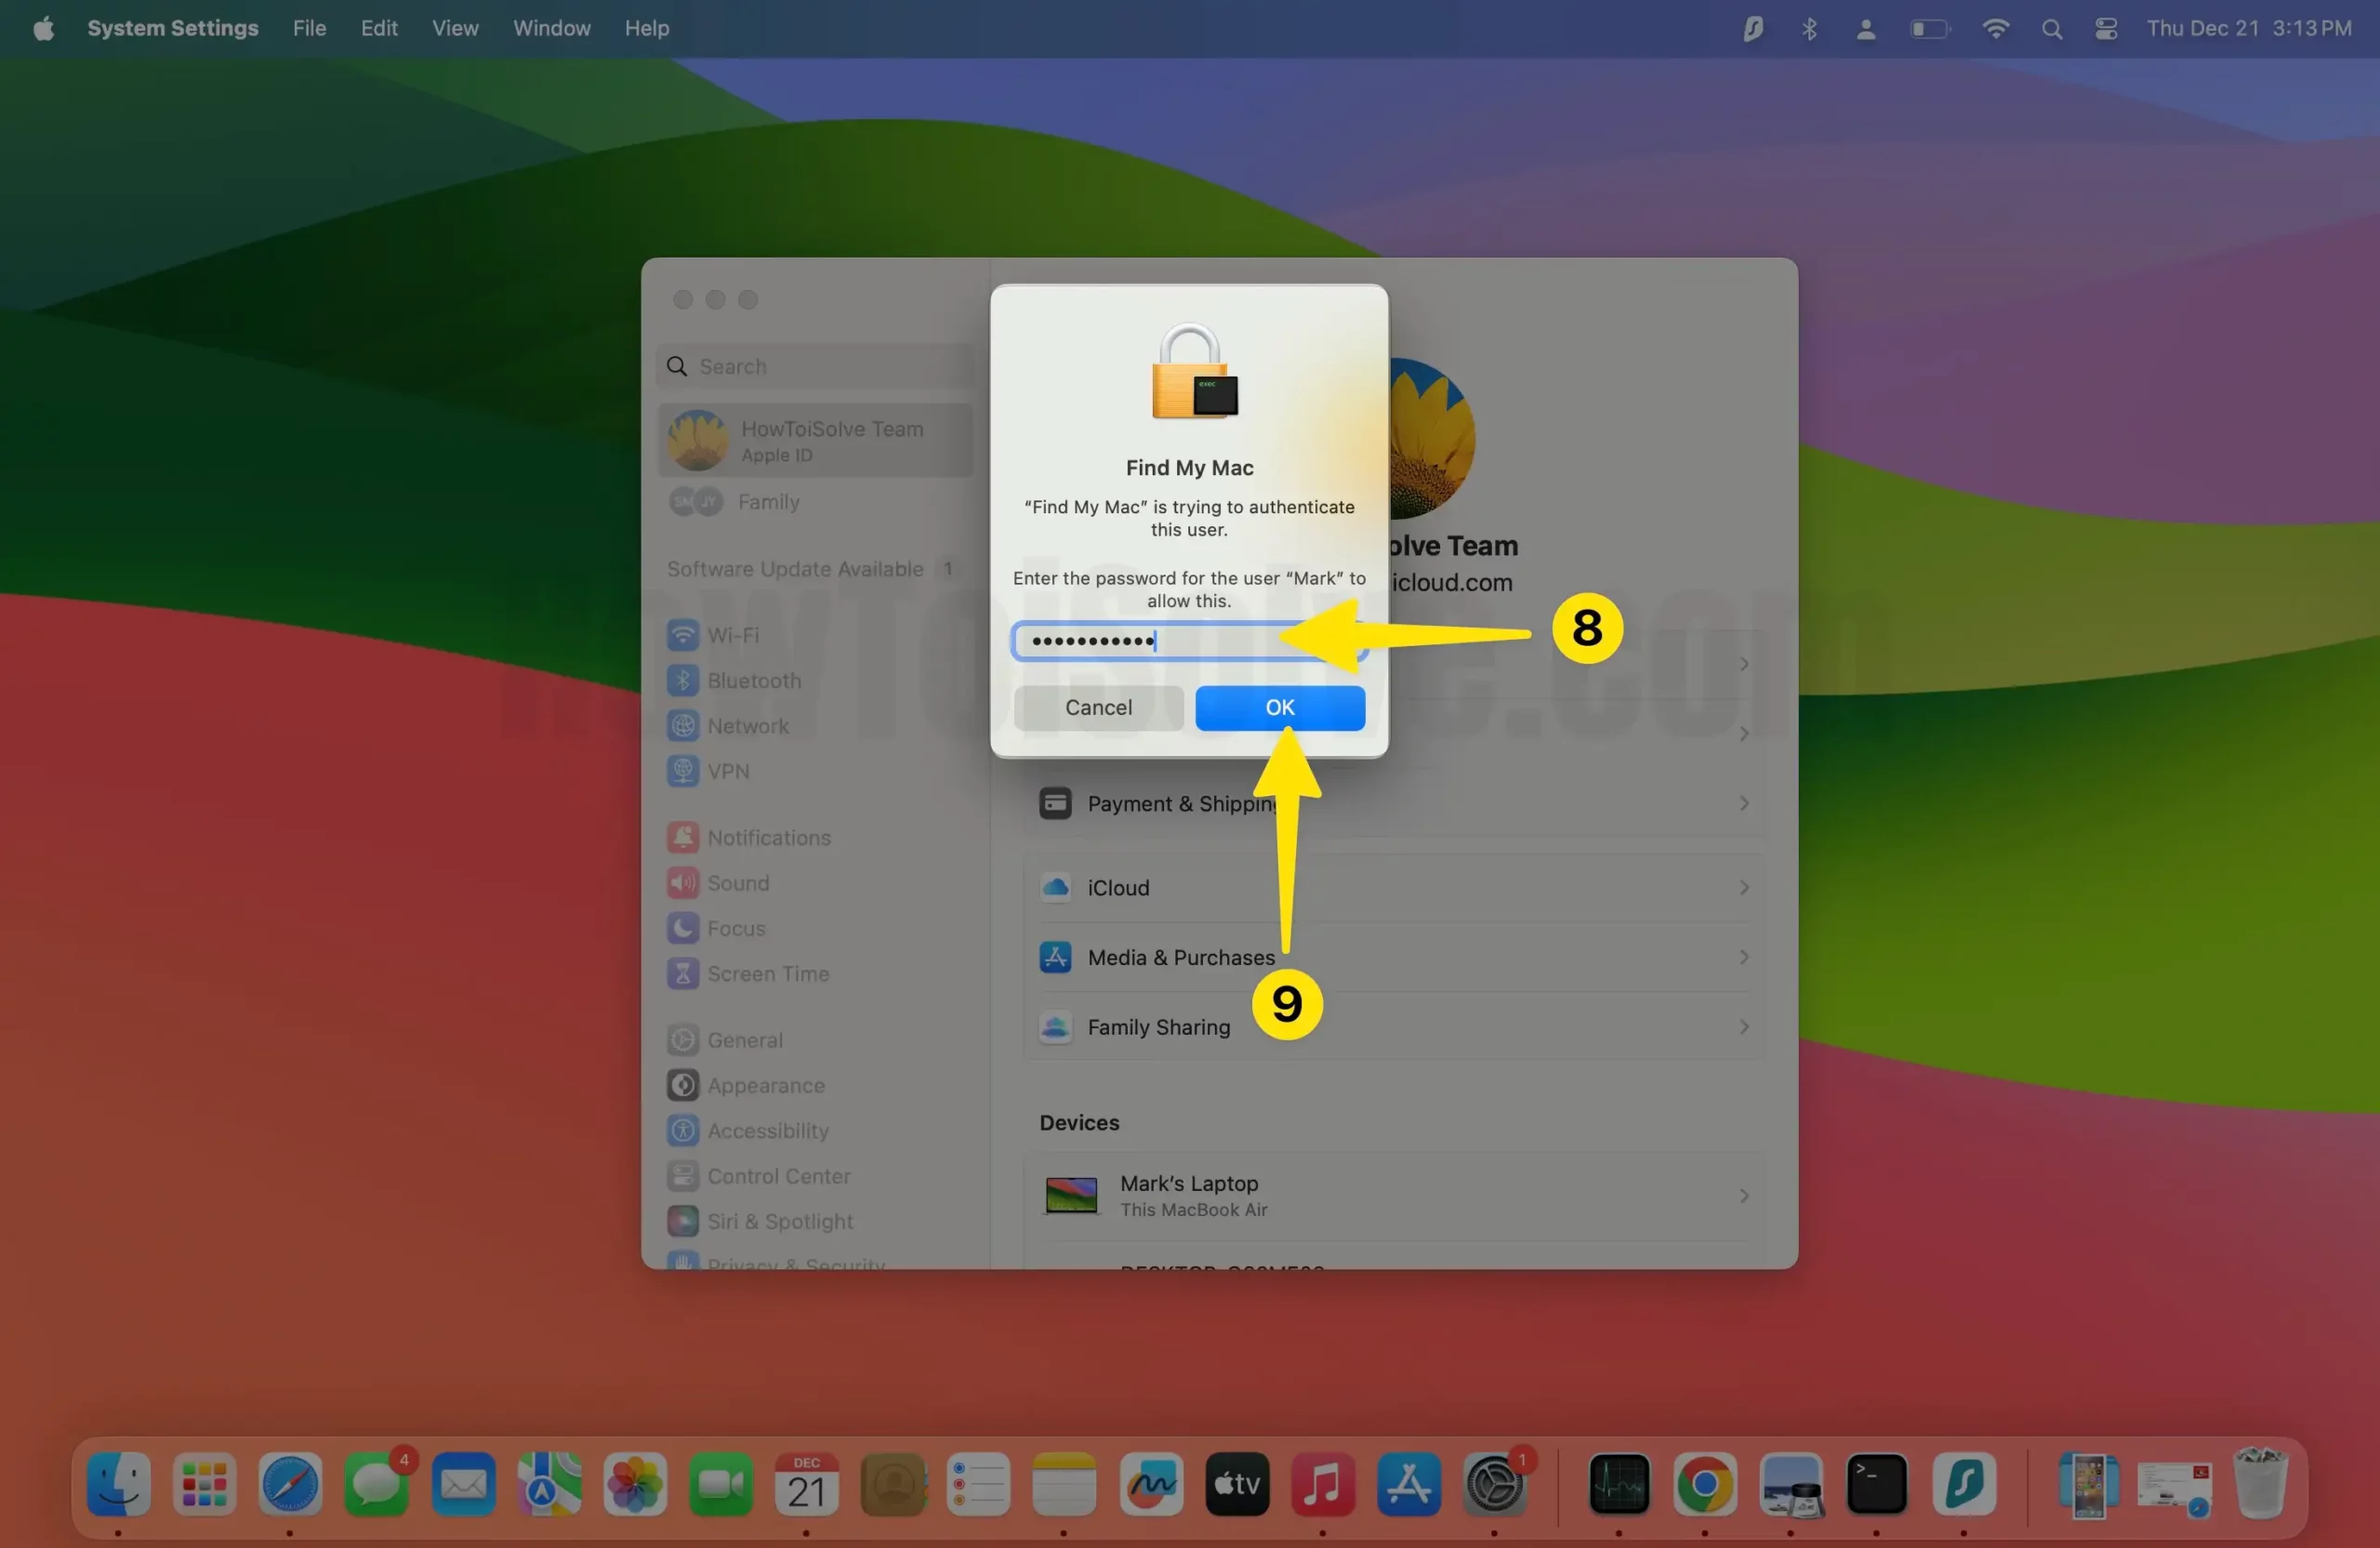
9. Turn off Find My Mac apps using iCloud system settings.

10. Click on find my Mac Turn On.

11. Choose the Allow on Mac.
12. Enter your Find My Mac Password, then the OK button.

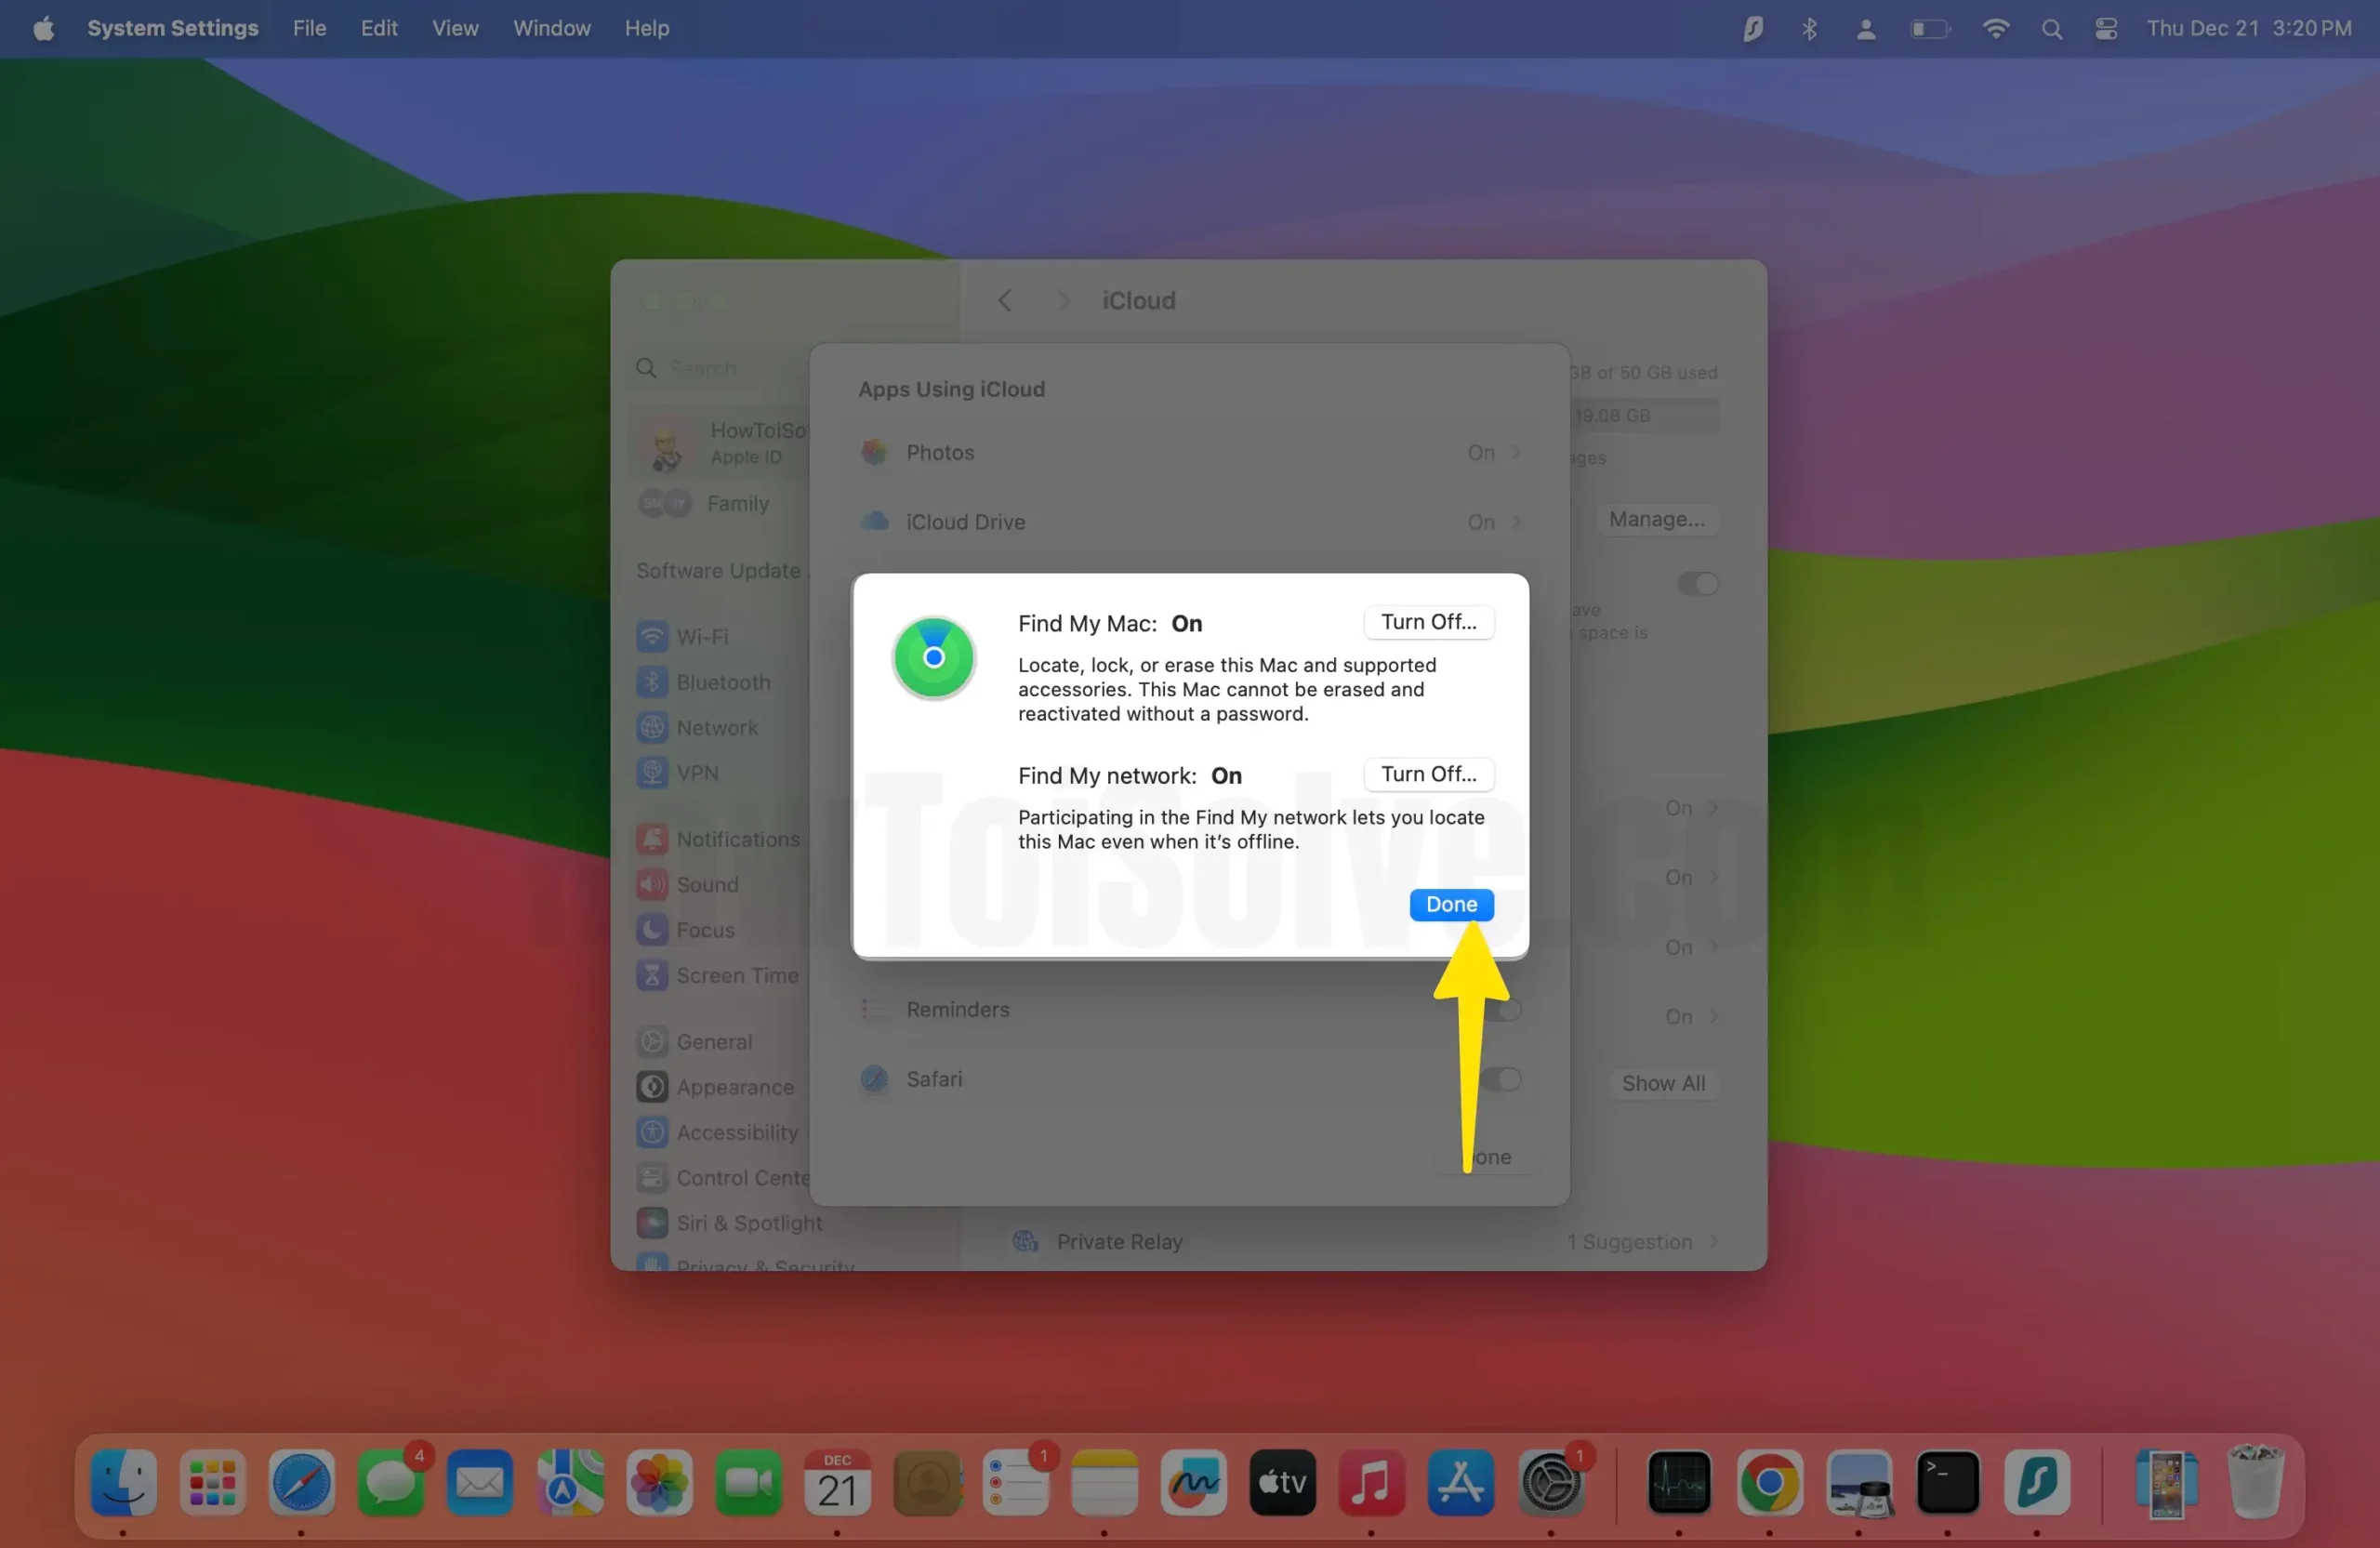
13. Next, finally, enable the toggle Find My Mac on it, then click the Done Button.
macS Monterey And Later
- Navigate to the Apple Logo.
- Choose System Preferences…
- Select Apple ID.
- Click iCloud from the left sidebar.
- Choose Find My Mac, and click Allow.
That’s It!
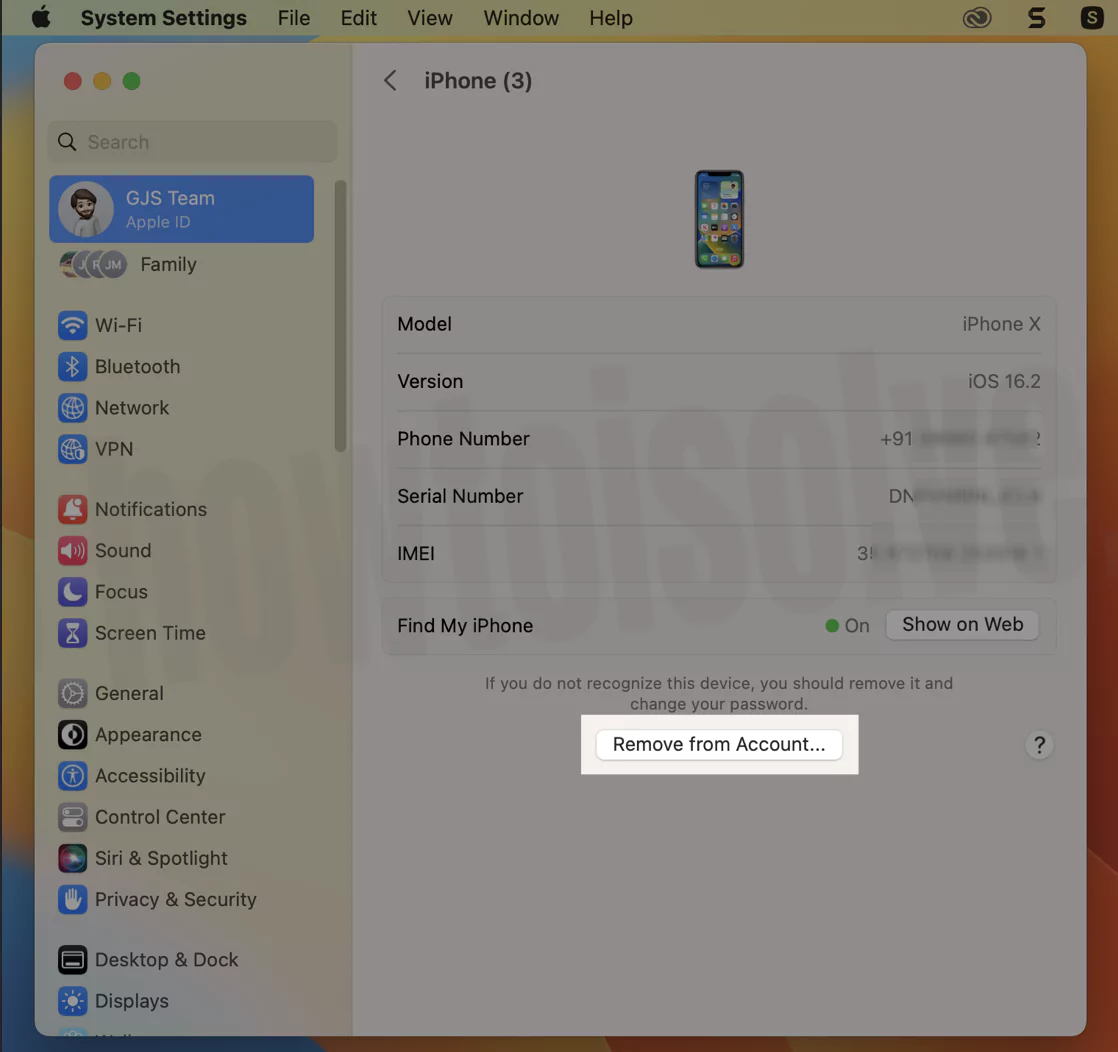
Remove the Device From iCloud On Mac That Turns off the Activation Lock
If you want to remove the device from iCloud that turns off the activation lock, then follow the steps below.
- Go to Apple Logo.
- Select System Settings…
- Click on Apple ID [Your Name].
- All your devices will be listed on the screen’s right side.

Click on the Desired Device (iPhone, iPad). From the next window, choose Remove From This Account.
Bottom Line
You must know where iCloud is and how to manage iCloud Storage on Mac. Now it’s time to learn how to free up iCloud Storage on Mac.
Thanks for visiting us! Read more tips and tricks.


