
Managing media files on smartphones can be challenging due to the large storage space consumed by HD photos and videos. At that time, Apple iPhone/iPad users have questions in his/her minds about how to Free up space without Deleting or Lost Photos. So, Here’s the tutorial that will teach you how to delete photos from your iPhone but not from iCloud. Also, we can get free space by deleting it from the iPhone camera roll once Backup on Third-Party Cloud Service [iCloud Gives Only 5GB Free]. Let’s determine your preferred options after carefully reading through all the alternate ways.
Don’t worry about your precious collection of photos and memories. “You can rest assured that their security is in good hands with us. Our automated systems will take care of everything for you.”
iPhone Photo Management: How to Delete Photos & Free Up Space
By removing hundreds and thousands of photos/videos to iCloud, you can use lots of space on the device to install a new application and enjoy performance all the time.
Solution 1: Enable iCloud Photo Library and Disable after Backup
iCloud Photo library we can turn on at any time; after that, Original Photo and Video move in iCloud in Backgroud [Either locked or Unlocked screen]. For that, you don’t have to sit in front of your iPhone/iPad. Here are the steps to enable and upload iCloud Library on iOS/iPad for iPhone/iPad settings. After uploading photos, turn off iCloud Photo Library then delete photos from the Photos app.
1. Open the Settings App on Your iOS device.
2. Tap on Profile Name [Apple ID name]. Select iCloud

3. Next, tap on Photos
4. Turn the toggle ON to the right side next to Sync this iPhone.

That’s it.
[Wait for 1 or 2 Days, Gigabytes Photos will take time depending on internet connectivity, Number of GBs]
- Now, Turn off Sync this iPhone settings from iCloud Photos. Repeat Steps 1 to 5
- Next, turn off Sync this iPhone toggle.

- A pop-up will ask you – Do you want to download a copy of your iCloud Photos to this iPhone? Photos and videos that have been optimized to save space will be removed from this iPhone. The original, full versions will still be available on other devices using iCloud Photos. Tap on Remove from iPhone.
- Again, for example, 4573 photos and videos will be removed from this iPhone. These photos and videos will remain in iCloud Photos. Choose Remove from iPhone.

That’s it.
Solution 2: Enable Auto-Backup Photo on Third-Party Cloud Server [Google Photo/ Dropbox]
Some iPhone user really likes to use Other cloud services that are secure and give up to 15GB of Free space, and Purchase more at a low cost compared to Apple iCloud. Today, Google Photo and Dropbox are the most trending options for backing up your Phone data to Third-Party servers. Let’s see how to Enable Auto backup of your Photos and Videos to Google Photos and Dropbox.
Learn how to Enable Photo Backup in Google Photos on your iPhone/iPad app.
Step #1. Open the Google Photos app on the iPhone. (Open the App Store, and find the Google Photos app to install it.) ignore it if you have installed it.

Step #2. Tap on Allow Full Access to give permission to your device’s Photo library.
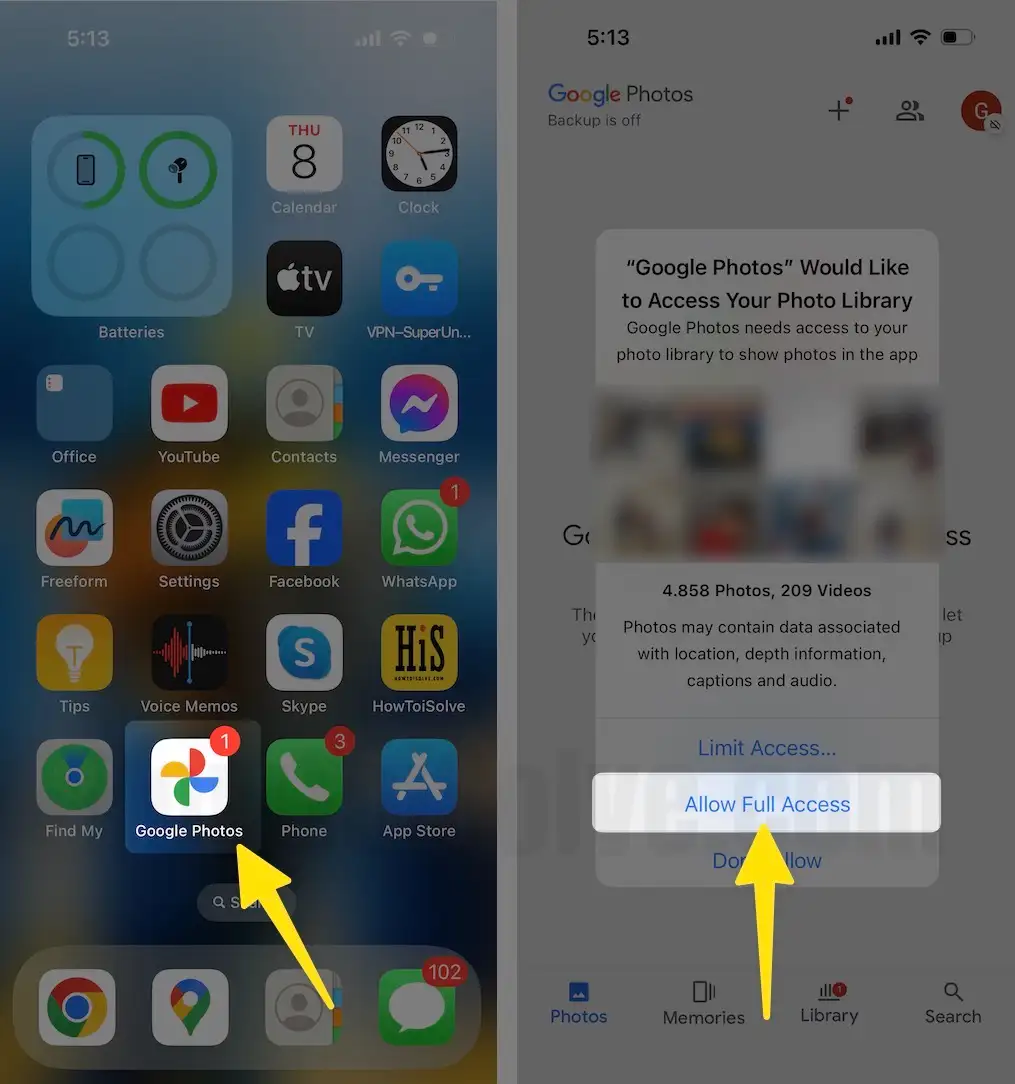
Step #3. Tap on the Profile Settings option at the top right corner of the iPhone screen.
(Hint – if you have multiple email accounts logged in, Please switch to a specific account in order to back up your pictures.
Step #4. Tap on Turn on Backup
A Backup Settings screen will open, and you have to choose your desired settings (Storage saver, Original quality).
Step #5. Tap on Confirm.
Step #6. Now go back to the screen and tap on the Profile icon; you can see in the below picture Backing up… is started.
You may know that Google Drive allows up to 15 GB of Free data storage.
That’s it.
Backup Your Pictures & videos to Dropbox on iPhone/iPad
- Open the Dropbox app on your iPhone.
- Tap on Account from the Bottom corner Tab.
- Click on the Camera Uploads Option.

- Tap on Turn on camera uploads to Start Backup your Photo in Dropbox Cloud.
on this screen, numbers of options on the screen, you can set Back up.., Upload from, and many more. Select the Prefer Options. - Click on Home option, and you can see backup is starting. For example, you can see my given below screen (3,100 remaining…) backing up.

That’s it.
Once All Photos are Uploaded from your Photos app, You can download them later So we can delete them from the iPhone camera roll. Now your iPhone/iPad has free space without lost photos/Videos of your iPhone/iPad.
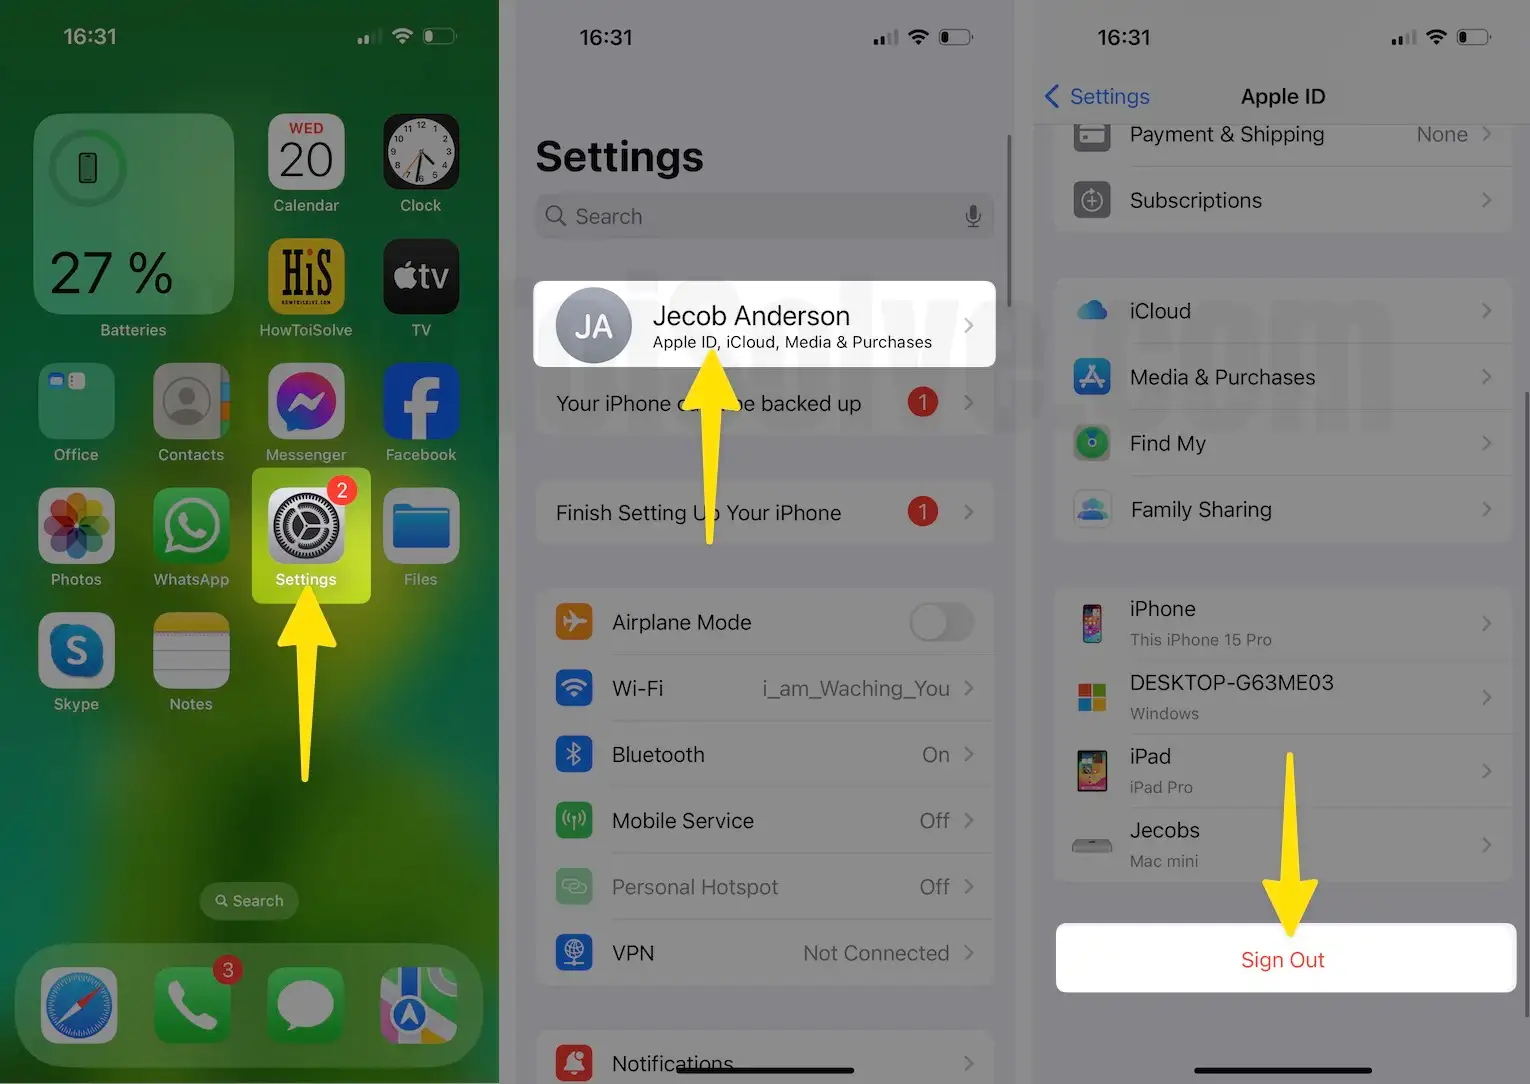
Solution 3: Sign Out iCloud and Sign in to Another iCloud Account
Unfortunately, it is not possible to transfer free space from another iCloud account to your limited storage account. Thus, the best option is to switch to another iCloud account on your iPhone/iPad. To do this, you will need to sign out of your current iCloud account, sign in to another iCloud account, and then turn on iCloud Photo from your iPhone/iPad settings.
Sign Out iCloud account:
Open Settings app on iPhone > Tap Apple ID name > Scroll to Option Sign Out >
That’s it.
Sign In iCloud Account: Settings app on iPhone > Sign in with Apple ID > That’s it. Enable iCloud Photo from iPhone settings > Apple ID Name > iCloud > Photo > iCloud Photo Toggle enable.
That’s it.
Extra Help: Need to increase iCloud storage space
Don’t have enough storage space on iCloud, buy or Upgrade your iCloud storage plan from iPhone/ iPad.
Plans start at $0.99/month and are in your local currency. The first 5GB is free; additional storage must be purchased.
Moved all photos to iCloud accessible and sync on your Mac or Other iOS devices. Have you enabled iCloud Photo Library for a specific device?
For Mac: Go to the Top Apple Menu > Click on System Settings…
Click on Profile Name > iCloud

Click on Photos

Enable Sync this Mac and click on Done button to save the changes. Starting today, your macOS photos will be backed up automatically when your device is connected to Wi-Fi.

Wait for sync and view on Mac; it’s done after Keeping photos on iCloud but deleting them from the iPhone.


