
Will you show network icon mac menu bar? There are 2 tricky ways to add a WiFi icon to the Mac menu bar. All the people who have recently shifted from the Windows ecosystem to the Apple ecosystem can find it complex or confusing to use some of the features of the Mac. Even people familiar with macOS can sometimes find it tricky to make changes like adding Wi-Fi to their MacBook Menu Bar.
Have trouble figuring out how to show the Wi-Fi in your MacBook Menu bar? Please don’t fret, as we have your back on this one. The contents of this article will help you figure out the ways to add the Wi-Fi option in the Menu bar of the Mac. Since macOS Sonoma is out in the market, we will cover the methods of showing the Wi-Fi in the Menu bar on both macOS Monterey and macOS Ventura & Later, so sit back and relax.
Show Wi-Fi in Menu Bar on Mac
Method 1: Using Drag & Drop Method
Quick and Easy way to put your WiFi network icon on the Mac menu bar using Control Center. Drag the icon to the Menu bar and stick it in the right place from control center. Also, we can move or Re-arrange the Menu bar icon using the Keyboard Key + drag using Mouse or Trackpad. In any case, if this method isn’t working, then Try and Alternate way.
Step 1→ Open Control Center on mac from the top menu, and click the control center icon.
Step 2→ Drage the WiFi to the Menu bar and Lift where you want a place.

To Move or Re-arrange the WiFi icon on the Top Menu bar,
Step 3→: Press the Command Key + Select and Drag the icon on the top Menu bar, to Re-arrange any icon or WiFi signal icon.
That’s it. For some reason, we can’t move or Drag the WiFi icon to the Menu Bar on Mac Try after Restart your Mac or Force Quit all running apps on Mac and Try. Also Using the same technique we can remove the Mac menu bar icon [Press Command + Select the icon and drag it down until you see the Close button, and Release icon to remove it].


Method 2: From mac System Settings
Since accessing the Wi-Fi options and settings directly from the Menu bar is much easier and more convenient, everyone would want to use this feature. Hence, we will show you the step-by-step process of showing the Wi-Fi button in the Menu bar of your MacBooks running on both macOS Monterey and macOS Ventura & later.
On macOS Ventura & Later
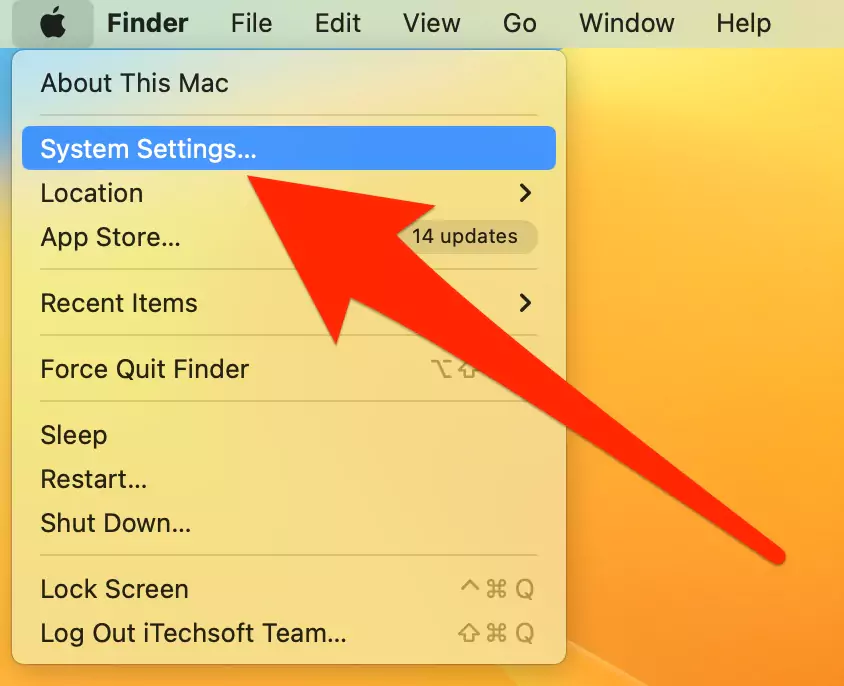
Step. 1→ Click on the Apple menu using your mouse.
Step. 2→ Tap on the system settings option in the menu that appears.
Step. 3→ Now go to the control center tab.
Step. 4→ Next to the Wi-Fi settings in the control center tab.
Step. 5→ Tick mark the “show in menu bar” option in the Wi-Fi settings.

After applying this setting, the Wi-Fi icon will be visible to you in the Menu bar of your Mac, from where you can use it to connect or disconnect your device to the available networks, open Wi-Fi settings, and much more.
On macOS Monterey
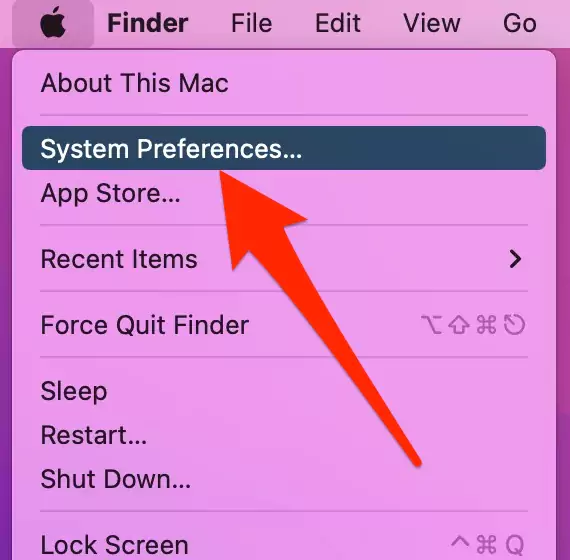
Step. 1→ Use your Mac’s touchpad or mouse to left-click on the Apple menu at the top left corner of your home screen.
Step. 2→ Select system preferences in the drop-down list.
Step. 3→ Then, go to network and select Wi-Fi from the window’s pane on the left side.
Step. 4→ Finally, check the box in front of the “show Wi-Fi Status in menu bar” setting.
Once you check mark this setting, Wi-Fi will appear in the Menu bar of your MacBook, and you will be able to open and access all the different functions and settings of your Mac’s Wi-Fi directly from this icon.
Get Detailed Wi-Fi info from the Menu Bar on macOS.
Now that we have added Wi-Fi to the Menu bar of your MacBook, it’s time to learn some of the applications of this Wi-Fi icon. One such application of this Wi-Fi symbol is that you can get detailed information or data about the Wi-Fi network to which it is connected. This process is how to get detailed Wi-Fi info from the Menu bar on macOS.
Step. 1→ Press the “option” on your keyboard and click on the Wi-Fi icon simultaneously to get detailed info about the network connected to the MacBook.

With this method, you can see the router and network IP address, security, channel, BSSID, and other details about the Wi-Fi.
How to Check Wi-Fi Signal Strength on Mac [How to test Wi-Fi signal on Mac]
Another useful and exciting application of adding the Wi-Fi icon to the Menu bar of the Mac is that you can use it to check the strength of your Wi-Fi signal. There is a simple shortcut for checking the Wi-Fi signal strength, which can be found below.
Long-press the option key on the keyboard while clicking on the Wi-Fi icon in the menu bar of the MacBook.
The Wi-Fi’s signal strength can be seen listed next to the “RSSI” heading. The signal strength is measured in dBm.
Wi-Fi Button on Mac Keyboard
There is no actual button or key on Mac’s keyboard for accessing Wi-Fi or the Wi-Fi settings. However, one can use the “Option key + click on the Wi-Fi icon” shortcut as the Wi-Fi button for your MacBook.
Adding the Wi-Fi icon to the Menu Bar of your MacBook can save a lot of your valuable time and effort by eliminating the need to use other applications or tools like the spotlight search or dock for opening the Wi-Fi settings. So go ahead and use this fantastic feature and let your Mac do the rest of the work for you.
FAQs→
Where is the Wi-Fi option on the Mac?
→ Ideally, the Wi-Fi option can be found in the system preferences (macOS Monterey) or system settings (macOS Ventura) settings of the MacBook. But you can also add the Wi-Fi symbol in the Menu bar of the Mac for easy and quick access. Refer to this article to learn how to show Wi-Fi in the Menu bar of the MacBook.
Why is my Mac not showing Wi-Fi options?
→ If your MacBook has the support for establishing wireless connections but cannot see the Wi-Fi options in the network preferences window, then you might not have set up the Wi-Fi service. Open the network settings from the system preferences pane. Then tap on the Add button > select the Interface menu > choose Wi-Fi. WiFi Not Showing on Mac.
Signal bars appear in the Wi-Fi status icon.
→ You can add the signal bars in the Wi-Fi status icon to know the strength of the Wi-Fi signal. Head over to on macOS Ventura:- Apple logo > System Settings > Control Center > WiFi “Show in Menu Bar” Enable MacOS Monterey & Earlier:- Apple icon > system preferences > Dock & Menu Bar. Select Wi-Fi on the left tab and choose the “Show Wi-Fi status in menu bar” option.
Wifi Missing From System Preferences
That means WiFi Profile is removed or Corrupted from Mac Network Settings. in That case Just remove it already and Add a New WiFi Profile on your Mac system settings.
To add Network Profile,
- On MacOS Ventura:- Go to the Apple Logo > System Settings > Network > Click on the Down arrow at last > Add Service… > WiFi > Create.
- On MacOS Monterey:- Go to the Apple Logo > System Preferences > Network > Click on [+] to add new Service > WiFi > Create.
Some of the time your WiFi icon grayed out or is inactive but wifi is working on Mac. don’t worry it has been stuck at some point. Restart your Mac will work or Keep your Mac updated.


