
Know why your Mac says Macintosh HD-Data” Can’t Be Unlocked on startup and After Reinstall macOS or Upgrade to MacOS Version to the latest one. Nowadays, macOS users get these error popup messages on the screen whenever they turn on and log in to a Mac or MacBook. Most people are affected by this error because Beta MacOS and Public MacOS are installed on separate partitions on the same Mac, MacBook.
The Warning message on the screen is “The Disk “Macintosh HD – Data” can’t be unlocked. A problem was detected with the disk that prevented it from being unlocked.
What Does Affect on Mac Behind this Problem?
We will fix the problem in two ways: in Normal mode and the second is in recovery mode,
1). Fix macOS Partition on Mac Disk
This Error or Warning message says that your Mac has a problem opening a disk partition, So your Mac has too many or more than one Disk Partition for Install MacOS. You have to Re-install macOS On another Partition. In this case, you must identify the active or Needed partition and then delete the unused Partition.
Step 1: Open Disk Utility on Mac Using Spotlight Search (Command + Space).

Step 2: Now, Click on View > “Show Sidebar” and “Show All Devices“.

Show All Devices in Disk Utility on Mac
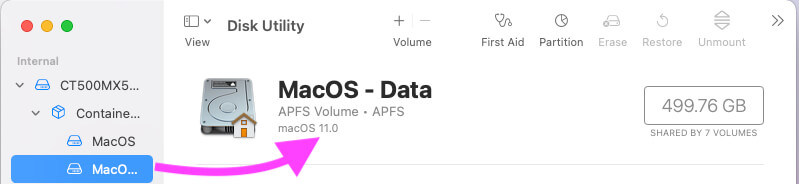
Select the Disk Volumes Partition from the sidebar of the Disk Utility window.
Normally, We can’t Delete Macintosh HD-Data or MacOS-Data Volume, because it contains User’s Data. So we will repair it first. then the problem is not fixed then Erase the Unused or Duplicate Partition [Backup first before erase]. Get a Detailed Explanation in this article.
But if you have more than one redundant Volume, then you can do it. Volumes like,
“Macintosh HD” “Macintosh HD – Data” “Macintosh HD – Data Data”

Select Macintosh HD – data on Mac updated
Run the Repair process and Wait for completion. Process Time depends on the Data size on your Mac.

Repair Volume on Mac
If you can’t Repair [First-Aid] Volume from Mac, then Erase the Apple Drive and Re-install a new copy of macOS. Later on, we will see how to do it. In this article, Before moving to the following essential steps, Backup the Data Using a Time Machine. Here’s a complete guide on Start Time Machine Backup of your Mac.
Just select the Unused Volume partition and Select (-) from the top Tab in a window.
Here, you have to go with the “Delete” option, Note: Don’t Delete All Groups of volume.
2) Backup Mac Data
Backup of your Mac Data must be a critical step because this problem we can’t figure out without deleting the Volume partition and Re-installation of your Mac. So you will lose the data. I recommend taking a Time Machine backup to External Drive.
- On MacOS Ventura:- Go to the Apple Logo > System Settings > General > Time Machine.

Open Time Machine Settings on Mac
- Add Backup Drive and Start Time Machine backup. see How to Start Time machine Backup on Mac.

Add Backup Drive to Mac Time Machine

Setup Time Machine Drive on Mac

Enable or Disable Encryption Backup for Time Machine on Mac
Wait for Your Mac Preparing Time Machine Backup Drive on Mac.

Wait for Prepare Time Machine Backup on Mac
- On MacOS Monterey & Earlier:- Go to the Apple Logo > System Preferences > Time Machine > Select Drive and Start Time Machine backup.
Once you backup on External Drive, you can Repair the Partition and Volume at any level. Let’s start with Repair Specific Volumes one by one.
3). First Aid – Repair the Drive From Disk Utility
Repair the Volume option, repair the internal system error, and repair itself. Sometimes, it’s time-consuming, depending on the Data size saved on your Mac’s drive.
- Open Disk Utility Window > Now, Click on View > “Show Sidebar” and “Show All Devices” on Mac.
- Select the Volume from sidebar > and Click on the First Aid option to start the repairing process.
Won’t Repair First Aid or Takes a time to complete the repair process
Many users found that this solution did not help them. Try the next solution if it does not work for you.
4). Erase Volume Partition
Before starting the Erasing process, you must check and identify which Volume Partition Data folder is in use because you have to Erase the Duplicate Machintosh HD Data Volume only.
- Open “Finder” on Mac > From the top Mac menu, click on “Go” > “Utilities” > and Open “Disk Utility“.
- Now, click on View > “Show Sidebar” and “Show All Devices” on Mac.
- Find Using MacOS Version installed on your Mac’s Partition. Select Unused or Duplicated Volume partition, then Select Erase option from the top options on a window.
Note: If your Mac won’t log in or cannot start, perform repair and erase the partition in recovery mode.
Go through macOS Recovery and fix the issues
Enter your Mac into MacOS Recovery, Perform all the repairs, and Reinstall or Erase the Duplicate drive from the macOS Recovery window.
Run First Aid:-
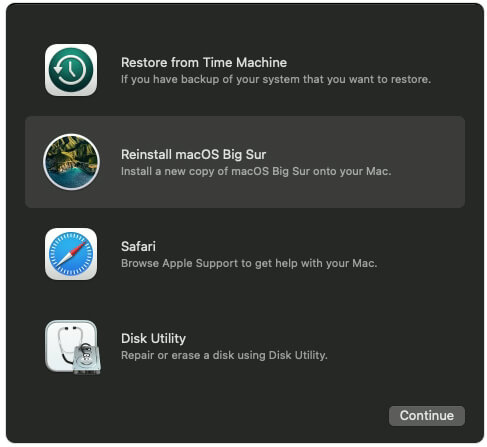
if you are in recovery mode, then you will see the macOS Utility screen. Select “Disk Utility” Option > “Continue“.
Select the volume from the sidebar and run first aid.
or To Erase the Drive,
Select the volume from the sidebar from Disk Utility and select Erase from the top of the window.
In the same way, we can Erase Apple Drive completely using Disk Utility to remove all unused Volumes and Partition from mac SSD or HDD internal drive.
- Intel Mac: Shut down your Mac and wait for 20 seconds. Now, Press and Hold the Power button [Touch ID] button until you see the Startup volume drive or Options > Enter your Mac password and See macOS Recovery Window > See and Click on Reinstall macOS.
- M1, M2 Mac: Then reinstall the new macOS on your Mac. Start your Mac > Press Command + R key to See macOS Recovery Window > Select install macOS, Your Mac will download lateset macOS from the internet and install it.
Later, using Time Machine backup, we can restore all types of Data to Mac without any Data loss.
If you won’t need more help from us, comment me in the comment box below or contact Apple Support at Genius bar reservation.


