I was so excited to use all new macOS Sonoma features, and when Apple announced macOS was released first, I downloaded it to my MacBook Pro. However, after four to five days, MacBook Pro started draining the battery unusually. Since I had faced this battery draining issue before, I wasn’t worried about this Because I knew some tricks which could fix the macOS battery drain on MacBook Pro and improve the MacBook’s battery life.
Let’s head over and look at the tips to fix battery-draining problems in macOS and how to improve the battery life of the MacBook. On behalf of MacBook owners have a query like “Macbook Battery Died and Won’t turn on“, “MacBook Pro/Air losing Battery During Sleep“, “Fix Battery Drain While Charging“.
Tips to Improve macOS Sequoia Battery Drain Issue Any Mac
Before getting started – you should use the advanced macOS features to stop rapid battery drain issues on your MacBook. For instance, Low Power Mode, Activate Dark Mode on Mac, Set Up a Dynamic Desktop on your Mac.
Turn on Low Power Mode & Turn off High Power Mode
This option is for your Macbook to optimize performance, reduce energy consumption, increase battery life, and operate more quietly. This option is available on MacOS Monterey & Later macOS installed on Mac with a Silicon chip. Follow the below steps,
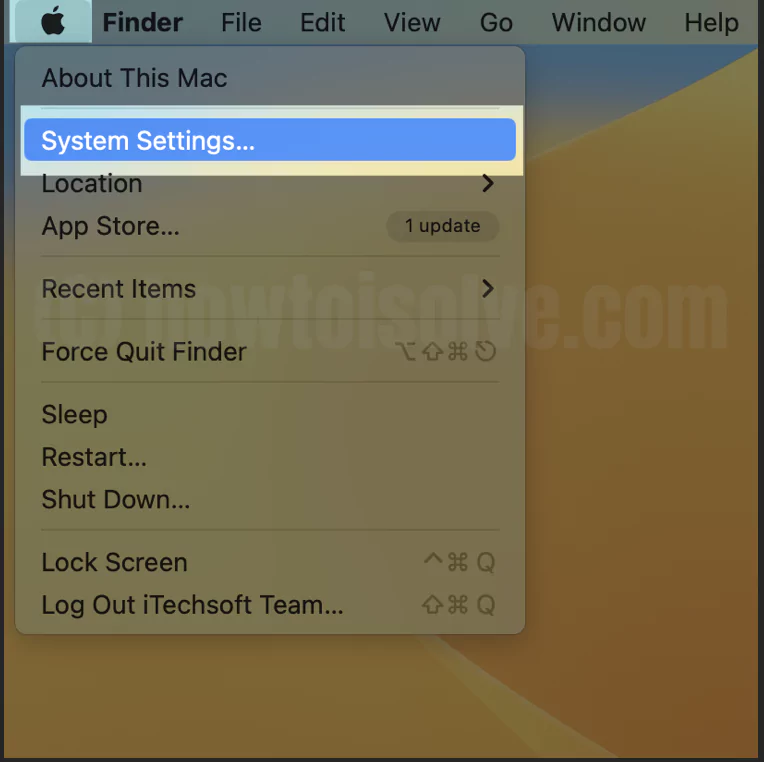
Step 1: Go to the Apple Logo from the top Mac menu > System Settings/Preferences.
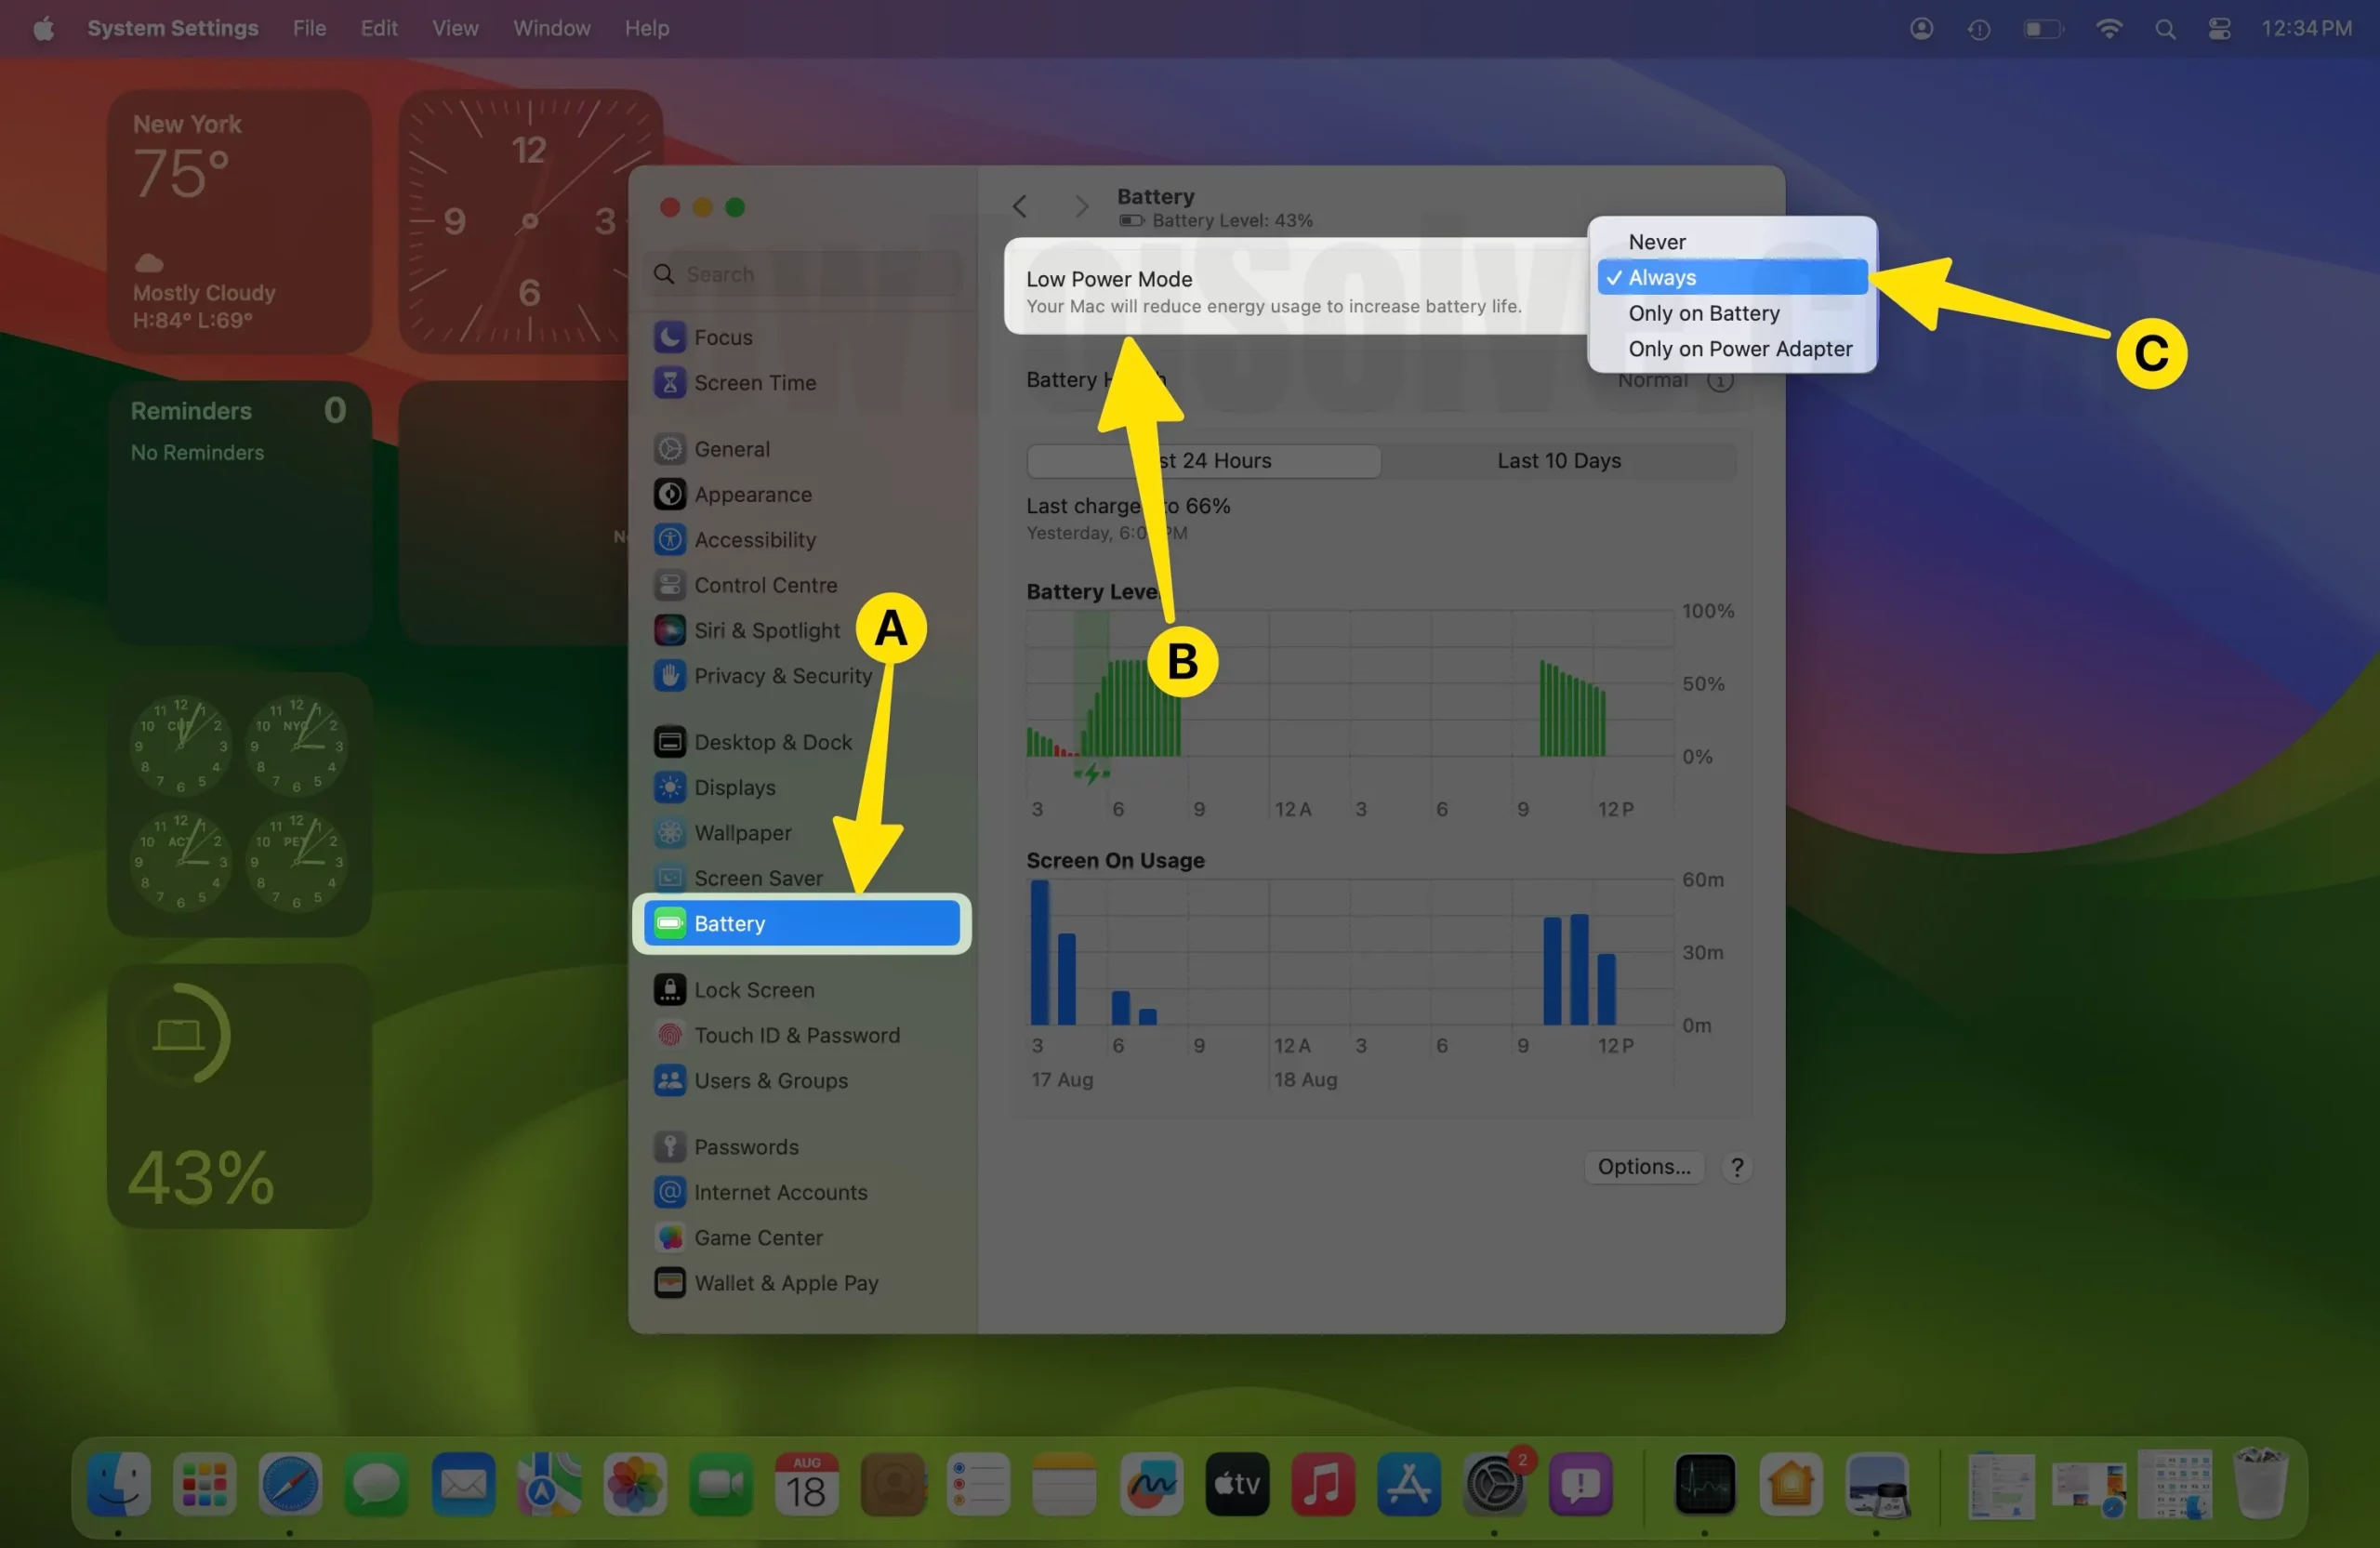
Step 2: Battery > Battery from the left side of the window.
Step 3: Select “Low Power mode” Option and select Always. That’s it.
For MacBook Pro M1 Max,
We can enable High power mode to allow your MacBook to use Maximum resources while doing heavy processes like exporting video. Unfortunately, you miss to turn off this feature; here are steps to set automatic or Turn on Low Power.
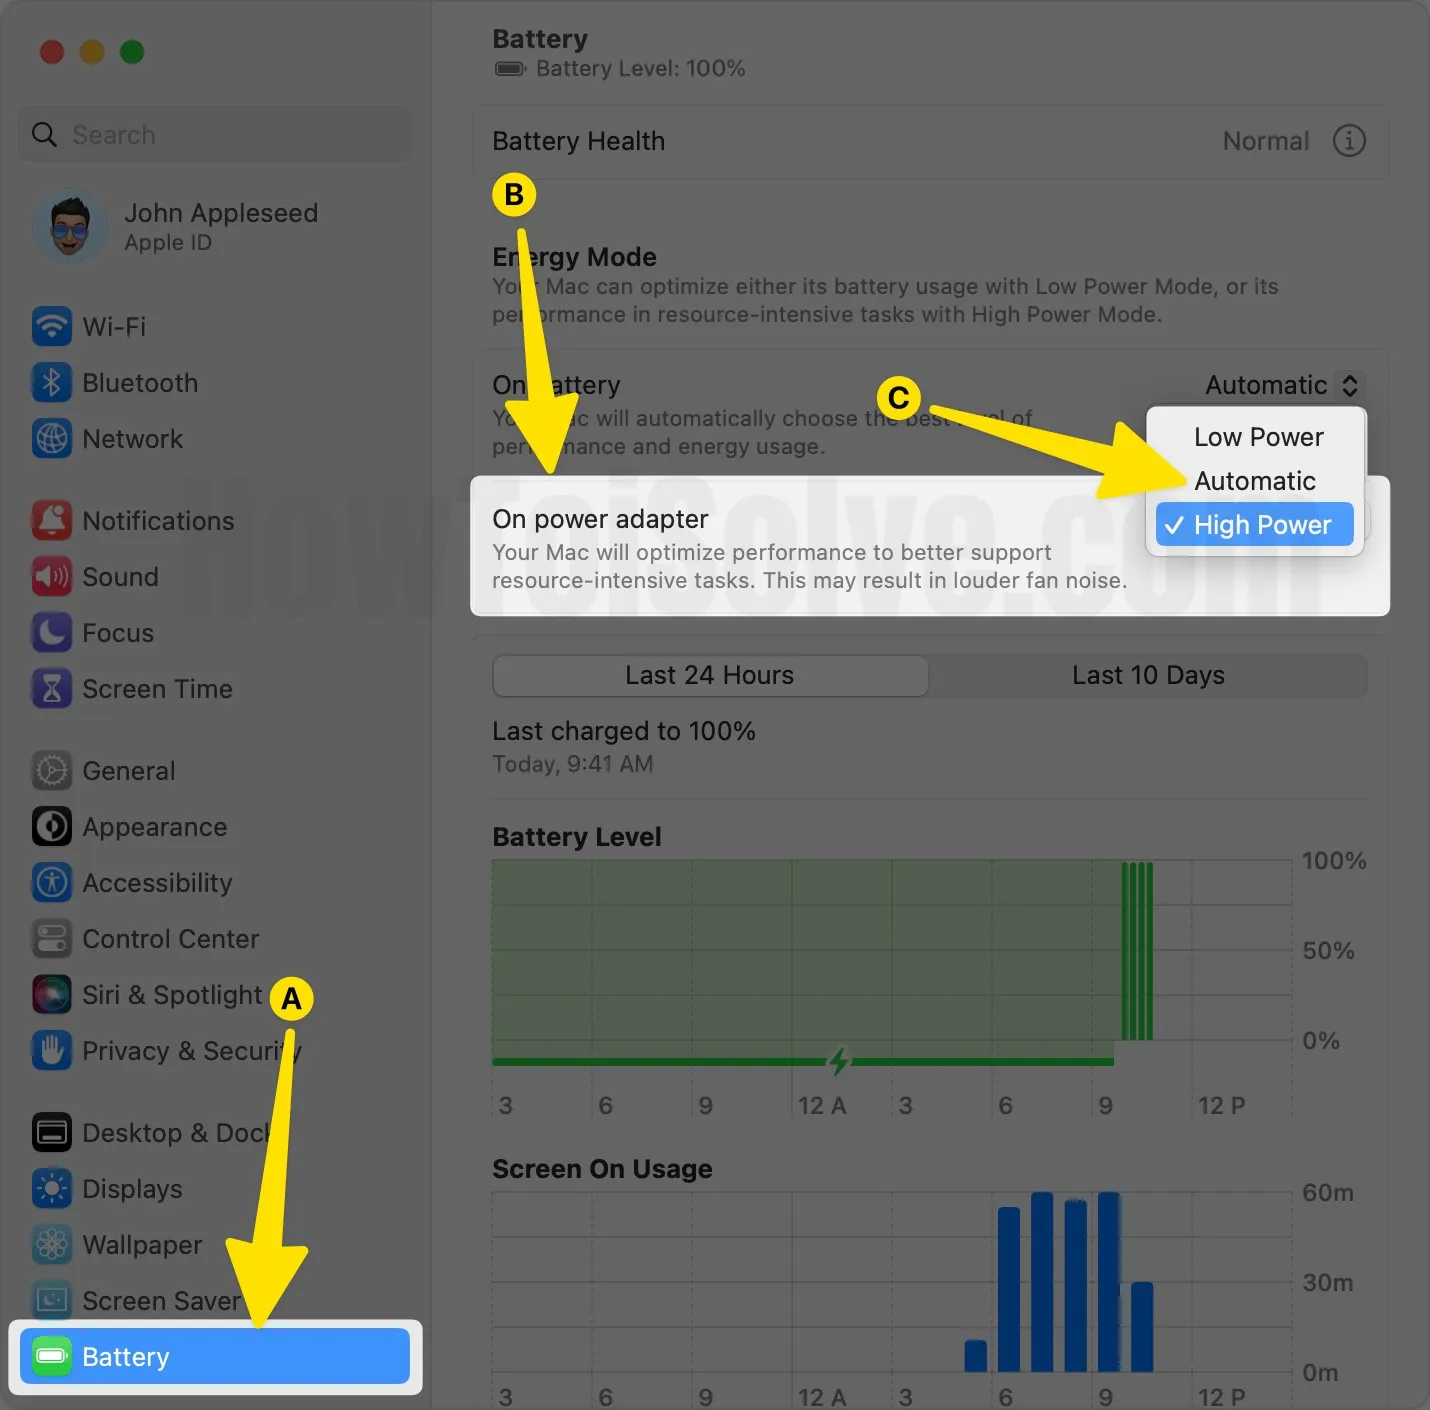
Step 1: Go to the Apple Logo from the top Mac menu > System Settings/Preferences.
Step 2: Battery > Power Adapter > Automatic.
That’s it.
Know more about Use High Power Mode on MacBook.
Quick Tips to Boost Your Mac Battery Life
- Lower the brightness of the MacBook, or keep at a Medium
- Try battery saver:
- Click on the “Apple Logo” icon at the top of the screen.
- Now open “System Settings/Preferences.”
- Then, tap “Energy Saver”. Enable it.
- Try not to open multiple tabs at once. Please open what you need, and after work is done, close it. Multiple tabs will increase the load on the processor, resulting in more battery use.
Solution 2: Check which application is using the Most battery of your MacBook
This way, you will get exactly which application disrupts your fun.
- From the “Finder”, tap “Applications”.
- Next, open “Utilities” and click “Activity Monitor.”
- From the top panel of that box, tap “Energy.”
If you do not want to follow these steps, simply from the Spotlight, you can search for the Activity Monitor.
The entire list of all the applications will be on your screen, along with battery consumption. Now analyze the list and find out which application is eating more battery and delete temporarily and then re-install it after some time.
Solution 3: Disable Location Services
Enabling the location services for each app does not make any sense, instead, turn it on for a few applications, whichever you need or disable it for the entire system. We all know location services gradually eat up battery whether you have enabled it on iPhone or MacBook Pro. When you disable entirely location services, the “Find My Mac” will not function.
Turn off On MacOS Ventura
- Go to the Apple Logo from the top menu > System Settings.
- Next, Click on Privacy & Security > Location Service.
- Manage all Apps that are using your Location individually or Complately Turn off toggle “Location Services“.

- That’s it.

Turn off On MacOS Monterey & Earlier
- Tap “Apple” icon.
- Then open “System Preferences”.
- Tap on “Security & Privacy”.
- On the bottom of the screen, you will see “Lock icon” Click on it to make changes.
- Now enter the required details, “Apple ID, and Password”.
- Tap “Privacy” and then tap “Location Services”.
- Next, disable the “Location Services” and confirm it.
- Again click on that “Lock” icon to prevent the security of your MacBook Pro.
Also Read – Change Best Energy Saver Settings On your Mac
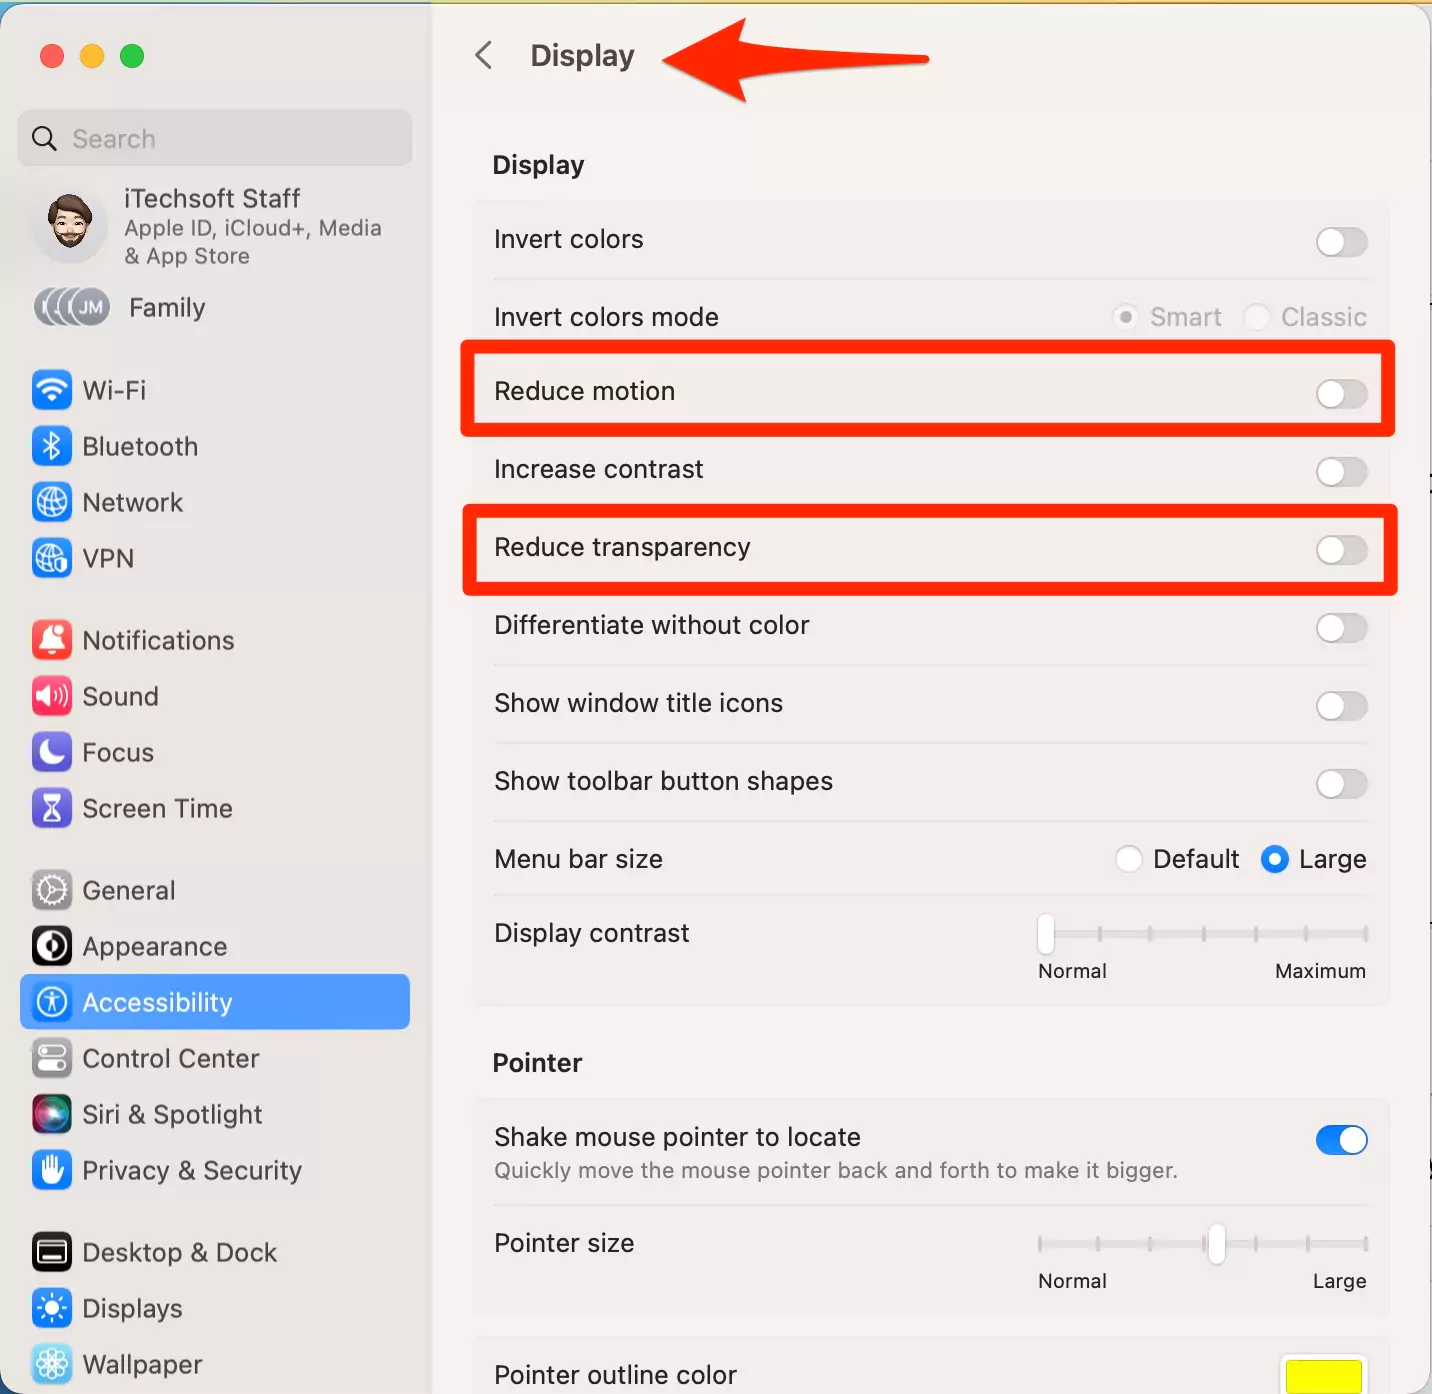
Solution 4: Disable Transparency and Motion Effects
Another reason behind battery draining can be the system’s continuous use of motion effects and transparency. Turning them off might improve the battery life of the MacBook Pro.
On MacOS Ventura
- Go to the Apple Logo > System Settings > Accessibility > Display > and Turn off the toggle “Reduce Motions” and “Reduce Transparency“.
On MacOS Monterey & Earlier
- Tap “Apple” icon on the top of the screen.
- Click on “System Preferences” and then open “Accessibility”.
- Now, on the left side click on the “Display”.
- Uncheck “Reduce Motions” and “Reduce Transparency”.
Solution 5: Turn off Live Caption on FaceTime
On MacOS Ventura Update, Your Mac will automatically caption audio using on-device intelligence. The accuracy of Live Captions may vary and should not be relied upon in high-risk situations. Follow the steps below to turn off Live caption,
- Open the FaceTime app on Mac > FaceTime from the top menu > Settings > Turn off “Live Captions (Beta)” Under General. That’s it.
Or
- Go to the Apple Logo > System Settings > Accessibility > Live Caption > Turn off “Live Captions”. or Turn off In-App Live Captions, With the toggle option “Live Captions in FaceTime“.
Let everyone on your calls know their speech is being transcribed. All audio is processed on the device. Live Captions uses additional power.
Solution 6: Turn off Automatic Updates
Enabling auto-updates is a good habit if you want all your MacBook apps up to date. But in a situation of unnecessary battery draining in MacBook, you should turn it off. As it continuously searches for updates in the background.
On MacOS Ventura
- Go to the Apple Logo > System Settings > General > Software Update > Click on (i) Button next to the Automatic Updates > See the Automatic Update settings and install itself. To Prevent that, Disable it.

On MacOS Monterey & Earlier
- Step #1: Go to the “Apple” menu.
- Step #2: Open “System Preferences” and click “App Store”.
- Step #3: On the bottom of the screen click on the “Lock” button to make changes.
- Step #4: Enter “Apple ID and Password”.
- Step #5: Disable everything like Installing macOS Updates, Downloading newly available updates in the background, Installing system data files and security updates, and more.
Solution 7: Try to use the only Safari
Compare to Google Chrome and Firefox; Safari is the most efficient and secure. Safari is now available with the ability to customize so that you can make your own web browser. It also saves battery compare to third-party browsers.
Solution 8: Clean Up your MacBook to fix Battery Drain
Cleaning up the MacBook will remove all the junk files and files which are causing errors while using the MacBook. Even you will get some free space.
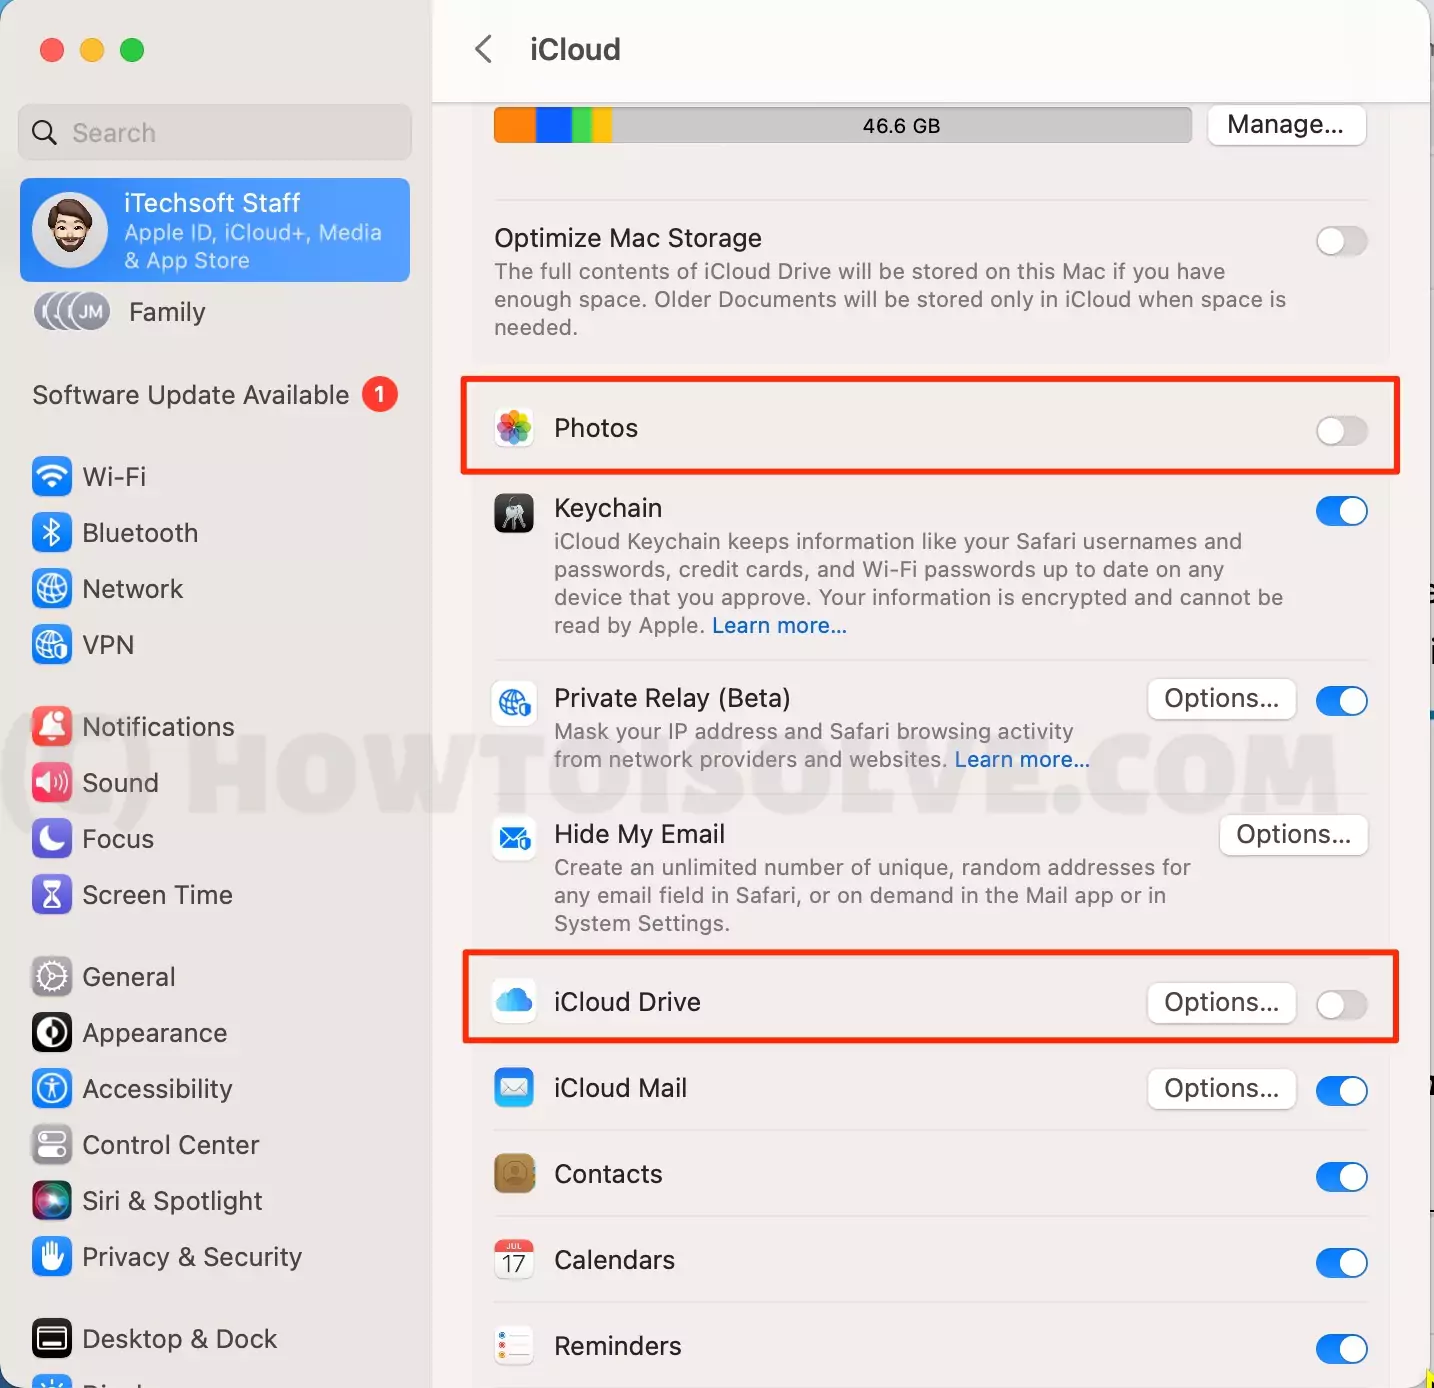
Solution 9: Disable iCloud Photo Sharing and My Photo Stream/iCloud Photo Library
When this feature is turned on iCloud will share all your albums and photos across every Apple device and eventually it will consume some amount of battery.
When you have enabled My Photo Stream, it will collect all the recent pictures from iDevices and share new pictures to My Photo Stream to every device.
On MacOS Ventura
- Go to the Apple Logo from the top menu > System Settings > Tap on your profile name > iCloud > Turn off Extra iCloud services that run and use in Backgroud like Photos, and iCloud Drive.
On MacOS Monterey & Earlier
- Tap on “Apple” icon and open “System Preferences”.
- Then click on “iCloud”.
- Next to “Photos”, click on “Options”.
- Disable iCloud Photo Library, iCloud Photo Sharing, and My Photo Stream.
- Tap “Done”.
Solution 10: Updates Apps to fix battery Drain
Even it is possible that Few outdated applications on the MacBook Not function properly and cause errors and errors. The best solution for outdated apps is to update them.
Step #1: Go to “App Store” and click on “Updates”.
Solution 11: Reset PRAM and SMC
The ultimate solution to every problem in MacBook [Intel Processor only]. Try it.
How to Reset PRAM:
- Shut down the MacBook completely.
- Press “Command+Option+P+R” and Power button together, before the gray screen, appears.
- Hold pressing until MacBook boots up totally.
- After leaving all buttons, restart the MacBook again.
PRAM has been reset, and now, when MacBook turns on, you have to make a few changes like time, volume, pointer speed, and more. Don’t worry. All the data is safe and secure.
Reset SMC:
It would be better if you reset SMC on MacBook without removing the battery.
- Shut down MacBook.
- Plug in Charger, don’t remove it.
- Now, press “Shift+Option+Control+Power” at once.
- Leave all the keys.
- Turn on MacBook.
The process is completed successfully.
Solution 12: Update MacBook to Fix macOS battery Drain
Still, if the battery draining issue isn’t fixed, then update the MacBook to the latest software if you haven’t updated it yet.
Step #1: Go to “App Store” and click on “Updates”.
There you will come to know if any new update is available or if your MacBook is up to date.
Don’t Miss out on Useful Features on Mac:


