Learn about how to screen record on Macs. Did you know macOS is mounted with a screen recording feature known as QuickTime? You can record the screen just above an app installed on your Mac computer. So no matter whether you want to record the gameplay or else want to make a video for YouTube, this aspect will reach out to all your needs.
However, there are plenty of third-party apps to screen record, but where the users are usually stuck is how to screen record on a Mac with audio using QuickTime. No worries! As in this tutorial, we will walk you through the complete procedure. What’s more? Ultimately, we will let you know how to record the entire screen or a selected portion of it on a Mac.
How To Record Video On Mac Using Webcam
Having the best webcam for Mac is always beneficial; as of now and forever, it offers a handy way to record the screen. Well, to compile the task, there are three different apps: QuickTime, iMovie, and PhoneBooth, and what makes it easier to perform is that all these applications are pre-installed on your Mac.
Trick to Screen Record on Mac Using QuickTime built-in App
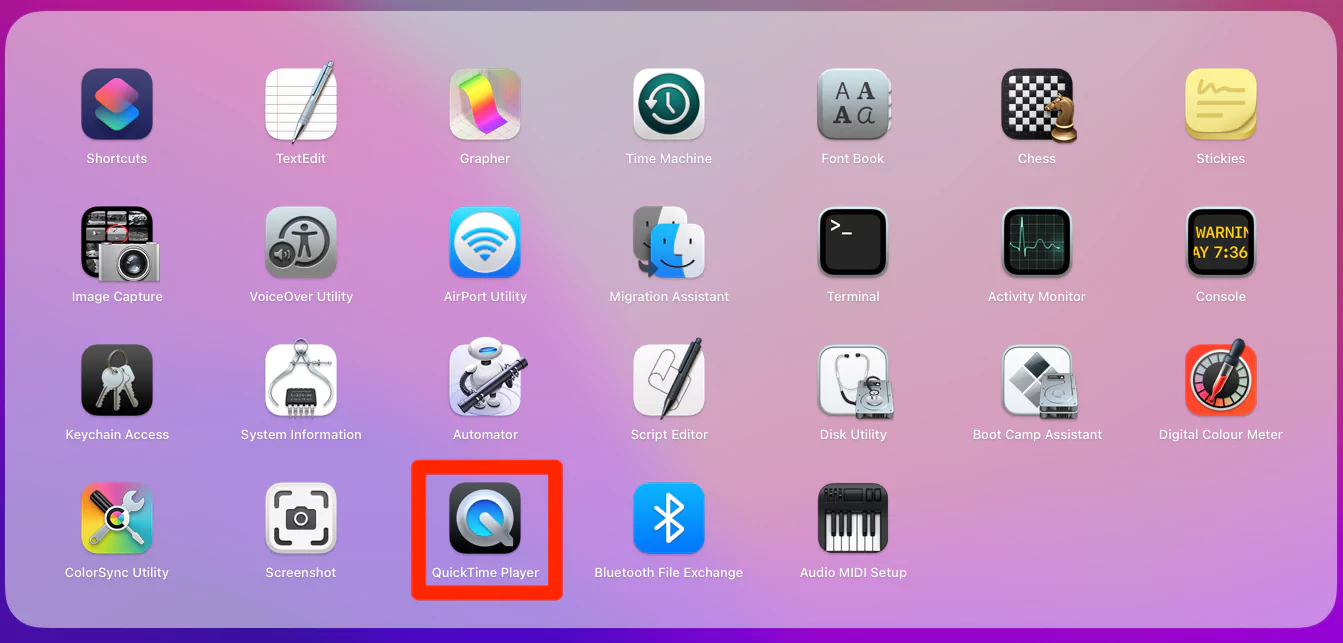
Step #1: Navigate to the QuickTime app using Spotlight Search on a Mac computer.
Step #2. Choose File on the top menu bar and click New Screen Recording. Or you can use Command (Option + Command + N) to open a new movie recording window via shortcuts.

Step #3. → Doing so will feature the camera screen. Choose the Red Record Button present in the window. After the video is completed, click on the record icon a second time to finish off.

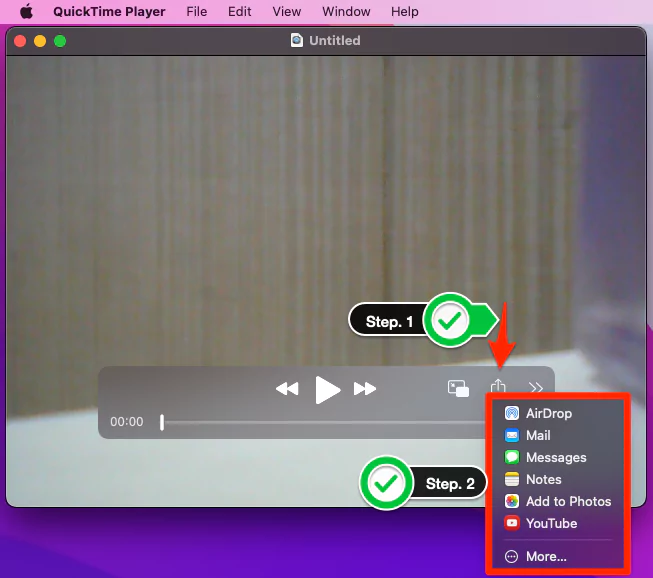
Step #4. → After completion of recording, if you want to share the file, click on the Share Icon present at the bottom right corner and choose the preferred method.
Step #5. And in case you want to save it, select File on the menu bar > choose Save or Press Command + S in a drop-down list and select the desired location to be saved. For example, see the below-given example.


Way to Screen Record on Mac in Photo Booth built-in App
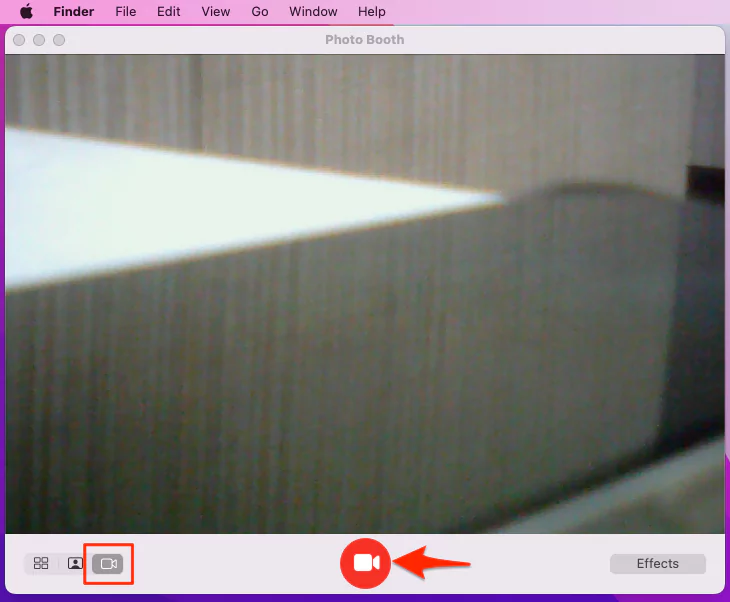
Step 1 → Open the Photo Booth app by using Spotlight Search, then click on the Video Reel icon located at the bottom left corner of the screen.
Step 2 → Now configure the camera and select the Record icon; look at the center of the window to begin recording.
Step 3: The thumbnail image will be highlighted below the main image. However, this thumbnail shows that you have captured the photo or video using the photo booth. The one you recorded last is located on the right side.

Step 4 → Select the Share icon present at the bottom left corner of the screen. And choose the preferred sharing method.

Step #5. To save the photo booth project on Mac, navigate to the Photo Booth Bar. Now click File and choose Export… Enter the desired location where you would like to store your project and click on the Save button.
If you are facing any errors in saving screen records on your macOS computer, please let me know in the comment box below.

Steps to Screen Record on Mac Using iMovie Video Editing Software by Apple
There is various best video editing software for Mac available on the macOS App Store, and out of them, some are superpowers over Apple iMovie. By the way, I’ll show you how to start screen recording on Mac with the iMovie app.
Note: iMovie screen recording is not compatible with all Apple Mac Minis.
Step 1 → Navigate to the iMovie app. Thereafter, either move to the iMovie Project Screen and click on Create New or else go to the iMovie Menu Bar and click on File > New Movie.
Step 2 → Choose Down-Facing Arrow, located on the iMovie screen.
Step 3 → From the Left camera panel, click on FaceTime HD Camera.
Step 4 → Hover the cursor and click on the Import To Drop Down present at the top of the screen. And choose the project you are presently working on.
Step 5 → Select the red record button to begin recording. After completion, click on the same button to finish up. Press Close to exit the Recording window.
Select “Projects,” located in the upper left corner of the iMovie screen, to save the recorded video and return to the iMovie Project Menu.
Here, you can either export the video or store the file on your Mac computer. Well, this is the proper answer for how to record your screen on a Mac.
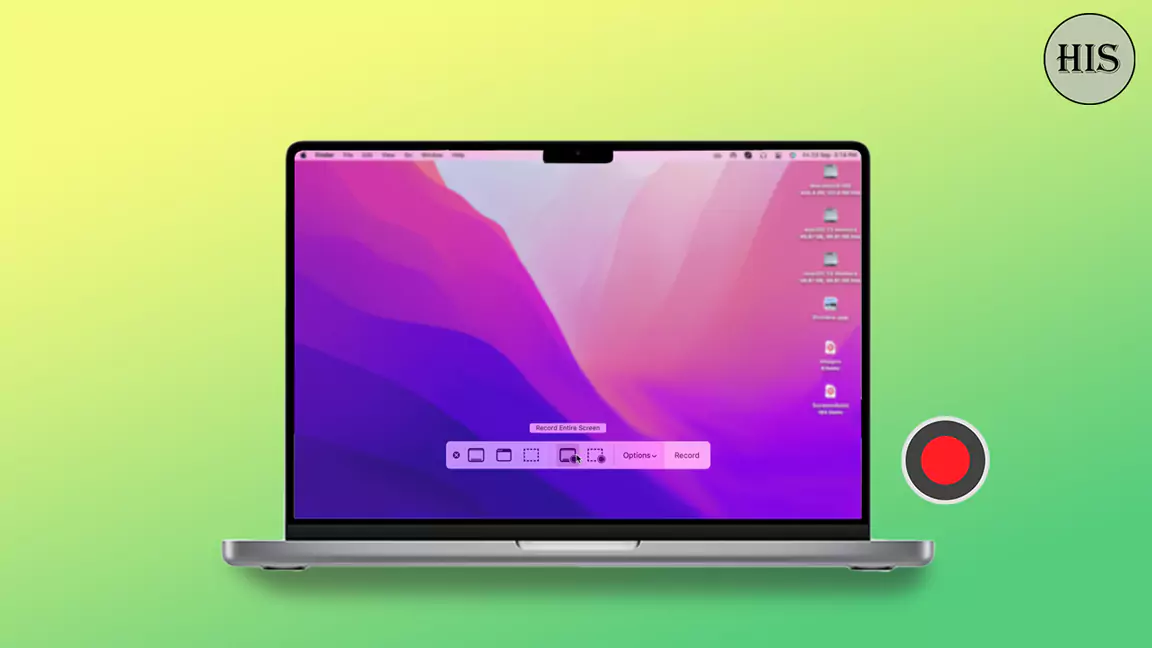
How To Record Entire Screen Of Mac (Screenshot Toolbar)
In the recent macOS version, the Apple company has launched a screenshot toolbar feature that allows capturing the screen of the MacBook with shortcut keys (Shift + Command + 5). To use this feature, ensure that the macOS version is updated (Mojave or Catalina or above).
Step 1: To begin the screen recording, press the above buttons. The TA pop-up menu will appear; select the fourth icon. Doing so will turn the cursor to look like a camera.
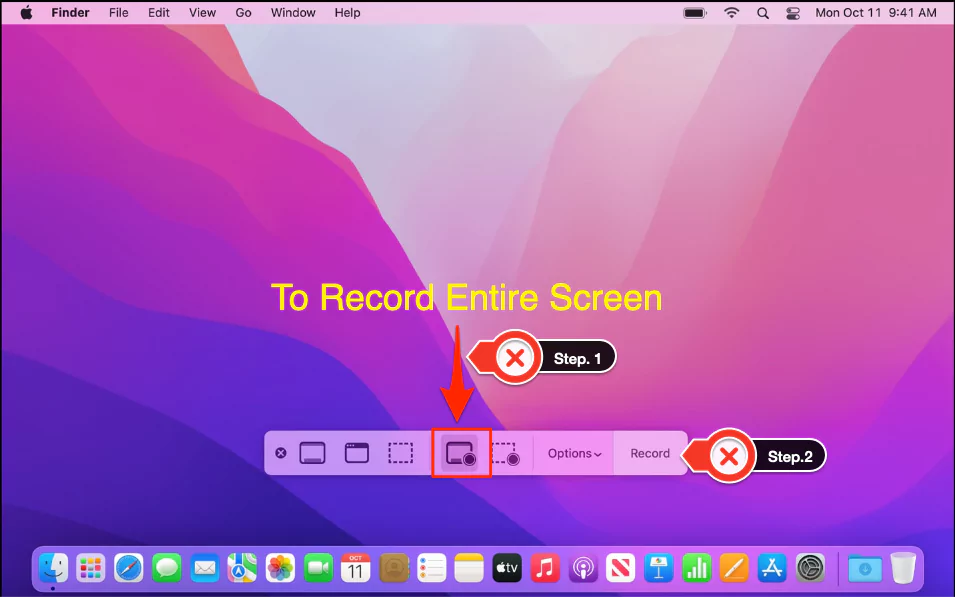
Step 2 → Click on the screen anywhere to begin the recording.
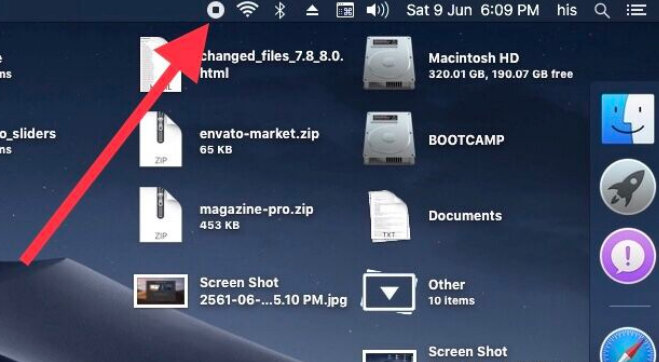
After completing the recording, press the same combination of keys: Shift + Command + 5. You can also choose the Stop icon located at the topmost part of the screen.
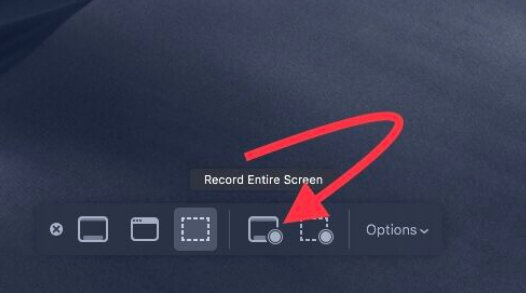
How To Record Selected Portion Of Camera (Screenshot Toolbar)
For more convenience and flexibility, the Mac comes with a feature known as a screenshot toolbar that allows the users to record a particular portion of the screen. If you want to record a specific part of the screen, follow the steps: st Step 1: Press Shift + Command + 5 to display the pop-up.
to feature the pop-up. Then, select the ‘Record Selected Portion’ icon.

Now place the screen at the desired portion and press the mouse key anywhere. To stop recording, click on the Stop icon next to the Control Center.
How To Record Video Call On Mac
Are you a sturdy user of video calls across various platforms like Skype or FaceTime and don’t know how to screen record on Mac? To ensure you never miss out on a meaningful discussion during the video call, you can record it by following the same steps mentioned: You can either record the entire screen or just a selected portion.
Tip: The Screenshot Toolbar is also used to record the screen for YouTube videos.
However, if you don’t want to prefer the in-built feature, various platforms are equipped with a recording feature.
Video Recording Setting on Mac For Screenshot Toolbar
How do you record your screen on a Mac? Following the above-mentioned guide will make the process simple and straightforward. But playing around with screenshot toolbar settings helps you use the feature conveniently and comfortably. To access those settings, follow the steps given below.
Press the Shift + Command + 5 to feature the screenshot toolbar—select Options.
Save To: This feature allows you to save the video or image to your chosen location.
Timer: If you prefer not to start the video recording immediately after tapping the record button, you can adjust this setting. There are two options: five and ten seconds; select accordingly.
Microphone: In this section, you can use the pre-installed microphone to capture external sounds while recording the video. However, you can change the sound input by heading to System Preferences… (For Ventura, go to System Settings…) > Sound > Input.
Options
Floating Thumbnail Option: You can select this feature only if you want to have a floating thumbnail while recording the video.
Remember the Last Session: Choose this feature when you want to continue with similar settings to appear in the future session.
Show Mouse Click: If you are creating a tutorial and want to highlight mouse icons throughout the video, select these settings.
What to Do When Webcam/Camera Is Not Working on Mac? (Continuity Camera Feature)
Mac Camera Stopped Working! And how do you screen record with audio on a Mac? That’s one of the worst-case scenarios you have ever gone through, but there is no need to worry. To solve such cases, Apple has launched the Continuity Camera feature, which is only compatible with the macOS Sonoma Beta Version. So here are the steps to use the feature.
What are the requirements to use the Continuity Camera feature on Mac?
Both your iPhone or iPad and Mac must have Bluetooth and Wi-Fi enabled.
Furthermore, your Mac, iPad, or iPhone must be logged in with the same Apple ID, and two-factor authentication must be enabled.
For Mac, use macOS Mojave or later; for iPad or iPhone, use iOS 12 or later.
Application Supported With Continuity Camera Features
- Finder
- Keynote 8.2 or later
- Messages
- Notes
- Numbers 5.2 or later
- Pages 7.2 or later
- TextEdit
Enable Continuity Camera On Mac
Note: The continuity feature on Mac can work for 40 or so feet.
Step 1 → However, the Continuity Camera feature is enabled by default on your iPhone. For convenience, go to iPhone Settings App > General > Airplay & Handoff > Continuity Camera Webcam and ensure it’s turned on.
Step 2 → Now, you need to bring the iPhone near to the Mac just when you launch the application mentioned above (compatible with the web browser too). Doing so will make the Mac automatically switch to the iPhone rear camera.
Step 3 → And if it doesn’t work for you, click on Video Preference in the application you are using on Mac and select the iPhone from there; at the same point, along with the camera, you can also use the iPhone microphone.
After establishing the connection, you can use various features like Center Stage, Portrait, Studio Light, or Desktop View. To use it, head to the Control Center > Video Effects.
FAQs →
Can I Screen Record on My Mac?
Yes, you can record your Mac’s screen using either QuickTime or the Screen Recording Toolbar, both of which are pre-installed on your Mac. To learn both methods, go through a complete guide on it.
How to Allow Screen Recording on Mac?
On your Mac computer, head to the Apple > System Preferences or System Settings (macOS Ventura & later) > Security & Privacy > Privacy > Screen Recording > Click on the tickbox present next to the desired application.


Where Do Screen Recordings Go on Mac?
The screen recordings on Mac are usually stored on the Desktop.
How to Screen Record on Mac for YouTube?
Suppose you are a YouTube influencer who works daily on a Mac. Well, the good news is now you can record the Mac screen for YouTube using the Screenshot Toolbar. At the same point, the most recent Continuity Camera (macOS Sonoma Beta) feature is the advanced add-on to reach your needs.
Does Screen Recording on Mac Record Audio?
Yes, the Mac records the audio. For example, in QuickTime, select File > New Screen Recording > To record video with audio, choose Microphone.
How Do I Record My Screen on Mac for Free?
You can easily record the screen of a Mac using the pre-installed Screenshot Toolbar. However, various applications like QuickTime, iMovie, and Photo Booth work similarly.
How Long Can You Screen Record on Mac?
Fortunately, there is no such limit to recording the video on Mac. This means you can record until the available storage space on your Mac is filled.
How to Record on Mac Shortcut?
The easy way to record on the Mac is by pressing Shift + Command + 5; doing so will highlight the Screenshot feature. For more information, go through this complete guide.
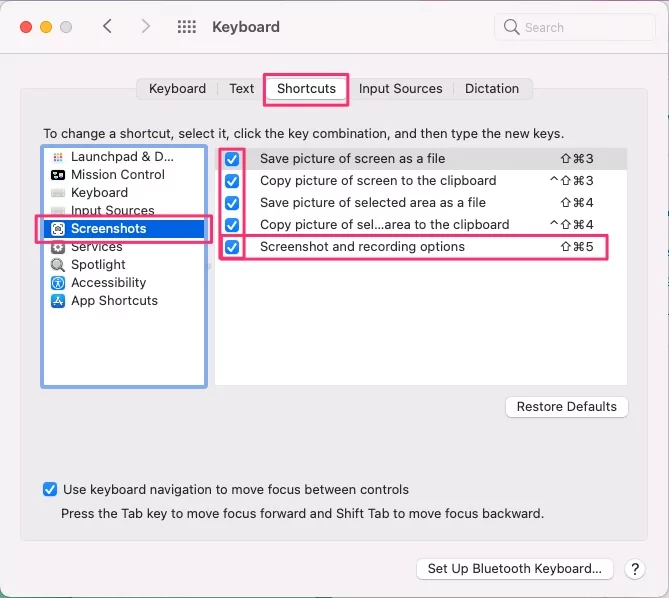
Customize Keyboard Shortcut
Check and know the Mac keyboard shortcut for the record or capture screen. If the keyboard shortcut is changed or overridden by another shortcut, then change it and correct it. Follow the below steps.
- Go to the Apple logo from the top Mac menu.
- Click on System Preferences Option > Keyboard.
- Select Shortcuts Tab > Screenshots.

- See the Last Screenshot and Recording Options. and use this keyboard key.
How to Stop Screen Recording on Mac
We can stop screen recording on any Mac screen. Because the Mac Top Menu Bar is always kept showing in Desktop, Split Screen, or Full-Screen Menu Bar mode.

So there is a screen recording icon; click on that and stop the Mac screen recording anytime.
Screen Record Mac With internal Audio
Yes, Mac users can record screens with internal audio or external audio. Just select the microphone settings before starting recording. By default, Mac doesn’t record audio from the screen, due to privacy reasons. But using a third-party app extension, we can start screen recording a Mac with internal audio or using the QuickTimePlayer app.
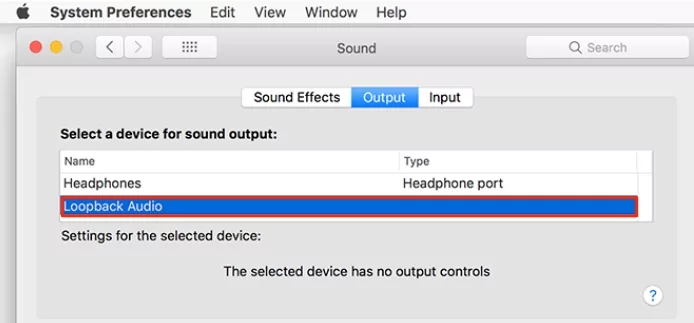
- First, download and install the Loopback Audio extension on your Mac. [Note: This extension supports the Chrome and Firefox browsers. Don’t use audio recording on Safari. Now, set the first loopback audio as the output audio device from Audio Preferences.
- Go to the Apple logo from the top Mac menu > System Preferences.

- Click on Sound > Output Tab and select “Loopback Audio.”
- Now, Use Command + Shift + 5 From the Keyboard to see the Screen record tool. Select Record Entire Screen or Record Selected Portion. Now, under the Options, select “Built-in Microphone” under the microphone section.
- Start recording.
QuickTime Screen Recording With Audio
QuickTime Player also does not support the direct option to record the Mac screen with audio. So you have to use a third-party extension, as explained above. Follow the same steps for the Record Mac screen using QuickTime with audio.
How to Edit Screen Recording in Mac
Step 1: When screen recording is completed, right-click, two-finger-click, or control-click on that screen recording that will allow you to edit the screen recording.
Step 2: Click “Markup.”
Step 3: On the top right corner, click on the “Trim button.”
Step 4: Catch the hold points at the end of the recording and modify their position; it will change the length of the recording.
Step 5: Tap “Done.”
Step 6: Tap “Save.”
How to Select save location for screen recording in mac
Step 1: Tap “Command+Shift+5” together to raise the screenshot toolbar.
Step 2: Tap “Options.”
Step 3: There you will be given options such as Desktop, Messages, Preview, Clipboard, Documents, or Mail. Select any one of them to save screen recordings.

How to set timers for screen recordings on mac
Step 1: Just like before, press “Command+Shift+5” to open the toolbar.
Step 2: Click “Options.”
Step 3: Tap on “Timer,” then select either “None,” “10 seconds,” or “5 seconds” to set the timer.

Do you have any queries about the Record screen on Mac? Please let me know in the comments.


