Several MacBook Users are getting quickly battery-drained issues on M1 MacBook Pro m1, M2 MacBook Air, while using Heavy Applications like Photoshop, Lightroom, Video calls on Native Mac apps like Zoom, Google Meet, Google Suite via Safari Browser. Some Mac users don’t use any on-screen programs, but they are using normal Browsing on Safari, Amazon Prime, YouTube, and Other Native Applications. Documentation on Active Screen Brightness is 70 to 80%.
Worried about M1 MacBook Pro and MacBook Air Battery Life? In this article, we’ll show you how to maximize battery life while also extending its lifespan. The late 2020 MacBook Pro and MacBook Air are both equipped with Apple’s in-house Apple Silicon Chip, the M1, which promises to offer superior performance as well as powerful battery backup.
First Check Good Habits
- Restarting Mac is a Good Habit:- Restarting your Machine at least once a Day or during Break time is a Good practice to close all running background apps at once.
- Minimize the Charge Cycle for Longer Battery life and health.
- Keep MacBook Battery Charging State Between 20% to 80%. Please unplug the power cable from the MacBook after it charges to approximately 80%. Also, don’t run your MacBook when it’s near 0%. First, charge your MacBook around 10% to 20%, then start work on it.
- Stop charging your MacBook when the Battery is hot.
- If your M1 MacBook Pro or Air is connected to multiple external displays, keep the charging level around 80%. Don’t keep the power cable connected all the time.
- Use M1 Silicon Optimized Apps, wait for an update, or Try an Alternate app that’s compatible.
- Always use the Original Apple Charging Cable and Adapter.
- Don’t put your MacBook on overnight charging.
How to maximize M1 MacBook Battery Lifespan: MacBook Pro, MacBook Air
1: Enable Low Power Mode
Low Power mode on the MacBook is available starting with macOS Monterey. This feature helps extend your MacBook battery life with Low Power Mode, which manages energy-intensive apps and processing. It directs power where you need it to maximize your battery’s performance. Follow the steps below to enable Low Power Mode on supported MacBook Models.
- MacBook (Early 2016 and later)
- MacBook Pro (Early 2016 and later)
Click on the Apple logo from the top Mac menu > System Preferences > Battery > Battery from the sidebar > Enable the Checkbox “Low Power Mode”

Additionally, explore more settings and Boost Your MacBook’s battery life with Battery Cycle Count.
2. Use M1-optimized apps
The MacBook and Mac Mini are divided into two parts, Intel-based and Apple Silicon M1 Chip processor. Apple defines an app as Universal if it runs on both types of processors. Using the native M1 compatible apps on MacBook M1 is highly recommended to reduce the processing power, and of course, it will save much more battery.
When you use the Universal app on MacBook Pro, MacBook Air M1, then the Intel-based code of the app is converted by the Rosetta 2 emulation software to give the best performance on the M1 processor.
My point is, prefer the M1-optimized apps rather than the Universal apps; doing this will automatically optimize and maximize the battery life of the MacBook M1. Visit the (https://isapplesiliconready.com/) Website to Get the list of M1 Optimized Apps available to download.
Furthermore, keep all the applications and macOS up to date as the optimized version of the app will come by updating the app itself; there is no other way.
3. Update macOS and Applications
Being an Apple user, you should be aware that keeping the macOS and installed apps reduces half of the issues. The first question that strikes while concerning the laptops and smartphones is, how long will the battery run? And nowadays, people ask how many years the battery will work? To some extent, these questions are illogical, as it totally depends on how carefully you’re using the MacBook, how many times do you charge the MacBook M1? and more.
Your first step towards improving the battery life should be keeping macOS and installed applications up to date. In the coming days, most of the apps will be M1-optimized; therefore, instead of updating them manually, why not turn on Automatic Updates for both macOS and Applications?
To Update macOS:
- Click on the Apple logo.
- Go to System Preferences.
- Select Software Updates.
- Download and Install Software Updates.
From the same screen, you can enable the Automatic Updates setting too.
To Update Applications:
- Go to the Mac App Store.
- Click on Updates in the sidebar.
- Hit the Update All button to begin the update for all the apps.
4. Avoid Chrome (Use Edge and Safari)
No matter which laptop you’re using, Chrome will always be eating up more and more resources and battery. Apple has almost redesigned the Safari browser with the latest macOS Big Sur update, but still, it’s hard to switch to other Best Privacy Mac browsers for the people who are using Chrome for years. Apple will always give you battery estimates considering its own applications as default; Safari has tons of new upgrades that could make your day and increase productivity without compromising security.
However, if you’re stuck with Chrome Extensions and have no other choice, then try Microsoft Edge; both of them are built on the Chromium platform, so you’ll get all the extensions in Microsoft Edge too.
5. Optimize Display Brightness and Turn Off Keyboard Backlights
Auto brightness is an amazing feature that could help save a lot of juice, especially, you work remotely and don’t have any specific desk. While working remotely, the environment and light change, so after determining the lightning conditions, MacBook Pro and MacBook Air M1 will automatically adjust brightness.
- Navigate to the System Preferences.
- Click Displays.
- Under Brightness Slider, check the box of Automatically adjust brightness.
At the same time, many times, we forget to turn off the keyboard backlight even in the daytime, which is not worth it at all. Here’s how to disable the keyboard backlight on MacBook Pro/MacBook Air M1.
- Launch the System Preferences on MacBook.
- Click on Keyboard.
- Select Keyboard tab.
- Select Turn the keyboard backlight off, with an inactivity time.
6. Disable Bluetooth when not NEEDED
With MacBook, usually, there is no wireless mouse or keyboard, and even if you use it, then while leaving your desk, of course, the mouse and keyboard will be a burden for you. Apart from the mouse and keyboard, if you haven’t connected any accessories to the MacBook, then turn off the Bluetooth on M1 MacBook Pro, MacBook Air.
- On the top menu bar, click on the Control Center button, and disable the Bluetooth.
However, when Bluetooth is disabled, the Apple Continuity feature won’t work that lets you share items between iPhone, iPad, and Mac.
7. Close Background Running Apps
Done with apps? Then close it. Keeping the apps running in the background won’t do any good to you and your M1 MacBook Pro, MacBook Air. Make it a habit; once done with using apps, just close it to save RAM and Battery both. And if you don’t believe it, then check the Activity Monitor; there, you’ll see how much processor is used by apps, alongside the battery usage.
Such hidden apps like Email Searching & Reading, Telegram, WhatsApp running in Background for Work.
- Force Close all Apps on Mac: Apple Logo > Force Quit > Select All Apps [Command + A] > Force Quit. That’s it.
8. Remove App from Login Items
There are plenty of applications, including DropBox, OneDrive, VPN, etc., automatically launch when you turn on the MacBook. Unless, the cloud apps, there is no meaning to allow VPN or PhotoShop apps to launch during startup. Removing unnecessary apps from opening during startup will speed up the MacBook as well as improve battery performance.
- Go to the System Preferences.
- Select Users & Groups.
- Choose the user account on which you want to make changes.
- Select Login Items.
- Click on the app and then click on the minus (-) button to remove apps.
9. Use Battery Health Management
The goal of the Battery Health Management function is to maximize the battery lifespan; it won’t be improving the battery life. Nevertheless, the M1 MacBook Pro and MacBook Air battery have a fixed charge cycle and also controls the MacBook to charge to 100% when necessary.
- Open the System Preferences.
- Select Battery.
- Go to Battery Health.
- Turn On Manage battery longevity.
10. Safe Mode
The safe mode determines the buggy apps that are not compatible with your Mac and Process is running in the background as well. Safe mode will help in stop eating your Macbook Battery while not use.
- Shut down your Mac. Wait for 20 seconds.
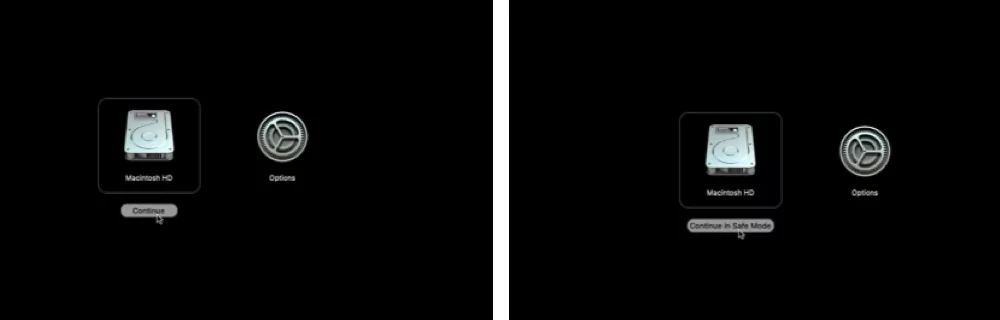
- Now, Turn on Your Mac by Press and Hold on Power button [Touch ID] until you see Startup volumes and Option [Settings icon] on the screen.
- Select Startup volume, Click on Continue. Next, Press and Hold on the Shift key and click on Continue in the Safe mode option. Release Shift key.

- That’s it. Log in to your Mac in safe mode.
Once your Login, Restart your Mac and Exit from safe mode.
11. Conclusion:-
If your Mac has an internet macOS issue and is buggy after a MacOS update. Then I recommend backing up your Mac with Time Machine and Clean installing your Mac once. Then restore the Data from the Time Machine backup. Sometimes, Damaged Hardware is also an issue, So you can contact Apple Support and Book Appointment at apple genius bar reservation.


