
When eSIM is not working on your iPhone, you are abruptly disconnected from the world. No incoming or outgoing calls, messages, social media, or web browsing! However, the most common reason for eSIM stops working or fails to activate can be a wrong installation procedure, an outdated carrier or OS, or a temporary glitch. But worry not. We have tested 16 different fixes for eSIM problems on the iPhone.
Why is eSIM not working on my iPhone?
Here are some of the common reasons for eSIM not working on iPhones.
- Loss or lost eSIM
- eSIM got mistakenly erased
- No coverage or service of the eSIM
- eSIM on your iPhone hasn’t been activated yet.
- APN on your iPhone isn’t configured correctly.
Considering all these reasons, we’ve mentioned the solution. But before that, if you’ve activated eSIM, follow the bold points mentioned below. So, without any ado, let’s get started!
Fix iPhone calling not activated
If you just set up the eSIM on your iPhone and see “No Service” in the control center, fuss not! Often it takes 2-3 hours before it gets fully activated. Here are some of the solutions you must consider to fix it.
- Wait it out: Some eSIM carriers might take up to 5-6 hours to convert it into eSIM. Usually, you’ll get a confirmation email or SMS when eSIM is fully serviced.
- Restart your iPhone: If it takes longer to activate, try restarting your iPhone and check for the issue.
- If nothing works: If none of the solutions works, it’s time to contact carrier support and ask about the issue.
- Get a new QR Code: We suggest you generate a new one after waiting a day. If your QR code still doesn’t work after waiting a day, retry generating the new one. A fresh QR code will help you install and activate your eSIM on your iPhone without any problems.
- Nonetheless, in this scenario, we recommend waiting a day, as this QR code procedure can take some time to register on the network. That’s because some carriers update such information regularly or daily at a specific time interval. If it still doesn’t work after waiting a day, try regenerating.
- Ensure you’re entering the correct IMEI number in the carrier app: This solution is for those whose iPhone belongs outside of the U.S. Many carriers outside of the U.S. allow entering the iPhone’s IMEI number so that eSIM gets directly installed on your iPhone. Unfortunately, the carrier fails to specify that some of the iPhone models have two eSIM variants. One flagship that offers eSIM without a physical slot is sold in the US, and another one that offers eSIM and nano-SIM is sold everywhere in the world. For this reason, the owner of an iPhone with a physical SIM slot will need to register IMEI2 in the carrier app.
Solution 1: My eSIM is not working. First, check the device compatibility
Yes, the first thing to ensure is to check the device compatibility because it’s one of the most common reasons. For your convenience, we’ve mentioned the list below.
List of iPhones compatible with eSIM
- iPhone 14 Pro Max
- iPhone 14 Pro
- iPhone 14 Plus
- iPhone 14
- iPhone 13 Pro Max
- iPhone 13 Pro
- iPhone 13 mini
- iPhone 13
- iPhone 12 Pro Max
- iPhone 12 Pro
- iPhone 12 mini
- iPhone 12
- iPhone 11 Pro Max
- iPhone 11 Pro
- iPhone 11
- iPhone XS
- iPhone XS Max
- iPhone XR
- iPhone SE 3 (2022)
- iPhone SE 2 (2020)
List of iPads compatible with eSIM
- iPad Pro 11″ (1st Gen or later)
- iPad Pro 12.9″ (3rd Gen or later)
- iPad Air (3rd Gen or later)
- iPad (7th Gen or later)
- iPad mini (5th Gen or later)
However, if your iPhone is compatible with eSIM, move to the following troubleshooting steps.
Solution 2: Reset Network Settings
Resetting the network settings is one of the first and foremost solutions you must try when eSIM is not working on an iPhone. Performing this procedure will make your iPhone forget every Wi-Fi network, Bluetooth Settings, and VPN. For this, you can read our article on how to Reset Network Settings on iPhone.
- Go to Settings.
- Select General.
- Hit Transfer or Reset iPhone.
- Tap Reset.
- Select Reset Network Settings.
- Enter the passcode for confirmation.
- Tap Reset Network Settings.
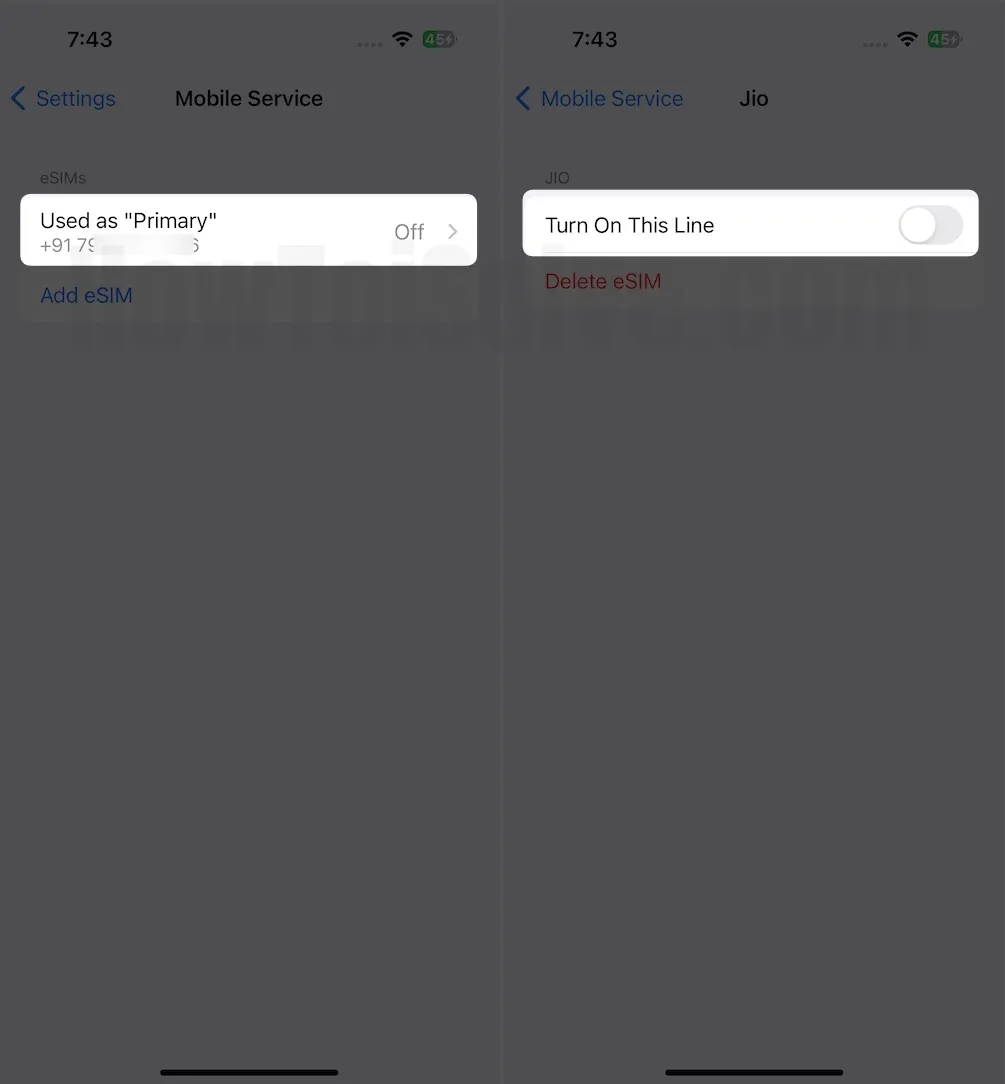
Solution 3: Disable and Enable eSIM
Turning the eSIM off and on will reconnect your iPhone to the network and fix the minor bug. Here’s how you can do it.
- Head to Settings.
- Select Cellular Data.
- Tap on the eSIM provider.
- Toggle off and then on the button next to the Turn On This Line.

Re-Enable the Toggle for Turn on This Line.
Solution 4: Enable and Disable Airplane Mode
Turning on and back off Airplane Mode will efficiently refresh your eSIM carrier settings. By re-enabling these settings, you lose nothing (Data and Money). Here’s how.
- Access the Control Center.
- Hit on the Airplane Mode Icon to turn it yellow.
- Then, please wait a while and tap on the Airplane Mode Icon again to turn it off.

Solution 5: Turn Off VPN
Turning on the VPN service can allow access to data over the geolocation. However, sometimes you can encounter issues when working with eSIM. In the worst cases, eSIM might stop working on your iPhone. So try turning off the VPN on your iPhone and check for the issue. For this, you can read our article on how to turn off VPN on iPhone.
Solution 6: Enable Data Roaming
Data roaming lets your device connect to the internet when you are outside of registered geolocation. The best part is that it does so without causing any interruption. So, if you’re presently traveling and eSIM is not working on your iPhone, try activating Data Roaming.
- Head to Settings.
- Select General.
- Tap on Cellular/Mobile Data Option.
- Enable the toggle next to Data Roaming.
That’s It!
Solution 7: Update your iPhone
Essential security software update and subordinate minor update.
Try checking for software updates on your iPhone. To do this, head to Settings > General > Software Update > Download and Install.
Solution 8: Check pending carrier update
Unlike the Software update, you must try checking the availability of carrier updates on your iPhone. To do this, go to Settings > General > About > follow the on-screen instructions to install the latest carrier update.
Solution 9: Manually Select Network
Low reception can be one reason eSIMs don’t work on iPhones. In this situation, tweaking the network can efficiently resolve the problem. To do that, follow the steps below.
- Head to the Settings App.
- Select Cellular/Mobile Data.
- Hit Network Selection.
- Disable the toggle next to Automatic.

Now, your eSIM will search for and display the network available in your region. From the list on your screen, tap the desired carrier. After this, your eSIM will automatically register to the selected network on your iPhone. That’s It!
Solution 10: Disable Low Data Mode
Low Data Mode is a beneficial feature in preventing the cellular from draining faster. It does so by restricting features on your iPhone and which eventually complicates eSIM on your device. As a solution, turn it off by following the steps below.
- Head to the Settings.
- Select Mobile/Cellular Data.
- Tap on the Mobile Data Options.
- Hit Data Mode > Select any of one from Allow More Data on 5G or Standard.
Solution 11: Disable Limit IP Address Tracking
- Navigate to the Settings App.
- Select Mobile/Cellular Data.
- Choose Mobile Data Data Options.
- Disable the toggle next to the Limit IP Address Tracking.
Solution 12: Turn Off Private DNS
Turning on the Private DNS can often interrupt the eSIM functionality, which eventually malfunctions it and causes iPhone’s eSIM not to work. So if Private DNS is enabled on your iPhone, try turning it off by following the steps below.
- Go to the Settings App.
- Choose Wi-Fi.
- Hit (i) Button present next to the Wi-Fi you’re connected to.
- Tap on the toggle next to the Private Wi-Fi Address to disable it.
Solution 13: Delete and reinstall your eSIM
Reinstalling the eSIM on your iPhone is one effective solution for fixing an eSIM that doesn’t work. Here’s how to do it.
Note: Usually, eSIM may not work on your iPhone if you have performed the wrong way to transfer eSIM. For this
- Access the Settings App.
- Choose Cellular/Mobile Data.
- Tap on the eSIM Provider.
- Select Remover Cellular Plan/Delete eSIM. Now follow the on-screen instructions to finish the deletion procedure.
Once the deletion procedure is finished, re-install the eSIM on your iPhone from scratch.
Solution 14: Common solutions to fix an eSIM card that does not work on an iPhone
One of the common reasons is related to configuration and compatibility. So, if eSIM isn’t working on your iPhone, make sure to check the following:
- Ensure your flagship is unlocked, or both the cellular plans belong to the same operator.
- Ensure the plan is configured and ready to use.
- Check if the operator supports dual SIM with eSIM.
Solution 15: Factory Reset iPhone (Attention!)
This isn’t the solution we recommend when eSIM is not working on your iPhone since, with this option, you’ll delete all your data stored on your device.
But even after performing the above solution, if none of the solutions works, it’s the only way left. Before performing, make sure to create the backup. For this, you can read our article on how to create a backup on an iPhone. Once you do so, follow the steps below.
- Go to the Settings.
- Select General.
- Tap on Transfer & Restore iPhone.
- Hit on Erase All Content and Settings.
- Select Continue from the next screen.
- Enter the passcode for confirmation.
That’s it!
Solution 16: If eSIM does not work, try manually activating it
If none of the solutions works, I recommend contacting the carrier support team. You might be facing an issue with your iPhone or a current eSIM problem. The carrier helps you identify such issues and offers solutions accordingly. We suggest visiting the nearest carrier store to resolve your eSIM issues and restore the network to the default on your iPhone.
However, you can also visit the carrier’s official website and find solutions or contact them.
Fixed eSIM is not working on iPhone!
These were all solutions to ensure eSIM is not working on your iPhone. I hope all of the abovementioned helped you to resolve the problem. Restarting iPhone, and Airplane mode, and resetting network settings fixed the eSIM issue most of the time.
What to do if eSIM does not have signal on iPhone?
The most reasonable reason for eSIM not having a signal on your iPhone is that your operator or service doesn’t have stable coverage in the region where you are currently present. Nonetheless, if you are on an international trip, we recommend verifying that eSIM has no limitations because of a billing problem.
How to fix a broken eSIM on iPhone
Since the eSIM is a virtual feature, it can be broken or lost, which means the issue is with configuration or installation.


