Wi-Fi and network-related problems usually create trouble for Mac users, and there are very few workarounds that could easily fix these types of problems. One of the best solutions is resetting network settings on Mac [with Terminal Command]; this will definitely help you troubleshoot the network connectivity issues. Often Mac keeps disconnecting from Wi-Fi, Safari won’t load websites, FaceTime doesn’t connect, and many more things could appear while using the Mac, and the only trick that works is to reset network settings on MacBook, Mac, and other macOS devices.
However, resetting network settings on macOS is quite different from iOS and a bit tedious, while iOS and iPadOS have separate options for one-click reset network settings. Therefore, follow the two methods below to reset the network settings on your Mac and MacBook.
How to Reset Network Settings on Mac, MacBook Pro, MacBook Air
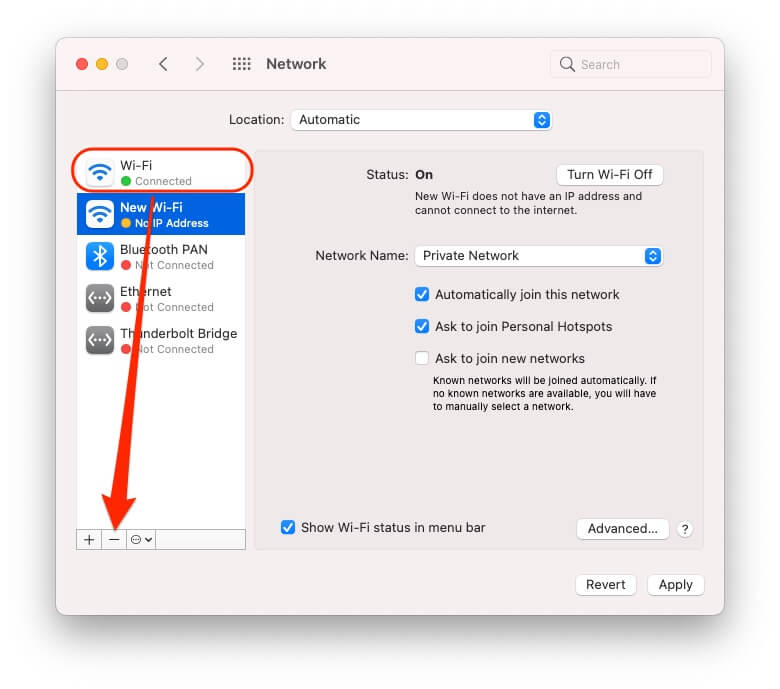
Method 1: Remove and Re-Add the Wi-Fi Interface
If the above method doesn’t work for you, then delete and add the Wi-Fi interface from the Mac. Here’s how to do it. In this process, your Mac will generate a new connection file for WiFi. If you have a problem with the Ethernet connection, then delete and re-add the Ethernet Interface profile to Mac Network settings.
We can create multiple WiFi interfaces with different service names at once and switch at any time.
On MacOS Ventura & Latest macOS: Reset Network Settings
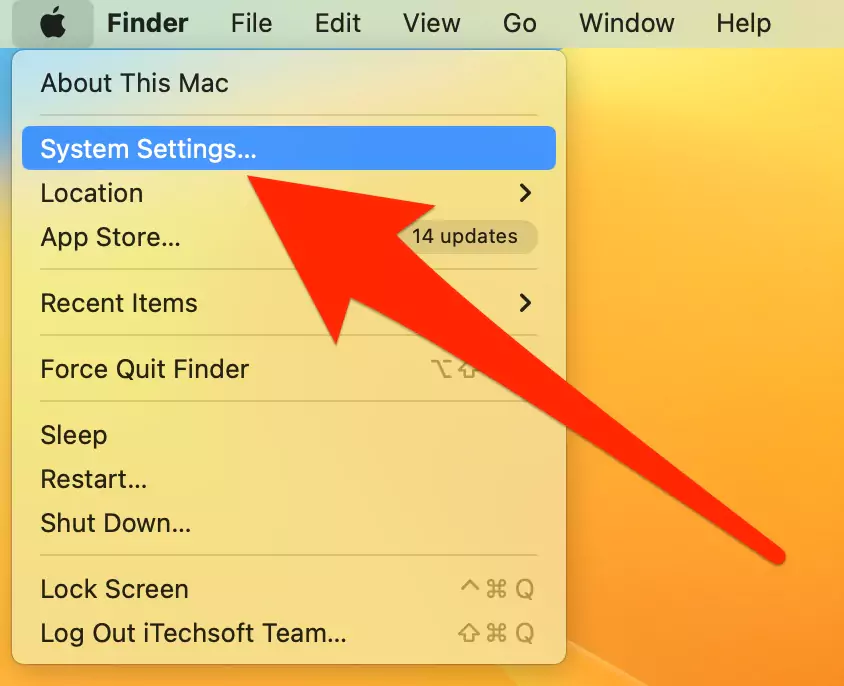
Step 1 → Click on the Apple logo in the top menu, then select “System Settings.”
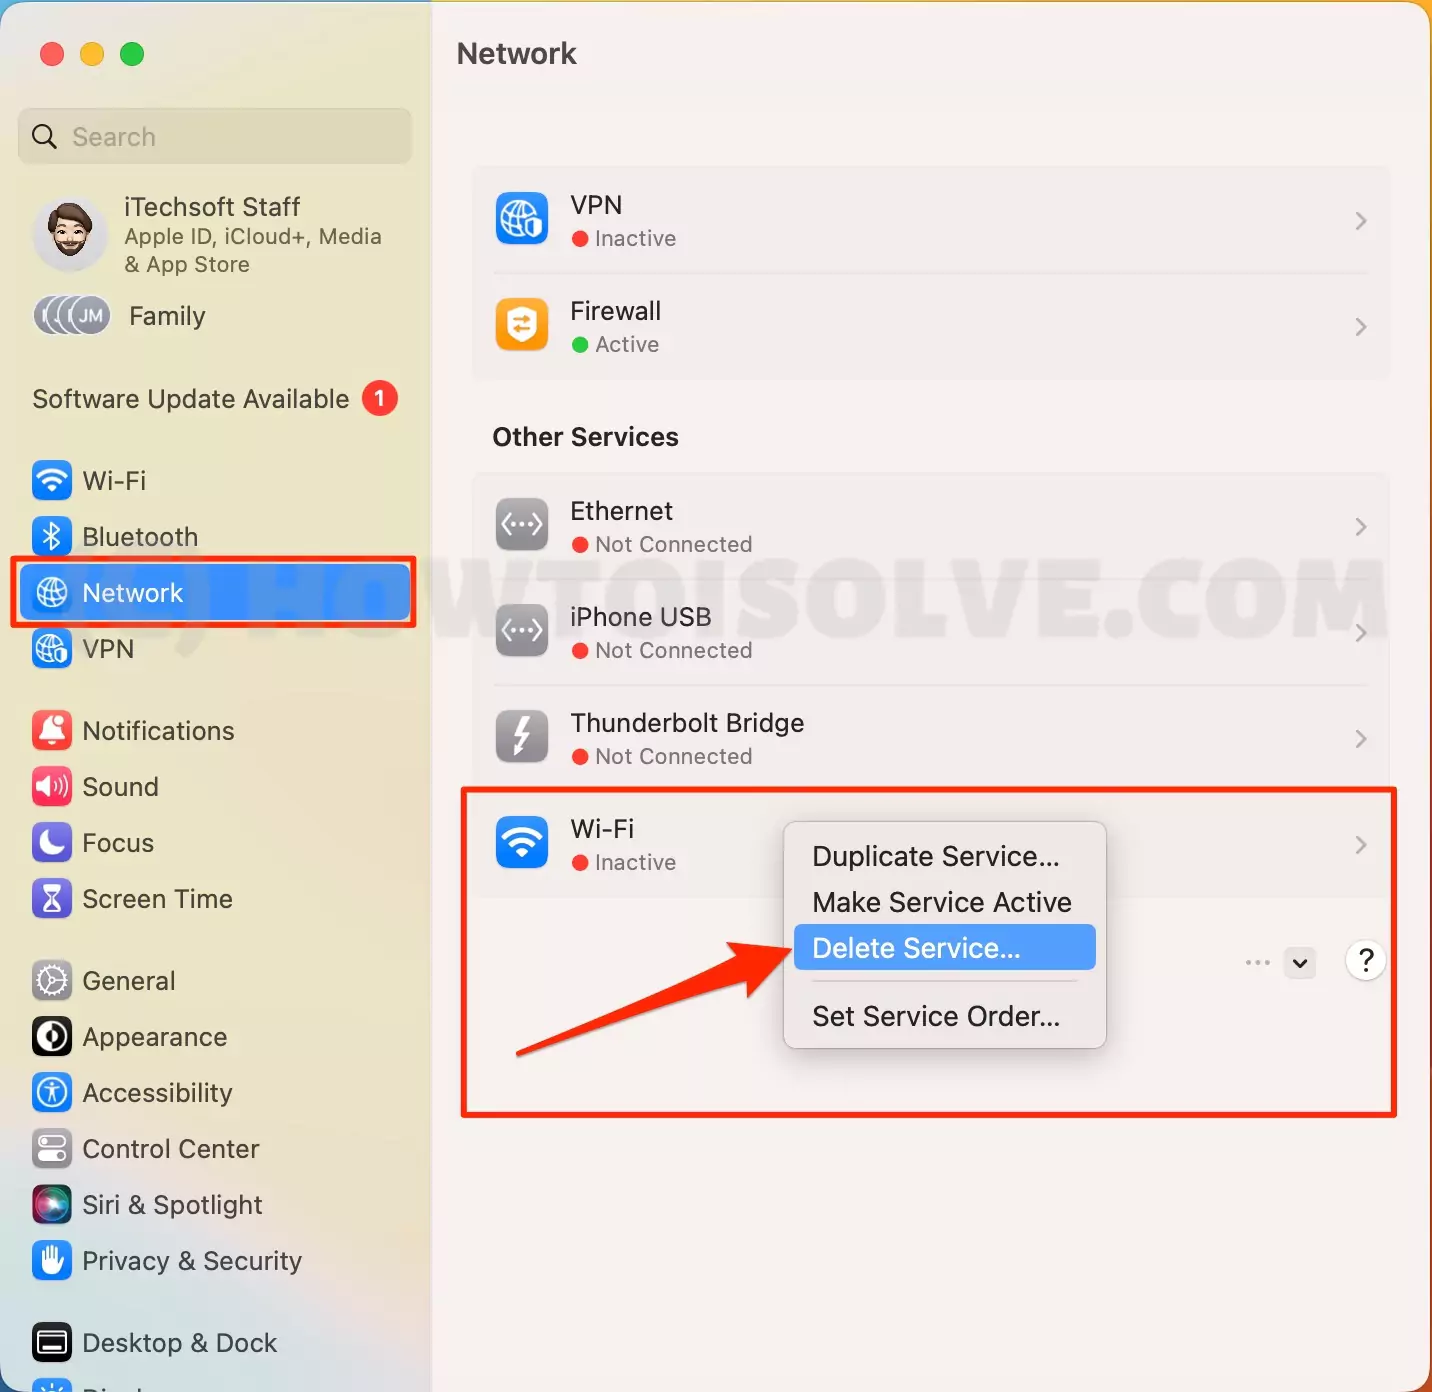
Step 2: Next, Open Network Option, right-click on WiFi Profile, and Choose “Delete Service…“
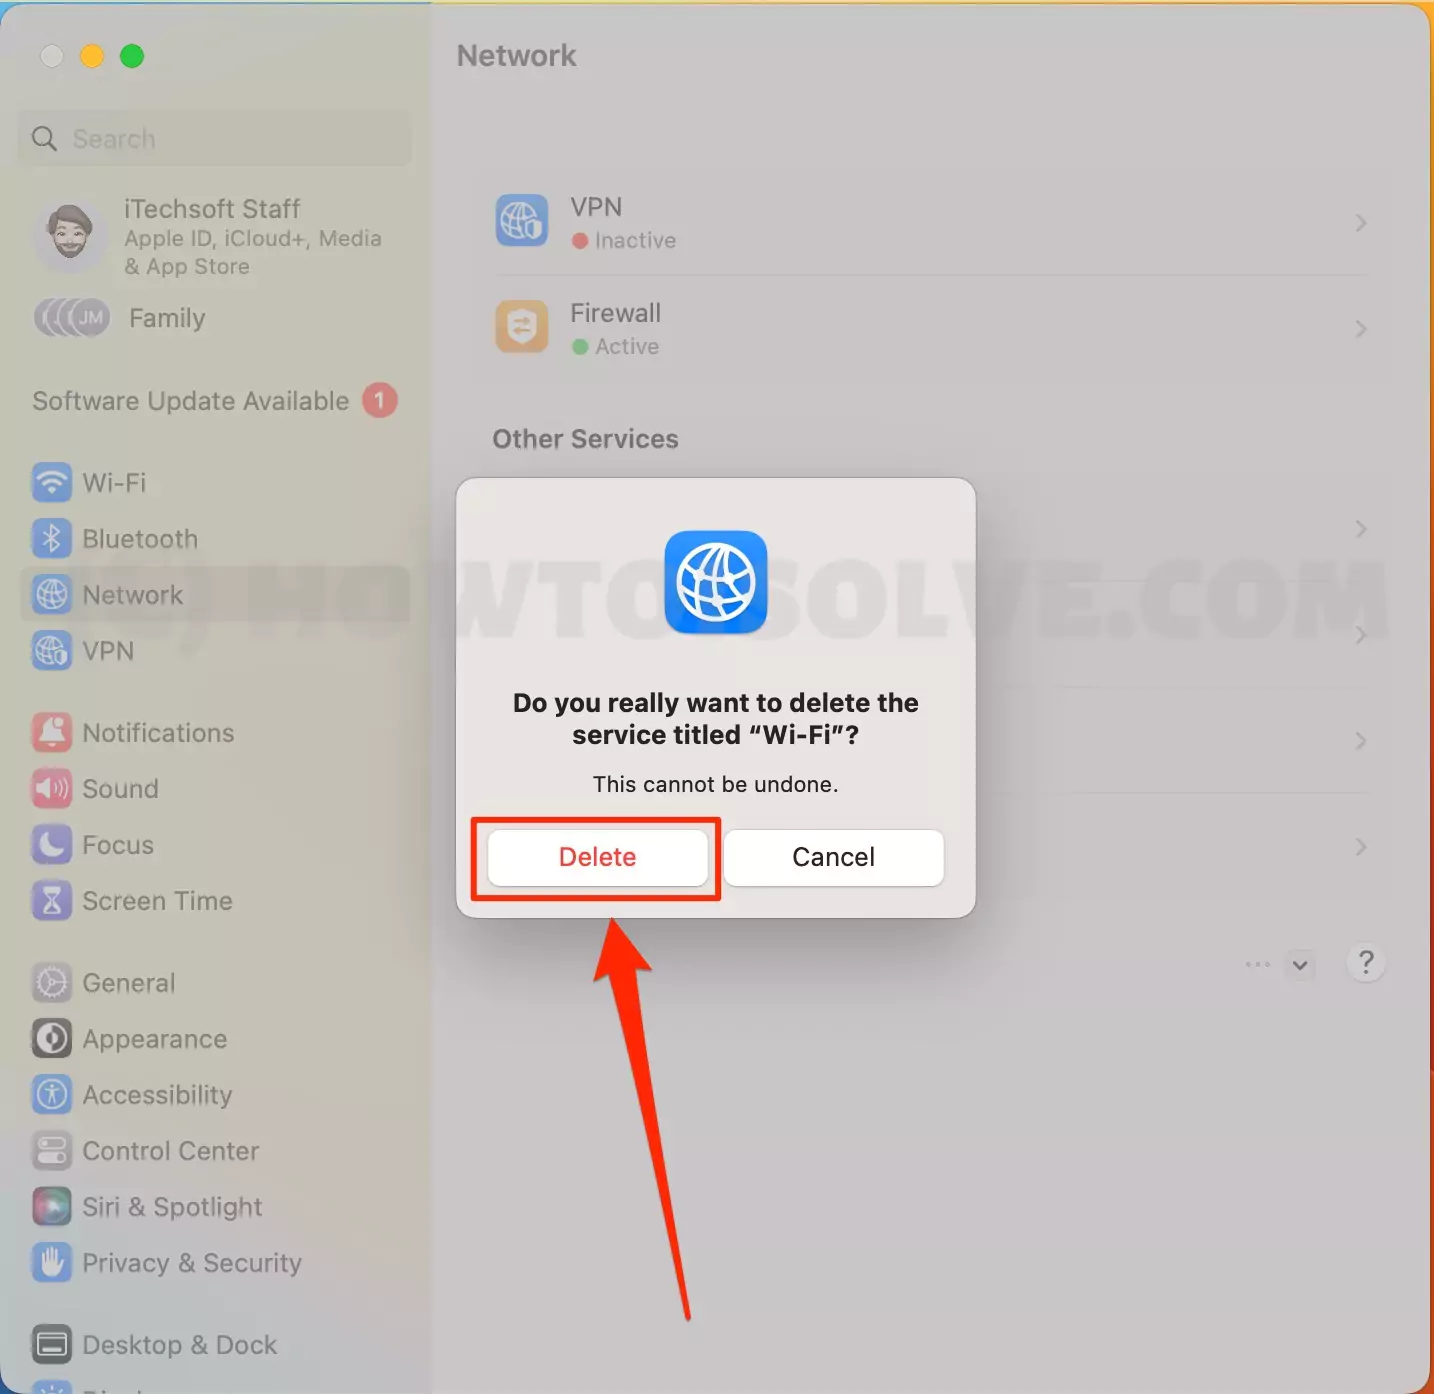
Step 3: Now, Click on Delete. “Do you really want to delete the service titled “Wi-Fi”?“
Step 4→ Now, re-add a new WiFi profile under the More service option, and finally, click the down arrow > Add Service.
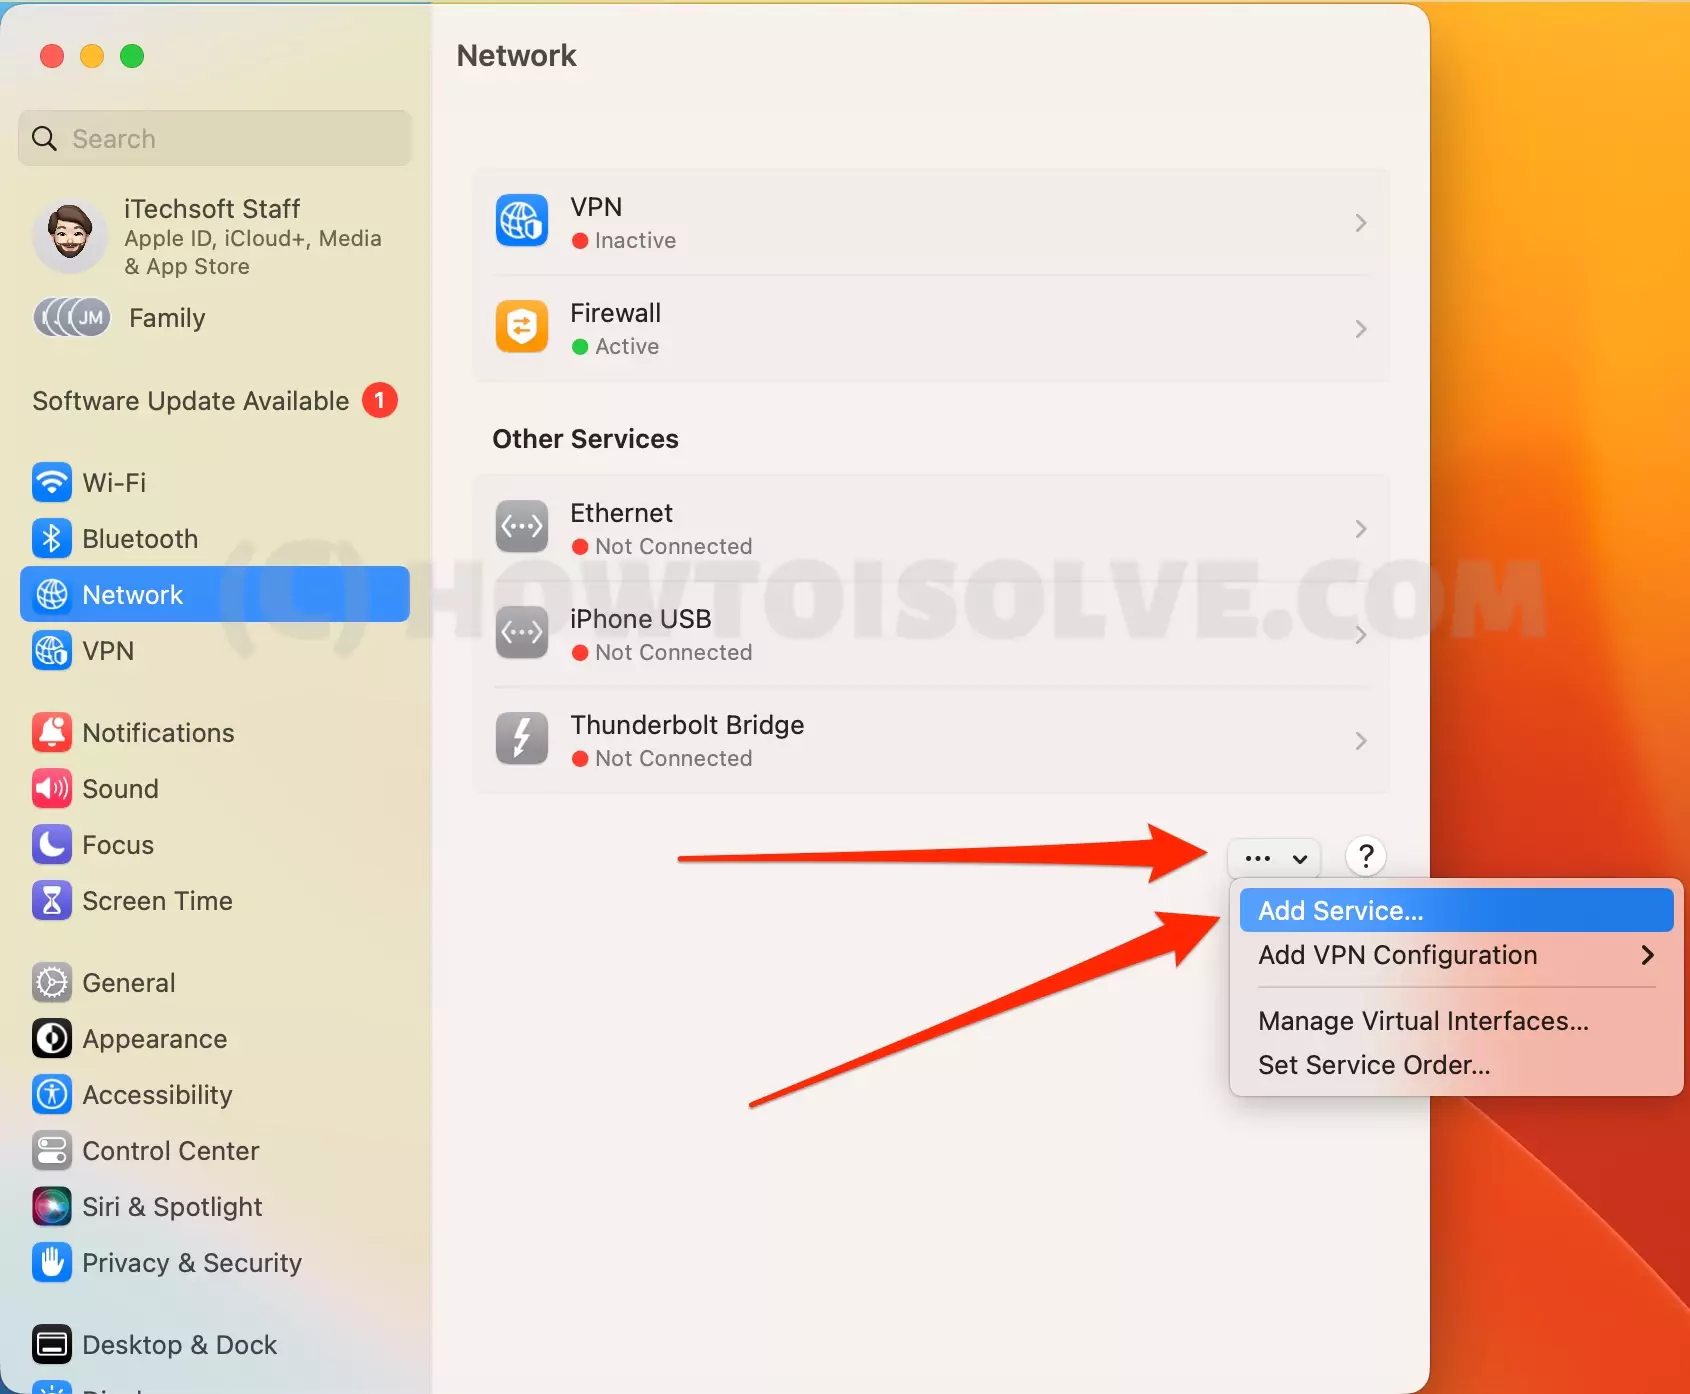
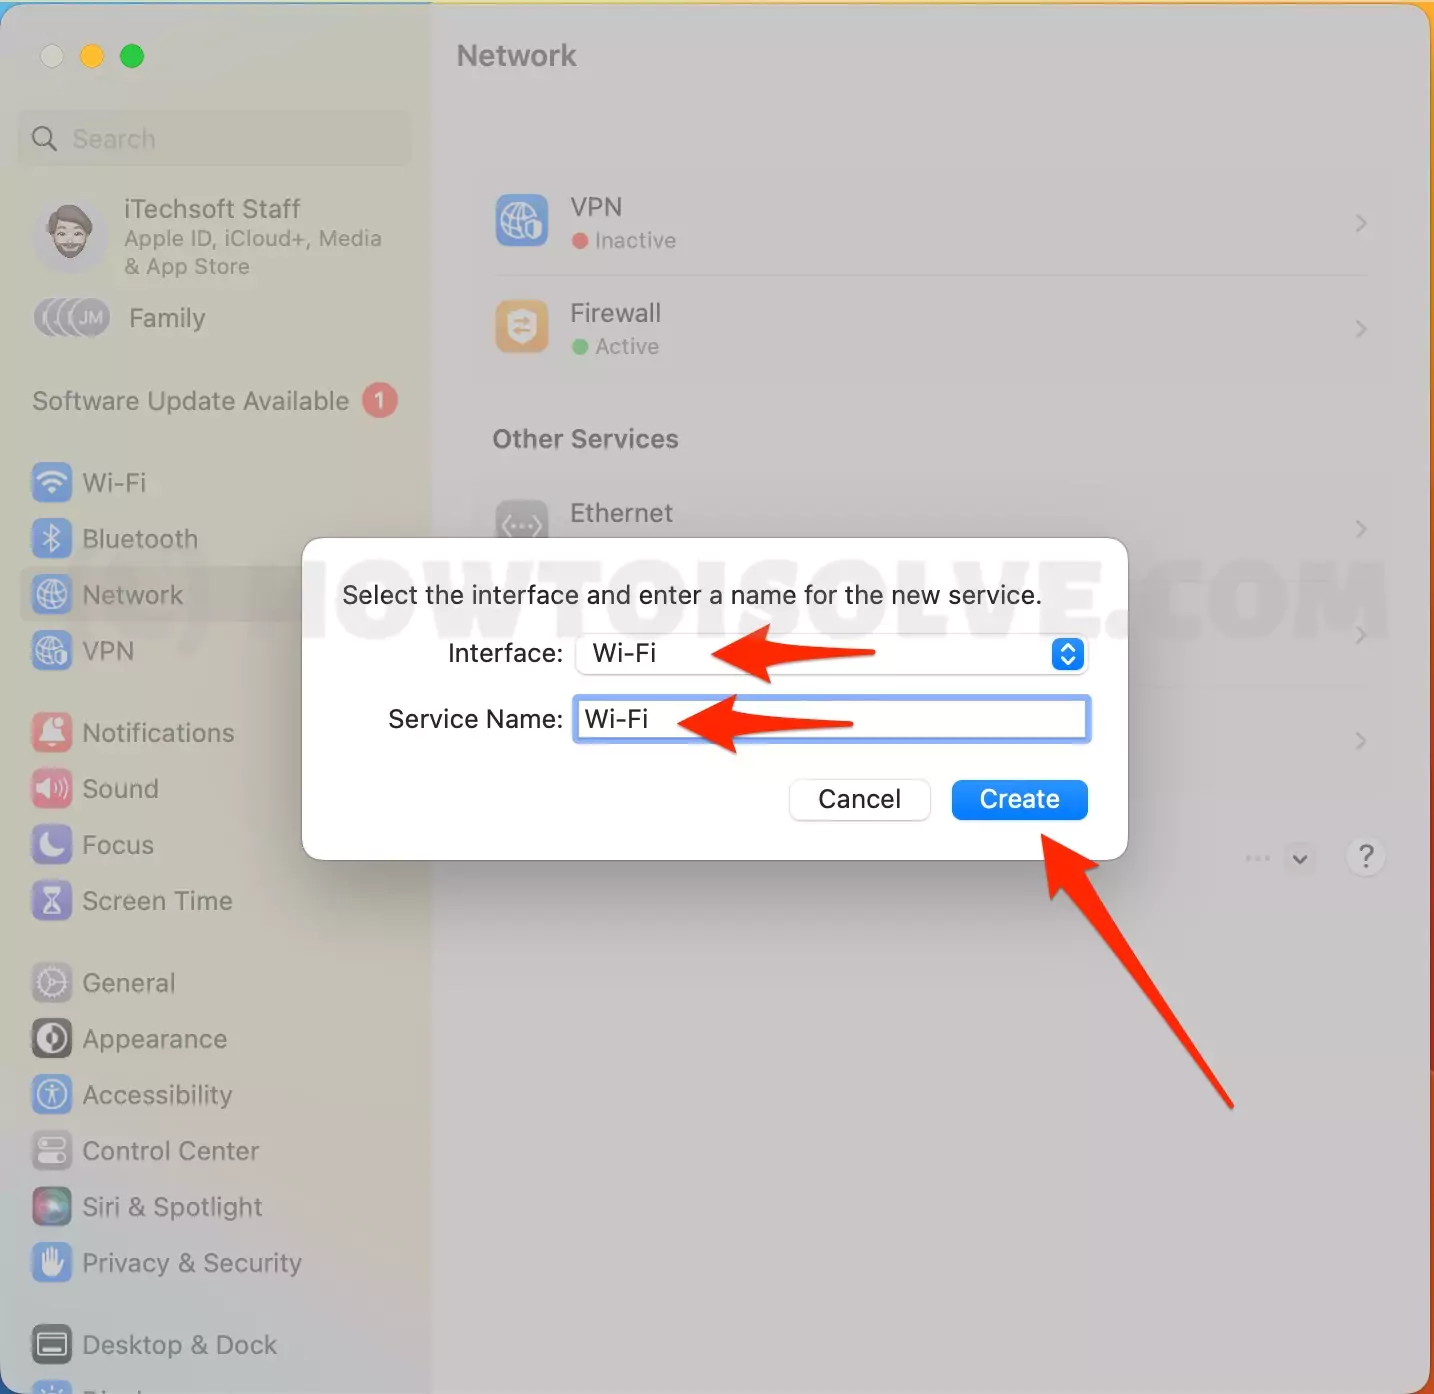
Step 5→: Select Interface: Wi-Fi and give the name of your Wi-Fi network. Click on Create.
That’s it. Follow the steps below to reset the network settings on macOS Monterey & earlier.
On MacOS Monterey & Earlier: Reset Network Settings
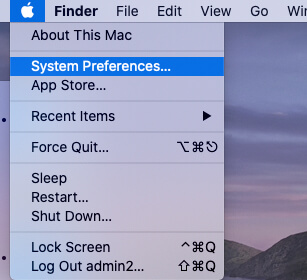
- Click on the Apple icon from the Top Mac Menu. Select System Preferences.

- Choose the Network option.

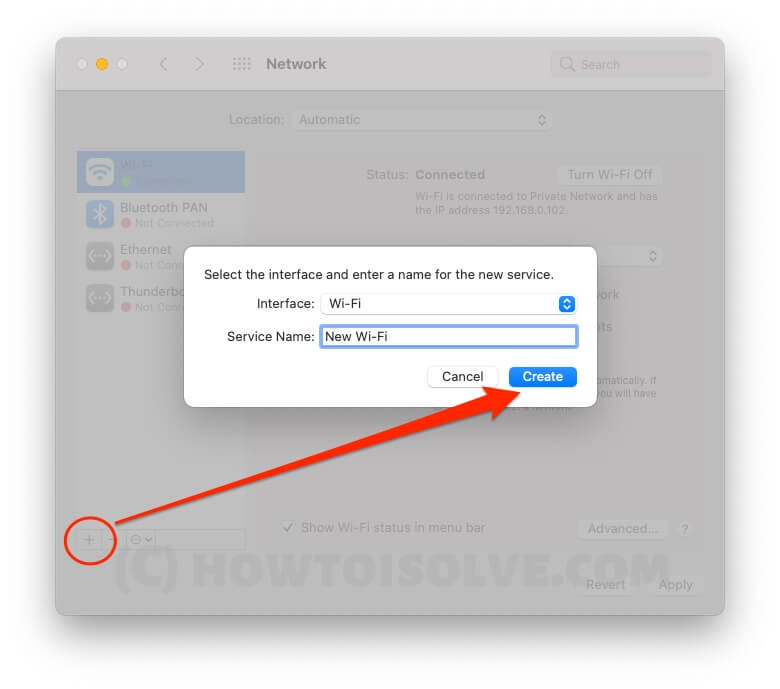
- Click on the Wi-Fi on the side panel and then click on (-) minus to delete it.

- Lastly, click Apply. Again, click on the (+) plus button to add the Wi-Fi interface. In the interface, choose the option “Wi-Fi“ and then select “Create.”
- Next, delete old WiFi, select WiFi from the side of the window, and click on the minus sign to delete it completely.

Connect new WiFi from the top WiFi menu or WiFi settings.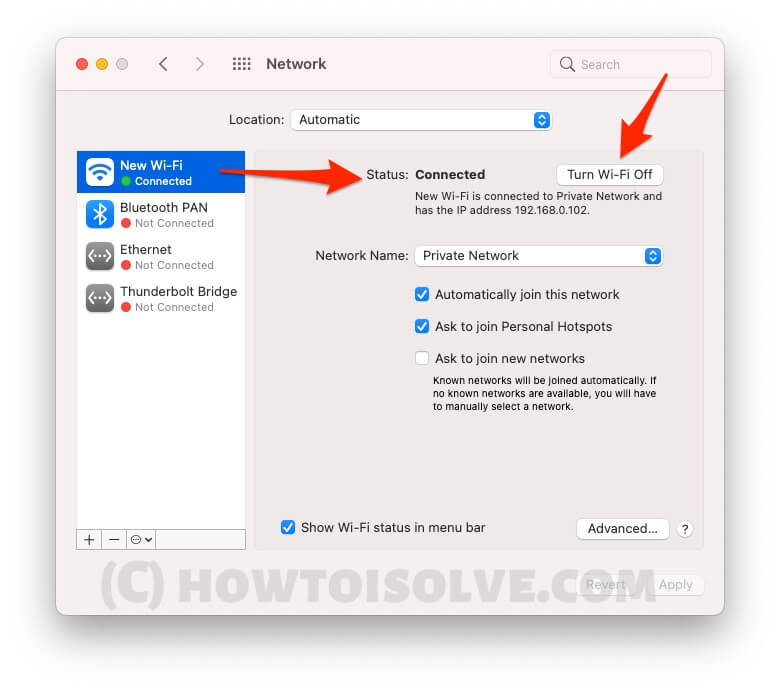
If all the above methods don’t work, then try to connect to WiFi from another user login. We can create multiple administrator accounts and user accounts to test the WiFi connection. Follow the below steps to create a new account.
Method 2: Wipe Wi-Fi Settings on Your Mac computer
Deleting the Wi-Fi settings from a Mac is equivalent to resetting network settings. Doing this will refresh the Wi-Fi settings, and most importantly, all the supportive files that might be corrupted and causing this issue will be removed. After restarting the Mac, the same files will automatically generate.
- Turn off Wi-Fi on the Mac.
- Open Finder and click on Go > Go To Folder… from the top Mac menu.
- Type the following path:
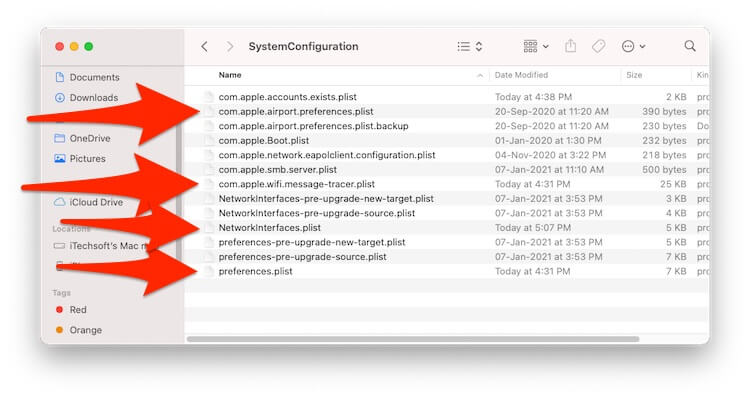
- /Library/Preferences/SystemConfiguration/

- /Library/Preferences/SystemConfiguration/
- Click Go.
- Select the following files:
- com.apple.airport.preferences.plist
- com.apple.network.identification.plist
- com.apple.wifi.message-tracer.plist
- NetworkInterfaces.plist
- preferences.plist
- For a backup, copy all these files on the desktop.
- Next, move these files to the Trash from the SystemConfiguration folder.
- Delete all the files from Trash.
- Restart the Mac, click on the Apple icon, and select Restart.

Reconnect to WiFi from the top WiFi shortcut on the Mac menu. After clicking on the Wi-Fi icon, enable the toggle. Then select the WiFi name and enter the password to connect successfully.
Alternatively, we can reset the network settings by removing the WiFi internet and re-adding it.
Method 3: Reset Network Settings Mac Terminal
Use the command line below to restart the wireless networking service and reset the network adapter. Follow the below command to turn off and turn on WiFi services on Mac using the Terminal command and fix the internal network issue.
- Open Terminal on Mac using Spotlight search, and type the below command. Make the network service go down.
sudo ifconfig en0 down2. Again run the command to turn on the Wireless network service again ,
sudo ifconfig en0 upNote: if the above command is not working on your Mac then try the below command.
ifconfig -aif the problem is with your hardware damage or internal software, then I recommending the below solution.
- Safe mode on Mac: Safe mode on Mac procedure is different on intel and M1 mac, here’s the full guide. and Safe mode determines the software issue on Startup Mac. Repair itself. Check again the issue is fixed after Exit safe mode.
- WiFi Network Card & Hardware issue: If you have performed all the troubleshooting, like Reinstalling MacOS [Without Data loss], we highly recommend Backing up your Mac. Use an External USB WiFi Adapter on your Mac and save dollars from high repair costs.
Note: M1 Mac users can do earse all content and settings to fix all the internal software issue.
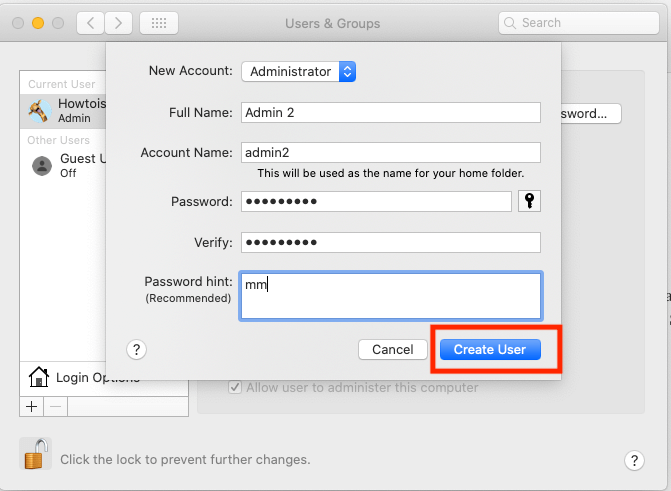
Method 4: Try on Another Administrator Account
A new administrator account will create a new file system and delete the old administrator account. For that, we need to create another account for you with password protection. I assume that you are in an admin account, so you can create another admin on the same Mac. Follow the below steps to create another one.
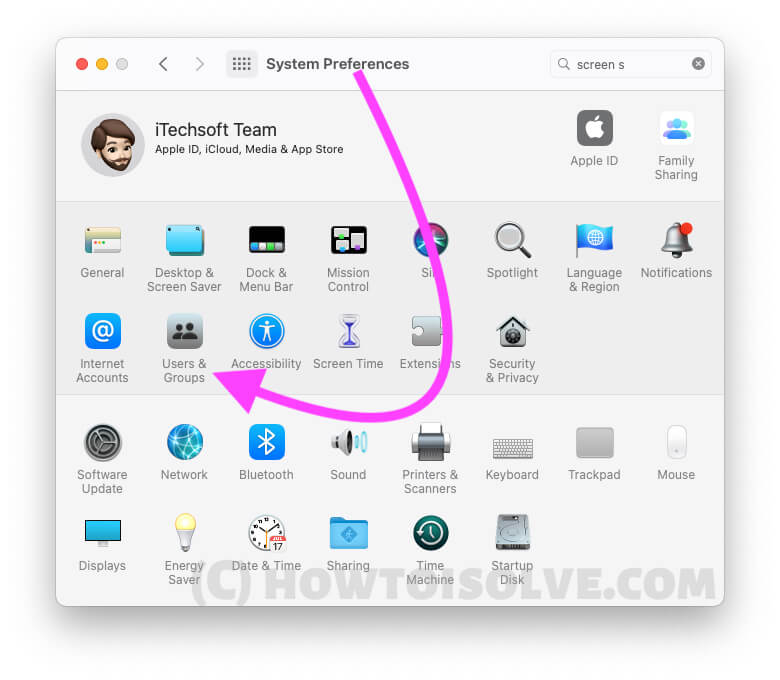
- Click on the Apple Logo from the Top Mac menu > Click on the System Preferences option.
- Next, click on Users & Groups > Unlock the lock by clicking on it.

- Click on the plus sign and select account type “Administrator.”

- Fill up all the details and click on Create User.
- That’s it.
Test your new administrator account on Mac. Sign out of your Mac, and log in again with another account. and set up the network connection.
Later on, you can completely delete the older administrator account to free up space. Don’t forget to back up your Mac. And Get Advantage of Startup Disk Full on Mac.
Select the user from the left side of the window > Click on the minus sign to delete the administrator account.
How to Reset an Ethernet Card For an iMac
Are you worried about the cable internet connection on your iMac? Because the Ethernet card is not starting on Mac restart or on turn-on.
- Click on the Apple Logo from the top Mac menu > System Preferences.
- Next, click on “Network,” select the small arrow, and select Network Port Configurations.
- Uncheck “Built-in Ethernet” and click on Apply Now.
- Now, restart your Mac and check again.
- Again, check & select “Built-in Ethernet” and apply.
- That’s it.
🕶Still, the issue is not fixed yet. Then check your Mac warranty status online and get a free diagnosis from Apple support with Book Appointment at the Apple Genius bar.
The above tricks are useful for resetting network settings on Mac and fixing all network issues permanently. Write to us for more help in the comment box.