
Undoubtedly, Apple Magic Keyboard is the primary input for any Mac. Therefore, knowing how to efficiently control or change the Keyboard settings on newly revamped macOS is one of the critical tasks.
Nevertheless, many owners swear to have personalized keyboard settings on macOS Ventura to simplify their lives. But at the end of the day, they stuck with what are the must-have keyboard settings that need to be configured on redesigned macOS.
Do not worry more! As we have simplified some of the most basic keyboard settings, such as Shortcuts, Dictation, Auto-Capitalization, and many more. So Continue reading the article and use your Keyboard with the best keyboard settings on Mac.
New Keyboard Settings For Mac (Updated macOS Ventura)
Have you recently upgraded your Mac with the latest macOS and need to familiarize yourself with how to reach the best keyboard settings? Then, go through the complete guide and get your work done!
Tip #1. Mac Keyboard Shortcuts
Keyboard shortcuts are always time-savers, As it offers a handier to open the various branched Menu in Mac by simply hunting it two-three keys from the Keyboard.
Eventually, the shortcuts rely upon practice and muscle memory. That’s why you must keep up in line before you make it in the long run.
Still, If you want to enable the keyboard shortcut on macOS Ventura, kindly follow the steps below.
macOS Ventura & Later:
- Click on Apple Logo > System Settings…
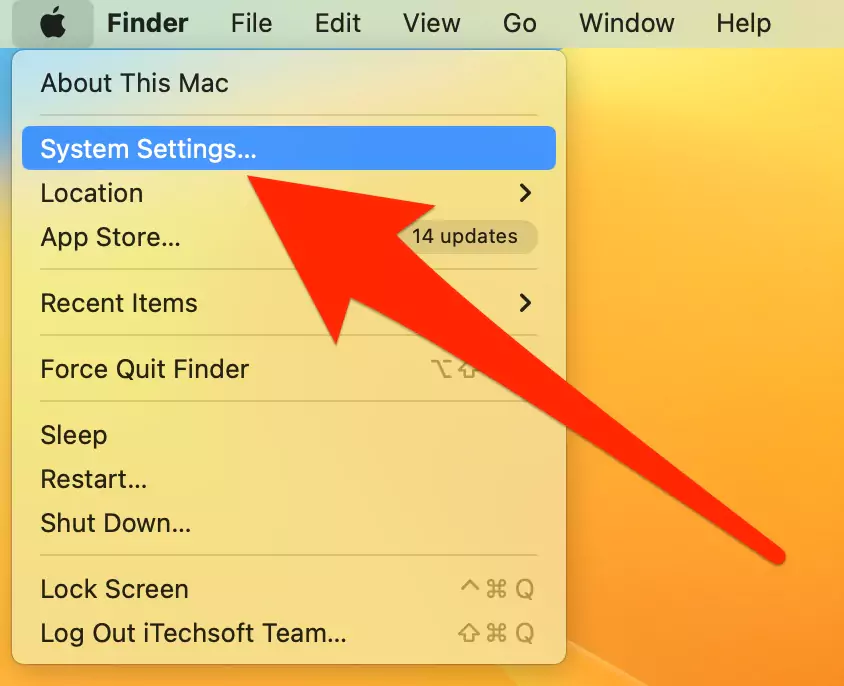
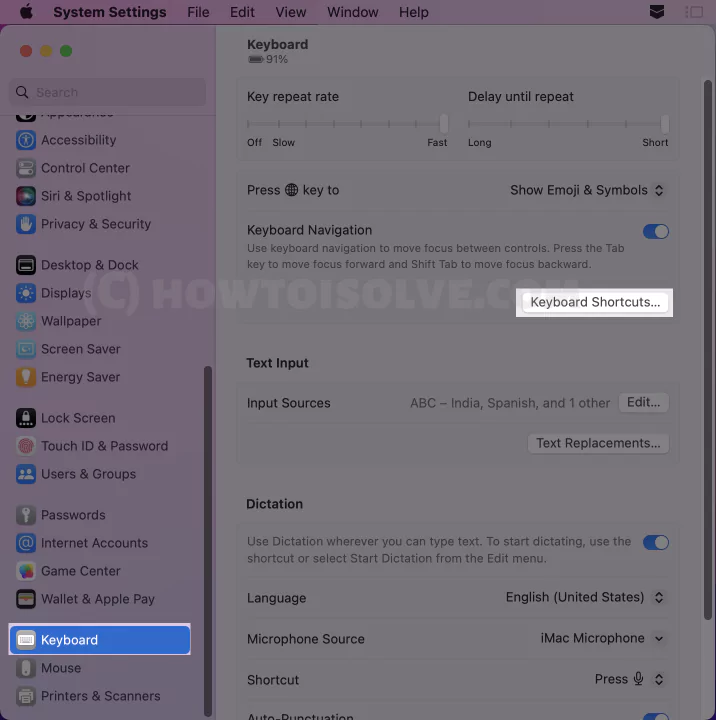
- Select Keyboard > Keyboard Shortcuts…

macOS Monterey & Earlier:
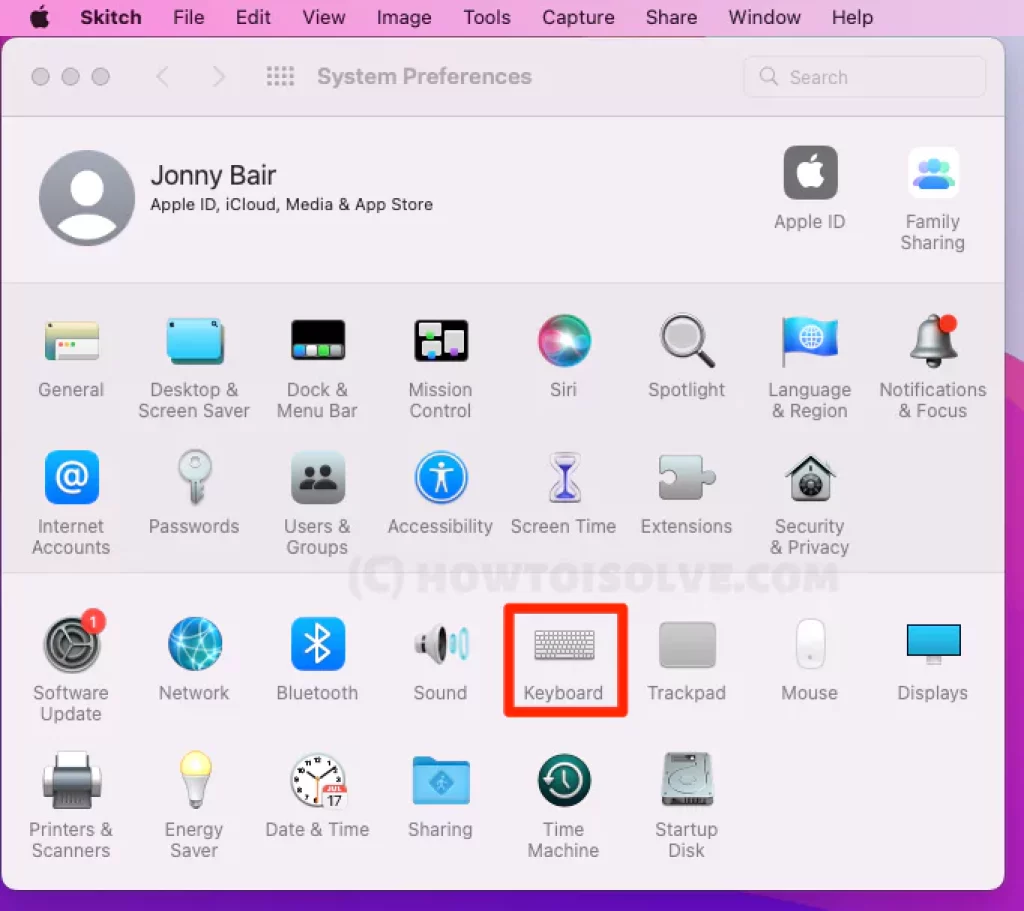
- Go to Apple Logo > System Preferences…

- Click on Keyboard > Shortcuts.

Moving forward to the next page, you will receive predefined keyboard shortcuts for brightness, mission control, Keyboard, input source, Screenshot, services, spotlight, Accessibility, function key, and Modifier Key. All predefined shortcuts on macOS can be changed according to your desire. in Addition, Using an App like CheatSheet we can Quickly See All The Keyboard Shortcuts For Any Mac App.
For Instance, you want to disable the shortcut key for brightness on Mac. Then, follow the same steps mentioned above as macOS installed on your device.
Then from Keyboard Shortcut Window, tap on the Display Option. Uncheck the box next to the Decrease Display Brightness, and Increase Display Brightness.
Tip #2. Add New Shortcuts
Now, Tab Key Navigation work on Mac System Settings in macOS Ventura.
In more,
The Mac computer is always known for its supremacy, and the true answer for it is allowed to add new keyboard shortcuts. In addition, it will enable you to create shortcuts for menu commands along with Finders. As of now, you might need to familiarize yourself with how to add the new shortcut keys on macOS Ventura to make it completely personalized; follow the below steps.
Things To Keep In Mind…
- You are allowed to create keyboard shortcuts only for the existing Menu.
- You are not allowed to create keyboard shortcuts for tasks just like opening an app.
- If you have designed the Shortcut that is already assigned to another functionality or app, the designed Shortcut will not work.
For Instance, you want to change the Shortcut of Screenshots on new and previous macOS. Then, follow the steps given below.
macOS Ventura & Later: Navigate to Apple Logo > System Settings… > Keyboard Shortcuts… > Screenshot. Choose the desired form, Screenshot Menu, and click on it to add a new shortcut.

macOS Monterey & Earlier: Navigate to Apple Logo > System Preferences… > Keyboard > Shortcuts Screenshot. Choose the desired option from Screenshot Menu and click on it to add a new shortcut.
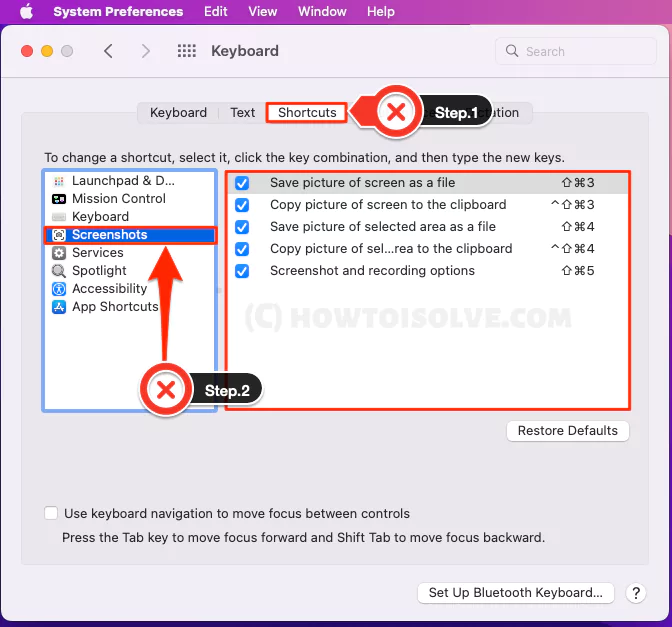
Now scroll through the various options available on the screen and customize the keys on macOS for comfort and convenience. First, go to the default shortcut by selecting Restore Defaults.
Tip #3. Disable Keyboard backlight
The keyboard backlight remains enabled whenever you turn on the Mac. Nevertheless, this backlight feature helps find the missed Key on the Keyboard while working in a dark room.
But as a tech nerd, we suggest disabling such settings as it might cause Battery Draining Issue On Mac. If you have made up your mind to disable the feature. Here is how you can do it.
Tip: You can change the brightness of the Backlight of Mac keyboard directly from the Control Center in the Menu bar.
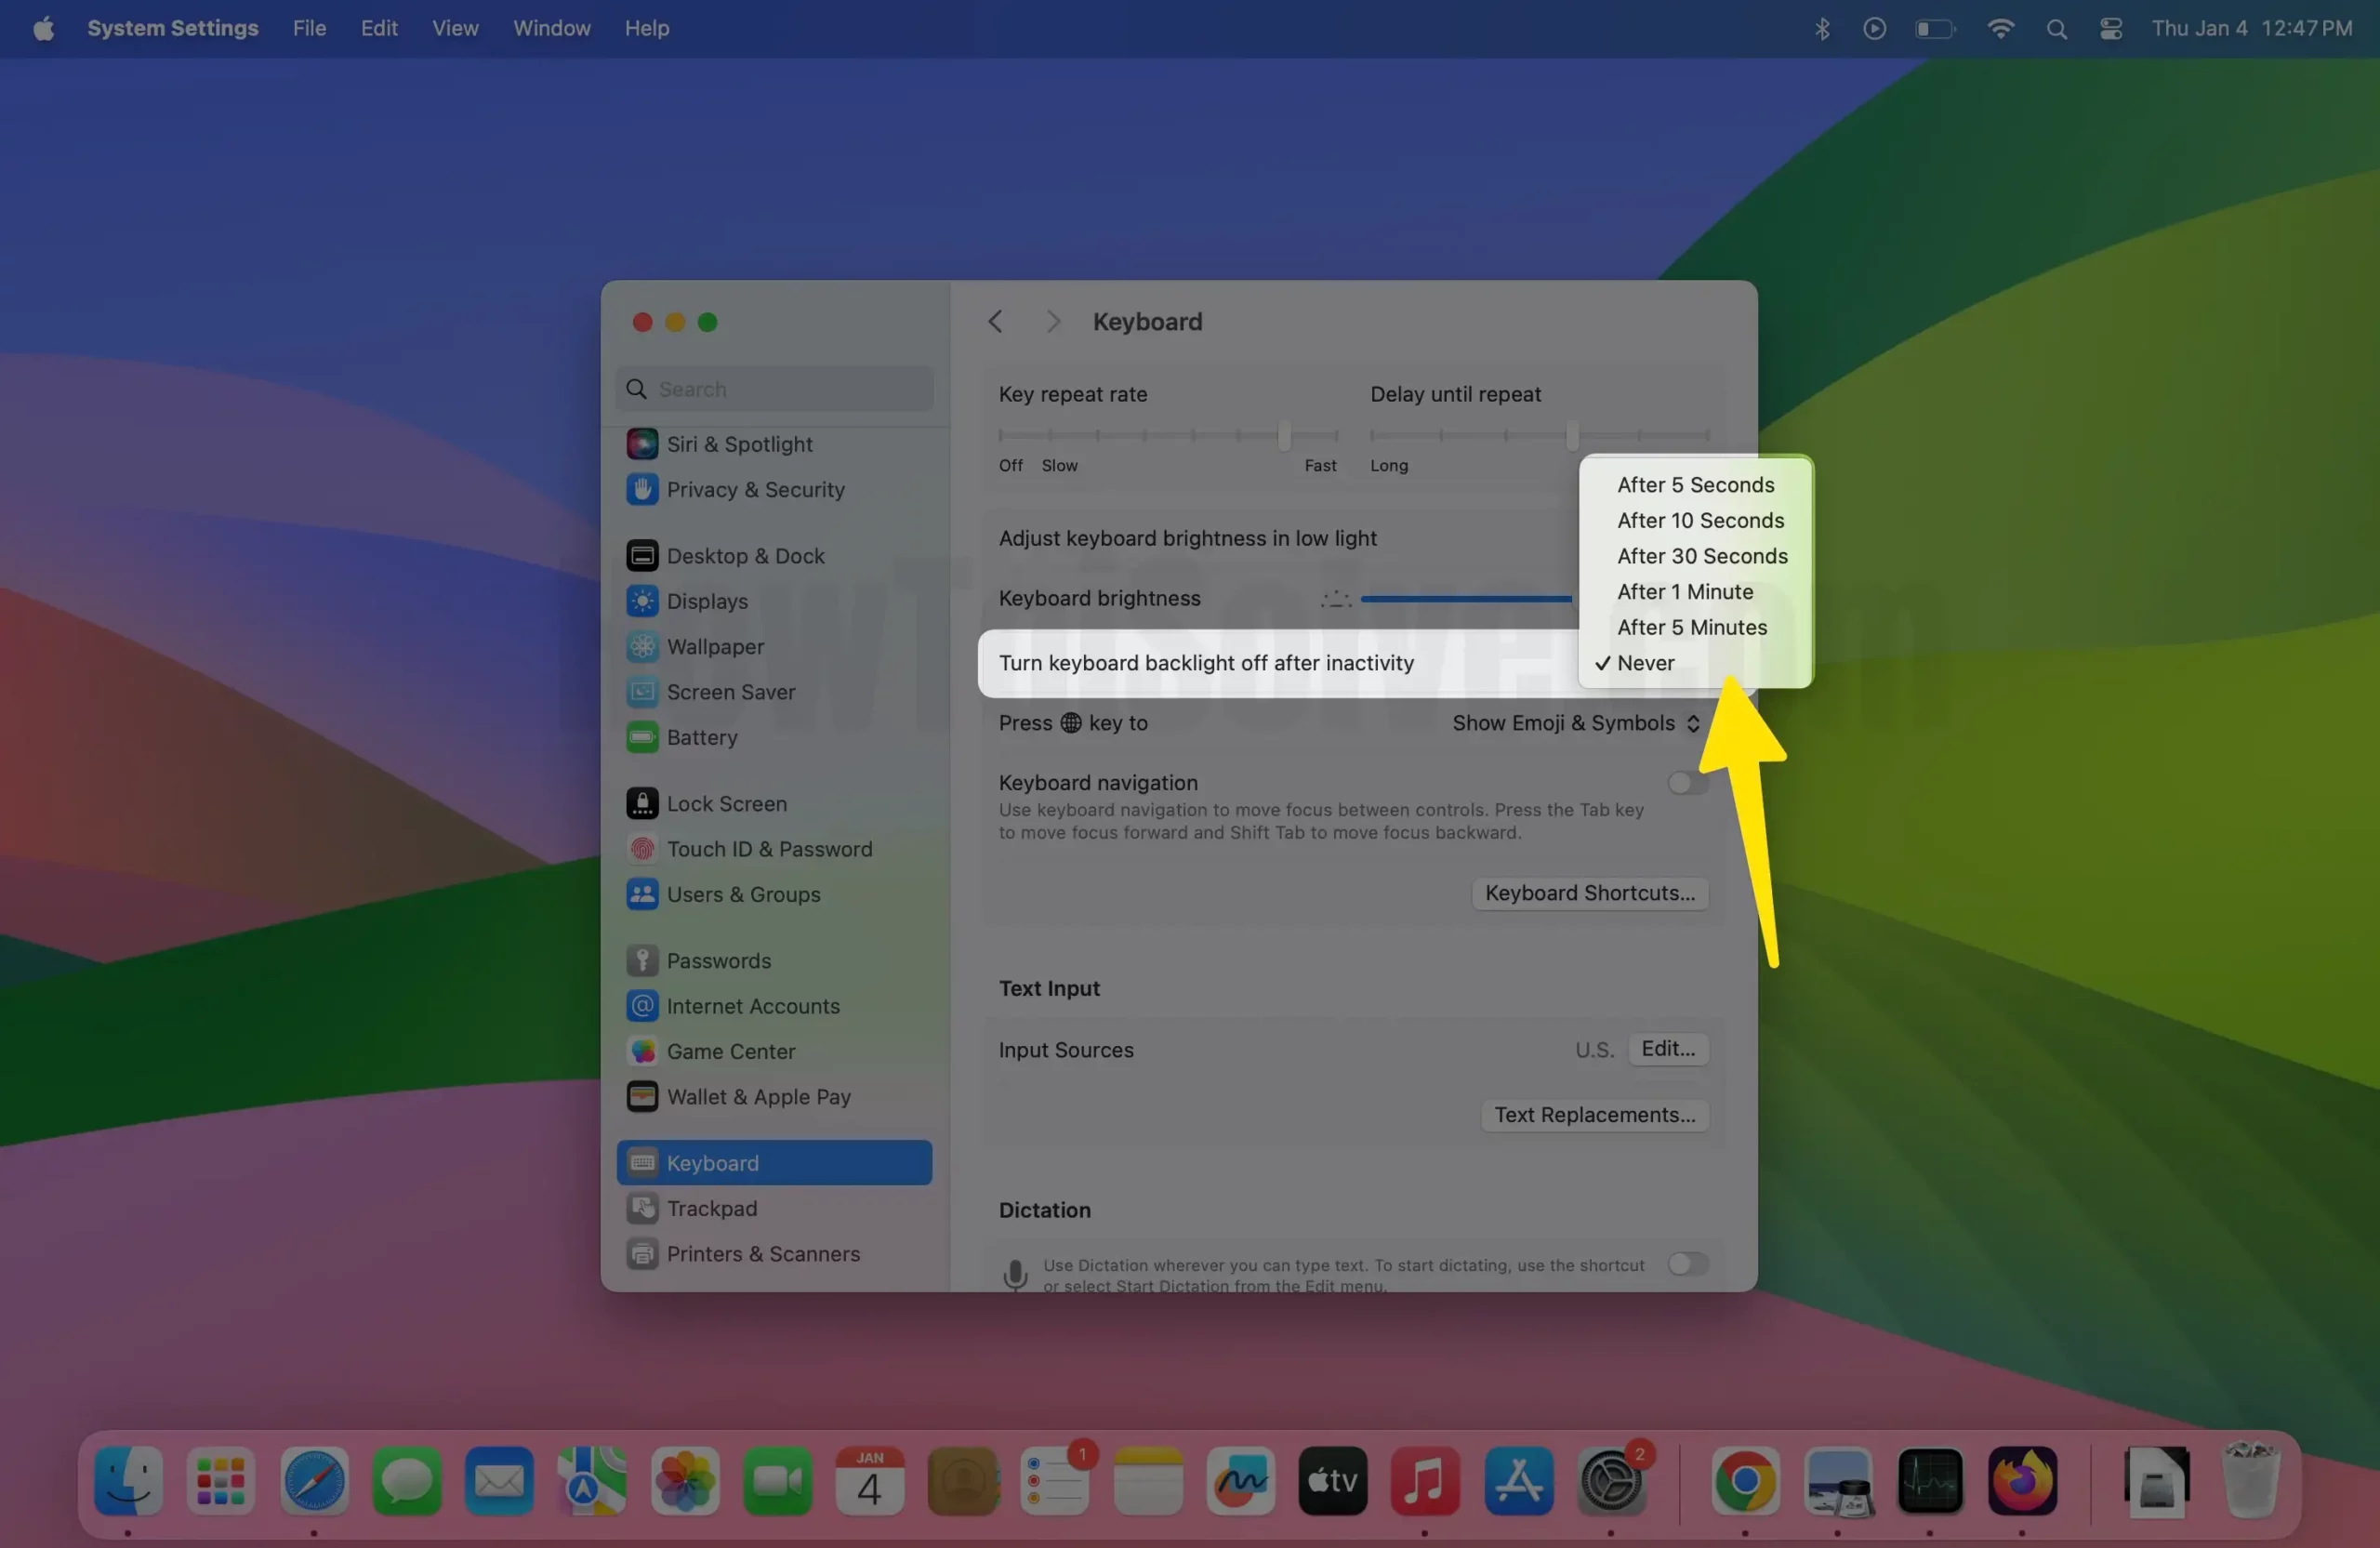
macOS Ventura & Later: Apple Logo > System Settings… > Keyboard. Under the Keyboard Repeat Rate, tap on the toggle next to the Turn Keyboard BacklIght After “Scheduled Time” of inactivity.
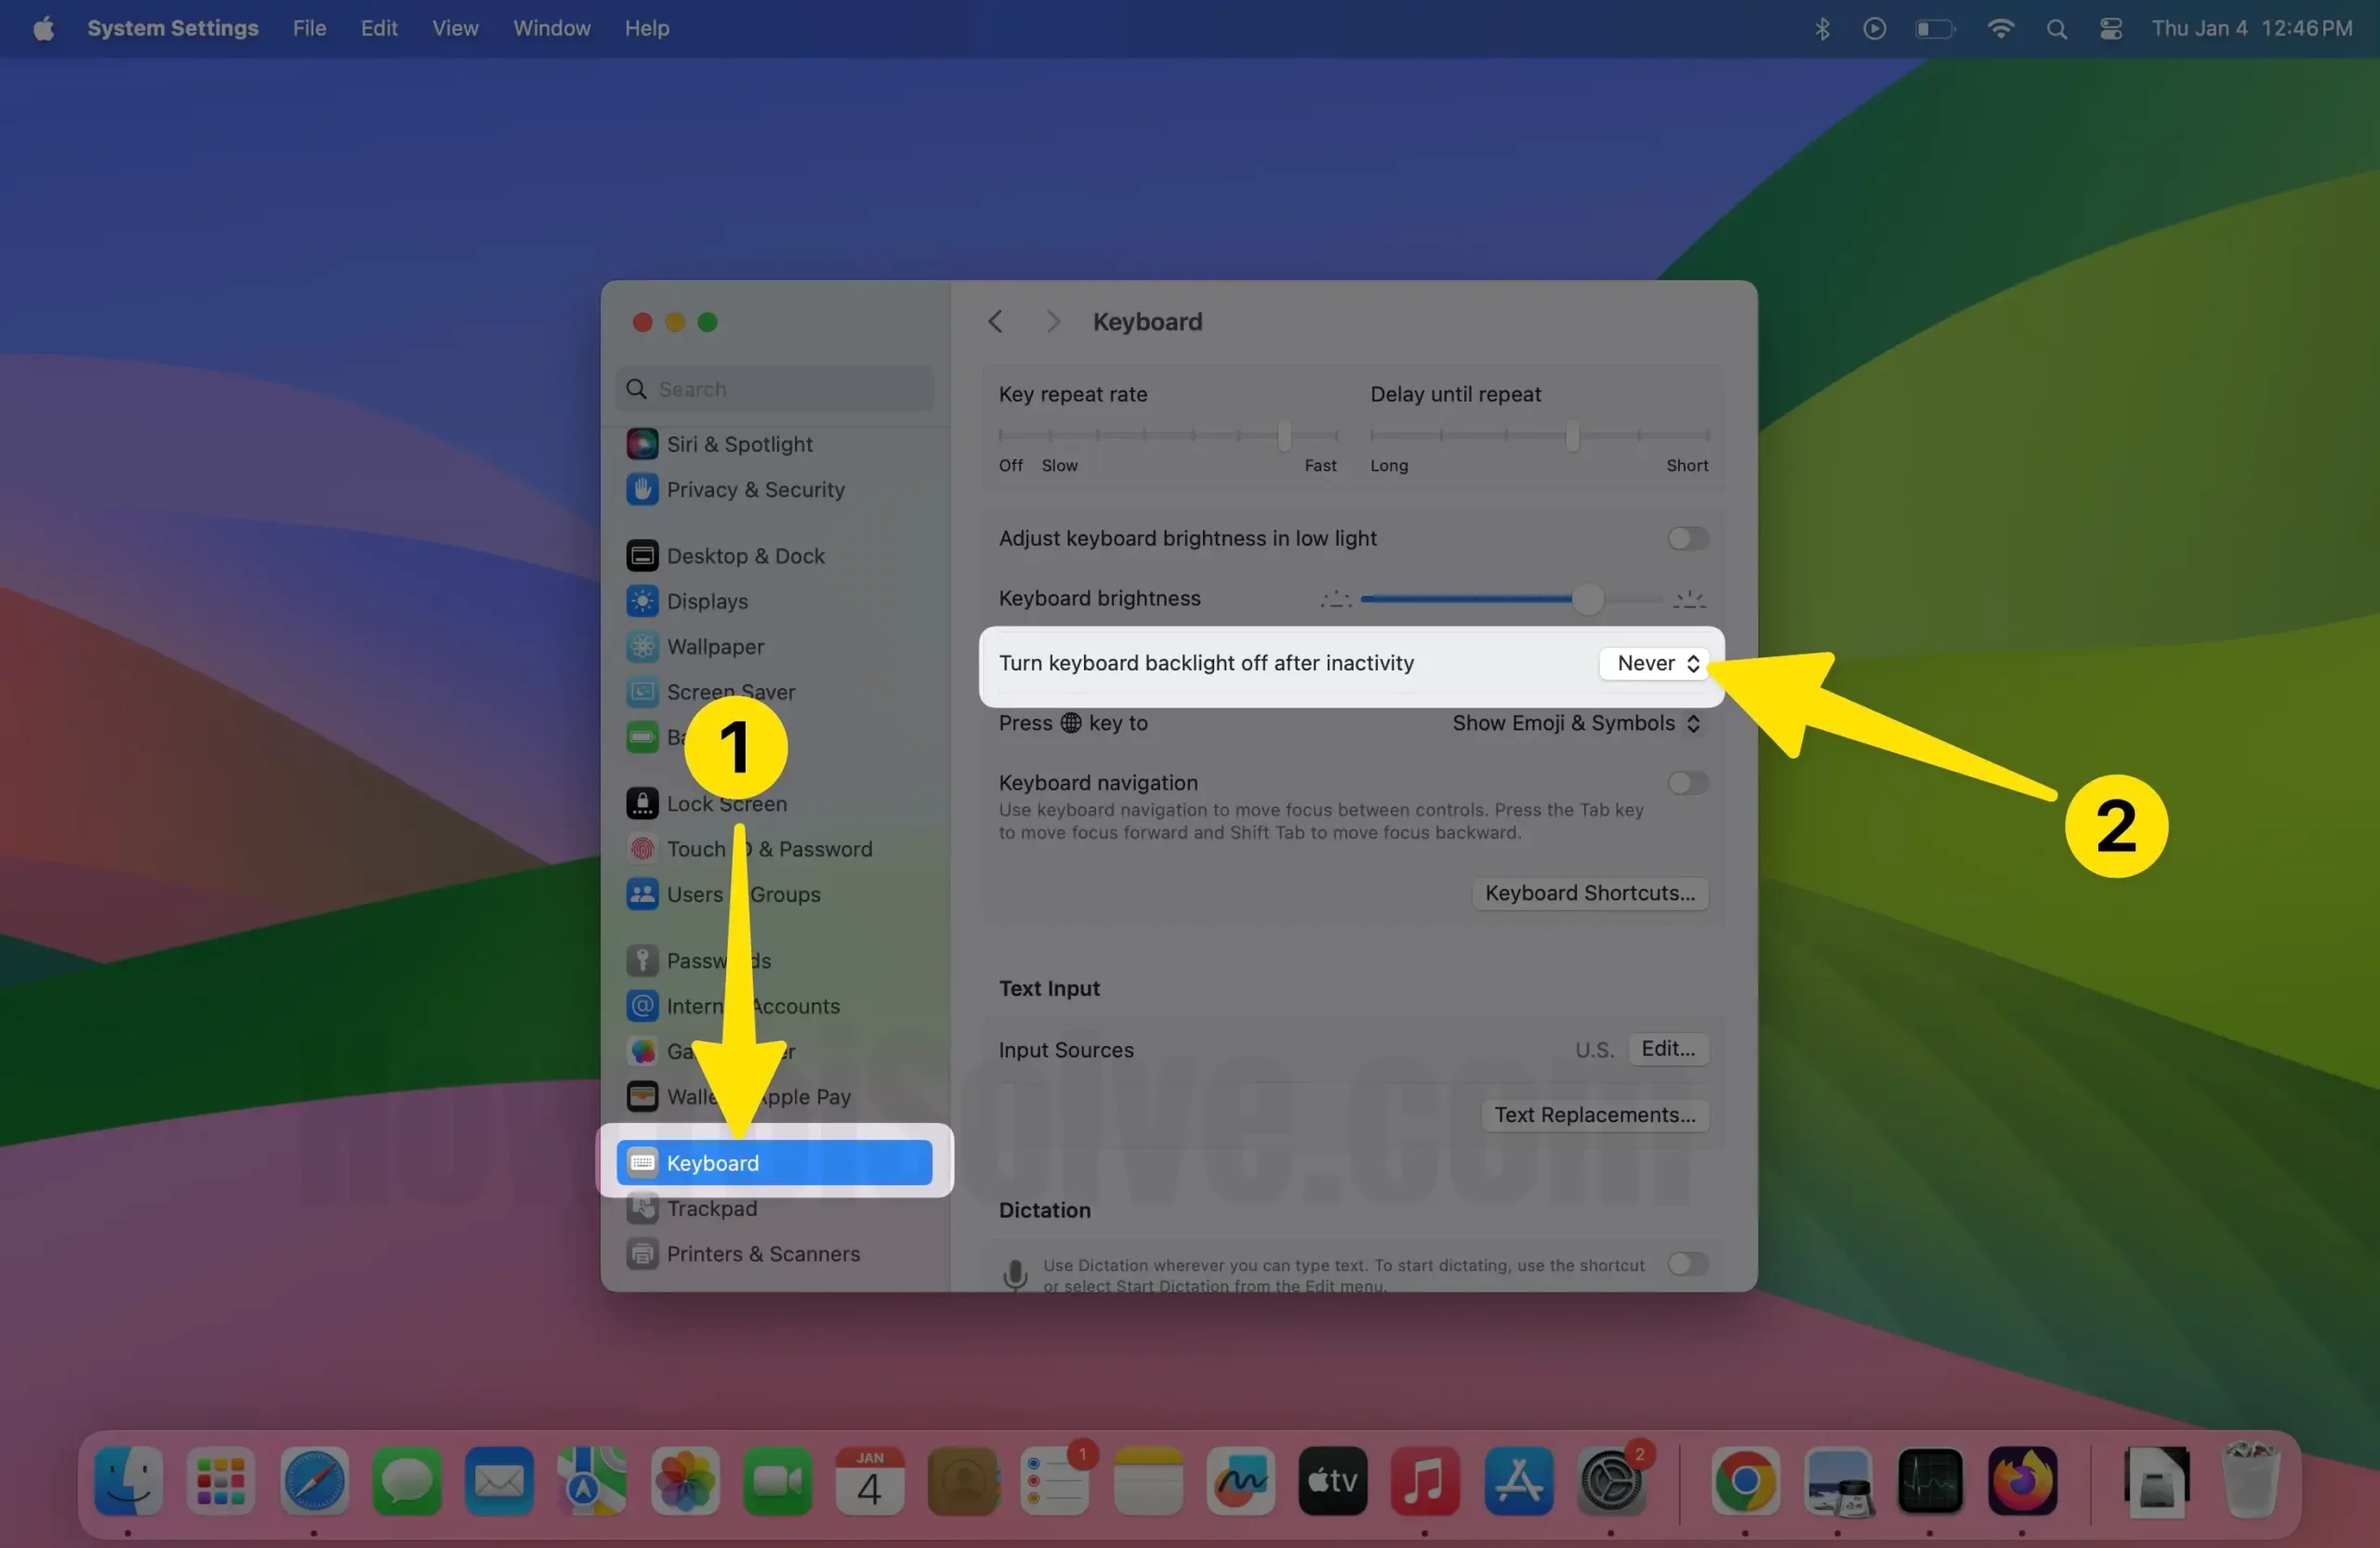
macOS Monterey & Earlier: Apple Logo > System Preferences… > Keyboard > Keyboard > check the box Turn Keyboard BacklIght After “Scheduled Time” of inactivity.
You can configure Schedule Time (5s, 10s, 30s, 1m, 5m), within which the backlight of the Mac computer will get turned off automatically.
Adjust Keyboard Brightness In Low light: This feature will automatically Adjust the Keyboard Brightness per the surrounding environment.
Tip #4. Enable Standard Function Key
By default, the upper row keys of the Apple Keyboard are assigned for the specific task, just as Adjusting Screen Brightness, Volume Control, and Video & Audio Playback. So if you are presently not using Standard Function Key on the Mac. Here is how you can enable it.
macOS Ventura & Later: Apple Logo > System Settings… > Keyboard Shortcut… below the Keyboard Navigation > Function Key > Toggle to enable Use F1, F2 etc As A Standard Function Keys .

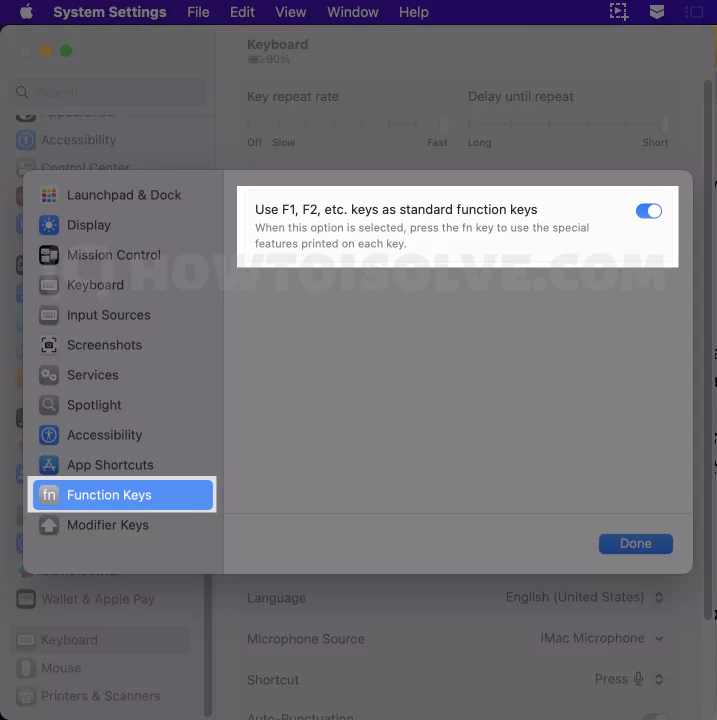
macOS Monterey & Earlier: Apple Logo > System Preferences… > Keyboard > Keyboard > check the box next to the Use F1, F2 etc As A Standard Function Keys.

That’s It!
Tip #5. Switch Keyboard Language Shortcut in 5 Ways
In new and old macOS, you can now switch between the different languages you have set up inside the Input Source of the Keyboard. Here are the shortcut ways to change the keyboard language on Mac.
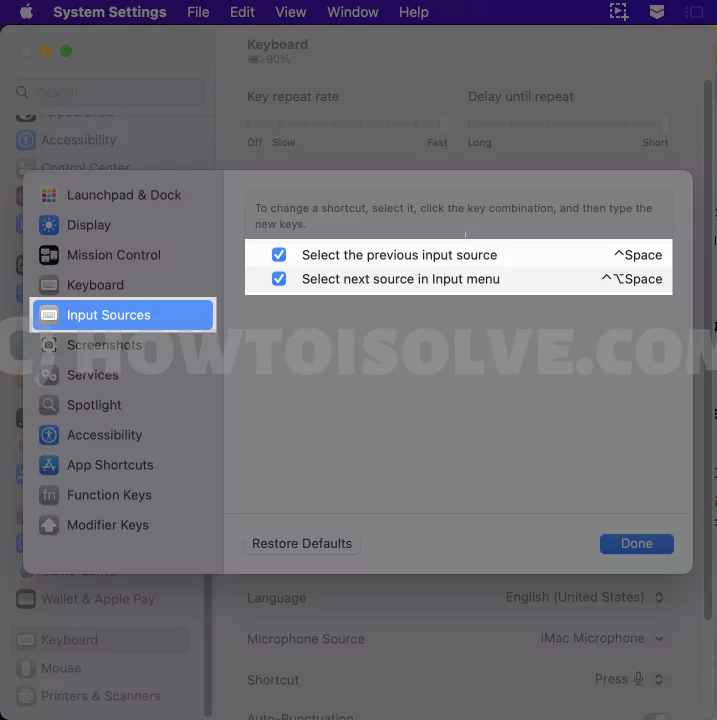
1. Use Input Menu: Hover the mouse to the Mac menu bar, click on Input Icon, and select the language you want. The current application is incompatible if the Input Menu seems to be greyed out or dimmed.
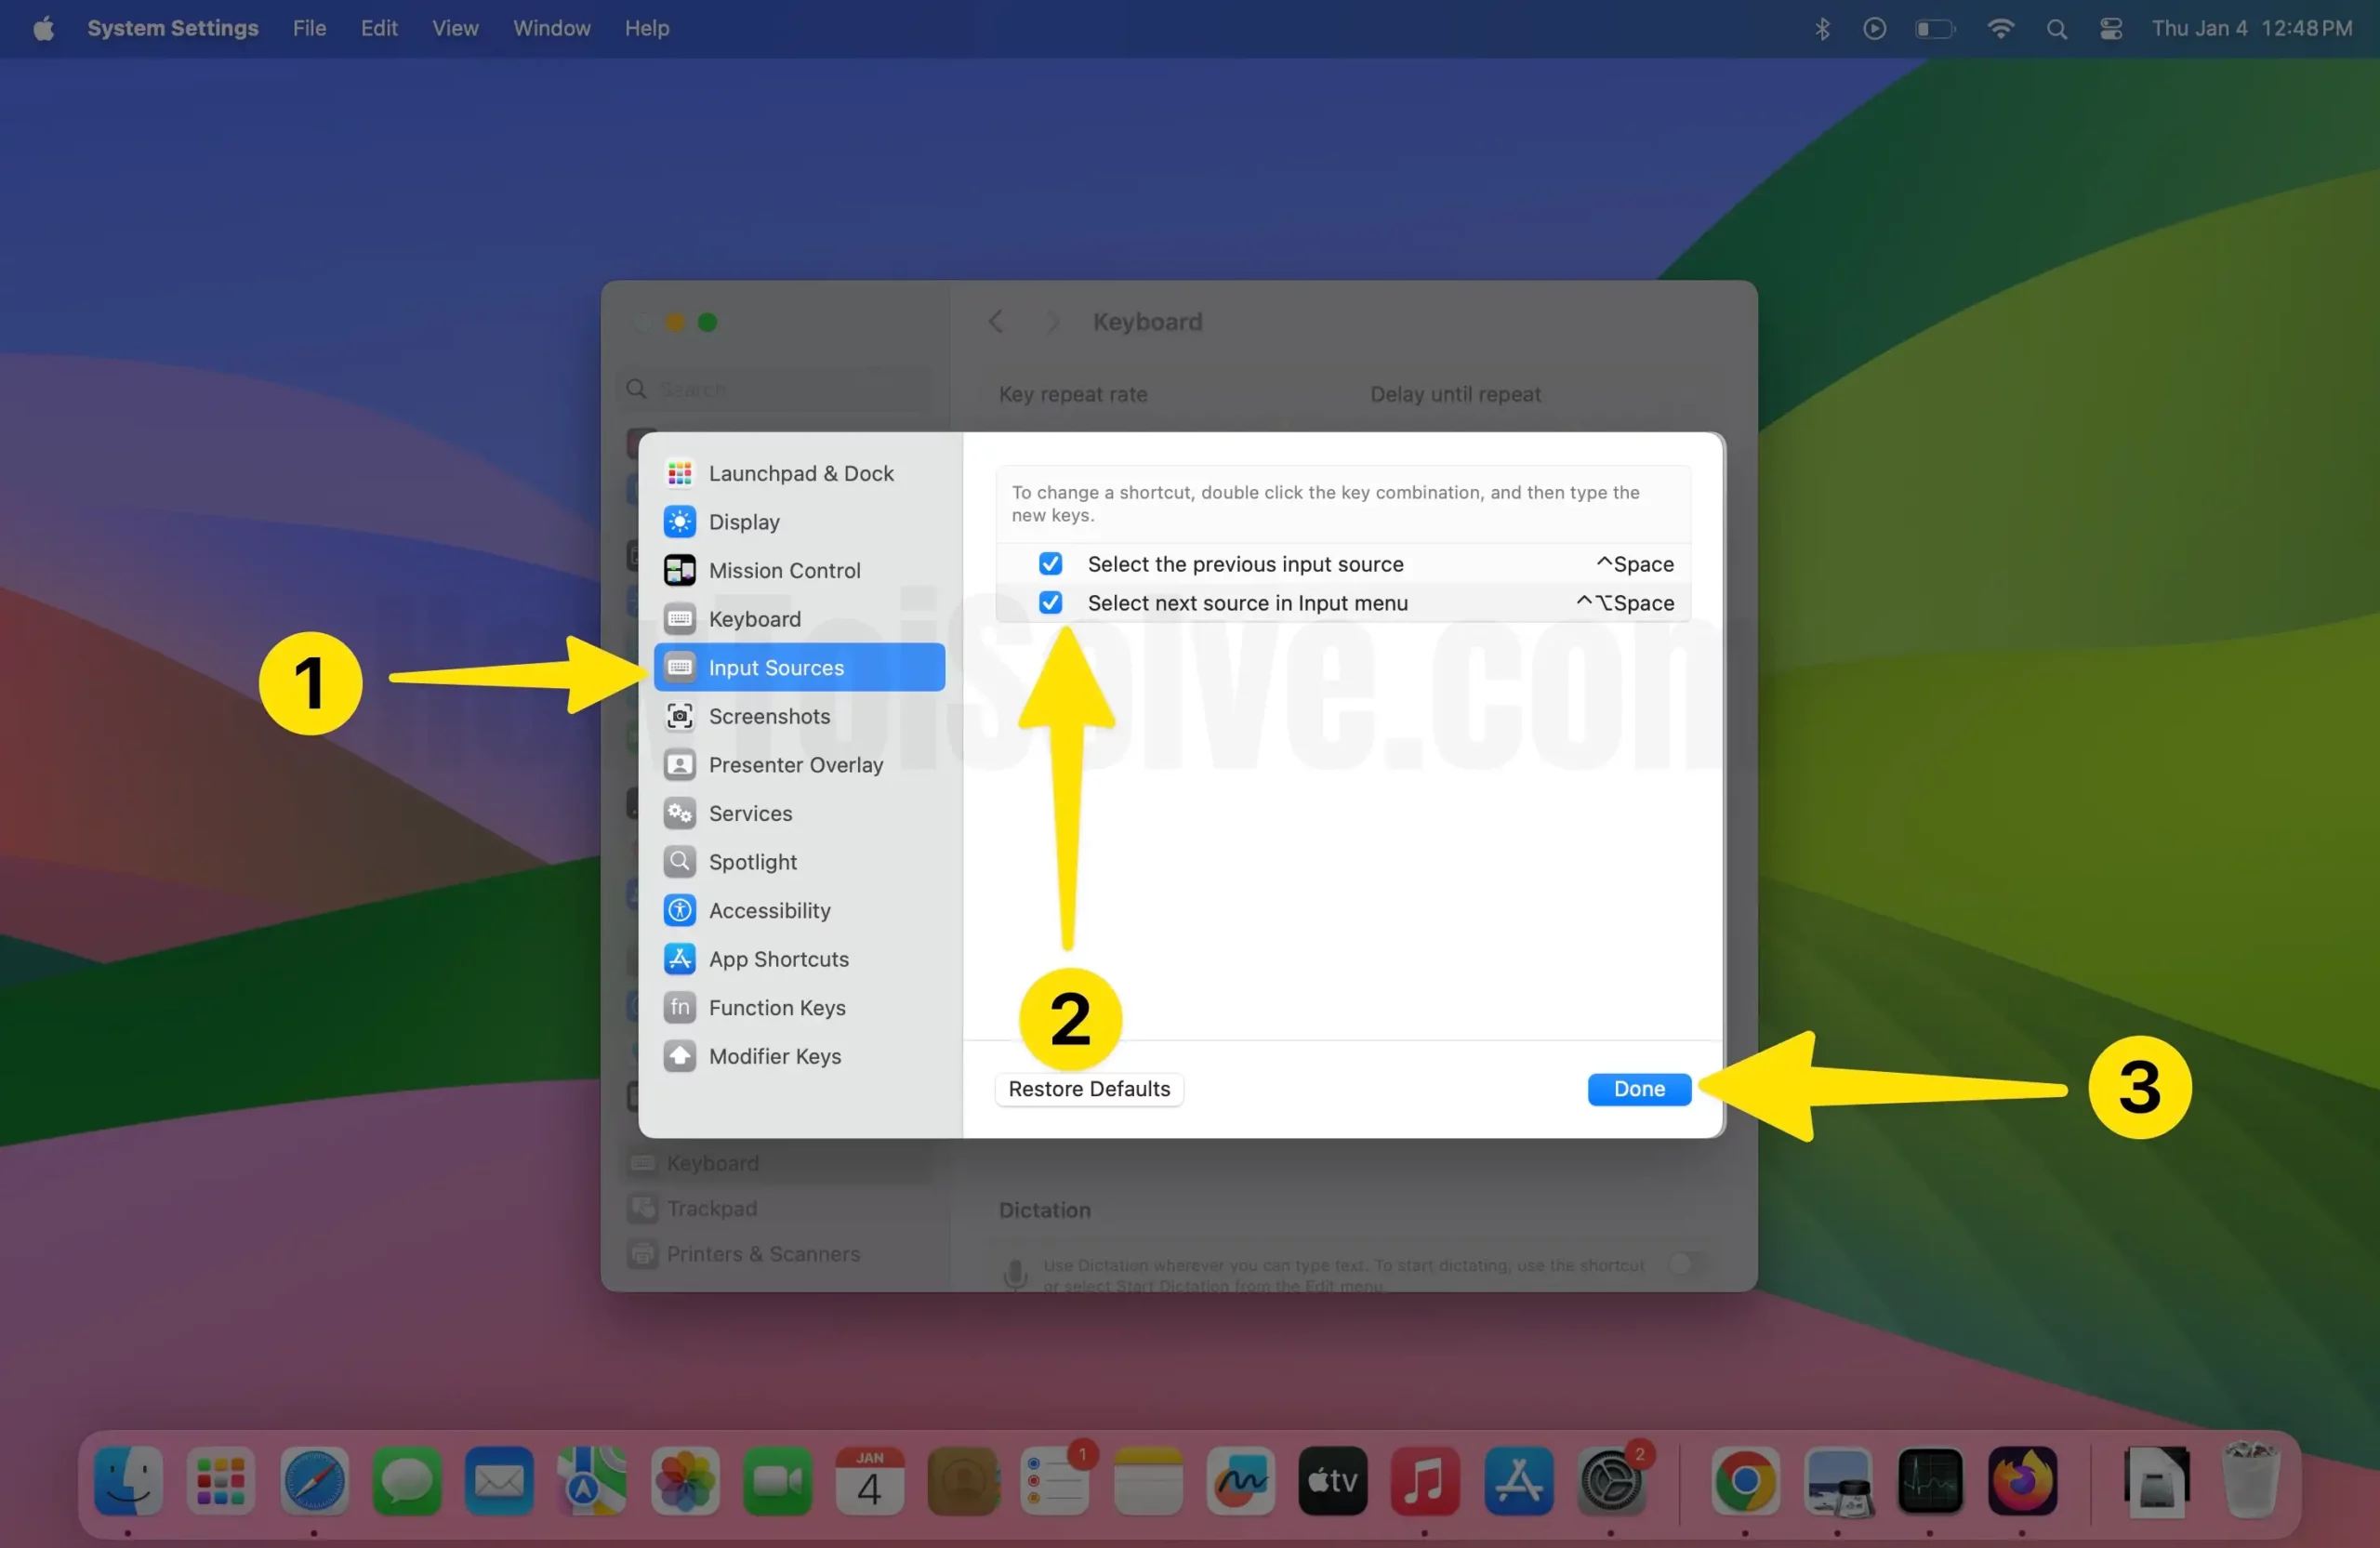
You can also use Option-Control-Space to pick out the next input source from the input menu or Control Space to select the previous input.
2. Use Fn /Globe Key: If you have shaped up the Fn/Globe Key to change the language on Mac, gently press the Key and Fn/Globe button (If available on Mac Keyboard), and it will appear in the list. Then keep pressing the same Key until the preferred language is selected from the Menu. The list will disappear after that.
To verify the settings, follow the given below steps:
macOS Ventura & Later: System Settings… > Keyboard > Keyboard Shortcuts… > Input Source.
macOS Monterey & Earlier: System Preferences… > Keyboard > Keyboard Menu.
3. Using Predefined Shortcut Keys: The Input language of Mac keyboard can be changed using the shortcuts (Option-Command-Space), which are mentioned under the Keyboard Shortcut settings ( System Settings… > Keyboard > Keyboard Shortcuts… > Input Source).
Anyhow, you can also change the shortcuts at your convenience under the same settings. After pressing the shortcut keys, your selected language will be visible in the Mac Menu Bar.
4. Using Caps Lock Key: Unlike the globe key, if you have selected the Caps Lock Key to change the language, press the Caps Lock Key to change over Non-Latin-Input Source-to-Latin Input Source.
macOS Ventura & Later: System Settings… > Keyboard > Keyboard Shortcuts… > Input Source.
macOS Monterey & Earlier: System Preferences… > Keyboard > Keyboard Menu.
5. Use Touch Bar: On the MacBook, you can smartly change over the Input Source language using the Touch Bar. Yes, you heard right, you can simply Customize The MacBook Touchbar by adding an Input Source Icon (Fn/Globe Key) or else Handwriting Icon; after that, select the Input Source you want to have.
Tip #6. Setup A Mac To Write In Different Languages
Writing in a different language is another complementary feature in macOS that allows users to instantly configure and switch between languages on their mac keyboard.
In case you want the same settings to either write in a different language or add another language on the new macOS Ventura. Follow the given below steps to change the mac keyboard language.
What Are New Languages Added On macOS Ventura?
Armenian, Albanian, Bangla, Azeri, Estonian, Filipino, Burmese, Georgian, Icelandic, Lao, Latvian, Khmer, Urdu, Lithuanian, Mongolian, and Uzbek (Latin).
macOS Ventura & Later: Navigate to the System Settings… > Keyboard > click on Edit… option next to the Input source.


macOS Monterey & Earlier: Move to the Apple Logo > System Preferences… > Keyboard > Input Source.

You will receive the + Icon to add any convenient compatible languages. If you want to remove the language, tap on a particular language to highlight it and choose – Minus Icon.
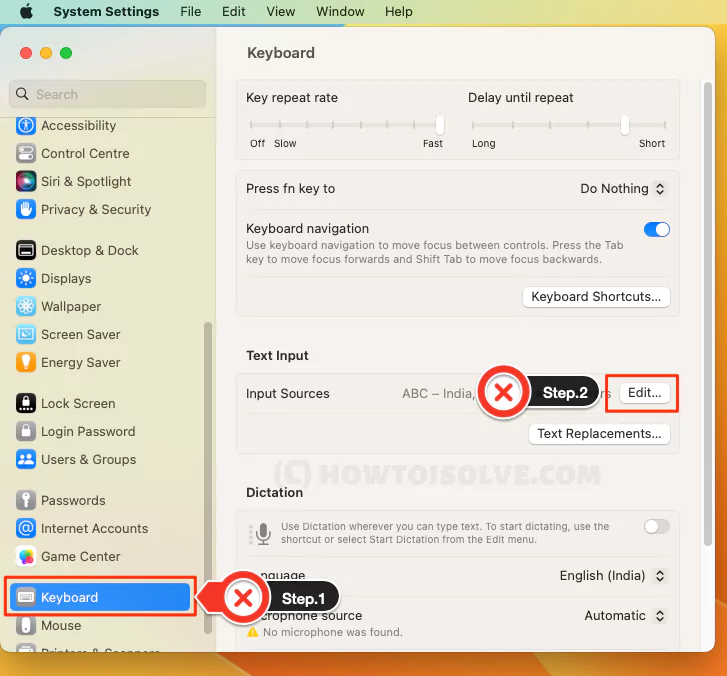
Tip #7. Auto-Capitalization
Auto-capitalization is the best feature that you have ever met with on Mac. Nevertheless, some end users of Mac prefer to have enabled or disabled Auto-Capitalization on macOS Ventura as per their needs and work.
macOS Ventura & Later: Apple Logo > System Settings… > Keyboard > Edit… next to input source under the Text Input menu > Toggle to enable or disable Capitalize Word Automatically.
macOS Monterey & Earlier: Apple Logo > System Preferences… > Keyboard > Text > Uncheck the box present next to the Capitalize Word Automatically.

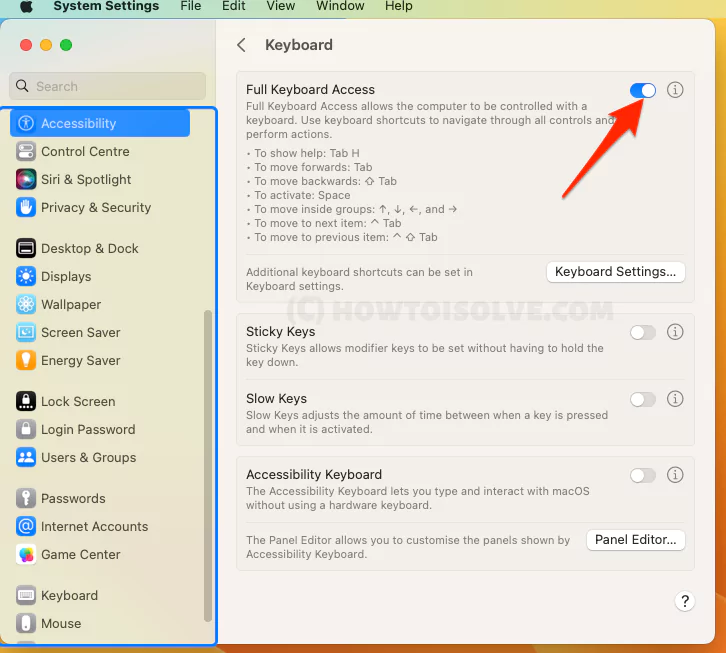
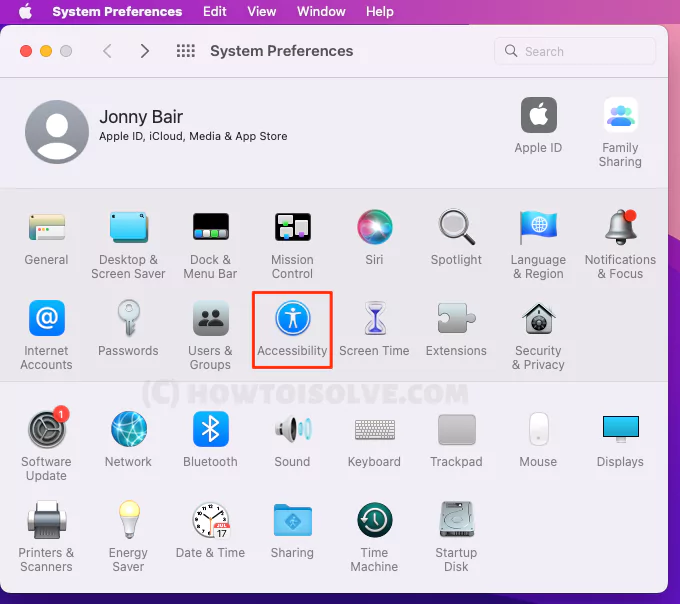
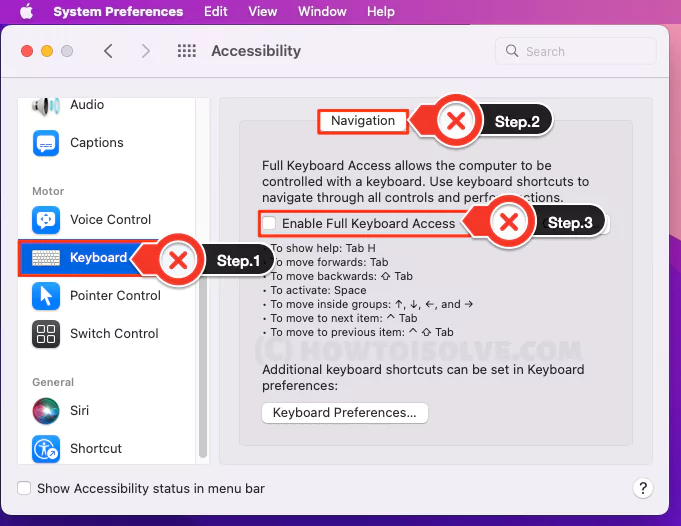
Tip #8. Full Keyboard Access
Is your Mac Trackpad Not Working, or it’s just not responding? Don’t hesitate, as none of your work remains pending or slow to execute. As of now, enabling full keyboard access will allow you to move toward Mac’s features and applications through the Keyboard.
macOS Ventura & Later: Apple Logo > System Settings… > Accessibility > Toggle next to the Full Keyboard Access.

macOS Monterey & Earlier: Apple Logo > System Preferences… > Accessibility > Keyboard > Navigate > check the box next to the Enable Full Keyboard Access.
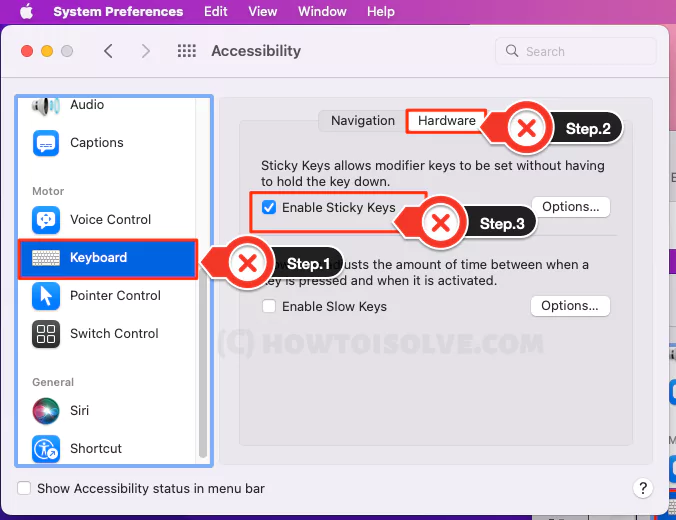
Tip #9. Sticky Keys
We are all familiar with frustration when asked to press the combination of keys to accumulate the task, and that’s where we have enabled Sticky Keys.
But consequently, due to the random press of the Key multiple times, some users came across Screen Of Mac Got Stuck or Keyboard Not Working. So to prevent such a situation, we suggest Apple fans disable Sticky Keys on Mac.
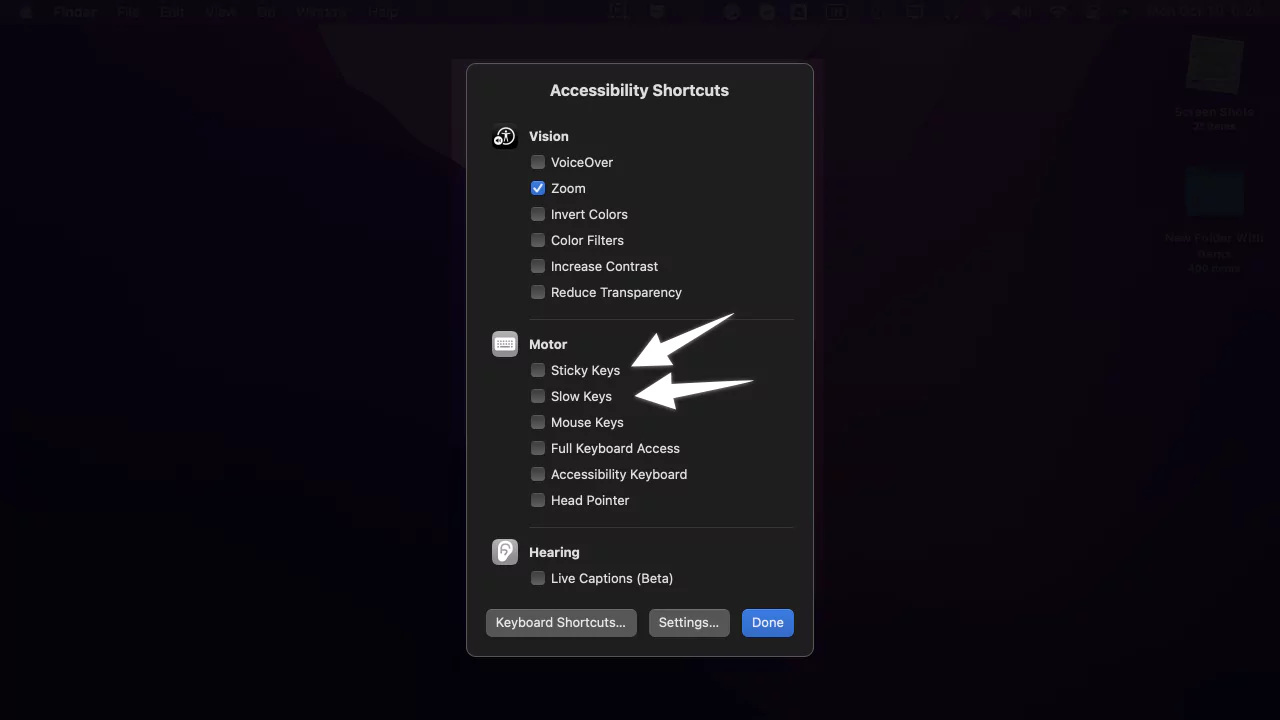
Use Option + Command + F5 Key to See the Accessibility Shortcuts Window and Disable Keys that affect your Mac keyboard.
Or Follow the Below steps To manage, the Keys.
macOS Ventura & Later: Apple Logo > System Settings… > Accessibility > Toggle next to the Sticky Keys to disable it.


macOS Monterey & Earlier: Apple Logo > System Preferences… > Accessibility > Hardware > uncheck the box next to the Sticky Key.
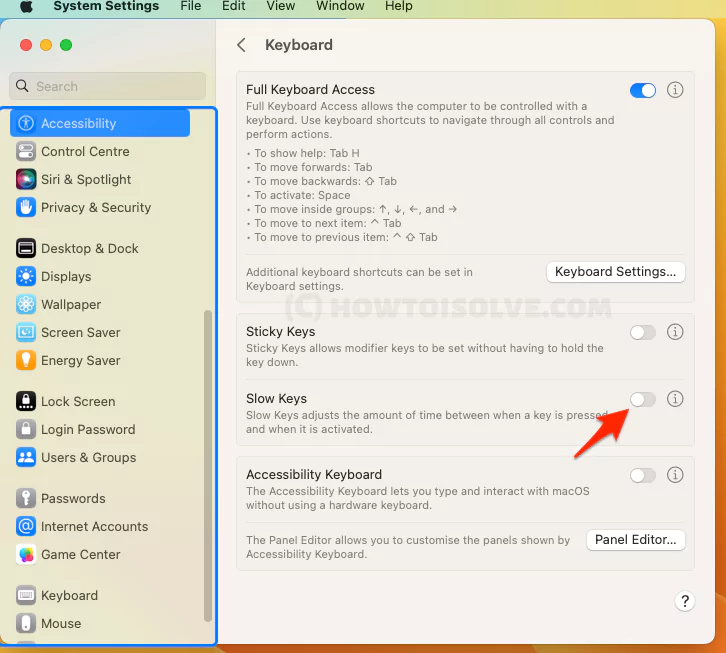
Tip #10.Slow Keys
A Slow Keys is a valuable tool for children and impedes people from having low flexible fingers. But it goes in the wrong direction if it’s for the speedy and sturdy writer just like you because it makes you experience a Delay In Typing On Mac Issues.
Considering both possibilities, we suggest you only enable it in the first scenario. To disable Slow Keys, follow the given below steps.
Use Accessibility Keyboard Shortcut Option + Command + F5 to Open the window and Uncheck Slow keys > Done.
Or Using Mac Settings Preferences…
macOS Ventura & Later: Apple Logo > System Settings… > Accessibility > Toggle next to the Slow Key to disable or enable it.
macOS Monterey & Earlier: Apple Logo > System Preferences… > Accessibility > Hardware > uncheck the box next to the Slow Key.

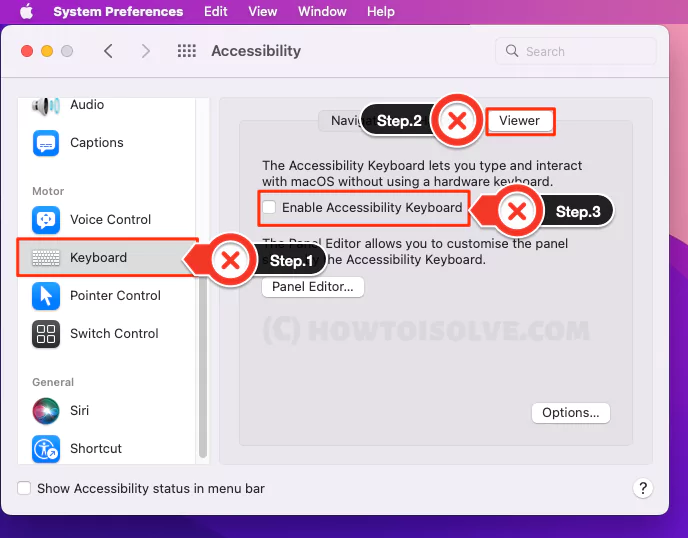
Tip #11. Accessibility Keyboard
The accessibility keyboard is the on-screen virtual Keyboard that allows you to type when your physical Keyboard is missing or not working. It offers an advanced and easy way of typing to make everything easily accessible. So, if your physical Keyboard is not responding, keep hope!
macOS Ventura & Later: Apple Logo > System Settings… > Accessibility > Toggle next to the Accessibility to enable or disable it.

macOS Monterey & Earlier: Apple Logo > System Preferences… > Accessibility > Viewer > uncheck the box next to the Enable Accessibility Keyboard.
Tip #12. Input Source
On your Mac device, you can use the input source device to write in different languages; simultaneously, customize the options for specific sources, such as changing the Keyboard layout on Mac.
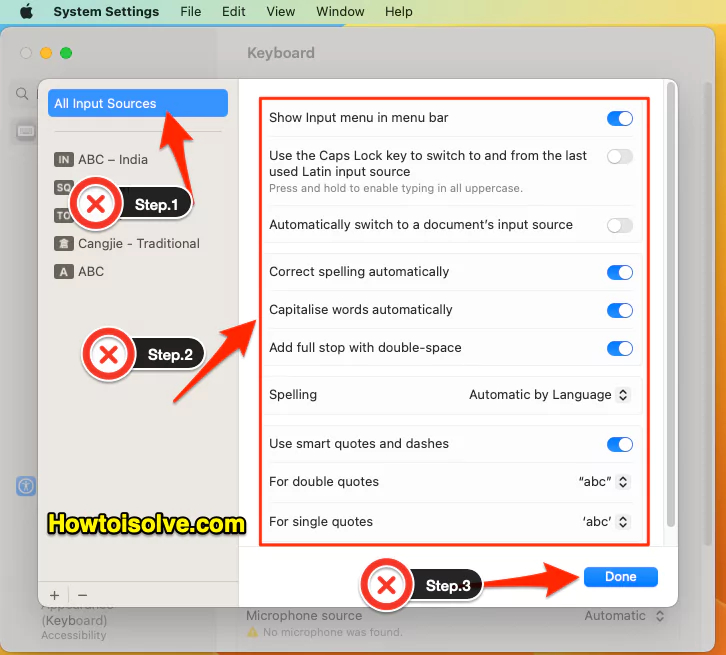
macOS Ventura & Later: Select Apple Logo > System Settings… > Keyboard > Under the Text Input section, select Edit… next to the Text Source.

macOS Monterey & Earlier: Apple Logo > System Preferences… > Keyboard > Input Source.
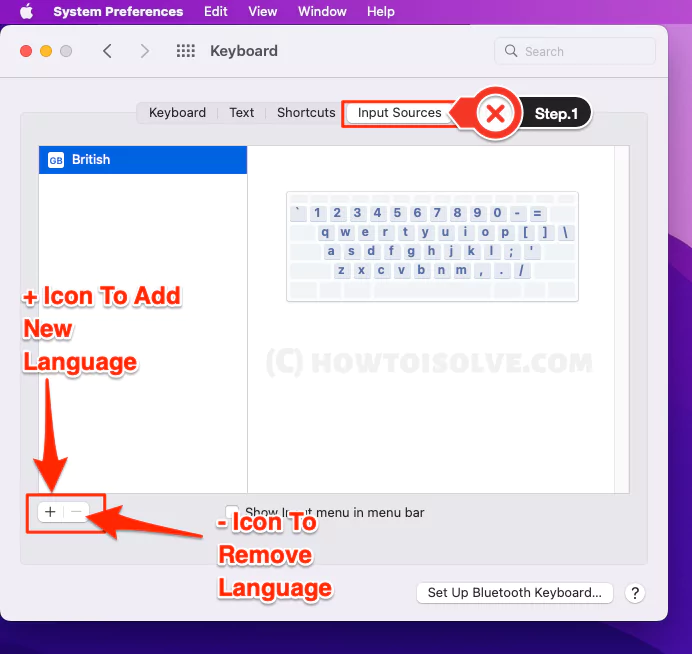
Click either to Add(+ Icon) or click Remove(-Minus) the language..
Promptly, when you enable the Input source, it excels the words in the different language but with similar alphabet keys. On the other hand, it consumes lots of settings that you need to look at.
Note: The below-mentioned macOS Monterey & Earlier settings are under the Text Menu in the keyboard settings.
Show Input Source In Menu Bar: Turning on this feature will be visible the input source in the menu bar. It consumes easy access to the Keyboard Viewer and Character Viewer to experience smart switches within them. More often than, users might complain that the Show Input source in the menu bar needs to be fixed, but in reality, it needs to be enabled from the Mac input source.
Automatically Switch To A Document’s Input Source: Pick out the input source for the Document and let it be enabled whenever you exhale the words on the Document.
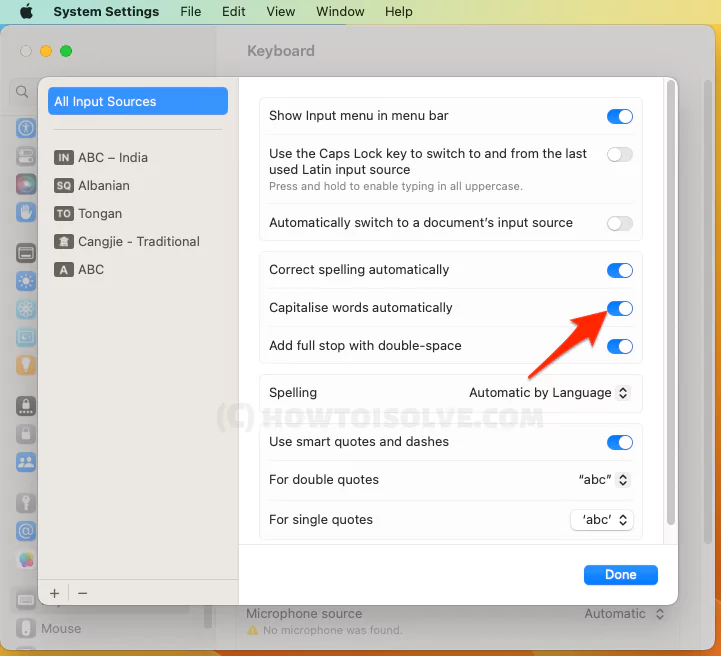
Correct Spelling Automatically: The name itself says enabling this feature will automatically Correct the spelling mistakes you made in your preferred language on your Mac.
Capitalize Word Automatically: Unlike the spelling correction, turning on the aspect on Mac under the input source will capitalize the Word on its own.
Add Period With Double-Space: The predefined settings on modern macOS include the Add Period With Double-Space feature. Simply pressing the Spacebar twice will insert the period at the end of a word or sentence.
Use Smart Quotes And Dashes: This aspect will automatically change quotation marks to typography; similarly, double hyphens to em dashes.
Spelling: It’s British English or any other language; turning ON the spelling feature will automatically make corrections if something goes wrong.
Language: To add new languages, click on the + Icon and select the one you want to add. Alternatively, click on the language to highlight > – Minus if you’re going to remove the unused language.
Tip #13. Text Replacement
Being a sturdy writer who constantly exhales the best content or always active on various platforms like WhatsApp, iMessage, or Telegram.
There is no need for record-breaking writers to boost your productivity and quality. Instead, enable the Text Replacement feature on the newly designed macOS to write out long sentences that you frequently use.
For example, set up the shortcut key HRY instead of typing “How Are You” on the WhatsApp app and then press the Spacebar.
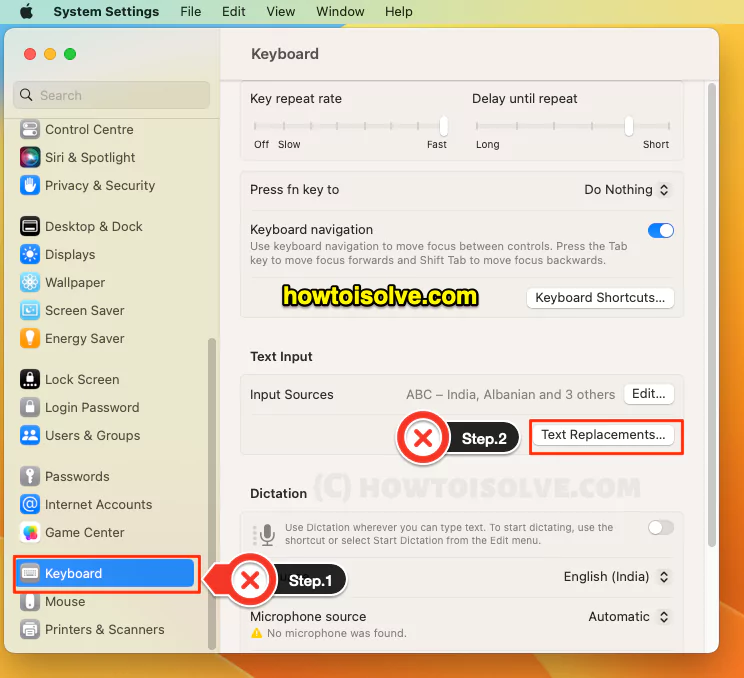
macOS Ventura & Later: Go to Apple Logo > System Settings… > Keyboard > Text Replacement…

macOS Monterey & Earlier: Apple Logo > System Preferences… > Keyboard > Text Menu.
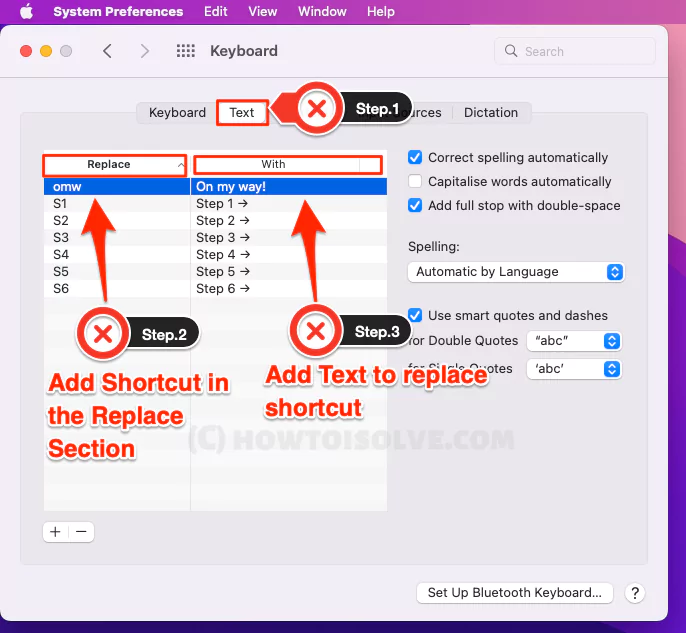
On the next screen, click on the + Icon to add the new text Replacement…Similarly, click one – Icon if you want to Delete the Text Replacement…
Tip #14. Change Mac Keyboard Language
Suppose you want to change the default language of Mac Keyboard. Then, follow the given below steps.
macOS Ventura & Later: Apple Logo > System Settings… > Edit… next to the Input Source > + Icon to add new default language on Mac.
macOS Monterey & Earlier: Apple Logo > System Preferences… > Keyboard > Input Source > + Icon to add new default language on Mac.
Similarly, you can remove the language from the list by selecting the language and then – Minus Icon.
Tip #15. Dictation
Voice-To-Text is an essential aspect of the new macOS; useful for those users who are over and out.
The feature is the Mac computer is known as Dictation. However, to use it, it needs to be enabled from the Keyboard Settings.
After that, it works similarly to Voice-To-Text; at the same point, you access in-depth Voice-Command to take over the complete Document.
macOS Ventura & Later: Go to Apple Logo > System Settings… > Keyboard > Toggle to enable or disable Dictation feature.


Click on “Enable“. When you dictate text, information like your voice input and contact names are sent to Apple to help your Mac recognize what you’re saying. Sometimes that loses your Mac Privacy settings.
macOS Monterey & Earlier: Apple Logo > System Preferences… > Keyboard > Dictation Menu > check or uncheck the box next to the Dictation.
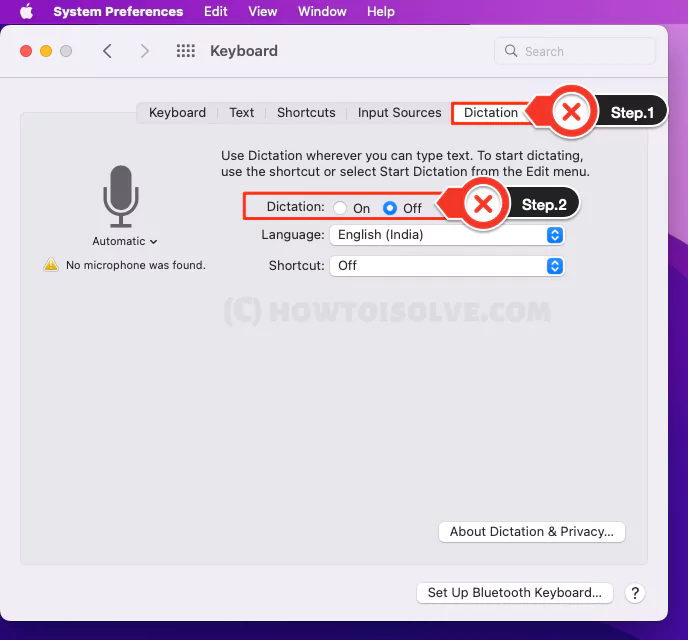
For more convenient usage, you can hinder the basic Dictation settings such as language, Microphone Source, and Shortcut Keys To Use Dictation on Mac.
Language: The language option under the dictation settings allows to use Dictation feature in vivid language.
Shortcut: As of now, you might want to access the Dictation feature instantly on the application, such as pages or notes. There are predefined shortcuts in the Shortcut drop-down to open Dictation Press Control Key Twice, Press Function Key Twice, Press Right Command Key Twice, Press Left Command Key Twice, and Press Either Command Key Twice to select any one from them.
For Instance, I have selected Dictation Press Control Key Twice as a shortcut for Dictation. So what you need to do is open the Page App on Mac and then press the Control Key Twice on your Mac computer to access instant Dictation. That’s it! Of course, you can create your shortcut key for the Dictation from the same settings on Mac.
Tip #16. Keyboard Navigation
If your Trackpad Is Not Working On Mac or you need the right way to Set Up The Mouse On Mac, you can now use the Keyboard as a mouse on Mac. But for that, you have to enable Keyboard Navigation Settings. So please go through the below-mentioned steps to enable it.
macOS Ventura & Later: Go to Apple Logo > System Settings… > Keyboard > Toggle to enable Keyboard Navigation.
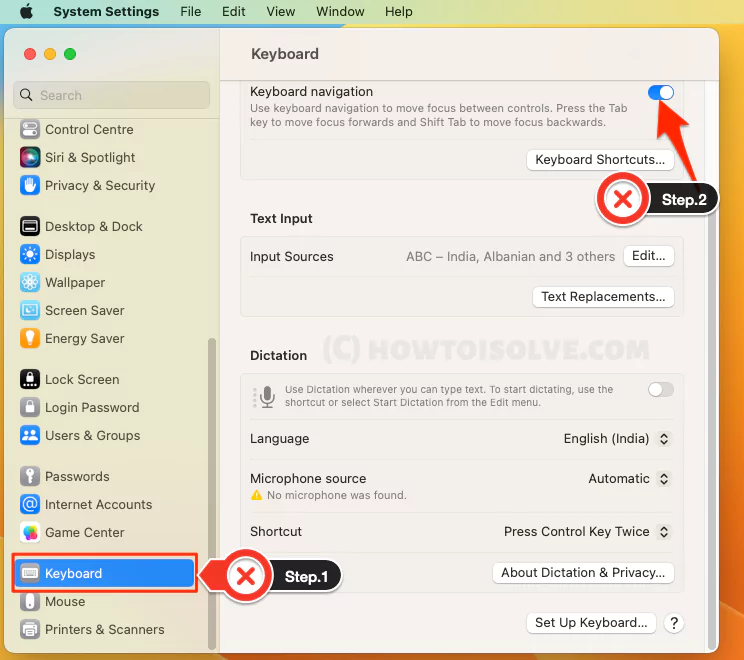
macOS Monterey & Earlier: Head to the Apple Logo > System Preferences… > Keyboard > Shortcuts > check the box next to the Use Keyboard Navigation To Move Focus Between Controls.

Tip #17. Use FN/Globe Key On Mac Keyboard
The Globe or FN key on the Mac keyboard derives various functionality with a single click. What is visible on the Touchbar can also be used to open the aspects to bring Emojis And Symbol Viewer, Start Dictation, and Change-Input Source.
macOS Ventura & Later: Apple Logo > System Settings… > Keyboard > Press Glob key or Fn Key from drop-down Option and select as per your need.
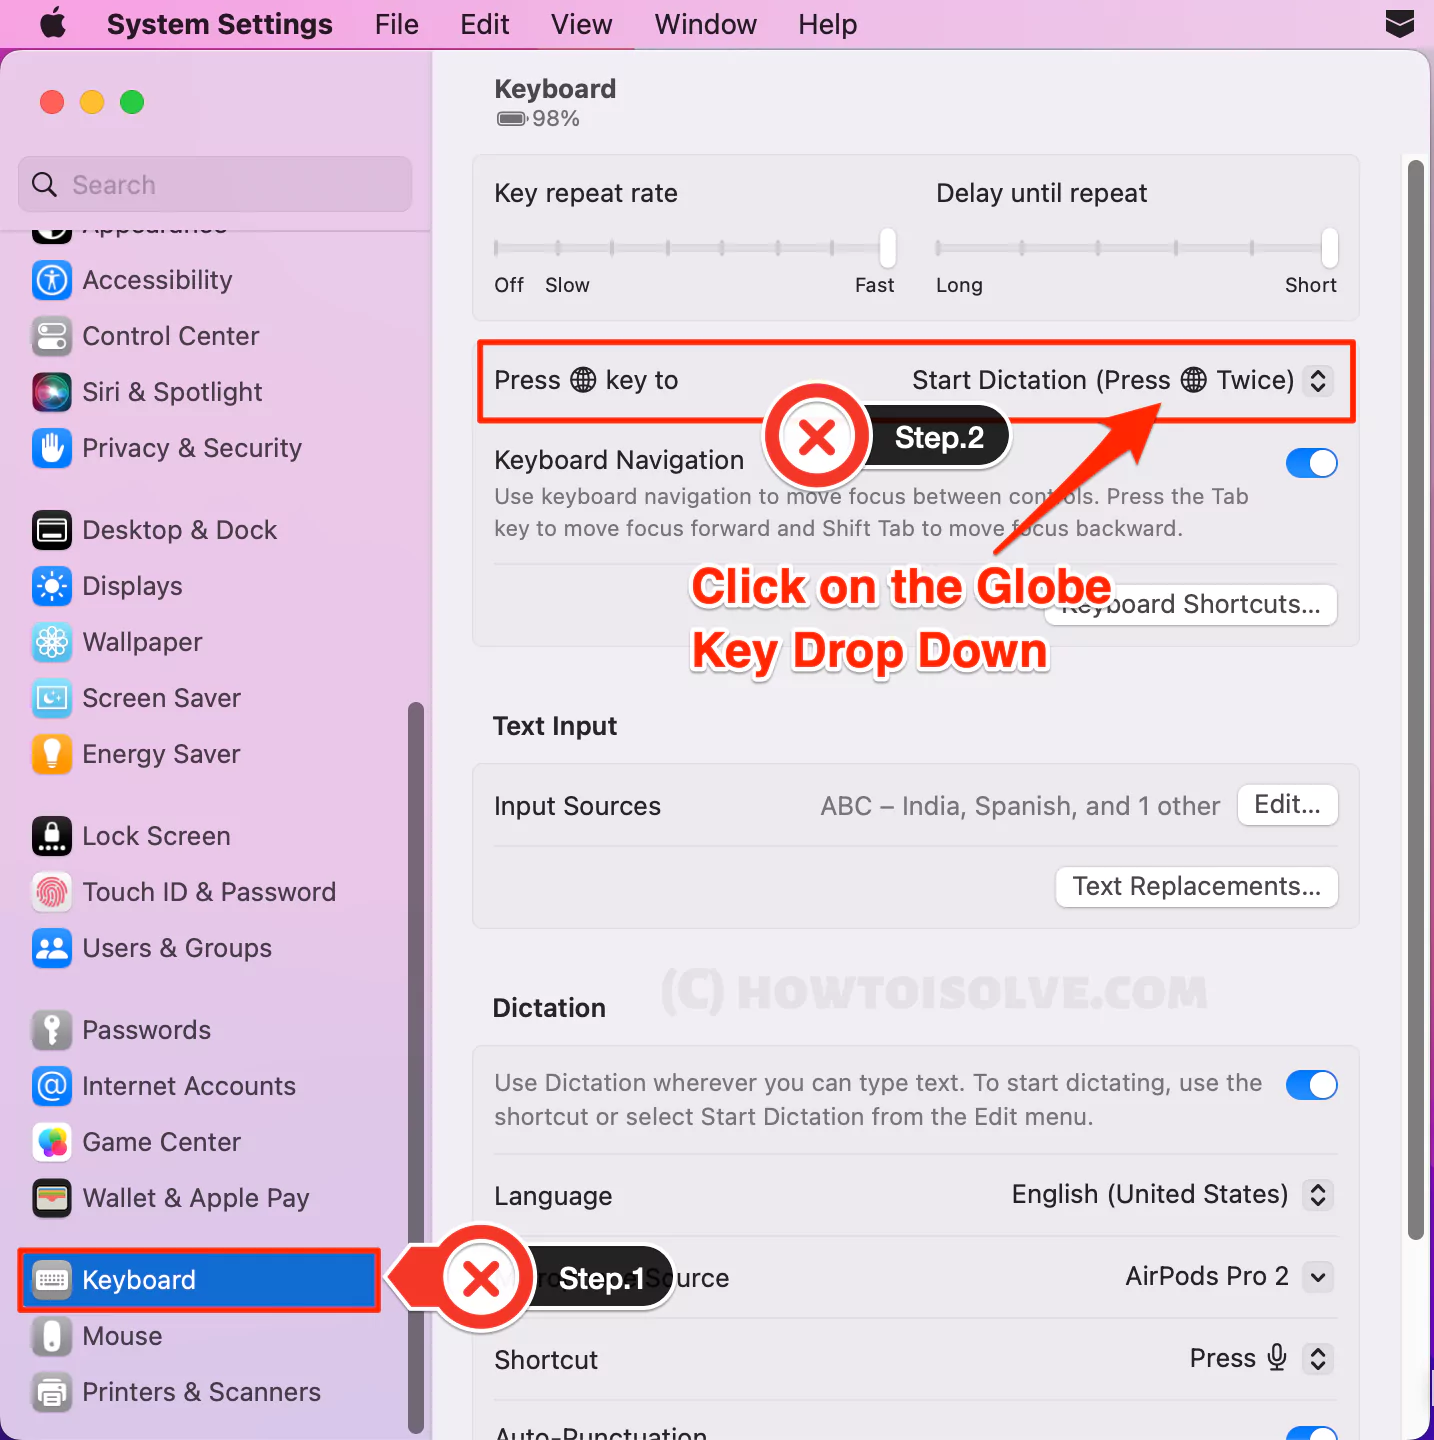

macOS Monterey & Earlier: Apple Logo > System Preferences… > Keyboard > Keyboard. Select Standard Function keys
Emoji & Symbols: When you set up the Globe/Fn Key to any Emoji & Symbol, with a single press, you can access Emojis Menu. However, there is a shortcut(Control+Command+Space) to access the emojis keyboard. Still, instead of playing around with a combination of keys, it’s better to configure a single press to access Emojis Menu.
Change Input Source: Configuring Globe/fn key to the input source; allow you to change over the different languages on Mac. So if you are a content writer who constantly exhales content in different languages for other domains, you can now easily switch between multiple languages using Globe Button.
Start Dictation: If you are fond of using the Dictation feature all day, feel free, as now there is no need to dive deep into the Keyboard settings. Because with a twice press on Globe Key, you can initiate Dictation on a Mac computer.
Tip #18. Key Repeat Rate
If you keep pressing the specific keyboard keys on the Mac, a menu appears featuring the alternate or accented character that you can pick out.
For Instance, if you press the O button on the Keyboard, a palette with various options like ô, ö, ò, ó, ō, õ, œ, and ø will appear. Select anyone you would like to have.
The key repeat rate is by-default enabled on Mac. You can disable it by dragging it to the Off. But if you want to increase the speed of the Key Repeat Rate suggestion pop-up, follow the steps below.
Note: On these settings, there are three options for the Key Repeat Rate Slider: Fast, Slow, and Off.
macOS Ventura & Later: Apple Logo > System Settings… > Keyboard > and then drag the Key Repeat Rate Slider as per your need.

macOS Monterey & Earlier: Apple Logo > System Preferences.. > Keyboard > Keyboard Menu > and then drag Key Repeat Slider slider preferably.

Tip #19. Delay Until Repeat
It’s nothing but how long you must press the Key until it begins to repeat.
Note: Two options are available for the Delay Until Repeat: Long and Short on these settings.
macOS Ventura & Later: Apple Logo > System Settings… > Keyboard > and then drag the Delay Until Repeat as per your convenience.
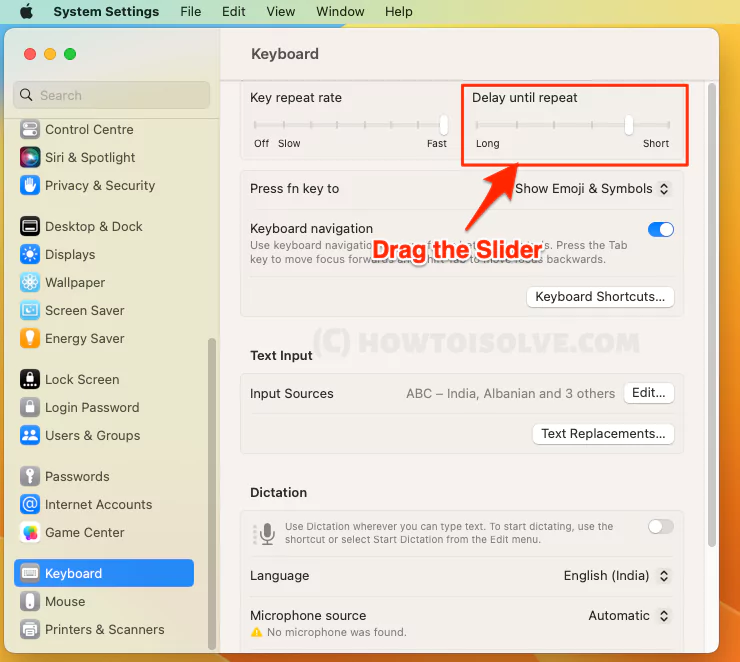
macOS Monterey & Earlier: Apple Logo > System Preferences.. > Keyboard > Keyboard Menu > and then drag Delay Until Repeat slider as needed.

macOS Keyboard Settings!
These are some of the important settings that you must definitely try on your Mac computer. In case, we have got some Keyboard Settings for macOS, that we have forgotten to mention in the article, let us know by dropping in the below comment box.
FAQs
Q1. Can I Use Windows Keyboard With Mac?
If you desire to use the Windows Keyboard with Mac, it’s pretty handy. You can now sturdily use any keyboard in case it’s Bluetooth or USB.
Q2. How to Reset A Mac Keyboard?
Made changes to the shortcuts on the Mac keyboard, and now, not fond of using it due to improper muscle memory. It’s easy to restore to default settings.
macOS Ventura & Later: Apple Logo > System Settings… > Keyboard > Keyboard Shortcuts… > On the next screen, Display, Mission Control, Keyboard, and many options are highlighted; select the one you want to restore. Lastly, choose to Restore Defaults > Done. That’s It!
macOS Monterey & Earlier: Apple Logo > System Preferences > Keyboard > Shortcuts > Under the shortcut menu, various options like Mission Control, Display, and many more will appear. Select the one you want to restore and choose to Restore Defaults.

Q3. How To Type @ On Mac Keyboard
Press Shift + 2 to type @ on the Mac Keyboard


