Explore solutions for fixing slow internet or wifi not working issues on macOS Sequoia or Sonoma. Apple’s latest macOS update, Sequoia compatible with all supported Mac machines, including M2, M1, and Intel Macs. Are you experiencing Wi-Fi problems after the update? This article provides comprehensive solutions. Let’s read carefully!
Related to your Wifi connectivity issue on your Mac device, here are the best possible solutions that work when you can’t turn on or enable wifi on your Mac after a macOS update. In the case when you turn Wifi and show a black triangle outline of the shape and not turning on, Mostly Wifi issues got a user on the latest macOS version. Do you have one of the earlier Mac software firmware? If Your home and office Wifi is Dropping on your Mac but other devices working very well, try the below steps perfectly.
Mac WiFi Won’t connect to the public Wireless network or Personal Hotspot. There should be network errors and Hardware faults in rare cases. Here are a few suggestions for getting rid of Wi-Fi issues on Macs.
WiFi not working on Mac: Step-By-Step Solutions

Check Hands-on Video To Fix macOS Sequoia WiFi Issues & Earlier MacOS
1. Primary Solutions:- Identify the Problem
First, assess the problem’s difficulty on your Mac, which may be due to age or a recent macOS update. Determine if it’s a software or hardware issue. Then, use the following troubleshooting tips to resolve your WiFi problems.
- Please restart your WiFi router and your Mac.
- Make Sure VPN is Turn Off if installed. Or Turn off Antivirus software if it’s installed.
- If the problem is with the Installed software, then Put your Mac in Safe mode and Check it works. Becuase safe mode determines the software issue on startup your Mac. Explained, for Apple Silicon M1 and Intel Mac. Some Mac users reported this, WiFi only working in Safe mode. So you can reinstall macOS [Not need backup, but I recommended it] or Clean install Mac with Backup.
- If you have an active Apple Private Relay service, you might feel like slow internet connectivity because your Connection passes from Apple’s Proxy server and blocks some dangerous attacks.
- Follow the WiFi Profile diagnosis below and use Public IP to access a fast internet connection.
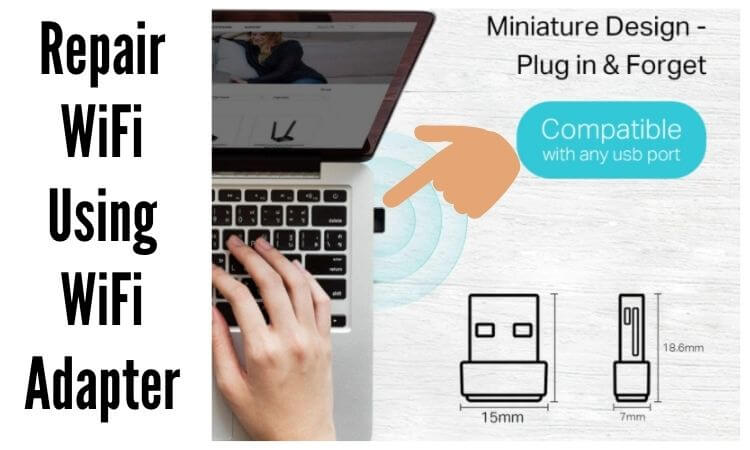
- If the problem is likely to be a Hardware WiFi Card, you can use the WiFi adapter given in this tutorial to connect to the Internet.
- Apple Support is a final help.
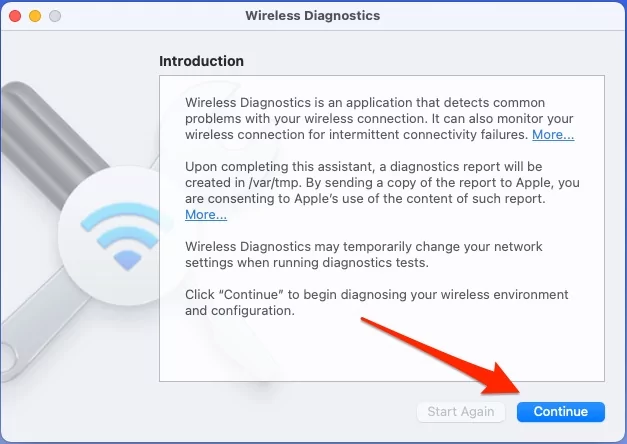
2. Run Wireless Diagnose on Mac
Try this solution to identify the Network issue in your home or office. This is an automatic process.
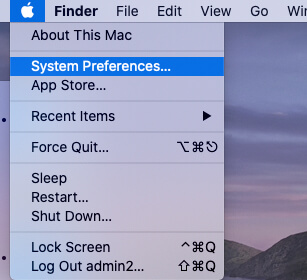
1→ Press and Hold on the Option Key from the Keyboard. Add WiFi in the top Mac menu [Apple logo from top Mac menu> System Preferences > Network > Select WiFi from the sidebar and select “Show WiFi Status in menu bar”].
2→ Click on WiFi from the top Mac menu. And see “Open Wireless Diagnostics“.

3→ Follow the on-screen instructions. That’s it.
3. Exclamation Mark Point Issues on WiFi Symbol on Top Menu: Renew DHCP Lease
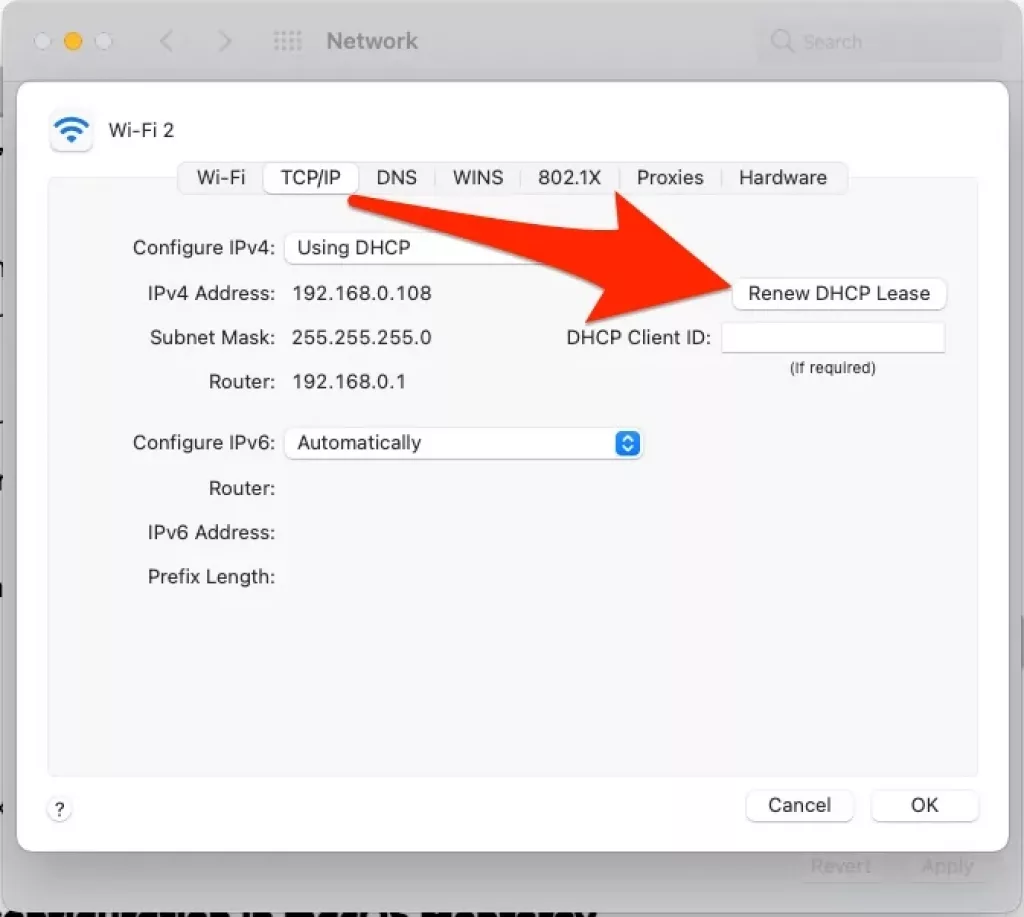
Renew or Get a new DHCP Lease address that refreshes or creates a new connection with a new IPV4 address, Subnet Mask, and Router. Follow the below steps to fix your Mac’s Dropping or Inability to connect to a WiFi network.
Steps for macOS Ventura, Sonoma, Sequoia
1→ Go to the Apple Logo from the top menu > System Settings.
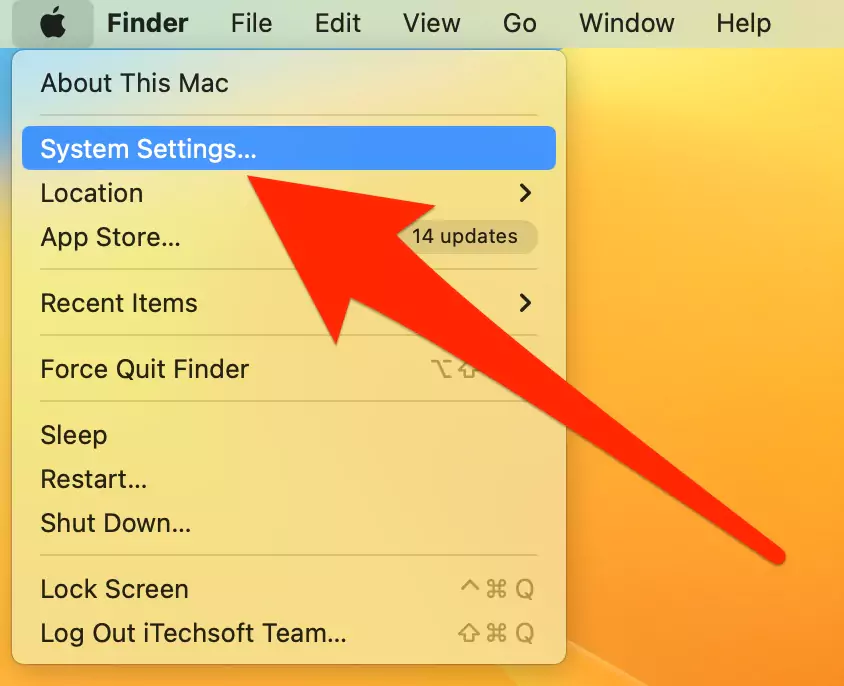
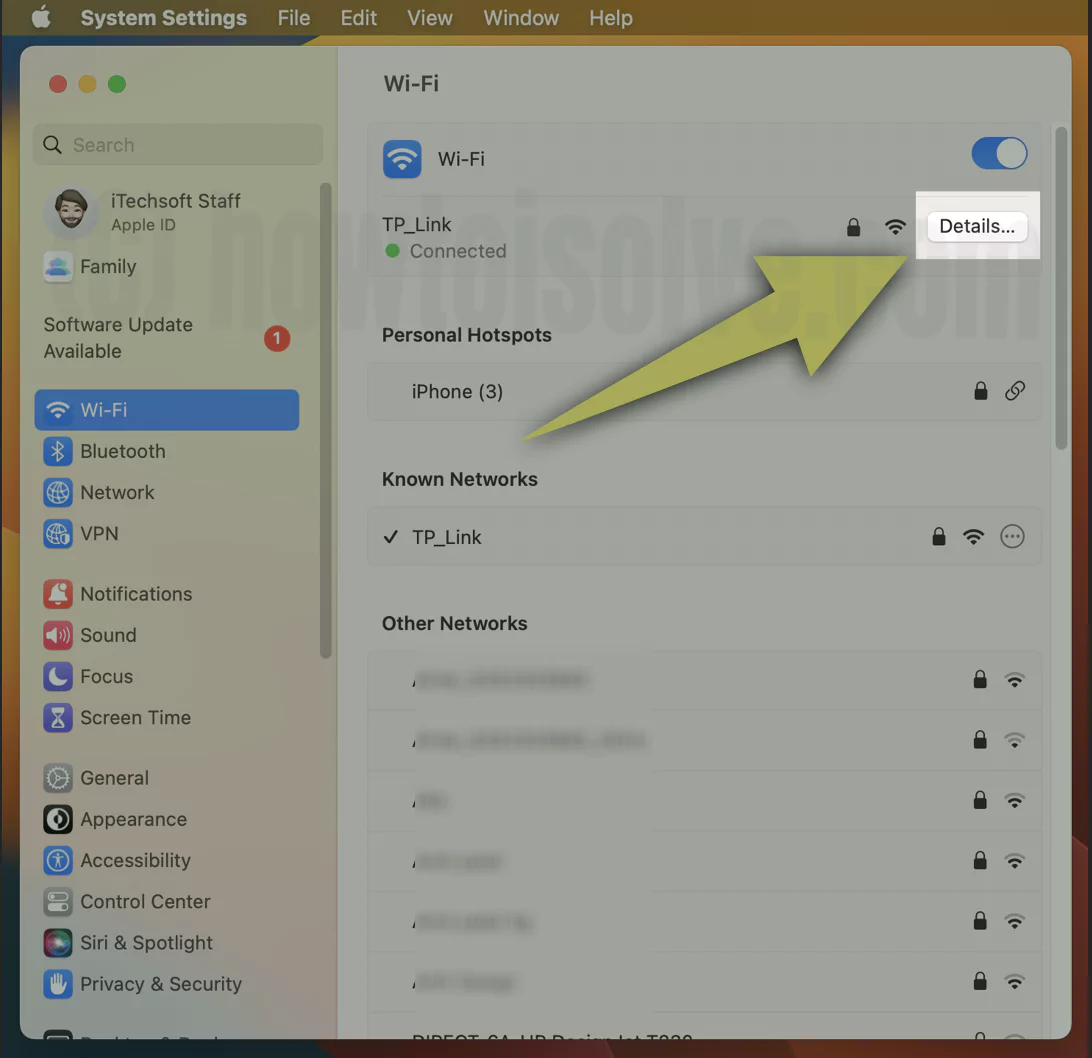
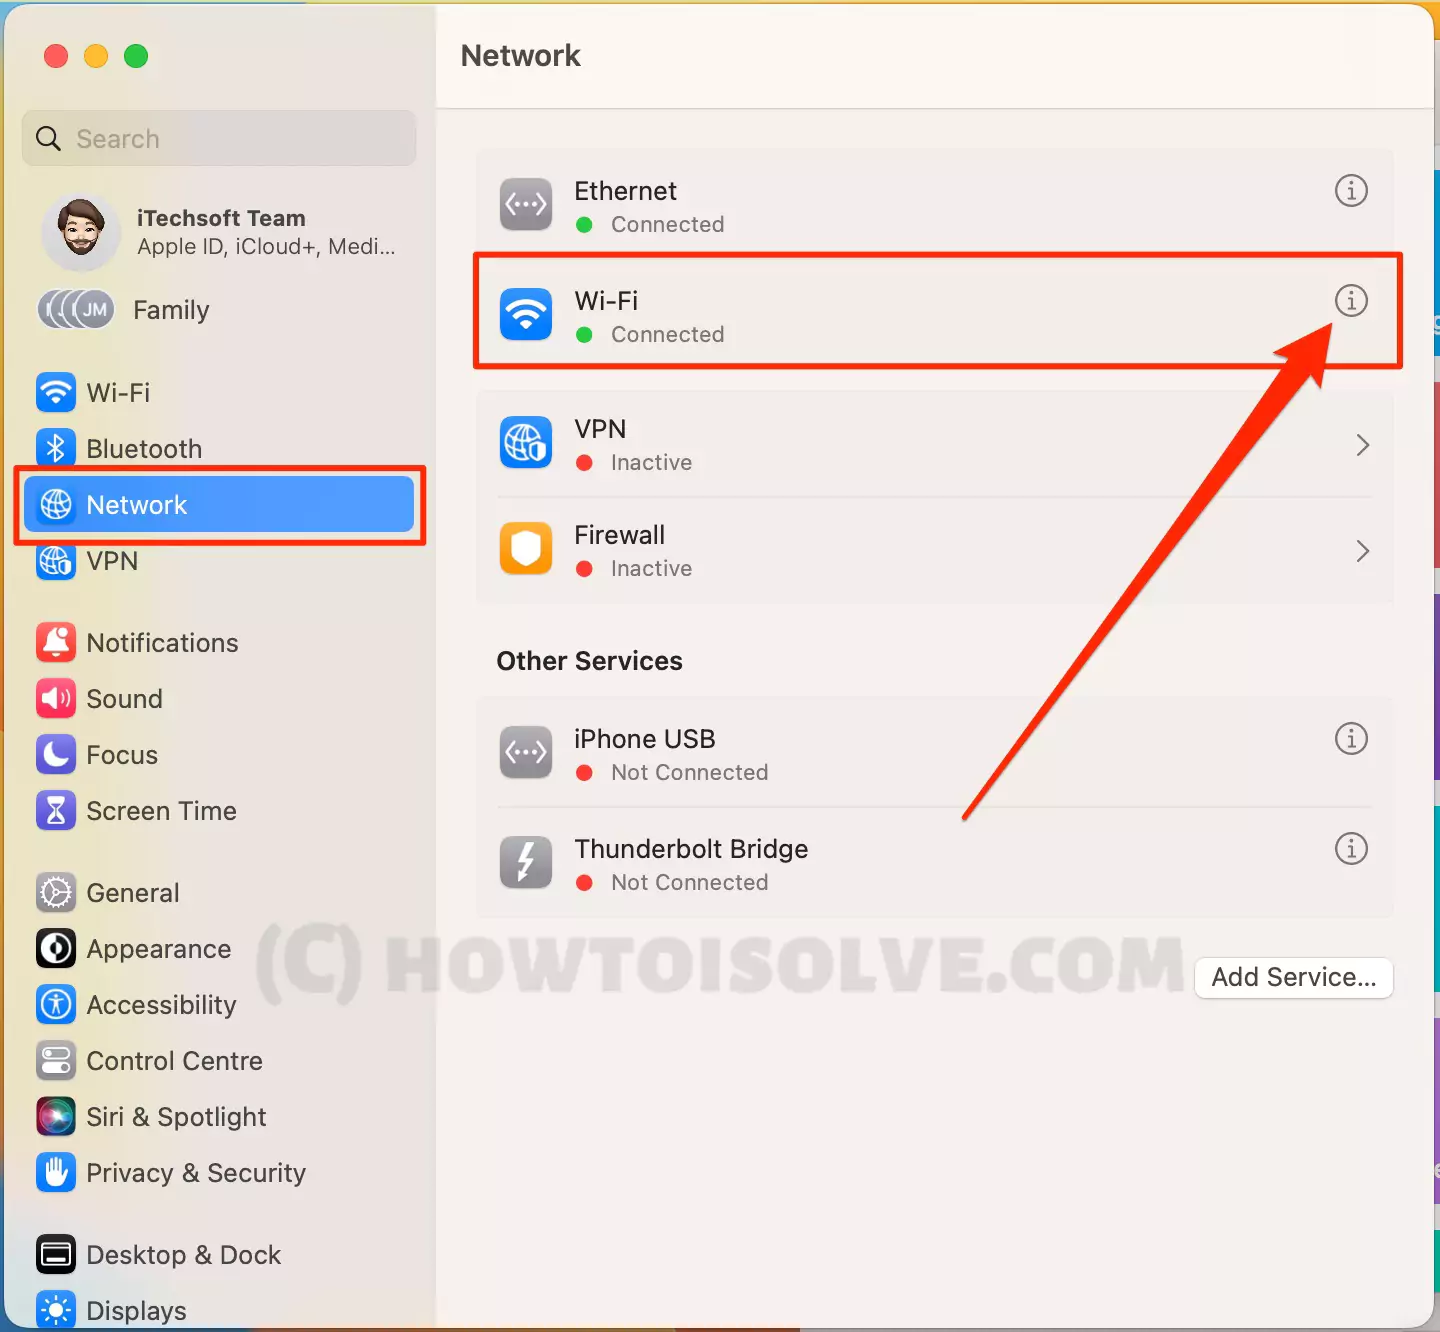
2→ Next, Open network > And Click on the (i) button next to the WiFi Name service.
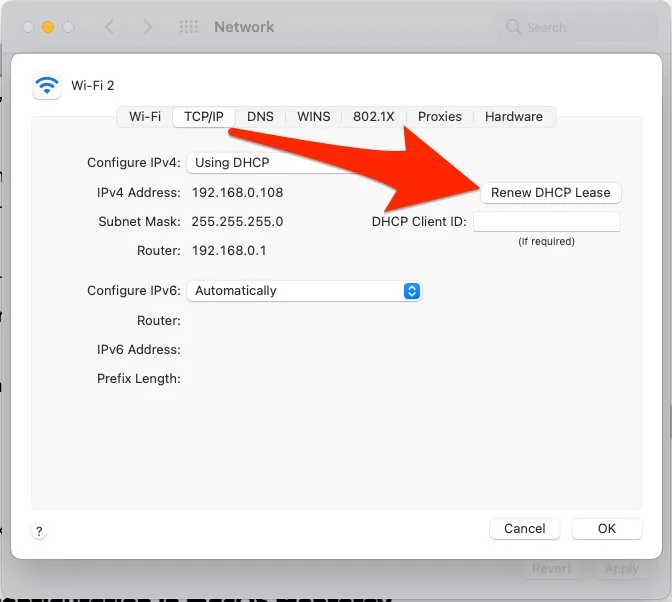
3→ Under TCP/IP > Click on Renew DHCP Lease.
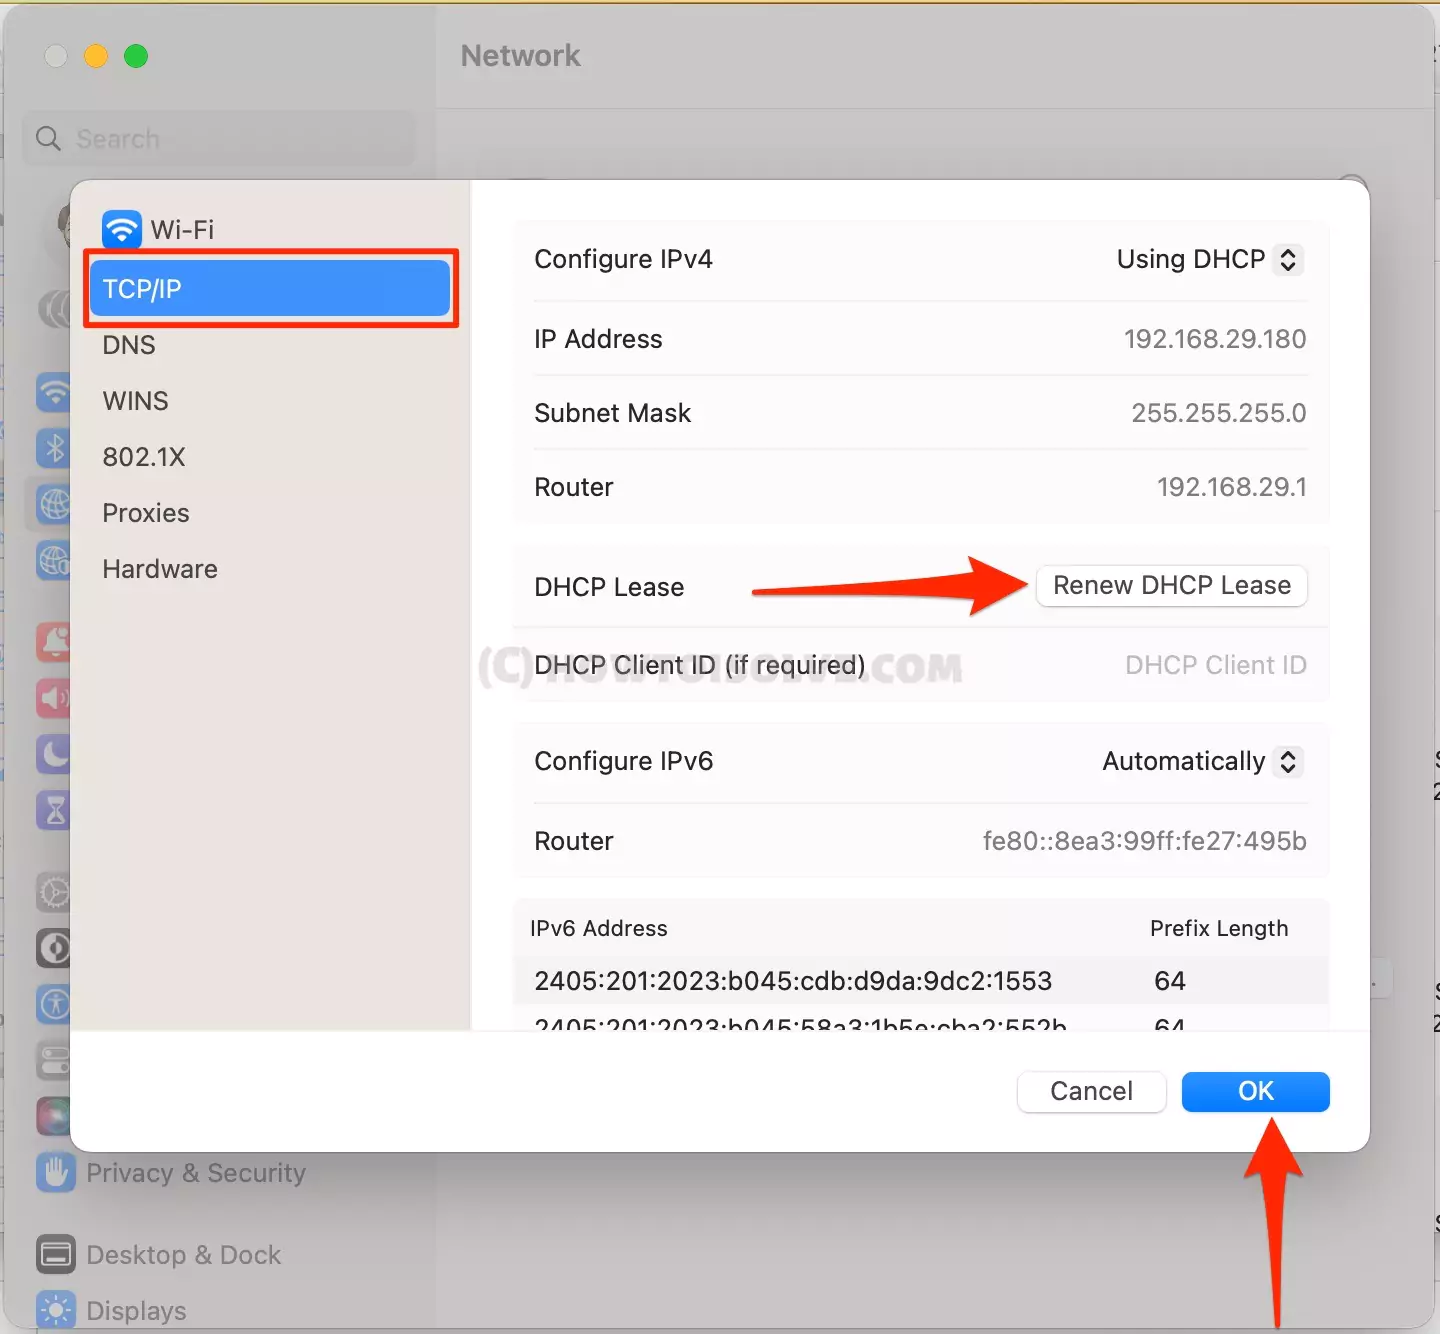
4→ Click on Ok to save the changes.
Wifi Settings in macOS that you must know
on macOS Monterey
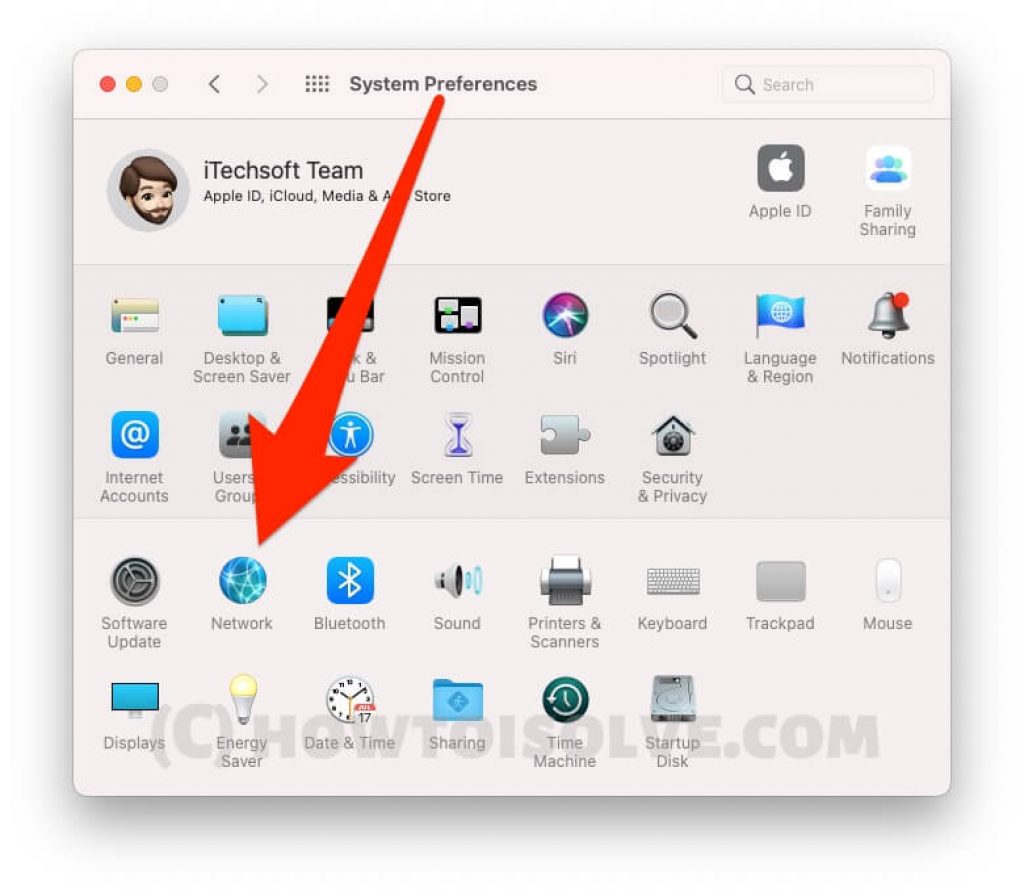
1→ Go to the Apple Menu on Mac. Next, Click on the System Preference option.
2→ Go to the Network option. The first item is WiFi in the left panel or popup window. After connecting, if you see an exclamation mark, keep the selected WiFi.
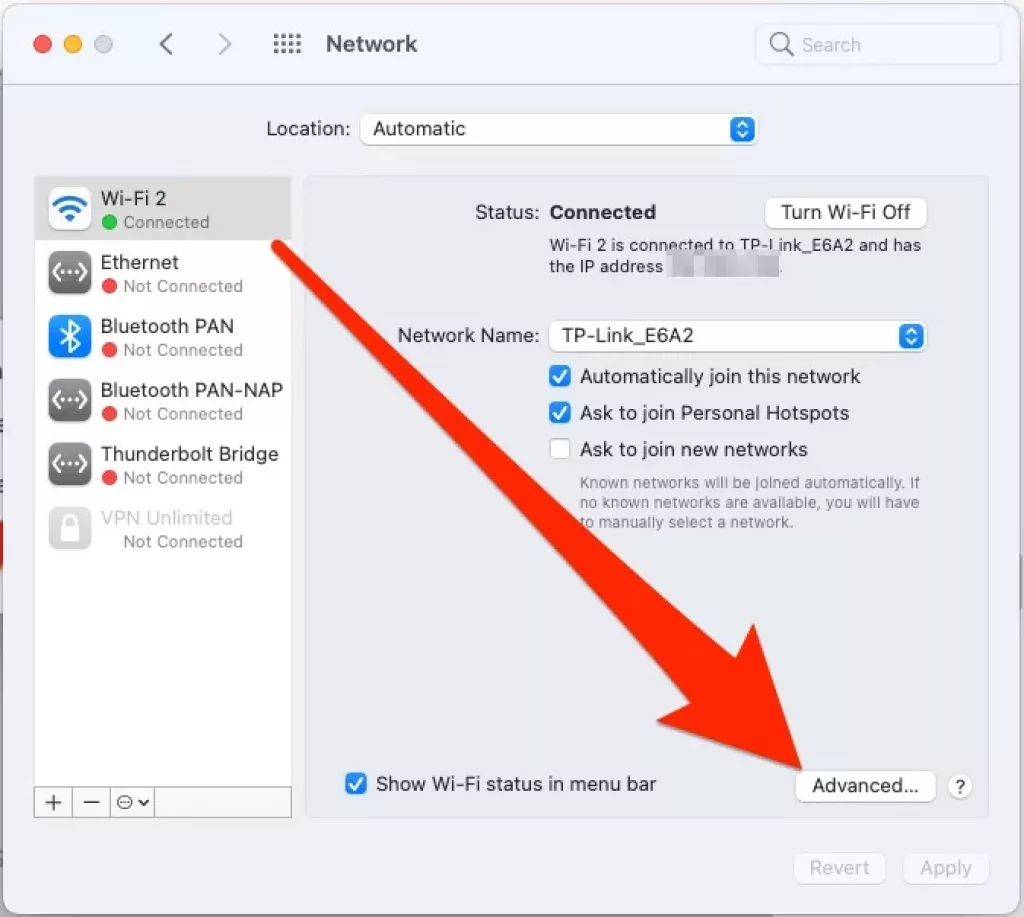
3→ Please locate the “Advanced” option. Then, navigate to the “TCP/IP” section in the tabs above.
4→ Here you will see three IP addresses. If no IP address appears, assign one manually to your Mac by clicking on “Renew DHCP Lease.”
Now, Try to Connect to the Same wifi after disconnecting.
WiFi issues are the same after making the changes in IP Address
4. Remove/Delete WiFi Profile on Mac’s Network Settings & Add WiFi Profile
On macOS Ventura, Sonoma:-
1→ Go to the Apple Logo from the top menu > System settings.

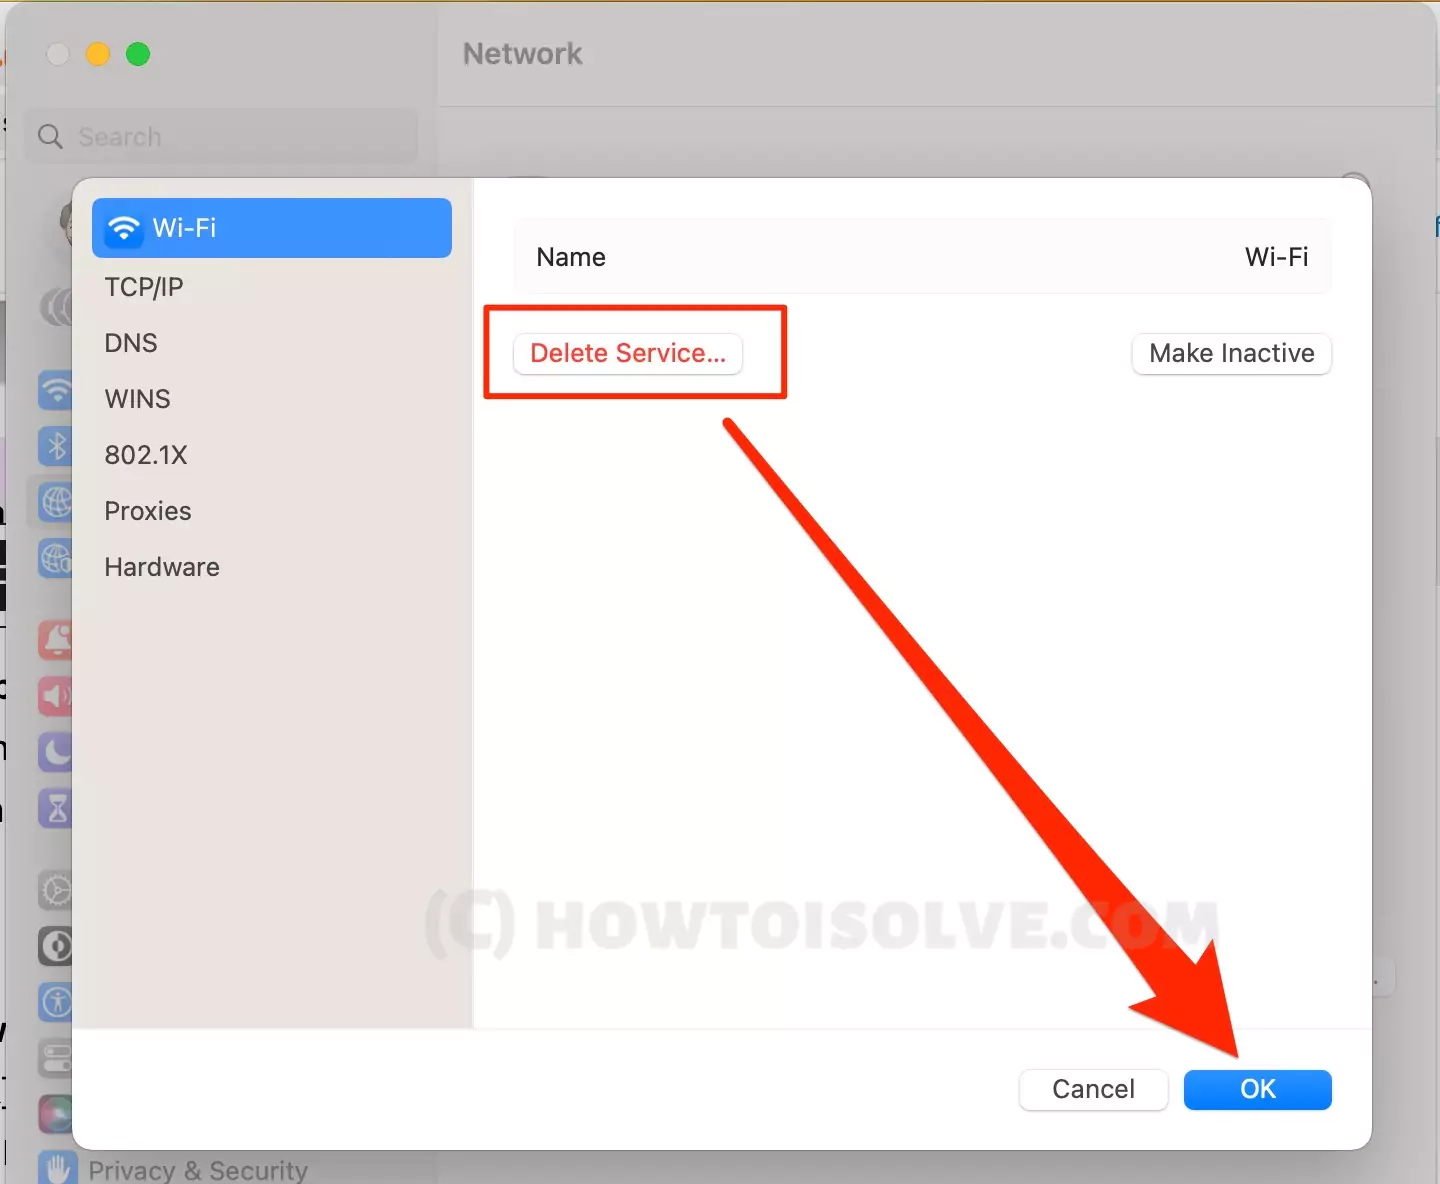
2→ Next, Click on Network > Wi-Fi – Click on the (i) button next to the WiFi service name.

3→ Now, Click on Delete Service…
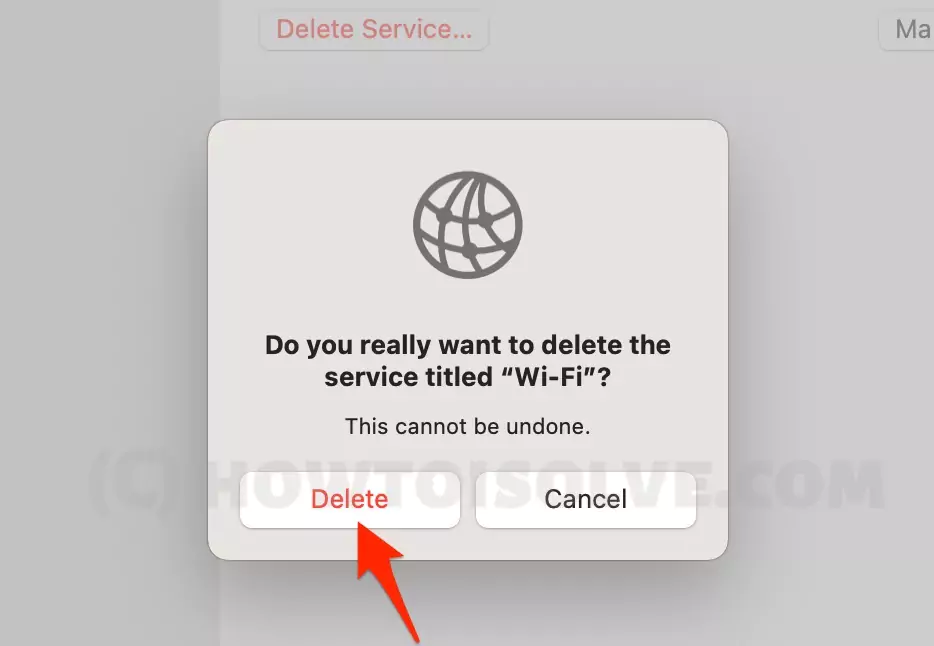
4→ Do you really want to delete the service titled “Wi-Fi”? This cannot be undone. Again Click on Delete.
5→ To add a new WiFi service, click on “Add Service” and then select “Add Service…”

5→ Select WiFi from Interface and Wi-Fi name. Now, the WiFi Profile has been added to the list of networks.

6→ Once again, click on the (i) button next to the inactive WiFi name.
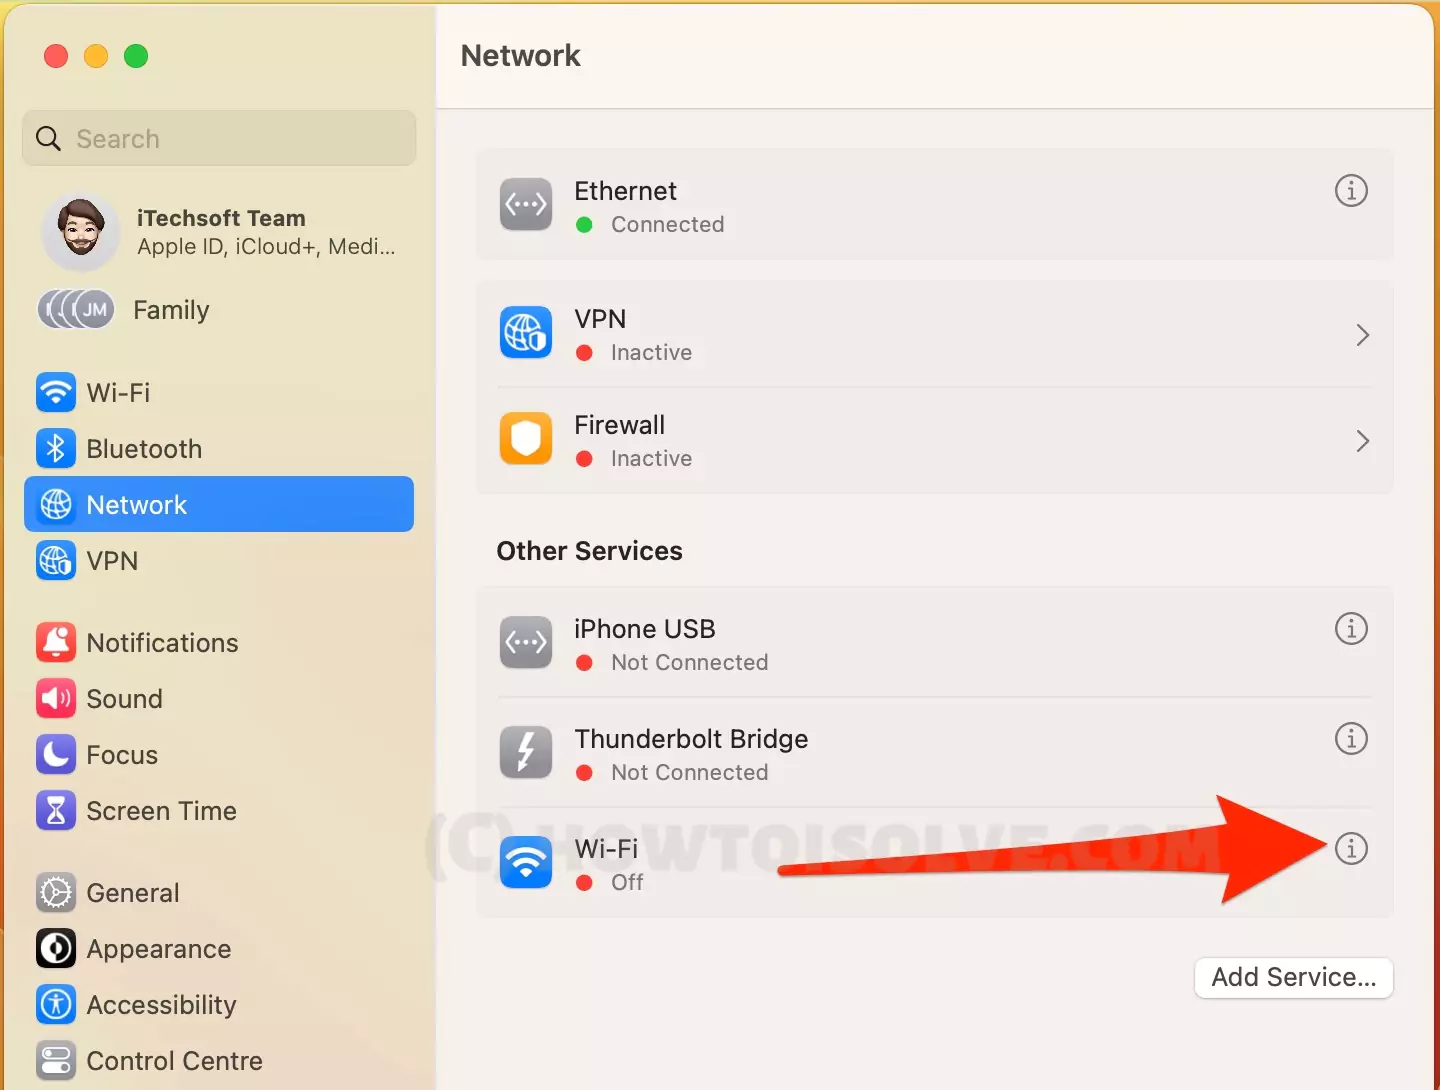
7→ and Make Active > Ok.

8→ Or From the top WiFi menu, Enable the toggle to turn on WiFi.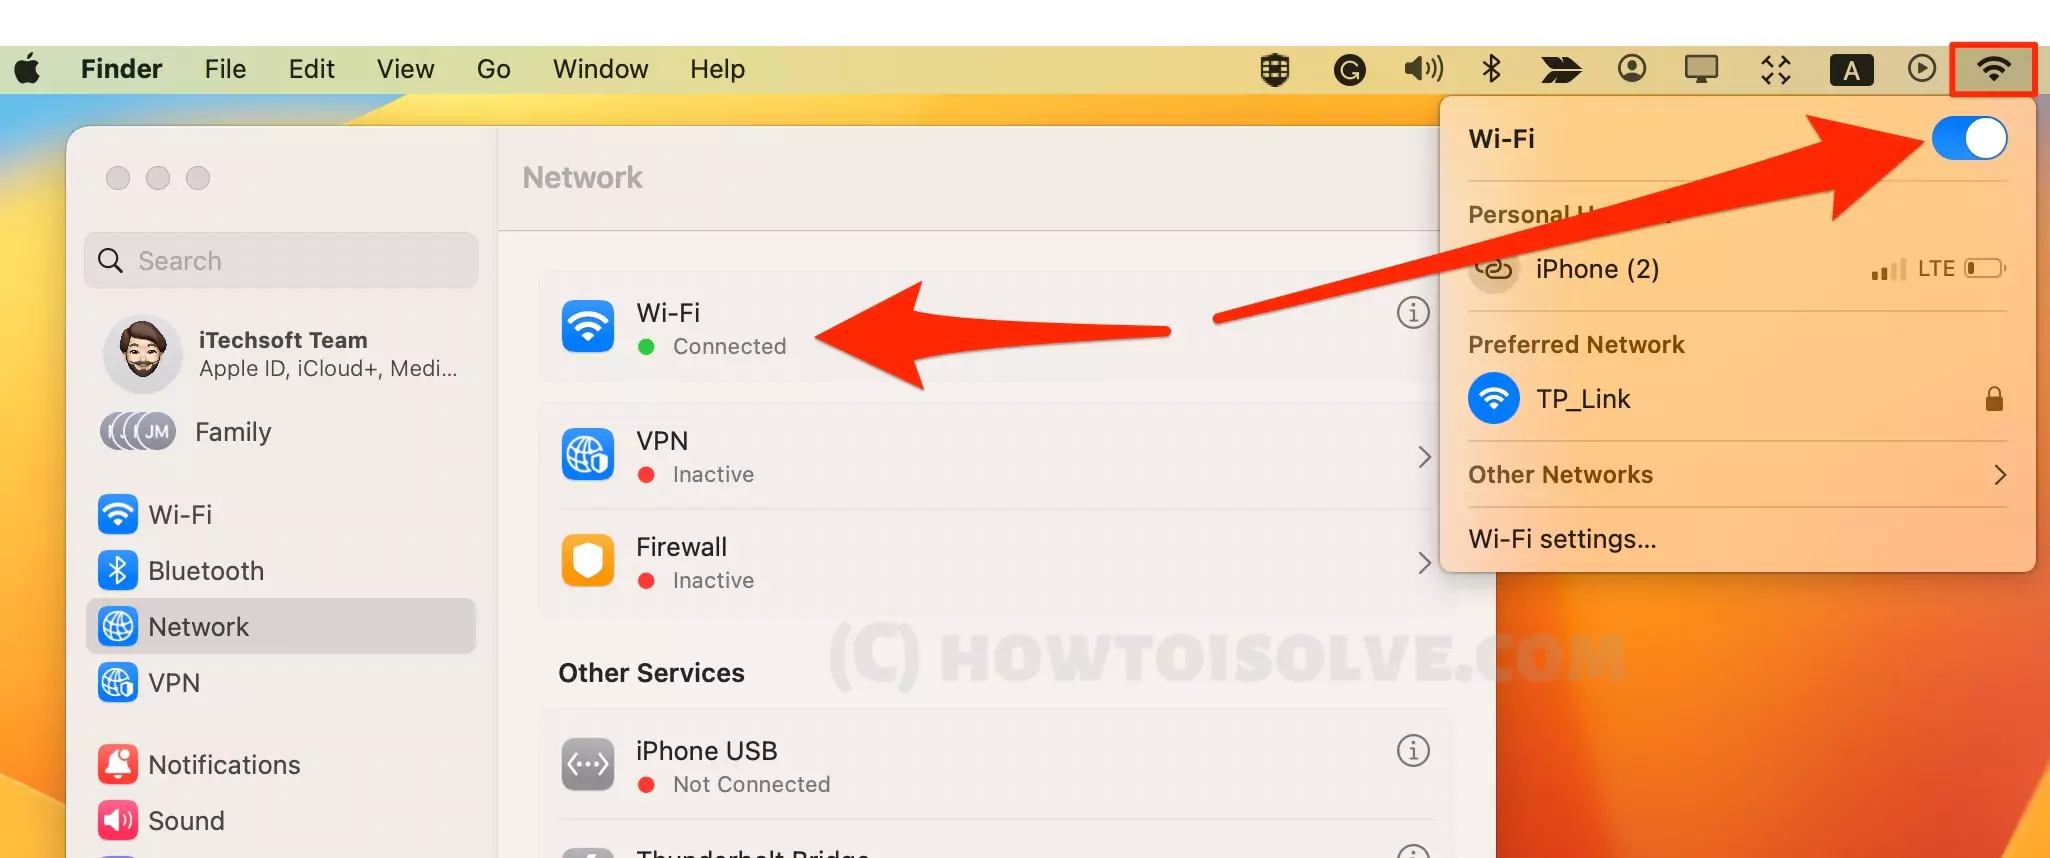
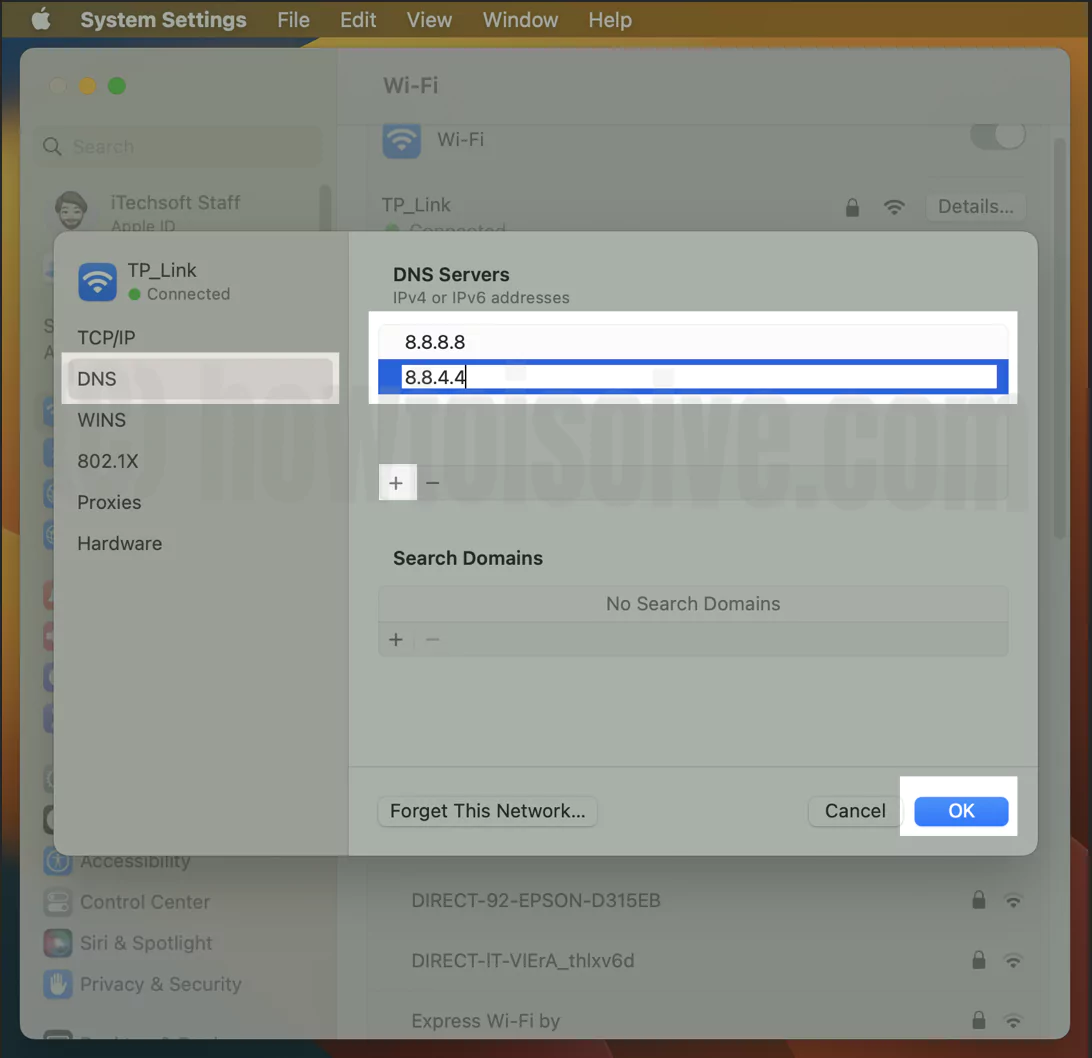
Additionally, check your DNS settings. Using a proxy DNS can help boost your Wi-Fi internet speed. Consider using Google Public DNS (8.8.8.8 and 8.8.4.4) on your Mac. This can enhance your speed performance and connectivity by utilizing a global data center and cache infrastructure. You can find the DNS cache option in the Wi-Fi details on your Mac.
10→ Select, DNS from the left side of the window and Click on Plus (+) to add a New DNS. add this 8.8.8.8 and 8.8.4.4 in separate line.
Google Public DNS is beneficial, especially for services like Canva, Cloudflare, and Amazon Web Services (AWS), which experience low latency.
On macOS Monterey:-
1→ Forget Wi-Fi Network: Click on the Apple logo > System Preferences > Network > Wi-Fi option on the left sidebar > Select the Wi-Fi network and click (-). Restart the Mac and reconnect the WiFi network.
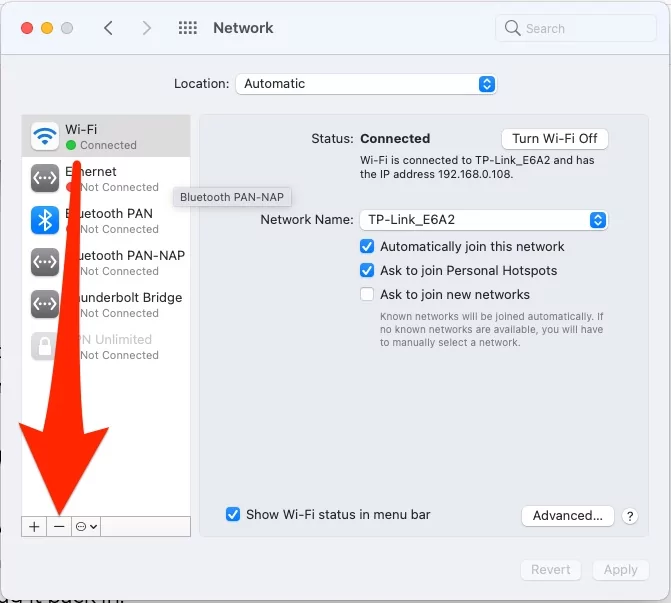
2→ Reconnect Wi-Fi: Add a New WiFi Profile again; click on “+” sign and select WiFi from the list of Interface dropdown. and Give a WiFi Name. and click on the Create button.
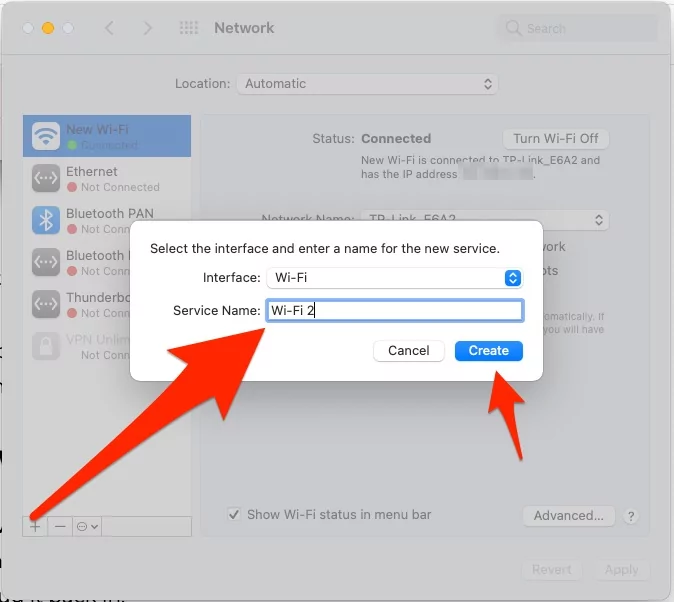
3→ Now Click on Advanced Button.

4→ Select TCP/IP Tab, and click on the Renew DHCP Lease button to get an updated IPV4 Address, Subnet Mask, and Router address.
5→ Now Move to DNS Tab, and Click on Plus Sign to add a new Google IP address, 8.8.8.8, and again click on plus to add second IP, 8.8.4.4.

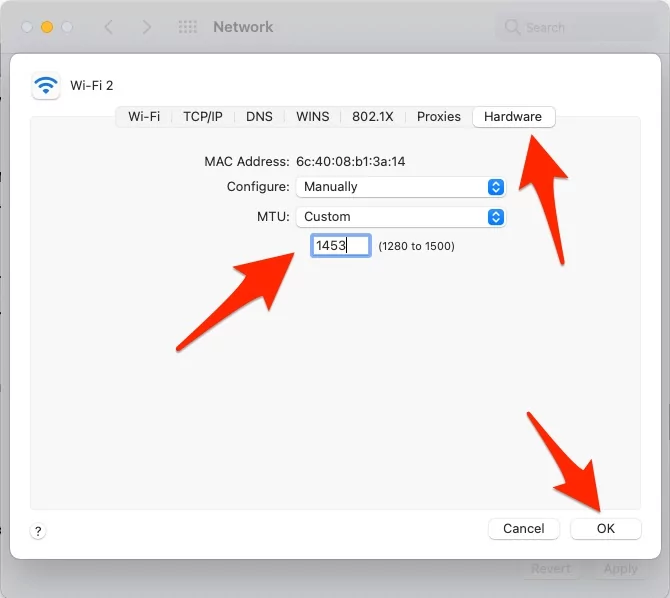
6→ Now Move to Hardware Tab, Configure to Manually, And MTU set Custom, and Enter 1453. Now Tap on Apply to save the changes.
Still the issue it not fixed…Continue with the below solutions…
- Restart Your Mac [Apple logo > Restart or Use the Power button on Mac]
- Go with Network Diagnostics [Apple Logo > System Preferences > Network > WiFi > Select Active WiFi Network].
- Restart your Router [Turn off the power supply and Turn on again, Wait for 2 minutes and Try to connect to WiFi again].
- Test Google.com in Different Browser.
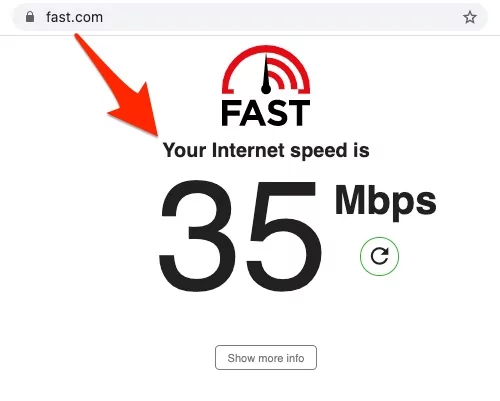
Find our More Cases and Troubleshooting guide that really fix WiFi issues on Mac after Update or installing macOS Sequoia, Sonoma, Ventura, Monterey, Big Sur, macOS Mojave, or macOS Catalina.
5. Update Date & Time on your Apple Mac
It sounds awkward, though incorrect date and time lead to various issues on the Mac, including the app-specific. Therefore, always set the Date & Time to automatic, after choosing the correct region.
On MacOS Ventura, Sonoma:-
- Go to the Apple Logo from the top menu > System Settings.
- Next, Click on General > Date & Time. Enable “Set time and date automatically” and also Enable “Set time zone automatically using your current location”.
On MacOS Monterey:-
- Click on the Apple logo > System Preferences.
- Then, go to Date & Time.
- Select Time Zone
- Checkmark the Set time zone automatically using current location.
- Alongside this, enable the Location Services, to ensure the MacBook detects accurate location.
- System Preferences > Security & Privacy > Privacy > Location Services (from the sidebar) > Select Enable Location Services.
6. Update Software firmware on Mac
Anyhow you can set up the Ethernet connection on the Mac, then connect Ethernet and update the Mac, if there is any pending software update available.
- Click on the Apple logo > About This Mac > Software Update.
- Alternatively, open the System Preferences > Software Update.
7. Remove all the Accessories from Mac
Often, we’re habituated to keep connected the accessories like Mouse, Keyboard, External Drive, USB Drive, headphones, and so on. All these peripherals can affect the functionality of the Mac, so disconnect the ones that you don’t need or for once, remove all of them, including mouse, keyboard, etc.
8. Add Custom Location on your Mac
It is a kind of advanced setting on which Mac sets its own preference, we don’t need to interfere unless there’s an issue. However, in this case, it seems like you may need to add a custom network location.
- Click on the Apple logo on the top menu bar.
- Select System Preferences.
- Go to Network.
- You see, Location? Open it and select Edit Locations…
- Click Plus(+) and add a network location, with any name.
- Save changes, Done, and Apply.
9. Remove Unnecessary Profile from MacBook
It’s possible that the Wi-Fi not working in Big Sur is due to a problematic profile that you have installed from a random website. Remove the profiles from MacBook.
- Go to System Preferences.
- Click Profiles.
- Delete all the custom profiles and reboot the Mac.
10. Delete Network Preferences from MacBook, Mac
Do you remember when iPhone Wi-Fi Stops working, all we do is Reset Network Settings on the iPhone? That’s what you have to do with Mac but in different approaches. Mac doesn’t have any straight option to reset network settings, but deleting the network preference files will do the same.
Back up the Mac, in case something goes wrong, besides, doing this will reset a few settings of Mac.
- Launch Finder on Mac.
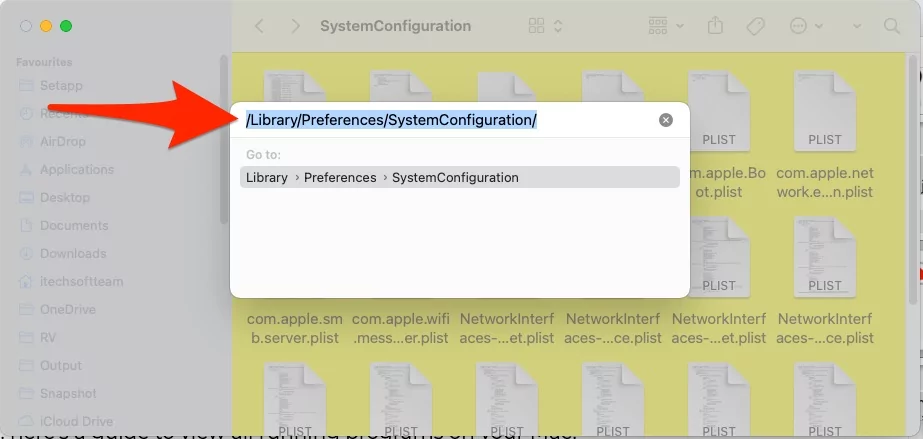
- Click Go on the top menu bar of Finder. and Enter: /Library/Preferences/SystemConfiguration

- Or Select Computer.
- Open the following path: Macintosh HD > Library > Preferences > System Configuration.
- Find the listed files and remove them all. Don’t worry, if you don’t find all the files.
- com.apple.airport.preferences.plist
- com.apple.network.identification.plist
- NetworkInterfaces.plist
- preferences.plist
- Settings.plist
11. Stop mDNSResponder
Give a try this. here’s a guide to view all running programs on your Mac.
- Launch Spotlight (command+space) and open Activity Monitor.
- Click on Network
- Select the mDNSResponder and click Cross from the top to close the process.
12. Use a USB WiFi Adapter: Fix WiFi Hardware Problems at Low Cost
External USB WiFi Adapter is an ideal solution nowadays for all Desktop & Laptop systems, Also This USB WiFi Adapter is compatible with most of all Windows OS and MacOS. Just buy it in a few dollars and Start Browsing anywhere and anytime on any device. here’s what you can use for your Mac if Your Mac’s WiFi has trouble with a Hardware problem. Otherwise, Apple WiFi Hardware repairing cost is high compared to this Best USB WiFi adapter.
Also, you can do the below troubleshooting, But don’t forget this helpful solution.
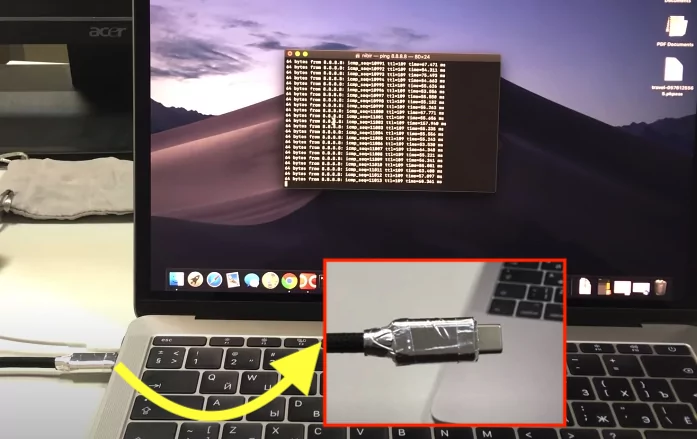
13. USB-C Dongle Kill WiFi Problem On MacBook Pro
Most of the Mac users are affected with WiFi issues while they plug USB 3/USB-C Dongle or Extension to Side Port for MacBook Pro and MacBook Air. So the common issue is WiFi Dropping and Disconnecting automatically. Note: Mostly affected MacBook 2016 & 2017 models.
The main cause of this issue is the Poor shielding inside the Power cable join that’s a nearby power cable.
Buying Guide:-
- I highly recommend buying Apple USB-C to HDMI, or Satechi USB-C to Ethernet/HDMI / USB-A.
Solution [Funny] but Found Helpful fix:-
- Cover the USB Cable near to port on the USB 3/USB-C hub with aluminum foil. See below picture,

14. Apple Support
Apple support is always ready for your help and Talk via Phone, Chat, or Email – Book Appointment At apple genius bar. If your mac is under warranty then check Mac warranty status online and Get free assistance and Hardware repair and Replacement service free.
15. Other Troubleshooting:- Fix mac can’t connect to wifi
Case 1: On the new update you might occur problems on PRAM memory and information that should be not updated successfully after update/Restore from old OS X. Some of the time PRAM memory use an external battery, so it might be not working and out of date battery cant able supply power, in this case, you have to replace it.
Case 2: in case of security purposes, are you using the WEP encryption method, that means you can’t use 802.11b, Because Apple’s Airport standard hooked up with Wifi or Ethernet, Verify that the Extreme card should be compatible with 802.11g and WPA2.
Case 3: iCloud might be crashed and turn off in this case you have to resolve it.
Case 4: Software update setting might be corrupted, Fixed it be updated, or restore old OS X.
Case 5: Verify that if your devices running through Wifi Router and not being updated with the latest firmware cause giving error and WiFi not working on Mac OS X.
Case 6: Distance Between your router and Mac device should not be closer than 1 meter and not longer than 50 meters.
Case 7: Contact your ISP (internet service provider) and Check it for the valid domain name.
Case 8: If you want wifi on hotspot connection and getting an error on particular browser surfing, Then try on other browsers Chrome, Mozilla, Opera, and Other.
Case 9: Turn off Wake for network option inside the Energy Saver setting, Apple Menu > System Preference > Energy Saver. Easy solution for WiFi not working on Mac computer and laptop.
Case 10: Many Users experience some antivirus that has been blocked some wifi port and a cant open web browser or Application.
You might also like: How to set a password on Mac WiFi hotspot
Activate Mac no wifi menu to select Network
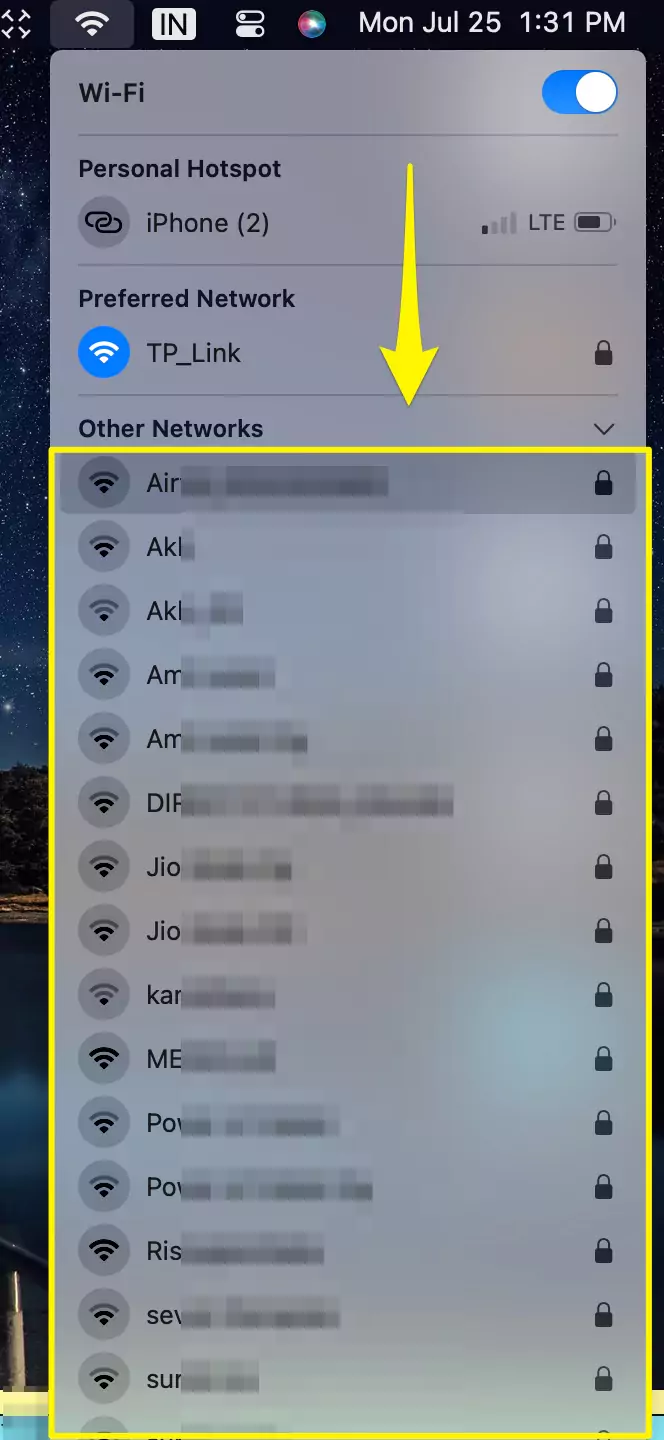
See all the Nearby networks on your Mac, Under the WiFi Shortcut, this will appear at the top Mac menu bar, If WiFi not showing then Add WiFi to Mac menu bar. Click on it and see the Option to Select and Connect WiFi to Mac.
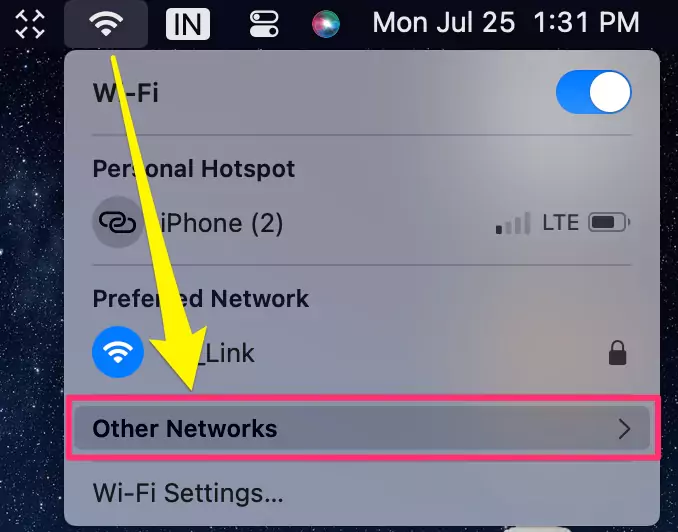
Step 1→ Click on the WiFi icon from the top menu bar.
Step 2→ Click on Other Networks to see the nearby unknown network and Connect it by clicking on the WiFi name.
Here listed cases are possible solutions recommended by brody for fixed network issues in case Wifi not working on Mac Monterey, iMac, MacBook Pro, MacBook Air, and Others. After that, if you can’t short out your Wi-Fi issue, then contact Apple support.

