All of Sudden, why iPhone keeps connecting and disconnecting while plugging into Mac? There are many reasons why the iPhone cannot establish a stable connection with Mac and keeps disconnecting. Might be possible that the lightning cable that you are using is Apple non-certified cable or defective. Also, if you are dealing with this problem, most of the time while we backup iOS devices on Mac or Restore the old backup to the iOS device. It might be difficult to charge the iPhone with the help of a Mac.
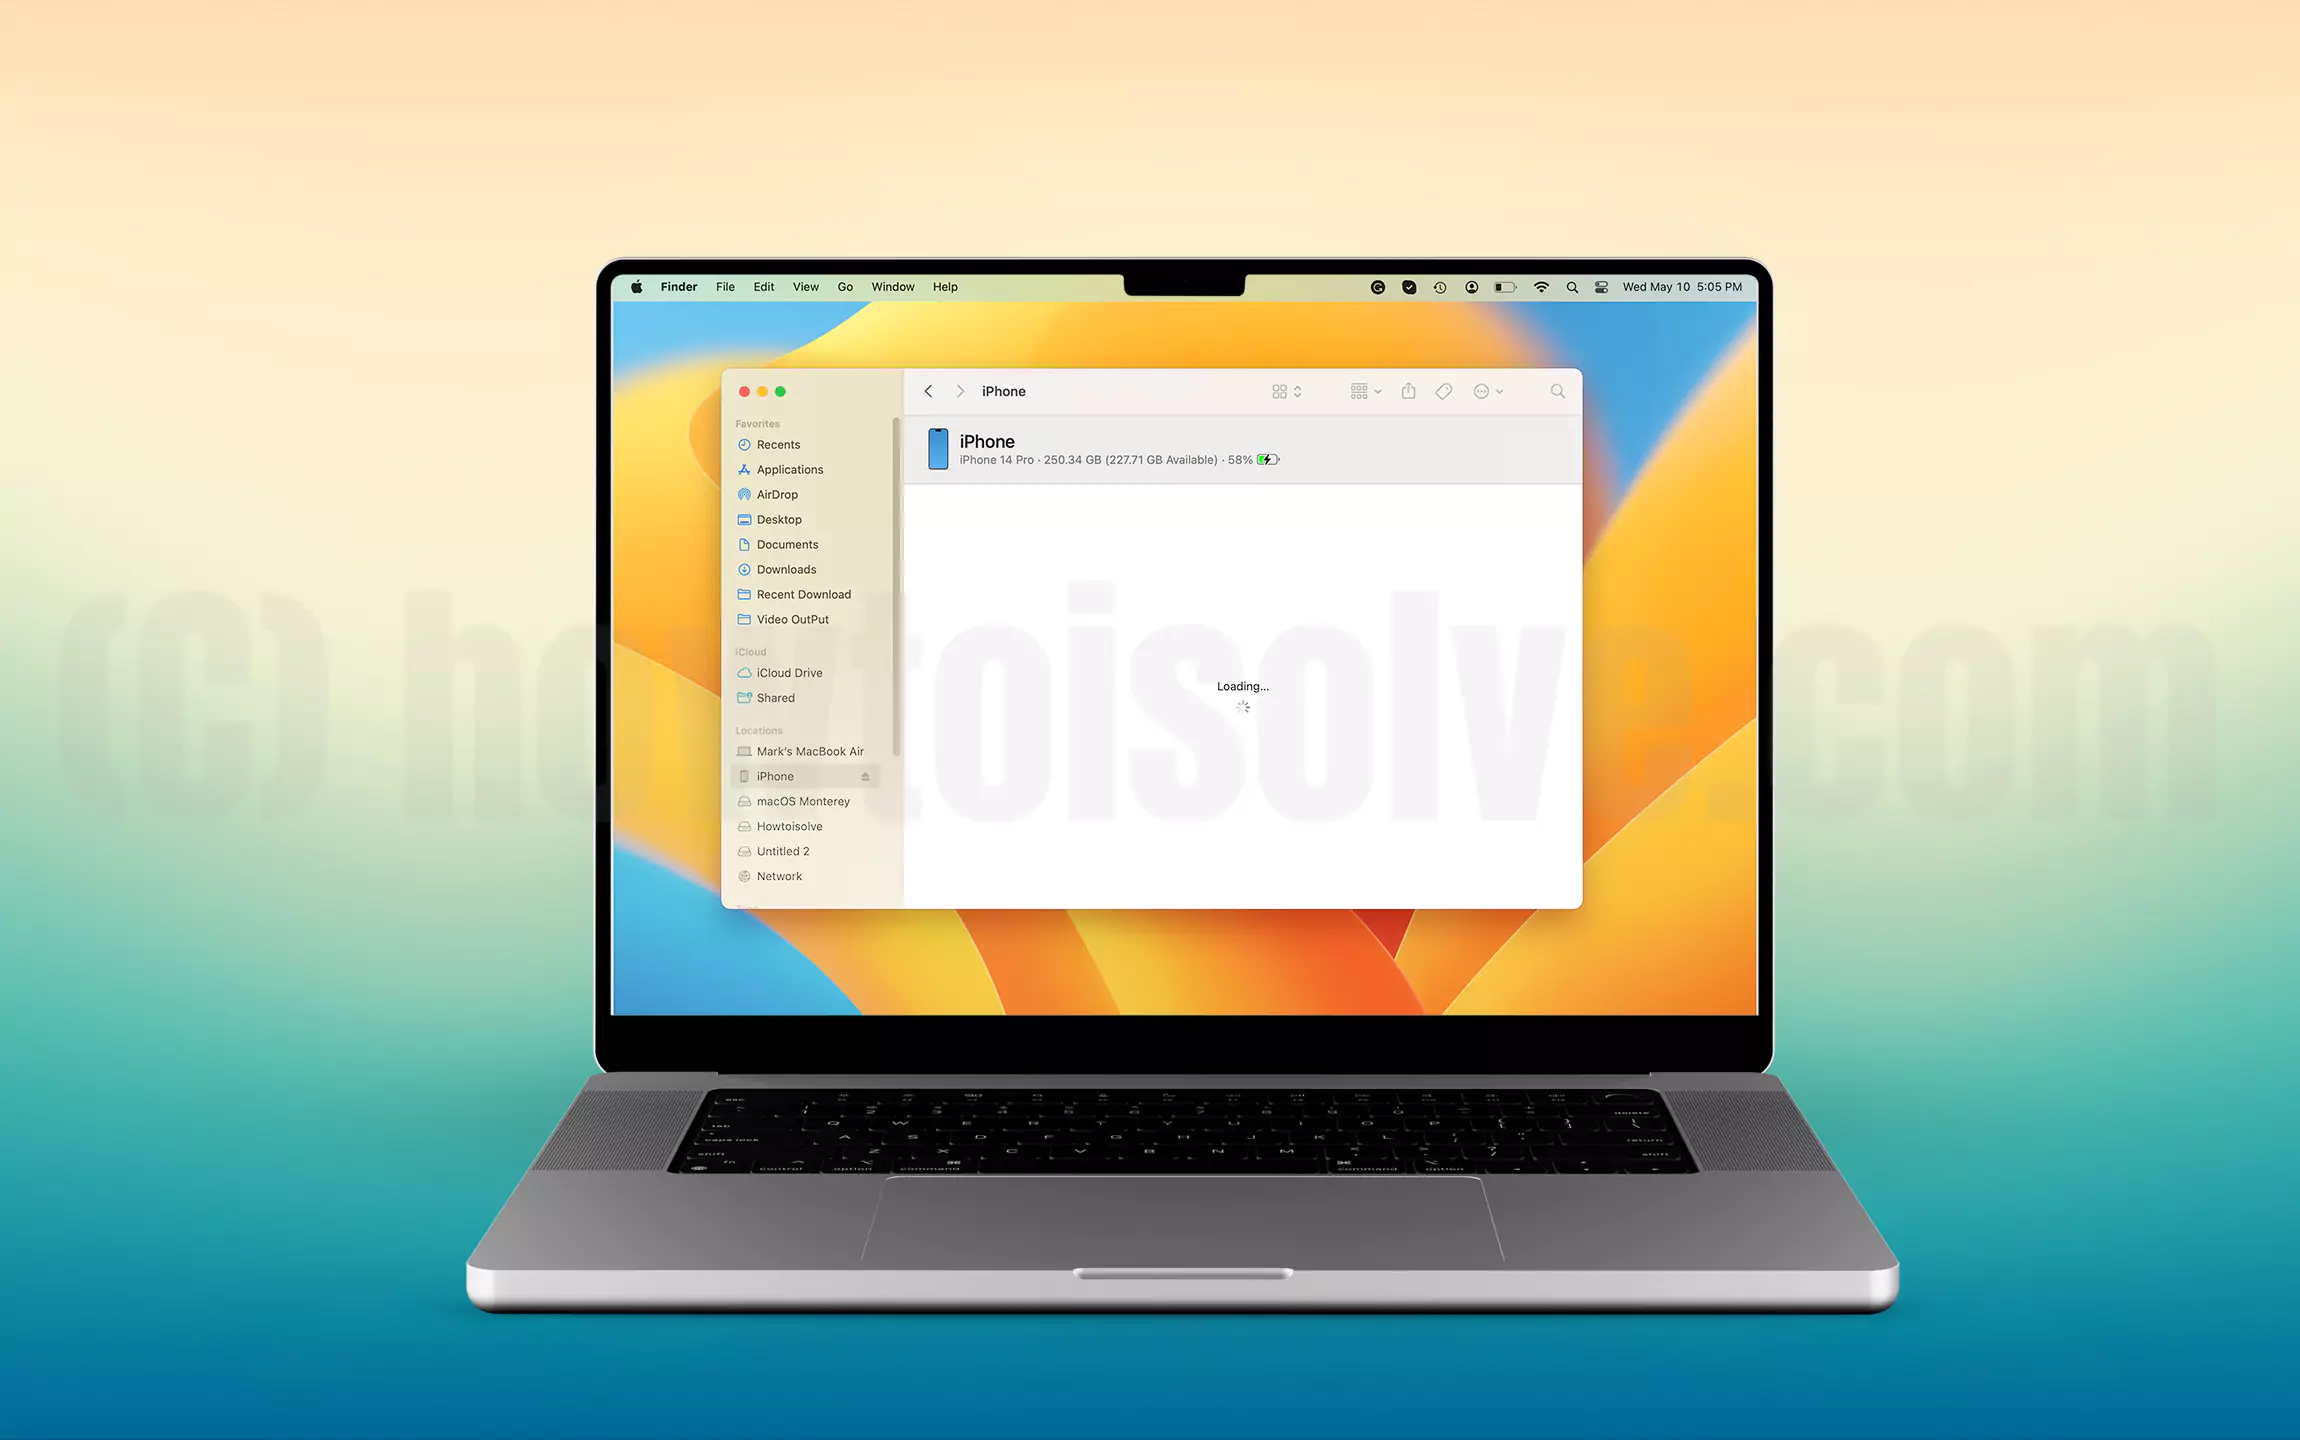
Some users Don’t know it’s shown on Mac, They are asking why my iPhone playing Charging Sound continuously with Haptic vibrate. That causing your Mac or Windows System hanging because your Mac/PC auto-syncing the device automatically if it’s enabled on Device Summary on Finder or iTunes. Some Mac Users asking why My iPhone/iPad not showing on the Finder Sidebar, To solve the issues check out the video tutorial in the last of this article.
We have collected eight most related solutions that will help you fix iPhone keeps connecting and disconnecting from Mac. So take your time and try these below troubleshooting tricks.
Fix iPhone Keeps Disconnecting and Connecting from MacBook, Mac
I hope this will work with all Apple’s Silicon M1-series, M1 Pro (MacBook Pro), M1 Max (MacBook Pro & Mac Studio), M1 ultra (Mac Studio), M2 chip of 2022 (MacBook Pro & MacBook Air) Or Intel chip Mac computer.
Full Video Guide to Resolve iPhone Keeps Disconnecting from Mac Issues
Most Recommended Solution: Reset Location & Privacy
We’ve received a more positive response by Resetting Location & Privacy more than any other trick. Try this first and move down to other solutions if it doesn’t work.
Before resetting the location and privacy on your iPhone, disconnect the iPhone from your Mac. This action will restore all the location and privacy settings to default. Once you do this, each app will ask you for location permission to use location services on a particular app.
Step #1: Open the “Settings” app on your iPhone.
Step #2: Select “General”.
Step #3: Click on Transfer or Reset iPhone – Next, Tap “Reset”.
Step #4: Lastly, tap “Reset Location & Privacy”.

Your Phone will ask you to enter the passcode to make changes in the setting, next, enter your screen time passcode if enabled. After that, Click on Reset Settings – This will reset your location and privacy settings to factory defaults.
After attempting to reset the location setting, check whether your phone detects your Mac Finder or not. If still, the same issue persists, Don’t worry; keep continuing given the below clues.
Solution 1: Check the Lightning Cable or Try Another Cable to fix the Loose Connection
The first thing that should be checked is the lightning cable you use to connect your iPhone to your Mac. If the charging cable itself is damaged then, iPhone keeps connecting and disconnecting from Mac. Borrow the charging cable from your friend and verify, if your lightning cable is damaged or iPhone is facing other problems while connecting to your Mac.
- Plugged out or Plugged in USB port from Mac
- The 8-pin lightning port on iOS devices is full of small particles or debris that make the connection lost between Mac and iPhone/iPad. Use Wooden teeth stick and clean up using Dry tools and hand.
Solution 2: Restart Your iPhone and Mac
Since the lightning cable is working perfectly, the next step is to eliminate minor bugs from iPhone and Mac, which might be causing this problem. A quick force restart will help you fix iPhone that keeps disconnecting and connecting from Mac. Depending upon your iPhone model, follow the steps.
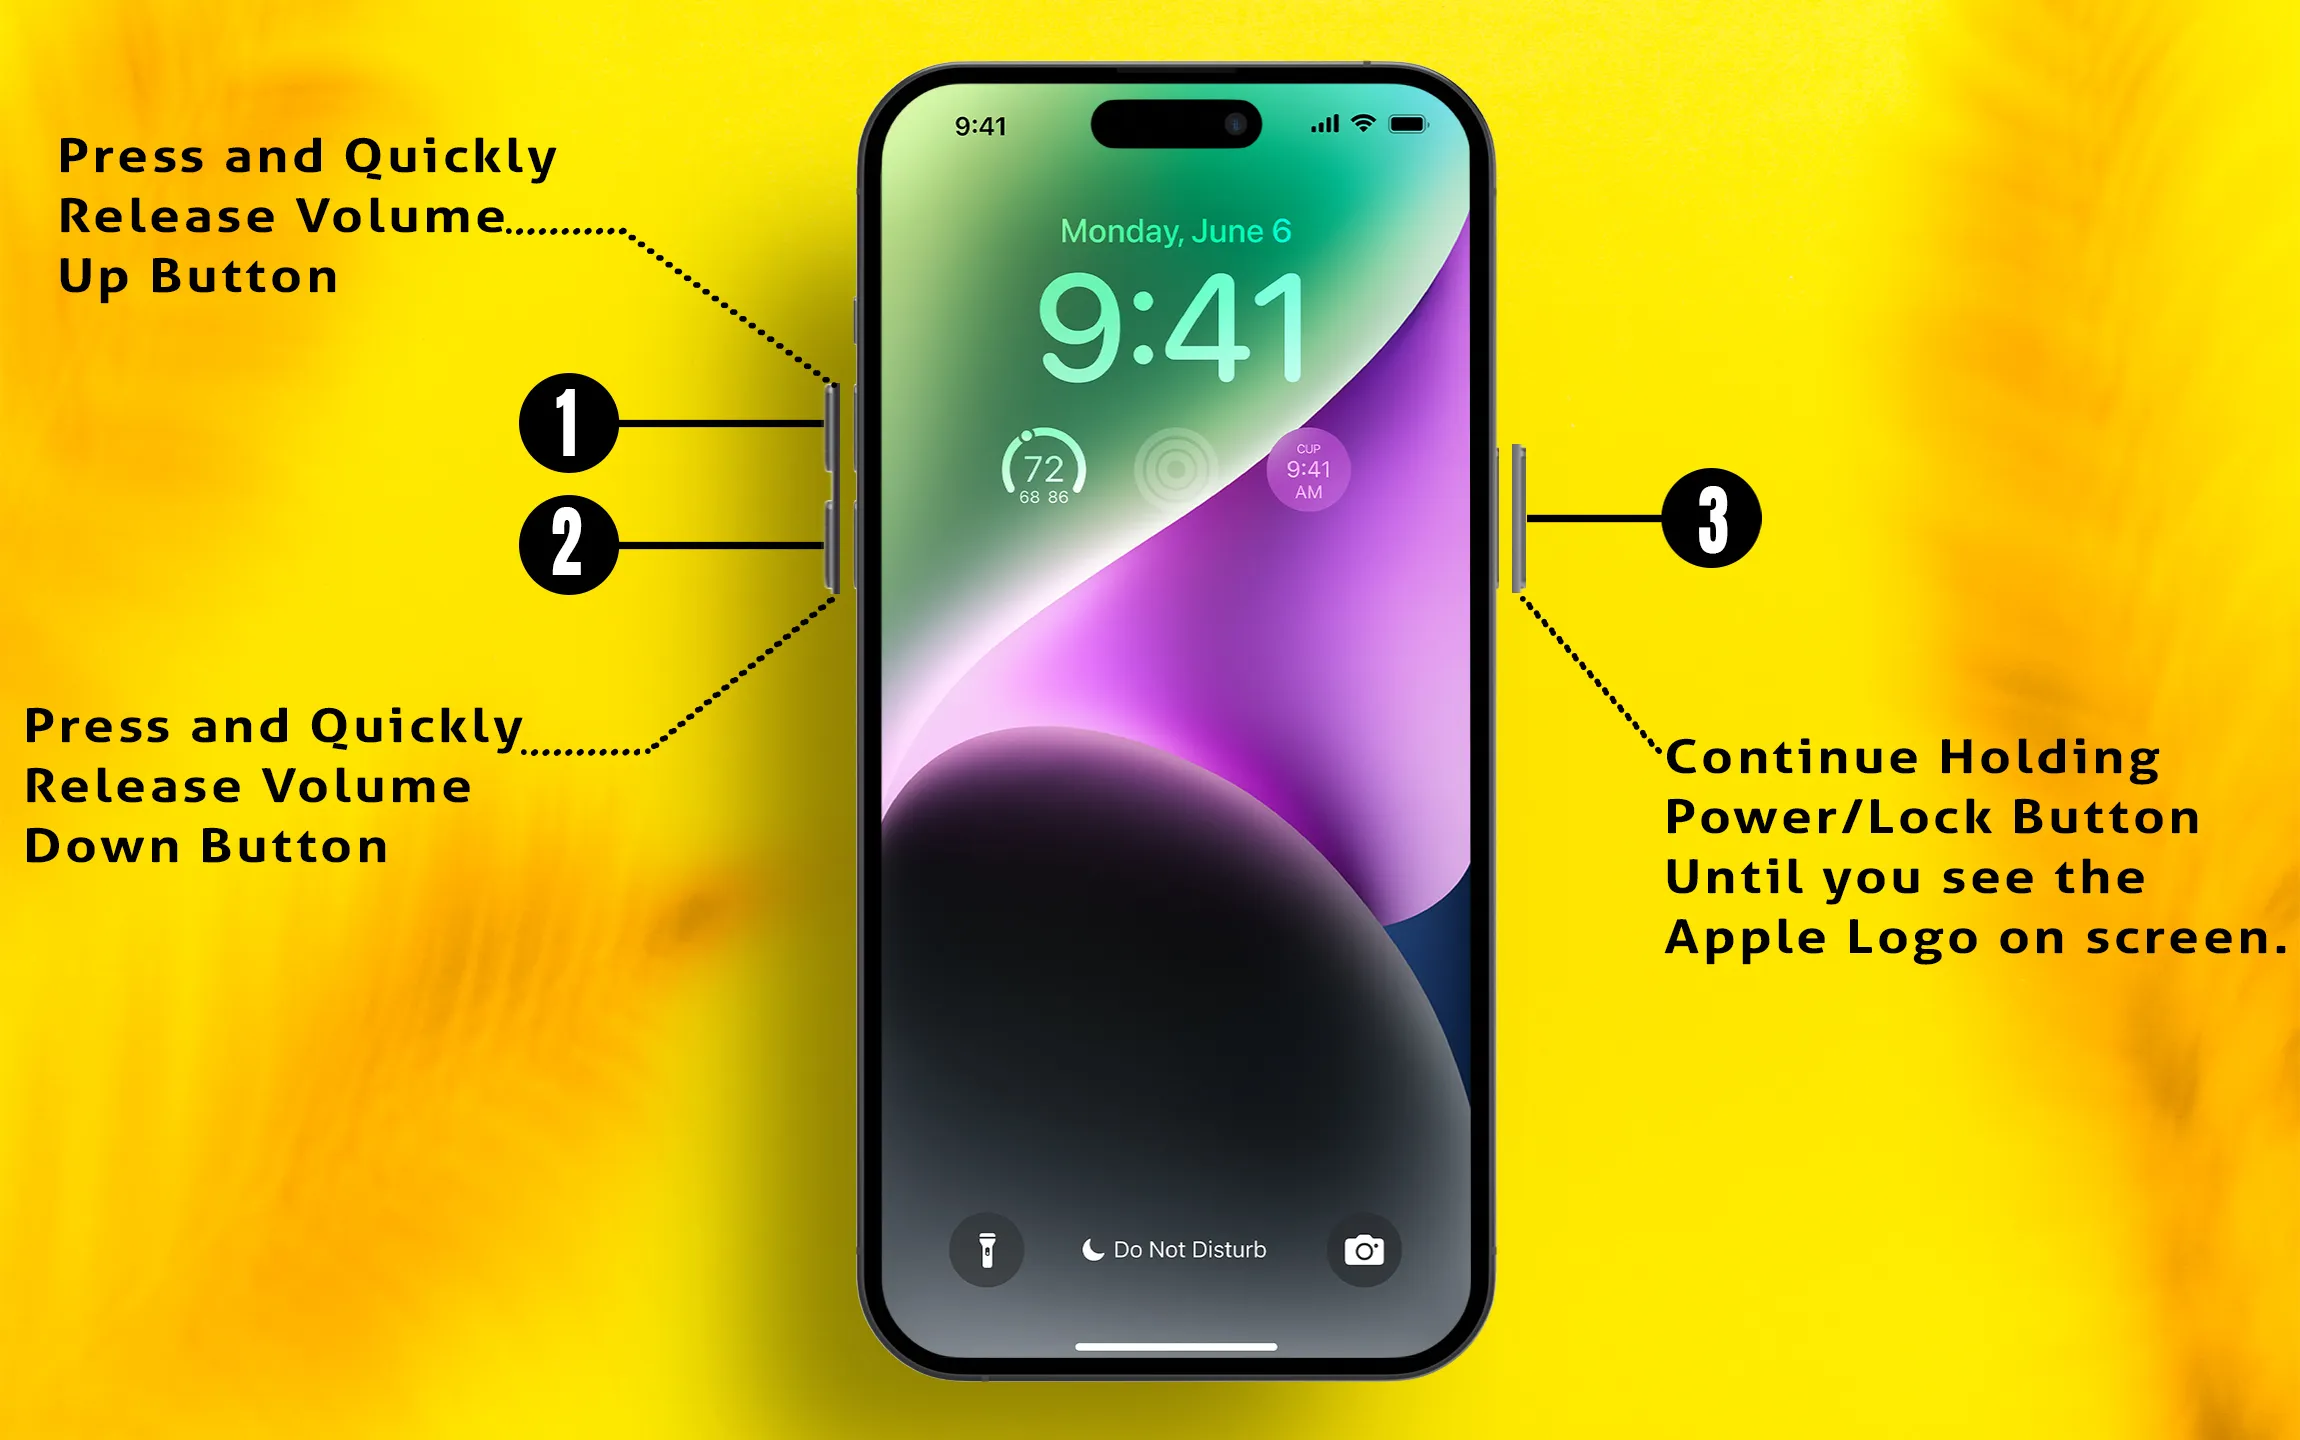
For iPhone 8 or later,
- Press and quickly release the Volume Up button.
- Press and quickly release the Volume Down button.
- Press and hold the Side button, until you see the Apple logo on the screen. Wait for 15 seconds and use the side button after that to turn on the iPhone again.
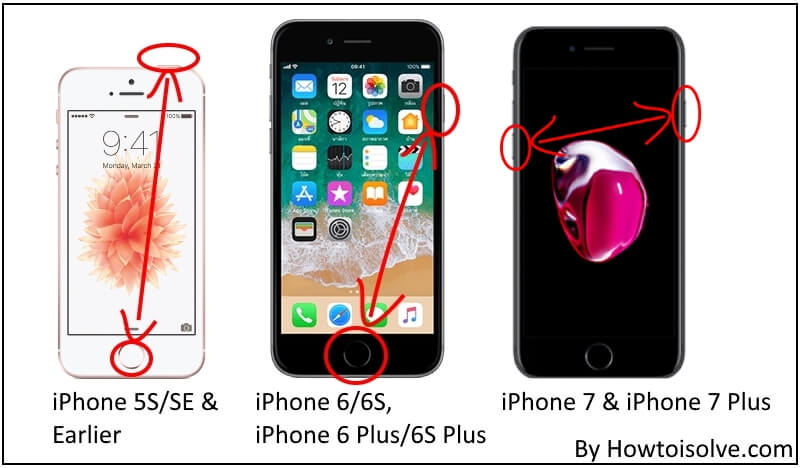
For iPhone 7 and 7 Plus,
- Press and hold the Volume Down button and Power button until the Apple logo appears on the screen.
For iPhone 6S Plus or earlier,
- Press and hold the Home and Power buttons and release when the Apple logo appears on the screen.
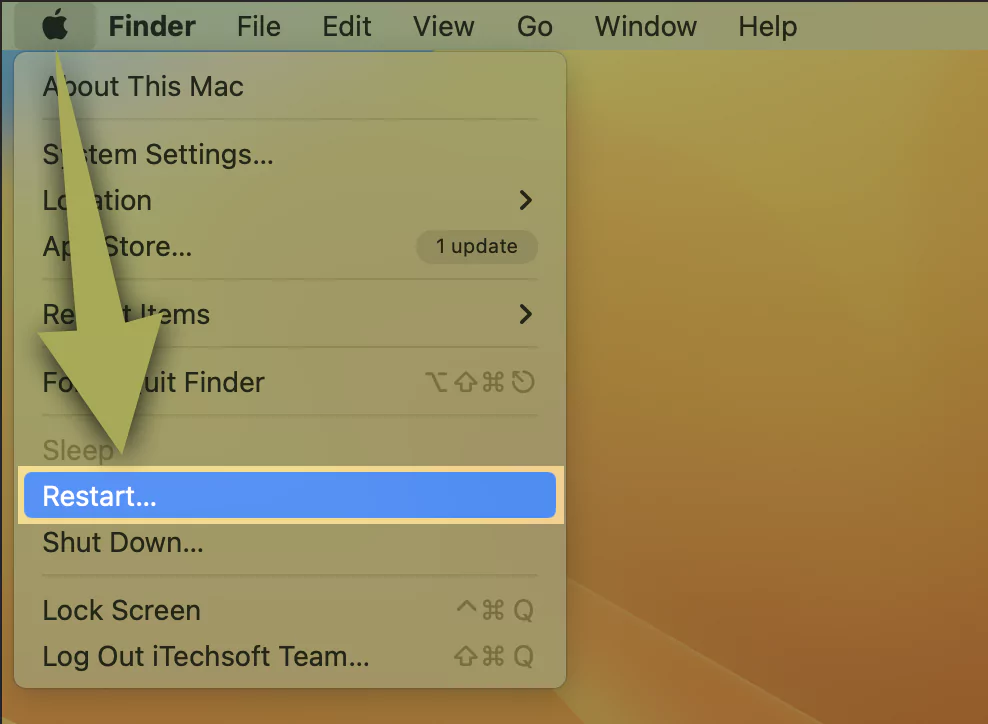
Steps To Restart Mac
- Click on the Apple menu and then select Restart.
After turning your Mac laptop or pc on, retry to connect your iPhone to your Mac computer via lighting to USB-C or USB cable, whatever ports your Mac has. Alternatively, you connect your iPhone to your Mac using Wi-Fi.
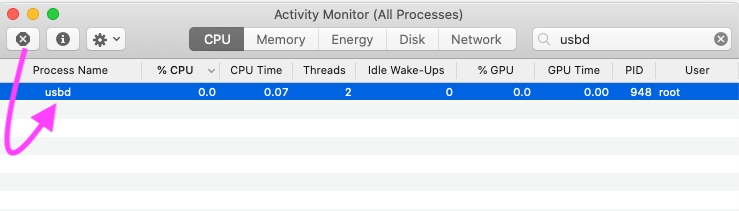
Solution 3: Kill Process using Activity Monitor (kill USBD)
The Activity Monitor is handy when some application doesn’t work as expected. Just like we force close the applications on iPhone, Mac has Activity Monitor that force closes the app and processes. One of the users with the same iPhone keeps connecting and disconnecting issues had fixed the problem with this solution.
Step #1: Connect iPhone to Mac.
Step #2: Go to the “Applications” and select “Utilities”.
Step #3: Open the “Activity Monitor”.
Step #4: Type in usbd in the search box and force close all the processes by clicking on (X) symbol.
It can also be done Using Mac Terminal,
Get here more about how to open terminal on Mac.
Step #1: Launch “Terminal” from the spotlight – you can open spotlight search by pressing Space + Command Keys simultaneously.

Step #2: Type the command, sudo killall –STOP –c usbd and hit enter.

Solution 4: Reset NVRAM and PRAM
For Apple Silicon Mac [M1 & M2] users –
Not required to reset NVRAM or PRAM on Mac (M1 & M2 chip), Restart your Mac. To do that, go to Apple Logo > Restart.
Steps For Intel Mac users,
If any hardware of the Mac is raising connectivity issues with iPhone, then resetting NVRAM & PRAM can help you fix the issue. To determine, the real problem, go with the below steps on your Mac.
Step #1: First, Unplug the lighting cable of your iPhone to your Mac.
Step #2: Now Shut down Mac computer.
Step #3: Next, turn your Mac Power ON, and quickly hold down the Option+Command+P+R keys for about 20 seconds. Release when you hear startup chime on Mac.
Step #4: Wait for a minute, Mac will restart.
Still, if you are unable to fix the iPhone keeps connecting and disconnecting on Mac issue, then make an appointment at Apple Genius Bar and get it fixed.
Solution 5: Reinstall MacOS that Repair Corrupted System
Reinstall macOS In recovery mode Mac.
Take action on MacOS software, Repair the MacOS without erasing data that is saved on the Macintosh HD drive. To do that, follow the below steps and backup all important data to Time Machine on Mac for security purposes. Reinstall MacOS will take time because it depends on internet connection speed, During the Reinstall MacOS request your Mac first download the latest compatible MacOS to Mac and install it on Mac after that.
➡️ Follow the steps below for M1 Apple SIlicon or Intel Mac
Steps For Apple Silicon Mac [M1],
- Shut down your Mac, After 20 seconds, Press and Hold on the Power button until your Mac sees the Startup volume screen. And Options gear icon.
- Click on “Options” > Reinstall macOS.
- Follow the on-screen instructions, and That’s it.
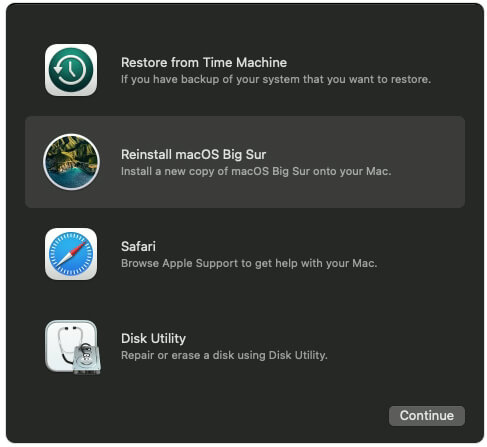
Steps For Intel Mac,
- Go to Apple Logo on Mac and Click on the Restart option.
- Now, your Mac shut off and turn on again, Quickly Press and Hold Command + R key until you see MacOS Utilities windows on Mac screen.
- The second option is “Reinstall MacOS“. – Reinstall a new copy of MacOS.

- Follow the on-screen instruction.
Solution 6: Create a New Admin Account and Try Again
Your Mac will create a new directory for the New Admin Account that we create from the primary Administrator account. Also, all the settings don’t overwrite your main account. That’s why I recommend using different Apple IDs for testing purposes. After that, we can change to our primary Apple ID under the System Preferences > Profile.
Here’s a complete guide to Create a new Admin Account on your MacOS 13 venture & later
- Go to Apple Logo on Mac and click on System Settings/Preference.
- Next, Click on the Users & Group option.
- Unlock the Lock; tap on the Lock icon at the bottom left corner of the windows. And Enter Mac Password to authorize it.
- After that, Click on the + icon to add a new User. Also, Select Admin, type “Administrator”, Username, and New Password for New Admin account.
- That’s it.

Now Switch to New Account, Go to Apple logo on Mac > Lock Screen. Click on the New Admin account and use it for Backup and Restore the device using Finder, like the primary admin account.
Solution 7: Update Your iPhone and Mac Software Firmware
As Apple always says that to use the iPhone and Mac seamlessly, both devices should be running on the latest version. Otherwise, you may encounter multiple software issues like this one. Before updating the iPhone, make sure the iPhone has 50% or more battery and is connected to a stable Wi-Fi connection. And for Mac, try to use an Ethernet cable to speed up an update procedure.
Steps to Check Software Update on your iPhone,
Step #1: Open the “Settings” app on your Apple smartphone.
Step #2: Tap “General”.
Step #3: Select “Software Update”. Wait for a while till the Phone checks for software Update. If your iPhone is stuck on check for update, follow this article.
Steps to Check for Software update On your Mac,
macOS 13 Ventura or later
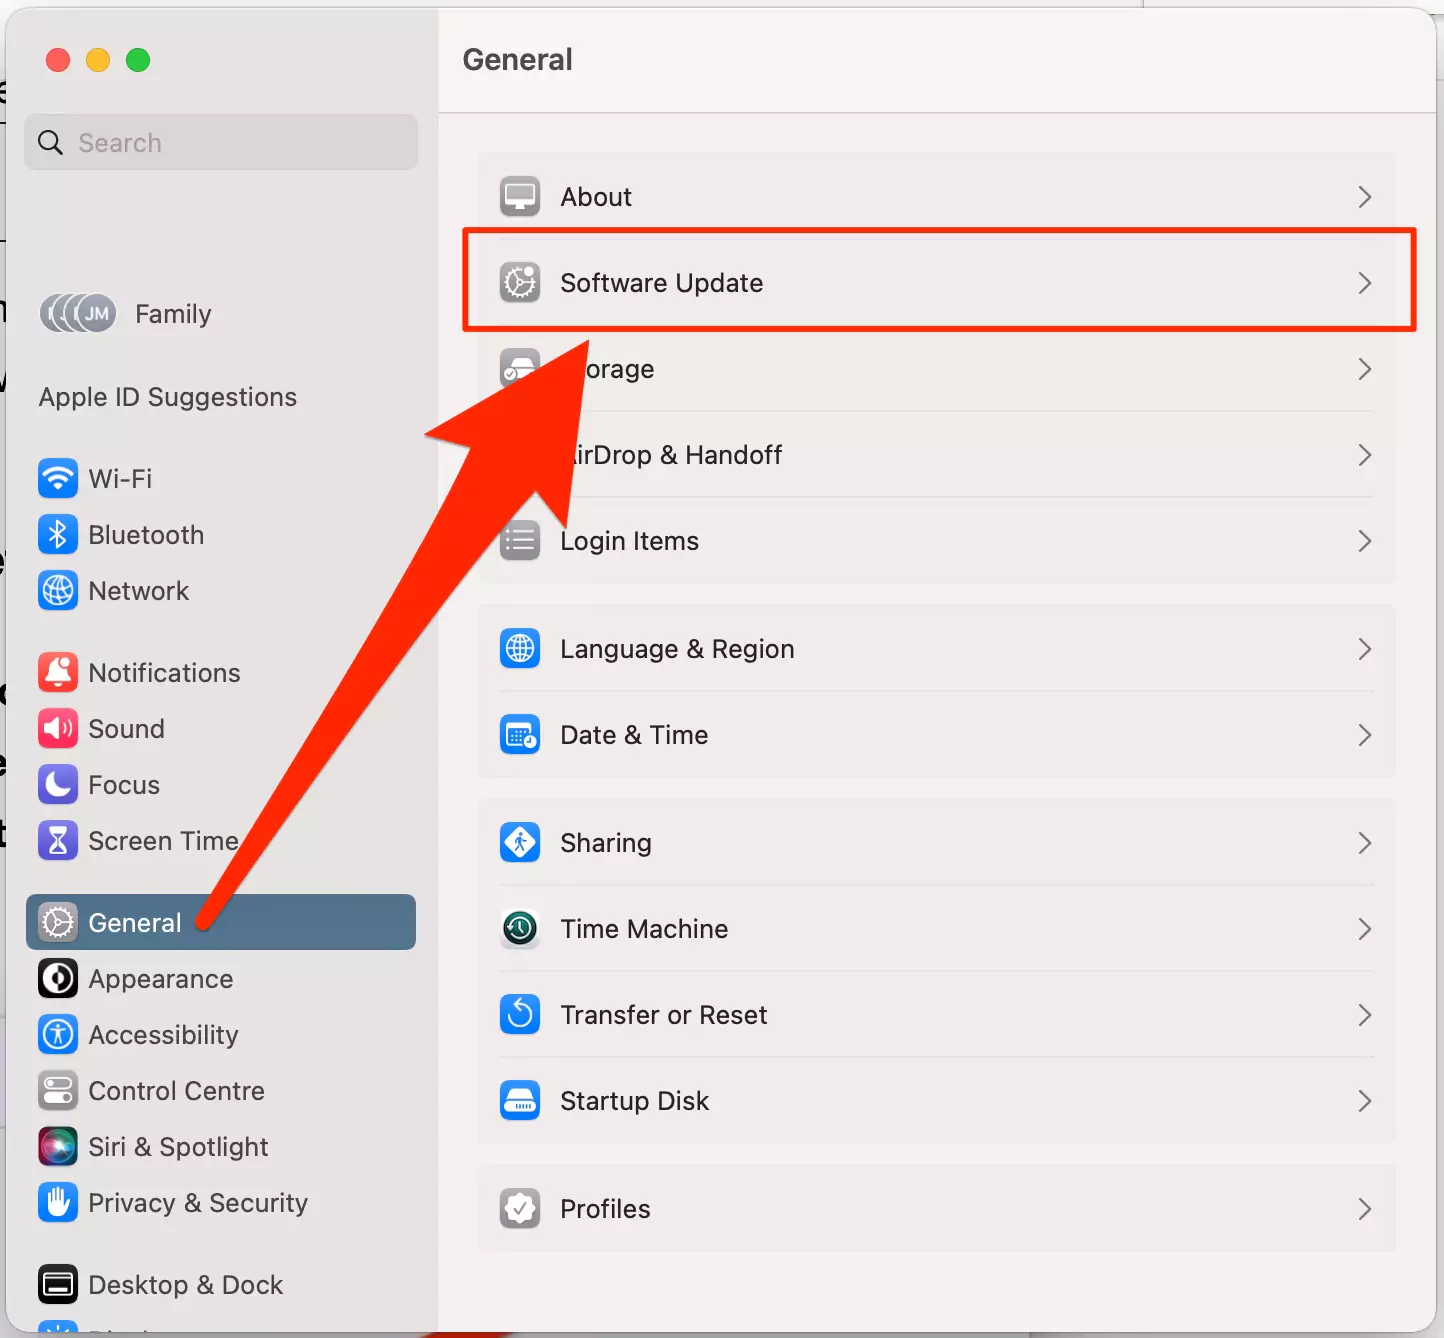
Follow these steps to check the Software Update on your latest macOS 13 Ventura.
- Click on Apple Logo on the upper-left side menubar.
- Choose System Settings
- Find General and Click on it
- Next hit on Software Update
Wait for a while, your Mac will check the latest update, Make sure that your Mac computer is connected to a Wi-Fi network. Offline Mac can display errors on the software update screen. The latest MacOS 13 Ventura is available in beta mode. Public macOS is macOS 12 Montery.
macOS Mojave or later
Step #1: Click on the Apple menu > System Preferences
Step #2: Select “Software Update”.
Step #3: Lastly, click on “Update Now”.
For earlier macOS versions,
Step #1: Navigate to the “App Store”.
Step #2: Click on the “Update” tab and then on “Update All”.
Solution 8: iPhone/iPad Not Showing on Finder Sidebar under the Locations
Launch Finder on Mac and Go to Preference from the top menu.
The third Tab is Sidebar. Click on it.
Enable Checkmark on Cds, DVDs, and iOS devices. Check out the video guide on how to fix it.
Above all are the most helpful solutions that somewhere I used in the past on my Mac. Because iPhone automatically disconnects and reconnects with Mac Also, iPhone/iPad plays a plugged-in sound.


